
Crypto Eagles
12k ໂພສ

Crypto Eagles
 Square Verified+
Square Content Creator | X: @CryptoProject6

Creator Awards 2024

#BinanceTurns7

Top Voices
ຜູ້ຊື້ຂາຍປະຈໍາ
6 ປີ
131 ກໍາລັງຕິດຕາມ
123.0K+ ຜູ້ຕິດຕາມ
165.7K+ Liked
3 ຫຼຽນລາງວັນ
ໂພສ
ທັງໝົດ
ວົງຢືມ
ວີດີໂອ
ຖ່າຍທອດສົດ
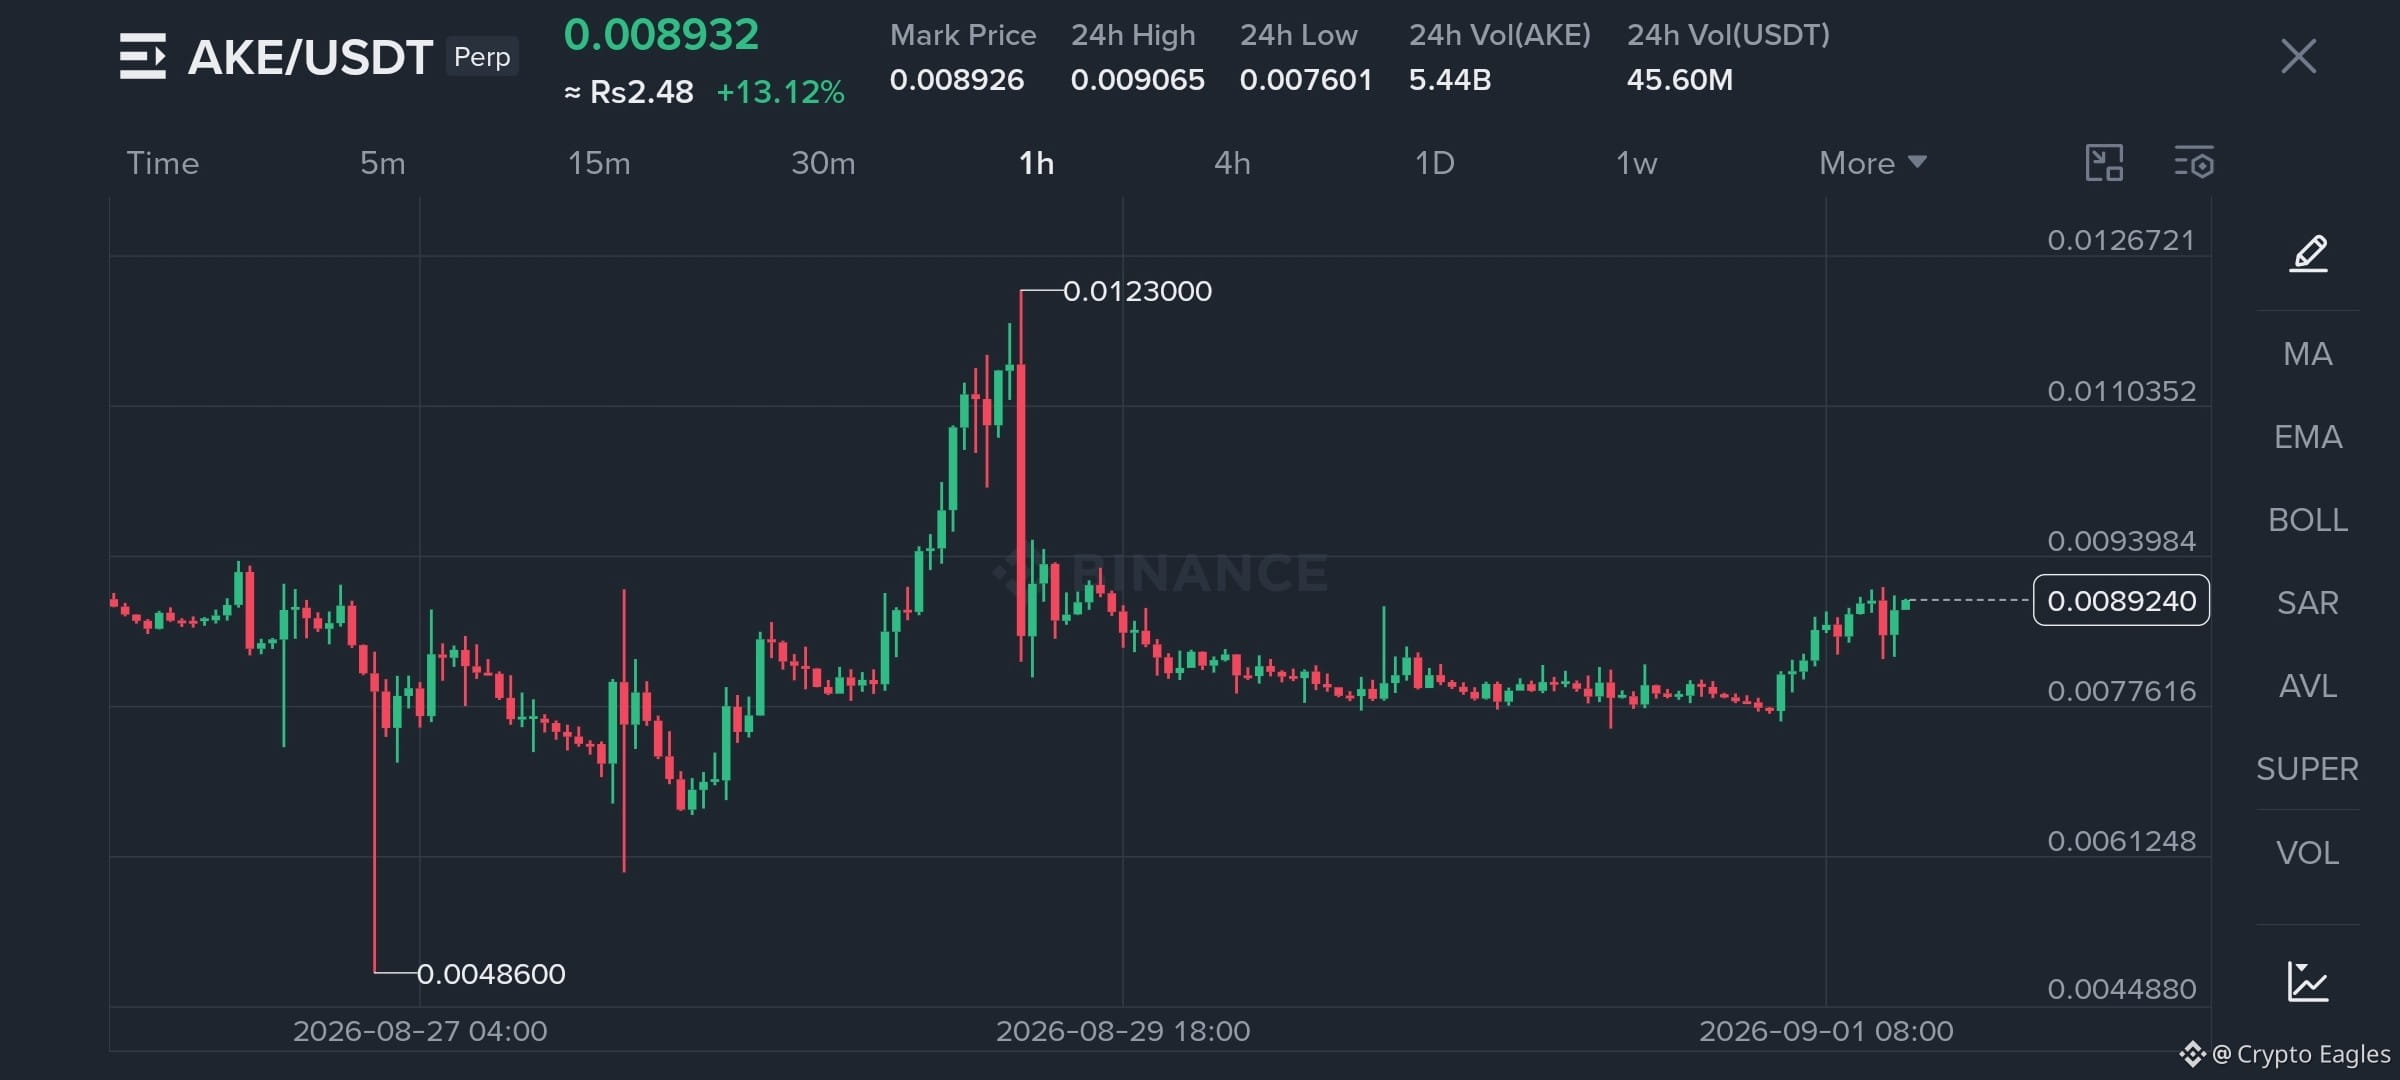
$AKE Long Setup
Entry: 0.00885 – 0.00895
SL: 0.00860
TP1: 0.00940
TP2: 0.01104
TP3: 0.01230
Strong 1H breakout from the 0.0077 accumulation zone. Price is holding near 0.00893; reclaiming 0.00940 can open the path toward 0.01104–0.01230.
$USELESS
$ARB
Entry: 0.00885 – 0.00895
SL: 0.00860
TP1: 0.00940
TP2: 0.01104
TP3: 0.01230
Strong 1H breakout from the 0.0077 accumulation zone. Price is holding near 0.00893; reclaiming 0.00940 can open the path toward 0.01104–0.01230.
$USELESS
$ARB
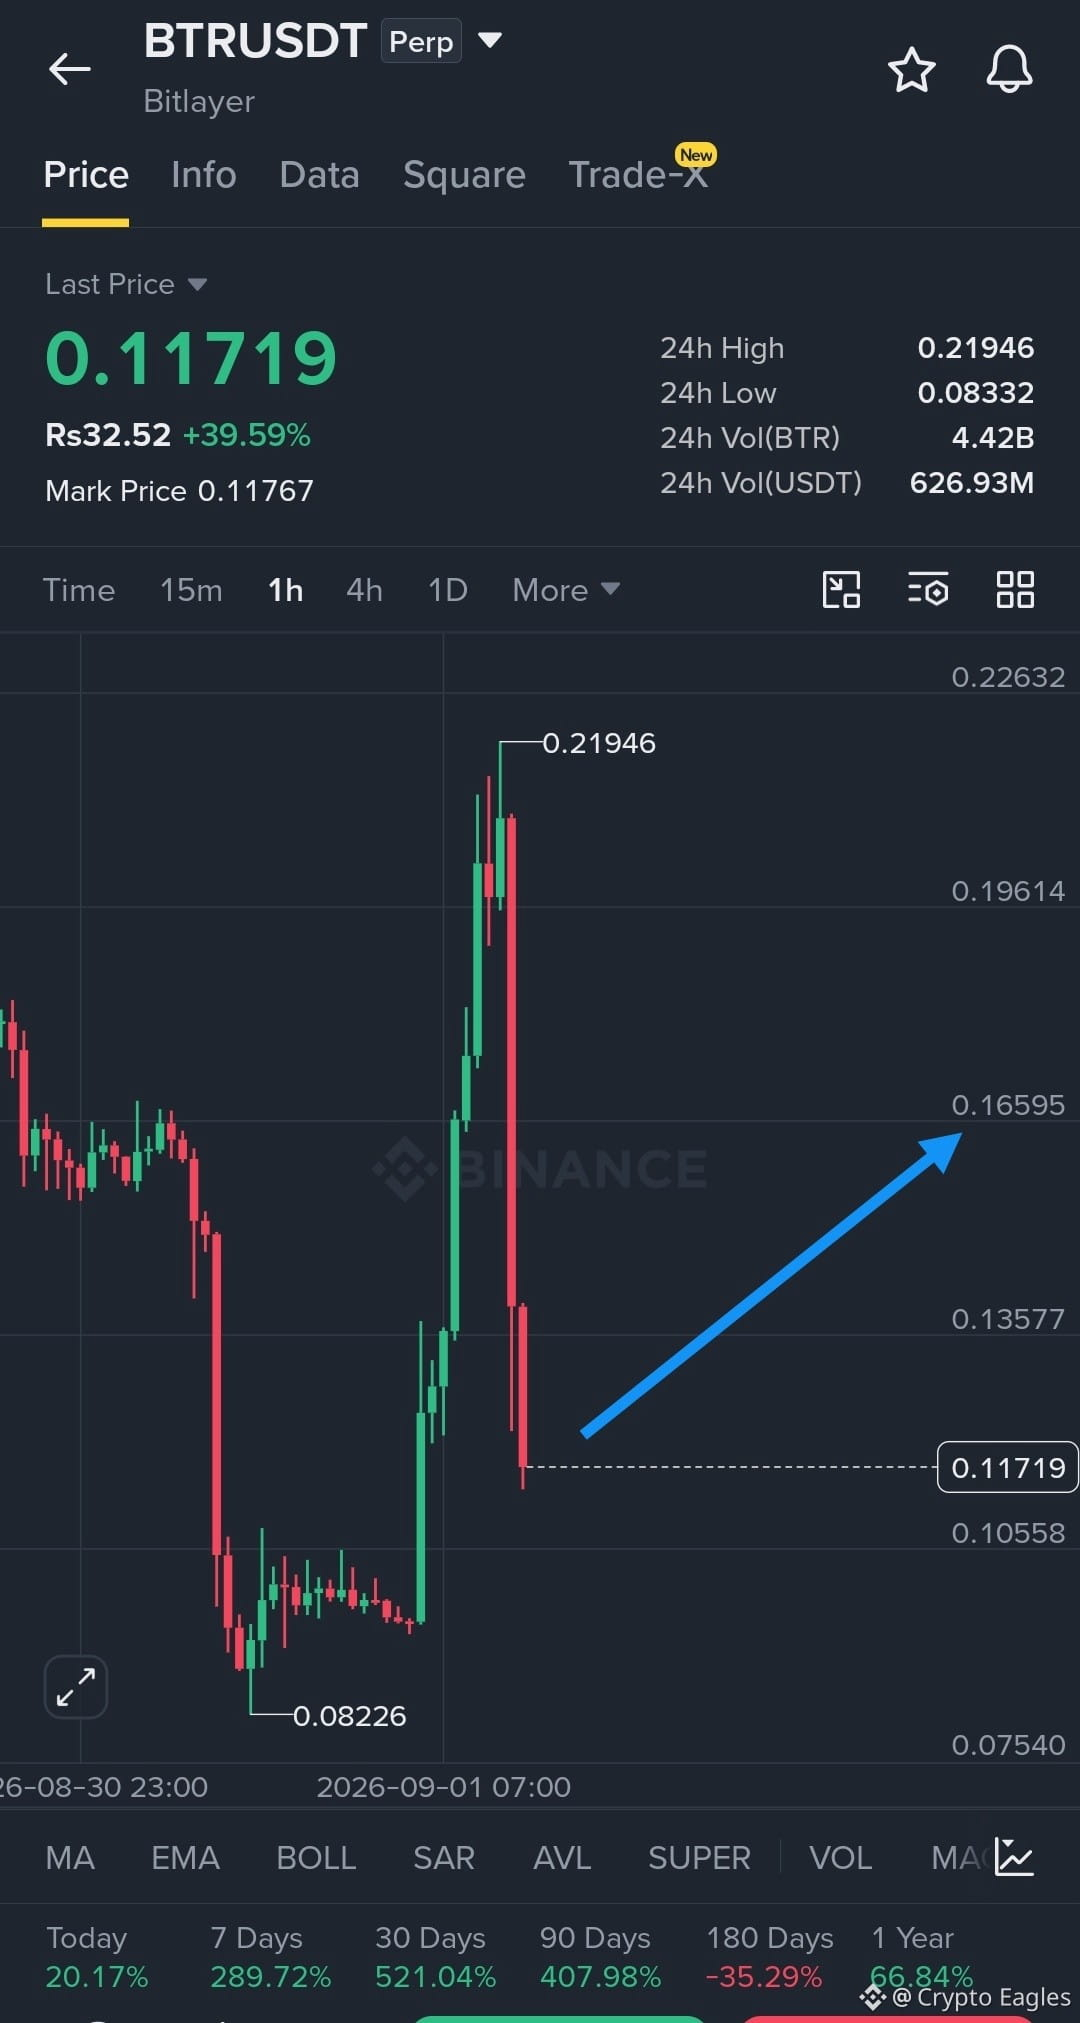
$BTR Long Setup
Entry: 0.115 – 0.120
SL: 0.1050
TP1: 0.1358
TP2: 0.1460
TP3: 0.1561
After the sharp rejection from 0.21946, BTR has pulled back into the 0.115–0.120 area. Holding 0.1056 keeps the recovery setup valid; reclaiming 0.1358 can open the next upside leg.
$USELESS
$ARB
Entry: 0.115 – 0.120
SL: 0.1050
TP1: 0.1358
TP2: 0.1460
TP3: 0.1561
After the sharp rejection from 0.21946, BTR has pulled back into the 0.115–0.120 area. Holding 0.1056 keeps the recovery setup valid; reclaiming 0.1358 can open the next upside leg.
$USELESS
$ARB
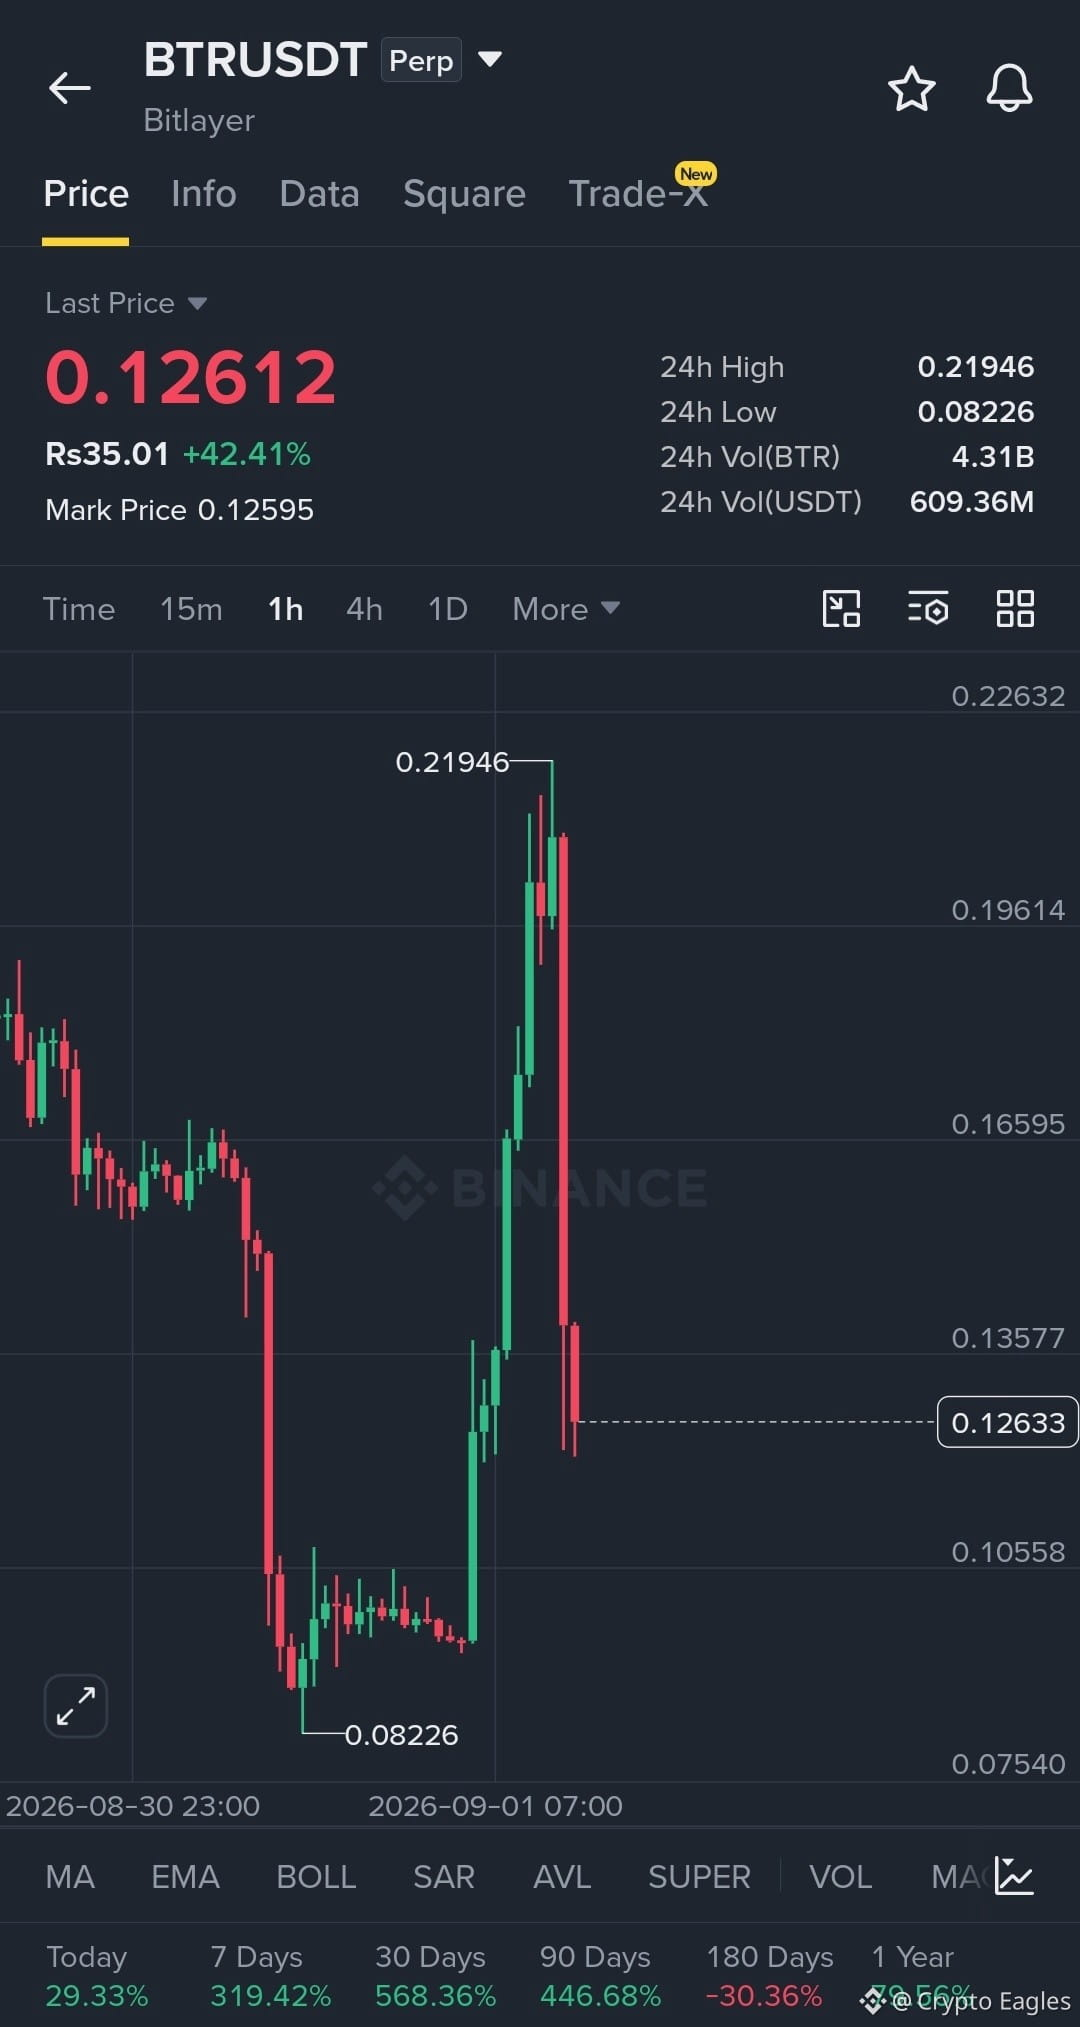
Big Congratulations to Everyone on $BTR ALL TARGETS ACHIEVED
$USELESS
$ARB
$USELESS
$ARB
Crypto Eagles
·
--
ສັນຍານໝີ$BTR Short Setup 📉
Entry: 0.205 – 0.212
SL: 0.225
TP1: 0.185
TP2: 0.160
TP3: 0.1263
After the +30% surge and rejection near 0.2120, a failed breakout can trigger a sharp retracement. Below 0.185 would strengthen the bearish move.
$USELESS
$ARB
Entry: 0.205 – 0.212
SL: 0.225
TP1: 0.185
TP2: 0.160
TP3: 0.1263
After the +30% surge and rejection near 0.2120, a failed breakout can trigger a sharp retracement. Below 0.185 would strengthen the bearish move.
$USELESS
$ARB
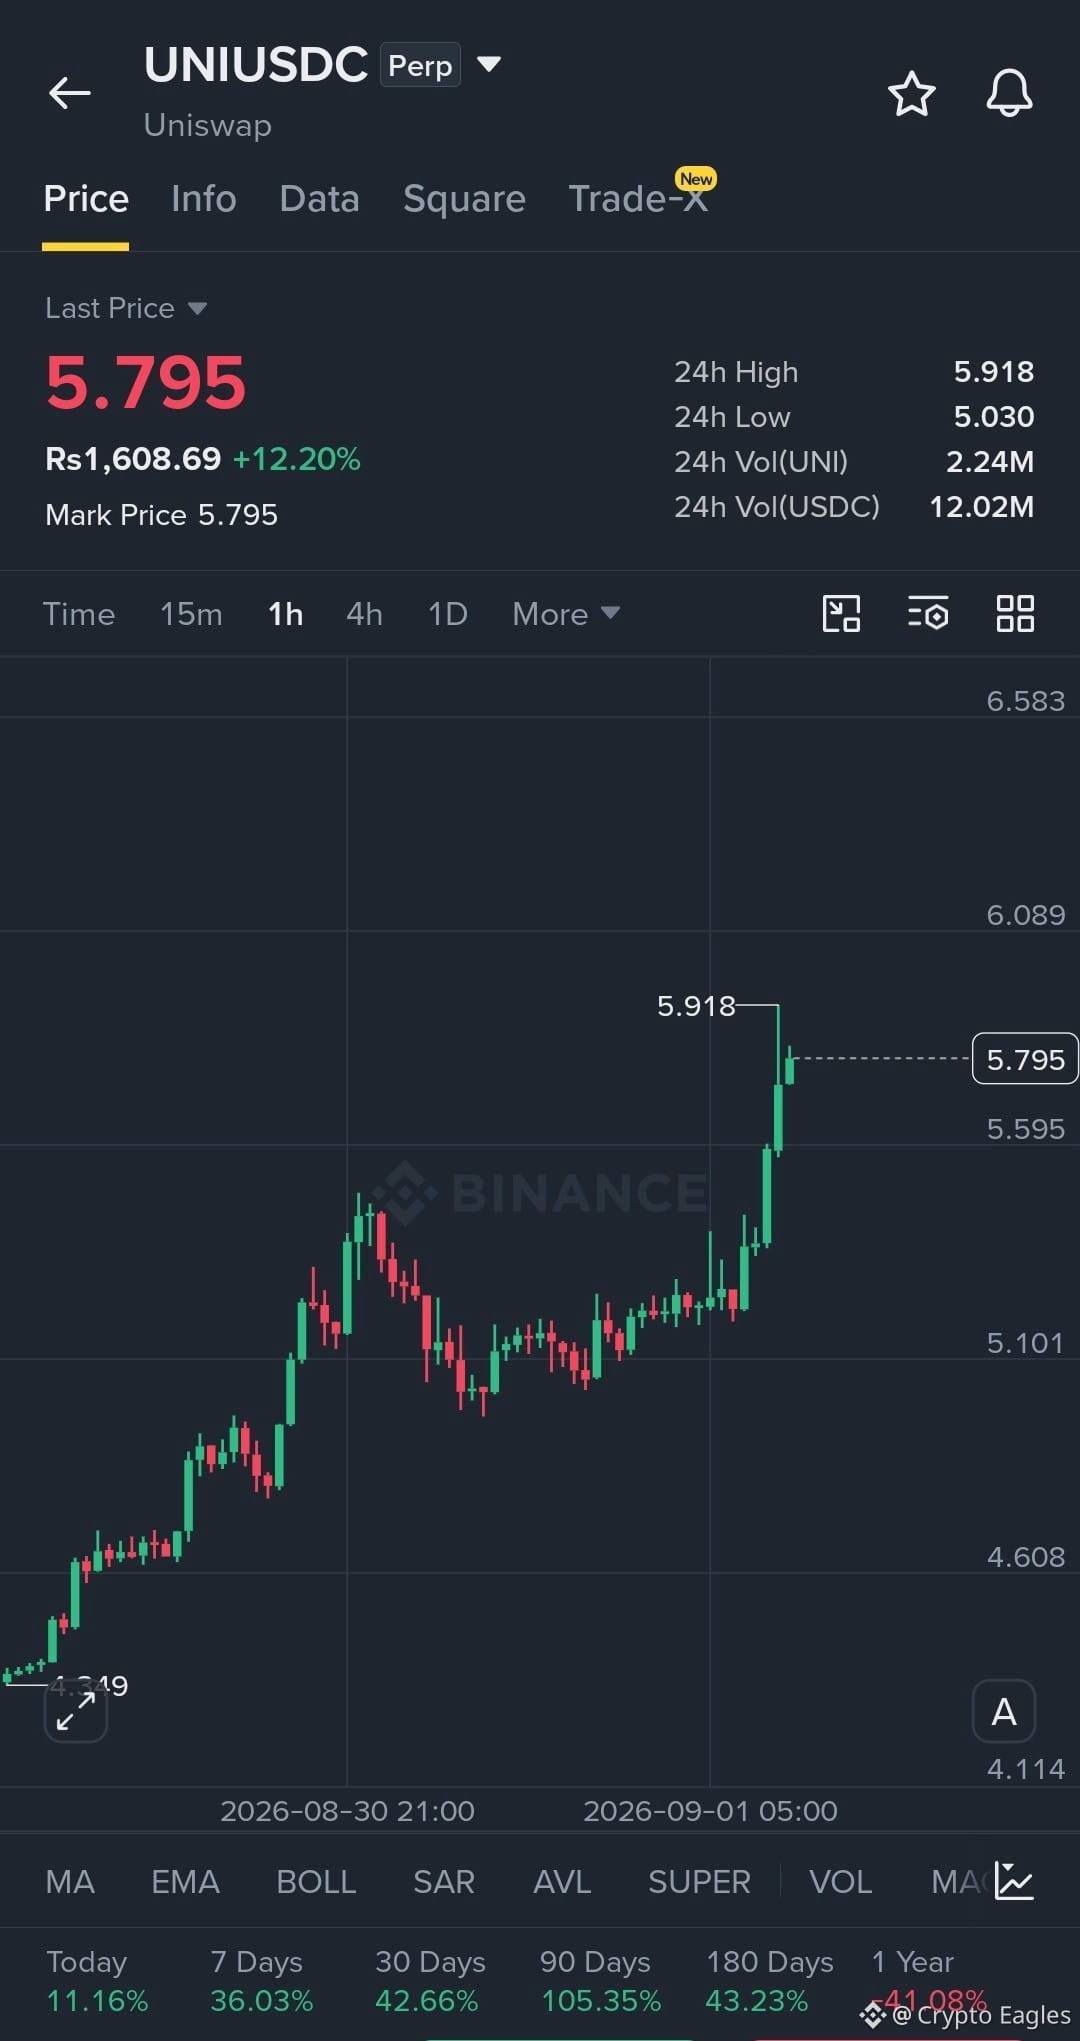
$UNI Long Setup
Entry: 5.72 – 5.80
SL: 5.58
TP1: 5.918
TP2: 6.089
TP3: 6.583
Strong 1H breakout from the 5.10 area with aggressive bullish momentum. Holding 5.59 keeps the breakout structure intact; a clean break above 5.918 can open the next upside leg.
$BTR
$USELESS
Entry: 5.72 – 5.80
SL: 5.58
TP1: 5.918
TP2: 6.089
TP3: 6.583
Strong 1H breakout from the 5.10 area with aggressive bullish momentum. Holding 5.59 keeps the breakout structure intact; a clean break above 5.918 can open the next upside leg.
$BTR
$USELESS
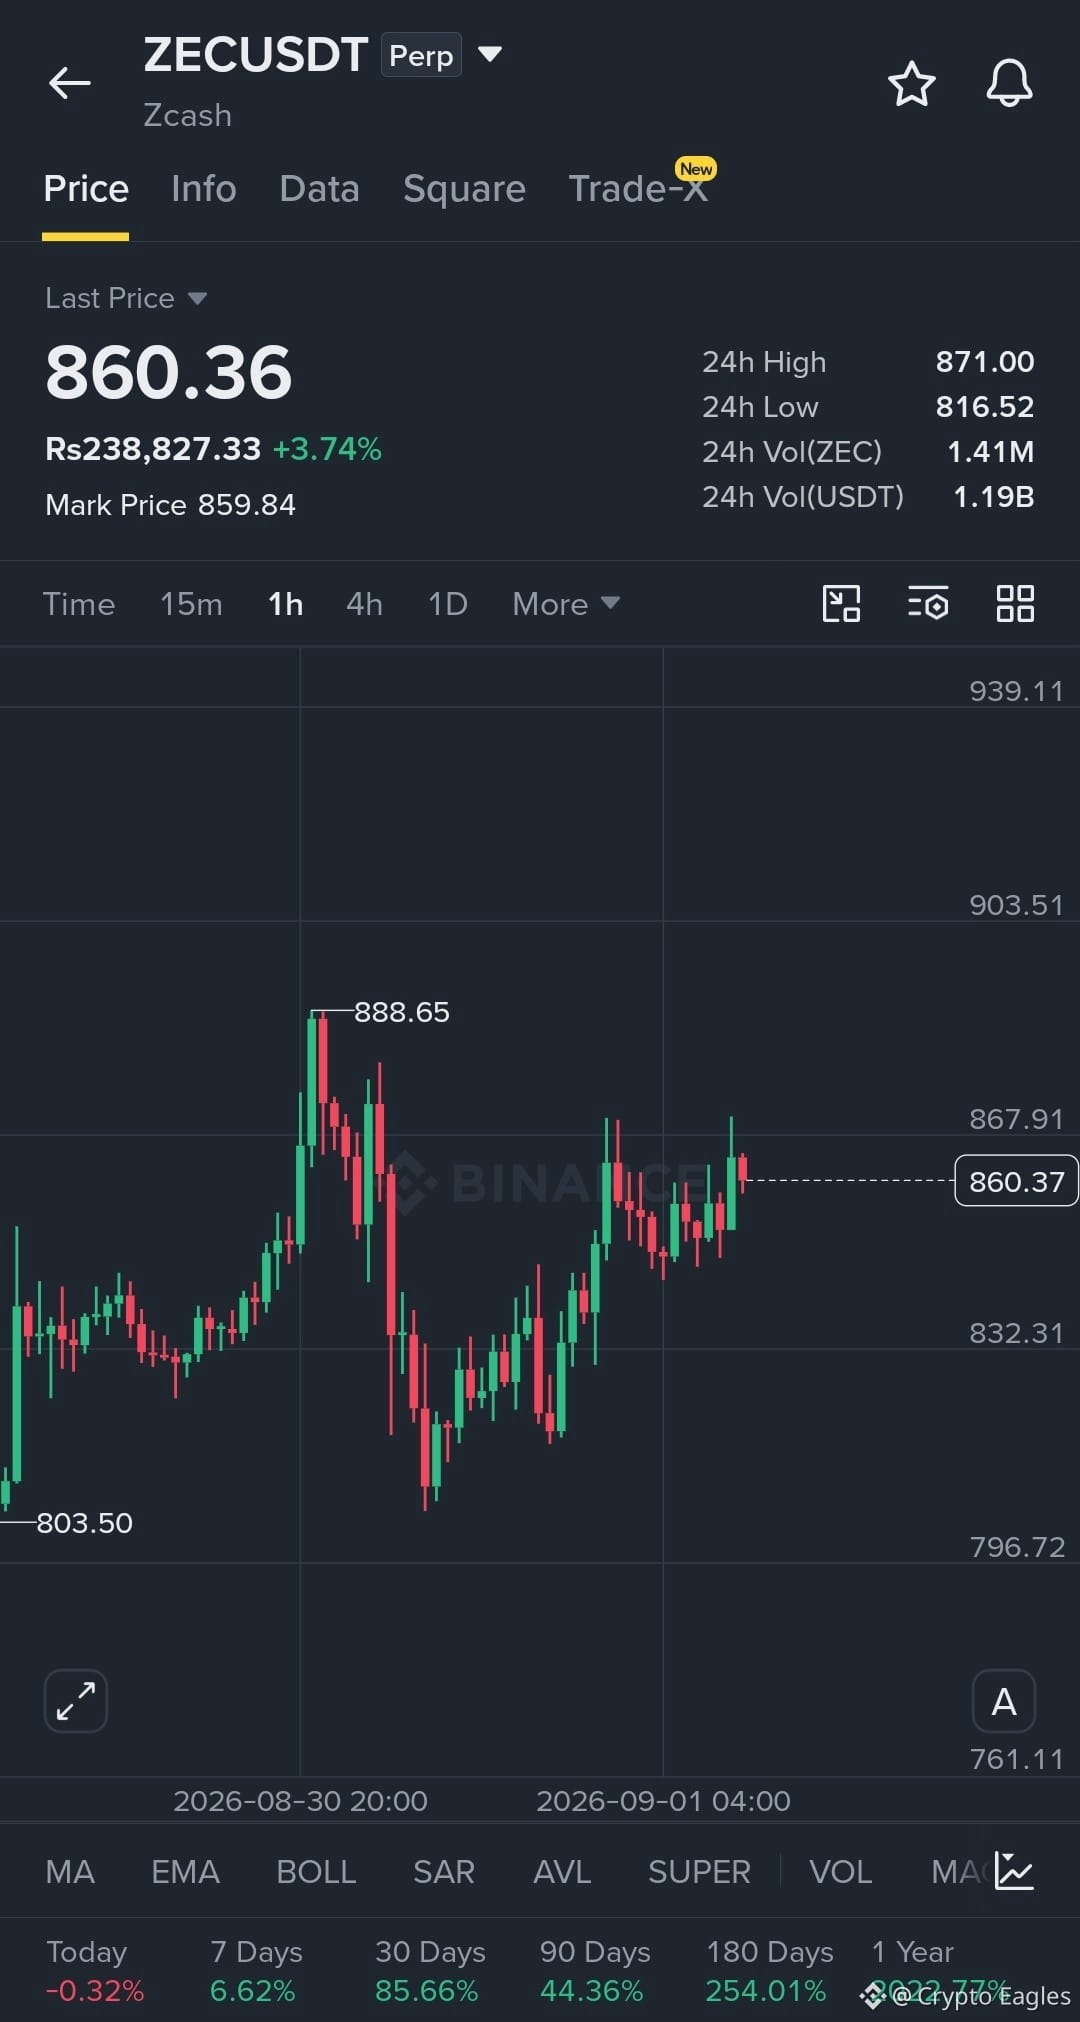
$ZEC Long Setup 🚀
Entry: 860 – 868
SL: 845
TP1: 888.65
TP2: 903.5
TP3: 939.1
Price is holding near 867.9 resistance with a bullish recovery structure. A clean break above 871 can confirm continuation toward 888.65+.
$BTR
$USELESS
Entry: 860 – 868
SL: 845
TP1: 888.65
TP2: 903.5
TP3: 939.1
Price is holding near 867.9 resistance with a bullish recovery structure. A clean break above 871 can confirm continuation toward 888.65+.
$BTR
$USELESS
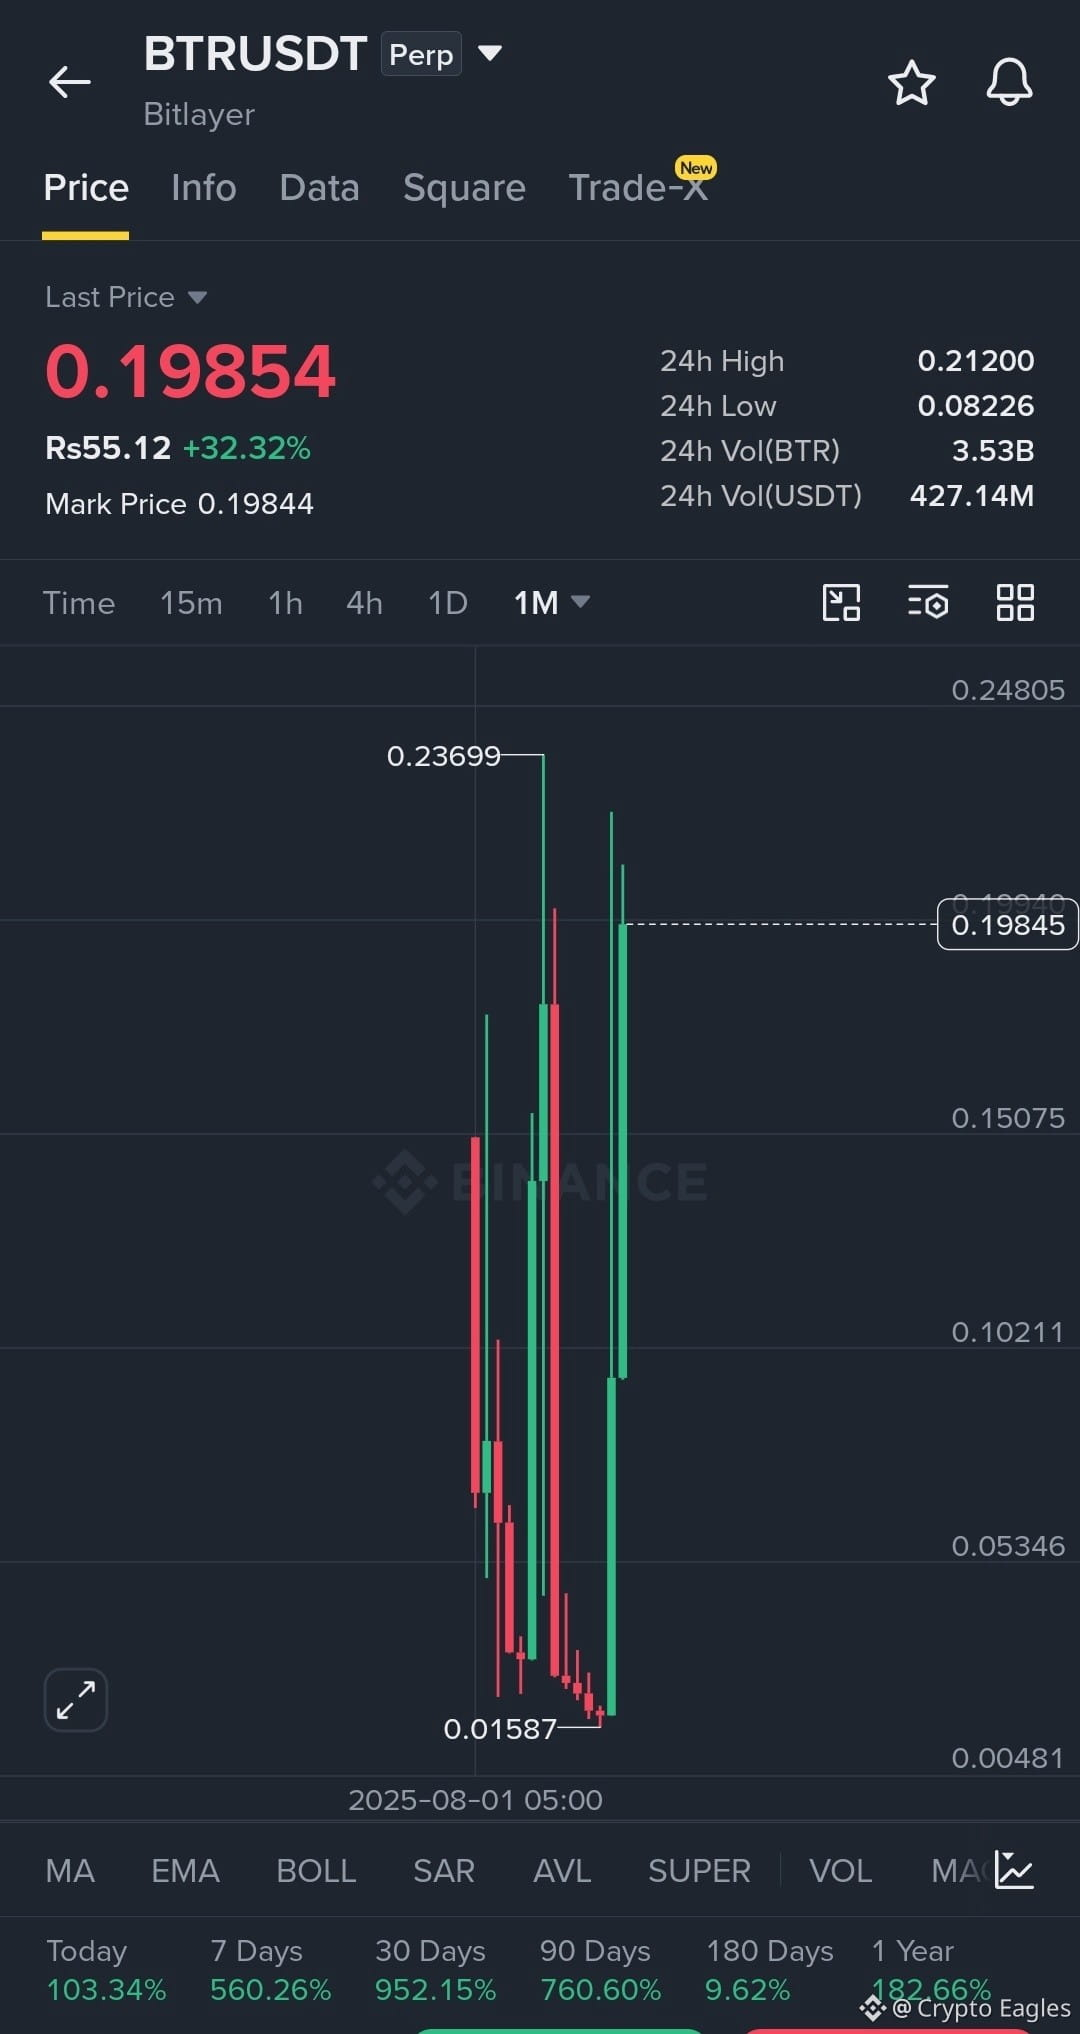
$BTR Short Setup 📉
Entry: 0.205 – 0.212
SL: 0.225
TP1: 0.185
TP2: 0.160
TP3: 0.1263
After the +30% surge and rejection near 0.2120, a failed breakout can trigger a sharp retracement. Below 0.185 would strengthen the bearish move.
$USELESS
$ARB
Entry: 0.205 – 0.212
SL: 0.225
TP1: 0.185
TP2: 0.160
TP3: 0.1263
After the +30% surge and rejection near 0.2120, a failed breakout can trigger a sharp retracement. Below 0.185 would strengthen the bearish move.
$USELESS
$ARB
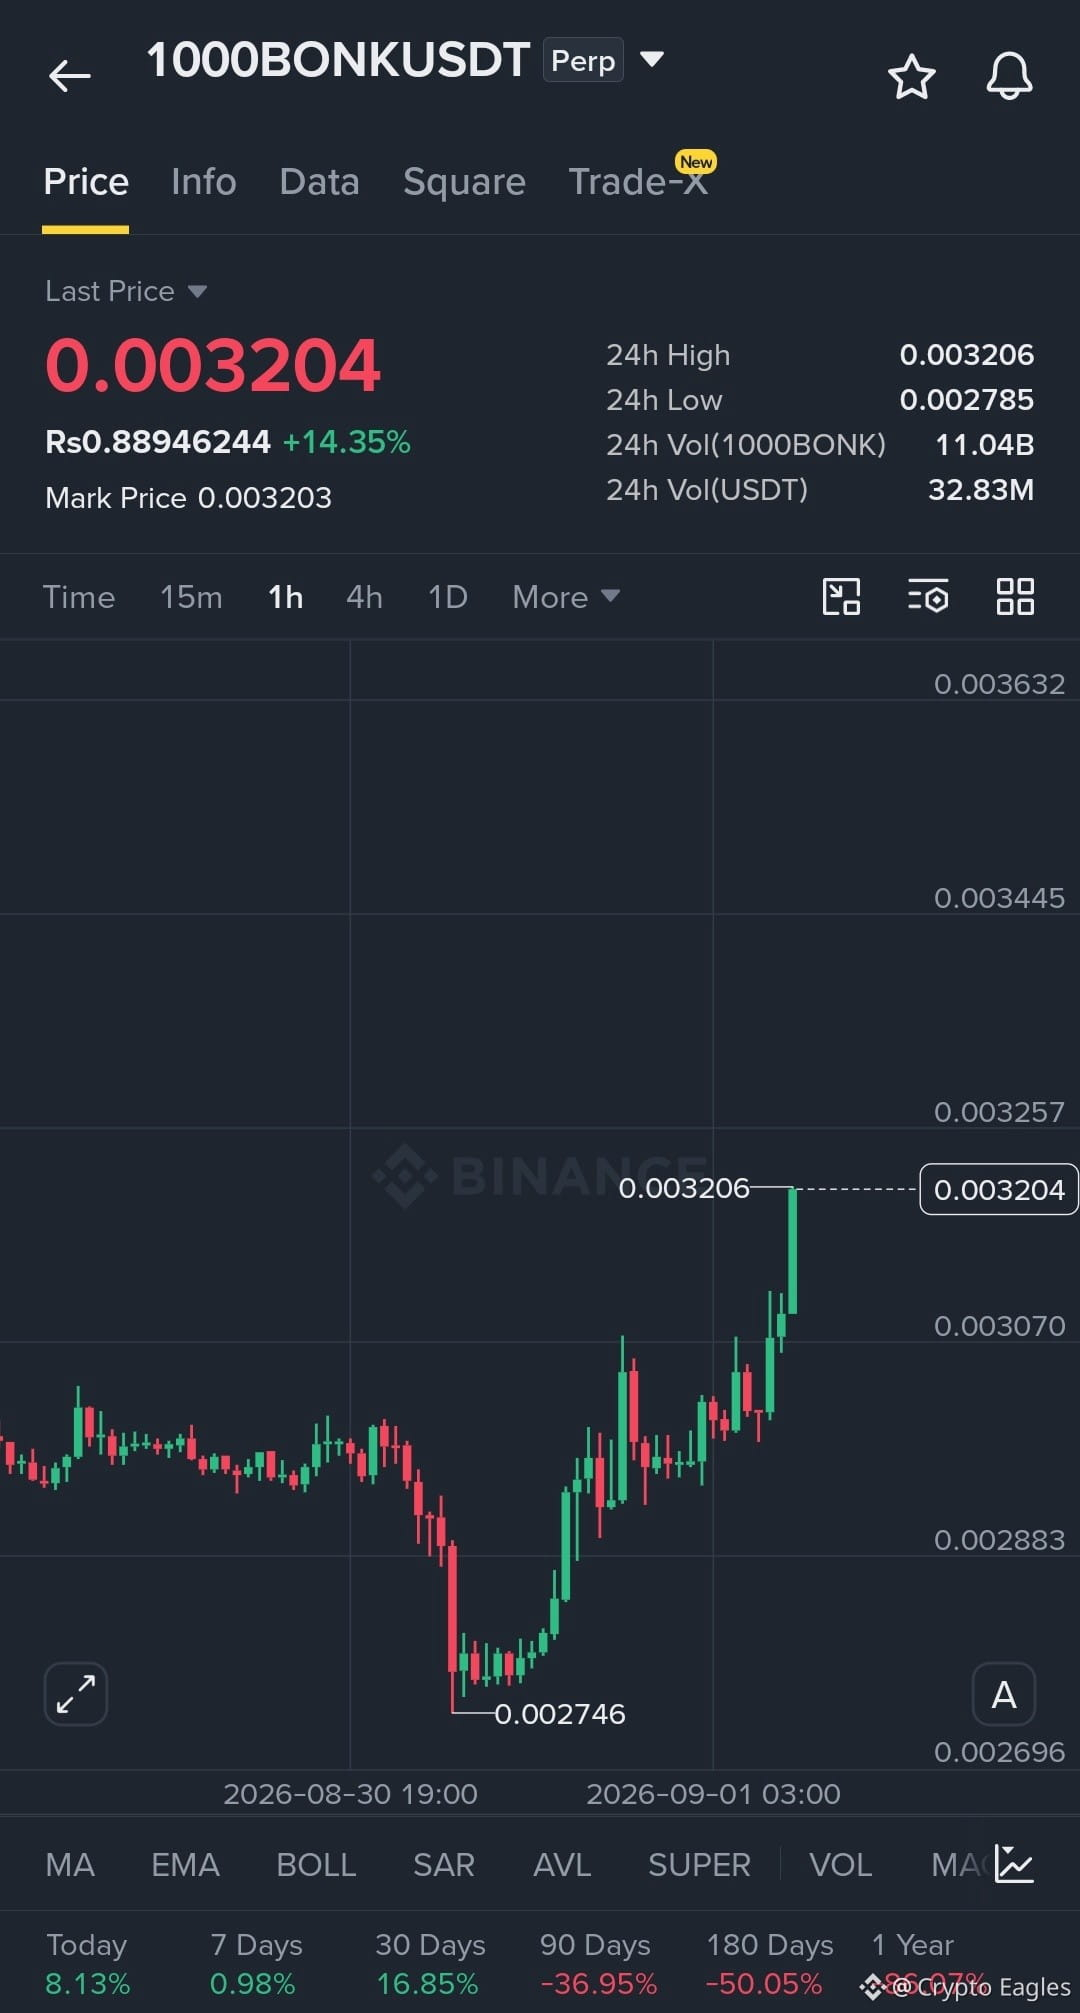
$1000BONK Long Setup 🚀
Entry: 0.00315 – 0.00320
SL: 0.00306
TP1: 0.00326
TP2: 0.00345
TP3: 0.00363
Strong recovery from 0.002746 with consecutive higher highs and a fresh breakout toward 0.003206. Holding 0.00307 keeps the bullish structure intact; a clean break above 0.003206 can open the next upside leg.
$USELESS
$BTR
Entry: 0.00315 – 0.00320
SL: 0.00306
TP1: 0.00326
TP2: 0.00345
TP3: 0.00363
Strong recovery from 0.002746 with consecutive higher highs and a fresh breakout toward 0.003206. Holding 0.00307 keeps the bullish structure intact; a clean break above 0.003206 can open the next upside leg.
$USELESS
$BTR
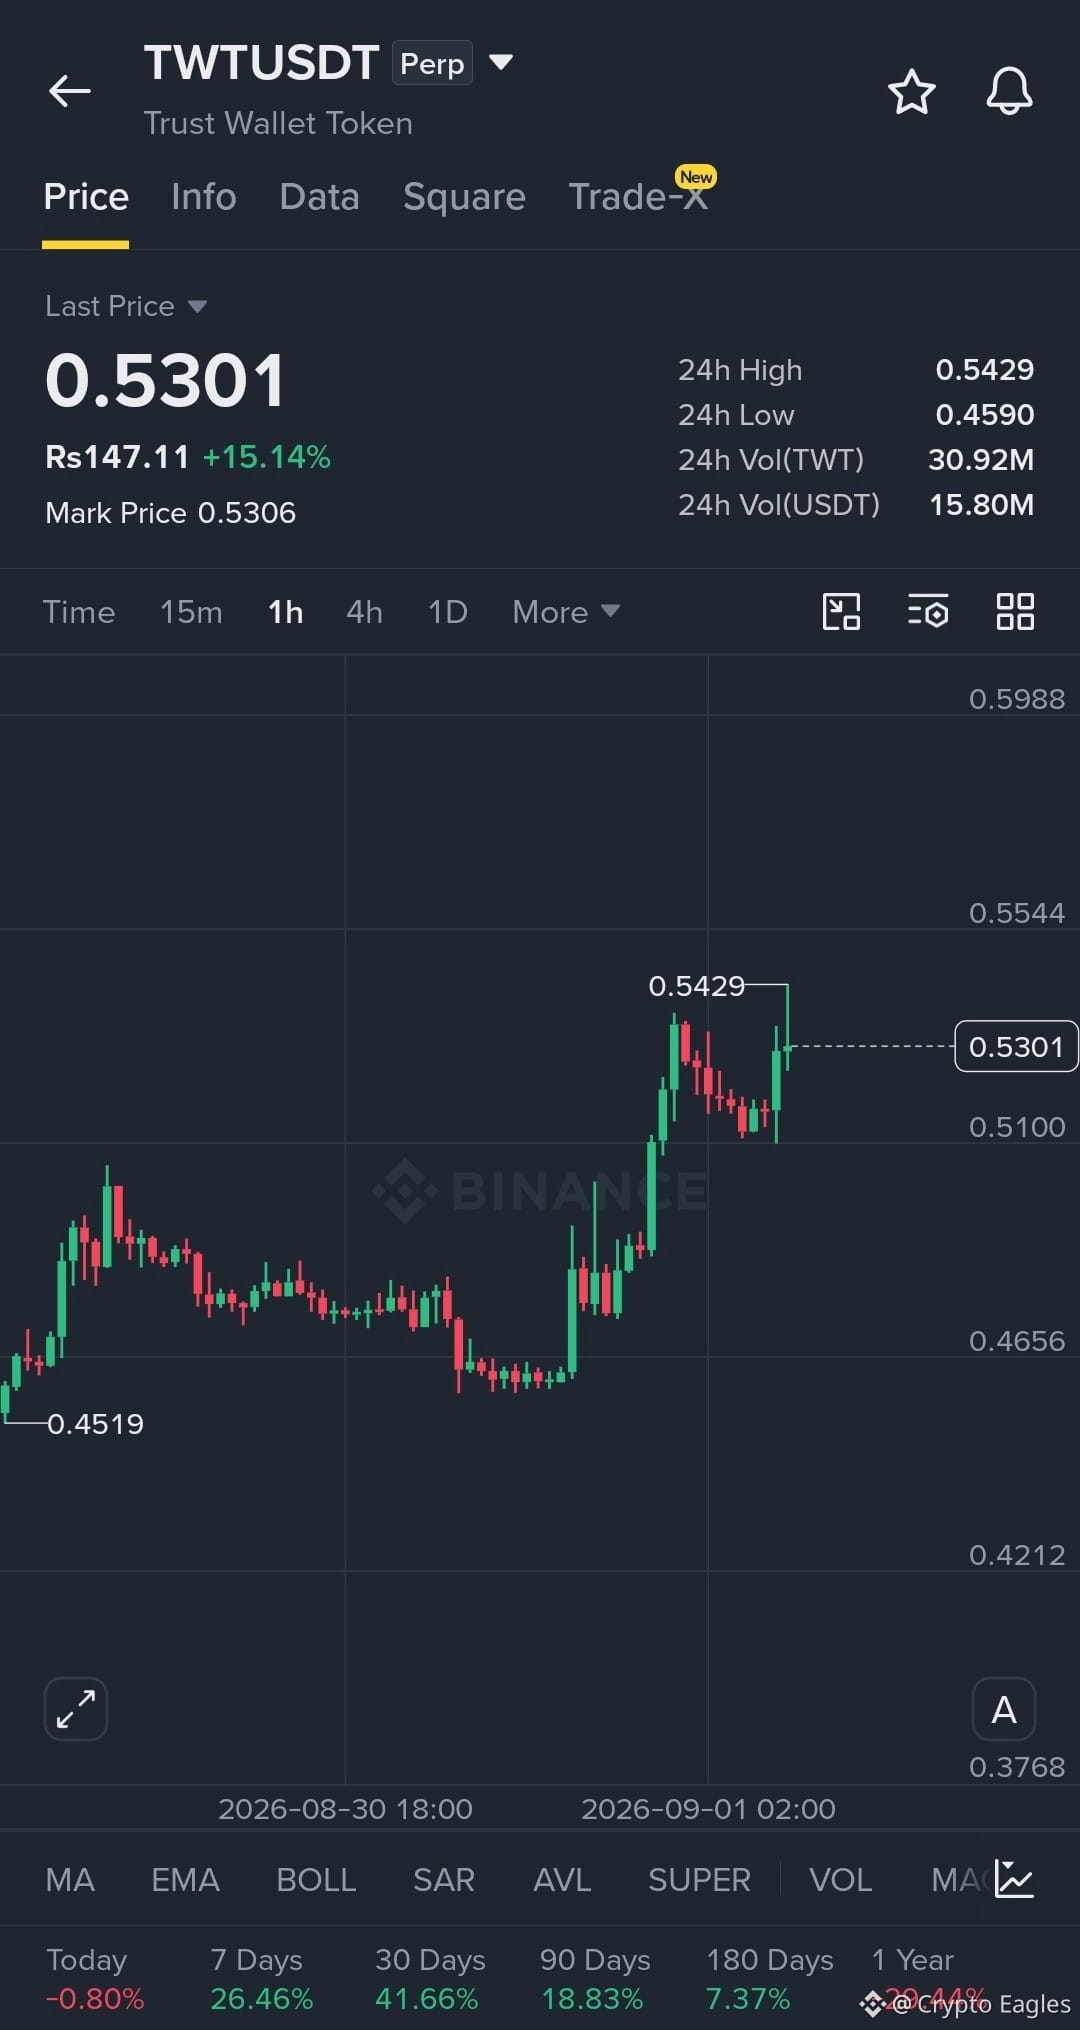
$TWT Long Setup
Entry: 0.525 – 0.530
SL: 0.509
TP1: 0.5429
TP2: 0.5544
TP3: 0.5988
Strong breakout with price holding above 0.5100 after retesting the breakout zone. A clean break above 0.5429 can open the next upside leg toward 0.5544–0.5988.
$USELESS
$0G
Entry: 0.525 – 0.530
SL: 0.509
TP1: 0.5429
TP2: 0.5544
TP3: 0.5988
Strong breakout with price holding above 0.5100 after retesting the breakout zone. A clean break above 0.5429 can open the next upside leg toward 0.5544–0.5988.
$USELESS
$0G
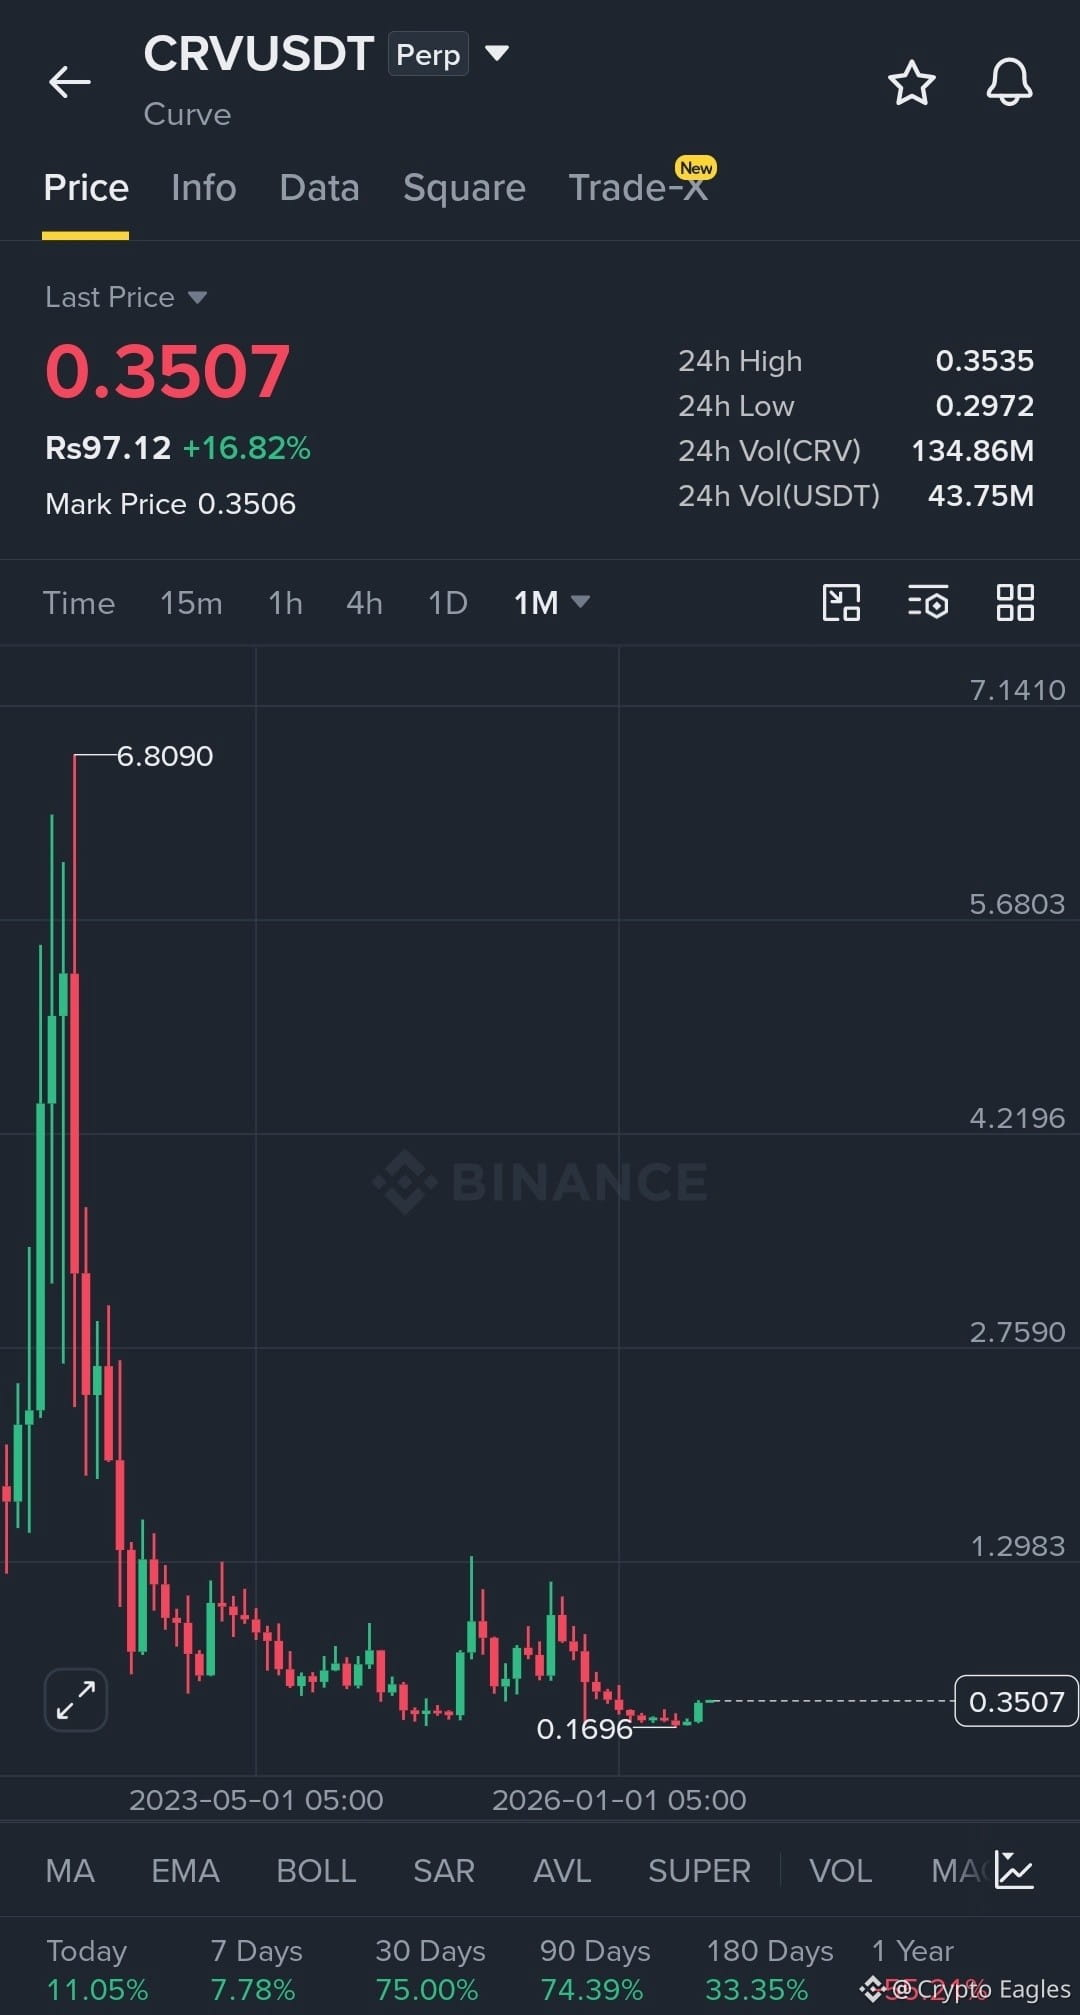
$CRV Long Setup
Entry: 0.3440 – 0.3500
SL: 0.3350
TP1: 0.3535
TP2: 0.3662
TP3: 0.3962
Strong 1H breakout from 0.3064 with sustained higher highs. Holding 0.3363 keeps the bullish structure intact; a clean break above 0.3535 can trigger the next upside move.
$0G
$USELESS
Entry: 0.3440 – 0.3500
SL: 0.3350
TP1: 0.3535
TP2: 0.3662
TP3: 0.3962
Strong 1H breakout from 0.3064 with sustained higher highs. Holding 0.3363 keeps the bullish structure intact; a clean break above 0.3535 can trigger the next upside move.
$0G
$USELESS
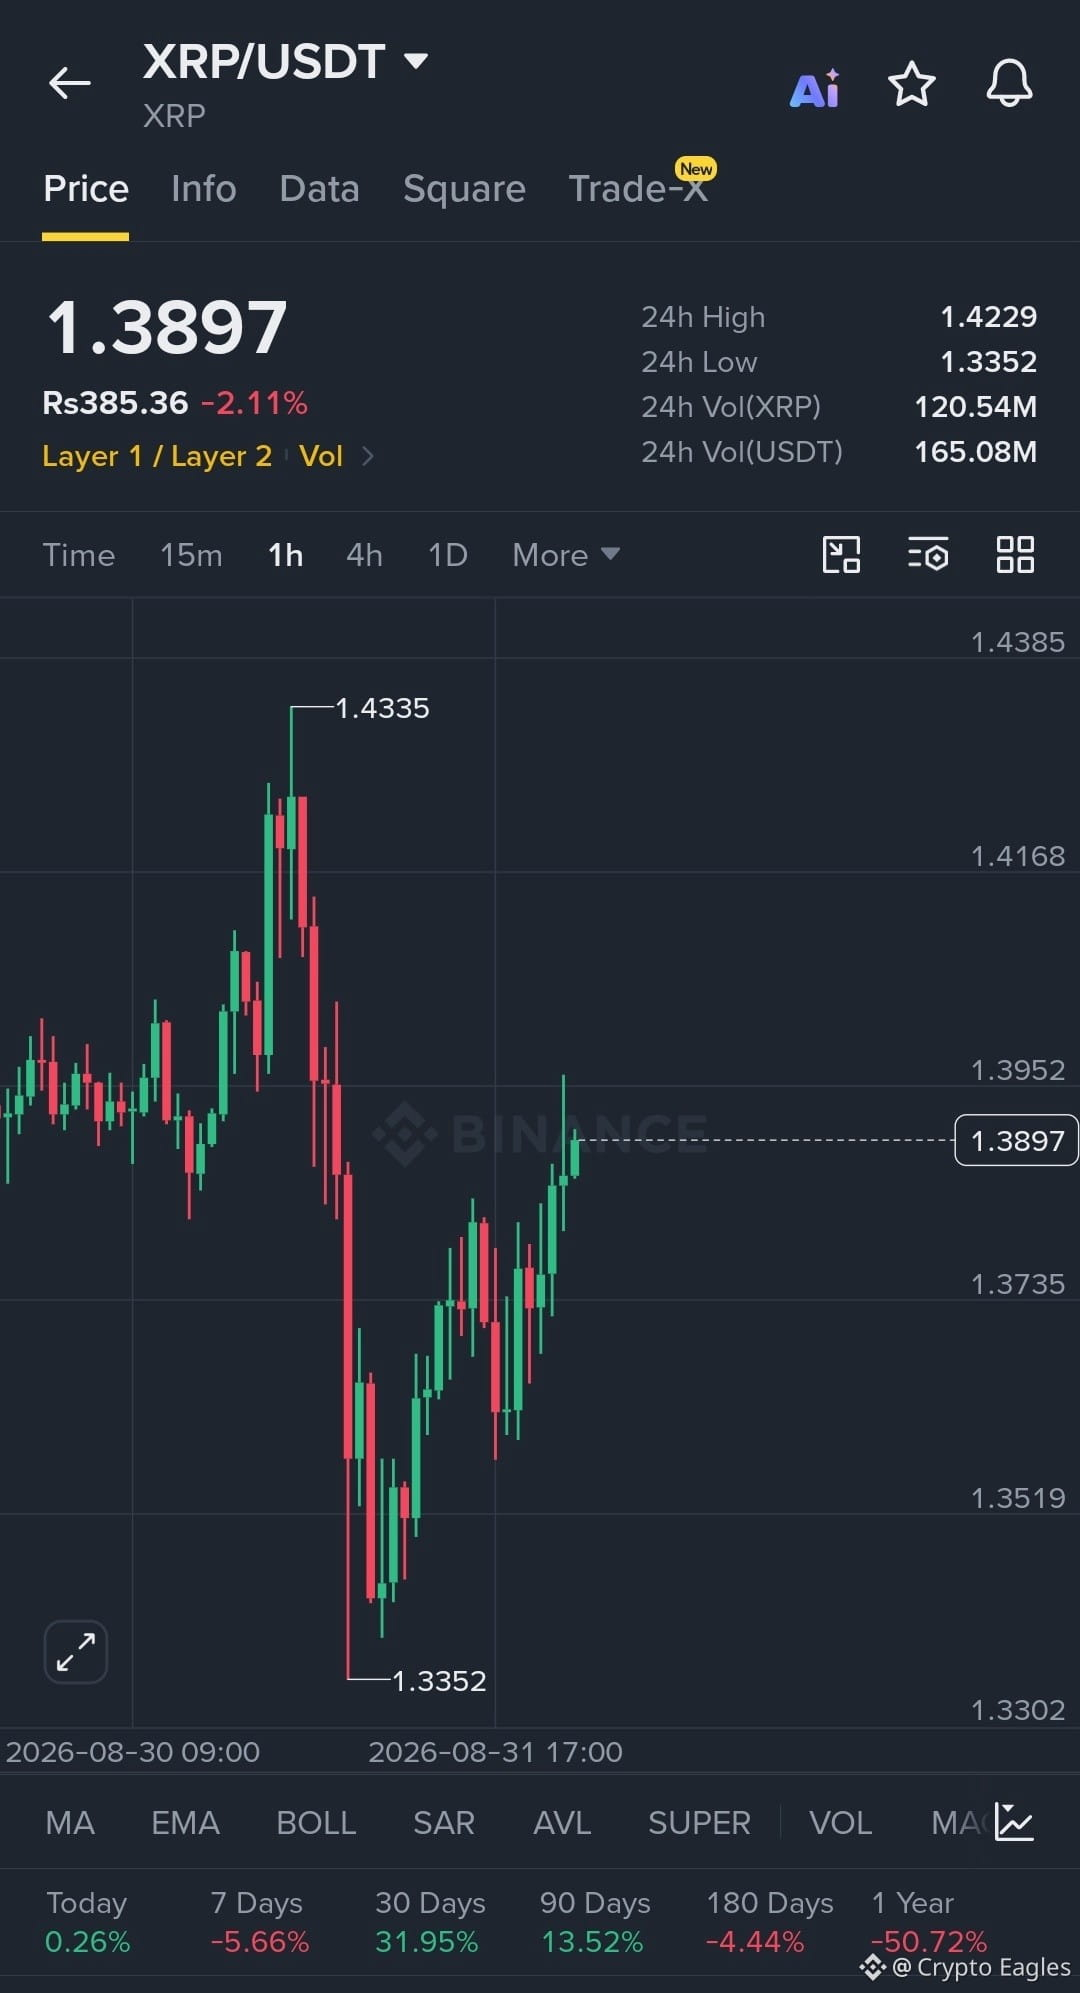
$XRP Long Setup
Entry: 1.385 – 1.395
SL: 1.350
TP1: 1.4168
TP2: 1.4335
TP3: 1.4385
XRP has recovered strongly from the 1.3352 sweep and is forming higher lows. Holding 1.3735 keeps the recovery structure bullish; a clean break above 1.4168 can open the next upside leg.
$USELESS
$SKR
Entry: 1.385 – 1.395
SL: 1.350
TP1: 1.4168
TP2: 1.4335
TP3: 1.4385
XRP has recovered strongly from the 1.3352 sweep and is forming higher lows. Holding 1.3735 keeps the recovery structure bullish; a clean break above 1.4168 can open the next upside leg.
$USELESS
$SKR
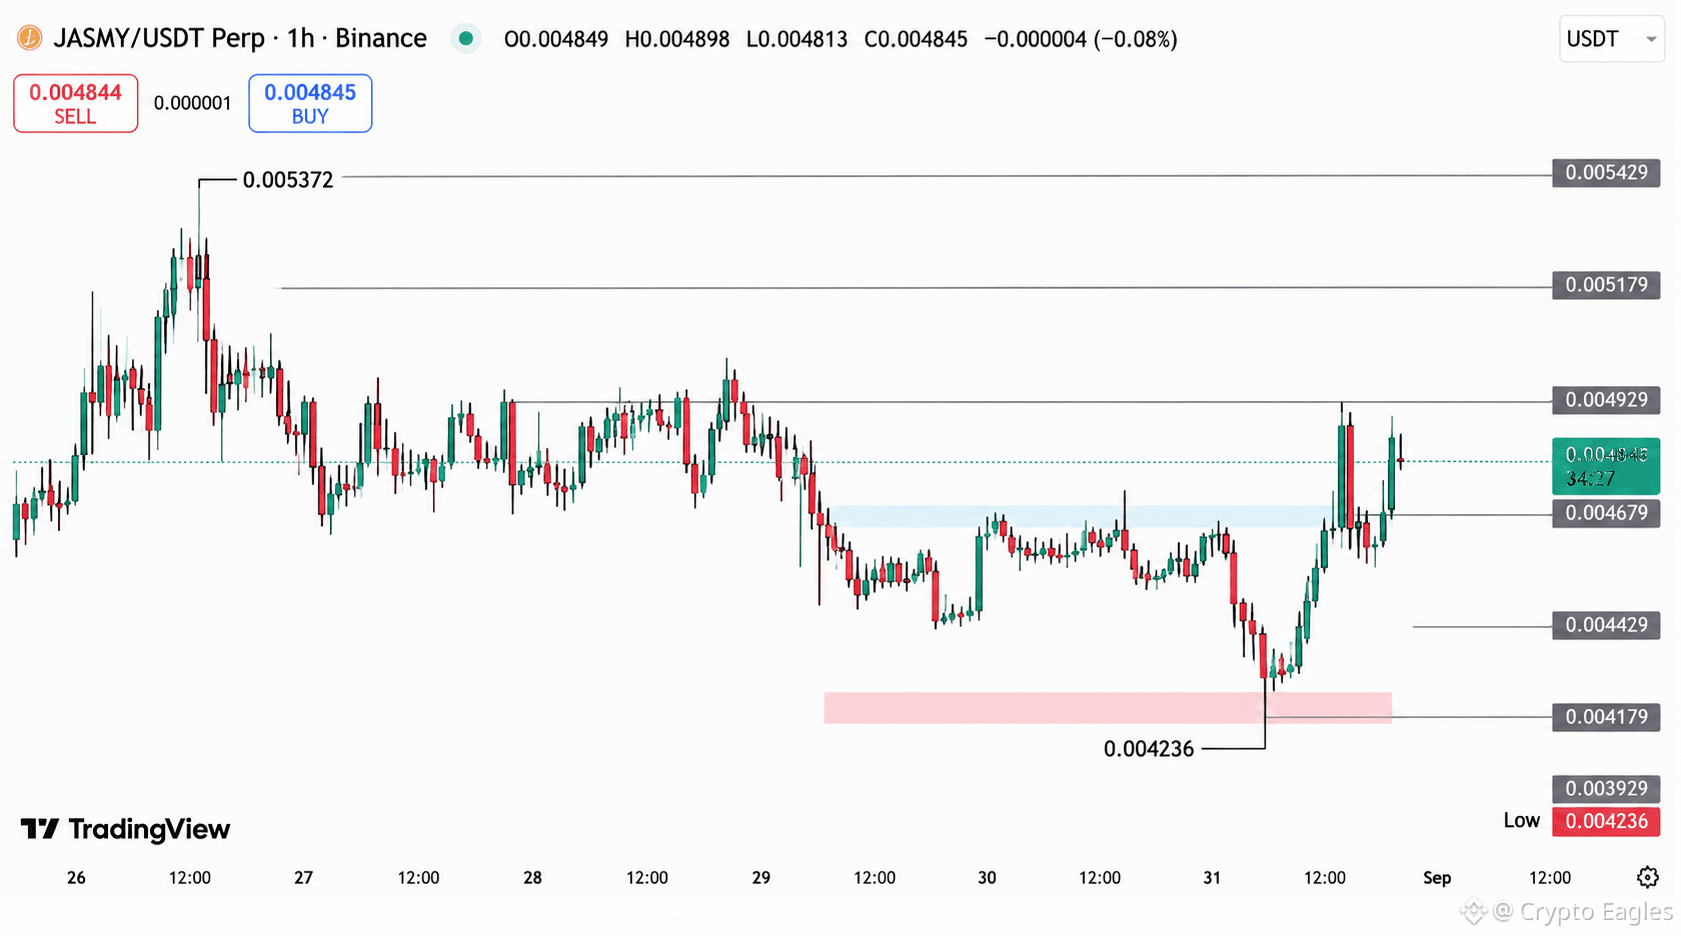
$JASMY is recovering from a strong demand-zone reaction.
Price swept the $0.004236 low and bounced sharply, reclaiming the $0.004679 level. Buyers are now pressing toward the major $0.004929 resistance.
A clean breakout above $0.004929 could open the path toward $0.005179, followed by the previous high near $0.005372.
The key support zone is $0.004679–$0.004429. Holding this area would keep the recovery structure constructive, while a breakdown could send price back toward the $0.004236 demand zone.
Momentum is improving — $0.004929 is the key confirmation level for the next upside move. 📈
Price swept the $0.004236 low and bounced sharply, reclaiming the $0.004679 level. Buyers are now pressing toward the major $0.004929 resistance.
A clean breakout above $0.004929 could open the path toward $0.005179, followed by the previous high near $0.005372.
The key support zone is $0.004679–$0.004429. Holding this area would keep the recovery structure constructive, while a breakdown could send price back toward the $0.004236 demand zone.
Momentum is improving — $0.004929 is the key confirmation level for the next upside move. 📈
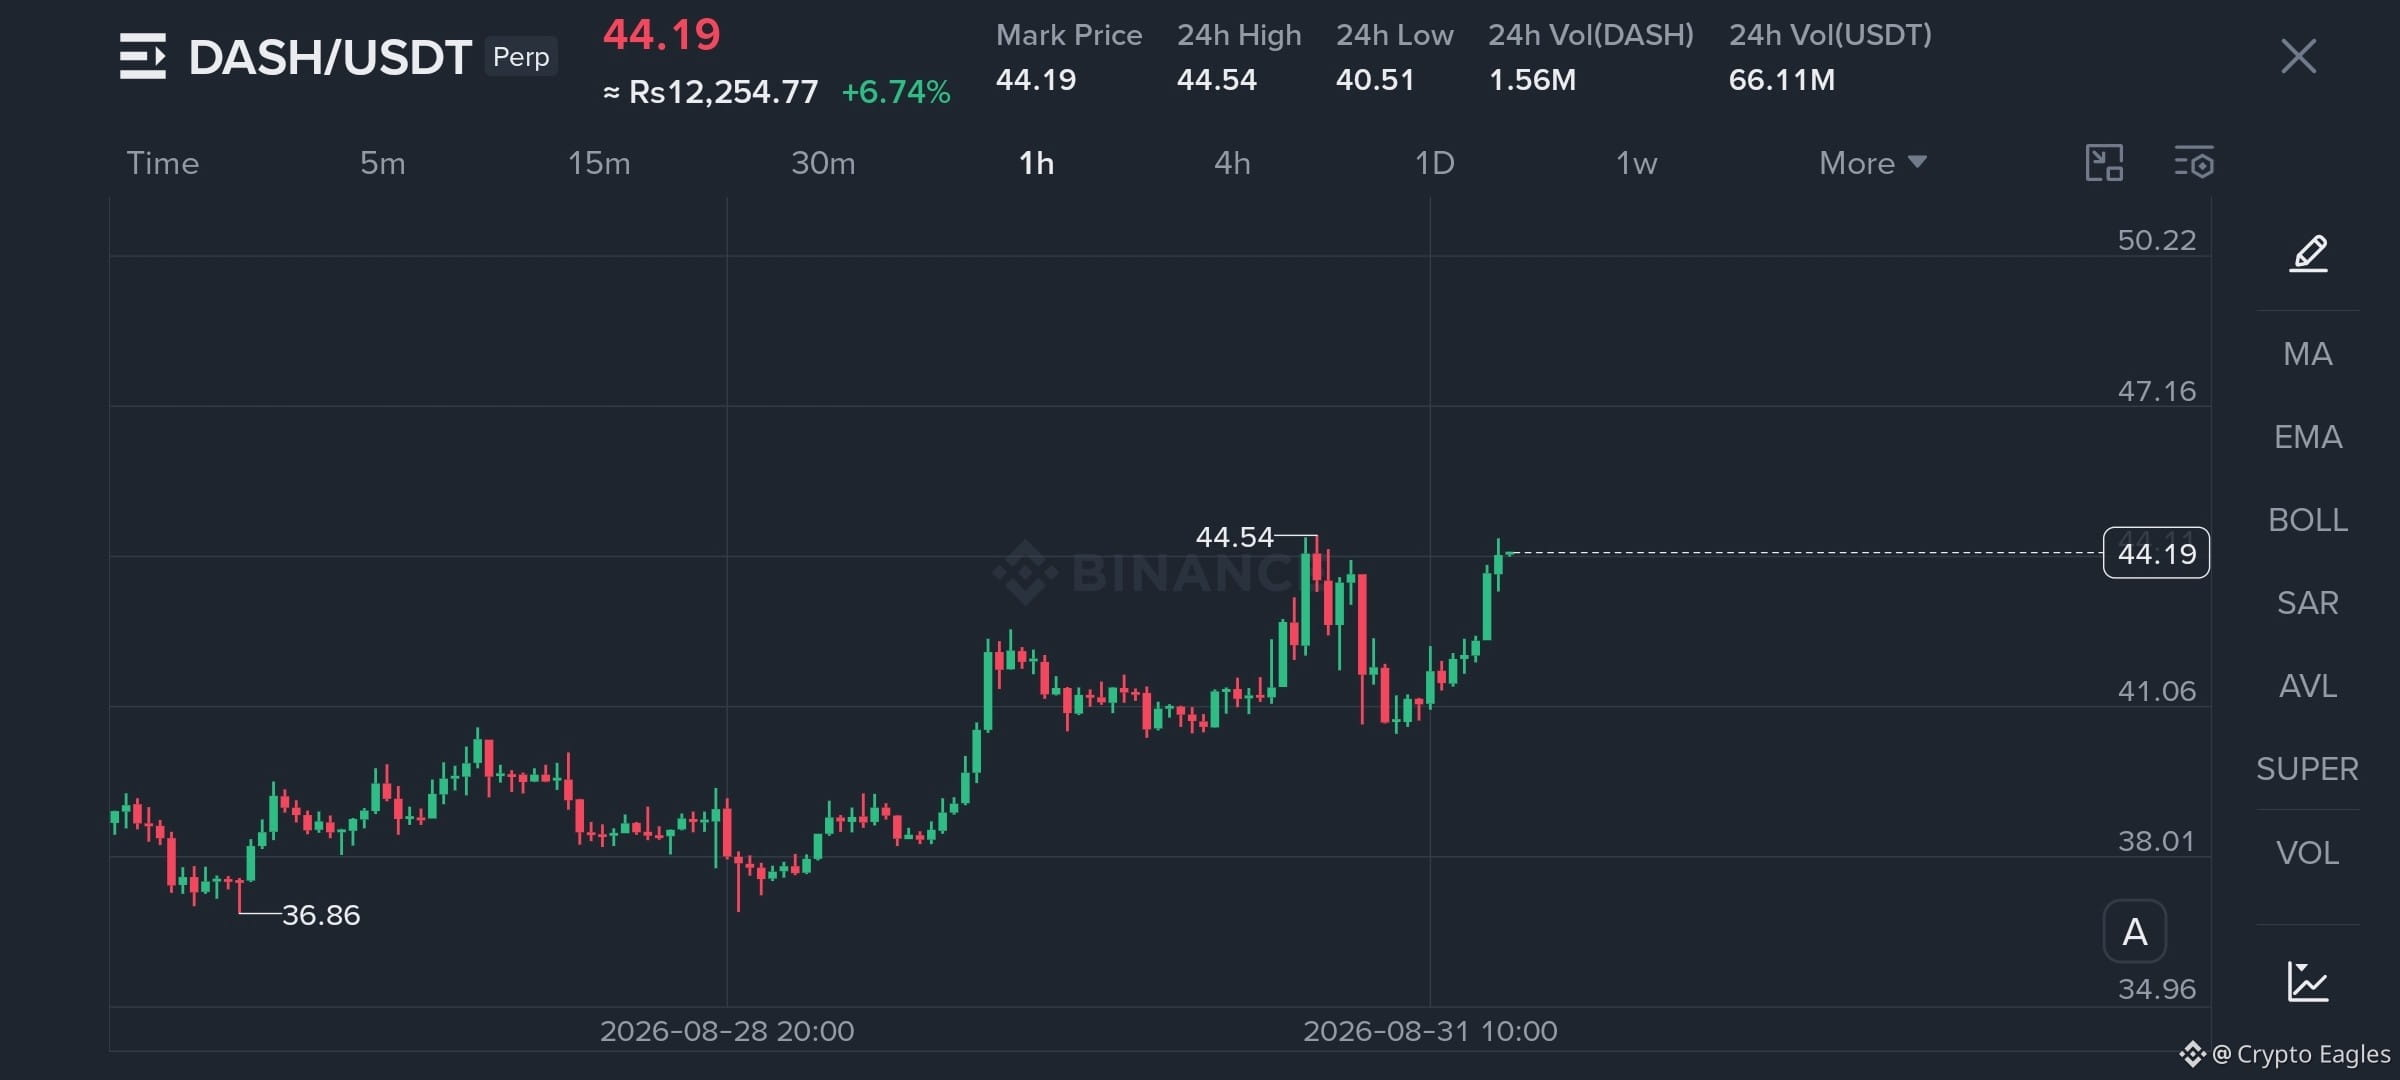
$DASH Long Setup 🚀
Entry: 43.80 – 44.20
SL: 41.00
TP1: 44.54
TP2: 47.16
TP3: 50.22
Strong 1H structure with higher highs and higher lows. 44.54 is the key breakout level — a clean break and hold above it can open the next upside leg.
$SKR
$GIGGLE
Entry: 43.80 – 44.20
SL: 41.00
TP1: 44.54
TP2: 47.16
TP3: 50.22
Strong 1H structure with higher highs and higher lows. 44.54 is the key breakout level — a clean break and hold above it can open the next upside leg.
$SKR
$GIGGLE
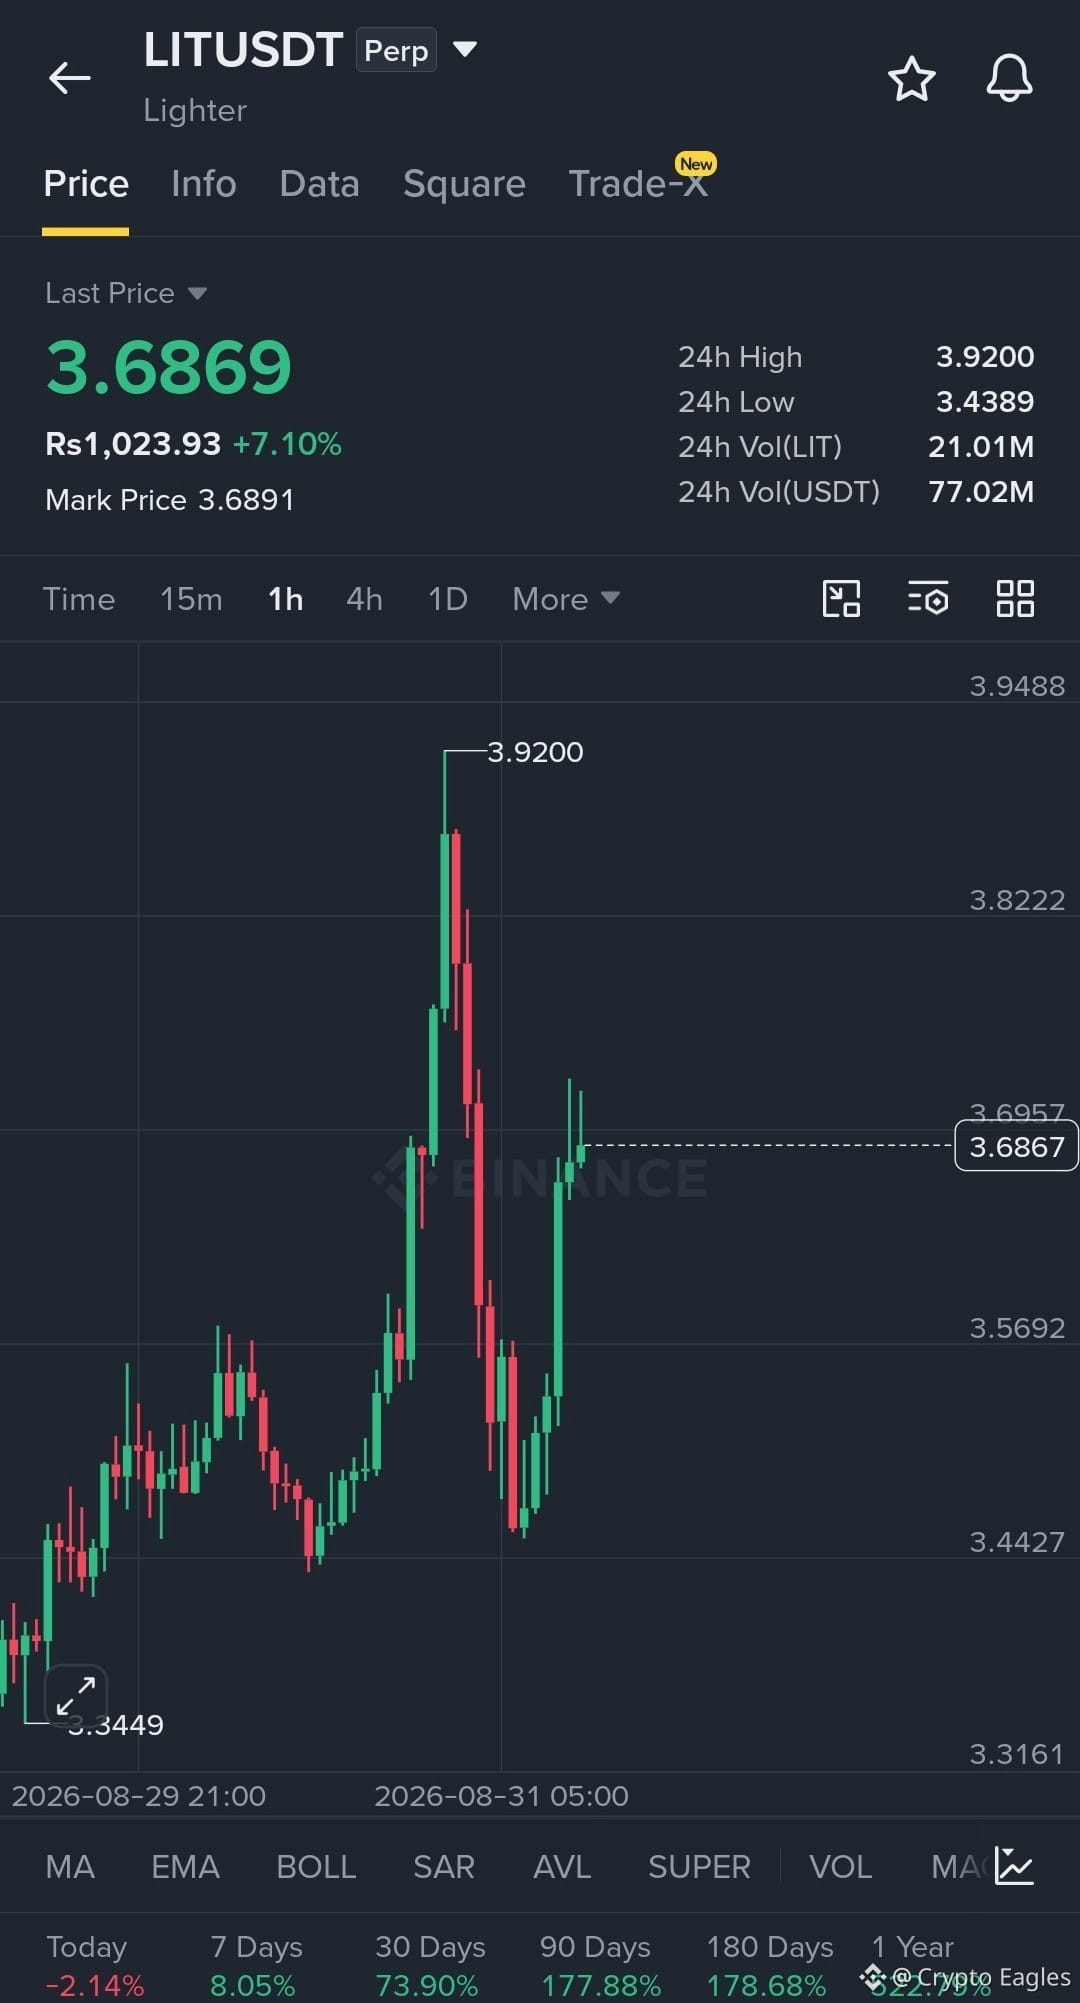
$LIT Buyers Are Reclaiming Control 🚀
$LIT is showing a strong recovery after defending the $3.44–$3.50 support zone. Buyers have pushed price back toward $3.70, suggesting momentum is shifting bullish again.
Long LIT
Entry: $3.62 – $3.69
SL: $3.52
TP: $3.82 – $3.92 – $4.05
The latest structure is leaning bullish as price forms a strong rebound from the recent low and approaches the $3.70 resistance. A clean breakout and hold above this area could open the path toward the previous $3.92 high and potentially extend the move higher.
If buyers maintain control above $3.60, could develop into another strong momentum leg. A break back below $3.52 would weaken the setup.
Momentum is building — confirmation above $3.70 is key. 📈
$SKR
$LIT is showing a strong recovery after defending the $3.44–$3.50 support zone. Buyers have pushed price back toward $3.70, suggesting momentum is shifting bullish again.
Long LIT
Entry: $3.62 – $3.69
SL: $3.52
TP: $3.82 – $3.92 – $4.05
The latest structure is leaning bullish as price forms a strong rebound from the recent low and approaches the $3.70 resistance. A clean breakout and hold above this area could open the path toward the previous $3.92 high and potentially extend the move higher.
If buyers maintain control above $3.60, could develop into another strong momentum leg. A break back below $3.52 would weaken the setup.
Momentum is building — confirmation above $3.70 is key. 📈
$SKR
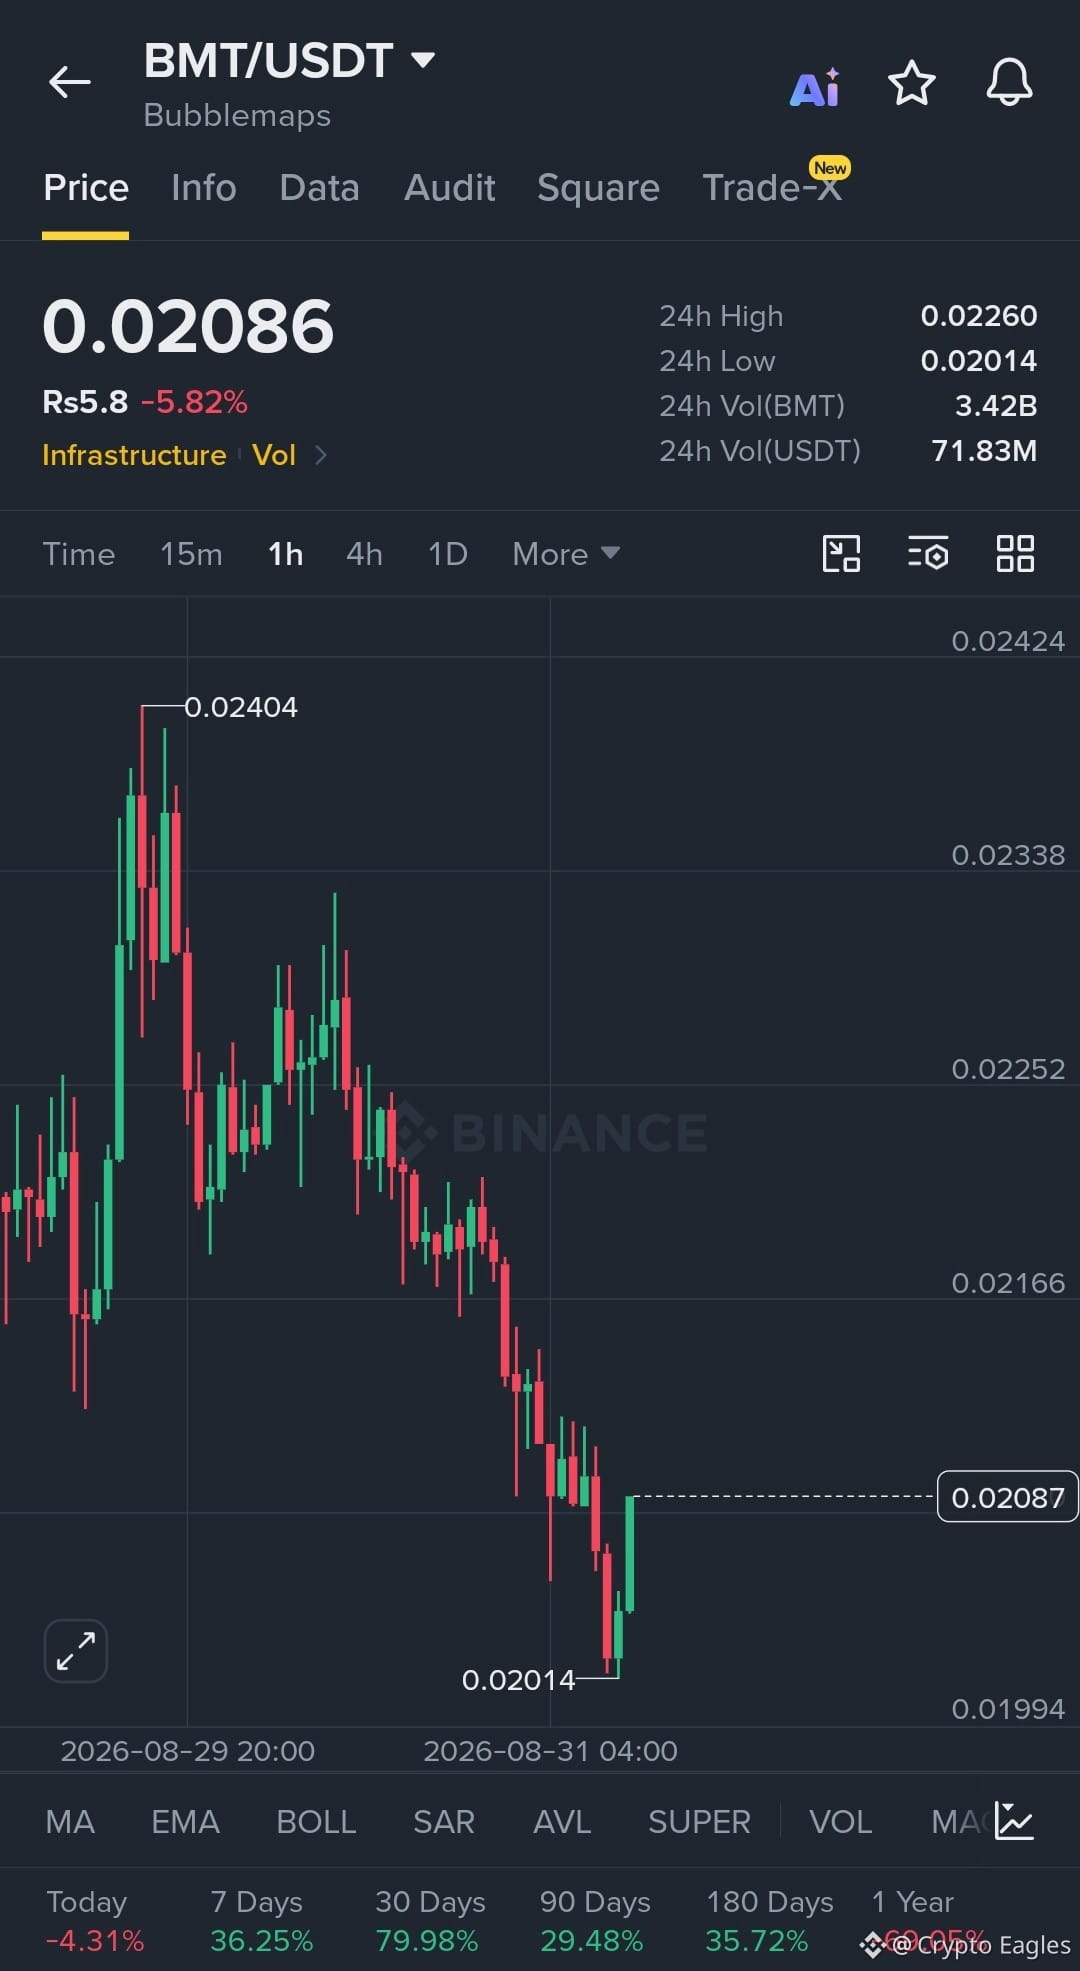
$BMT Long Setup 🚀
Entry: 0.0207 – 0.0209
SL: 0.0201
TP1: 0.02166
TP2: 0.02252
TP3: 0.02338
Price swept the 0.02014 low and bounced sharply. Holding 0.0207 can support a relief move toward the previous resistance levels.
$SKR
$ZORA
Entry: 0.0207 – 0.0209
SL: 0.0201
TP1: 0.02166
TP2: 0.02252
TP3: 0.02338
Price swept the 0.02014 low and bounced sharply. Holding 0.0207 can support a relief move toward the previous resistance levels.
$SKR
$ZORA
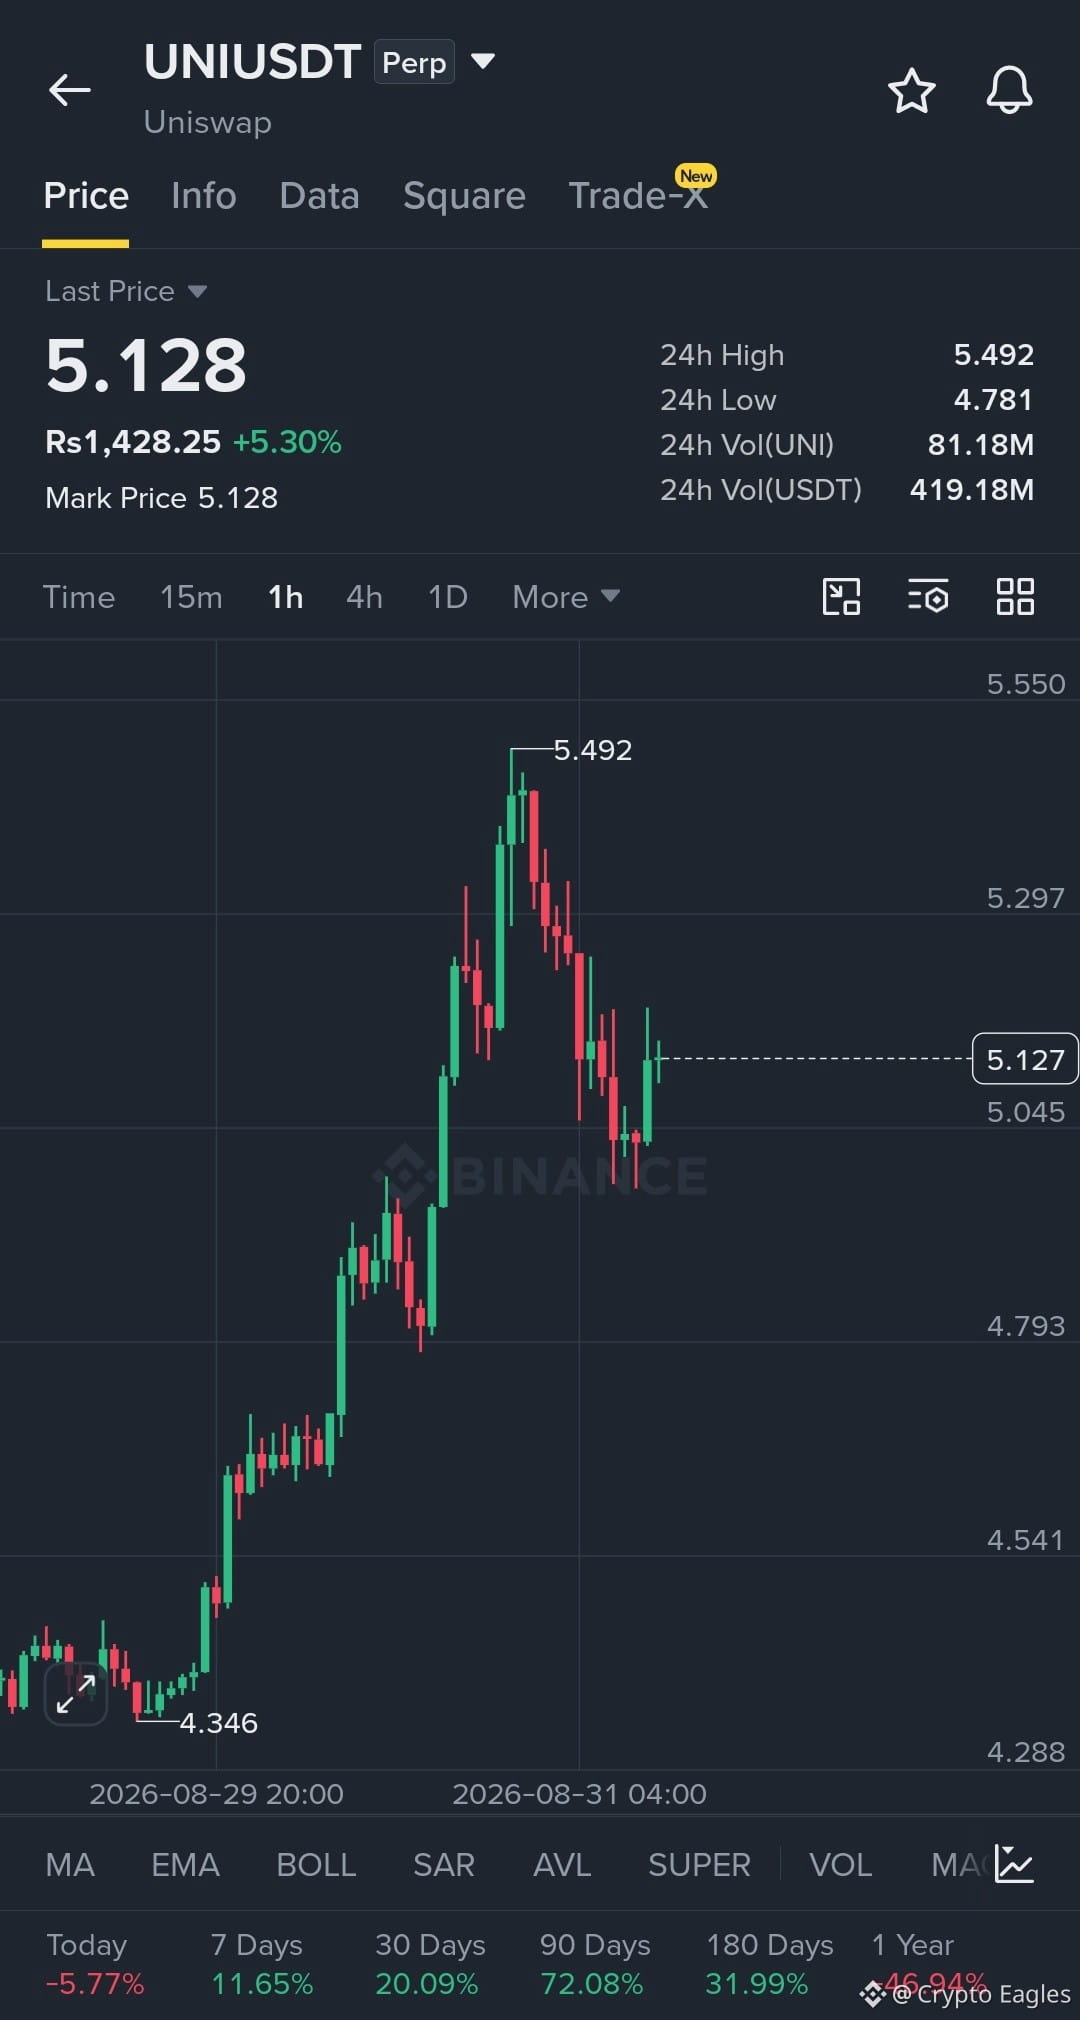
#UNIUSDT Long Setup
Entry: 5.05 – 5.15
Stop Loss: 4.92
TP1: 5.30
TP2: 5.49
TP3: 5.55
Setup: Strong 1H uptrend after the breakout from the 4.79 area. Price pulled back from 5.49 and is now reclaiming 5.05 support. A hold above 5.05 can send UNI back toward the 5.49 resistance and potentially 5.55
$UNI $SKR $ZORA
Entry: 5.05 – 5.15
Stop Loss: 4.92
TP1: 5.30
TP2: 5.49
TP3: 5.55
Setup: Strong 1H uptrend after the breakout from the 4.79 area. Price pulled back from 5.49 and is now reclaiming 5.05 support. A hold above 5.05 can send UNI back toward the 5.49 resistance and potentially 5.55
$UNI $SKR $ZORA
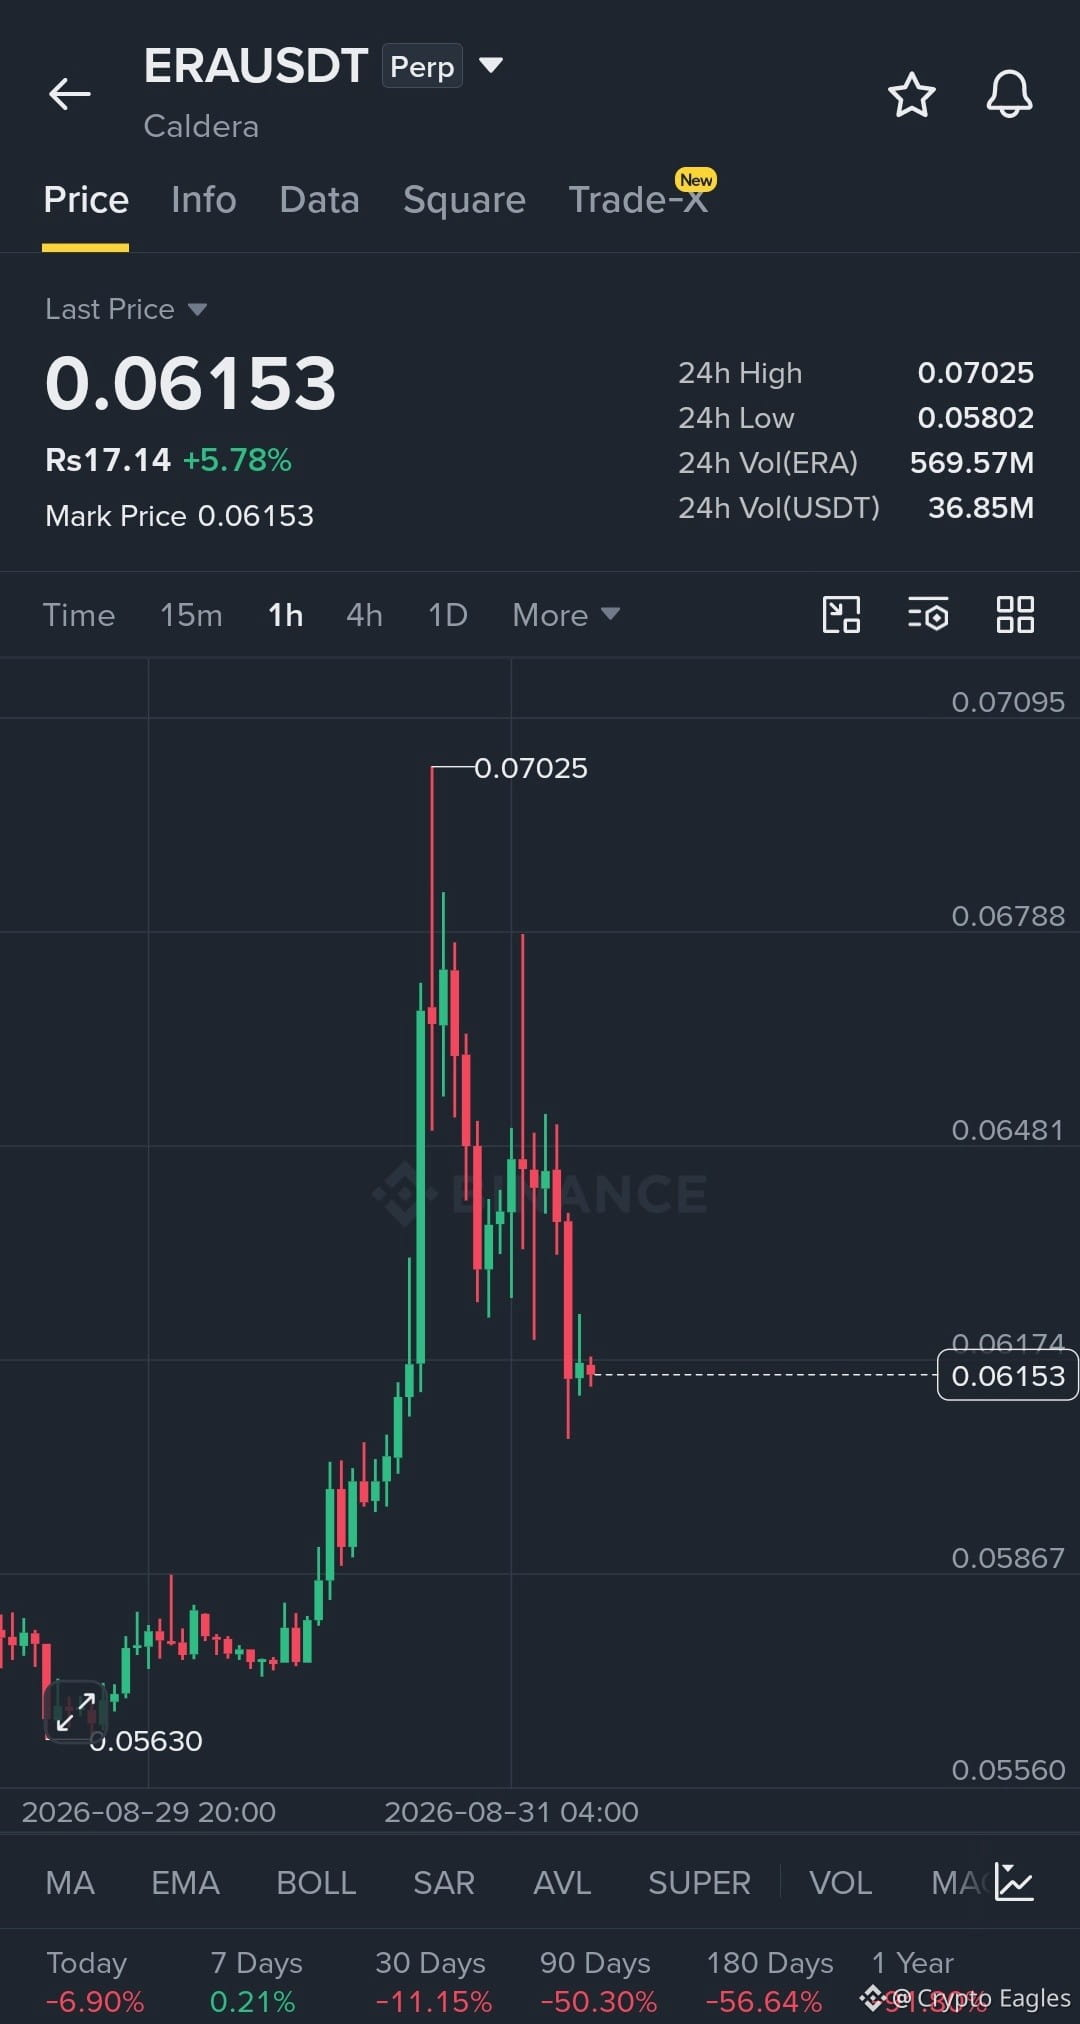
$ERA Long Setup
Entry: 0.06080 – 0.06150
Stop Loss: 0.05840
TP1: 0.06480
TP2: 0.06780
TP3: 0.07025
Setup: ERA had a strong breakout from the 0.058–0.060 area, followed by a sharp rejection from 0.07025. Price is now retracing toward support. The cleaner long is around 0.06080–0.06150, with 0.06480 as the first major reclaim. A break below 0.05840 invalidates the setup.
$SKR
$HEMI
Entry: 0.06080 – 0.06150
Stop Loss: 0.05840
TP1: 0.06480
TP2: 0.06780
TP3: 0.07025
Setup: ERA had a strong breakout from the 0.058–0.060 area, followed by a sharp rejection from 0.07025. Price is now retracing toward support. The cleaner long is around 0.06080–0.06150, with 0.06480 as the first major reclaim. A break below 0.05840 invalidates the setup.
$SKR
$HEMI
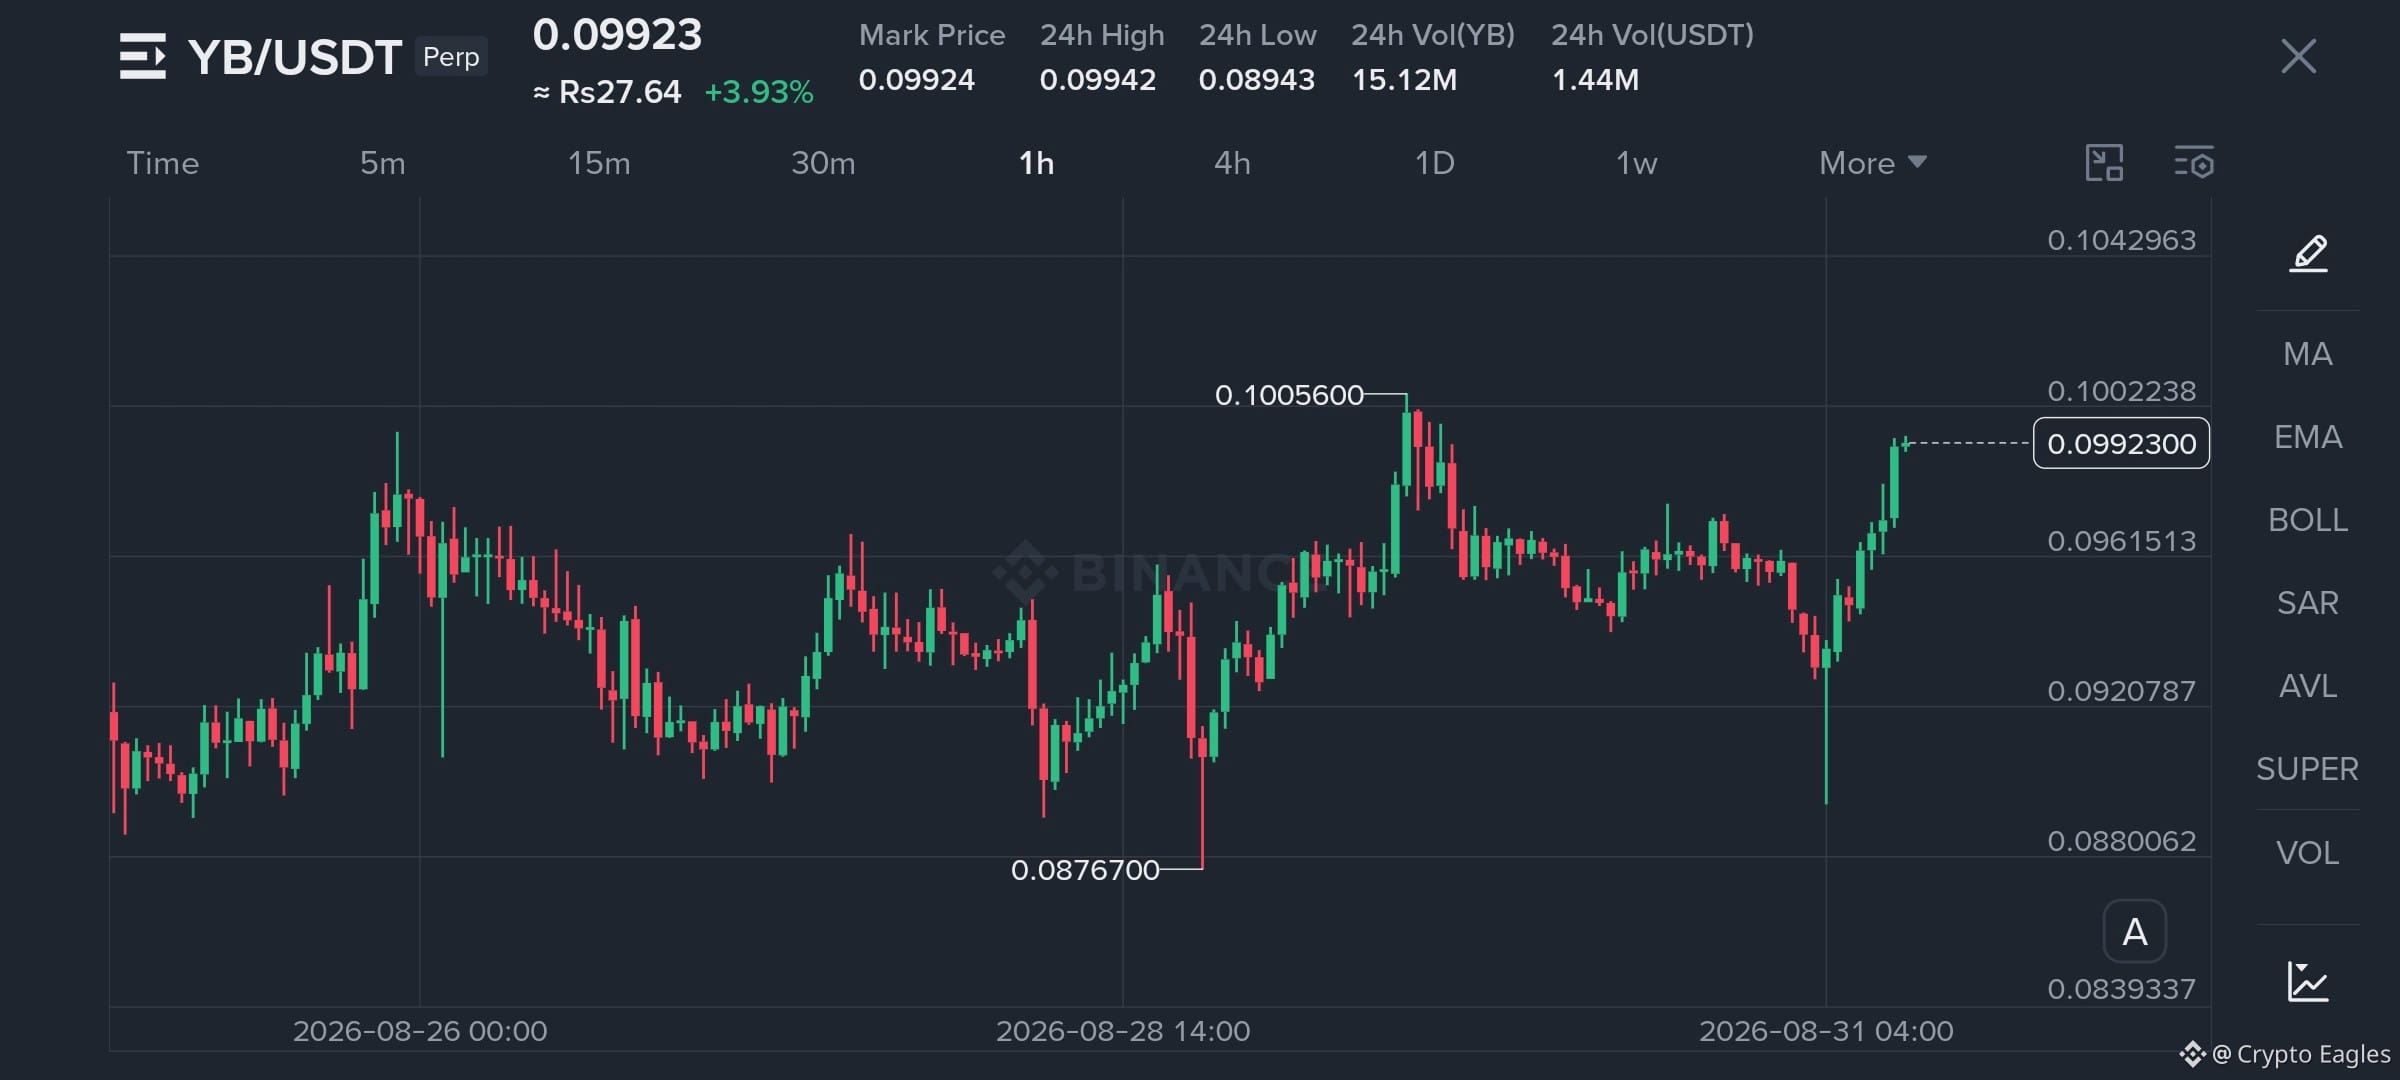
$YB Long Setup
Entry: 0.09780 – 0.09900
Stop Loss: 0.09580
TP1: 0.10056
TP2: 0.10220
TP3: 0.10430
Setup: $YB is showing strong 1H recovery momentum and is pressing the previous high at 0.10056. Best entry is on a pullback/retest of 0.09780–0.09900 rather than chasing. A clean breakout above 0.10056 opens the way toward 0.10220–0.10430. Losing 0.09580 invalidates the setup.
$SKR
Entry: 0.09780 – 0.09900
Stop Loss: 0.09580
TP1: 0.10056
TP2: 0.10220
TP3: 0.10430
Setup: $YB is showing strong 1H recovery momentum and is pressing the previous high at 0.10056. Best entry is on a pullback/retest of 0.09780–0.09900 rather than chasing. A clean breakout above 0.10056 opens the way toward 0.10220–0.10430. Losing 0.09580 invalidates the setup.
$SKR
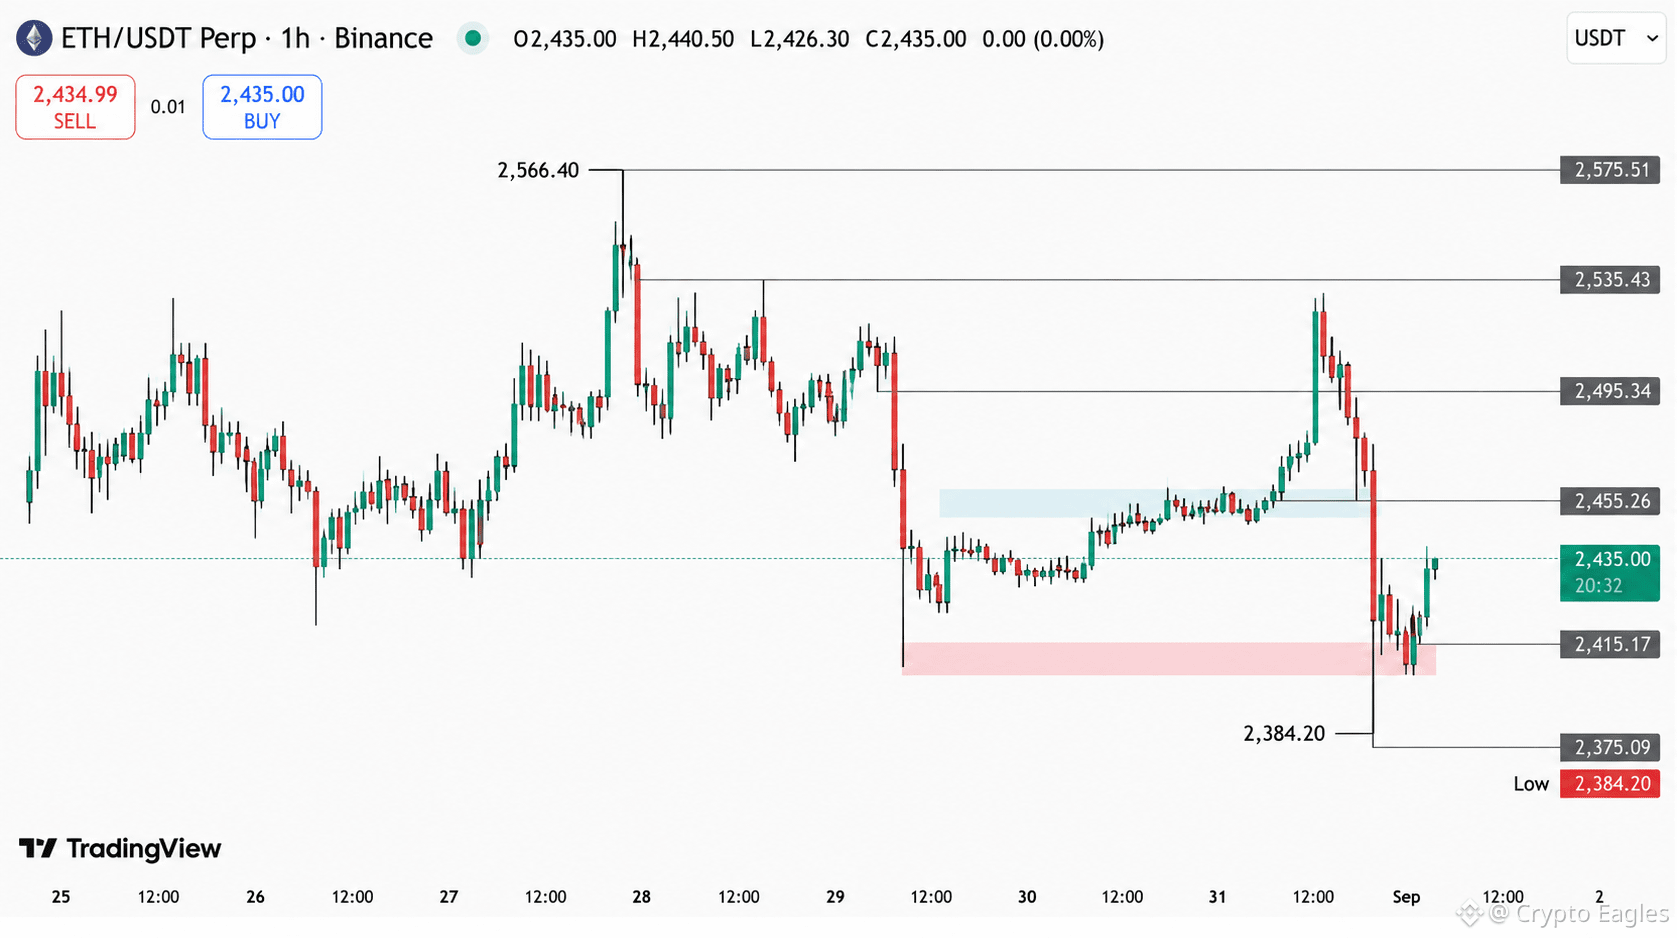
$ETH Long Setup
Entry: 2,415 – 2,435
Stop Loss: 2,375
TP1: 2,455
TP2: 2,495
TP3: 2,535
Setup: ETH is bouncing from the 2,415 demand zone after sweeping the 2,384 low. The reclaim toward 2,435 suggests buyers are stepping in. A clean break and hold above 2,455 can open the path toward 2,495–2,535. Losing 2,375 invalidates the setup.
$SKR
$ZORA
Entry: 2,415 – 2,435
Stop Loss: 2,375
TP1: 2,455
TP2: 2,495
TP3: 2,535
Setup: ETH is bouncing from the 2,415 demand zone after sweeping the 2,384 low. The reclaim toward 2,435 suggests buyers are stepping in. A clean break and hold above 2,455 can open the path toward 2,495–2,535. Losing 2,375 invalidates the setup.
$SKR
$ZORA
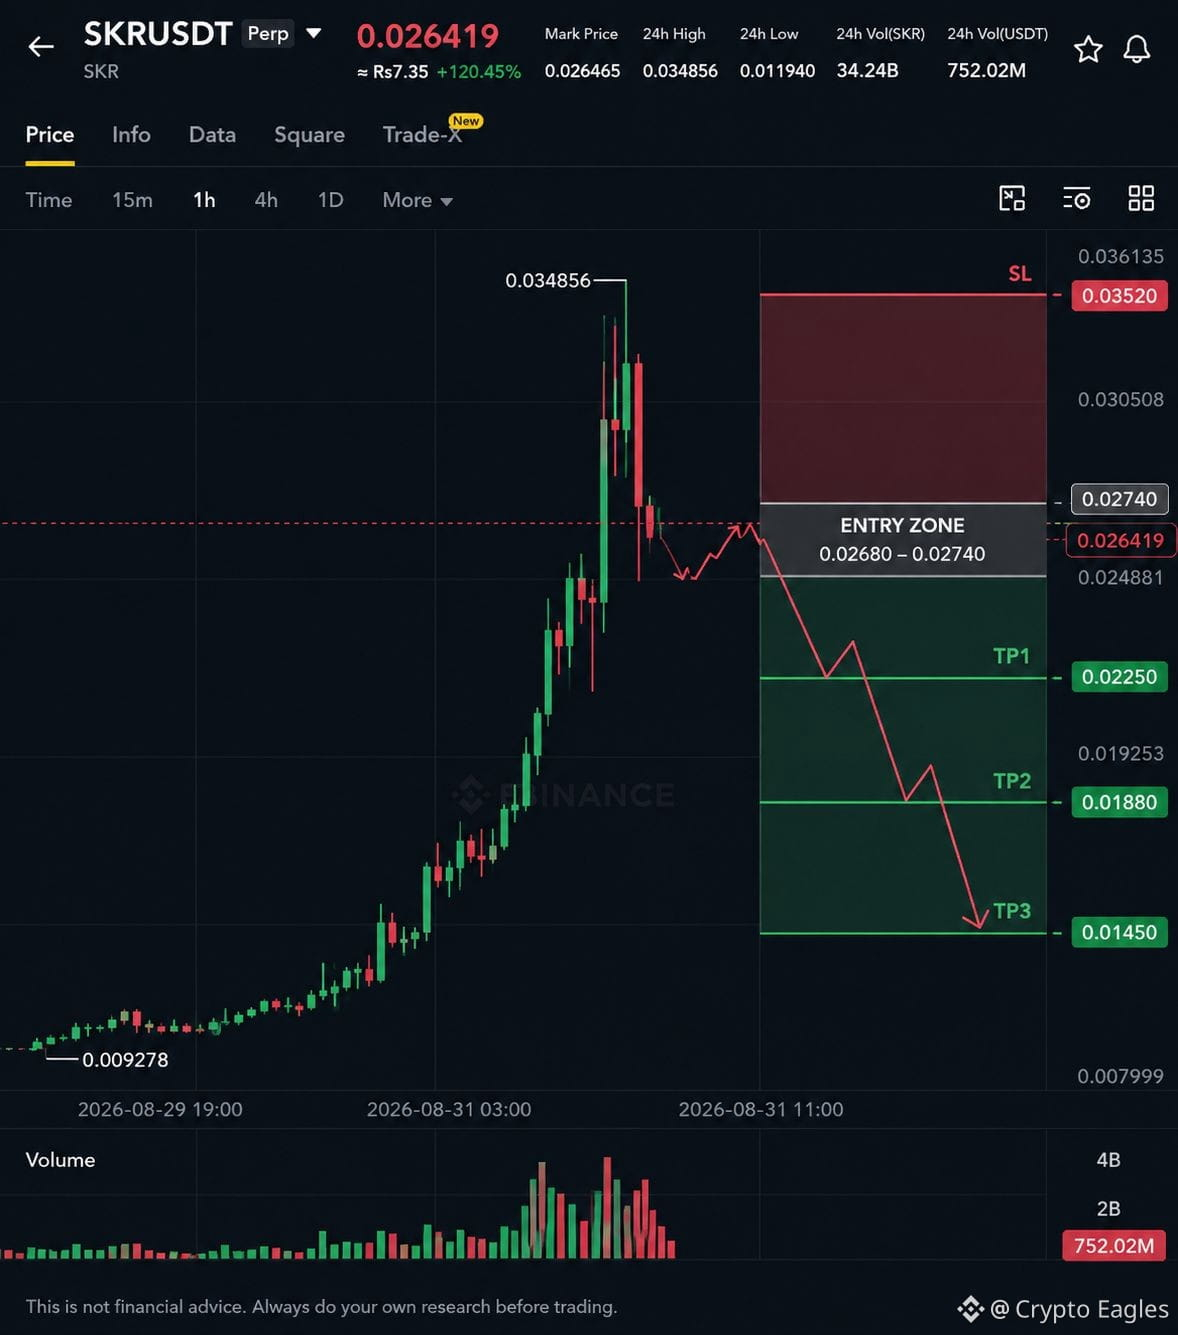
$SKR Short Setup
Entry: 0.02680 – 0.02740
Stop Loss: 0.03520
TP1: 0.02250
TP2: 0.01880
TP3: 0.01450
Setup: After the explosive +120% move and rejection from 0.03486, price is showing signs of distribution. The 0.02680–0.02740 zone is the key short-entry area; rejection here could trigger a deeper retracement toward the marked targets.
$ZORA
$FLOCK
Entry: 0.02680 – 0.02740
Stop Loss: 0.03520
TP1: 0.02250
TP2: 0.01880
TP3: 0.01450
Setup: After the explosive +120% move and rejection from 0.03486, price is showing signs of distribution. The 0.02680–0.02740 zone is the key short-entry area; rejection here could trigger a deeper retracement toward the marked targets.
$ZORA
$FLOCK
ເຂົ້າສູ່ລະບົບເພື່ອສຳຫຼວດເນື້ອຫາເພີ່ມເຕີມ