
Ethan_Blake
17.6k Жариялаулар

Ethan_Blake
 «Square расталған+» белгісі
Хабарлау
Пайдаланушыны блоктау
Content Creator | Crypto Market Analysis | My Own Trading Ideas | Follow Me & Join The Journey | 100K Followers Is My Dream
Ашық сауда
Жоғары жиілікті трейдер
1.7 жыл
245 Жазылым
40.3K+ Жазылушылар
22.2K+ лайк басылған
Жазбалар
Портфолио
Барлығы
Баға ұсыныстары
Тікелей эфир
PINNED
·
--
all Guy's please follow me 🎁🎁🎁🎁🎁🎁🎁🎁🎁🎁🎁🎁🎁🎁🎁🎁🎁🎁🎁🎁🎁🎁🎁🎁🎁
all Guy's please follow me 🎁🎁🎁🎁🎁🎁🎁🎁🎁🎁🎁🎁🎁🎁🎁🎁🎁🎁🎁🎁🎁🎁🎁🎁🎁

84
1
4
145
·
--
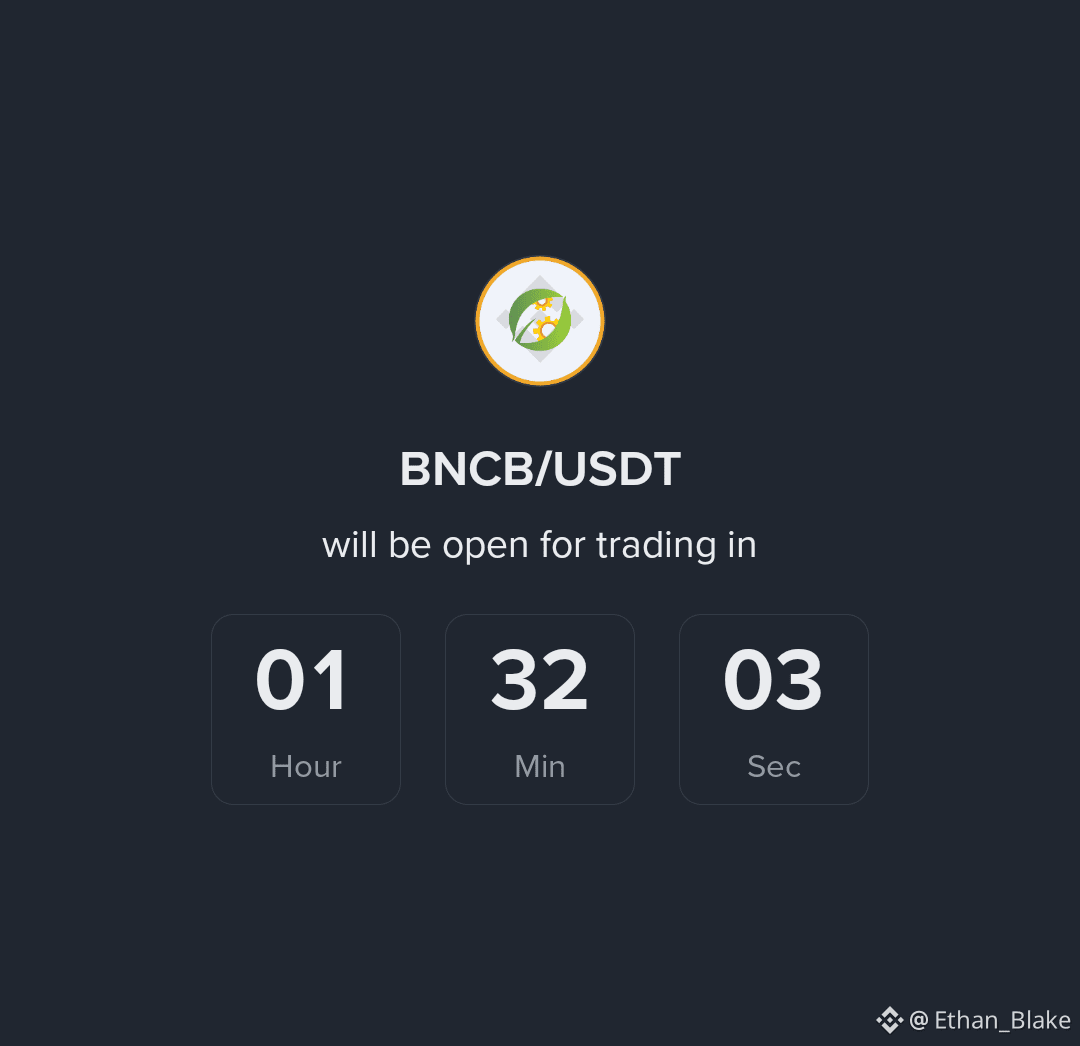
$BNCB /USDT is coming soon.
Trading opens in just 1h 32m.
Stay ready for the launch.
{spot}(BNCBUSDT)
$BNCB /USDT is coming soon.
Trading opens in just 1h 32m.
Stay ready for the launch.
Trading opens in just 1h 32m.
Stay ready for the launch.
1
·
--
Жоғары (өспелі)
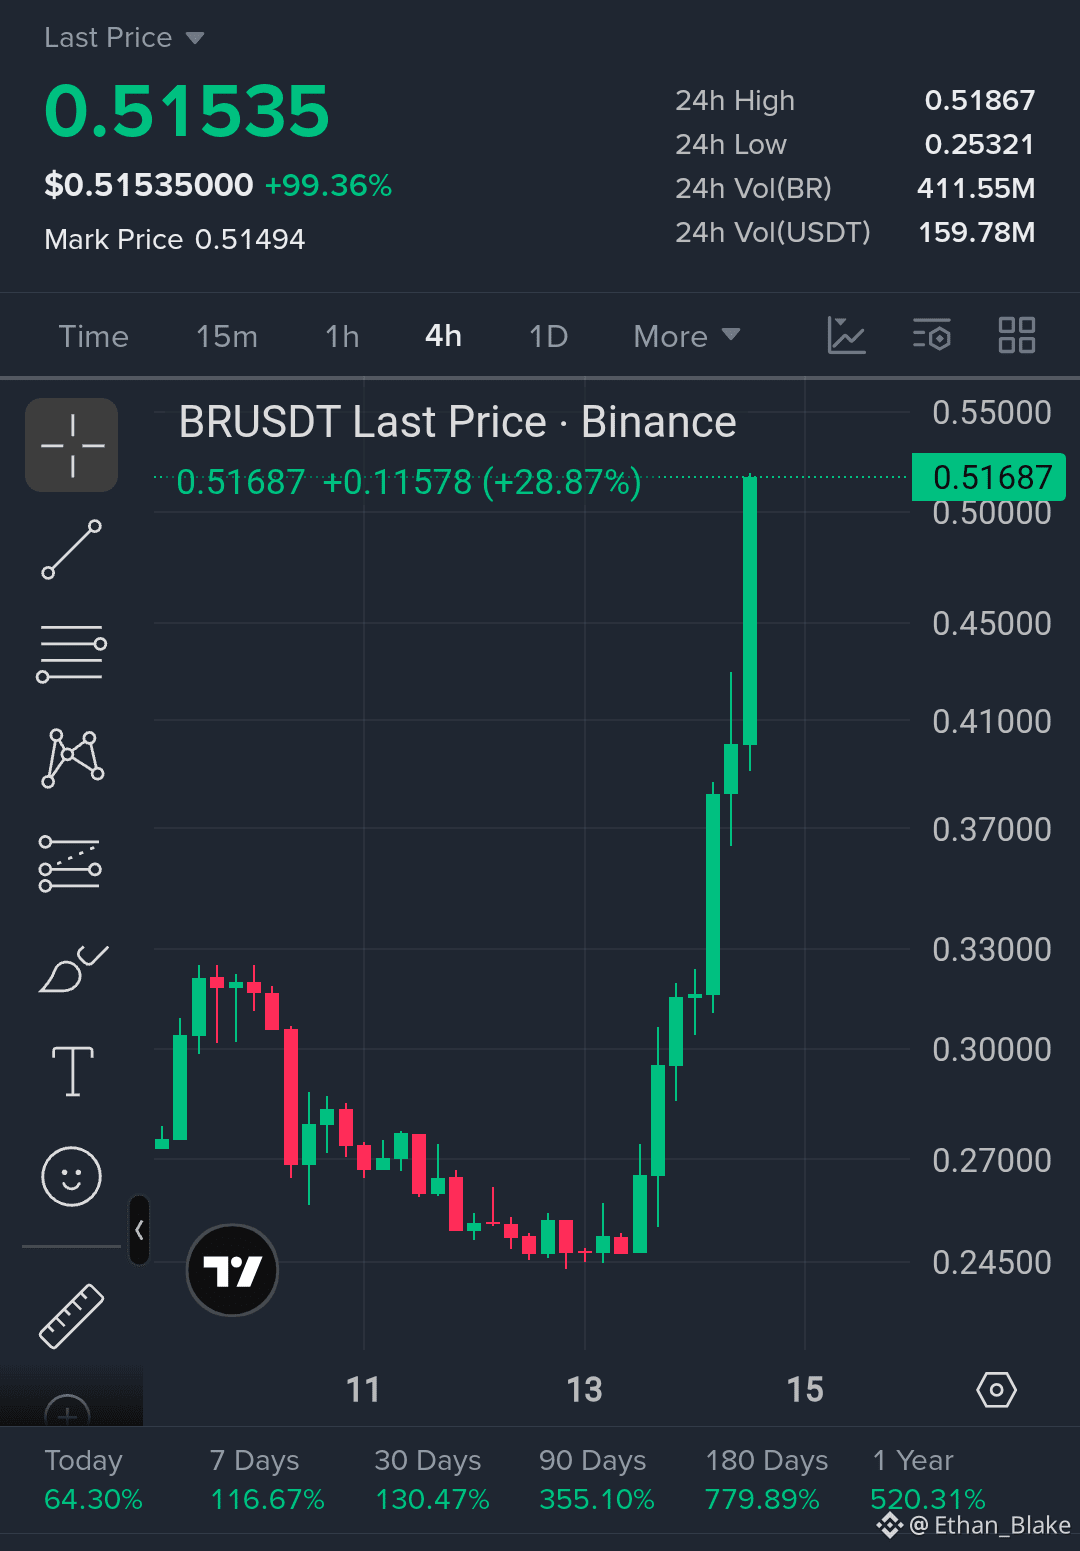
🚀 $BR LONG SETUP
I’m watching a potential LONG setup on $BR with 5x isolated leverage after this huge breakout. 👇
Entry Zone: $0.4400 – $0.4650
TP 1: $0.5180
TP 2: $0.5500
TP 3: $0.6000
TP 4: $0.6800
SL (Invalidation): $0.3950
👀 Watching price action closely near this key level.
$BR USDT
{future}(BRUSDT)
Setup Logic:
• $0.4400–$0.4650 is the key action zone after the breakout.
• $0.5180 is the immediate resistance/high area.
• Invalidation: Losing $0.3950 weakens this LONG setup.
• Note: Wait for a retest and confirmation of the entry zone before execution. Don’t chase the +99% move.
Risk Tip:
Capital preservation first. The move is already extended, so patience matters. Use isolated leverage and manage risk responsibly relative to the Stop Loss.
— Ethan_Blake
🚀 $BR LONG SETUP
I’m watching a potential LONG setup on $BR with 5x isolated leverage after this huge breakout. 👇
Entry Zone: $0.4400 – $0.4650
TP 1: $0.5180
TP 2: $0.5500
TP 3: $0.6000
TP 4: $0.6800
SL (Invalidation): $0.3950
👀 Watching price action closely near this key level.
$BR USDT
Setup Logic:
• $0.4400–$0.4650 is the key action zone after the breakout.
• $0.5180 is the immediate resistance/high area.
• Invalidation: Losing $0.3950 weakens this LONG setup.
• Note: Wait for a retest and confirmation of the entry zone before execution. Don’t chase the +99% move.
Risk Tip:
Capital preservation first. The move is already extended, so patience matters. Use isolated leverage and manage risk responsibly relative to the Stop Loss.
— Ethan_Blake
I’m watching a potential LONG setup on $BR with 5x isolated leverage after this huge breakout. 👇
Entry Zone: $0.4400 – $0.4650
TP 1: $0.5180
TP 2: $0.5500
TP 3: $0.6000
TP 4: $0.6800
SL (Invalidation): $0.3950
👀 Watching price action closely near this key level.
$BR USDT
Setup Logic:
• $0.4400–$0.4650 is the key action zone after the breakout.
• $0.5180 is the immediate resistance/high area.
• Invalidation: Losing $0.3950 weakens this LONG setup.
• Note: Wait for a retest and confirmation of the entry zone before execution. Don’t chase the +99% move.
Risk Tip:
Capital preservation first. The move is already extended, so patience matters. Use isolated leverage and manage risk responsibly relative to the Stop Loss.
— Ethan_Blake
80
·
--
Жоғары (өспелі)
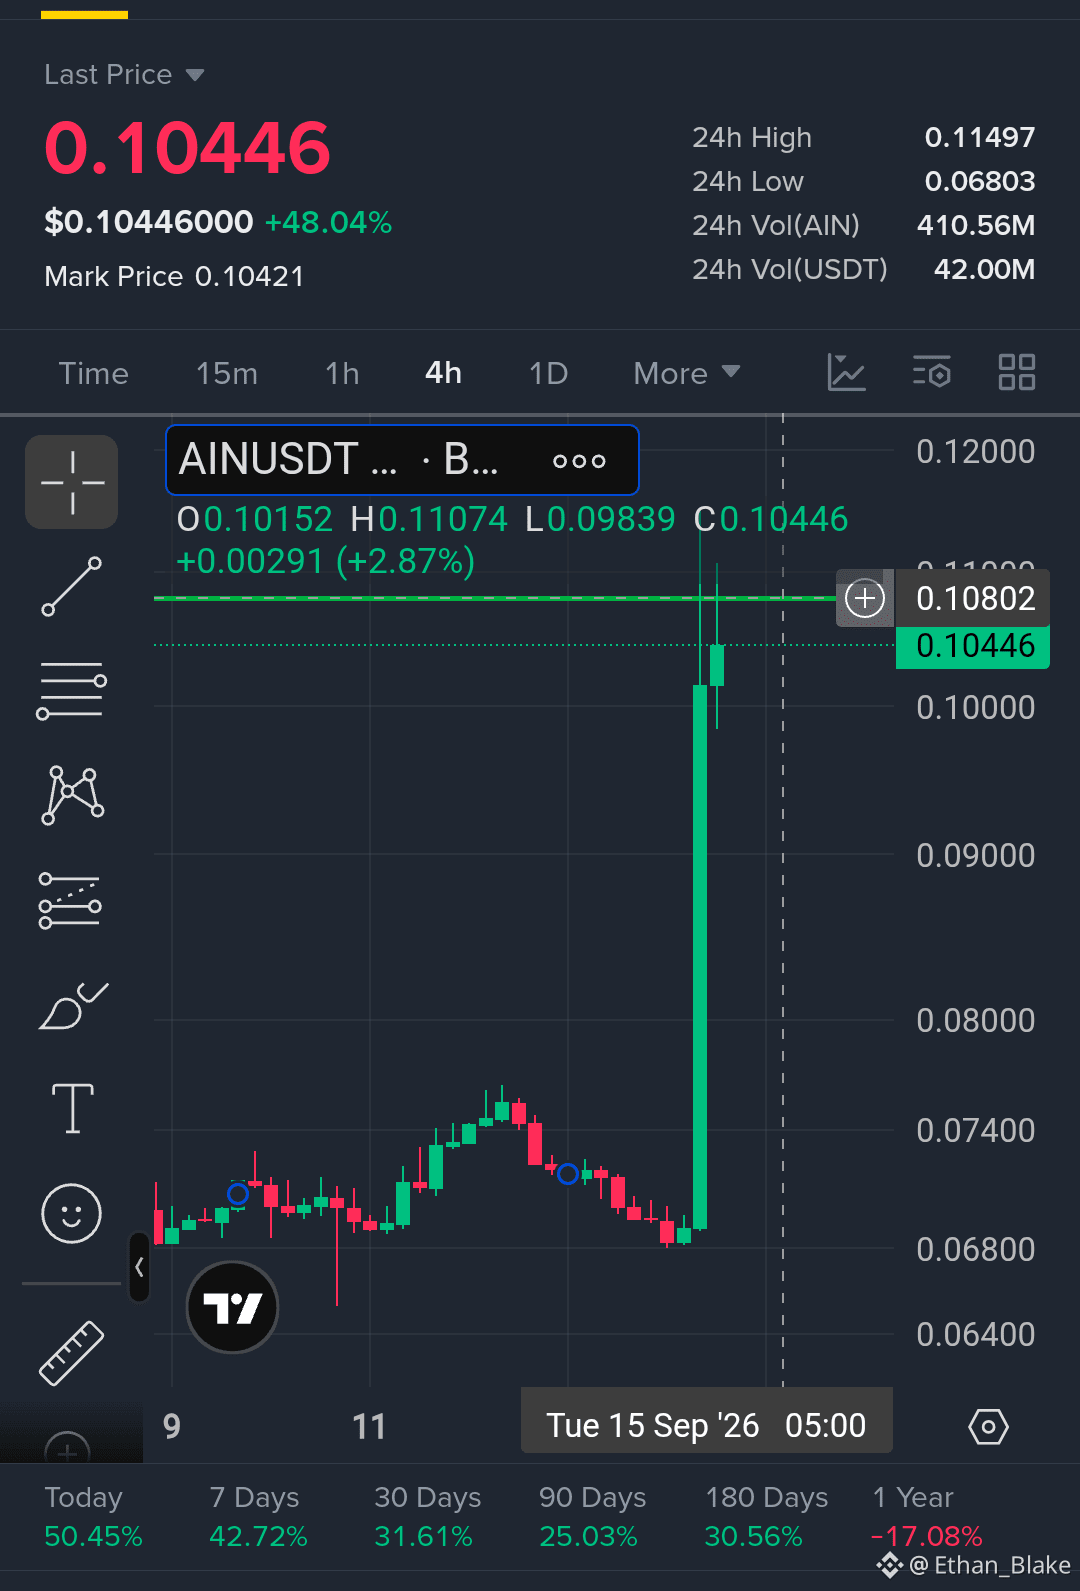
🚀 $AIN LONG SETUP
I’m watching a potential LONG setup on $AIN with 5x isolated leverage after this strong breakout. 👇
Entry Zone: $0.1000 – $0.1020
TP 1: $0.1080
TP 2: $0.1120
TP 3: $0.1150
TP 4: $0.1200
SL (Invalidation): $0.0960
👀 Watching price action closely near this key level.
$AIN USDT
{future}(AINUSDT)
Setup Logic:
• $0.1000–$0.1020 is the key action zone after the sharp breakout.
• $0.1080 is the first major resistance; a clean reclaim can open the next targets.
• Invalidation: Losing $0.0960 weakens this LONG setup.
• Note: Wait for a retest and confirmation of the entry zone before execution. Don’t chase the pump.
Risk Tip:
Capital preservation first. 5x keeps leverage more conservative relative to the SL distance. Avoid chasing candles and manage risk carefully.
— Ethan_Blake
🚀 $AIN LONG SETUP
I’m watching a potential LONG setup on $AIN with 5x isolated leverage after this strong breakout. 👇
Entry Zone: $0.1000 – $0.1020
TP 1: $0.1080
TP 2: $0.1120
TP 3: $0.1150
TP 4: $0.1200
SL (Invalidation): $0.0960
👀 Watching price action closely near this key level.
$AIN USDT
Setup Logic:
• $0.1000–$0.1020 is the key action zone after the sharp breakout.
• $0.1080 is the first major resistance; a clean reclaim can open the next targets.
• Invalidation: Losing $0.0960 weakens this LONG setup.
• Note: Wait for a retest and confirmation of the entry zone before execution. Don’t chase the pump.
Risk Tip:
Capital preservation first. 5x keeps leverage more conservative relative to the SL distance. Avoid chasing candles and manage risk carefully.
— Ethan_Blake
I’m watching a potential LONG setup on $AIN with 5x isolated leverage after this strong breakout. 👇
Entry Zone: $0.1000 – $0.1020
TP 1: $0.1080
TP 2: $0.1120
TP 3: $0.1150
TP 4: $0.1200
SL (Invalidation): $0.0960
👀 Watching price action closely near this key level.
$AIN USDT
Setup Logic:
• $0.1000–$0.1020 is the key action zone after the sharp breakout.
• $0.1080 is the first major resistance; a clean reclaim can open the next targets.
• Invalidation: Losing $0.0960 weakens this LONG setup.
• Note: Wait for a retest and confirmation of the entry zone before execution. Don’t chase the pump.
Risk Tip:
Capital preservation first. 5x keeps leverage more conservative relative to the SL distance. Avoid chasing candles and manage risk carefully.
— Ethan_Blake
84
·
--
Жоғары (өспелі)
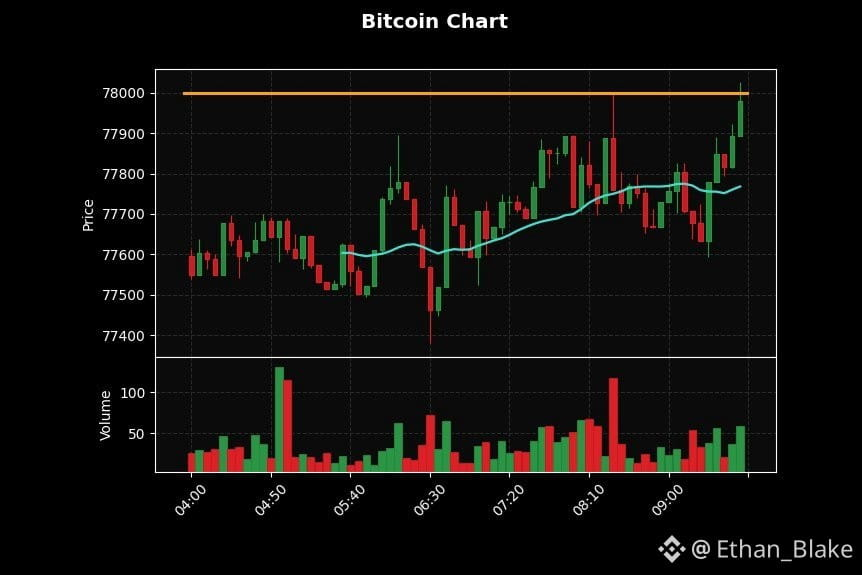
🚀 $BTC LONG SETUP
I’m watching a potential bullish setup on $BTC . Price is pushing strongly toward the key $78,000 resistance, while the moving average is still rising.
Entry Zone: $77,900–$78,000 after confirmation
TP 1: $78,100
TP 2: $78,200
TP 3: $78,300
TP 4: $78,500
SL (Invalidation): $77,750
👀 Watching price action closely near $78,000.
$BTC USDT
{future}(BTCUSDT)
Setup Logic: • $77,900–$78,000 is the key action zone near resistance.
• A clean break and retest above $78,000 would support bullish continuation.
• Losing $77,750 weakens this setup.
• Note: Wait for entry-zone confirmation before acting. Do not chase the candle.
Risk Tip:
Capital preservation first. Avoid FOMO and never risk money you cannot afford to lose.
— Ethan_Blake
🚀 $BTC LONG SETUP
I’m watching a potential bullish setup on $BTC . Price is pushing strongly toward the key $78,000 resistance, while the moving average is still rising.
Entry Zone: $77,900–$78,000 after confirmation
TP 1: $78,100
TP 2: $78,200
TP 3: $78,300
TP 4: $78,500
SL (Invalidation): $77,750
👀 Watching price action closely near $78,000.
$BTC USDT
Setup Logic: • $77,900–$78,000 is the key action zone near resistance.
• A clean break and retest above $78,000 would support bullish continuation.
• Losing $77,750 weakens this setup.
• Note: Wait for entry-zone confirmation before acting. Do not chase the candle.
Risk Tip:
Capital preservation first. Avoid FOMO and never risk money you cannot afford to lose.
— Ethan_Blake
I’m watching a potential bullish setup on $BTC . Price is pushing strongly toward the key $78,000 resistance, while the moving average is still rising.
Entry Zone: $77,900–$78,000 after confirmation
TP 1: $78,100
TP 2: $78,200
TP 3: $78,300
TP 4: $78,500
SL (Invalidation): $77,750
👀 Watching price action closely near $78,000.
$BTC USDT
Setup Logic: • $77,900–$78,000 is the key action zone near resistance.
• A clean break and retest above $78,000 would support bullish continuation.
• Losing $77,750 weakens this setup.
• Note: Wait for entry-zone confirmation before acting. Do not chase the candle.
Risk Tip:
Capital preservation first. Avoid FOMO and never risk money you cannot afford to lose.
— Ethan_Blake
97
·
--
Жоғары (өспелі)
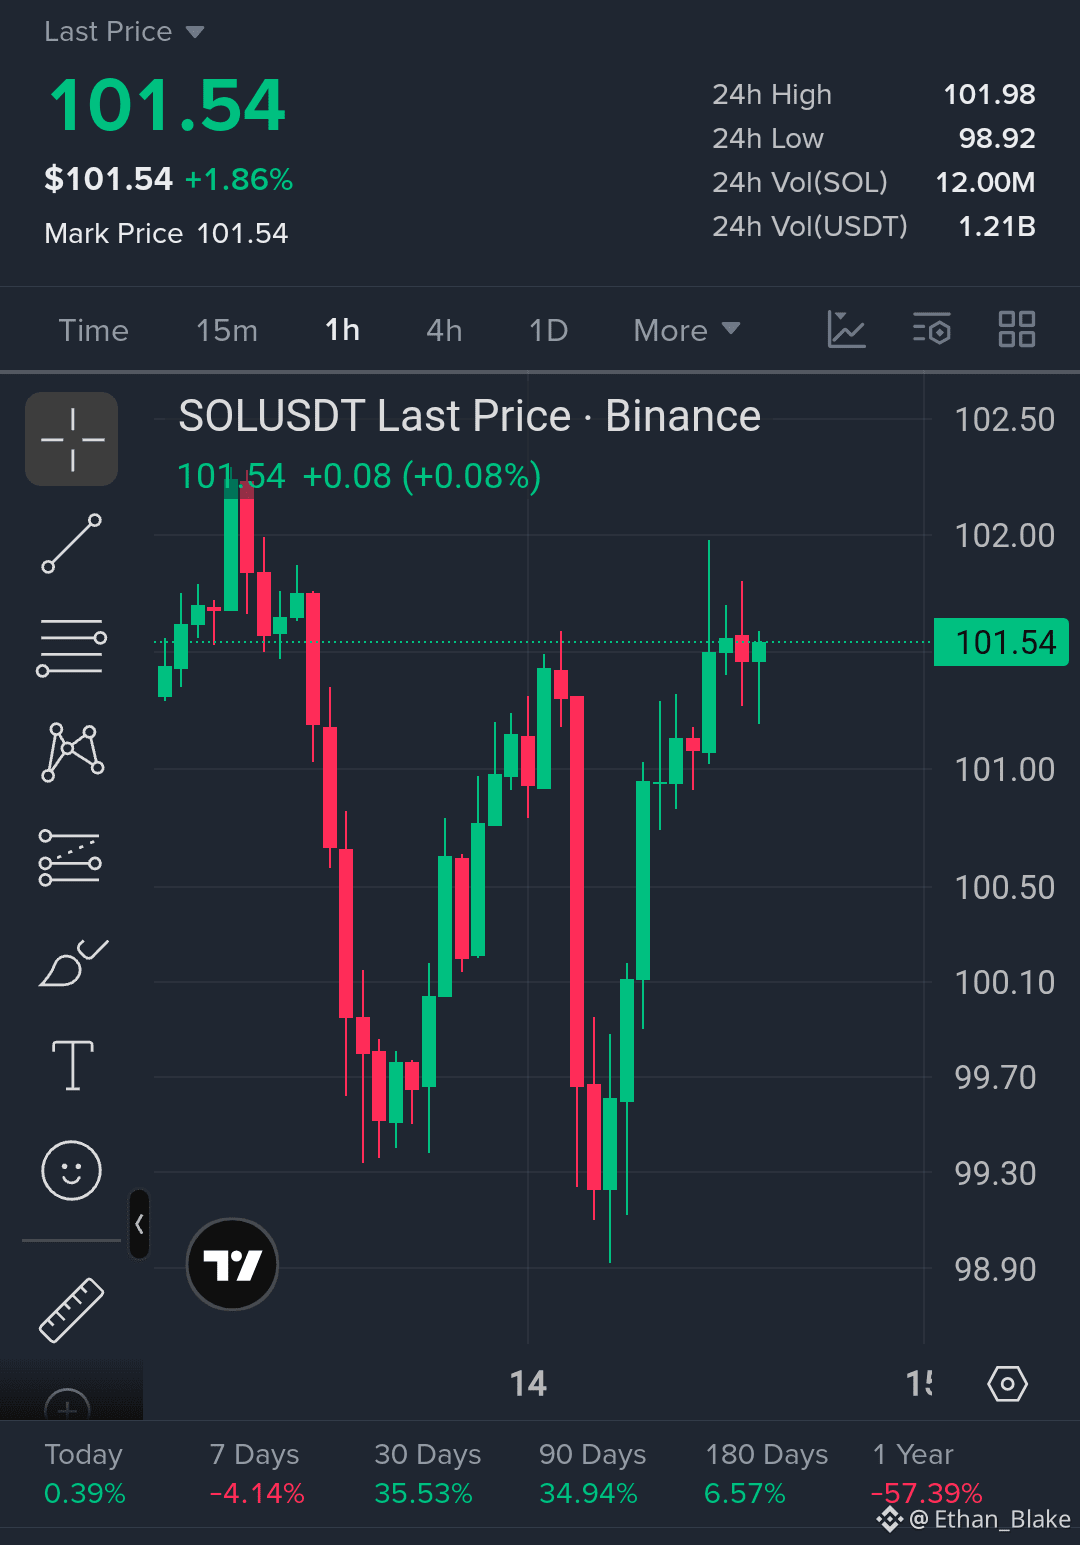
🚀 $SOL — LONG SETUP
I’m watching a potential LONG setup on $SOL with 5x isolated leverage...👇
Current Price: $101.54
24h Change: +1.86%
Entry Zone: $101.20–$101.45
TP 1: $101.90
TP 2: $102.20
TP 3: $102.50
TP 4: $102.90
SL (Invalidation): $100.85
👀 Watching price action closely near this key level.
$SOL USDT
{future}(SOLUSDT)
Setup Logic: • $101.20–$101.45 is the key action zone after the strong rebound.
• Holding above $100.85 keeps this bullish setup valid.
• Note: Wait for a retest and confirmation inside the entry zone before execution. Don’t FOMO into a candle.
Risk Tip:
Capital preservation first. Avoid chasing candles and manage leverage responsibly relative to your Stop Loss.
— Ethan_Blake
🚀 $SOL — LONG SETUP
I’m watching a potential LONG setup on $SOL with 5x isolated leverage...👇
Current Price: $101.54
24h Change: +1.86%
Entry Zone: $101.20–$101.45
TP 1: $101.90
TP 2: $102.20
TP 3: $102.50
TP 4: $102.90
SL (Invalidation): $100.85
👀 Watching price action closely near this key level.
$SOL USDT
Setup Logic: • $101.20–$101.45 is the key action zone after the strong rebound.
• Holding above $100.85 keeps this bullish setup valid.
• Note: Wait for a retest and confirmation inside the entry zone before execution. Don’t FOMO into a candle.
Risk Tip:
Capital preservation first. Avoid chasing candles and manage leverage responsibly relative to your Stop Loss.
— Ethan_Blake
I’m watching a potential LONG setup on $SOL with 5x isolated leverage...👇
Current Price: $101.54
24h Change: +1.86%
Entry Zone: $101.20–$101.45
TP 1: $101.90
TP 2: $102.20
TP 3: $102.50
TP 4: $102.90
SL (Invalidation): $100.85
👀 Watching price action closely near this key level.
$SOL USDT
Setup Logic: • $101.20–$101.45 is the key action zone after the strong rebound.
• Holding above $100.85 keeps this bullish setup valid.
• Note: Wait for a retest and confirmation inside the entry zone before execution. Don’t FOMO into a candle.
Risk Tip:
Capital preservation first. Avoid chasing candles and manage leverage responsibly relative to your Stop Loss.
— Ethan_Blake
1
248
·
--
Жоғары (өспелі)
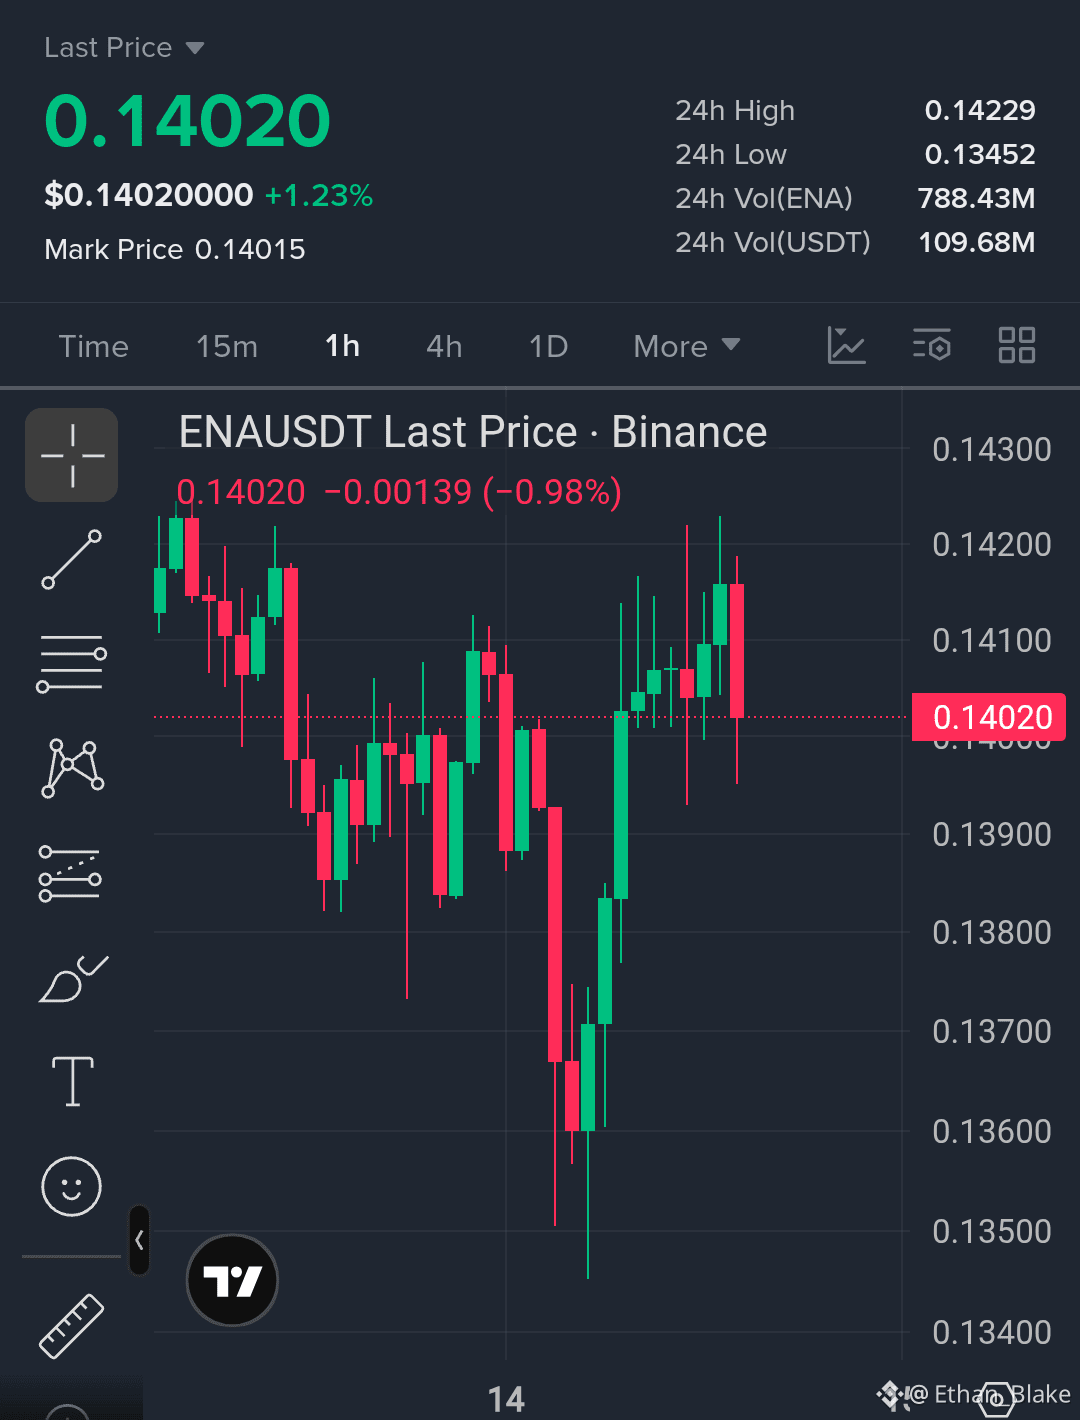
🚀 $ENA — LONG SETUP
I’m watching a potential LONG setup on $ENA with 10x isolated leverage...👇
Entry Zone: $0.1395 – $0.1402
TP 1: $0.1412
TP 2: $0.1422
TP 3: $0.1430
TP 4: $0.1440
SL (Invalidation): $0.1375
👀 Market Bias: Bullish above the $0.1395 support area. ENA is holding near $0.1402 after a strong rebound, but $0.1422 remains key resistance.
$ENA USDT
{future}(ENAUSDT)
Setup Logic: • $0.1395–$0.1402 is the key action zone based on current 1H structure.
• Invalidation: Losing $0.1375 weakens this long setup.
• 24H change: +1.23%
• Key resistance: $0.1422
• Note: Wait for a retest and entry-zone confirmation before execution. Don’t FOMO.
Risk Tip:
Capital preservation first. Avoid chasing candles and manage leverage responsibly relative to your Stop Loss.
— Ethan_Blake
🚀 $ENA — LONG SETUP
I’m watching a potential LONG setup on $ENA with 10x isolated leverage...👇
Entry Zone: $0.1395 – $0.1402
TP 1: $0.1412
TP 2: $0.1422
TP 3: $0.1430
TP 4: $0.1440
SL (Invalidation): $0.1375
👀 Market Bias: Bullish above the $0.1395 support area. ENA is holding near $0.1402 after a strong rebound, but $0.1422 remains key resistance.
$ENA USDT
Setup Logic: • $0.1395–$0.1402 is the key action zone based on current 1H structure.
• Invalidation: Losing $0.1375 weakens this long setup.
• 24H change: +1.23%
• Key resistance: $0.1422
• Note: Wait for a retest and entry-zone confirmation before execution. Don’t FOMO.
Risk Tip:
Capital preservation first. Avoid chasing candles and manage leverage responsibly relative to your Stop Loss.
— Ethan_Blake
I’m watching a potential LONG setup on $ENA with 10x isolated leverage...👇
Entry Zone: $0.1395 – $0.1402
TP 1: $0.1412
TP 2: $0.1422
TP 3: $0.1430
TP 4: $0.1440
SL (Invalidation): $0.1375
👀 Market Bias: Bullish above the $0.1395 support area. ENA is holding near $0.1402 after a strong rebound, but $0.1422 remains key resistance.
$ENA USDT
Setup Logic: • $0.1395–$0.1402 is the key action zone based on current 1H structure.
• Invalidation: Losing $0.1375 weakens this long setup.
• 24H change: +1.23%
• Key resistance: $0.1422
• Note: Wait for a retest and entry-zone confirmation before execution. Don’t FOMO.
Risk Tip:
Capital preservation first. Avoid chasing candles and manage leverage responsibly relative to your Stop Loss.
— Ethan_Blake
85
·
--
Төмен (кемімелі)
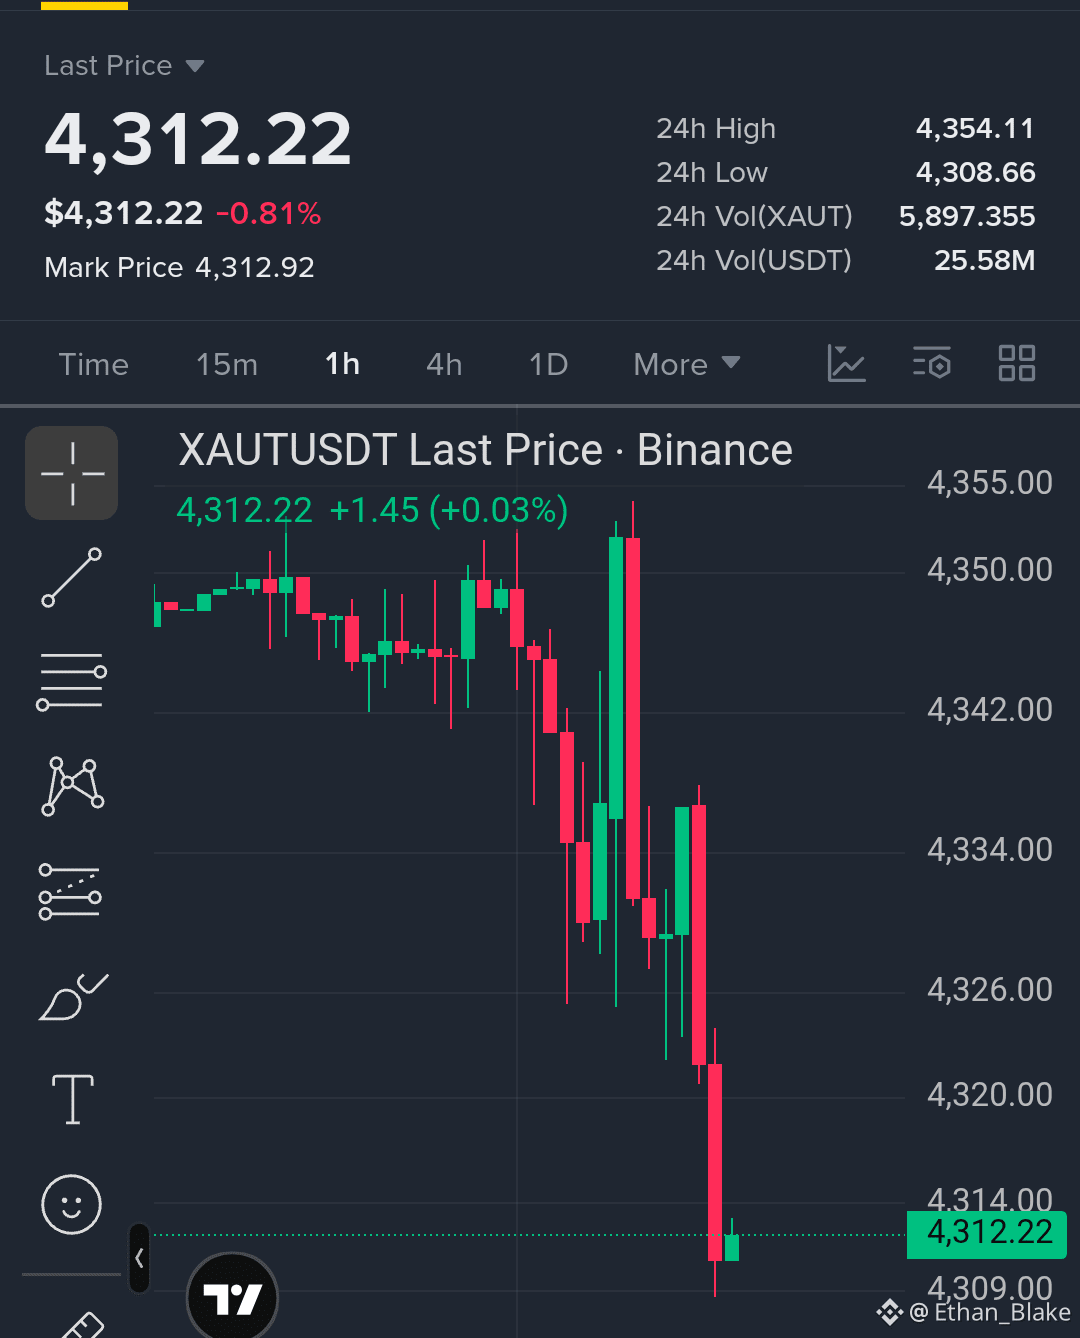
🔻 $XAUT SHORT SETUP
I’m watching a potential SHORT setup on $XAUT with 50x isolated leverage...👇
Entry Zone: $4,318 – $4,326
TP 1: $4,310
TP 2: $4,302
TP 3: $4,292
TP 4: $4,280
SL (Invalidation): $4,340
👀 Watching price action closely after the sharp rejection.
$XAUT USDT
{future}(XAUTUSDT)
Setup Logic: • $4,318–$4,326 is the key retest zone after strong downside momentum.
• Invalidation: A sustained move above $4,340 weakens this short setup.
• Note: Wait for a confirmed retest into the entry zone before execution. Don’t FOMO.
Risk Tip:
Capital preservation first. Avoid chasing candles and manage leverage responsibly relative to your Stop Loss.
— Ethan_Blake
🔻 $XAUT SHORT SETUP
I’m watching a potential SHORT setup on $XAUT with 50x isolated leverage...👇
Entry Zone: $4,318 – $4,326
TP 1: $4,310
TP 2: $4,302
TP 3: $4,292
TP 4: $4,280
SL (Invalidation): $4,340
👀 Watching price action closely after the sharp rejection.
$XAUT USDT
Setup Logic: • $4,318–$4,326 is the key retest zone after strong downside momentum.
• Invalidation: A sustained move above $4,340 weakens this short setup.
• Note: Wait for a confirmed retest into the entry zone before execution. Don’t FOMO.
Risk Tip:
Capital preservation first. Avoid chasing candles and manage leverage responsibly relative to your Stop Loss.
— Ethan_Blake
I’m watching a potential SHORT setup on $XAUT with 50x isolated leverage...👇
Entry Zone: $4,318 – $4,326
TP 1: $4,310
TP 2: $4,302
TP 3: $4,292
TP 4: $4,280
SL (Invalidation): $4,340
👀 Watching price action closely after the sharp rejection.
$XAUT USDT
Setup Logic: • $4,318–$4,326 is the key retest zone after strong downside momentum.
• Invalidation: A sustained move above $4,340 weakens this short setup.
• Note: Wait for a confirmed retest into the entry zone before execution. Don’t FOMO.
Risk Tip:
Capital preservation first. Avoid chasing candles and manage leverage responsibly relative to your Stop Loss.
— Ethan_Blake
1
334
·
--
Төмен (кемімелі)
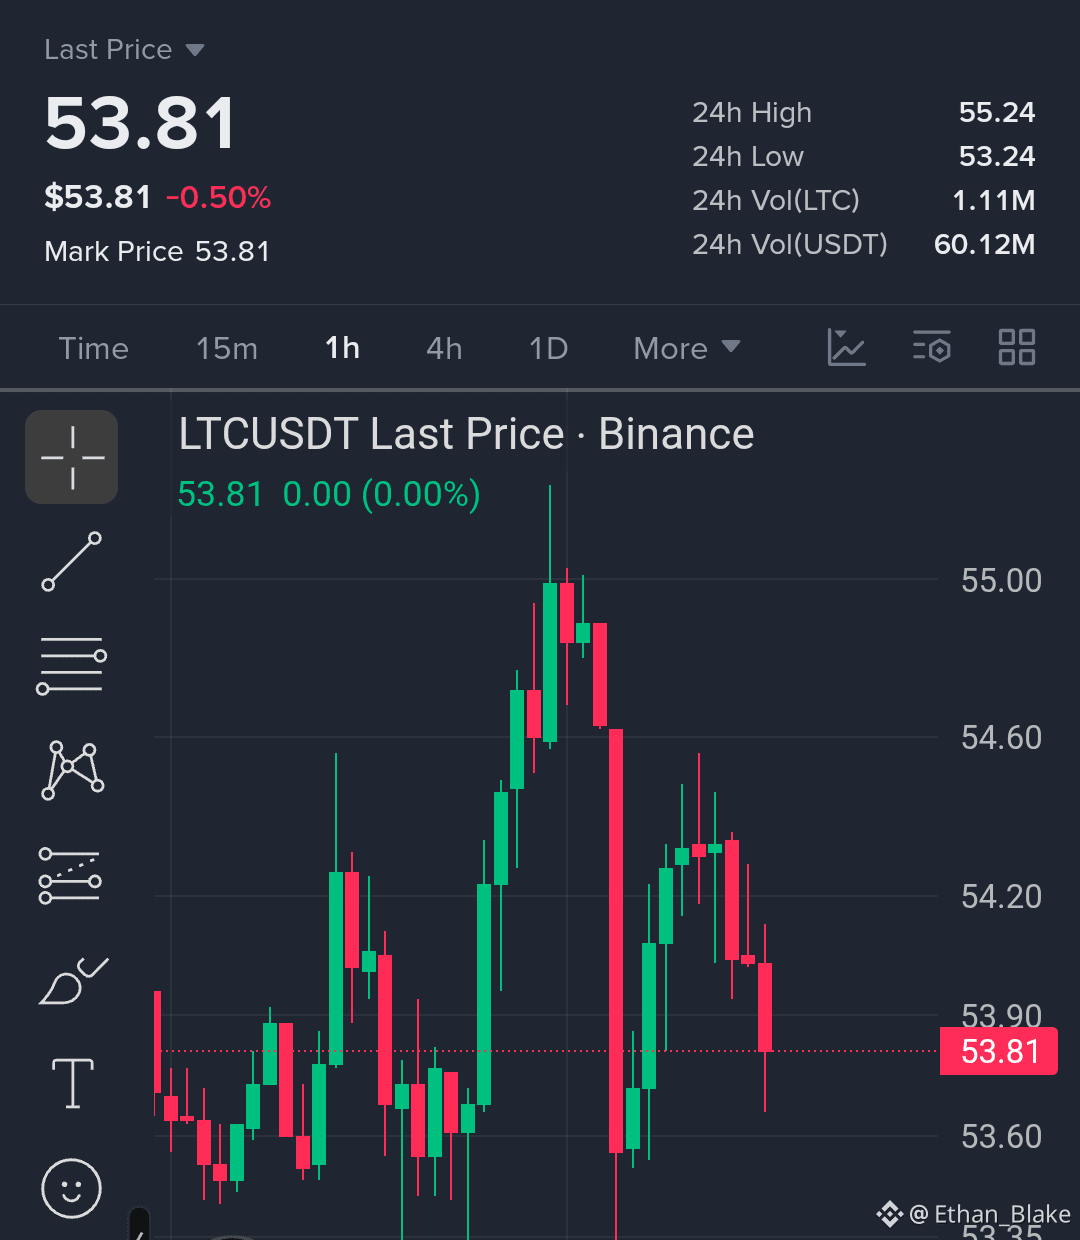
🔻 $LTC SHORT SETUP
I’m watching a potential SHORT setup on $LTC with 10x isolated leverage...👇
Entry Zone: $53.90 – $54.20
TP 1: $53.60
TP 2: $53.35
TP 3: $53.10
TP 4: $52.80
SL (Invalidation): $54.55
👀 Watching price action closely near this key level.
$LTC USDT
{future}(LTCUSDT)
Setup Logic: • $53.90–$54.20 is the key action zone after rejection from higher levels.
• Invalidation: Holding above $54.55 weakens this short setup.
• Note: Wait for a retest and confirmation inside the entry zone before execution. Don’t FOMO.
Risk Tip:
Capital preservation first. Avoid chasing candles and manage leverage responsibly relative to your Stop Loss.
— Ethan_Blake
🔻 $LTC SHORT SETUP
I’m watching a potential SHORT setup on $LTC with 10x isolated leverage...👇
Entry Zone: $53.90 – $54.20
TP 1: $53.60
TP 2: $53.35
TP 3: $53.10
TP 4: $52.80
SL (Invalidation): $54.55
👀 Watching price action closely near this key level.
$LTC USDT
Setup Logic: • $53.90–$54.20 is the key action zone after rejection from higher levels.
• Invalidation: Holding above $54.55 weakens this short setup.
• Note: Wait for a retest and confirmation inside the entry zone before execution. Don’t FOMO.
Risk Tip:
Capital preservation first. Avoid chasing candles and manage leverage responsibly relative to your Stop Loss.
— Ethan_Blake
I’m watching a potential SHORT setup on $LTC with 10x isolated leverage...👇
Entry Zone: $53.90 – $54.20
TP 1: $53.60
TP 2: $53.35
TP 3: $53.10
TP 4: $52.80
SL (Invalidation): $54.55
👀 Watching price action closely near this key level.
$LTC USDT
Setup Logic: • $53.90–$54.20 is the key action zone after rejection from higher levels.
• Invalidation: Holding above $54.55 weakens this short setup.
• Note: Wait for a retest and confirmation inside the entry zone before execution. Don’t FOMO.
Risk Tip:
Capital preservation first. Avoid chasing candles and manage leverage responsibly relative to your Stop Loss.
— Ethan_Blake
82
·
--
Жоғары (өспелі)
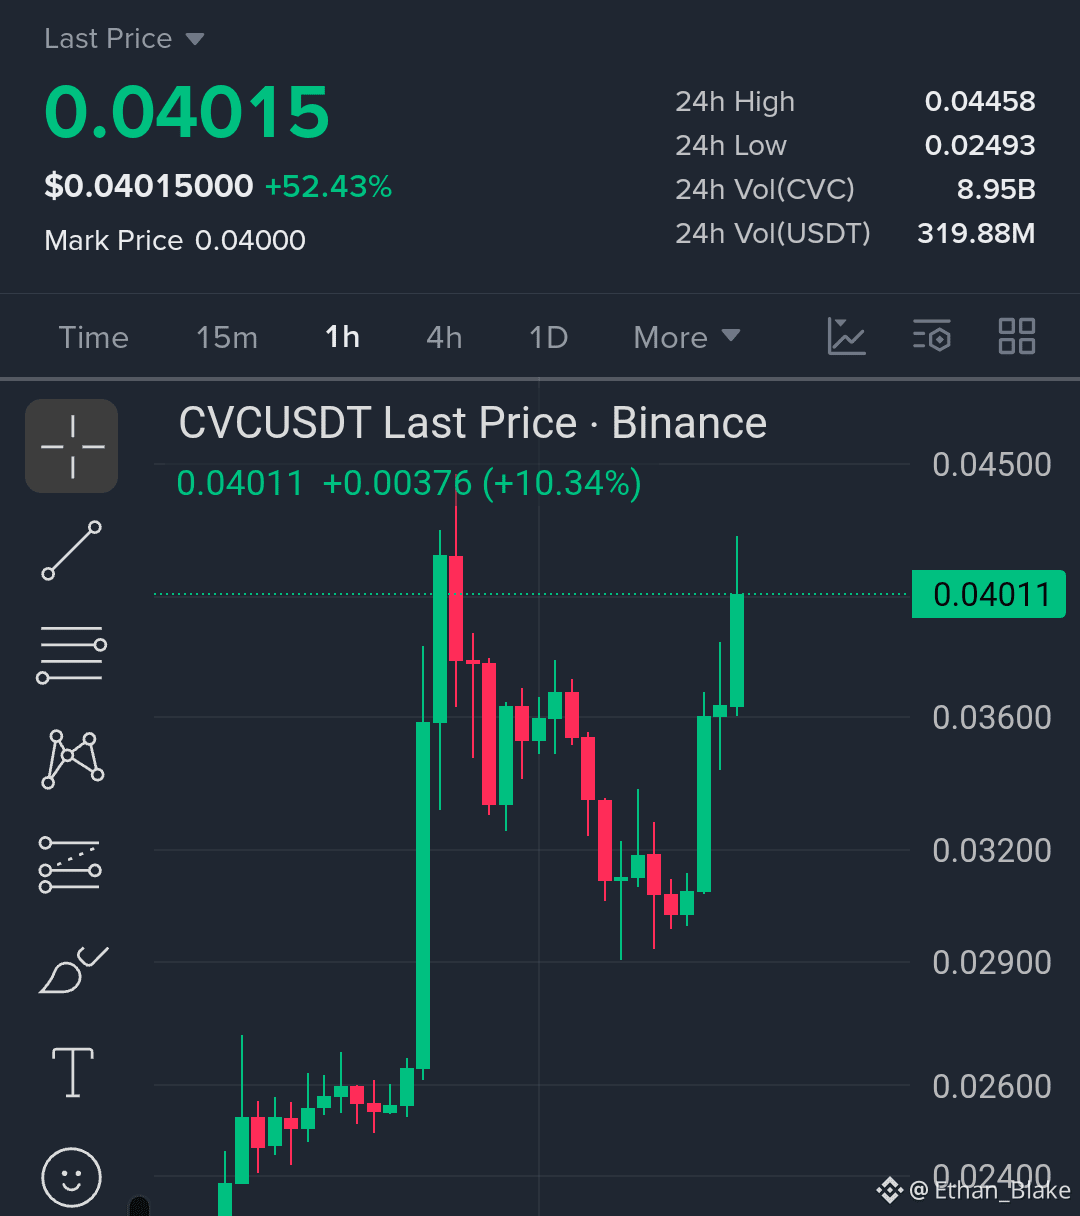
🚀 $CVC LONG SETUP
I’m watching a potential LONG setup on $CVC with 3x – 5x isolated leverage...👇
Entry Zone: $0.03500 – $0.03800 TP 1: $0.04250 TP 2: $0.04450 TP 3: $0.04800 TP 4: $0.05200
SL (Invalidation): $0.03150
👀 Watching price action closely near this key level.
$CVC USDT
{future}(CVCUSDT)
Setup Logic: • $0.03500–$0.03800 is the key support and retest zone following the recent bullish breakout. • Invalidation: A daily/4H close below $0.03150 invalidates this bullish momentum. • Note: Price has pumped significantly; wait for a healthy retest into the entry zone before executing to avoid buying the top.
Risk Tip: Capital preservation first. Avoid chasing green candles, keep leverage low on high-volatility moves, and stick to strict risk management.
— Ethan_Blake
🚀 $CVC LONG SETUP
I’m watching a potential LONG setup on $CVC with 3x – 5x isolated leverage...👇
Entry Zone: $0.03500 – $0.03800 TP 1: $0.04250 TP 2: $0.04450 TP 3: $0.04800 TP 4: $0.05200
SL (Invalidation): $0.03150
👀 Watching price action closely near this key level.
$CVC USDT
Setup Logic: • $0.03500–$0.03800 is the key support and retest zone following the recent bullish breakout. • Invalidation: A daily/4H close below $0.03150 invalidates this bullish momentum. • Note: Price has pumped significantly; wait for a healthy retest into the entry zone before executing to avoid buying the top.
Risk Tip: Capital preservation first. Avoid chasing green candles, keep leverage low on high-volatility moves, and stick to strict risk management.
— Ethan_Blake
I’m watching a potential LONG setup on $CVC with 3x – 5x isolated leverage...👇
Entry Zone: $0.03500 – $0.03800 TP 1: $0.04250 TP 2: $0.04450 TP 3: $0.04800 TP 4: $0.05200
SL (Invalidation): $0.03150
👀 Watching price action closely near this key level.
$CVC USDT
Setup Logic: • $0.03500–$0.03800 is the key support and retest zone following the recent bullish breakout. • Invalidation: A daily/4H close below $0.03150 invalidates this bullish momentum. • Note: Price has pumped significantly; wait for a healthy retest into the entry zone before executing to avoid buying the top.
Risk Tip: Capital preservation first. Avoid chasing green candles, keep leverage low on high-volatility moves, and stick to strict risk management.
— Ethan_Blake
1
137
·
--
😂 Too real!
Your savings: 💰
Inflation: 🪣💦
Working hard just to watch your money lose value. 😭
Follow for more
Share with your trading fam.
😂 Too real!
Your savings: 💰
Inflation: 🪣💦
Working hard just to watch your money lose value. 😭
Follow for more
Share with your trading fam.
Your savings: 💰
Inflation: 🪣💦
Working hard just to watch your money lose value. 😭
Follow for more
Share with your trading fam.

64
·
--
Жоғары (өспелі)
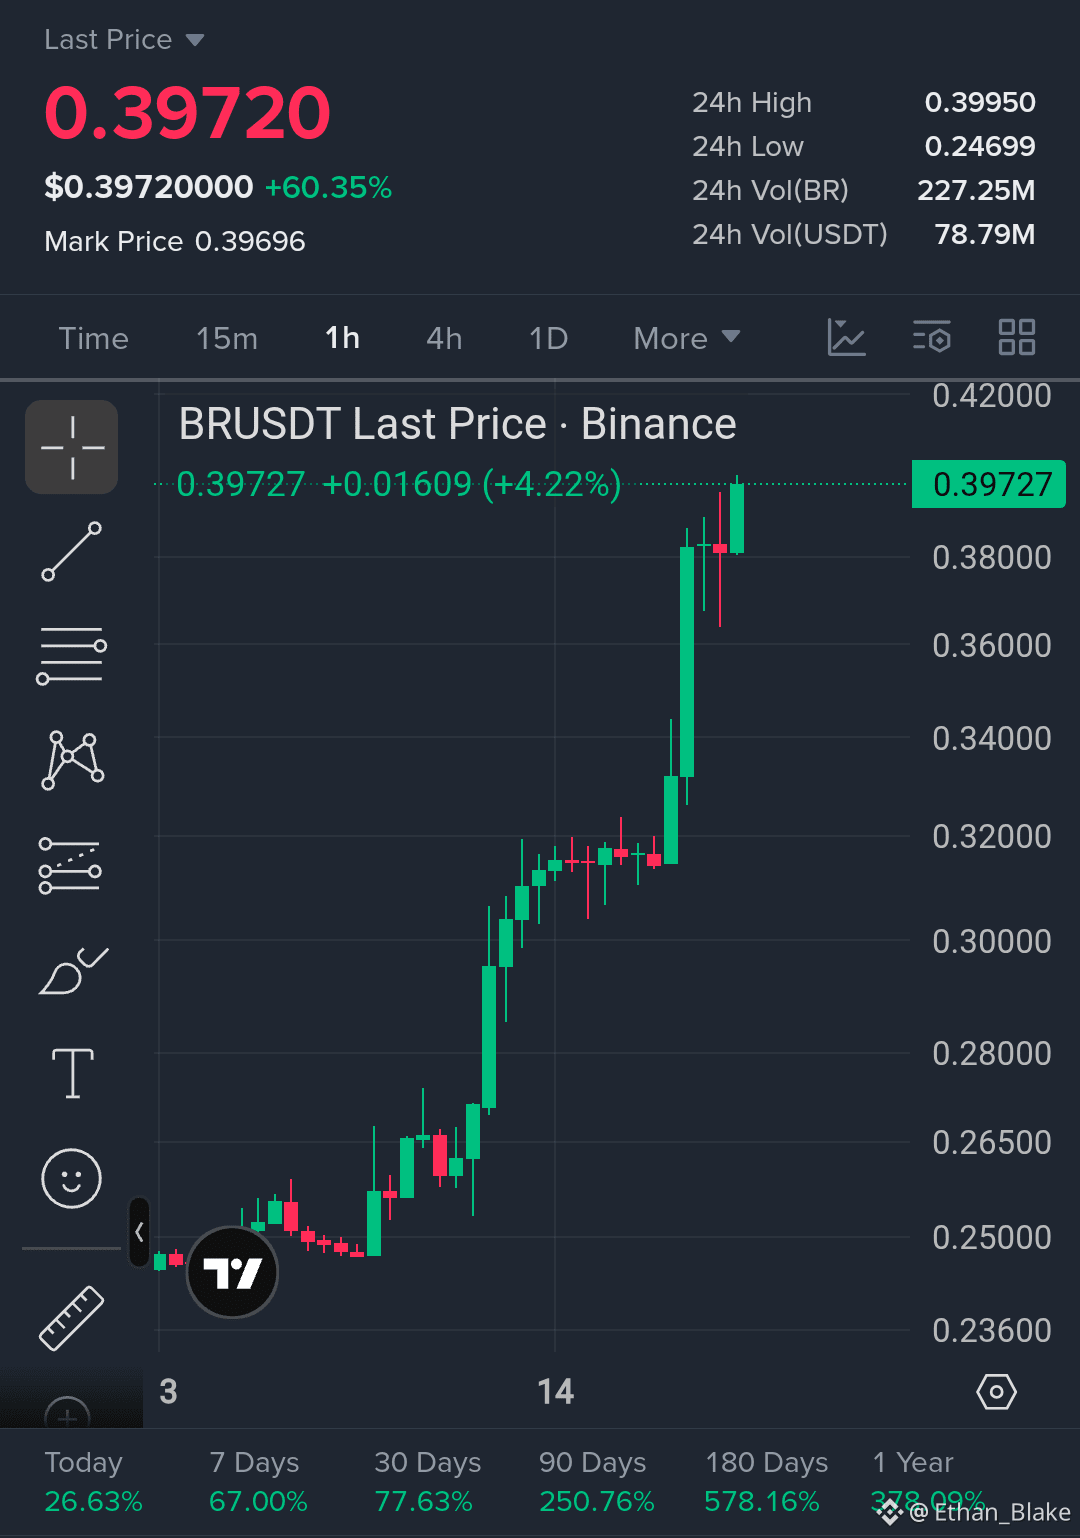
🚀 $BR LONG SETUP
I’m watching a potential LONG setup on $BR with 30x isolated leverage. Momentum is strongly bullish after the breakout, but I don’t want to chase this pump. 👇
Entry Zone: $0.378 – $0.385
TP 1: $0.405
TP 2: $0.420
TP 3: $0.440
TP 4: $0.460
SL (Invalidation): $0.365
👀 Current price: $0.3972 — already above the entry zone, so wait for a retest before entering.
{future}(BRUSDT)
Setup Logic:
• $0.378–$0.385 is the key retest zone after the breakout.
• Holding above $0.365 keeps the bullish bias valid.
• Strong volume and momentum support the upside, but volatility is very high.
• Note: Wait for price to enter the setup zone. Don’t chase candles.
Risk Tip:
Protect your capital. Don’t chase candles or over-leverage. Strict risk management always.
$BR UUSDT
Follow @SmartBoy_007 for real-time updates.
🚀 $BR LONG SETUP
I’m watching a potential LONG setup on $BR with 30x isolated leverage. Momentum is strongly bullish after the breakout, but I don’t want to chase this pump. 👇
Entry Zone: $0.378 – $0.385
TP 1: $0.405
TP 2: $0.420
TP 3: $0.440
TP 4: $0.460
SL (Invalidation): $0.365
👀 Current price: $0.3972 — already above the entry zone, so wait for a retest before entering.
Setup Logic:
• $0.378–$0.385 is the key retest zone after the breakout.
• Holding above $0.365 keeps the bullish bias valid.
• Strong volume and momentum support the upside, but volatility is very high.
• Note: Wait for price to enter the setup zone. Don’t chase candles.
Risk Tip:
Protect your capital. Don’t chase candles or over-leverage. Strict risk management always.
$BR UUSDT
Follow @SmartBoy_007 for real-time updates.
I’m watching a potential LONG setup on $BR with 30x isolated leverage. Momentum is strongly bullish after the breakout, but I don’t want to chase this pump. 👇
Entry Zone: $0.378 – $0.385
TP 1: $0.405
TP 2: $0.420
TP 3: $0.440
TP 4: $0.460
SL (Invalidation): $0.365
👀 Current price: $0.3972 — already above the entry zone, so wait for a retest before entering.
Setup Logic:
• $0.378–$0.385 is the key retest zone after the breakout.
• Holding above $0.365 keeps the bullish bias valid.
• Strong volume and momentum support the upside, but volatility is very high.
• Note: Wait for price to enter the setup zone. Don’t chase candles.
Risk Tip:
Protect your capital. Don’t chase candles or over-leverage. Strict risk management always.
$BR UUSDT
Follow @SmartBoy_007 for real-time updates.
1
145
·
--
Төмен (кемімелі)
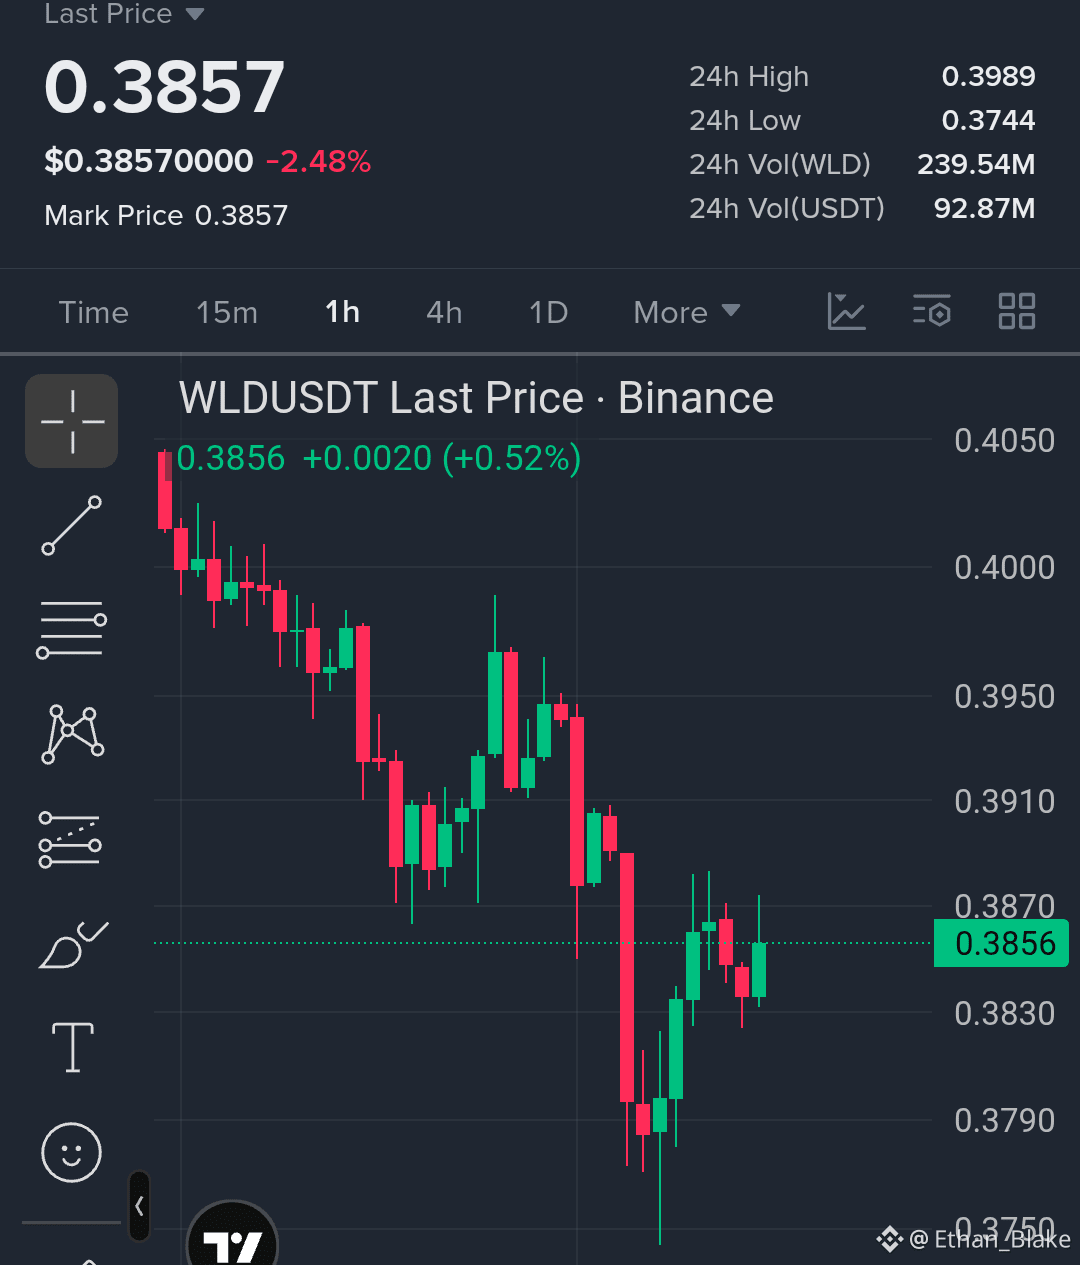
🔻 $WLD SHORT SETUP
I’m watching a potential SHORT setup on $WLD with 3x isolated leverage. Price is bouncing into a key resistance area while the 1H structure still looks bearish. 👇
Entry Zone: $0.3870 – $0.3890
TP 1: $0.3830
TP 2: $0.3790
TP 3: $0.3750
TP 4: $0.3710
SL (Invalidation): $0.3920
👀 I’m watching for rejection around $0.3870–$0.3890.
{future}(WLDUSDT)
$WLD USDT
Setup Logic:
• $0.3870–$0.3890 is the key resistance zone.
• Holding below $0.3920 keeps this short bias valid.
• A clear rejection can push price back toward $0.3790 and lower.
• If price breaks and holds above $0.3920, the setup is invalid.
Risk Tip:
Protect your capital. Don’t chase candles or over-leverage. Strict risk management always.
— SmartBoy_007
🔻 $WLD SHORT SETUP
I’m watching a potential SHORT setup on $WLD with 3x isolated leverage. Price is bouncing into a key resistance area while the 1H structure still looks bearish. 👇
Entry Zone: $0.3870 – $0.3890
TP 1: $0.3830
TP 2: $0.3790
TP 3: $0.3750
TP 4: $0.3710
SL (Invalidation): $0.3920
👀 I’m watching for rejection around $0.3870–$0.3890.
$WLD USDT
Setup Logic:
• $0.3870–$0.3890 is the key resistance zone.
• Holding below $0.3920 keeps this short bias valid.
• A clear rejection can push price back toward $0.3790 and lower.
• If price breaks and holds above $0.3920, the setup is invalid.
Risk Tip:
Protect your capital. Don’t chase candles or over-leverage. Strict risk management always.
— SmartBoy_007
I’m watching a potential SHORT setup on $WLD with 3x isolated leverage. Price is bouncing into a key resistance area while the 1H structure still looks bearish. 👇
Entry Zone: $0.3870 – $0.3890
TP 1: $0.3830
TP 2: $0.3790
TP 3: $0.3750
TP 4: $0.3710
SL (Invalidation): $0.3920
👀 I’m watching for rejection around $0.3870–$0.3890.
$WLD USDT
Setup Logic:
• $0.3870–$0.3890 is the key resistance zone.
• Holding below $0.3920 keeps this short bias valid.
• A clear rejection can push price back toward $0.3790 and lower.
• If price breaks and holds above $0.3920, the setup is invalid.
Risk Tip:
Protect your capital. Don’t chase candles or over-leverage. Strict risk management always.
— SmartBoy_007
1
302
·
--
Жоғары (өспелі)
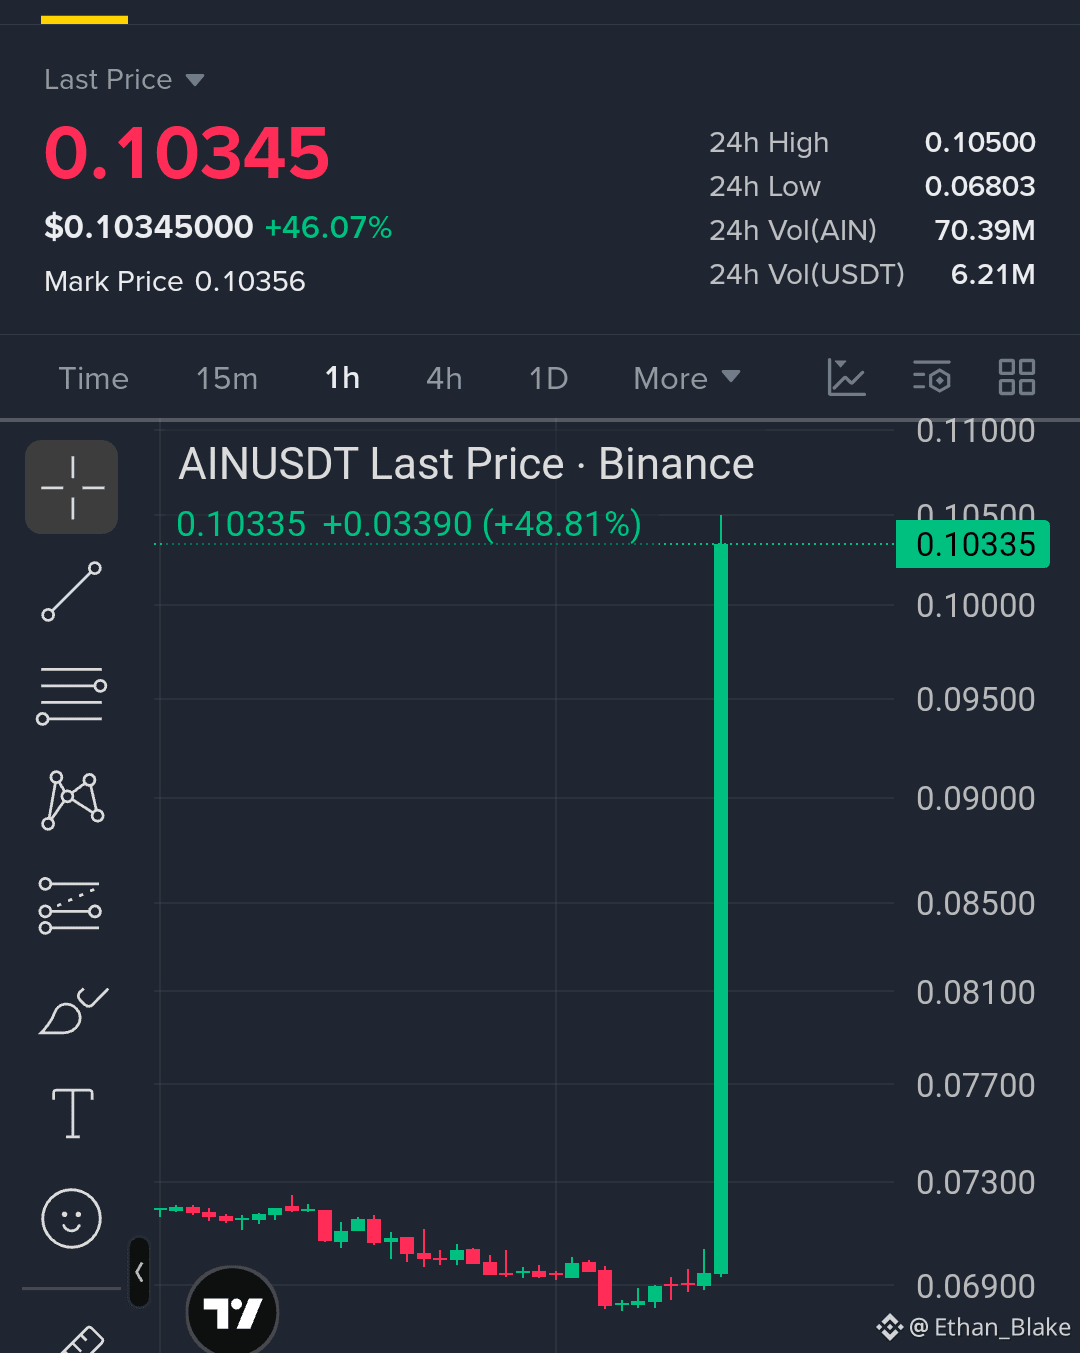
🚀 $AIN LONG SETUP
Guys, I’m taking a LONG look at $AIN with 10x x leverage isolated in Futures...👇
Entry Zone: $0.099 – $0.102
TP 1: $0.105
TP 2: $0.108
TP 3: $0.110
TP 4: $0.115
SL: $0.095
👀 I’m watching this setup closely. Let’s see how it plays out.
{future}(AINUSDT)
Setup Logic:
$0.099–$0.102 is the key entry zone for this setup.
Holding above $0.095 keeps the setup valid.
A clean move above $0.105 can open the way toward the next targets.
If momentum continues, $0.108 and $0.110 become the next levels to watch.
Risk Tip:
Protect your capital.
Don’t chase the move or revenge trade.
Use proper risk management.
Follow @SmartBoy_007 for more setups.
Stay sharp. Trade smart.
🚀 $AIN LONG SETUP
Guys, I’m taking a LONG look at $AIN with 10x x leverage isolated in Futures...👇
Entry Zone: $0.099 – $0.102
TP 1: $0.105
TP 2: $0.108
TP 3: $0.110
TP 4: $0.115
SL: $0.095
👀 I’m watching this setup closely. Let’s see how it plays out.
Setup Logic:
$0.099–$0.102 is the key entry zone for this setup.
Holding above $0.095 keeps the setup valid.
A clean move above $0.105 can open the way toward the next targets.
If momentum continues, $0.108 and $0.110 become the next levels to watch.
Risk Tip:
Protect your capital.
Don’t chase the move or revenge trade.
Use proper risk management.
Follow @SmartBoy_007 for more setups.
Stay sharp. Trade smart.
Guys, I’m taking a LONG look at $AIN with 10x x leverage isolated in Futures...👇
Entry Zone: $0.099 – $0.102
TP 1: $0.105
TP 2: $0.108
TP 3: $0.110
TP 4: $0.115
SL: $0.095
👀 I’m watching this setup closely. Let’s see how it plays out.
Setup Logic:
$0.099–$0.102 is the key entry zone for this setup.
Holding above $0.095 keeps the setup valid.
A clean move above $0.105 can open the way toward the next targets.
If momentum continues, $0.108 and $0.110 become the next levels to watch.
Risk Tip:
Protect your capital.
Don’t chase the move or revenge trade.
Use proper risk management.
Follow @SmartBoy_007 for more setups.
Stay sharp. Trade smart.
74
·
--
Жоғары (өспелі)
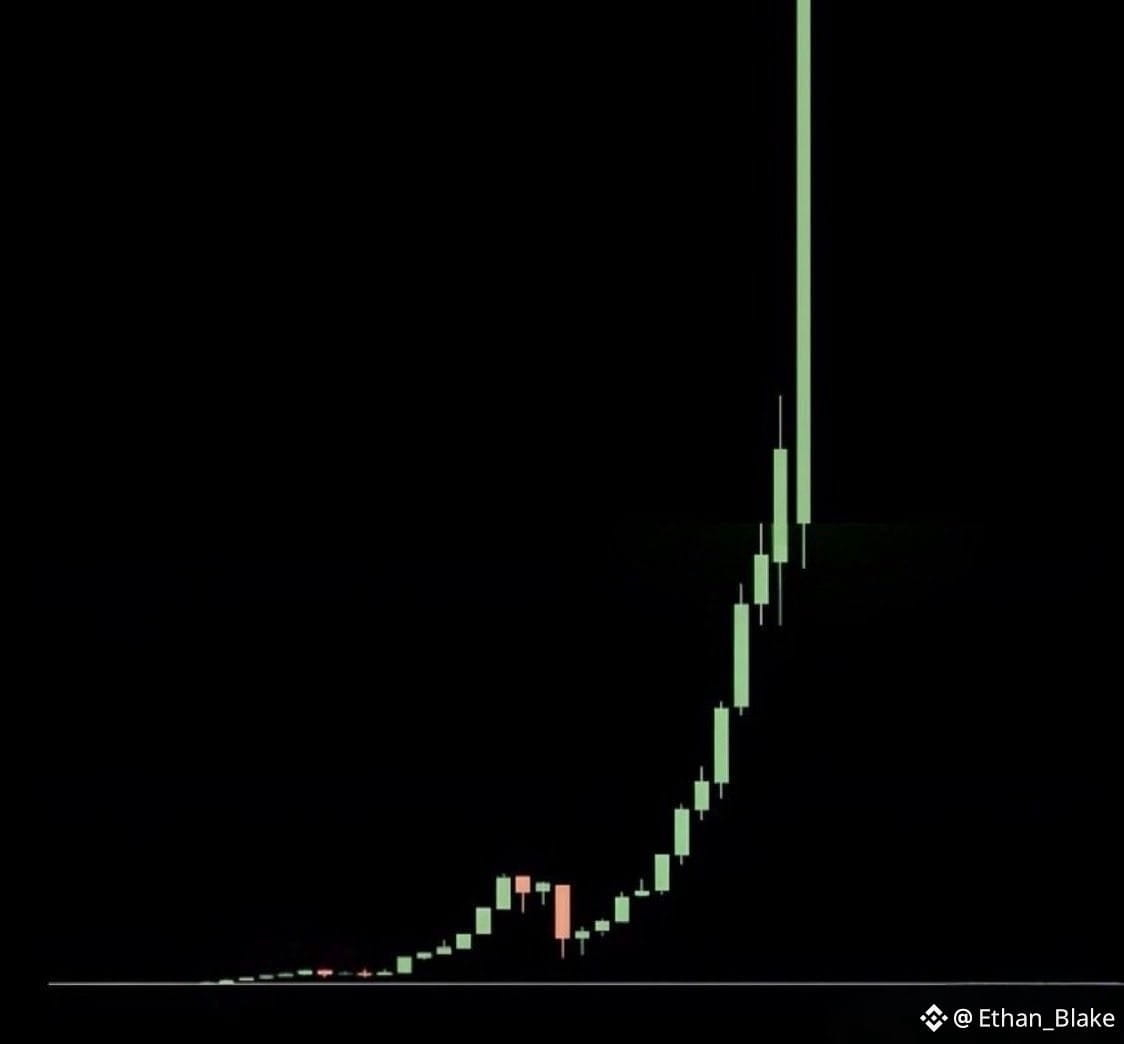
🔥 September could have a new breakout star!
HYPE, ZEC & TAO are all on my radar. Recent market momentum has already put HYPE and ZEC in the spotlight.
But the big question is:
Which one surprises the market next?
$HYPE 🟢
{future}(HYPEUSDT)
$ZEC 🔥
{future}(ZECUSDT)
$TAO 🤖
{future}(TAOUSDT)
Which one are you watching? 👀
Follow for more
Share with your trading fam.
🔥 September could have a new breakout star!
HYPE, ZEC & TAO are all on my radar. Recent market momentum has already put HYPE and ZEC in the spotlight.
But the big question is:
Which one surprises the market next?
$HYPE 🟢
$ZEC 🔥
$TAO 🤖
Which one are you watching? 👀
Follow for more
Share with your trading fam.
HYPE, ZEC & TAO are all on my radar. Recent market momentum has already put HYPE and ZEC in the spotlight.
But the big question is:
Which one surprises the market next?
$HYPE 🟢
$ZEC 🔥
$TAO 🤖
Which one are you watching? 👀
Follow for more
Share with your trading fam.
169
·
--
Төмен (кемімелі)
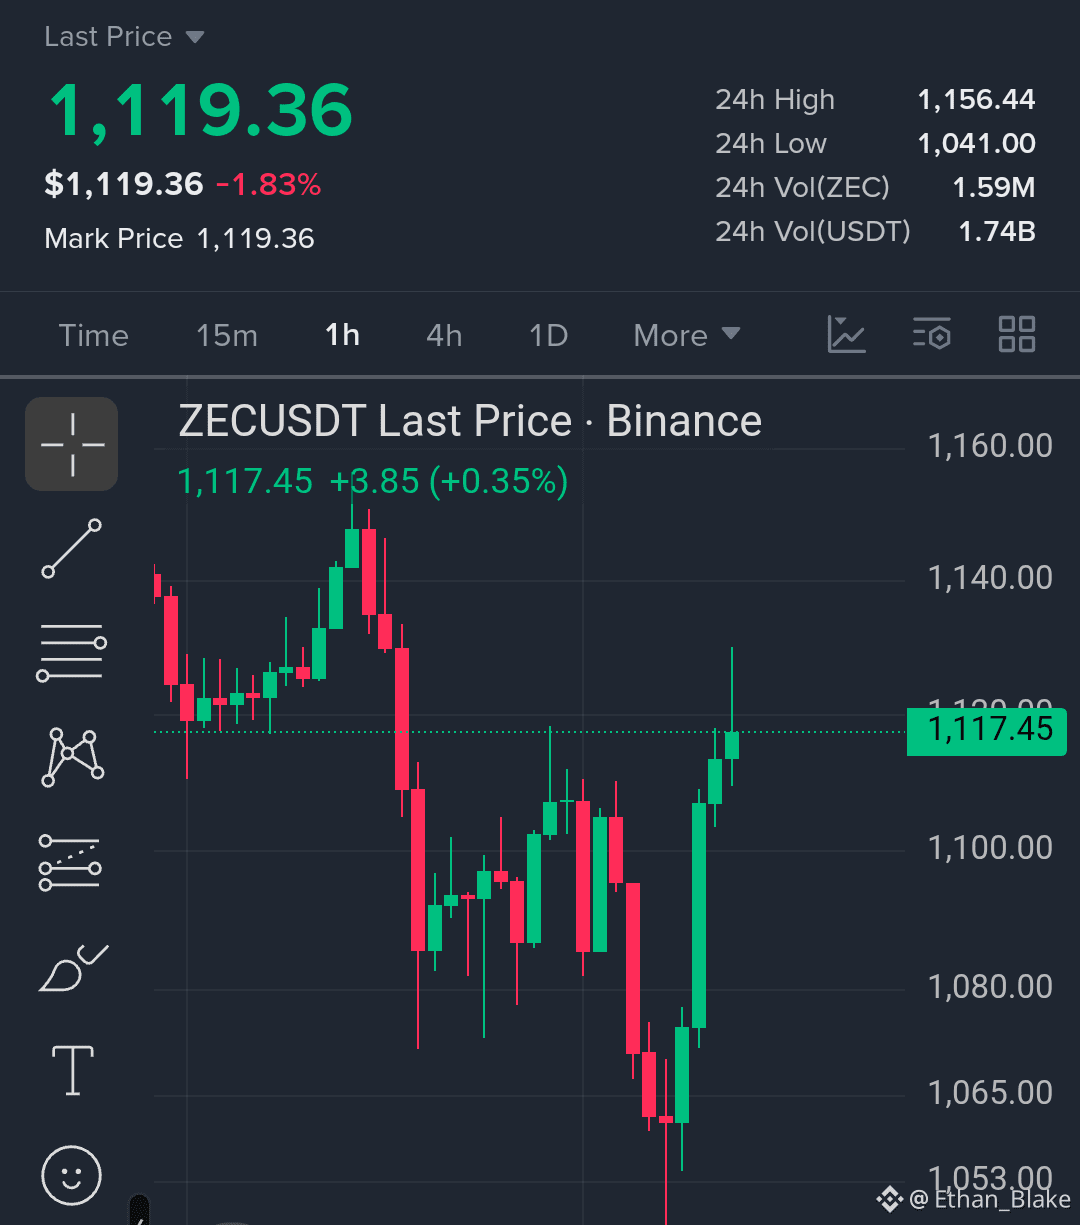
🚀 $ZEC — LONG SETUP
Guys, I’m taking a LONG look at $ZEC with 5x leverage isolated in Futures...👇
Entry Zone: $1,105 – $1,118
TP 1: $1,130
TP 2: $1,145
TP 3: $1,160
TP 4: $1,180
SL: $1,085
👀 I’m watching this setup closely. Let’s see how it plays out.
{future}(ZECUSDT)
Setup Logic:
$1,105–$1,118 is the key entry zone for this setup.
Holding above $1,100 keeps the setup valid.
A clean move above $1,130 can open the way toward the next targets.
If momentum continues, $1,160 and $1,180 become the next levels to watch.
Risk Tip:
Protect your capital.
Don’t chase the move or revenge trade.
Use proper risk management.
Follow @SmartBoy_007 for more setups.
Stay sharp. Trade smart.
🚀 $ZEC — LONG SETUP
Guys, I’m taking a LONG look at $ZEC with 5x leverage isolated in Futures...👇
Entry Zone: $1,105 – $1,118
TP 1: $1,130
TP 2: $1,145
TP 3: $1,160
TP 4: $1,180
SL: $1,085
👀 I’m watching this setup closely. Let’s see how it plays out.
Setup Logic:
$1,105–$1,118 is the key entry zone for this setup.
Holding above $1,100 keeps the setup valid.
A clean move above $1,130 can open the way toward the next targets.
If momentum continues, $1,160 and $1,180 become the next levels to watch.
Risk Tip:
Protect your capital.
Don’t chase the move or revenge trade.
Use proper risk management.
Follow @SmartBoy_007 for more setups.
Stay sharp. Trade smart.
Guys, I’m taking a LONG look at $ZEC with 5x leverage isolated in Futures...👇
Entry Zone: $1,105 – $1,118
TP 1: $1,130
TP 2: $1,145
TP 3: $1,160
TP 4: $1,180
SL: $1,085
👀 I’m watching this setup closely. Let’s see how it plays out.
Setup Logic:
$1,105–$1,118 is the key entry zone for this setup.
Holding above $1,100 keeps the setup valid.
A clean move above $1,130 can open the way toward the next targets.
If momentum continues, $1,160 and $1,180 become the next levels to watch.
Risk Tip:
Protect your capital.
Don’t chase the move or revenge trade.
Use proper risk management.
Follow @SmartBoy_007 for more setups.
Stay sharp. Trade smart.
49
·
--
Жоғары (өспелі)
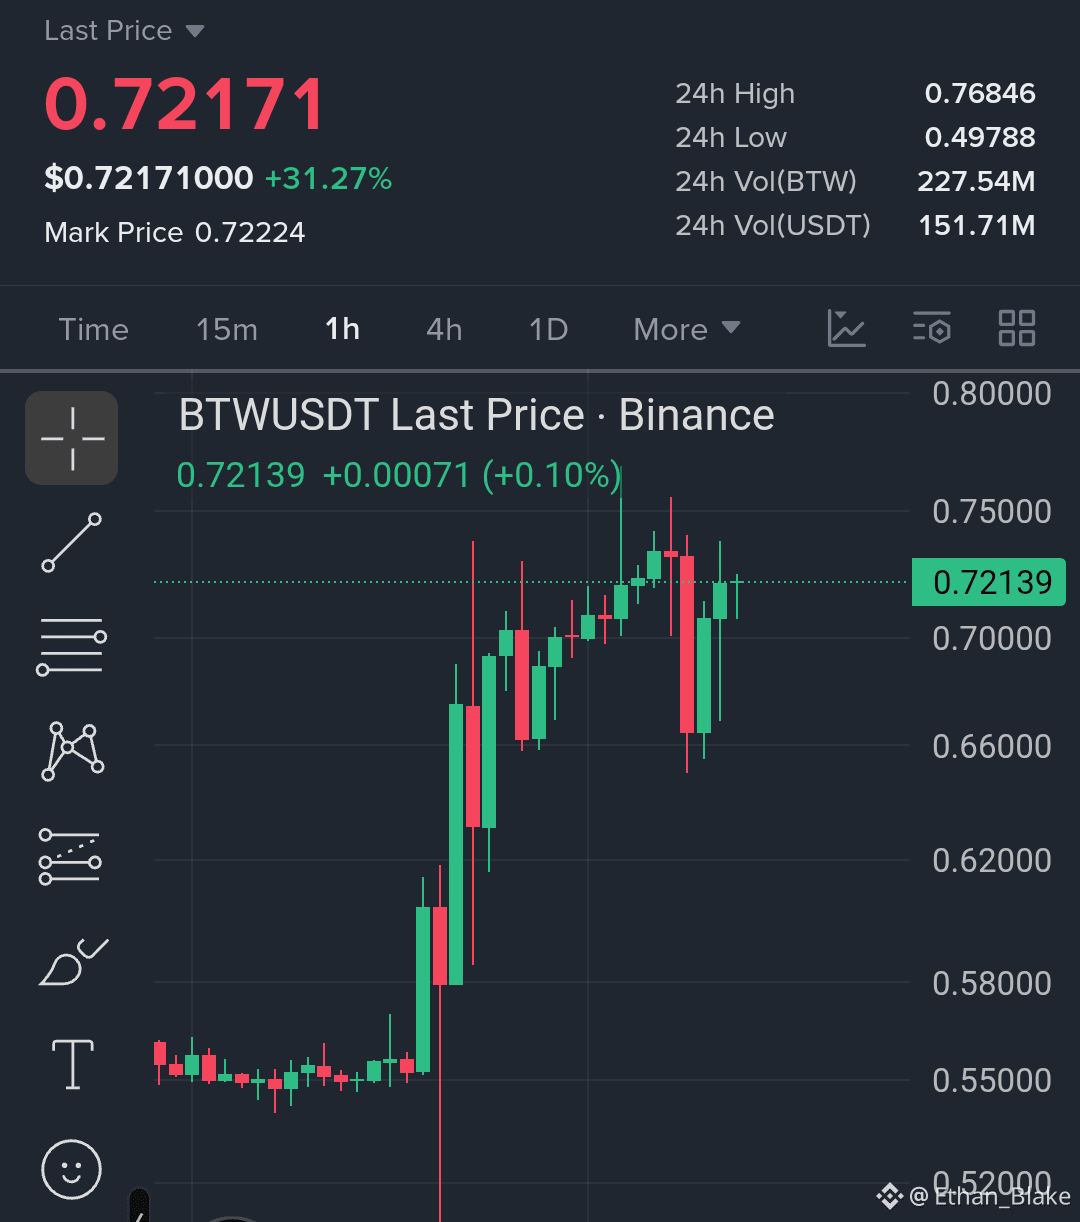
🚀 $BTW LONG SETUP
Guys, I’m taking a LONG look at $BTW with 15x leverage isolated in Futures...👇
Entry Zone: $0.705 – $0.718
TP 1: $0.735
TP 2: $0.750
TP 3: $0.768
TP 4: $0.800
SL: $0.682
👀 I’m watching this setup closely. Let’s see how it plays out.
{future}(BTWUSDT)
Setup Logic:
$0.705–$0.718 is the key entry zone for this setup.
Holding above $0.700 keeps the setup valid.
A clean move above $0.735 can open the way toward the next targets.
If momentum continues, $0.768 and $0.800 become the next levels to watch.
Risk Tip:
Protect your capital.
Don’t chase the move or revenge trade.
Use proper risk management.
Follow @SmartBoy_007 for more setups.
Stay sharp. Trade smart.
🚀 $BTW LONG SETUP
Guys, I’m taking a LONG look at $BTW with 15x leverage isolated in Futures...👇
Entry Zone: $0.705 – $0.718
TP 1: $0.735
TP 2: $0.750
TP 3: $0.768
TP 4: $0.800
SL: $0.682
👀 I’m watching this setup closely. Let’s see how it plays out.
Setup Logic:
$0.705–$0.718 is the key entry zone for this setup.
Holding above $0.700 keeps the setup valid.
A clean move above $0.735 can open the way toward the next targets.
If momentum continues, $0.768 and $0.800 become the next levels to watch.
Risk Tip:
Protect your capital.
Don’t chase the move or revenge trade.
Use proper risk management.
Follow @SmartBoy_007 for more setups.
Stay sharp. Trade smart.
Guys, I’m taking a LONG look at $BTW with 15x leverage isolated in Futures...👇
Entry Zone: $0.705 – $0.718
TP 1: $0.735
TP 2: $0.750
TP 3: $0.768
TP 4: $0.800
SL: $0.682
👀 I’m watching this setup closely. Let’s see how it plays out.
Setup Logic:
$0.705–$0.718 is the key entry zone for this setup.
Holding above $0.700 keeps the setup valid.
A clean move above $0.735 can open the way toward the next targets.
If momentum continues, $0.768 and $0.800 become the next levels to watch.
Risk Tip:
Protect your capital.
Don’t chase the move or revenge trade.
Use proper risk management.
Follow @SmartBoy_007 for more setups.
Stay sharp. Trade smart.
84
·
--
Жоғары (өспелі)
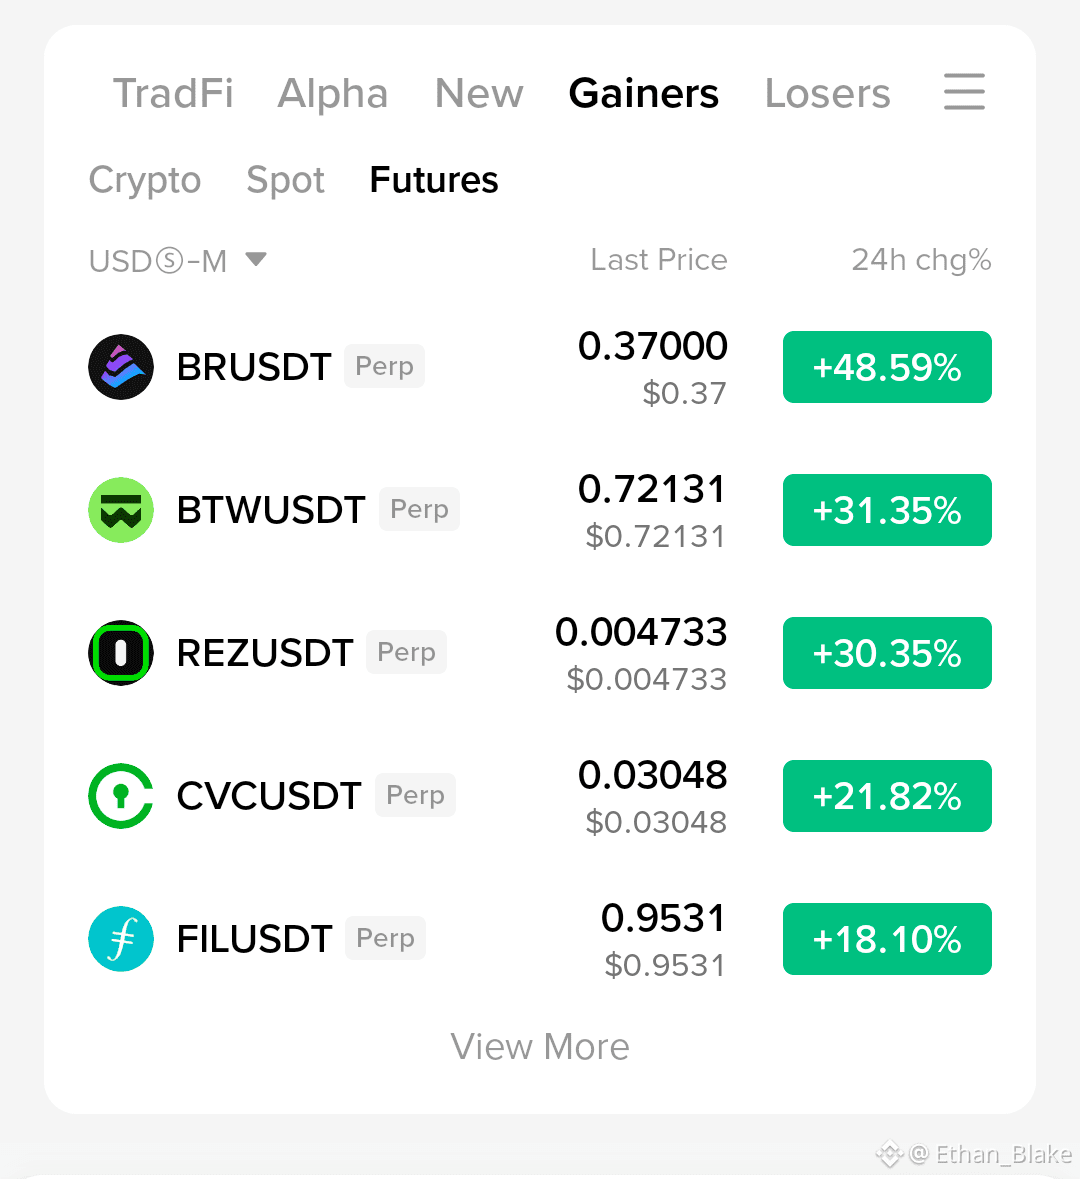
Top Futures Gainers Today
$BR USUSDT: +48.59% 🚀
$BTW USDT: +31.35%
$REZUSDT: +30.35%
$CVC USDT: +21.82%
$FILUSDT: +18.10%
Strong momentum in the market. Watch these coins closely.
Follow for more
Share with your trading fam.
Top Futures Gainers Today
$BR USUSDT: +48.59% 🚀
$BTW USDT: +31.35%
$REZUSDT: +30.35%
$CVC USDT: +21.82%
$FILUSDT: +18.10%
Strong momentum in the market. Watch these coins closely.
Follow for more
Share with your trading fam.
$BR USUSDT: +48.59% 🚀
$BTW USDT: +31.35%
$REZUSDT: +30.35%
$CVC USDT: +21.82%
$FILUSDT: +18.10%
Strong momentum in the market. Watch these coins closely.
Follow for more
Share with your trading fam.
204
·
--
gogogogogogogooooggoogogogogogogogogogo
gogogogogogogooooggoogogogogogogogogogo
Ethan_Blake
·
--
all Guy's please follow me 🎁🎁🎁🎁🎁🎁🎁🎁🎁🎁🎁🎁🎁🎁🎁🎁🎁🎁🎁🎁🎁🎁🎁🎁🎁

61
·
--
Жоғары (өспелі)
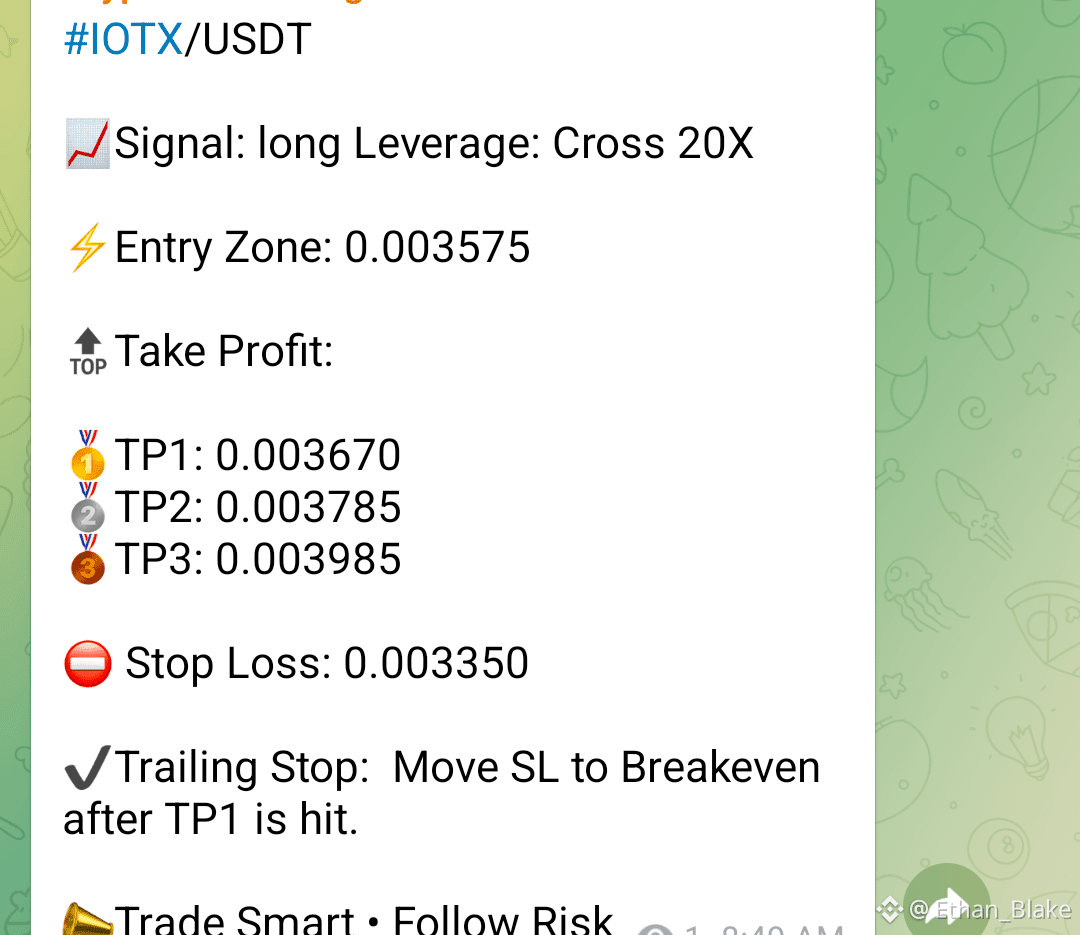
#IOTX /USDT
📈Signal: long Leverage: Cross 20X
⚡️Entry Zone: 0.003575
🔝Take Profit:
🥇TP1: 0.003670
🥈TP2: 0.003785
🥉TP3: 0.003985
⛔️ Stop Loss: 0.003350
✔️Trailing Stop: Move SL to Breakeven after TP1 is hit.
📣Trade Smart • Follow Risk
$IOTX
{future}(IOTXUSDT)
#IOTX /USDT
📈Signal: long Leverage: Cross 20X
⚡️Entry Zone: 0.003575
🔝Take Profit:
🥇TP1: 0.003670
🥈TP2: 0.003785
🥉TP3: 0.003985
⛔️ Stop Loss: 0.003350
✔️Trailing Stop: Move SL to Breakeven after TP1 is hit.
📣Trade Smart • Follow Risk
$IOTX
📈Signal: long Leverage: Cross 20X
⚡️Entry Zone: 0.003575
🔝Take Profit:
🥇TP1: 0.003670
🥈TP2: 0.003785
🥉TP3: 0.003985
⛔️ Stop Loss: 0.003350
✔️Trailing Stop: Move SL to Breakeven after TP1 is hit.
📣Trade Smart • Follow Risk
$IOTX
1
213
Көбірек контент көру үшін кіріңіз
Binance Square платформасында әлемдік криптоқоғамдастыққа қосылыңыз
⚡️ Криптовалюта туралы ең соңғы және пайдалы ақпаратты алыңыз.
💬 Әлемдегі ең ірі криптобиржаның сеніміне ие.
👍 Расталған авторлардың нақты пікірлерін табыңыз.
Электрондық пошта/телефон нөмірі
Трендтегі тақырыптар
AnthropicCEOCallsForAISlowdown
125,311 рет көрілді
2,120 адам талқылап жатыр
#anthropicceocallsforaislowdown
Rivals Unite: Altman, Musk and Others Back the Slowdown CallWithin hours of Amodei’s essay, OpenAI CEO Sam Altman publicly agreed that the industry needs to “pace the frontier,” noting it had already been a major internal discussion at OpenAI. Elon Musk of xAI simply posted “Dario is right.” Reports also noted support from other leading figures including Demis Hassabis. This rare public alignment among fierce competitors underscores how seriously the top labs now view the accelerating risks. The industry appears to be shifting from pure speed toward coordinated caution.
$BR
$BTW
$REZ
Crypto Futrures Afridi
·3 лайк
·2k рет көрілді
RevolutDataLeakReportedlyPostedAttackersThreatenDailyReleases
867 рет көрілді
33 адам талқылап жатыр
BrazilCentralBankRaisesVASPCapitalRequirements
4,544 рет көрілді
226 адам талқылап жатыр