

CryptoPandaヅ
8.6k 投稿

CryptoPandaヅ
 厳選トピック確認済+
報告
ユーザーをブロック
Support My Analysis, I thank You All. Hoping for your profitable journey!
取引を発注
超高頻度トレーダー
4.4年
0 フォロー
38.7K+ フォロワー
26.4K+ いいね
投稿
ポートフォリオ
すべて
引用
ライブ
·
--
ブリッシュ
翻訳参照
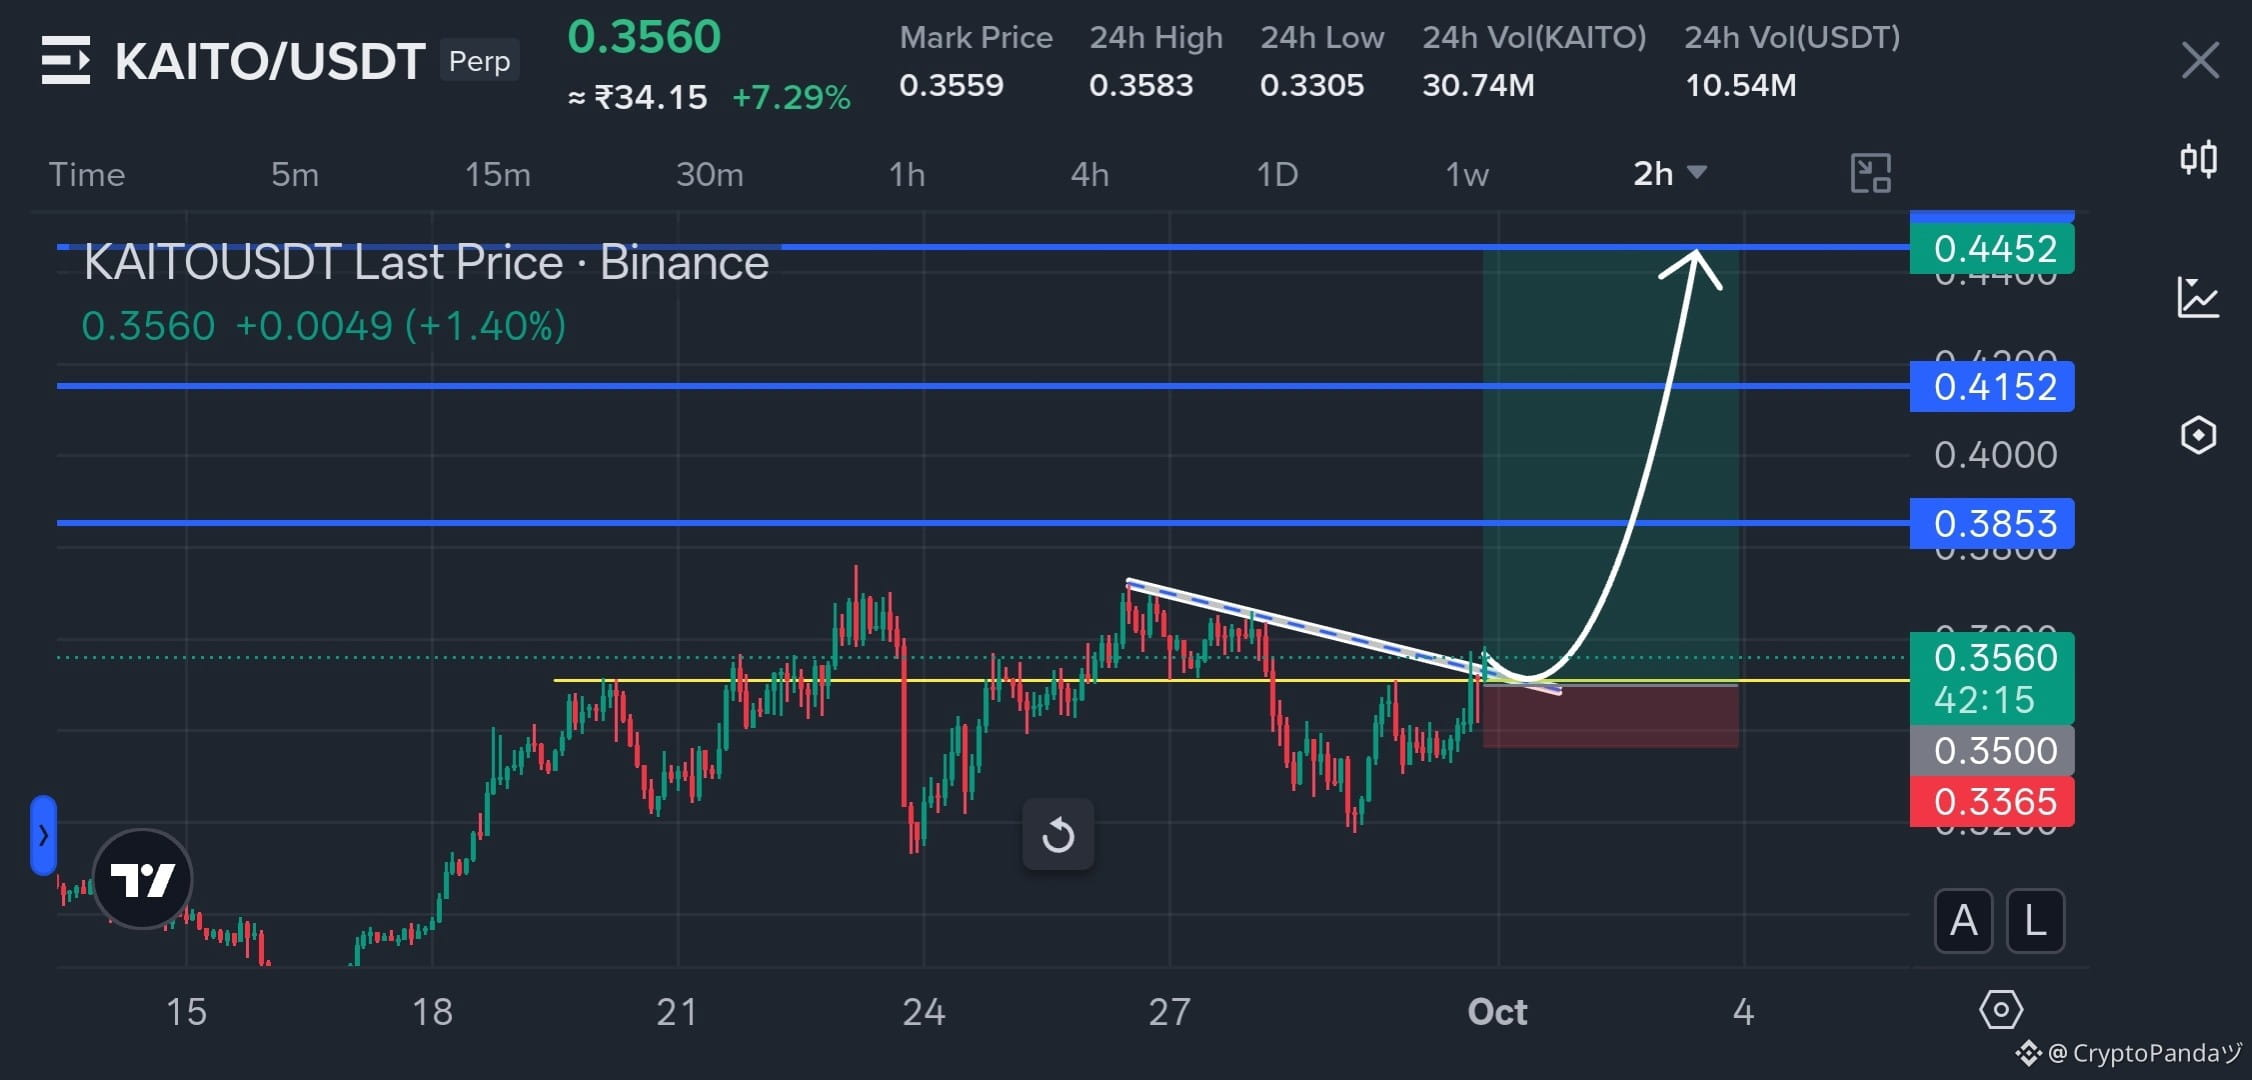
$KAITO — 0.3505 Resistance Turned Support, Upside Lift Incoming 📈
Trade Plan: Long $KAITO
Entry: 0.35 - 0.36
SL: 0.3365
TP: 0.3853 | 0.4152 | 0.4452
Why this Setup?
KAITO is breaking above the descending trendline that has been capping price since the 0.37 area. The 0.35 horizontal zone is now acting as the key breakout/retest area, with price holding above it around 0.356. If this breakout sustains, the chart structure points toward 0.3853, then 0.4152 and finally 0.4452. As long as 0.3365 holds, the bullish setup remains valid.
Trade $KAITO here 👇
{future}(KAITOUSDT)
$KAITO — 0.3505 Resistance Turned Support, Upside Lift Incoming 📈
Trade Plan: Long $KAITO
Entry: 0.35 - 0.36
SL: 0.3365
TP: 0.3853 | 0.4152 | 0.4452
Why this Setup?
KAITO is breaking above the descending trendline that has been capping price since the 0.37 area. The 0.35 horizontal zone is now acting as the key breakout/retest area, with price holding above it around 0.356. If this breakout sustains, the chart structure points toward 0.3853, then 0.4152 and finally 0.4452. As long as 0.3365 holds, the bullish setup remains valid.
Trade $KAITO here 👇
Trade Plan: Long $KAITO
Entry: 0.35 - 0.36
SL: 0.3365
TP: 0.3853 | 0.4152 | 0.4452
Why this Setup?
KAITO is breaking above the descending trendline that has been capping price since the 0.37 area. The 0.35 horizontal zone is now acting as the key breakout/retest area, with price holding above it around 0.356. If this breakout sustains, the chart structure points toward 0.3853, then 0.4152 and finally 0.4452. As long as 0.3365 holds, the bullish setup remains valid.
Trade $KAITO here 👇
2
130
·
--
ブリッシュ
翻訳参照
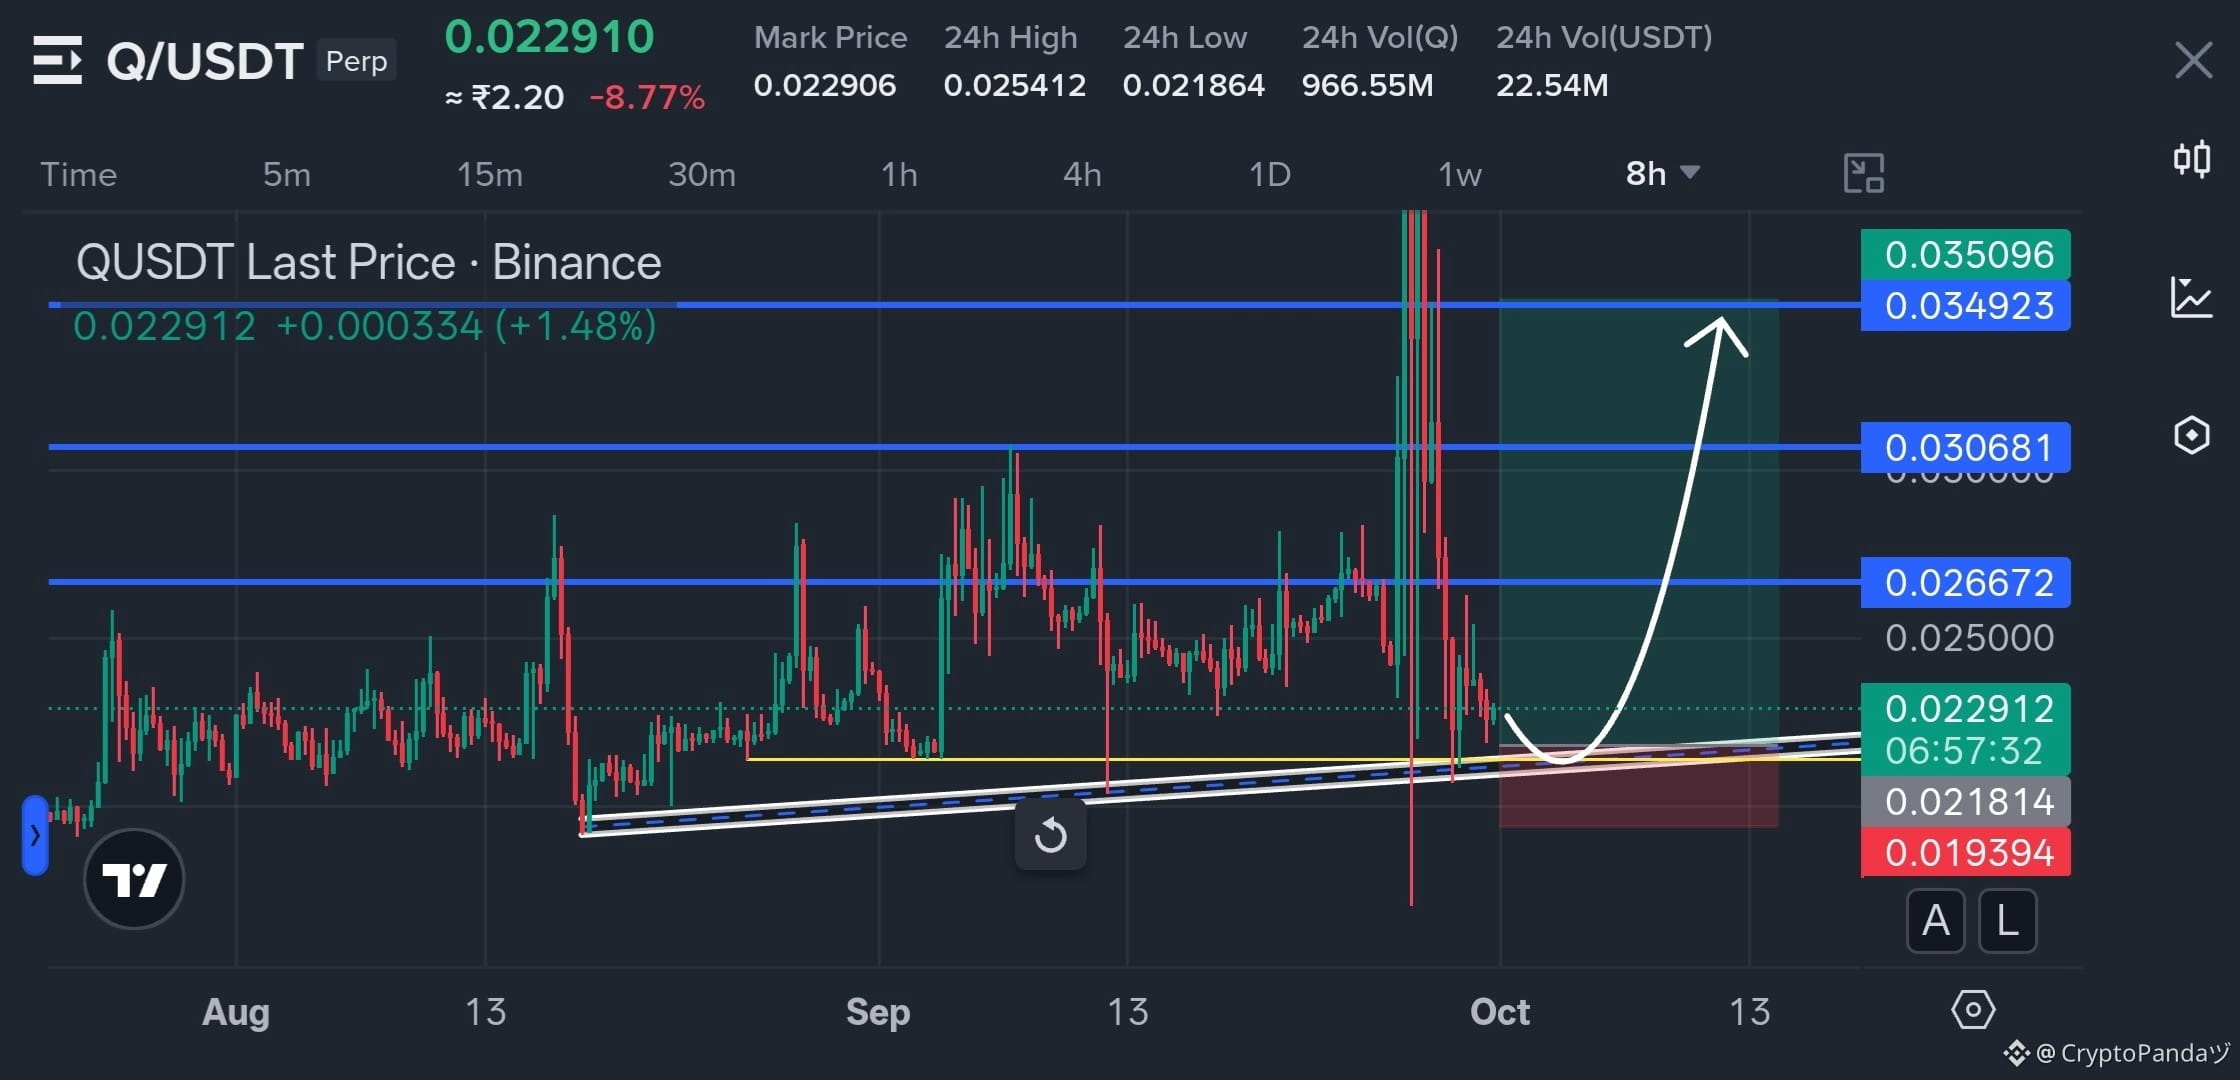
$Q — Coiling Tight Above 0.0218 Demand. Bulls Ready For The Next Upside Leg 📈
Trade Plan: Long $Q
Entry: 0.022 - 0.023
SL: 0.019394
TP: 0.026672 | 0.030681 | 0.034923
Why this Setup?
Price is holding above the rising trendline around the 0.022 zone after repeated tests, while the structure continues to form higher support. A bounce from this area could push price toward 0.026672 first, followed by 0.030681 and 0.034923 if momentum expands. As long as 0.019394 holds, the bullish setup remains valid.
Trade $Q here 👇
{future}(QUSDT)
$Q — Coiling Tight Above 0.0218 Demand. Bulls Ready For The Next Upside Leg 📈
Trade Plan: Long $Q
Entry: 0.022 - 0.023
SL: 0.019394
TP: 0.026672 | 0.030681 | 0.034923
Why this Setup?
Price is holding above the rising trendline around the 0.022 zone after repeated tests, while the structure continues to form higher support. A bounce from this area could push price toward 0.026672 first, followed by 0.030681 and 0.034923 if momentum expands. As long as 0.019394 holds, the bullish setup remains valid.
Trade $Q here 👇
Trade Plan: Long $Q
Entry: 0.022 - 0.023
SL: 0.019394
TP: 0.026672 | 0.030681 | 0.034923
Why this Setup?
Price is holding above the rising trendline around the 0.022 zone after repeated tests, while the structure continues to form higher support. A bounce from this area could push price toward 0.026672 first, followed by 0.030681 and 0.034923 if momentum expands. As long as 0.019394 holds, the bullish setup remains valid.
Trade $Q here 👇
3
155
·
--
ブリッシュ
翻訳参照
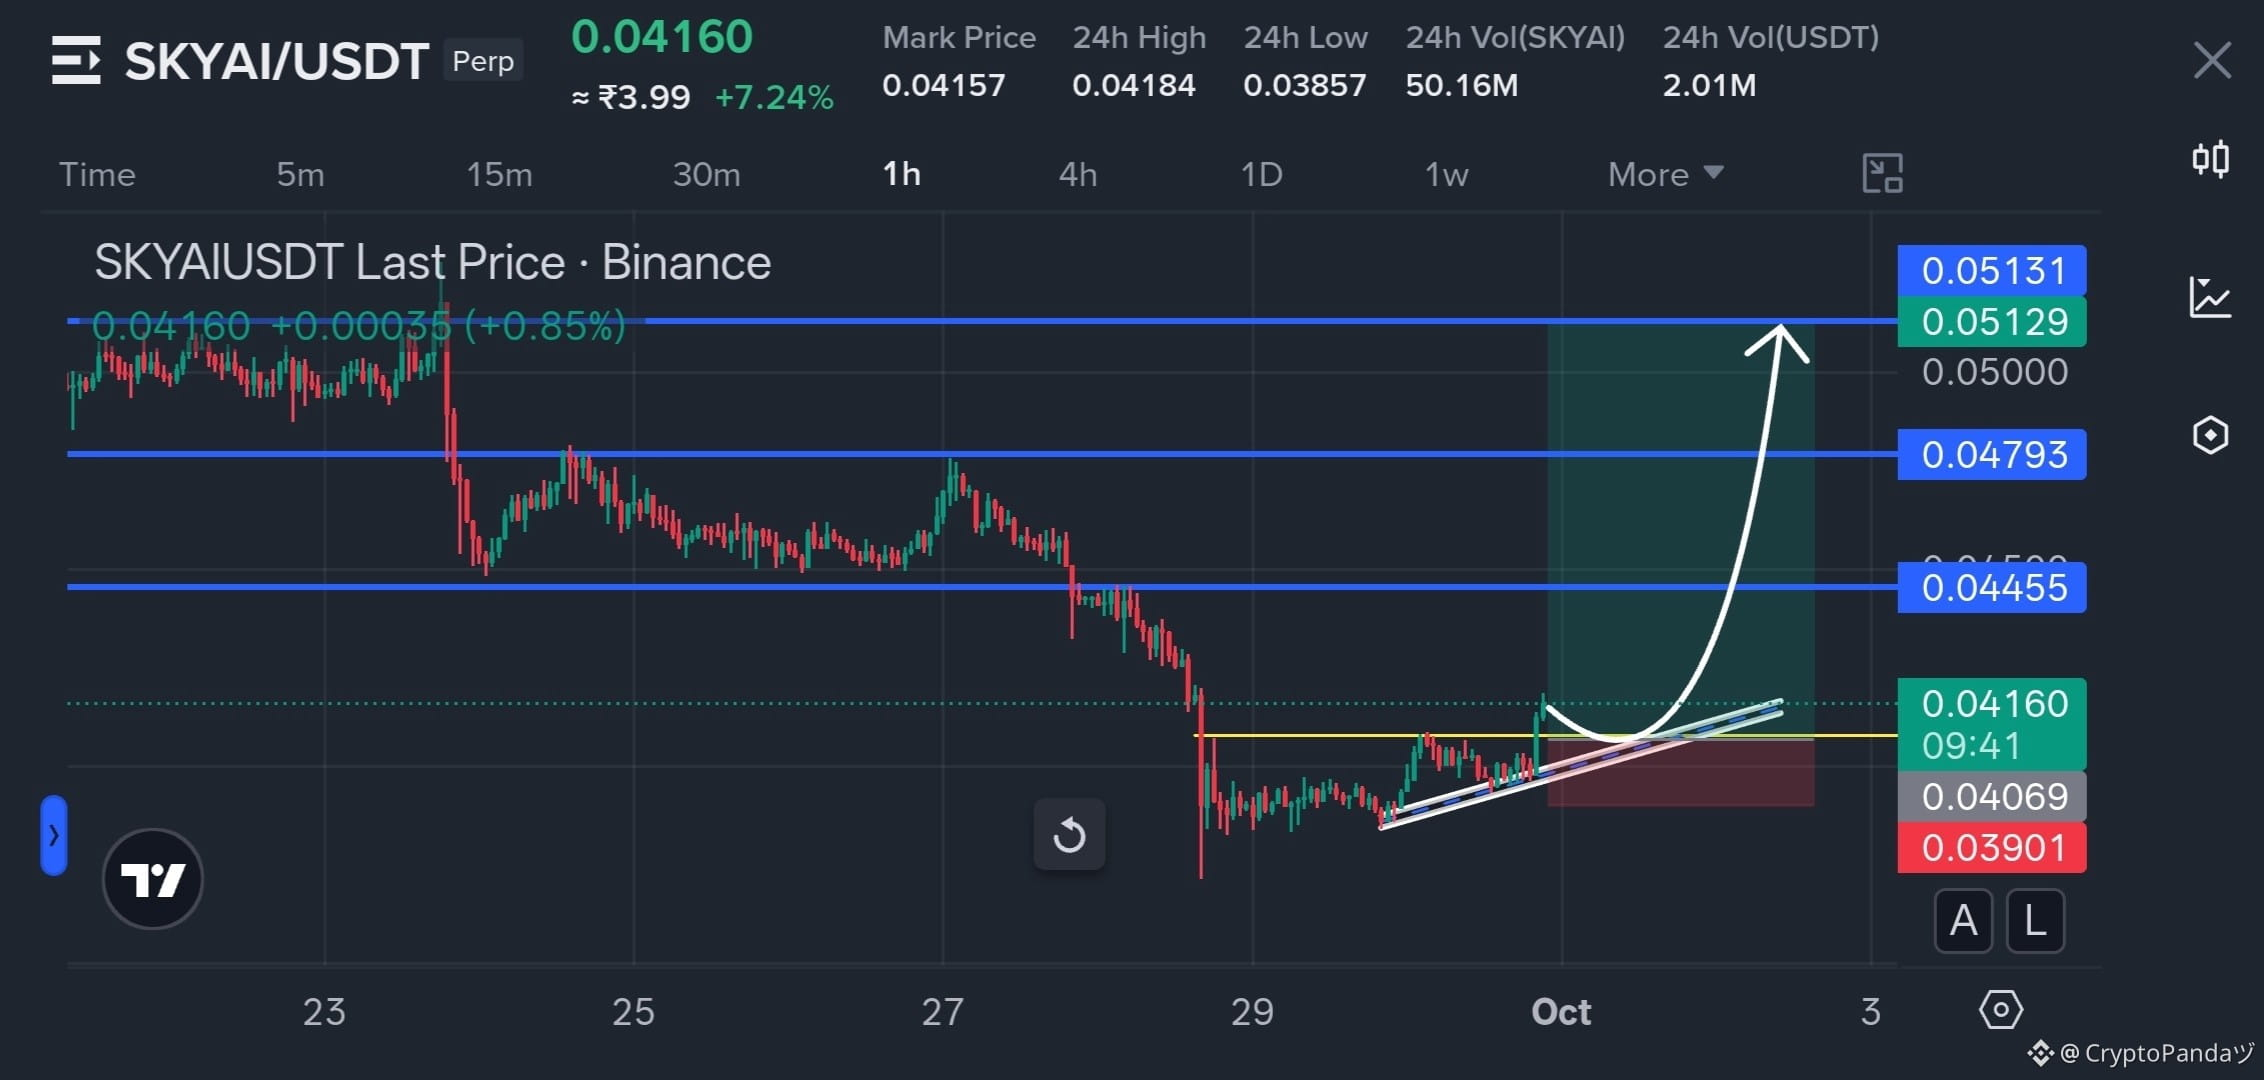
$SKYAI — Ascending Base Support At 0.0405, Upside Void Opening 📈
Trade Plan: Long $SKYAI
Entry: 0.0405 - 0.0415
SL: 0.03901
TP: 0.04455 | 0.04793 | 0.05131
Why this Setup?
SKYAI is building a tight ascending base above the 0.0405 area, with higher lows forming along the rising trendline. A sustained reclaim from this structure could open the path toward 0.04455, followed by 0.04793 and 0.05131 as momentum expands. As long as 0.03901 holds, the bullish setup remains valid.
Trade $SKYAI here 👇
{future}(SKYAIUSDT)
$SKYAI — Ascending Base Support At 0.0405, Upside Void Opening 📈
Trade Plan: Long $SKYAI
Entry: 0.0405 - 0.0415
SL: 0.03901
TP: 0.04455 | 0.04793 | 0.05131
Why this Setup?
SKYAI is building a tight ascending base above the 0.0405 area, with higher lows forming along the rising trendline. A sustained reclaim from this structure could open the path toward 0.04455, followed by 0.04793 and 0.05131 as momentum expands. As long as 0.03901 holds, the bullish setup remains valid.
Trade $SKYAI here 👇
Trade Plan: Long $SKYAI
Entry: 0.0405 - 0.0415
SL: 0.03901
TP: 0.04455 | 0.04793 | 0.05131
Why this Setup?
SKYAI is building a tight ascending base above the 0.0405 area, with higher lows forming along the rising trendline. A sustained reclaim from this structure could open the path toward 0.04455, followed by 0.04793 and 0.05131 as momentum expands. As long as 0.03901 holds, the bullish setup remains valid.
Trade $SKYAI here 👇
4
2.2k
·
--
ブリッシュ
翻訳参照
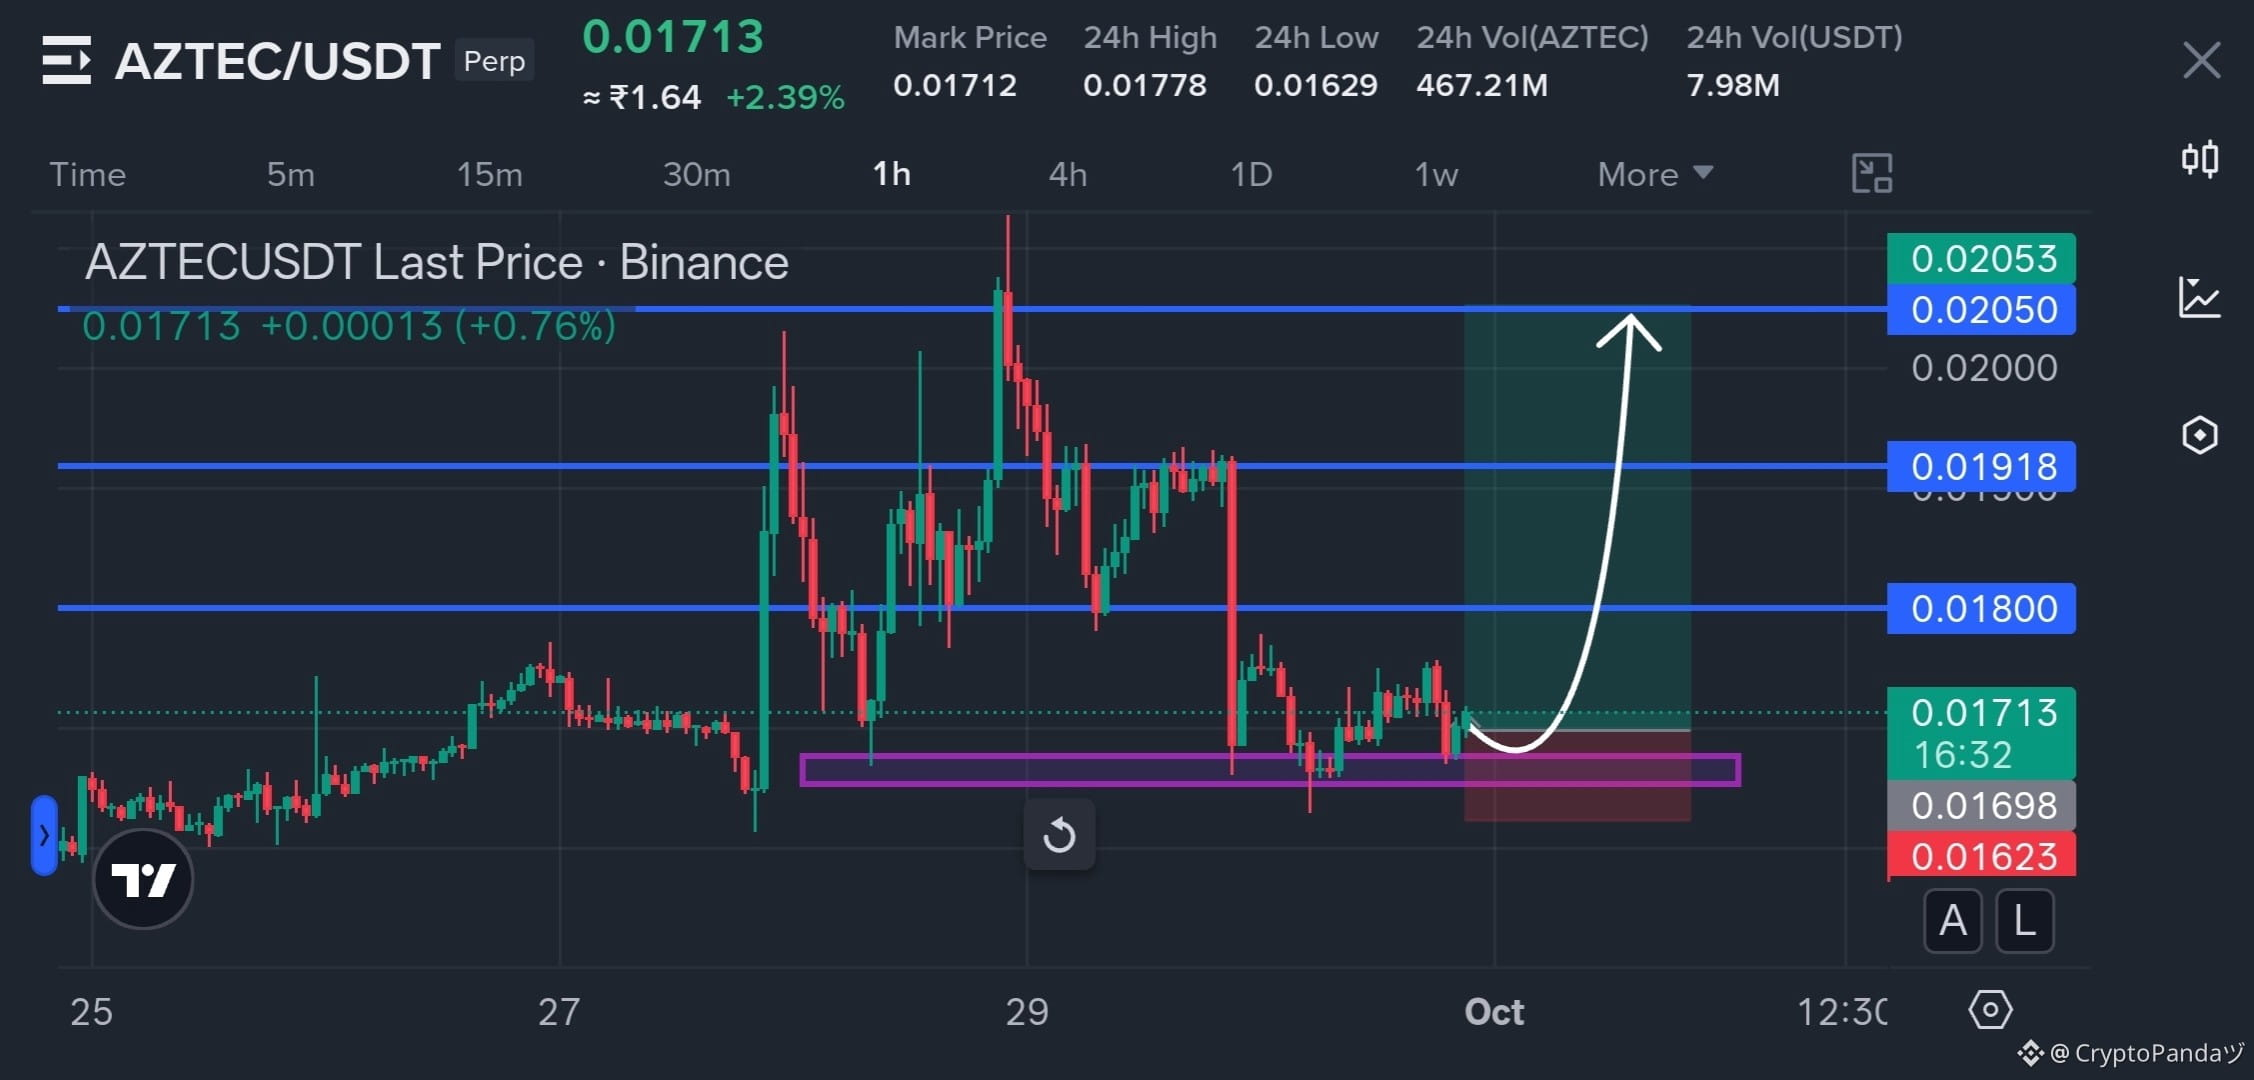
$AZTEC — Order Block Reclaim Near 0.01700, Upside Continuation Loading 📈
Trade Plan: Long $AZTEC
Entry: 0.0170 - 0.0172
SL: 0.01623
TP: 0.01800 | 0.01918 | 0.02050
Why this Setup?
Price is holding the 0.01698 - 0.01700 demand zone after repeated tests, while the chart shows a tight base forming beneath the 0.01800 resistance. A clean reclaim of 0.01800 could open the path toward 0.01918 and then 0.02050 as upside momentum expands. As long as 0.01623 holds, the bullish setup remains valid.
Trade $AZTEC here 👇
{future}(AZTECUSDT)
$AZTEC — Order Block Reclaim Near 0.01700, Upside Continuation Loading 📈
Trade Plan: Long $AZTEC
Entry: 0.0170 - 0.0172
SL: 0.01623
TP: 0.01800 | 0.01918 | 0.02050
Why this Setup?
Price is holding the 0.01698 - 0.01700 demand zone after repeated tests, while the chart shows a tight base forming beneath the 0.01800 resistance. A clean reclaim of 0.01800 could open the path toward 0.01918 and then 0.02050 as upside momentum expands. As long as 0.01623 holds, the bullish setup remains valid.
Trade $AZTEC here 👇
Trade Plan: Long $AZTEC
Entry: 0.0170 - 0.0172
SL: 0.01623
TP: 0.01800 | 0.01918 | 0.02050
Why this Setup?
Price is holding the 0.01698 - 0.01700 demand zone after repeated tests, while the chart shows a tight base forming beneath the 0.01800 resistance. A clean reclaim of 0.01800 could open the path toward 0.01918 and then 0.02050 as upside momentum expands. As long as 0.01623 holds, the bullish setup remains valid.
Trade $AZTEC here 👇
1
4
89
·
--
弱気相場
翻訳参照
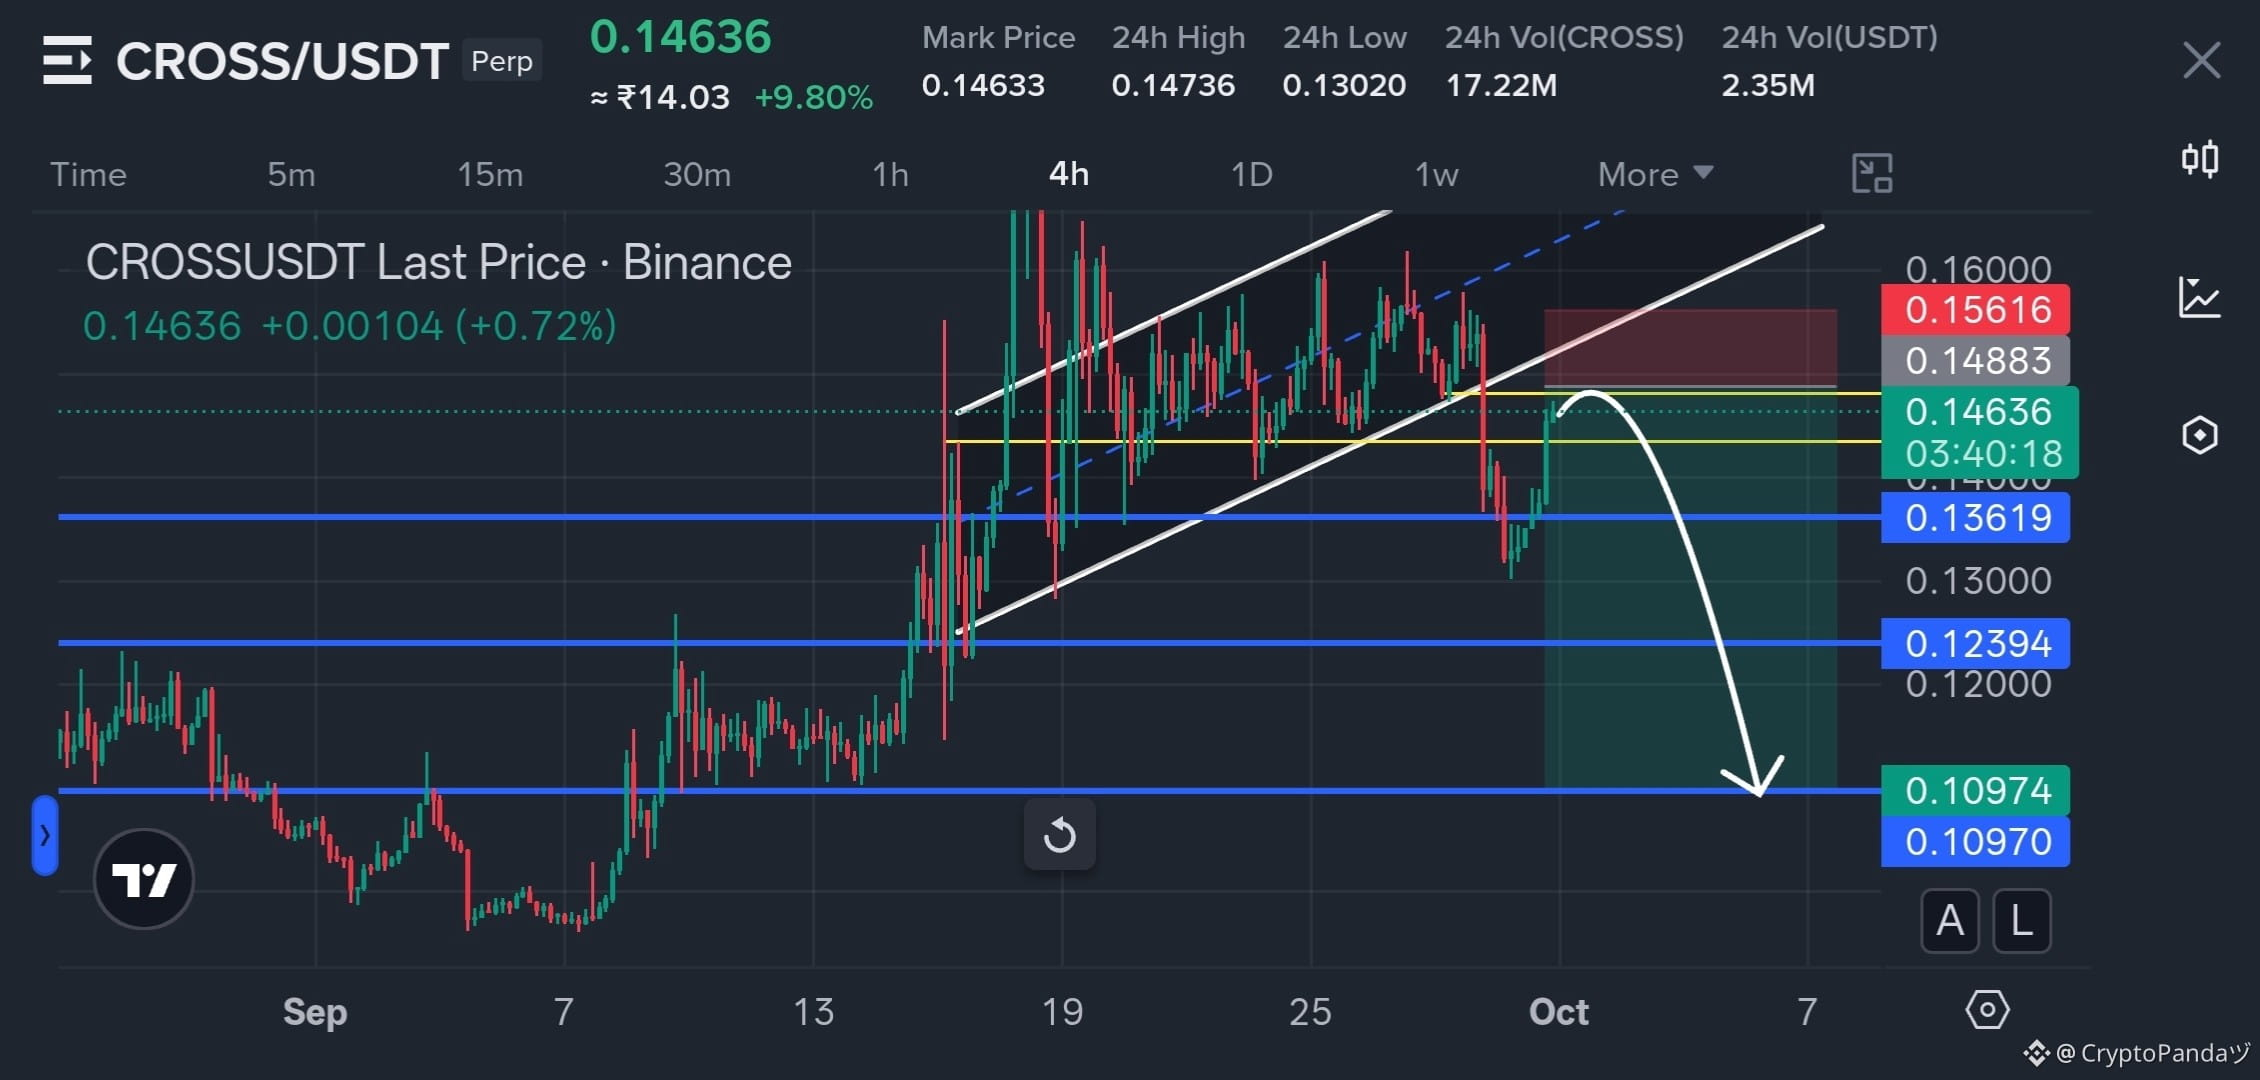
$CROSS — Rising Wedge Retest Near 0.148 Resistance, Downside Sweep Loading 📉
Trade Plan: Short $CROSS
Entry: 0.145 - 0.148
SL: 0.15616
TP: 0.13619 | 0.12394 | 0.10974
Why this Setup?
Price is retesting the broken rising-wedge structure around the 0.145 - 0.148 resistance zone, creating a potential rejection area. If sellers regain control here, downside momentum could expand toward the 0.13619, 0.12394 and 0.10974 levels. As long as 0.15616 holds, the bearish setup remains valid.
Trade $CROSS here 👇
{future}(CROSSUSDT)
$CROSS — Rising Wedge Retest Near 0.148 Resistance, Downside Sweep Loading 📉
Trade Plan: Short $CROSS
Entry: 0.145 - 0.148
SL: 0.15616
TP: 0.13619 | 0.12394 | 0.10974
Why this Setup?
Price is retesting the broken rising-wedge structure around the 0.145 - 0.148 resistance zone, creating a potential rejection area. If sellers regain control here, downside momentum could expand toward the 0.13619, 0.12394 and 0.10974 levels. As long as 0.15616 holds, the bearish setup remains valid.
Trade $CROSS here 👇
Trade Plan: Short $CROSS
Entry: 0.145 - 0.148
SL: 0.15616
TP: 0.13619 | 0.12394 | 0.10974
Why this Setup?
Price is retesting the broken rising-wedge structure around the 0.145 - 0.148 resistance zone, creating a potential rejection area. If sellers regain control here, downside momentum could expand toward the 0.13619, 0.12394 and 0.10974 levels. As long as 0.15616 holds, the bearish setup remains valid.
Trade $CROSS here 👇
3
120
·
--
ブリッシュ
$AKE 1.1K USDT(30日間の取引)
翻訳参照
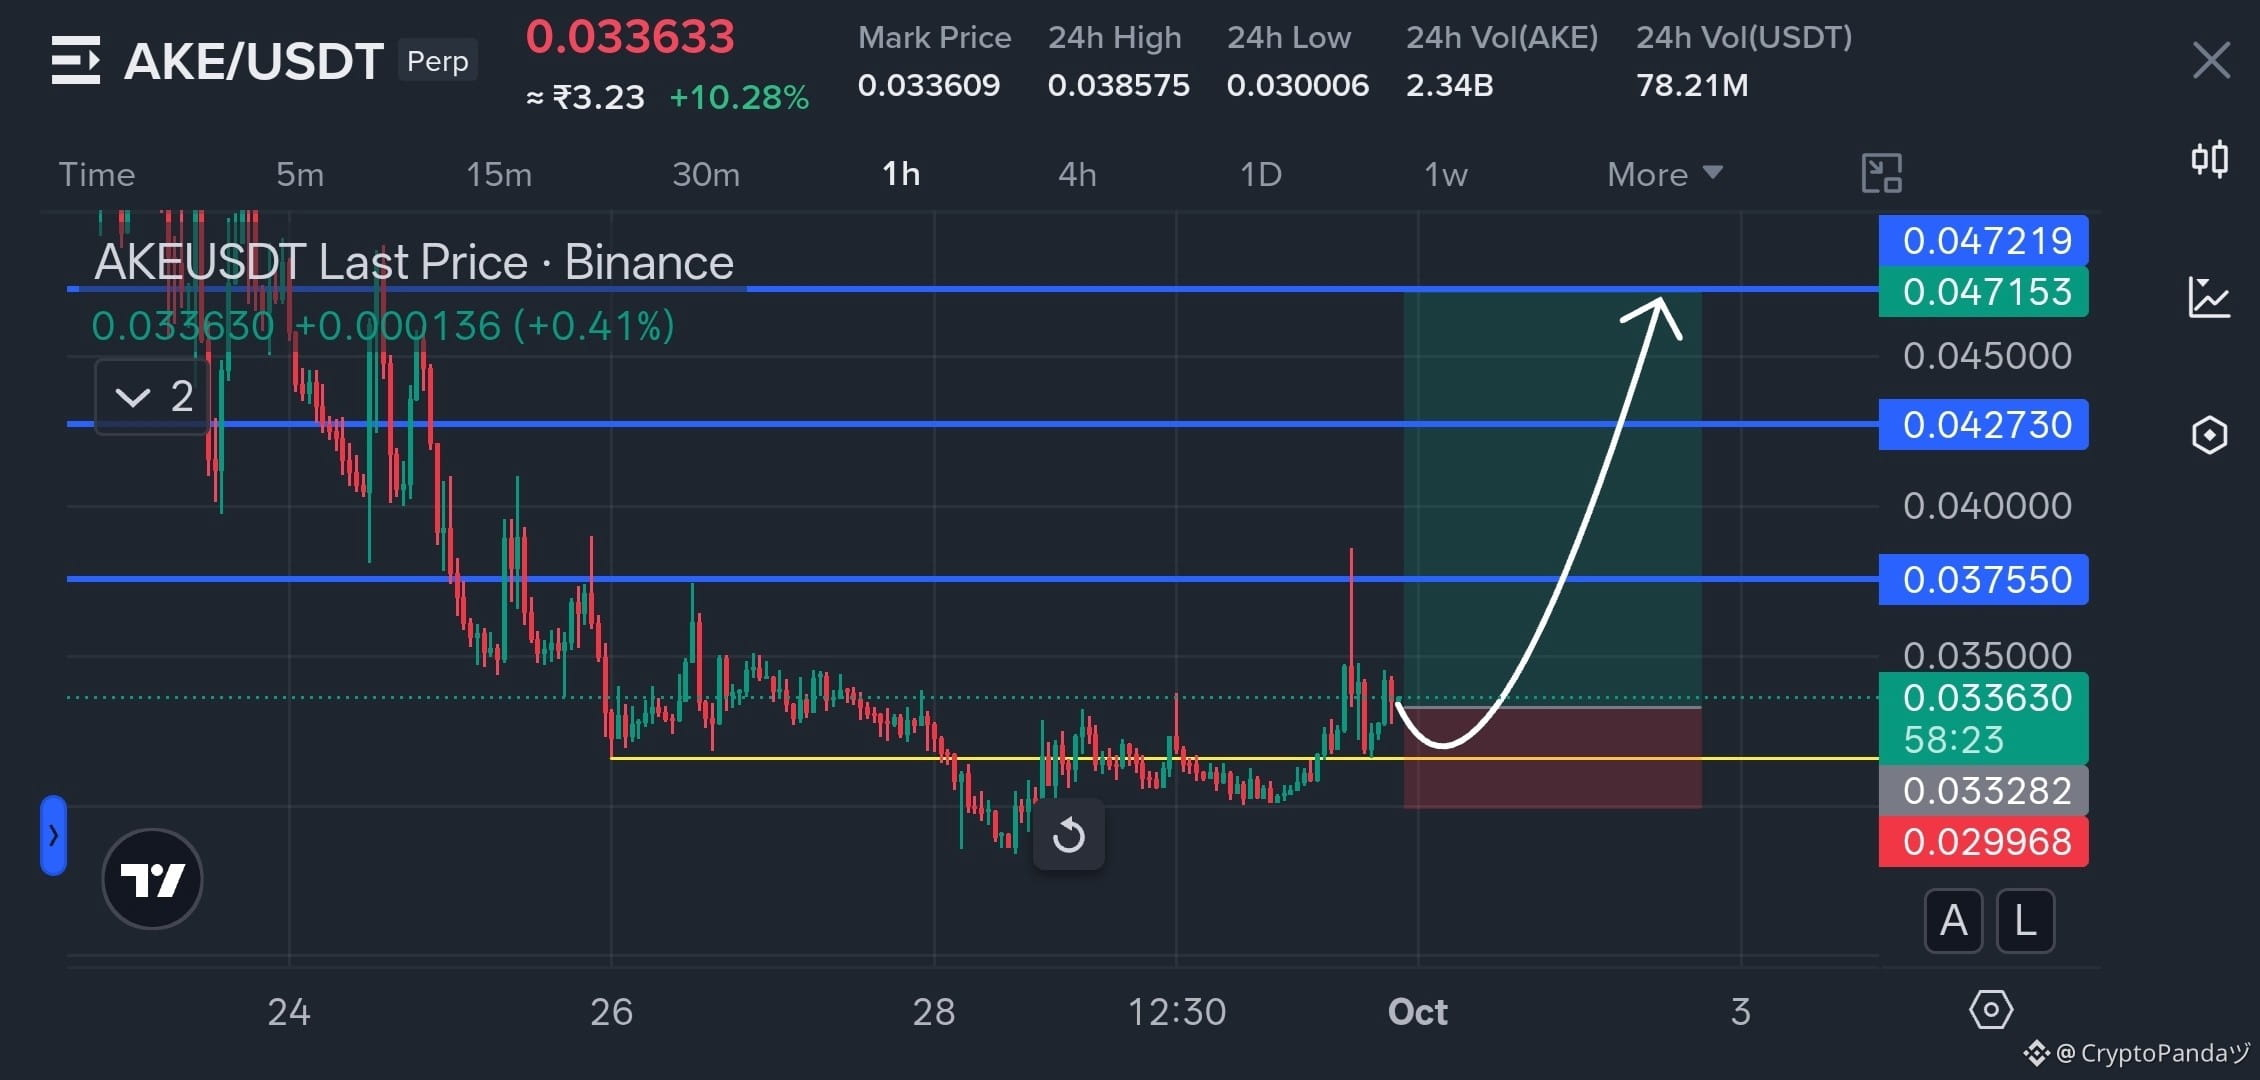
$AKE — Base Reclaim Above 0.03328, Upside Liquidity Sweep Loading 📈
Trade Plan: Long $AKE
Entry: 0.0330 - 0.0340
SL: 0.029968
TP: 0.037550 | 0.042730 | 0.047219
Why this Setup?
Price is reclaiming the 0.03328 base after a prolonged compression phase, with buyers defending the recent higher-low structure. The chart shows a clear upside liquidity ladder at 0.037550, 0.042730 and 0.047219, giving the move room to expand if the base continues to hold. As long as 0.029968 holds, the bullish setup remains valid.
Trade $AKE here 👇
{future}(AKEUSDT)
$AKE — Base Reclaim Above 0.03328, Upside Liquidity Sweep Loading 📈
Trade Plan: Long $AKE
Entry: 0.0330 - 0.0340
SL: 0.029968
TP: 0.037550 | 0.042730 | 0.047219
Why this Setup?
Price is reclaiming the 0.03328 base after a prolonged compression phase, with buyers defending the recent higher-low structure. The chart shows a clear upside liquidity ladder at 0.037550, 0.042730 and 0.047219, giving the move room to expand if the base continues to hold. As long as 0.029968 holds, the bullish setup remains valid.
Trade $AKE here 👇
Trade Plan: Long $AKE
Entry: 0.0330 - 0.0340
SL: 0.029968
TP: 0.037550 | 0.042730 | 0.047219
Why this Setup?
Price is reclaiming the 0.03328 base after a prolonged compression phase, with buyers defending the recent higher-low structure. The chart shows a clear upside liquidity ladder at 0.037550, 0.042730 and 0.047219, giving the move room to expand if the base continues to hold. As long as 0.029968 holds, the bullish setup remains valid.
Trade $AKE here 👇
4
169
·
--
ブリッシュ
翻訳参照
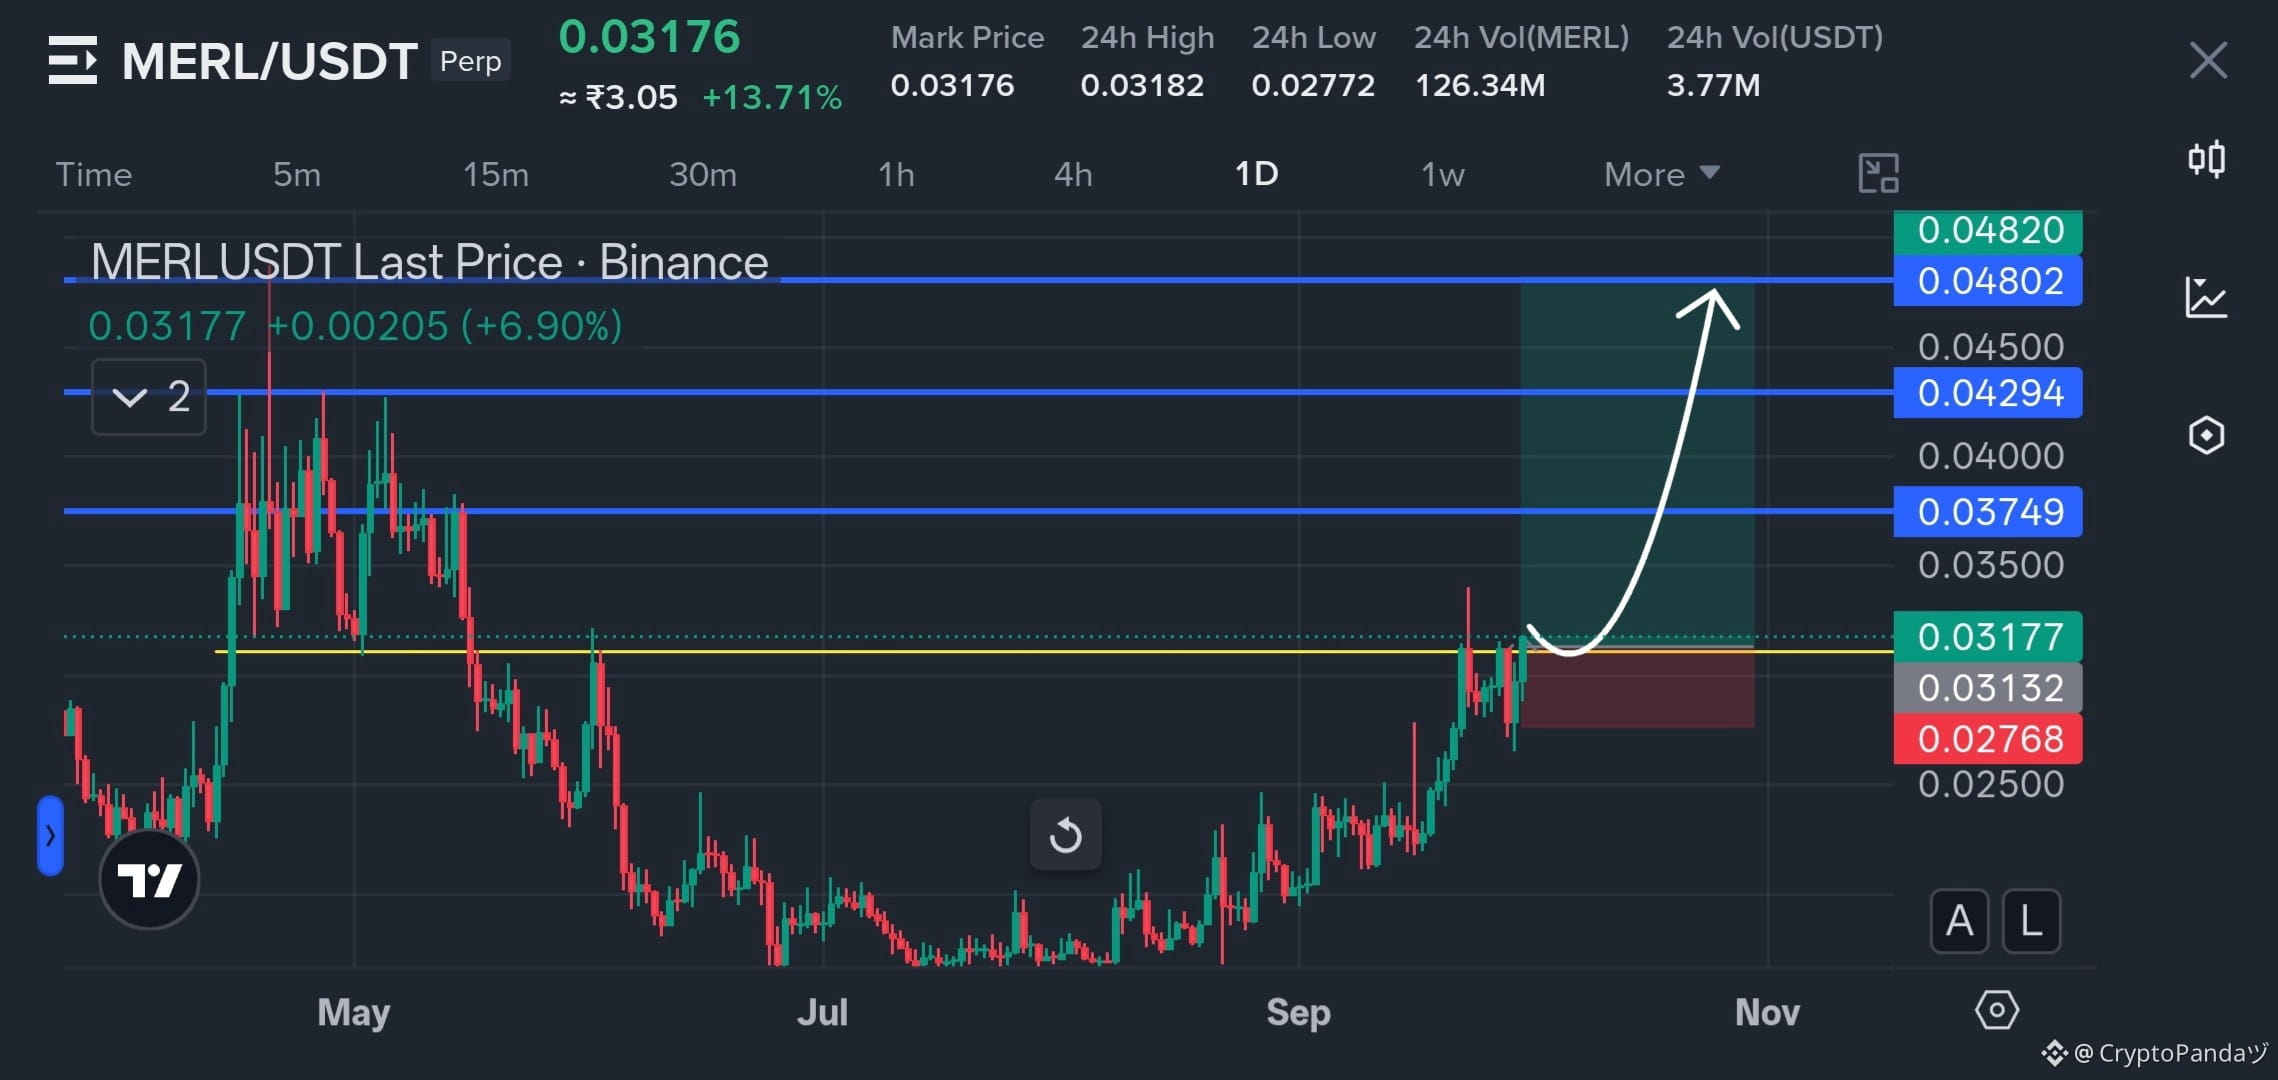
$MERL — Resistance at 0.03132 Broken, Bulls Ready For The Massive Pump 📈
Trade Plan: Long $MERL
Entry: 0.030 - 0.032
SL: 0.02768
TP: 0.03749 | 0.04294 | 0.04802
Why this Setup?
The 0.03132 resistance has been broken with strong upside momentum, opening room for a potential expansion toward the higher resistance zones at 0.03749, 0.04294 and 0.04802. If price holds above the breakout area, an upside spike could accelerate toward the TP levels. As long as 0.02768 holds, the bullish setup remains valid.
Trade $MERL here 👇
{future}(MERLUSDT)
$MERL — Resistance at 0.03132 Broken, Bulls Ready For The Massive Pump 📈
Trade Plan: Long $MERL
Entry: 0.030 - 0.032
SL: 0.02768
TP: 0.03749 | 0.04294 | 0.04802
Why this Setup?
The 0.03132 resistance has been broken with strong upside momentum, opening room for a potential expansion toward the higher resistance zones at 0.03749, 0.04294 and 0.04802. If price holds above the breakout area, an upside spike could accelerate toward the TP levels. As long as 0.02768 holds, the bullish setup remains valid.
Trade $MERL here 👇
Trade Plan: Long $MERL
Entry: 0.030 - 0.032
SL: 0.02768
TP: 0.03749 | 0.04294 | 0.04802
Why this Setup?
The 0.03132 resistance has been broken with strong upside momentum, opening room for a potential expansion toward the higher resistance zones at 0.03749, 0.04294 and 0.04802. If price holds above the breakout area, an upside spike could accelerate toward the TP levels. As long as 0.02768 holds, the bullish setup remains valid.
Trade $MERL here 👇
2
108
·
--
ブリッシュ
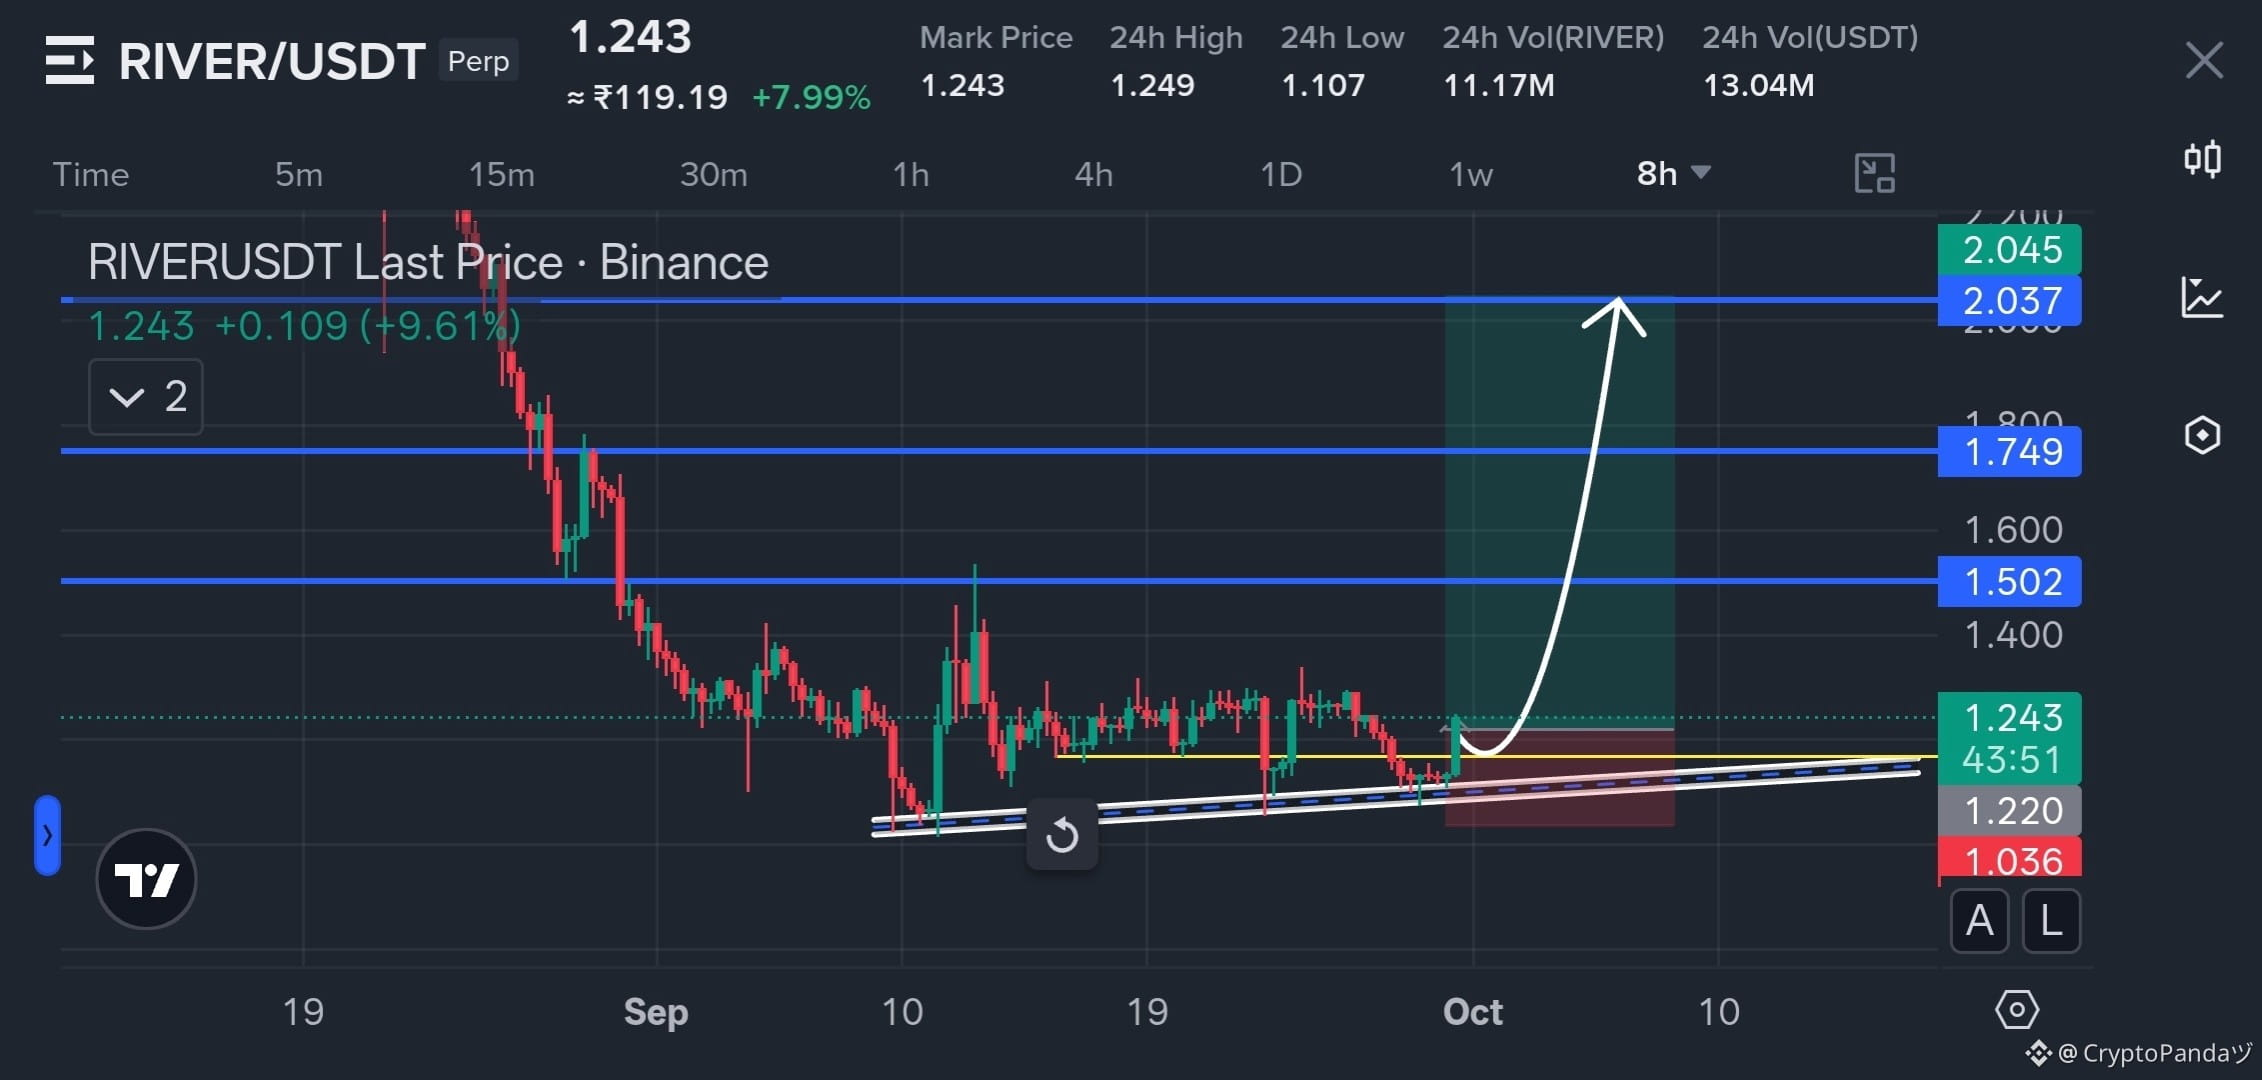
$RIVER — 1.22のトレンドライン上昇:ベースホールディング、上値拡大のロード中 📈
取引プラン:ロング $RIVER
エントリー:1.22 - 1.24
SL:1.036
TP:1.502 | 1.749 | 2.037
このセットアップの理由?
価格は1.22付近で上昇するサポートのトレンドラインを維持しつつ、1.20エリア上で反復的にベースを構築しています。この上昇構造からのリクレイム(取り戻し)により、まず1.502へ向かう道が開かれ、その後、勢いが拡大すれば1.749、さらに2.037へと進む可能性があります。1.036が維持される限り、この強気セットアップは有効です。
取引 $RIVER はここ👇
{future}(RIVERUSDT)
$RIVER — 1.22のトレンドライン上昇:ベースホールディング、上値拡大のロード中 📈
取引プラン:ロング $RIVER
エントリー:1.22 - 1.24
SL:1.036
TP:1.502 | 1.749 | 2.037
このセットアップの理由?
価格は1.22付近で上昇するサポートのトレンドラインを維持しつつ、1.20エリア上で反復的にベースを構築しています。この上昇構造からのリクレイム(取り戻し)により、まず1.502へ向かう道が開かれ、その後、勢いが拡大すれば1.749、さらに2.037へと進む可能性があります。1.036が維持される限り、この強気セットアップは有効です。
取引 $RIVER はここ👇
取引プラン:ロング $RIVER
エントリー:1.22 - 1.24
SL:1.036
TP:1.502 | 1.749 | 2.037
このセットアップの理由?
価格は1.22付近で上昇するサポートのトレンドラインを維持しつつ、1.20エリア上で反復的にベースを構築しています。この上昇構造からのリクレイム(取り戻し)により、まず1.502へ向かう道が開かれ、その後、勢いが拡大すれば1.749、さらに2.037へと進む可能性があります。1.036が維持される限り、この強気セットアップは有効です。
取引 $RIVER はここ👇
2
127
·
--
弱気相場
翻訳参照
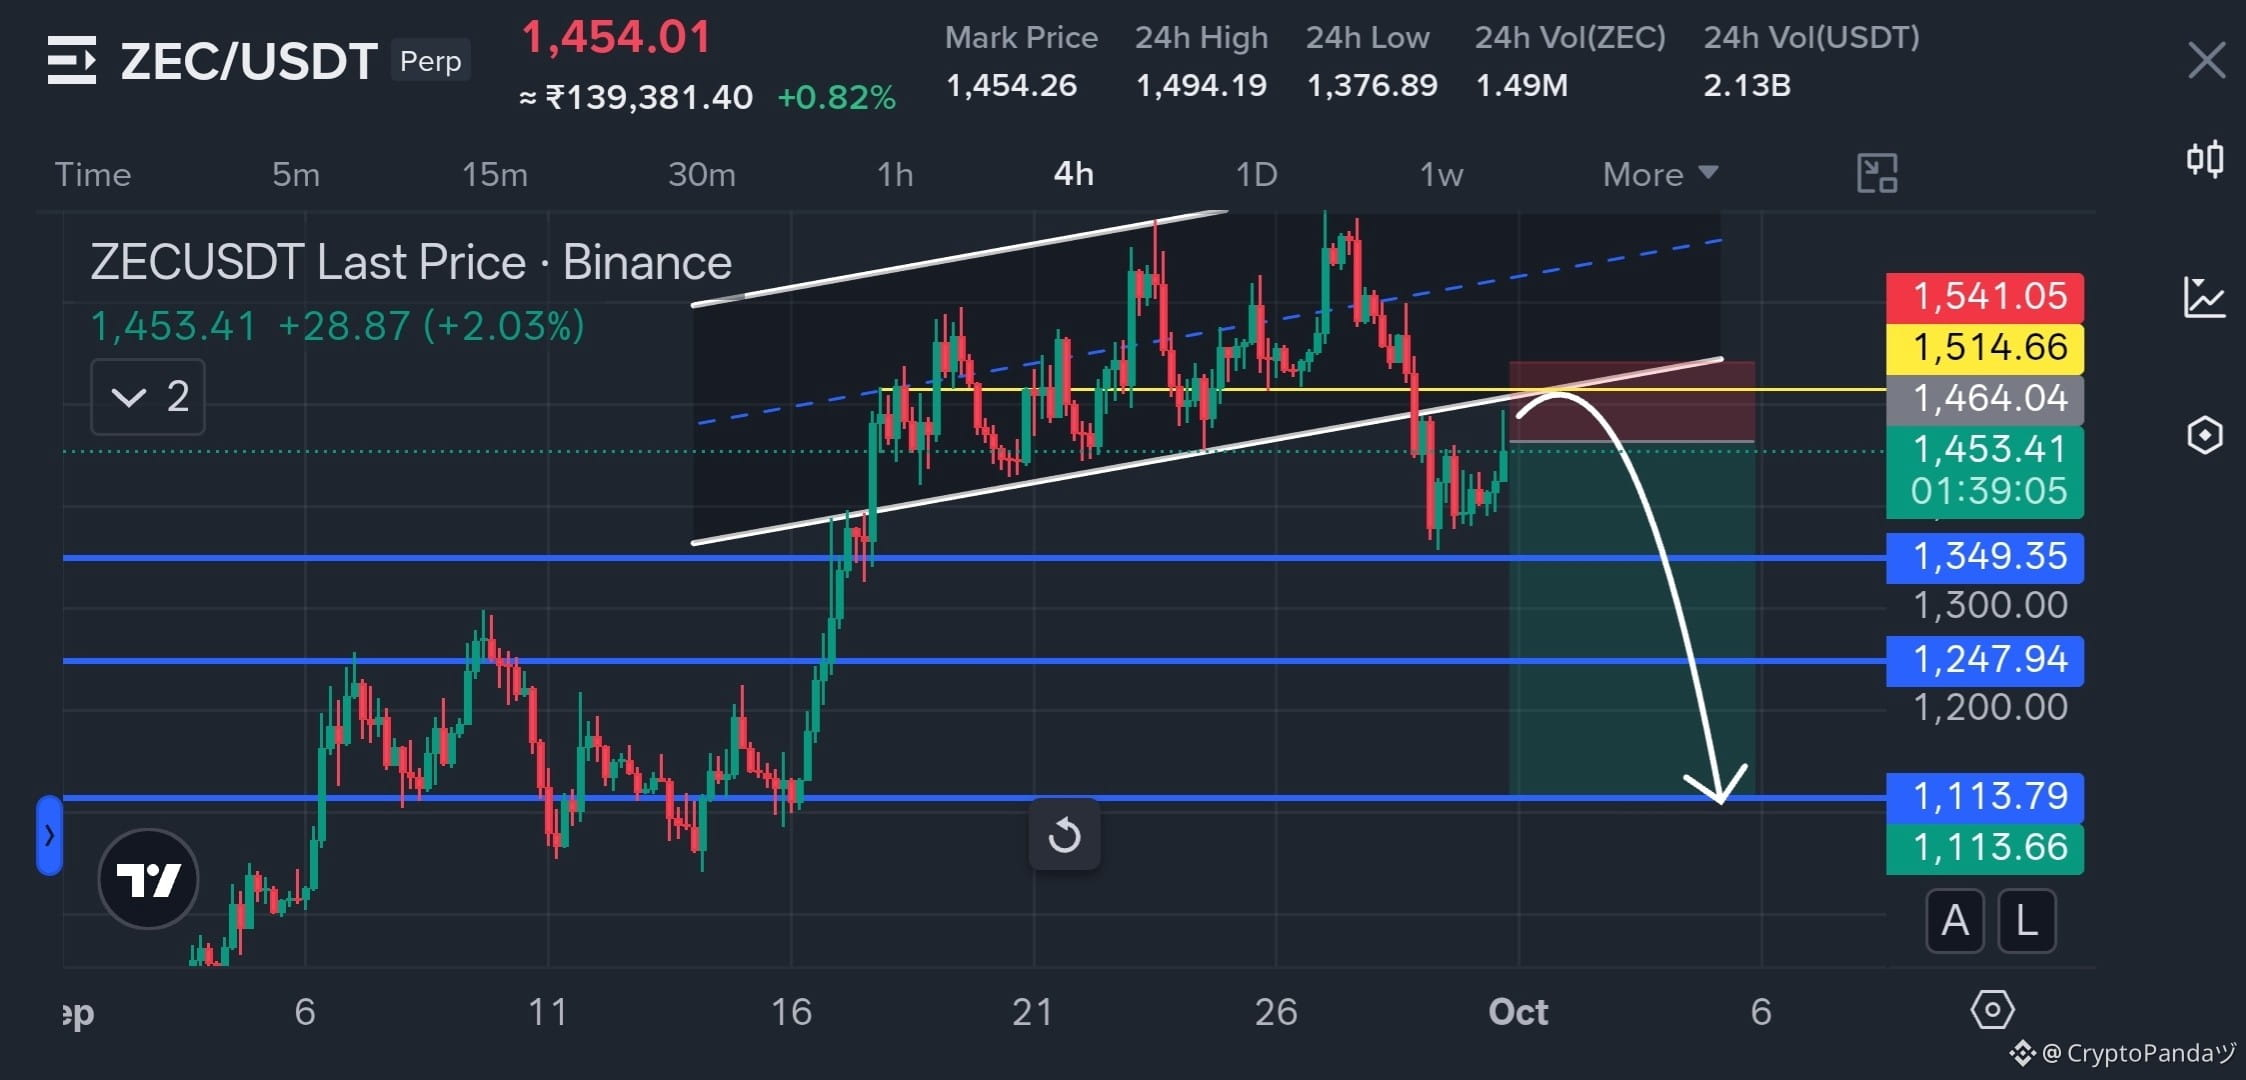
$ZEC — 4H Channel Breakdown Retesting 1464 Resistance, Flush Setup Loading 📉
Trade Plan: Short $ZEC
Entry: 1450 - 1500
SL: 1541.05
TP: 1349.35 | 1247.94 | 1113.79
Why this Setup?
The 4H rising channel has broken down, and price is now retesting the broken trendline around the 1464 resistance area. The 1514 - 1541 supply zone sits above the retest, while 1349.35 marks the first major downside support. A rejection from this breakdown-retest area could open the path toward the lower support levels. As long as 1541.05 holds, the bearish setup remains valid.
Trade $ZEC here 👇
{future}(ZECUSDT)
$ZEC — 4H Channel Breakdown Retesting 1464 Resistance, Flush Setup Loading 📉
Trade Plan: Short $ZEC
Entry: 1450 - 1500
SL: 1541.05
TP: 1349.35 | 1247.94 | 1113.79
Why this Setup?
The 4H rising channel has broken down, and price is now retesting the broken trendline around the 1464 resistance area. The 1514 - 1541 supply zone sits above the retest, while 1349.35 marks the first major downside support. A rejection from this breakdown-retest area could open the path toward the lower support levels. As long as 1541.05 holds, the bearish setup remains valid.
Trade $ZEC here 👇
Trade Plan: Short $ZEC
Entry: 1450 - 1500
SL: 1541.05
TP: 1349.35 | 1247.94 | 1113.79
Why this Setup?
The 4H rising channel has broken down, and price is now retesting the broken trendline around the 1464 resistance area. The 1514 - 1541 supply zone sits above the retest, while 1349.35 marks the first major downside support. A rejection from this breakdown-retest area could open the path toward the lower support levels. As long as 1541.05 holds, the bearish setup remains valid.
Trade $ZEC here 👇
2
211
·
--
ブリッシュ
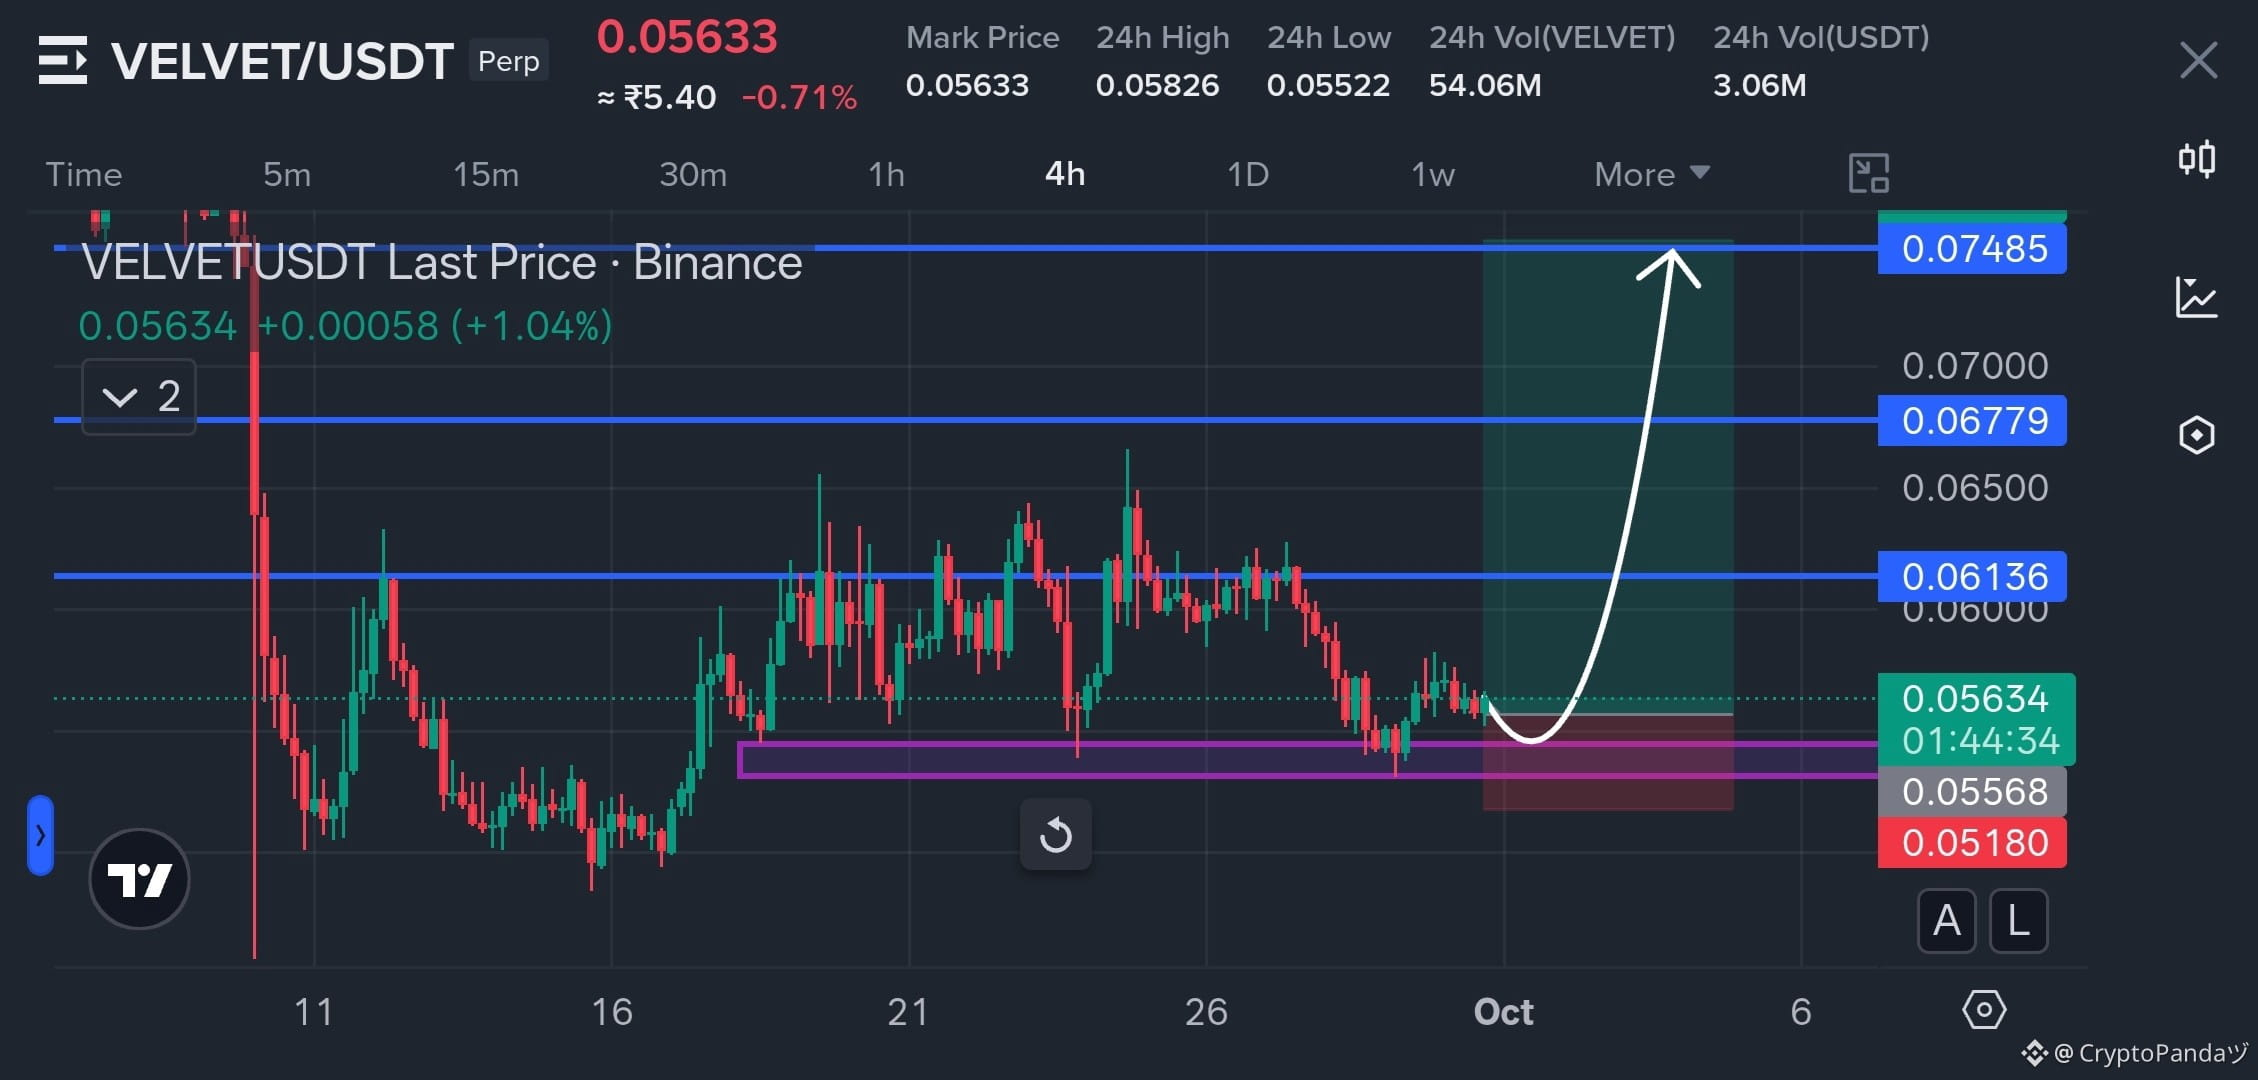
$VELVET — 0.05568での4Hデマンド・リテスト、上値回収の再加速 📈
取引プラン:ロング $VELVET
エントリー:0.055 - 0.057
SL:0.05180
TP:0.06136 | 0.06779 | 0.07485
なぜこのセットアップ?
4Hチャートは、このゾーンでの複数回の反応の後、0.05568デマンド・ゾーンの直上で圧縮しています。想定しているのは、0.055 - 0.057への最終的なスイープ、そして回収(リクレイム)です。このデマンドを維持できれば、価格はまず0.06136へ、その後0.06779、そして0.07485へ向かう可能性があります。0.05568での明確な損失は構造を弱め、一方0.05180は無効化(インバリデーション)の水準です。
取引 $VELVET ここ👇
{future}(VELVETUSDT)
$VELVET — 0.05568での4Hデマンド・リテスト、上値回収の再加速 📈
取引プラン:ロング $VELVET
エントリー:0.055 - 0.057
SL:0.05180
TP:0.06136 | 0.06779 | 0.07485
なぜこのセットアップ?
4Hチャートは、このゾーンでの複数回の反応の後、0.05568デマンド・ゾーンの直上で圧縮しています。想定しているのは、0.055 - 0.057への最終的なスイープ、そして回収(リクレイム)です。このデマンドを維持できれば、価格はまず0.06136へ、その後0.06779、そして0.07485へ向かう可能性があります。0.05568での明確な損失は構造を弱め、一方0.05180は無効化(インバリデーション)の水準です。
取引 $VELVET ここ👇
取引プラン:ロング $VELVET
エントリー:0.055 - 0.057
SL:0.05180
TP:0.06136 | 0.06779 | 0.07485
なぜこのセットアップ?
4Hチャートは、このゾーンでの複数回の反応の後、0.05568デマンド・ゾーンの直上で圧縮しています。想定しているのは、0.055 - 0.057への最終的なスイープ、そして回収(リクレイム)です。このデマンドを維持できれば、価格はまず0.06136へ、その後0.06779、そして0.07485へ向かう可能性があります。0.05568での明確な損失は構造を弱め、一方0.05180は無効化(インバリデーション)の水準です。
取引 $VELVET ここ👇
2
421
·
--
ブリッシュ
翻訳参照
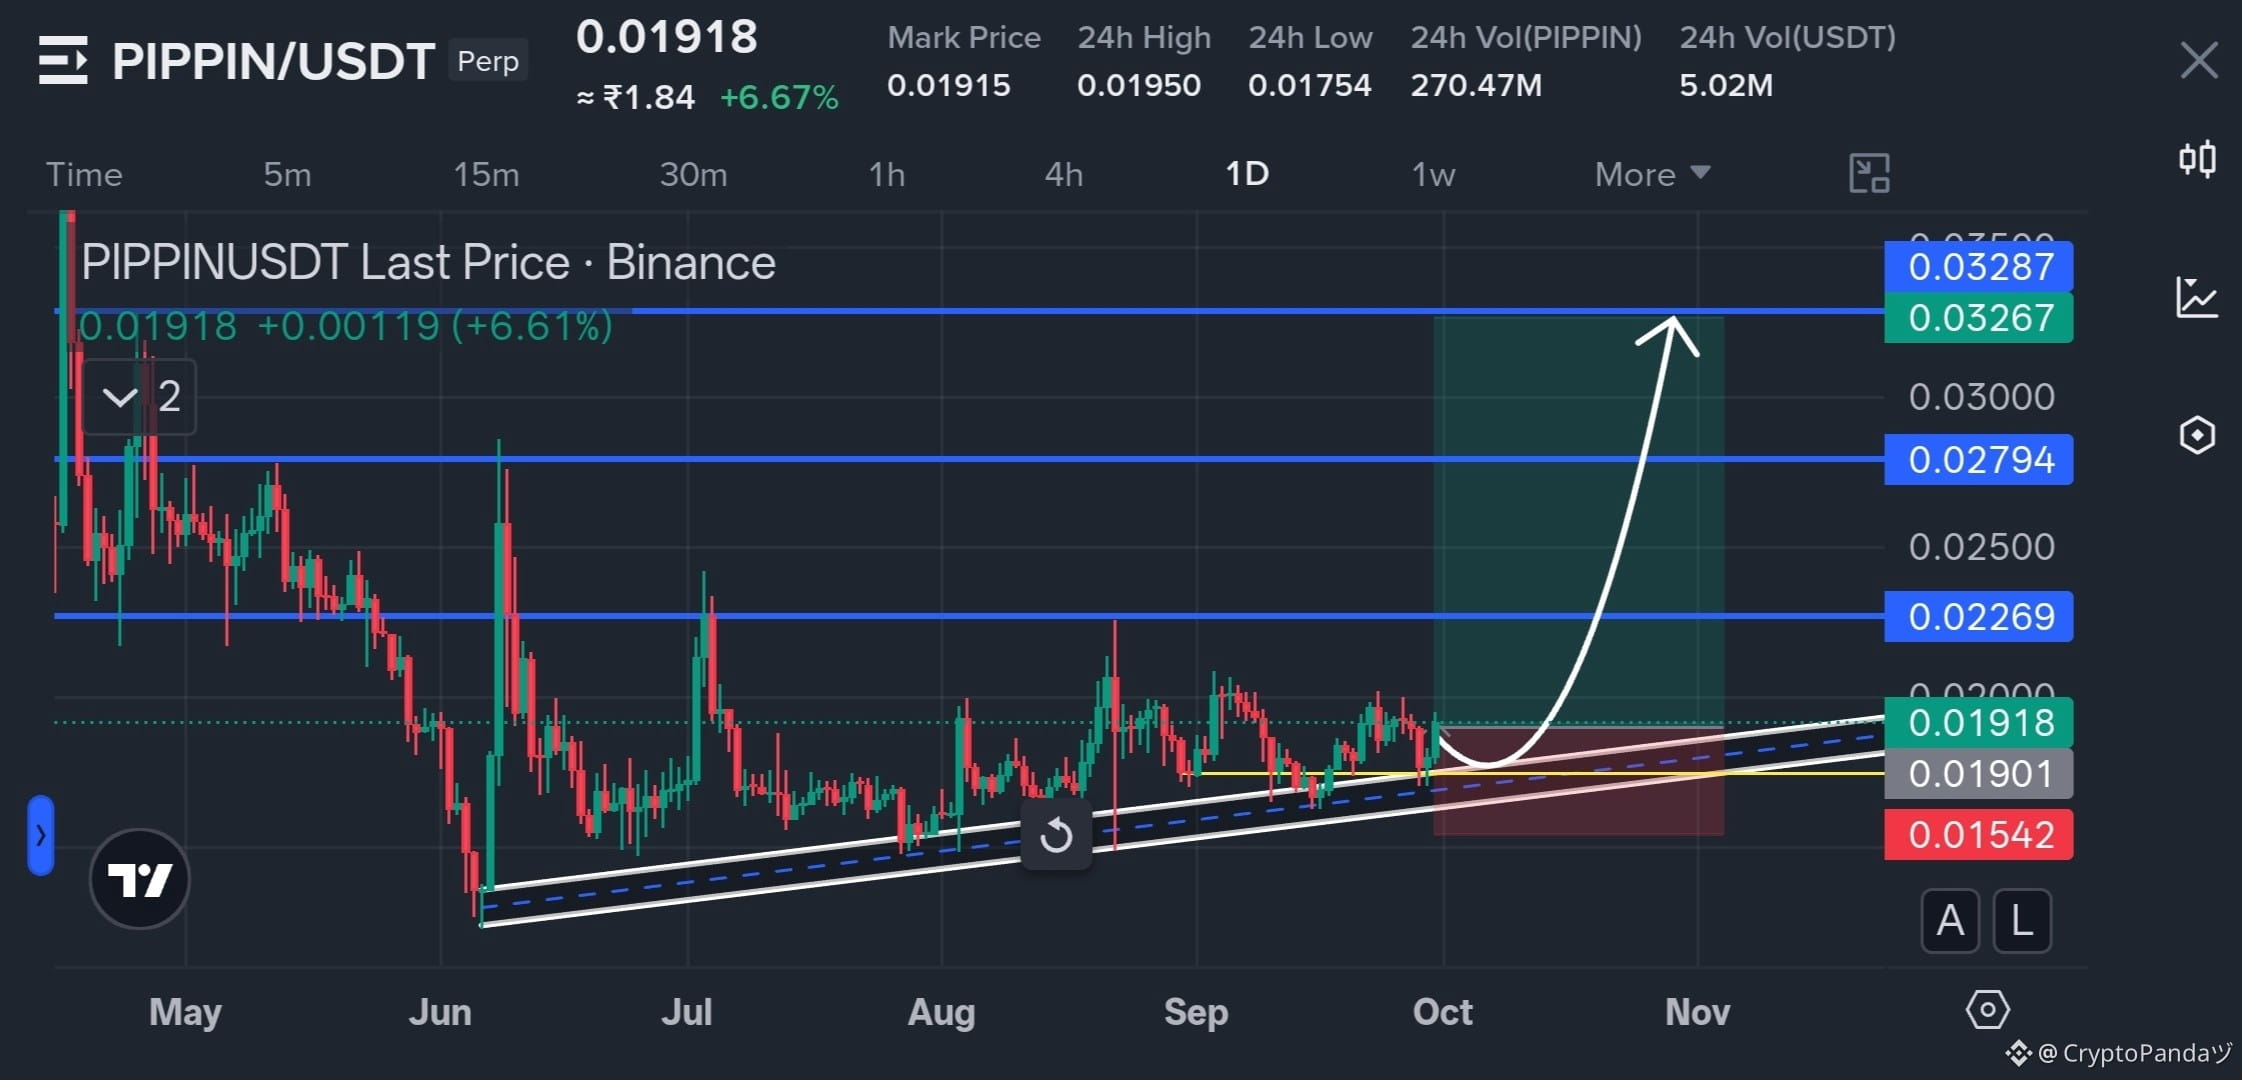
$PIPPIN — Ascending Trendline Holding at 0.01901, Breakout Loading 📈
Trade Plan: Long $PIPPIN
Entry: 0.0185 - 0.0195
SL: 0.01542
TP: 0.02269 | 0.02794 | 0.03287
Why this Setup?
Price is consolidating directly above the 0.01901 support while respecting the rising trendline. A successful bounce from this base could push it through 0.02269, with the next major upside levels at 0.02794 and 0.03287. As long as 0.01542 holds, the bullish setup remains valid.
Trade $pippin here 👇
{alpha}(CT_501Dfh5DzRgSvvCFDoYc2ciTkMrbDfRKybA4SoFbPmApump)
{future}(PIPPINUSDT)
$PIPPIN — Ascending Trendline Holding at 0.01901, Breakout Loading 📈
Trade Plan: Long $PIPPIN
Entry: 0.0185 - 0.0195
SL: 0.01542
TP: 0.02269 | 0.02794 | 0.03287
Why this Setup?
Price is consolidating directly above the 0.01901 support while respecting the rising trendline. A successful bounce from this base could push it through 0.02269, with the next major upside levels at 0.02794 and 0.03287. As long as 0.01542 holds, the bullish setup remains valid.
Trade $pippin here 👇
Trade Plan: Long $PIPPIN
Entry: 0.0185 - 0.0195
SL: 0.01542
TP: 0.02269 | 0.02794 | 0.03287
Why this Setup?
Price is consolidating directly above the 0.01901 support while respecting the rising trendline. A successful bounce from this base could push it through 0.02269, with the next major upside levels at 0.02794 and 0.03287. As long as 0.01542 holds, the bullish setup remains valid.
Trade $pippin here 👇
3
191
·
--
弱気相場
翻訳参照
$QNT — 4H Resistance Cluster at 317.53–326.62, Reversal Incoming 📉
Trade Plan: Short $QNT
Entry: 315 - 325
SL: 335.43
TP: 279.03 | 239.02 | 202.73
Why this Setup?
The 4H chart shows price pushing into the 317.53–326.62 resistance zone after a strong recovery, with 335.43 acting as the invalidation level. A rejection from this supply area could trigger a deeper pullback toward the marked support levels at 279.03, 239.02 and 202.73.
Trade $QNT here 👇
{future}(QNTUSDT)
$QNT — 4H Resistance Cluster at 317.53–326.62, Reversal Incoming 📉
Trade Plan: Short $QNT
Entry: 315 - 325
SL: 335.43
TP: 279.03 | 239.02 | 202.73
Why this Setup?
The 4H chart shows price pushing into the 317.53–326.62 resistance zone after a strong recovery, with 335.43 acting as the invalidation level. A rejection from this supply area could trigger a deeper pullback toward the marked support levels at 279.03, 239.02 and 202.73.
Trade $QNT here 👇
Trade Plan: Short $QNT
Entry: 315 - 325
SL: 335.43
TP: 279.03 | 239.02 | 202.73
Why this Setup?
The 4H chart shows price pushing into the 317.53–326.62 resistance zone after a strong recovery, with 335.43 acting as the invalidation level. A rejection from this supply area could trigger a deeper pullback toward the marked support levels at 279.03, 239.02 and 202.73.
Trade $QNT here 👇
2
309
ログインして、さらにコンテンツを読む
厳選トピックで世界の暗号資産トレーダーの仲間入り
⚡️ 暗号資産に関する最新かつ有益な情報が見つかります。
💬 世界最大の暗号資産取引所から信頼されています。
👍 認証を受けたクリエイターから、有益なインサイトを得られます。
メール / 電話番号
トレンドトピック
BitcoinClears$85200
閲覧回数 5,242
147人が討論中
動きが出て、$BTC はデータがあった直前にあった場所にそのまま立っています。取引における本当の忍耐ってこういうことです。
データは混ざって入ってきましたが、いくつか重要な数字がありました。ADP 非農業部門雇用者数は予想の73Kに対して90Kでした。一方でコアPCEは、予想の0.3%に対して0.2%です。最終的なGDPも予想の1.5%に対して2.2%と強めでした。個人消費は予想の0.8%に対して0.9%でした。同時に、個人所得は予想の0.5%に対して0.2%で未達でした。
BTCは最初に85,600ドルまで急騰しましたが、今は必要なところに戻っています。私は引き続き、82,759ドルと80,000ドルの流動性の低いレンジを見ています。上側の流動性はもう終わって、あとは塵も残っていないからです。
データ発表中にライブセッションを行いました。その中で、市場は83,800ドル→85,600ドル→そして83,000ドル付近へと戻っていくのを見ました。それでも私たちは取引に入りませんでした。
それが忍耐です。
市場に明確な方向性がないときは、無理にエントリーはできません。同じレンジがまだ注目ポイントで、相場がセットアップを提示してくれるまで待ちます。
みなさん、セッションはどうでしたか? それから、尊敬するメンバーの皆さんともっと定期的にセッションをするべきでしょうか。そうすれば、市場について適切に議論できます。
#BitcoinClears$85200 #AltcoinSeasonIndexHoldsAbove60For5Days #USADPAdds90000JobsInSeptember #BitcoinSlipsBelow$84000 #SECToClarifyOnChainFundraisingRules
Crypto_LUX
·いいね:23件
·閲覧回数 11.1k
AltcoinSeasonIndexHoldsAbove60For5Days
閲覧回数 30,760
892人が討論中
USADPAdds90000JobsInSeptember
閲覧回数 13,296
519人が討論中