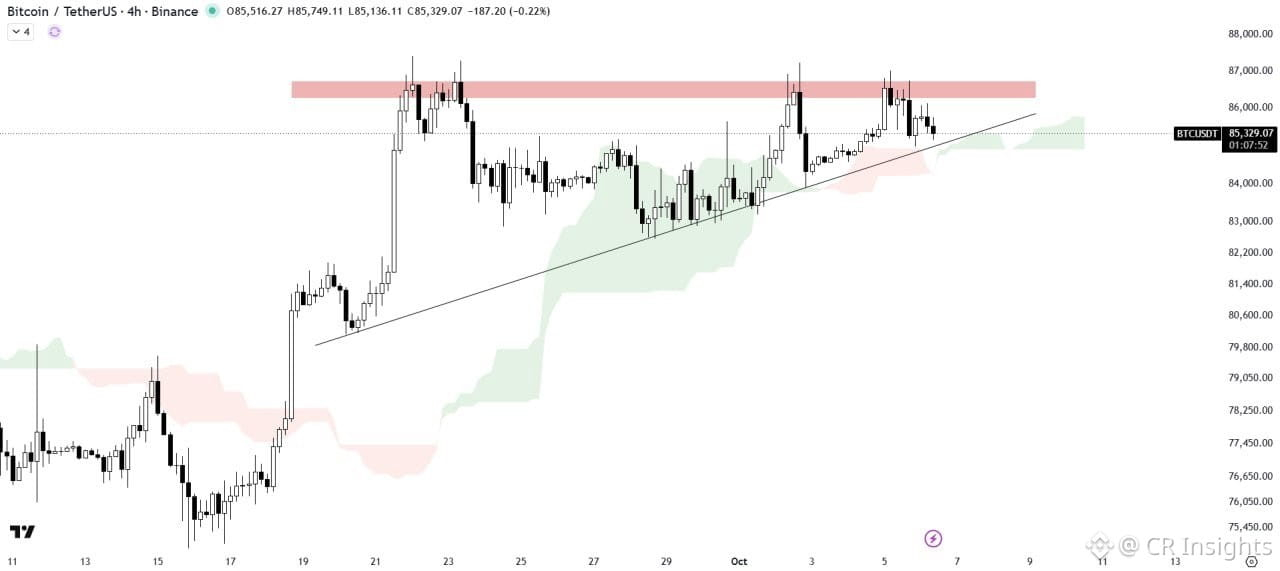
$BTC is sitting right where the 4H setup gets interesting.
The chart is an ascending triangle, with higher lows pushing into the same $86.3K–$86.7K resistance. Price is now back around $84K–$85K, so the rising support is being tested.
If BTC gets back above $86.7K, I want a 4H close above the resistance and then a retest that holds. That confirms the breakout. Long entry $86.7K–$87K, SL $85.8K, TP1 $87.6K, TP2 $90K, TP3 $92K. If BTC breaks back below the retest, the breakout setup is invalid.
If BTC loses $84.2K, I want a 4H close below it and then a failed retest from underneath. That confirms the breakdown. Short entry $83.9K–$84.2K, SL $85.2K, TP1 $83.3K, TP2 $82.5K, TP3 $81.5K. Reclaiming $85.2K invalidates the short setup.
So the trade map is simple.
Break $86.7K + retest → Long → $87.6K / $90K / $92K
Break $84.2K + failed retest → Short → $83.3K / $82.5K / $81.5K
Until one side confirms, there’s no clean trade in the middle
The chart is an ascending triangle, with higher lows pushing into the same $86.3K–$86.7K resistance. Price is now back around $84K–$85K, so the rising support is being tested.
If BTC gets back above $86.7K, I want a 4H close above the resistance and then a retest that holds. That confirms the breakout. Long entry $86.7K–$87K, SL $85.8K, TP1 $87.6K, TP2 $90K, TP3 $92K. If BTC breaks back below the retest, the breakout setup is invalid.
If BTC loses $84.2K, I want a 4H close below it and then a failed retest from underneath. That confirms the breakdown. Short entry $83.9K–$84.2K, SL $85.2K, TP1 $83.3K, TP2 $82.5K, TP3 $81.5K. Reclaiming $85.2K invalidates the short setup.
So the trade map is simple.
Break $86.7K + retest → Long → $87.6K / $90K / $92K
Break $84.2K + failed retest → Short → $83.3K / $82.5K / $81.5K
Until one side confirms, there’s no clean trade in the middle