
A first-person account of moving from "watching APR numbers" to actually running a liquidity position on STON.fi — the mistakes, the surprises, and the one lesson I wish someone had told me on day one.
I'd read every explainer I could find about liquidity provision before I actually did it. I understood the theory — the 0.3% fee split, the AMM math, the concept of impermanent loss. What I didn't have was the lived experience of watching a real position move for thirty straight days, and it turns out that gap between "understanding the mechanism" and "having actually sat with it" is bigger than I expected. So here's the honest version, mistakes included.
My honest take before we get into it: nothing about my first month was catastrophic, but almost everything about it was more nuanced than the explainer content I'd read prepared me for. Theory gets you 70% of the way there. The rest you only get from actually doing it.
📥 Week One: Picking a Pool Was Harder Than It Should Have Been
I went in wanting to keep things simple, which in hindsight was the right instinct even though I second-guessed it constantly. I chose a TON/USDT pool instead of chasing the highest advertised APR I could find elsewhere, and I want to be upfront about why: the pools showing eye-watering yields were almost always thin, obscure pairs with volatility I genuinely didn't understand yet. Starting there would have meant learning two hard lessons at once — how liquidity provision works, and how volatile, low-liquidity assets behave — and I only had the appetite to learn one at a time.

Connecting my wallet and actually depositing was mechanically simple — a few clicks, review the deposit ratio, confirm. What surprised me was smaller than I expected: the amounts of each token I deposited weren't exactly 50/50 by my own calculation, because the pool's current price ratio determined the split, not some fixed rule I could set myself. I'd read about this in passing but genuinely didn't internalize it until I saw my own deposit confirmation showing numbers slightly different from what I'd typed in.
Started with a stablecoin-adjacent pair specifically to reduce variables while learning
Deposited a modest amount I was fully prepared to not touch for the full month
Didn't check the position again for nearly 48 hours, which in hindsight was exactly the right instinct
📊 Week Two: Watching the APR Number Move Around Was Genuinely Unsettling
This is where the gap between reading about APR and actually watching it live hit me. The displayed APR wasn't a fixed number I could bank on — it fluctuated day to day based on trading volume through the pool, and during my second week it swung more than I expected, some days notably higher, others noticeably lower.
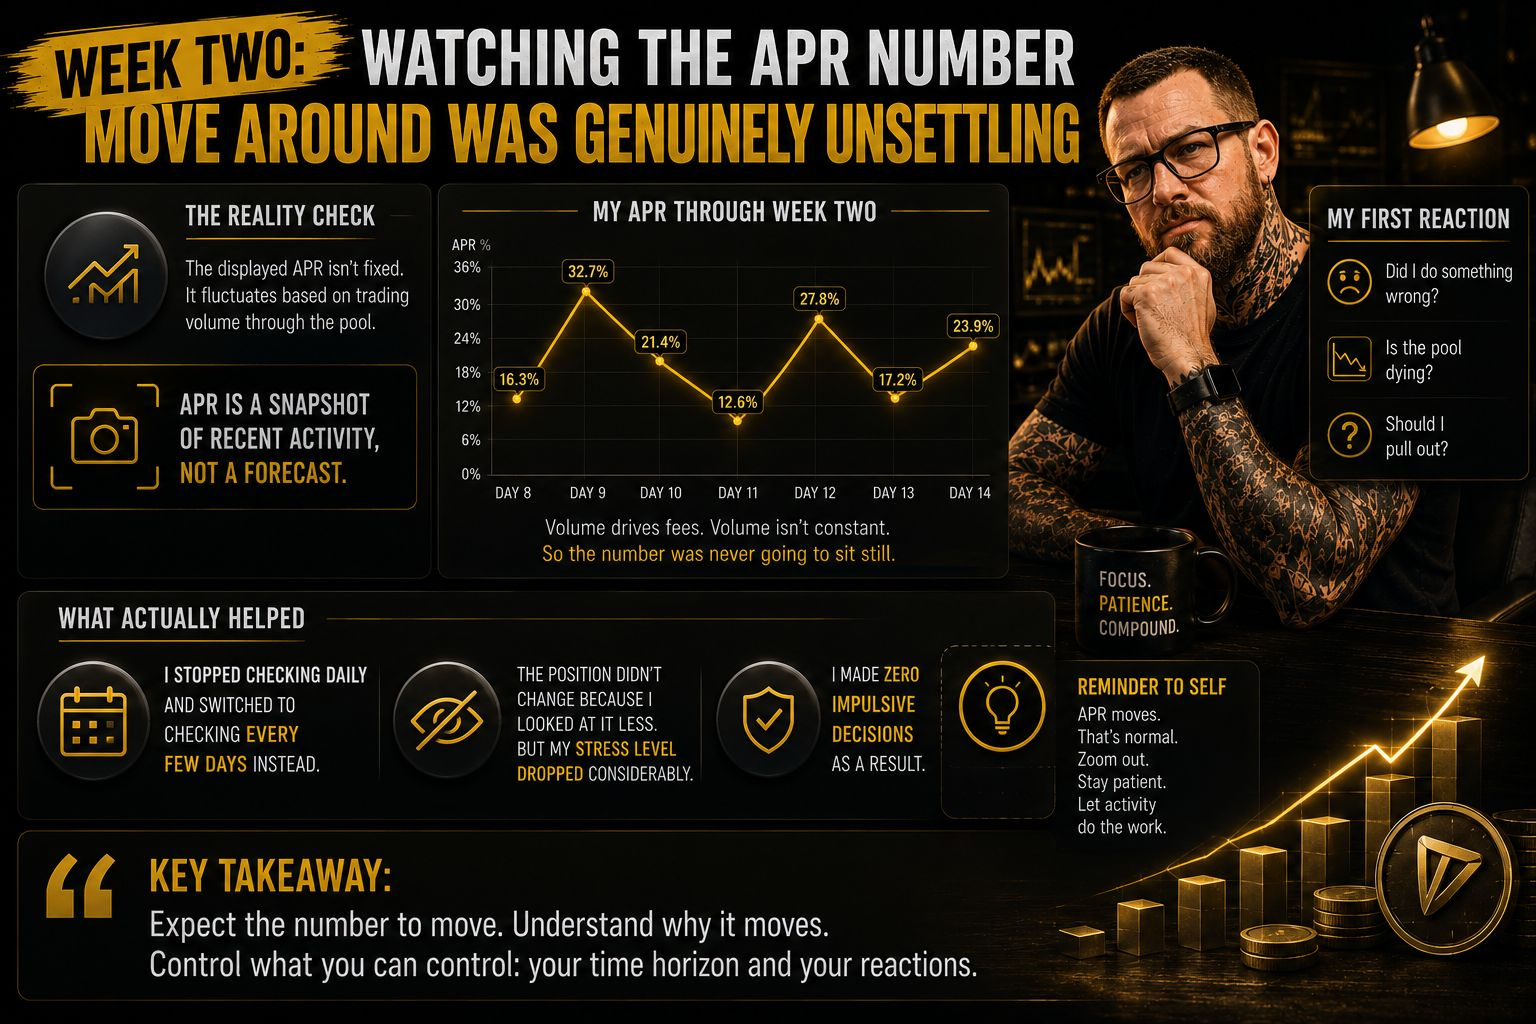
My first instinct, if I'm honest, was mild panic on the low days. Did I do something wrong? Is the pool dying? It took actually sitting with it to internalize what should have been obvious from the explainer content I'd already read: APR is a snapshot of recent activity, not a forecast, and it never was supposed to be stable day to day. Volume drives fees, volume isn't constant, therefore the number showing on my screen was never going to sit still.
What actually helped: I stopped checking daily and switched to checking every few days instead. The position didn't change because I looked at it less — but my stress level dropped considerably, and I made zero impulsive decisions as a result.
⚖️ Week Three: The Week I Finally Understood Impermanent Loss, Not Just Recited It
I'd read the definition of impermanent loss a dozen times before this month. I could have recited it accurately in a conversation. But there's a difference between reciting a definition and watching your own position's composition quietly shift as one asset moved relative to the other — and week three is when that difference became real for me.
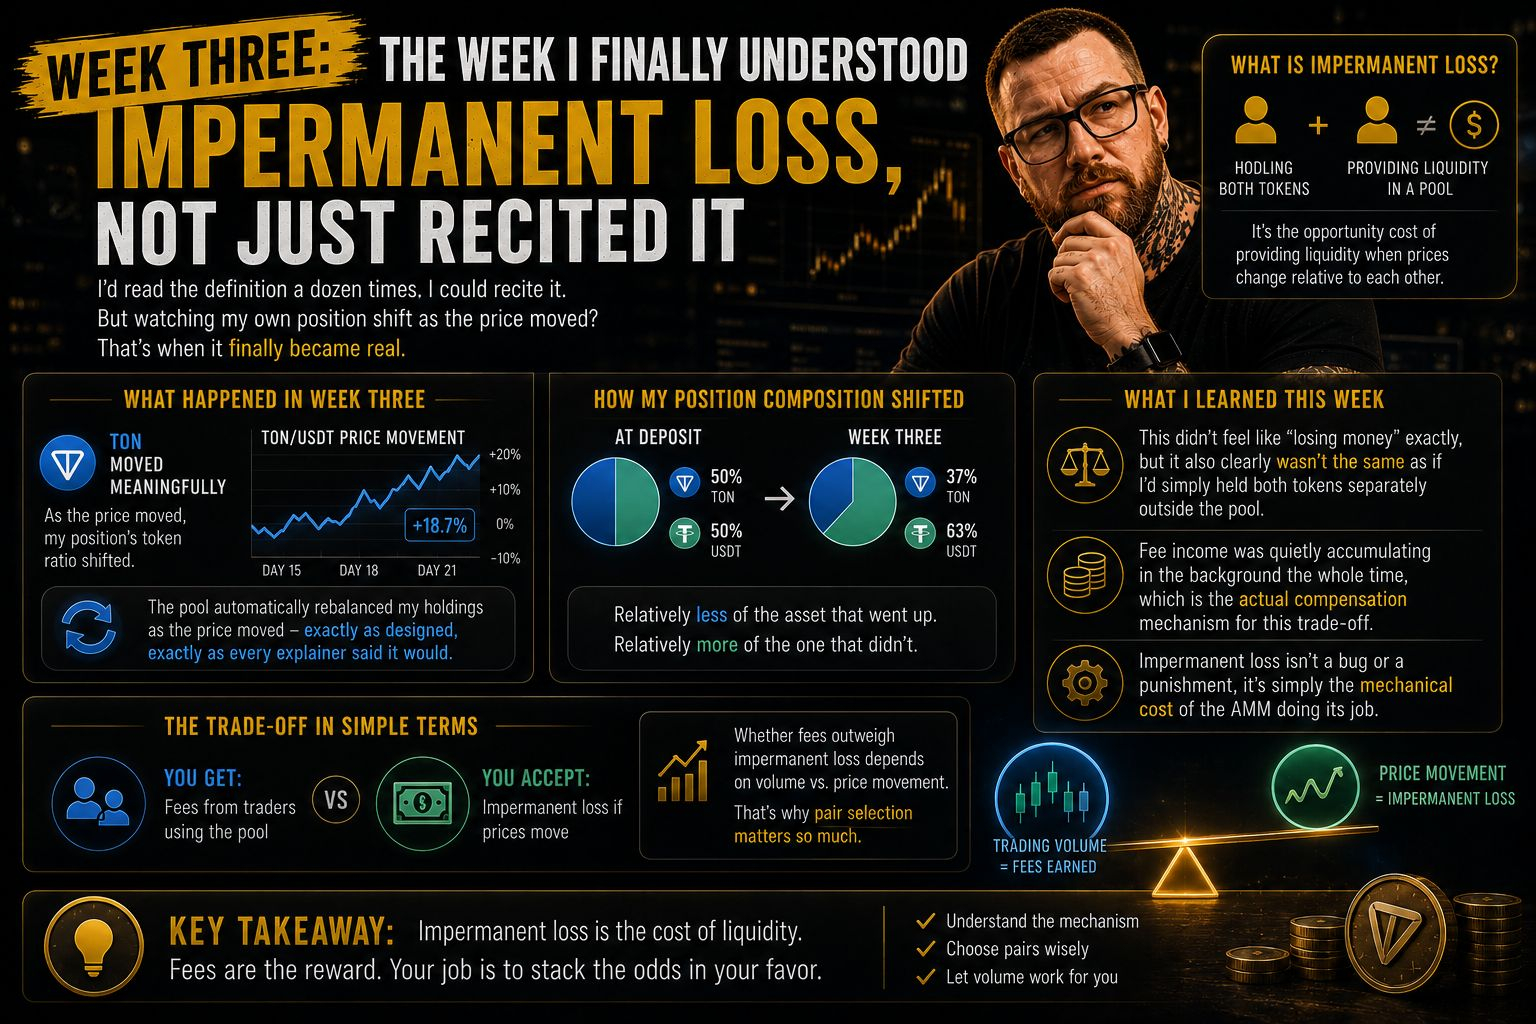
TON moved meaningfully during that stretch, and I noticed my position's token ratio had shifted from what I'd originally deposited. The pool had automatically rebalanced my holdings as the price moved — exactly as designed, exactly as every explainer had told me it would — but seeing it happen to my own money felt different than reading about the mechanism in the abstract.
My position held relatively less of the asset that had gone up in price, and relatively more of the one that hadn't
This didn't feel like "losing money" exactly, but it also clearly wasn't the same as if I'd simply held both tokens separately outside the pool
Fee income was quietly accumulating in the background the whole time, which is the actual compensation mechanism for this specific trade-off
The lesson that finally landed: impermanent loss isn't a bug or a punishment, it's simply the mechanical cost of the AMM doing its job of maintaining a tradeable pool. Whether fees outweigh it depends entirely on how much volume flows through relative to how much the underlying assets moved — which is precisely why pair selection matters so much more than I appreciated going in.
🧮 Week Four: Doing the Actual Math Instead of Trusting the Dashboard Number
By the final week, I wanted a real answer, not a vibe. So I actually sat down and compared my position's current value against what I would have had if I'd simply held both tokens separately from day one, outside any pool. This is the comparison that actually matters, and it's also the one the interface doesn't do for you automatically — you have to go looking for it yourself.

The result, for my specific pool and specific month, was modestly positive relative to just holding — the accumulated fees outweighed the impermanent loss from TON's price movement over that period. I want to be careful not to oversell that outcome, though, because I'm acutely aware it's one data point from one month in one specific pool during one specific set of market conditions, not a rule I can extrapolate forward with any confidence.
If there's one number I'd tell past-me to actually calculate before getting emotionally invested in the "up" or "down" feeling: compare against simply holding. Everything else is secondary to that one comparison.
🛠️ The Practical Things Nobody's Explainer Mentioned
A few smaller, unglamorous things I picked up that didn't make it into any guide I'd read beforehand, but genuinely shaped how I'll approach my next position:
Network fees for deposits, withdrawals, and any claim actions add up faster than you'd think if you're actively managing rather than setting and forgetting
Checking the position too frequently made me feel more informed while actually just increasing my stress without changing any decision I made
The auto-compounding design meant I never had to manually claim anything — my "profit" only became concrete and countable the moment I actually withdrew
🧭 What I'd Tell Someone Starting Their First Position Today

Looking back at the whole month, the advice I'd actually give isn't complicated, but it's specific in a way the general explainer content wasn't for me:
Start with a pair you actually understand the volatility profile of, not the one with the flashiest advertised APR
Deposit an amount you're genuinely comfortable not touching, because checking constantly doesn't help and does add stress
Manually calculate the "versus just holding" comparison yourself at some point — don't just trust the dashboard's framing
Expect the APR number to move around; that's normal, not a warning sign
Treat impermanent loss as a real, understood trade-off you're being compensated for, not a mistake you made
None of this makes liquidity provision risk-free, and I don't think that's the right takeaway from any single month of one person's experience. But going from reciting the theory to actually living inside a position for thirty days changed how I think about every part of it — in ways that reading, on its own, genuinely couldn't.
$GRAM