

Arthur Mint
3.8k Publications

Arthur Mint
 Compte Square Vérifié+
Signaler
Bloquer l’utilisateur
Arthur is here. Crypto Expert. Web3 Builder. Verified KOL on Binance Square. Let's keep growing together: X - @ArthurMint_
72 Suivis
43.9K+ Abonnés
14.3K+ J’aime
Publications
Tous
Direct
·
--
🎙️ 🎉2026狂暴牛市,号角已吹响,行情尽在BSC链!!11月1号马斯克将为火星狗Marvin庆祝生日,这波链上行情一定要抓住!
Fin
02 h 27 min 07 sec
5.3k
10
39
·
--
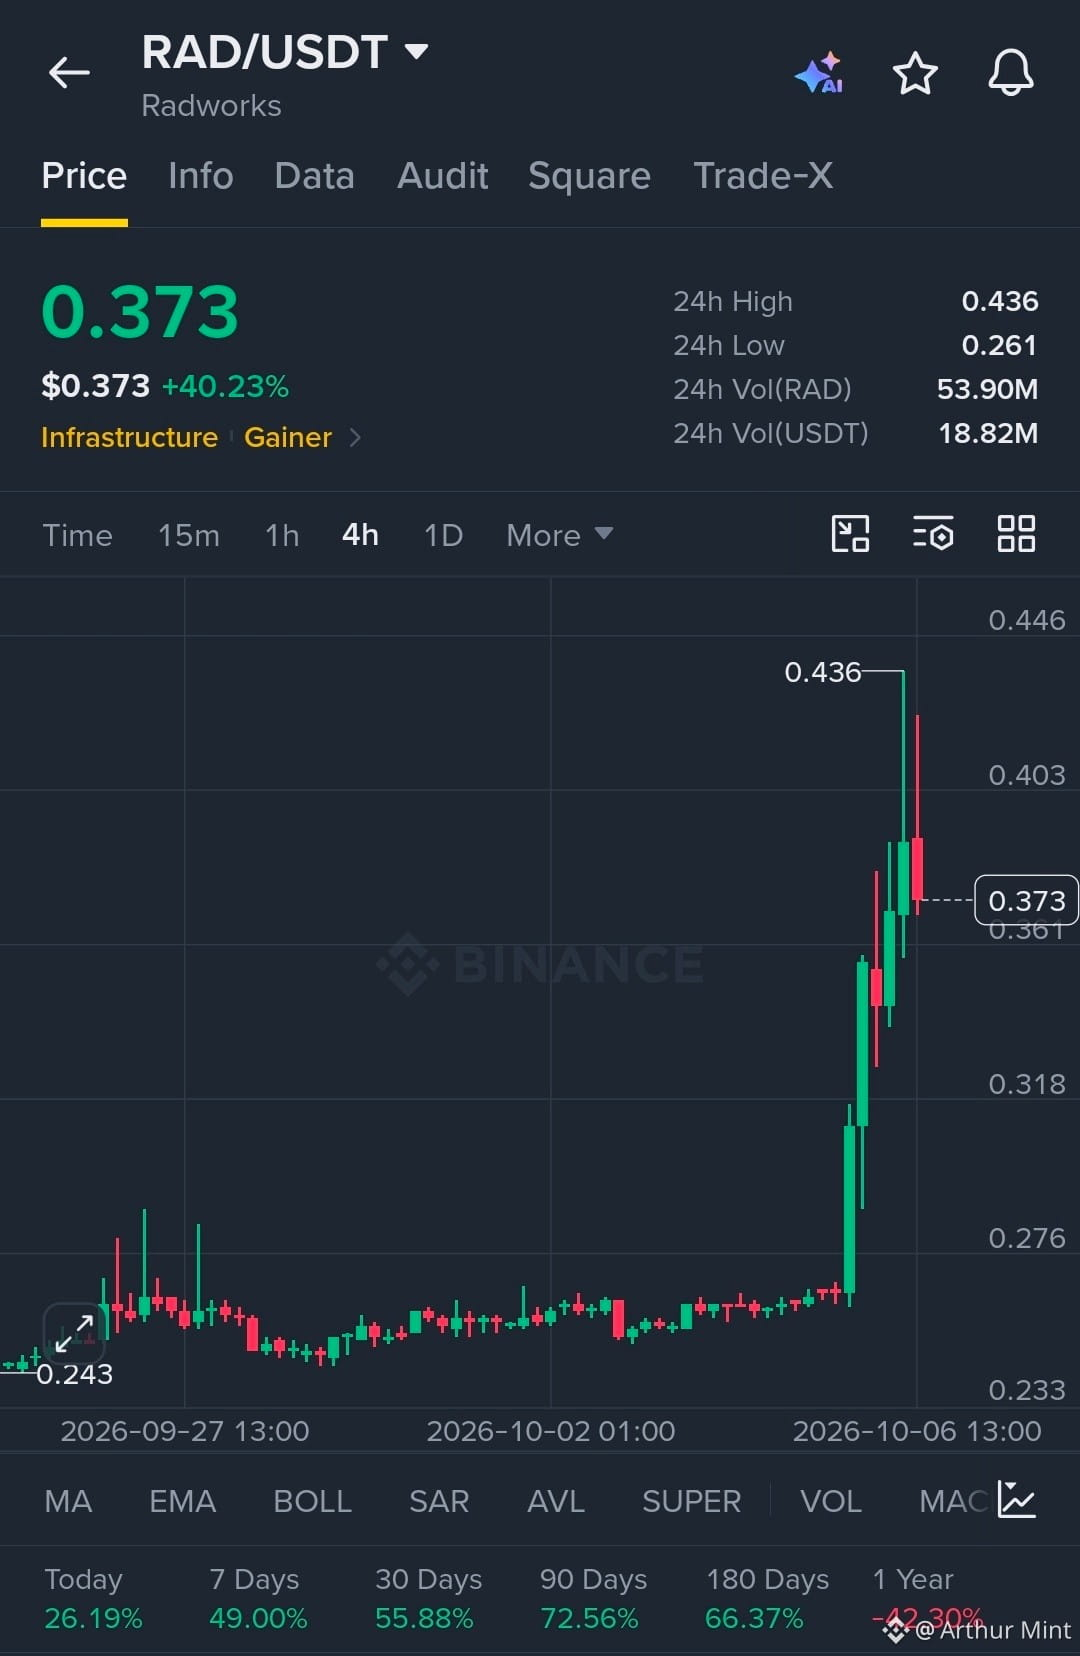
$RAD showing strong bullish strength after a sharp breakout with momentum holding above key support.
Buyers remain in control as the structure continues to form higher highs and higher lows.
EP
0.365 - 0.375
TP
TP1 0.403
TP2 0.436
TP3 0.470
SL
0.348
Liquidity remains stacked above the recent high, while any pullback into the breakout zone can trigger a strong reaction. Structure stays bullish as long as RAD holds above the key support area.
Let’s go $RAD
$RAD showing strong bullish strength after a sharp breakout with momentum holding above key support.
Buyers remain in control as the structure continues to form higher highs and higher lows.
EP
0.365 - 0.375
TP
TP1 0.403
TP2 0.436
TP3 0.470
SL
0.348
Liquidity remains stacked above the recent high, while any pullback into the breakout zone can trigger a strong reaction. Structure stays bullish as long as RAD holds above the key support area.
Let’s go $RAD
Buyers remain in control as the structure continues to form higher highs and higher lows.
EP
0.365 - 0.375
TP
TP1 0.403
TP2 0.436
TP3 0.470
SL
0.348
Liquidity remains stacked above the recent high, while any pullback into the breakout zone can trigger a strong reaction. Structure stays bullish as long as RAD holds above the key support area.
Let’s go $RAD
1
1
277
·
--
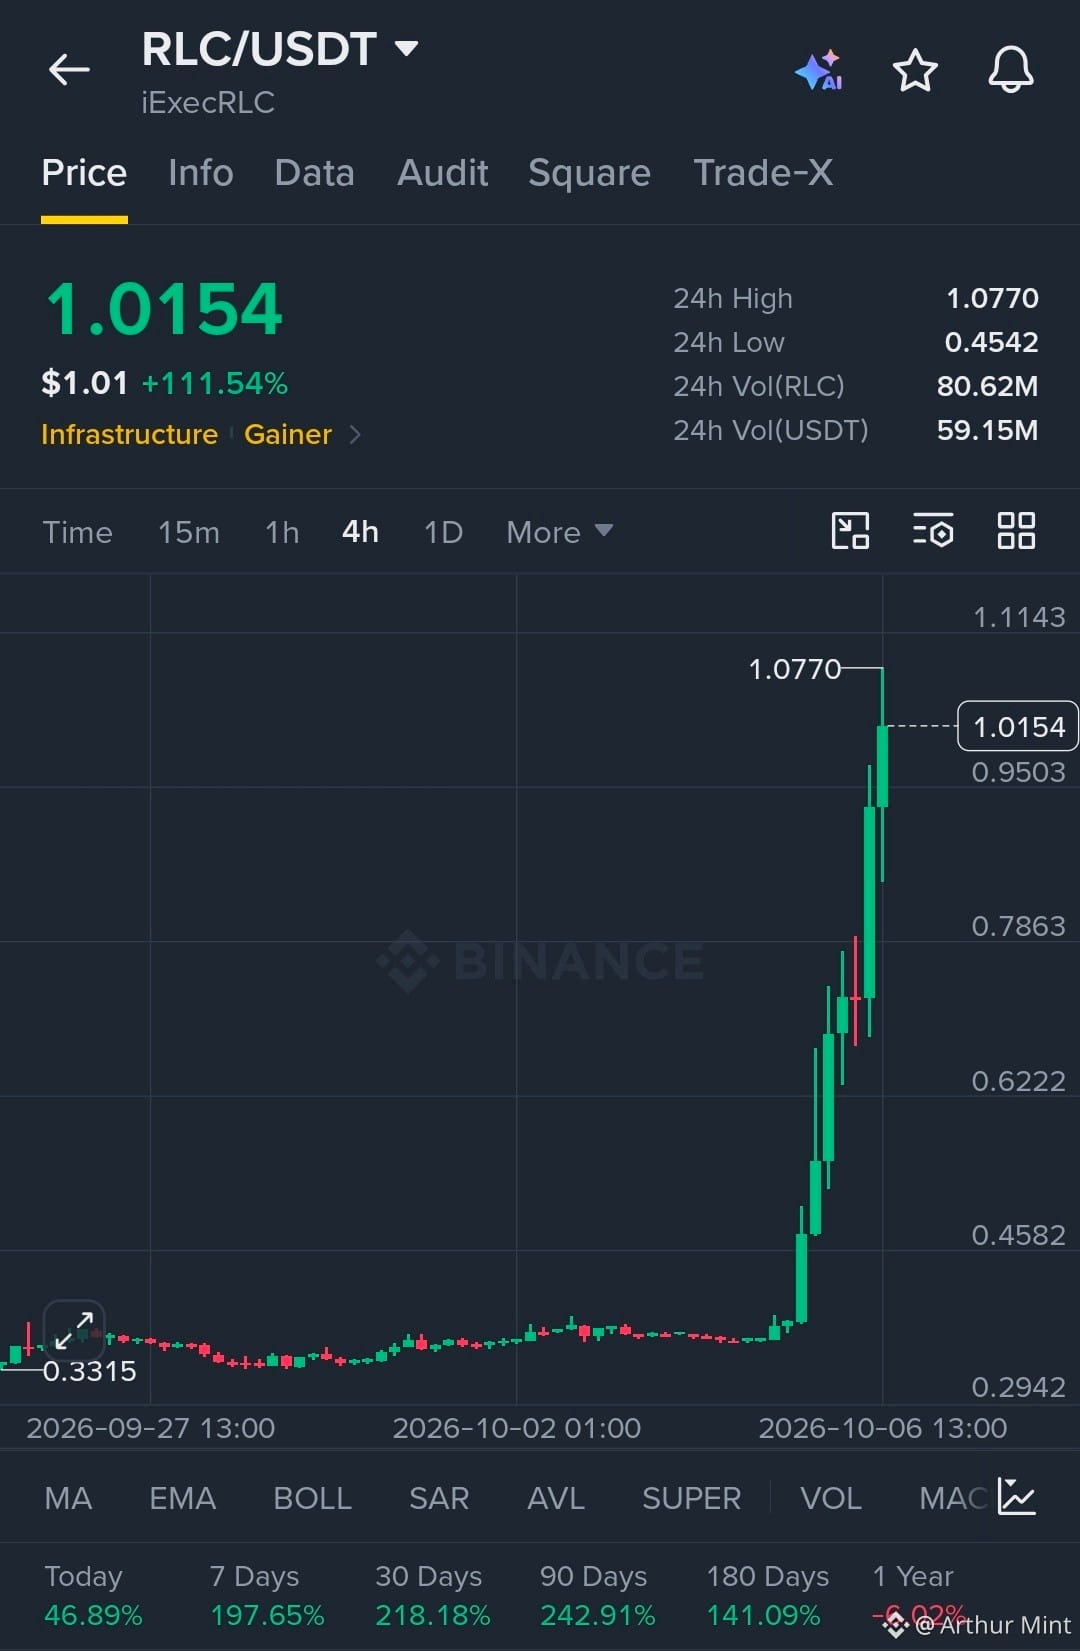
$RLC is showing explosive strength with aggressive upside momentum.
Buyers are in control, with structure holding above the breakout zone.
EP
0.95 - 1.01
TP
TP1 1.08
TP2 1.15
TP3 1.25
SL
0.88
Liquidity remains stacked above the recent high, while reactions around the breakout zone will confirm whether buyers can sustain the move. Structure remains bullish as long as price holds the entry zone.
Let’s go $RLC
$RLC is showing explosive strength with aggressive upside momentum.
Buyers are in control, with structure holding above the breakout zone.
EP
0.95 - 1.01
TP
TP1 1.08
TP2 1.15
TP3 1.25
SL
0.88
Liquidity remains stacked above the recent high, while reactions around the breakout zone will confirm whether buyers can sustain the move. Structure remains bullish as long as price holds the entry zone.
Let’s go $RLC
Buyers are in control, with structure holding above the breakout zone.
EP
0.95 - 1.01
TP
TP1 1.08
TP2 1.15
TP3 1.25
SL
0.88
Liquidity remains stacked above the recent high, while reactions around the breakout zone will confirm whether buyers can sustain the move. Structure remains bullish as long as price holds the entry zone.
Let’s go $RLC
678
·
--
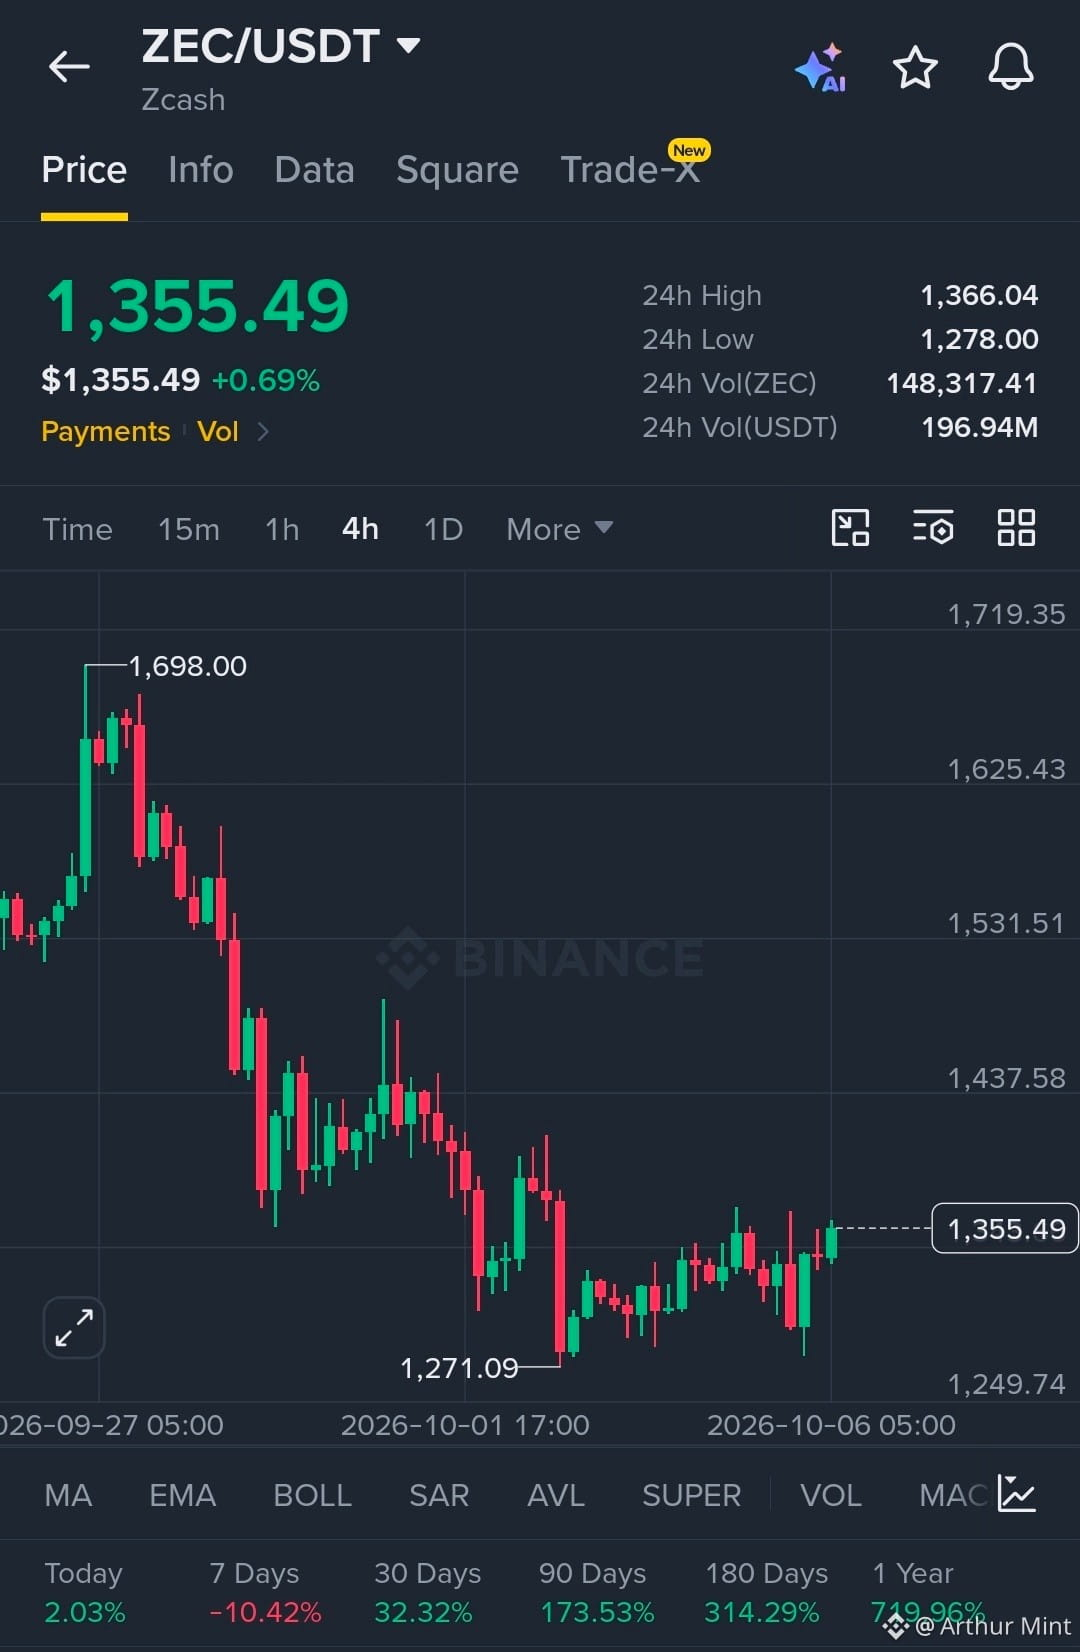
$ZEC showing strong recovery momentum from the 1,271 liquidity zone.
Structure is shifting bullish with buyers maintaining control above the 1,330–1,350 support area.
EP
1,350–1,360
TP
TP1 1,390
TP2 1,430
TP3 1,480
SL
1,315
Liquidity below 1,330 has been absorbed, while price continues to form higher lows and react strongly from demand. A clean break above 1,370 can open the path toward the next liquidity zones.
Let’s go $ZEC
$ZEC showing strong recovery momentum from the 1,271 liquidity zone.
Structure is shifting bullish with buyers maintaining control above the 1,330–1,350 support area.
EP
1,350–1,360
TP
TP1 1,390
TP2 1,430
TP3 1,480
SL
1,315
Liquidity below 1,330 has been absorbed, while price continues to form higher lows and react strongly from demand. A clean break above 1,370 can open the path toward the next liquidity zones.
Let’s go $ZEC
Structure is shifting bullish with buyers maintaining control above the 1,330–1,350 support area.
EP
1,350–1,360
TP
TP1 1,390
TP2 1,430
TP3 1,480
SL
1,315
Liquidity below 1,330 has been absorbed, while price continues to form higher lows and react strongly from demand. A clean break above 1,370 can open the path toward the next liquidity zones.
Let’s go $ZEC
306
·
--
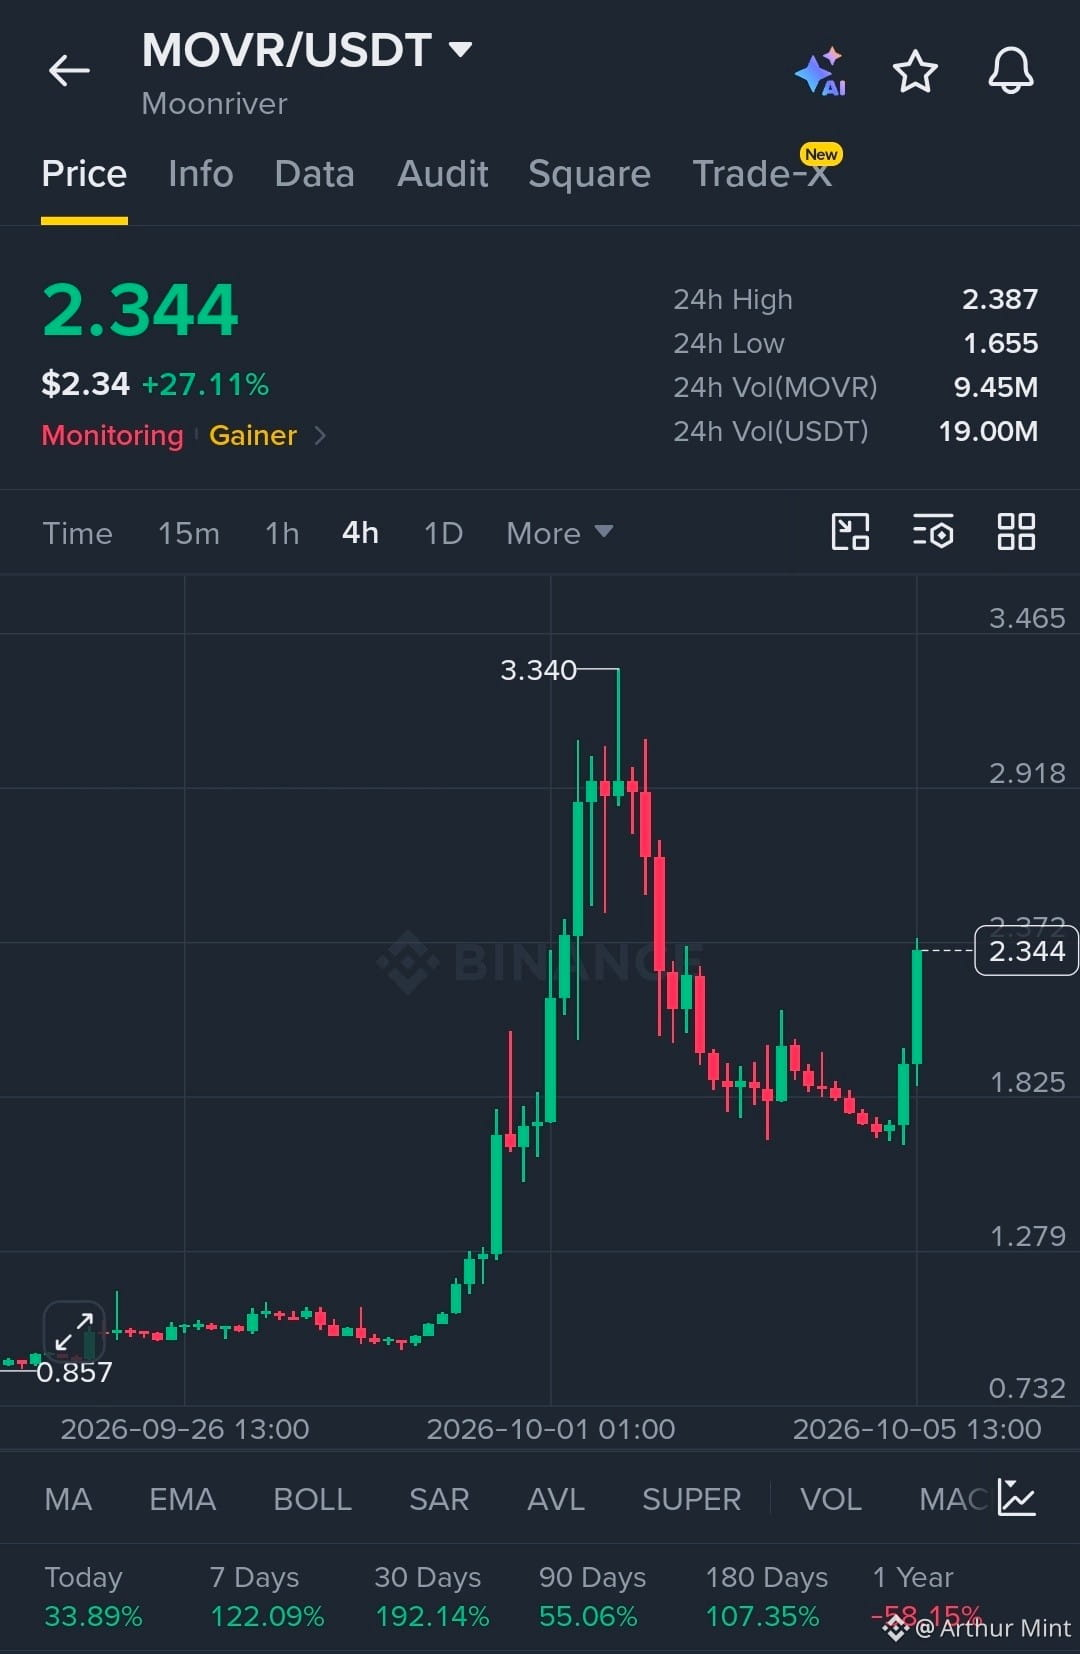
$MOVR is showing strong breakout strength with aggressive upside momentum.
Structure is bullish, with buyers reclaiming key resistance and taking control.
EP
2.30–2.35
TP
TP1 2.55
TP2 2.90
TP3 3.30
SL
2.05
Liquidity above MOVR is being targeted as price reclaims the 2.30 area, while the reaction from 1.80–1.85 confirms stronger buyer control. A sustained hold above the breakout zone keeps the structure bullish.
Let’s go $MOVR
$MOVR is showing strong breakout strength with aggressive upside momentum.
Structure is bullish, with buyers reclaiming key resistance and taking control.
EP
2.30–2.35
TP
TP1 2.55
TP2 2.90
TP3 3.30
SL
2.05
Liquidity above MOVR is being targeted as price reclaims the 2.30 area, while the reaction from 1.80–1.85 confirms stronger buyer control. A sustained hold above the breakout zone keeps the structure bullish.
Let’s go $MOVR
Structure is bullish, with buyers reclaiming key resistance and taking control.
EP
2.30–2.35
TP
TP1 2.55
TP2 2.90
TP3 3.30
SL
2.05
Liquidity above MOVR is being targeted as price reclaims the 2.30 area, while the reaction from 1.80–1.85 confirms stronger buyer control. A sustained hold above the breakout zone keeps the structure bullish.
Let’s go $MOVR
1
495
·
--
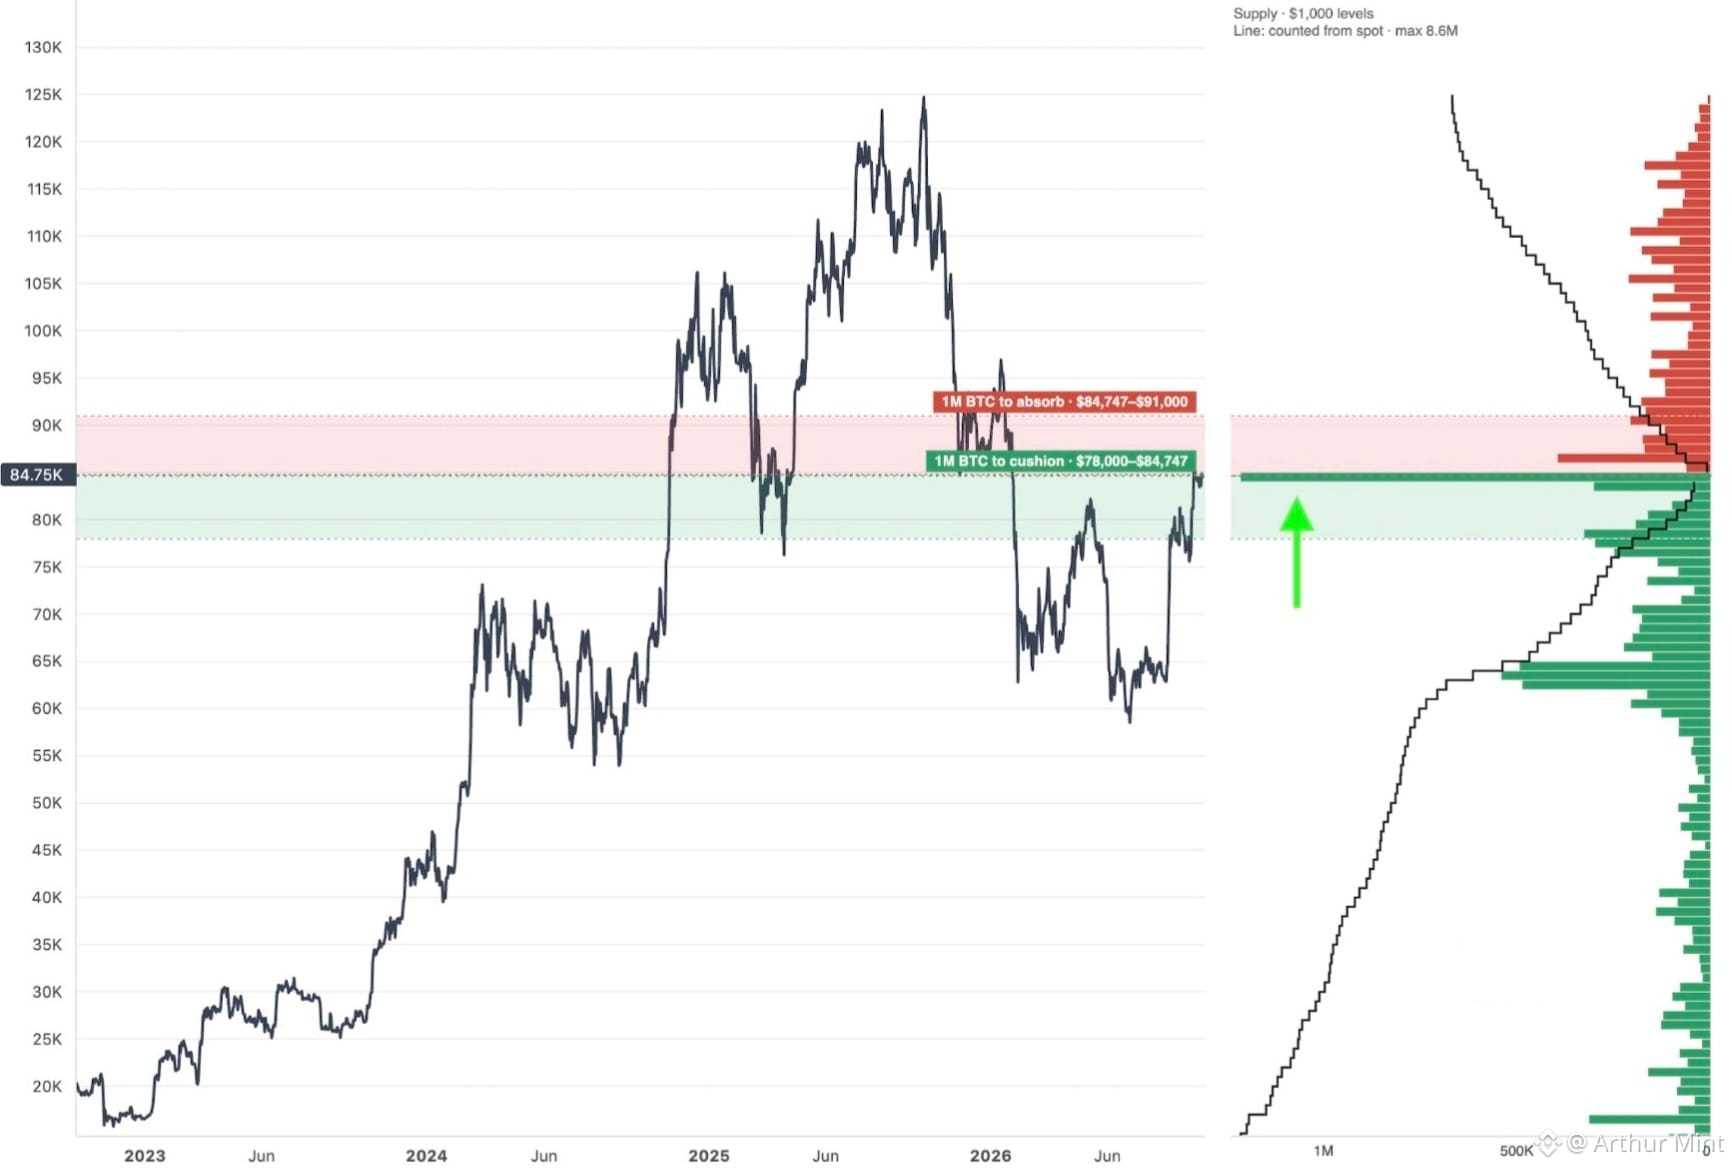
BITCOIN BUYERS ARE DEFENDING A KEY ZONE
The chart highlights heavy $BTC demand around $84K–$85K, suggesting strong buying interest.
This liquidity sits inside a broader $78K–$84,747 cushion zone.
Above it, supply reaches toward $91K.
That structure keeps the setup bullish while buyers remain active.
Still, these zones can fail. Will Bitcoin push higher?
BITCOIN BUYERS ARE DEFENDING A KEY ZONE
The chart highlights heavy $BTC demand around $84K–$85K, suggesting strong buying interest.
This liquidity sits inside a broader $78K–$84,747 cushion zone.
Above it, supply reaches toward $91K.
That structure keeps the setup bullish while buyers remain active.
Still, these zones can fail. Will Bitcoin push higher?
The chart highlights heavy $BTC demand around $84K–$85K, suggesting strong buying interest.
This liquidity sits inside a broader $78K–$84,747 cushion zone.
Above it, supply reaches toward $91K.
That structure keeps the setup bullish while buyers remain active.
Still, these zones can fail. Will Bitcoin push higher?
2
566
·
--
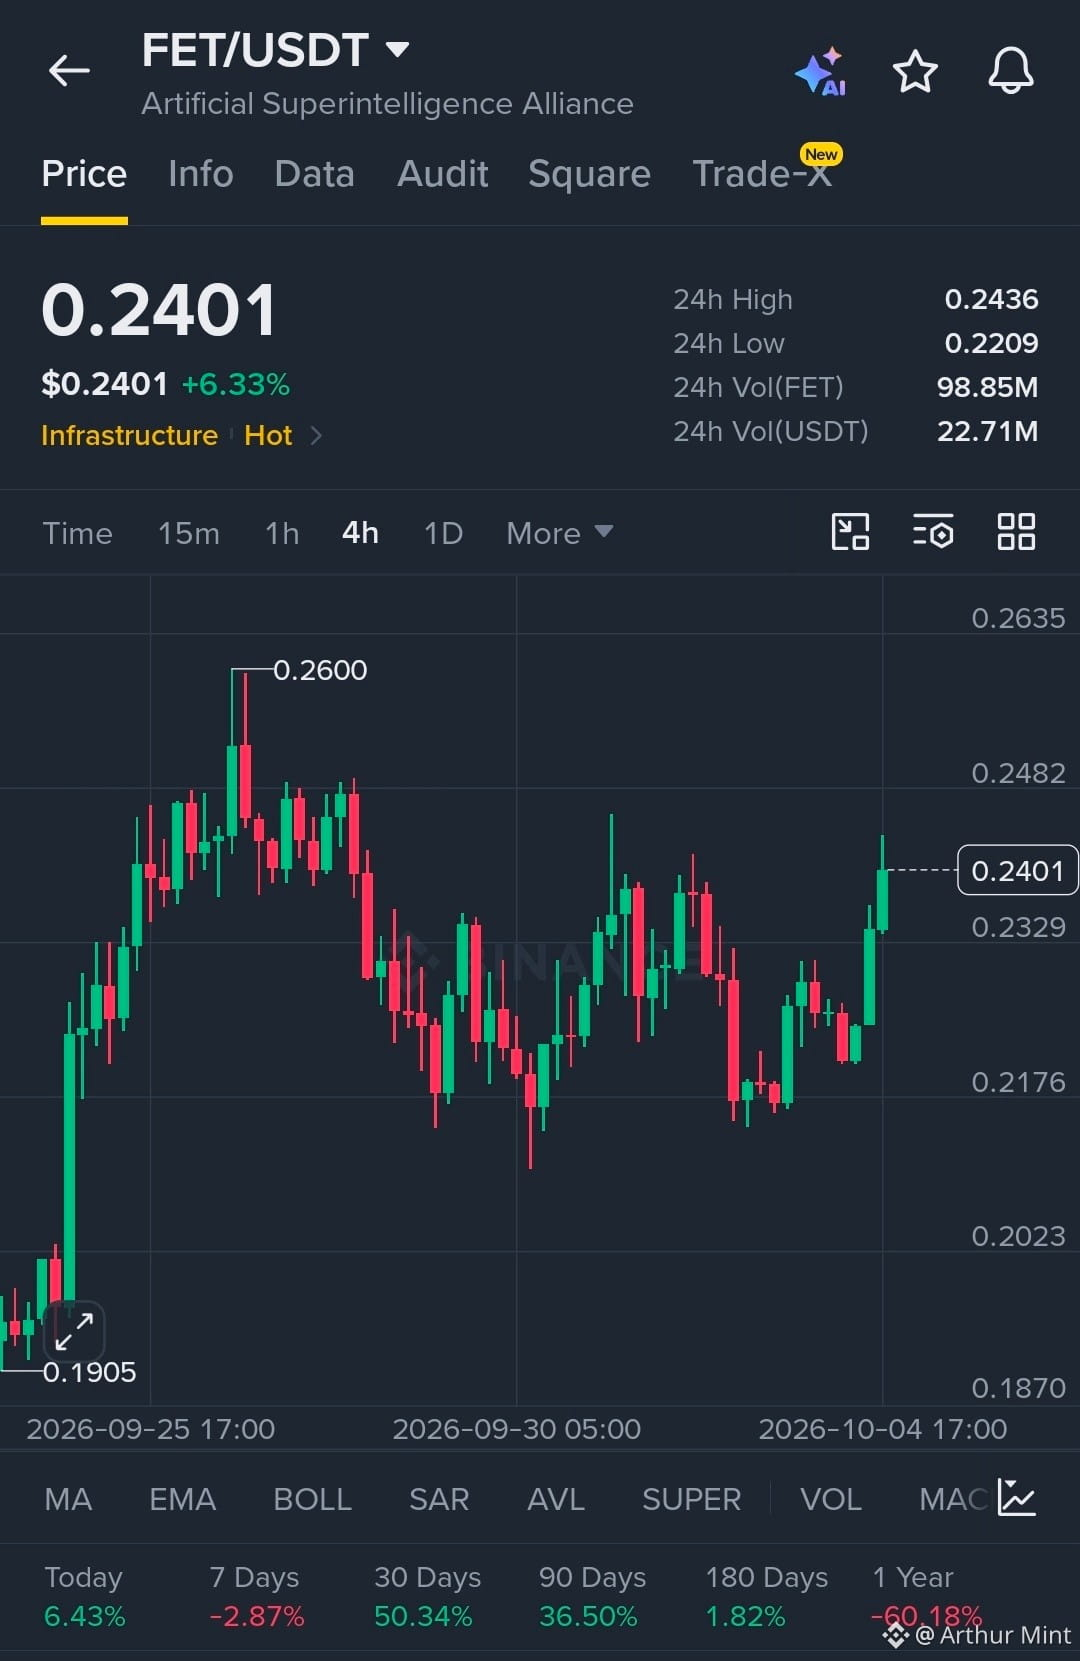
$FET showing strong bullish strength after reclaiming the 0.2329 area.
Structure is bullish with buyers maintaining control above key support.
EP
0.2390-0.2410
TP
TP1 0.2482
TP2 0.2600
TP3 0.2635
SL
0.2320
Liquidity is building above 0.2482, and a clean reaction from the current zone can drive FET toward the higher resistance levels. Structure remains bullish while price holds the entry zone.
Let’s go $FET
$FET showing strong bullish strength after reclaiming the 0.2329 area.
Structure is bullish with buyers maintaining control above key support.
EP
0.2390-0.2410
TP
TP1 0.2482
TP2 0.2600
TP3 0.2635
SL
0.2320
Liquidity is building above 0.2482, and a clean reaction from the current zone can drive FET toward the higher resistance levels. Structure remains bullish while price holds the entry zone.
Let’s go $FET
Structure is bullish with buyers maintaining control above key support.
EP
0.2390-0.2410
TP
TP1 0.2482
TP2 0.2600
TP3 0.2635
SL
0.2320
Liquidity is building above 0.2482, and a clean reaction from the current zone can drive FET toward the higher resistance levels. Structure remains bullish while price holds the entry zone.
Let’s go $FET
1
477
·
--
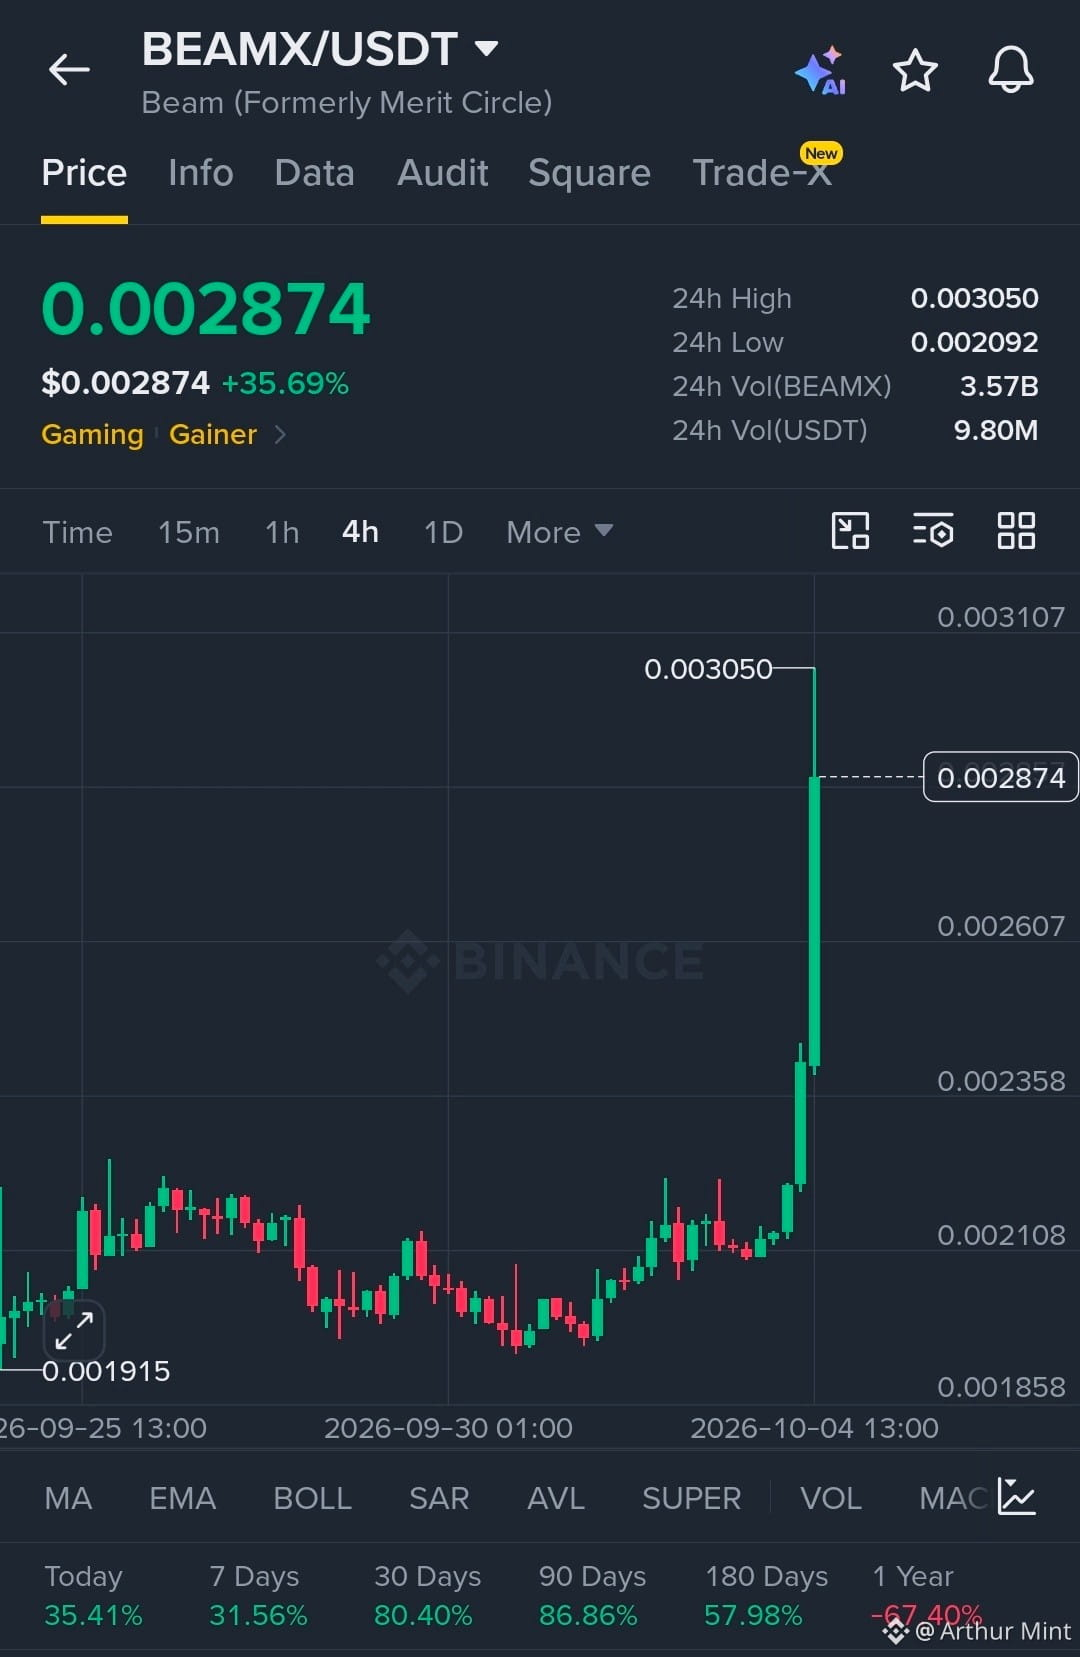
$BEAMX is showing strong bullish momentum with a decisive breakout above the recent range.
Buyers remain in control as price holds the breakout structure above key support.
EP
0.00270 - 0.00285
TP
TP1 0.00305
TP2 0.00330
TP3 0.00360
SL
0.00255
Liquidity above 0.00305 remains the immediate target, while a clean hold above the breakout zone can support further expansion. A reaction back toward the entry zone should be watched for structure confirmation.
Let’s go $BEAMX
$BEAMX is showing strong bullish momentum with a decisive breakout above the recent range.
Buyers remain in control as price holds the breakout structure above key support.
EP
0.00270 - 0.00285
TP
TP1 0.00305
TP2 0.00330
TP3 0.00360
SL
0.00255
Liquidity above 0.00305 remains the immediate target, while a clean hold above the breakout zone can support further expansion. A reaction back toward the entry zone should be watched for structure confirmation.
Let’s go $BEAMX
Buyers remain in control as price holds the breakout structure above key support.
EP
0.00270 - 0.00285
TP
TP1 0.00305
TP2 0.00330
TP3 0.00360
SL
0.00255
Liquidity above 0.00305 remains the immediate target, while a clean hold above the breakout zone can support further expansion. A reaction back toward the entry zone should be watched for structure confirmation.
Let’s go $BEAMX
332
·
--
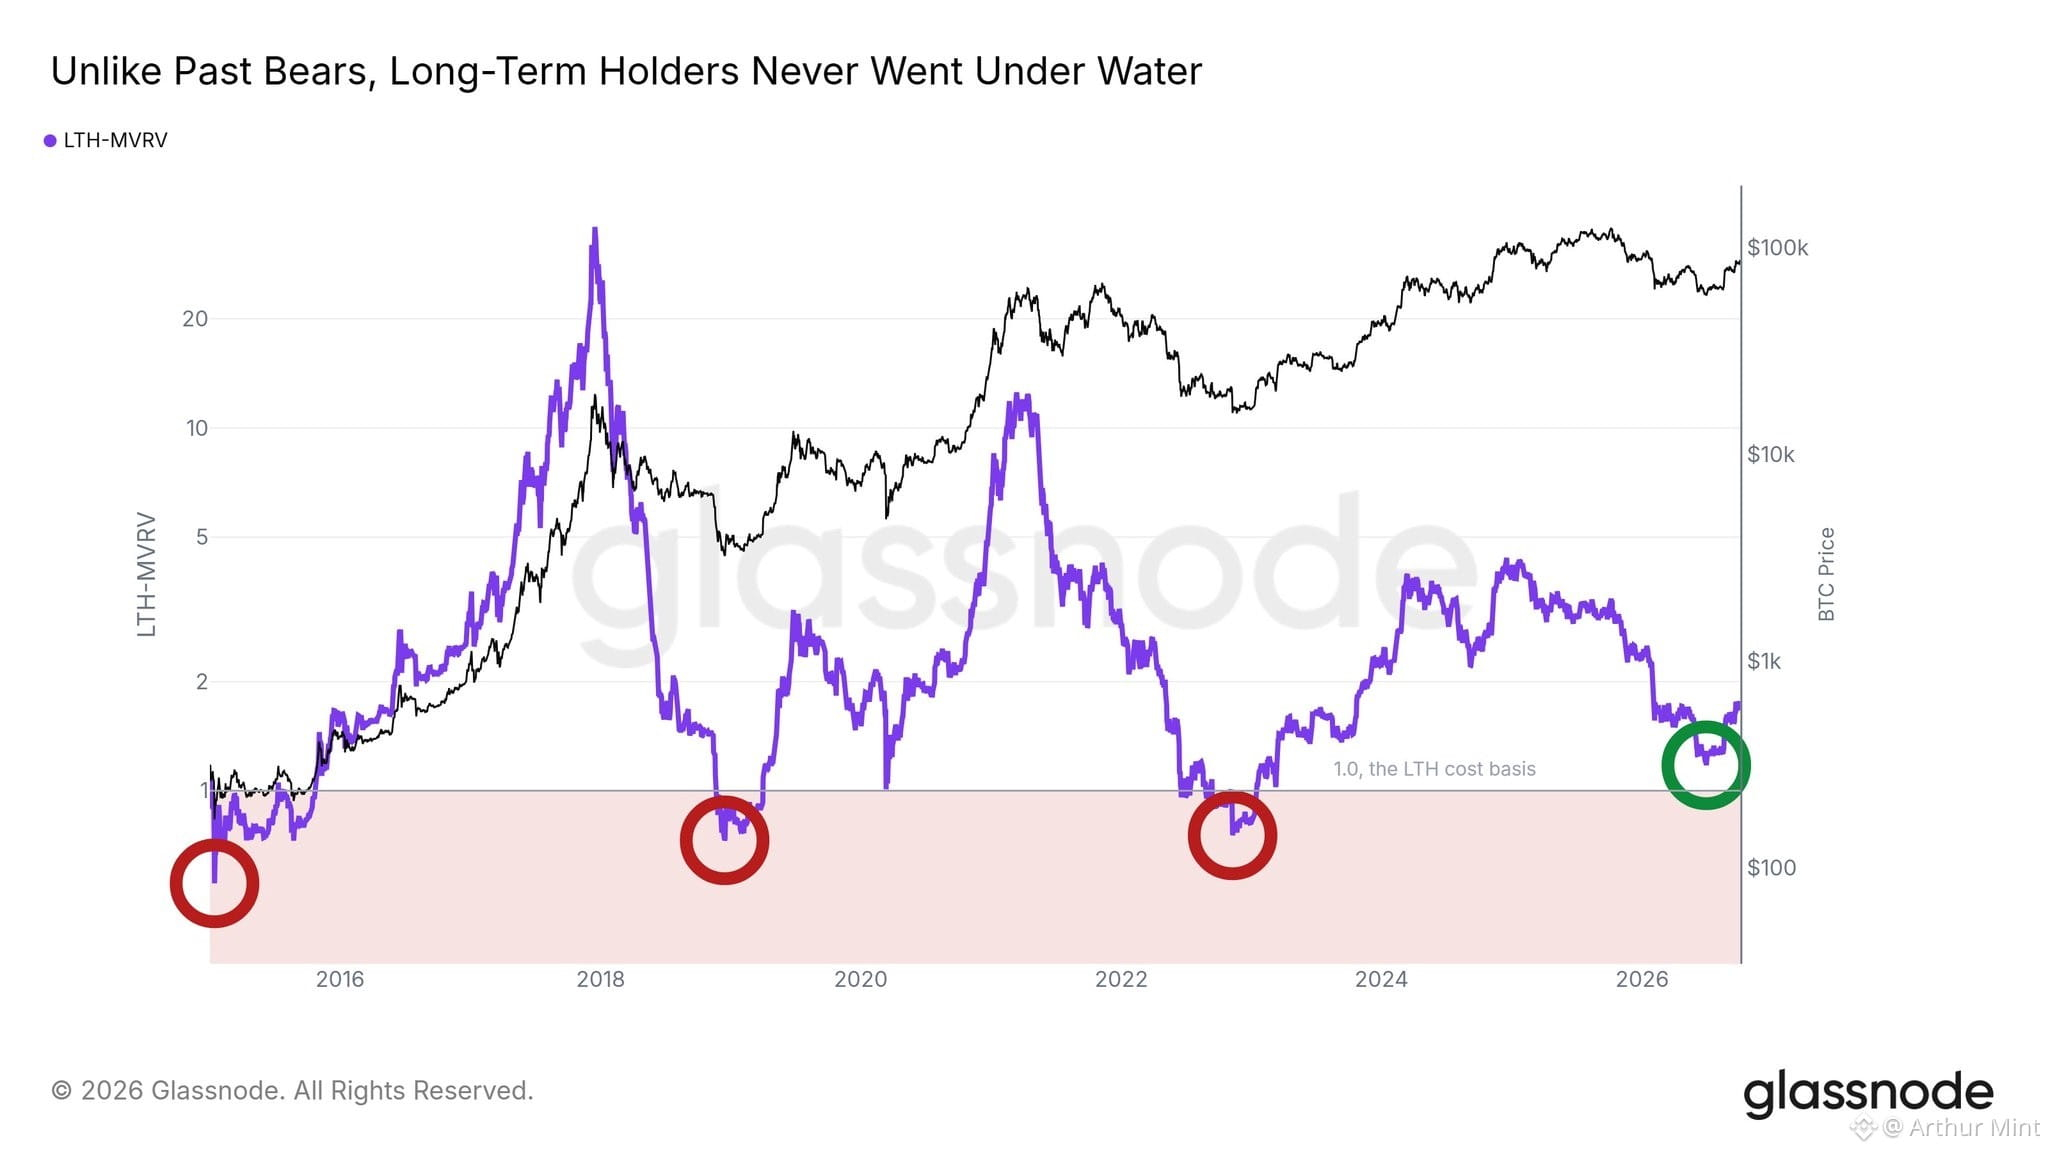
BITCOIN’S LONG-TERM HOLDERS ARE SHOWING RARE STRENGTH
Bitcoin’s long-term holders have stayed profitable throughout this cycle, unlike prior bear markets.
The chart shows LTH-MVRV never falling below 1, meaning this cohort did not move underwater at the cycle low.
That matters because staying above the cost-basis line points to stronger conviction among long-term investors.
Now, LTH-MVRV is climbing again, creating a more constructive setup for $BTC and the wider crypto market.
Still, conditions can shift fast, so this remains a signal, not a guarantee.
Could Bitcoin’s resilience be setting up the next big move?
BITCOIN’S LONG-TERM HOLDERS ARE SHOWING RARE STRENGTH
Bitcoin’s long-term holders have stayed profitable throughout this cycle, unlike prior bear markets.
The chart shows LTH-MVRV never falling below 1, meaning this cohort did not move underwater at the cycle low.
That matters because staying above the cost-basis line points to stronger conviction among long-term investors.
Now, LTH-MVRV is climbing again, creating a more constructive setup for $BTC and the wider crypto market.
Still, conditions can shift fast, so this remains a signal, not a guarantee.
Could Bitcoin’s resilience be setting up the next big move?
Bitcoin’s long-term holders have stayed profitable throughout this cycle, unlike prior bear markets.
The chart shows LTH-MVRV never falling below 1, meaning this cohort did not move underwater at the cycle low.
That matters because staying above the cost-basis line points to stronger conviction among long-term investors.
Now, LTH-MVRV is climbing again, creating a more constructive setup for $BTC and the wider crypto market.
Still, conditions can shift fast, so this remains a signal, not a guarantee.
Could Bitcoin’s resilience be setting up the next big move?
1
697
·
--
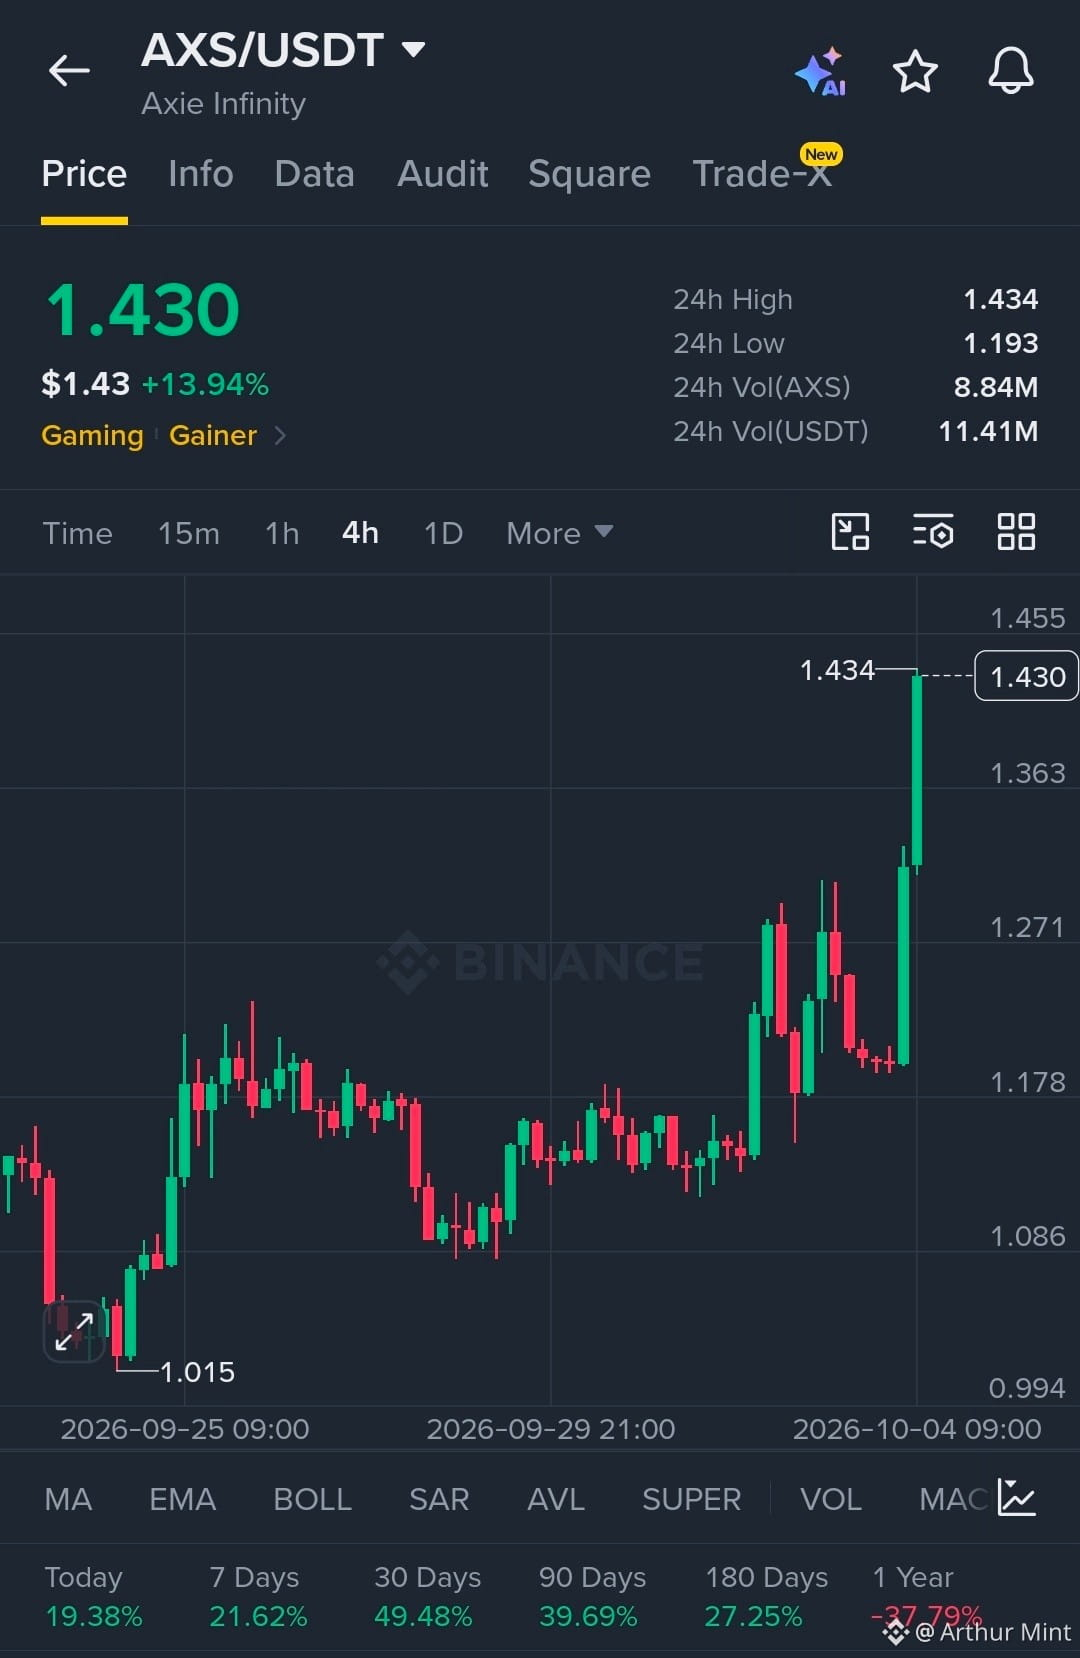
$AXS is showing strong bullish momentum.
Buyers remain in control above the breakout structure.
EP
1.390 - 1.420
TP
TP1 1.480
TP2 1.550
TP3 1.650
SL
1.320
Liquidity has been taken above the previous highs, with strong reaction confirming buyer control. As long as AXS holds the breakout structure, continuation remains favored.
Let’s go $AXS
$AXS is showing strong bullish momentum.
Buyers remain in control above the breakout structure.
EP
1.390 - 1.420
TP
TP1 1.480
TP2 1.550
TP3 1.650
SL
1.320
Liquidity has been taken above the previous highs, with strong reaction confirming buyer control. As long as AXS holds the breakout structure, continuation remains favored.
Let’s go $AXS
Buyers remain in control above the breakout structure.
EP
1.390 - 1.420
TP
TP1 1.480
TP2 1.550
TP3 1.650
SL
1.320
Liquidity has been taken above the previous highs, with strong reaction confirming buyer control. As long as AXS holds the breakout structure, continuation remains favored.
Let’s go $AXS
1
590
·
--
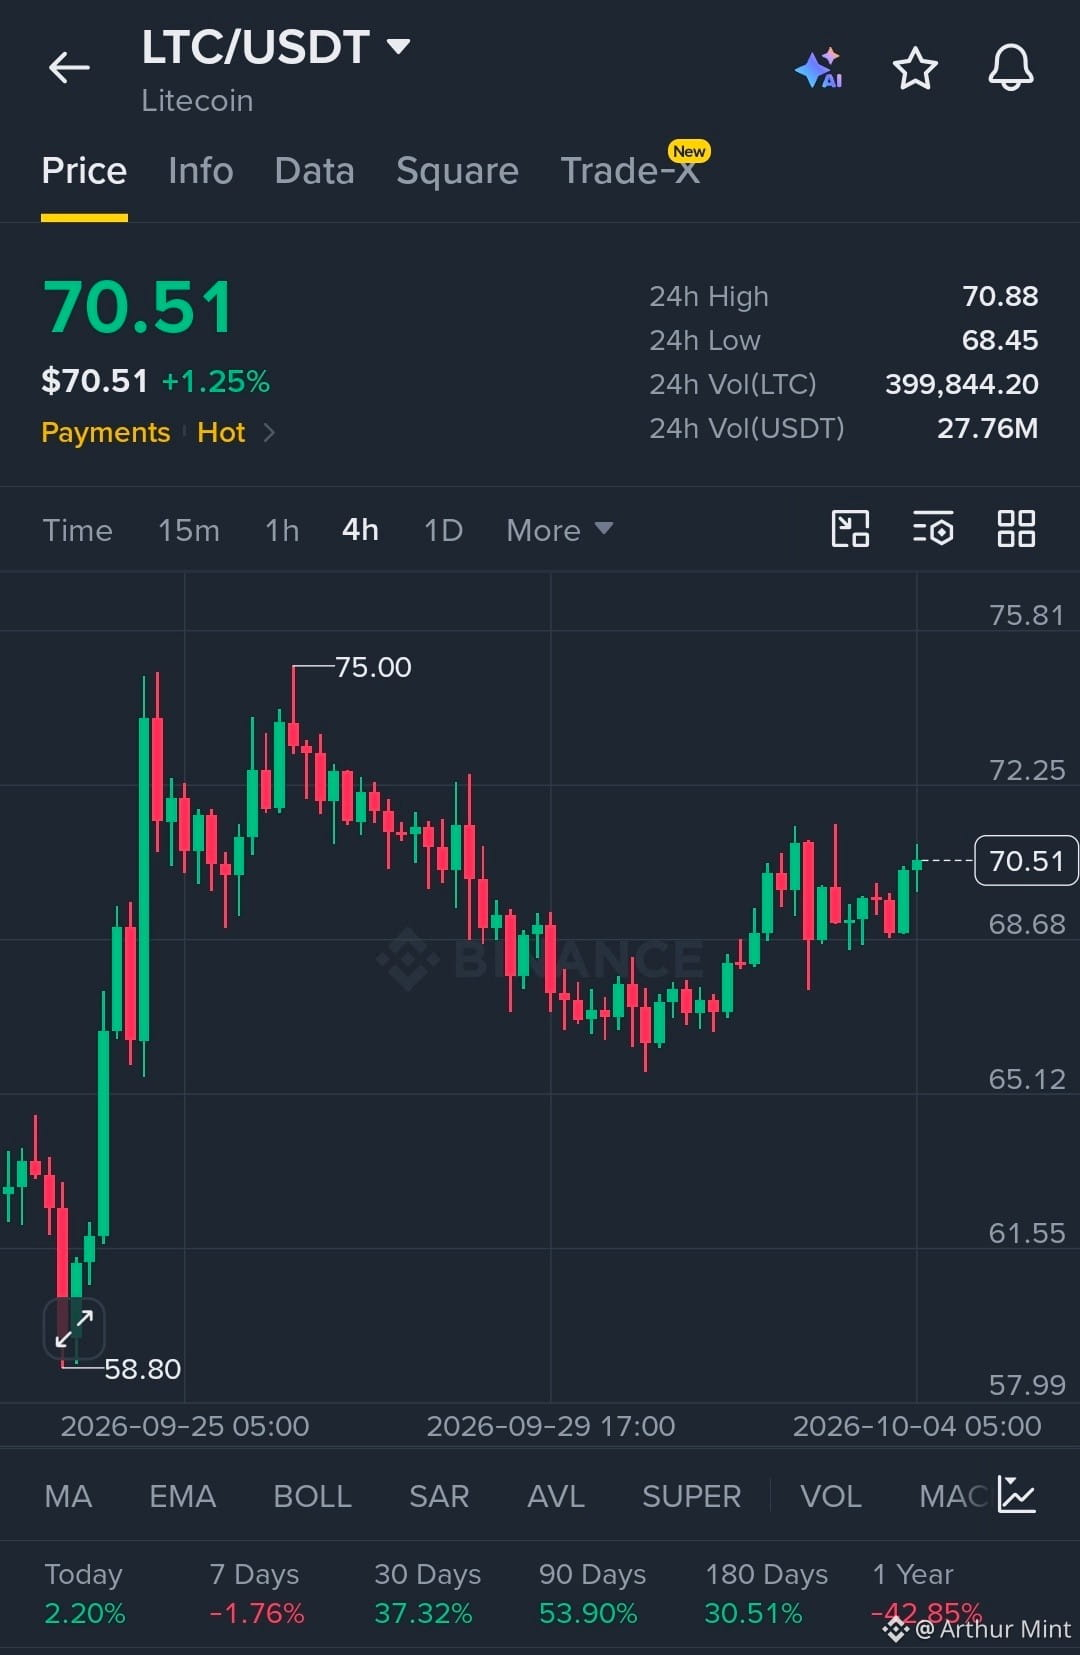
$LTC is showing strong recovery strength with buyers defending the higher structure.
Bullish control remains intact above the 68.68 support zone.
EP
69.80 - 70.50
TP
TP1 72.25
TP2 74.00
TP3 75.00
SL
68.20
Liquidity is building above the recent highs, while reactions around 68.68 confirm buyer control. A clean break above 72.25 can open the path toward the higher targets.
Let’s go $LTC
$LTC is showing strong recovery strength with buyers defending the higher structure.
Bullish control remains intact above the 68.68 support zone.
EP
69.80 - 70.50
TP
TP1 72.25
TP2 74.00
TP3 75.00
SL
68.20
Liquidity is building above the recent highs, while reactions around 68.68 confirm buyer control. A clean break above 72.25 can open the path toward the higher targets.
Let’s go $LTC
Bullish control remains intact above the 68.68 support zone.
EP
69.80 - 70.50
TP
TP1 72.25
TP2 74.00
TP3 75.00
SL
68.20
Liquidity is building above the recent highs, while reactions around 68.68 confirm buyer control. A clean break above 72.25 can open the path toward the higher targets.
Let’s go $LTC
1
740
·
--
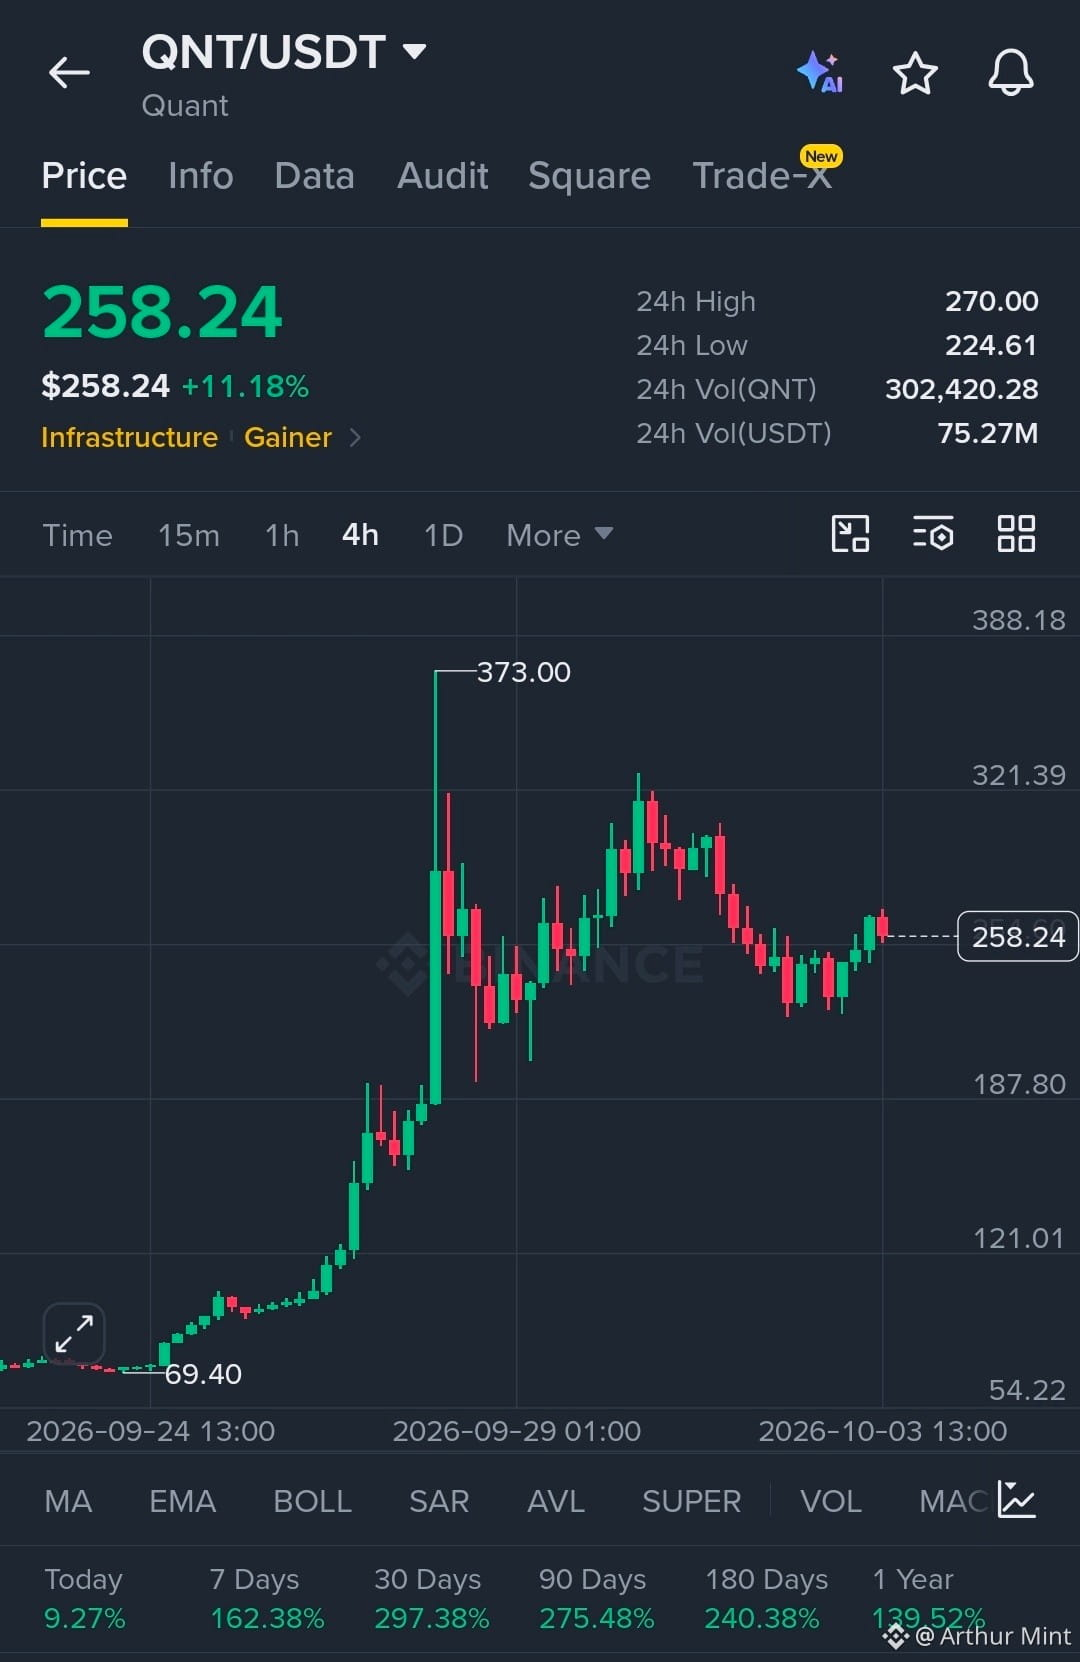
$QNT showing strong bullish momentum with buyers defending the breakout zone.
Structure holding bullish control with price reclaiming the 250 area.
EP
250 - 260
TP
TP1 285
TP2 321
TP3 373
SL
224
Liquidity remains below the recent consolidation, while price is reacting strongly from the 230–250 zone. A clean hold above 260 can drive continuation toward 321 and higher, with structure favoring upside while 224 holds.
Let’s go $QNT
$QNT showing strong bullish momentum with buyers defending the breakout zone.
Structure holding bullish control with price reclaiming the 250 area.
EP
250 - 260
TP
TP1 285
TP2 321
TP3 373
SL
224
Liquidity remains below the recent consolidation, while price is reacting strongly from the 230–250 zone. A clean hold above 260 can drive continuation toward 321 and higher, with structure favoring upside while 224 holds.
Let’s go $QNT
Structure holding bullish control with price reclaiming the 250 area.
EP
250 - 260
TP
TP1 285
TP2 321
TP3 373
SL
224
Liquidity remains below the recent consolidation, while price is reacting strongly from the 230–250 zone. A clean hold above 260 can drive continuation toward 321 and higher, with structure favoring upside while 224 holds.
Let’s go $QNT
465
·
--
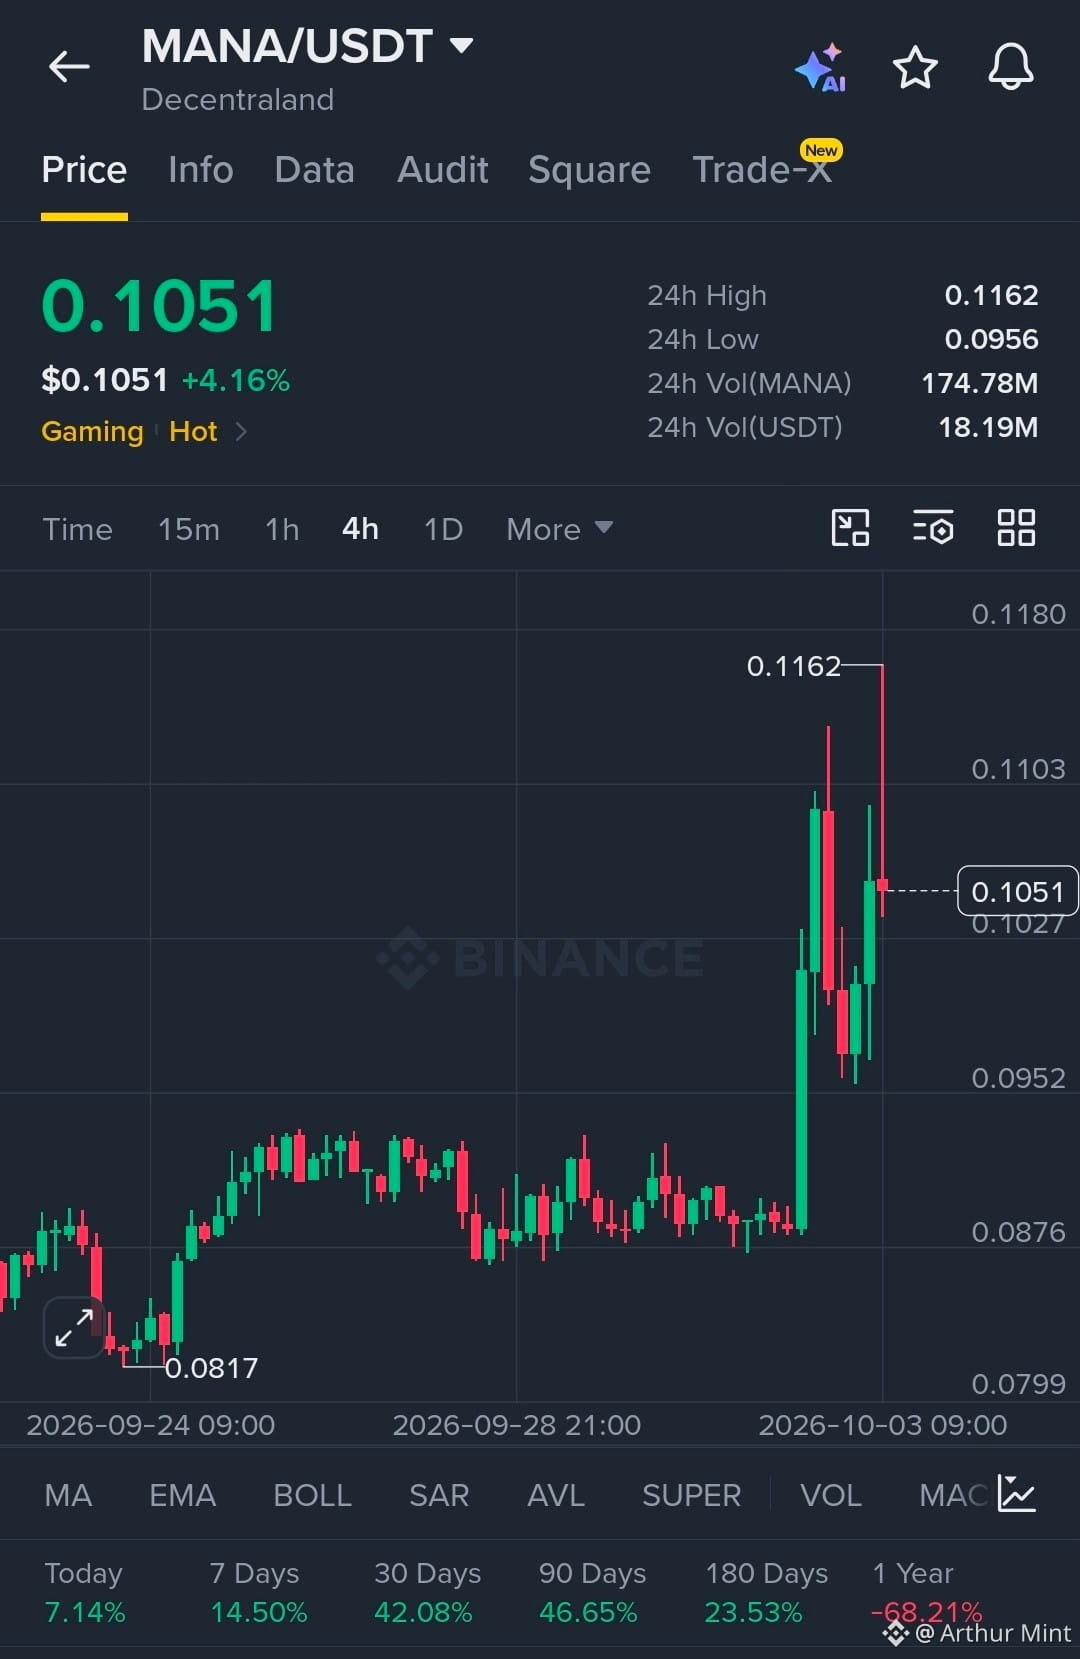
$MANA is showing strong momentum after breaking out from the 0.088 zone.
Structure remains bullish above 0.095 with buyers maintaining control.
EP
0.103-0.105
TP
TP1 0.110
TP2 0.116
TP3 0.125
SL
0.095
Liquidity above 0.110 is being targeted, while a clean reaction from the breakout zone can drive MANA toward the 0.116 high and higher liquidity. Structure stays valid above 0.095.
Let’s go $MANA
$MANA is showing strong momentum after breaking out from the 0.088 zone.
Structure remains bullish above 0.095 with buyers maintaining control.
EP
0.103-0.105
TP
TP1 0.110
TP2 0.116
TP3 0.125
SL
0.095
Liquidity above 0.110 is being targeted, while a clean reaction from the breakout zone can drive MANA toward the 0.116 high and higher liquidity. Structure stays valid above 0.095.
Let’s go $MANA
Structure remains bullish above 0.095 with buyers maintaining control.
EP
0.103-0.105
TP
TP1 0.110
TP2 0.116
TP3 0.125
SL
0.095
Liquidity above 0.110 is being targeted, while a clean reaction from the breakout zone can drive MANA toward the 0.116 high and higher liquidity. Structure stays valid above 0.095.
Let’s go $MANA
1
3
438
·
--
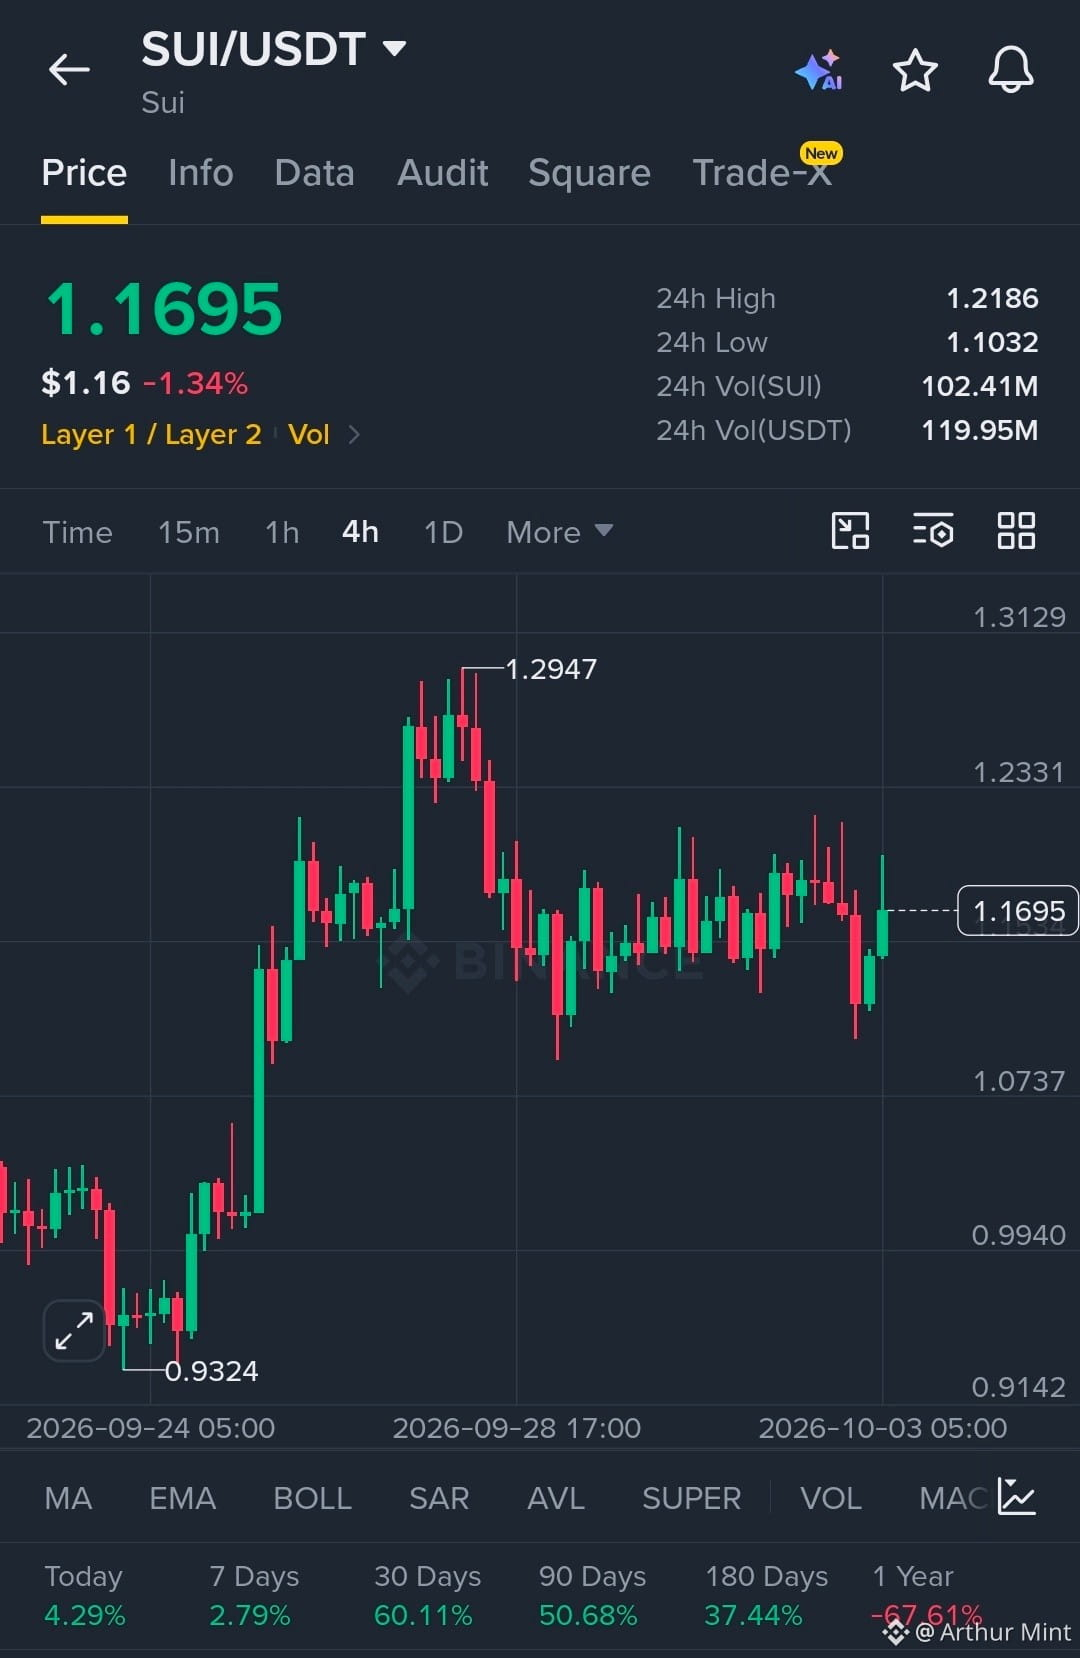
$SUI is holding strong above key demand with buyers stepping back in.
Structure remains controlled as SUI defends the 1.15 area and targets higher liquidity.
EP
1.16 - 1.17
TP
TP1 1.20
TP2 1.23
TP3 1.29
SL
1.10
Liquidity is building above 1.20, while the recent reaction from 1.10 shows strong demand. A clean reclaim of 1.20 can open the path toward higher resistance and continuation.
Let’s go $SUI
$SUI is holding strong above key demand with buyers stepping back in.
Structure remains controlled as SUI defends the 1.15 area and targets higher liquidity.
EP
1.16 - 1.17
TP
TP1 1.20
TP2 1.23
TP3 1.29
SL
1.10
Liquidity is building above 1.20, while the recent reaction from 1.10 shows strong demand. A clean reclaim of 1.20 can open the path toward higher resistance and continuation.
Let’s go $SUI
Structure remains controlled as SUI defends the 1.15 area and targets higher liquidity.
EP
1.16 - 1.17
TP
TP1 1.20
TP2 1.23
TP3 1.29
SL
1.10
Liquidity is building above 1.20, while the recent reaction from 1.10 shows strong demand. A clean reclaim of 1.20 can open the path toward higher resistance and continuation.
Let’s go $SUI
1
341
·
--
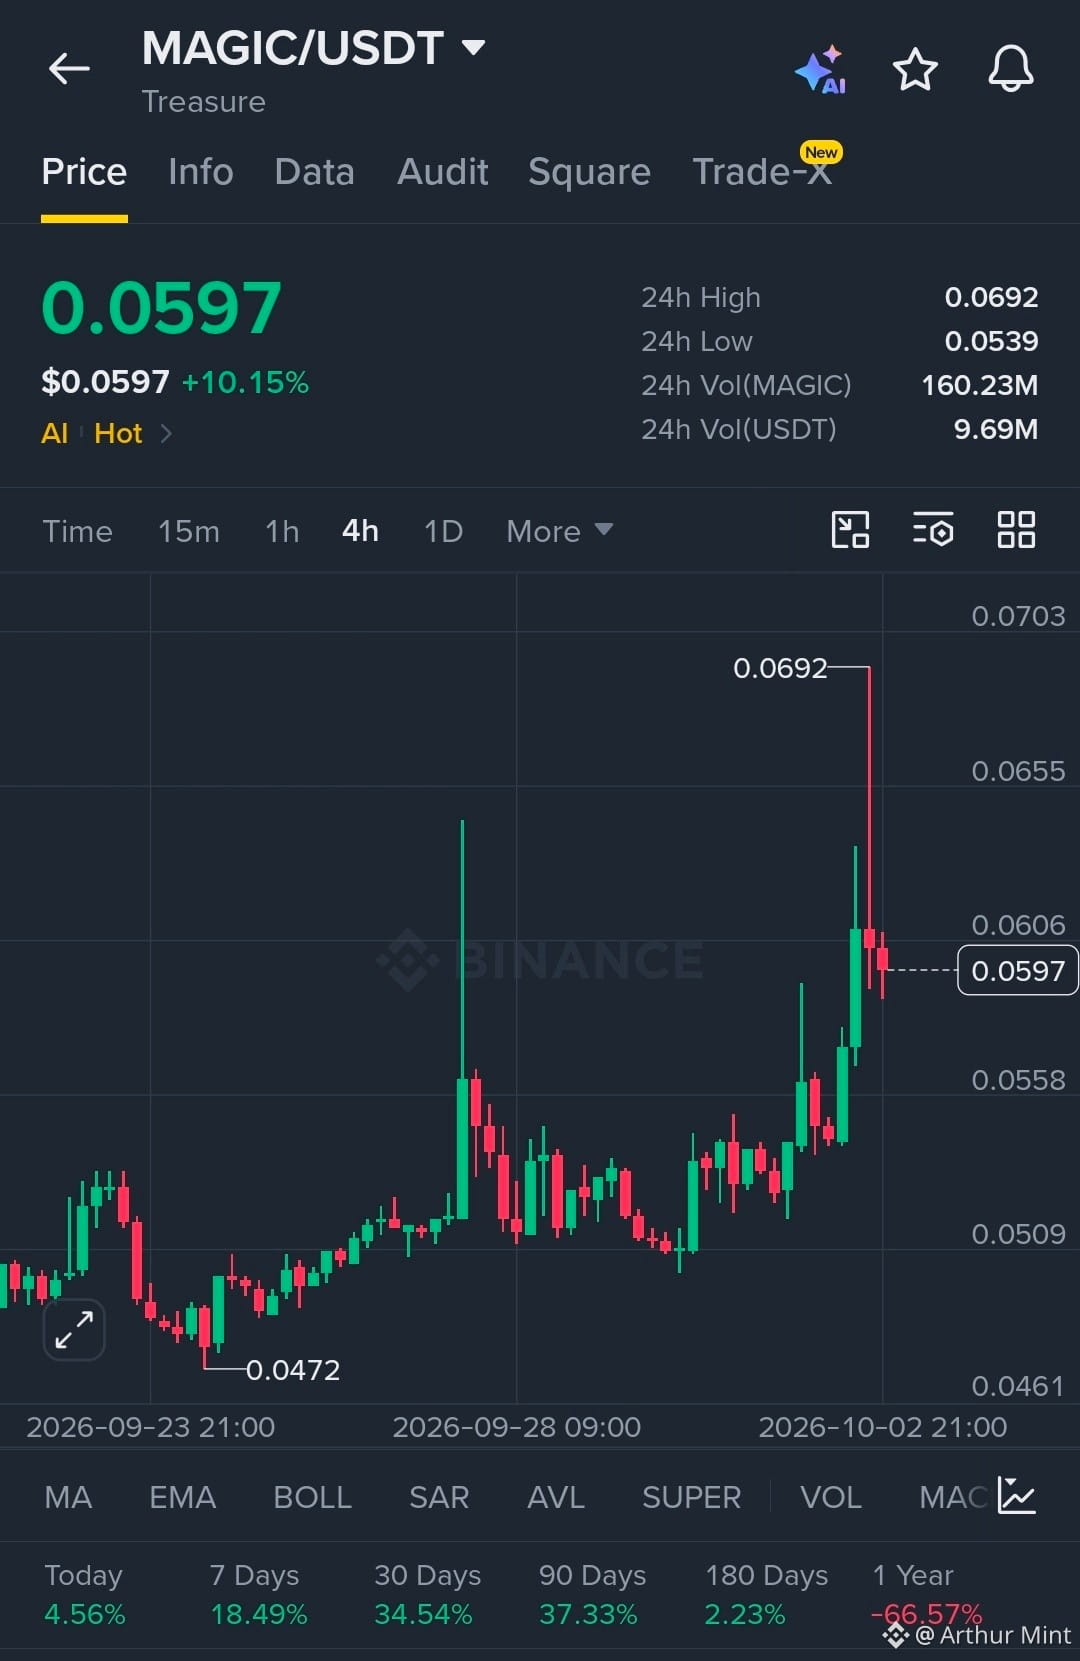
$MAGIC showing strong bullish strength after reclaiming the 0.0558 zone.
Structure remains in buyers’ control above the 0.0558 support.
EP
0.0590 - 0.0600
TP
TP1 0.0620
TP2 0.0655
TP3 0.0690
SL
0.0565
Liquidity has been swept above 0.0606, and the reaction is holding near the breakout zone. As long as structure stays above 0.0558, buyers remain in control with 0.0692 as the key liquidity target.
Let’s go $MAGIC
$MAGIC showing strong bullish strength after reclaiming the 0.0558 zone.
Structure remains in buyers’ control above the 0.0558 support.
EP
0.0590 - 0.0600
TP
TP1 0.0620
TP2 0.0655
TP3 0.0690
SL
0.0565
Liquidity has been swept above 0.0606, and the reaction is holding near the breakout zone. As long as structure stays above 0.0558, buyers remain in control with 0.0692 as the key liquidity target.
Let’s go $MAGIC
Structure remains in buyers’ control above the 0.0558 support.
EP
0.0590 - 0.0600
TP
TP1 0.0620
TP2 0.0655
TP3 0.0690
SL
0.0565
Liquidity has been swept above 0.0606, and the reaction is holding near the breakout zone. As long as structure stays above 0.0558, buyers remain in control with 0.0692 as the key liquidity target.
Let’s go $MAGIC
1
2
440
·
--
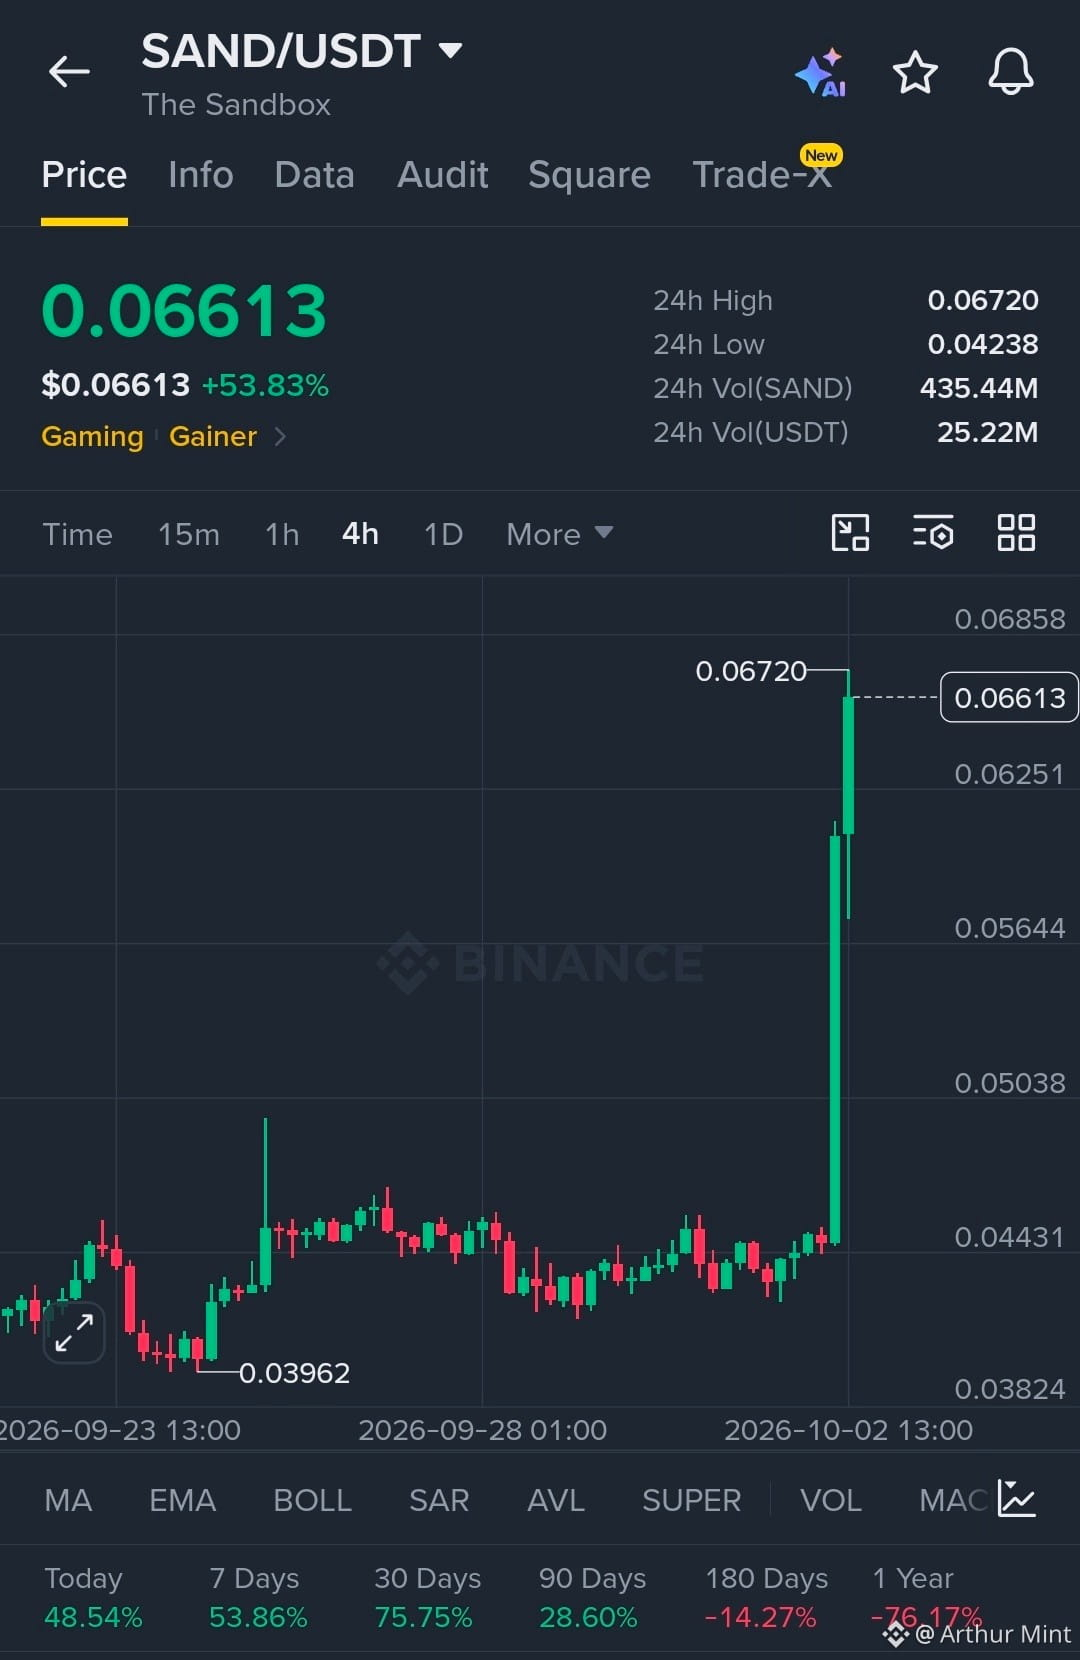
$SAND is showing explosive strength with a clean breakout from the accumulation range.
Bulls are in control while price holds above the breakout structure.
EP
0.06150 - 0.06300
TP
TP1 0.06850
TP2 0.07200
TP3 0.07800
SL
0.05600
Liquidity above the breakout is being targeted after the sharp expansion, with 0.06720 acting as the immediate reaction zone. Holding the breakout area keeps the bullish structure intact, while a loss of support could trigger a deeper liquidity sweep.
Let’s go $SAND
$SAND is showing explosive strength with a clean breakout from the accumulation range.
Bulls are in control while price holds above the breakout structure.
EP
0.06150 - 0.06300
TP
TP1 0.06850
TP2 0.07200
TP3 0.07800
SL
0.05600
Liquidity above the breakout is being targeted after the sharp expansion, with 0.06720 acting as the immediate reaction zone. Holding the breakout area keeps the bullish structure intact, while a loss of support could trigger a deeper liquidity sweep.
Let’s go $SAND
Bulls are in control while price holds above the breakout structure.
EP
0.06150 - 0.06300
TP
TP1 0.06850
TP2 0.07200
TP3 0.07800
SL
0.05600
Liquidity above the breakout is being targeted after the sharp expansion, with 0.06720 acting as the immediate reaction zone. Holding the breakout area keeps the bullish structure intact, while a loss of support could trigger a deeper liquidity sweep.
Let’s go $SAND
371
·
--
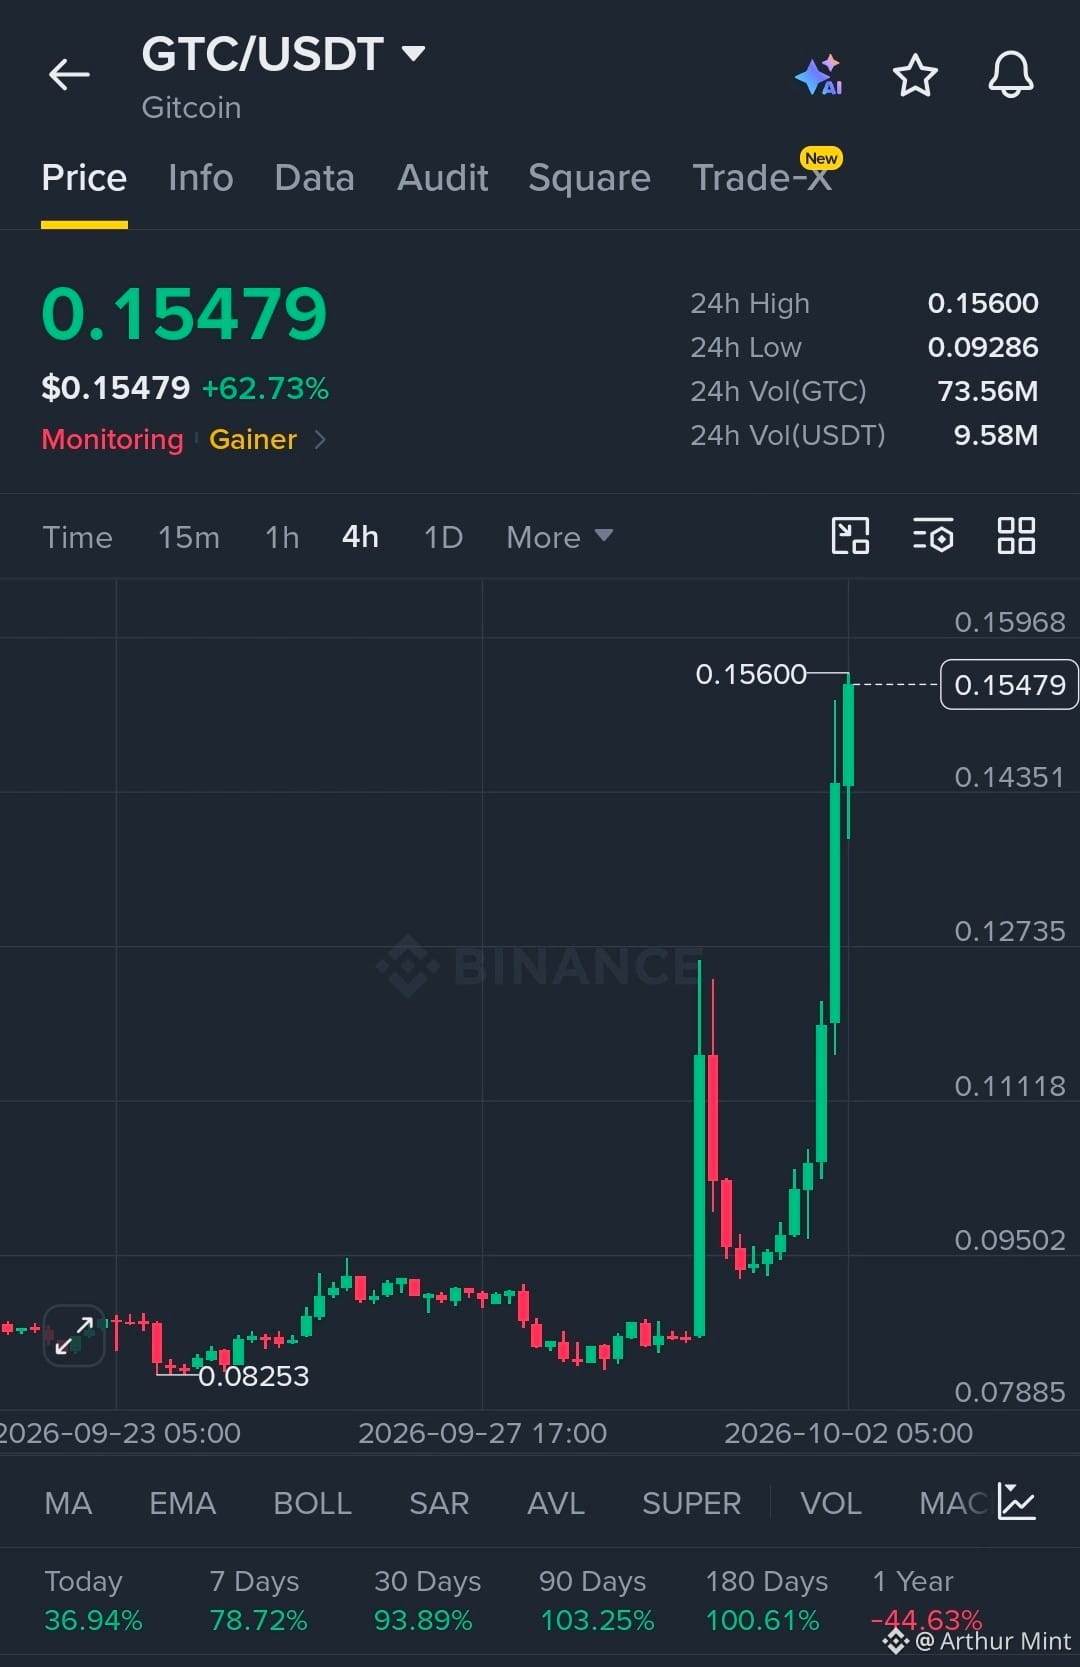
$GTC is showing strong momentum after breaking above major resistance.
Structure remains bullish with strong control above the breakout zone.
EP
0.150 - 0.154
TP
TP1 0.165
TP2 0.175
TP3 0.190
SL
0.142
Liquidity above 0.156 is being tested with strong reaction from the breakout zone. Structure remains bullish while price holds above 0.143, keeping higher liquidity targets in focus.
Let’s go $GTC
$GTC is showing strong momentum after breaking above major resistance.
Structure remains bullish with strong control above the breakout zone.
EP
0.150 - 0.154
TP
TP1 0.165
TP2 0.175
TP3 0.190
SL
0.142
Liquidity above 0.156 is being tested with strong reaction from the breakout zone. Structure remains bullish while price holds above 0.143, keeping higher liquidity targets in focus.
Let’s go $GTC
Structure remains bullish with strong control above the breakout zone.
EP
0.150 - 0.154
TP
TP1 0.165
TP2 0.175
TP3 0.190
SL
0.142
Liquidity above 0.156 is being tested with strong reaction from the breakout zone. Structure remains bullish while price holds above 0.143, keeping higher liquidity targets in focus.
Let’s go $GTC
553
·
--
SEPTEMBER SET THE STAGE FOR A STRONGER CRYPTO MARKET
September delivered a striking reversal in sentiment, with the chart showing multiple major crypto moves in positive territory.
The broad green setup reflects a market that pushed higher despite the Clarity Act failing in the Senate and the FED hiking rates.
Bitcoin held above the 50W MA for two straight weeks, while BTC, ETH and SOL reached $87K, $2.8K and $120. Crypto’s total market cap also reclaimed $3T.
Institutional demand added fuel, with BTC ETFs recording $2.65B in inflows and ETH ETFs $832.4M. ETH/BTC also broke a nearly five-year downtrend.
Momentum is strong, but pullbacks remain possible. Can Uptober take this momentum even further?
SEPTEMBER SET THE STAGE FOR A STRONGER CRYPTO MARKET
September delivered a striking reversal in sentiment, with the chart showing multiple major crypto moves in positive territory.
The broad green setup reflects a market that pushed higher despite the Clarity Act failing in the Senate and the FED hiking rates.
Bitcoin held above the 50W MA for two straight weeks, while BTC, ETH and SOL reached $87K, $2.8K and $120. Crypto’s total market cap also reclaimed $3T.
Institutional demand added fuel, with BTC ETFs recording $2.65B in inflows and ETH ETFs $832.4M. ETH/BTC also broke a nearly five-year downtrend.
Momentum is strong, but pullbacks remain possible. Can Uptober take this momentum even further?
September delivered a striking reversal in sentiment, with the chart showing multiple major crypto moves in positive territory.
The broad green setup reflects a market that pushed higher despite the Clarity Act failing in the Senate and the FED hiking rates.
Bitcoin held above the 50W MA for two straight weeks, while BTC, ETH and SOL reached $87K, $2.8K and $120. Crypto’s total market cap also reclaimed $3T.
Institutional demand added fuel, with BTC ETFs recording $2.65B in inflows and ETH ETFs $832.4M. ETH/BTC also broke a nearly five-year downtrend.
Momentum is strong, but pullbacks remain possible. Can Uptober take this momentum even further?

375
·
--
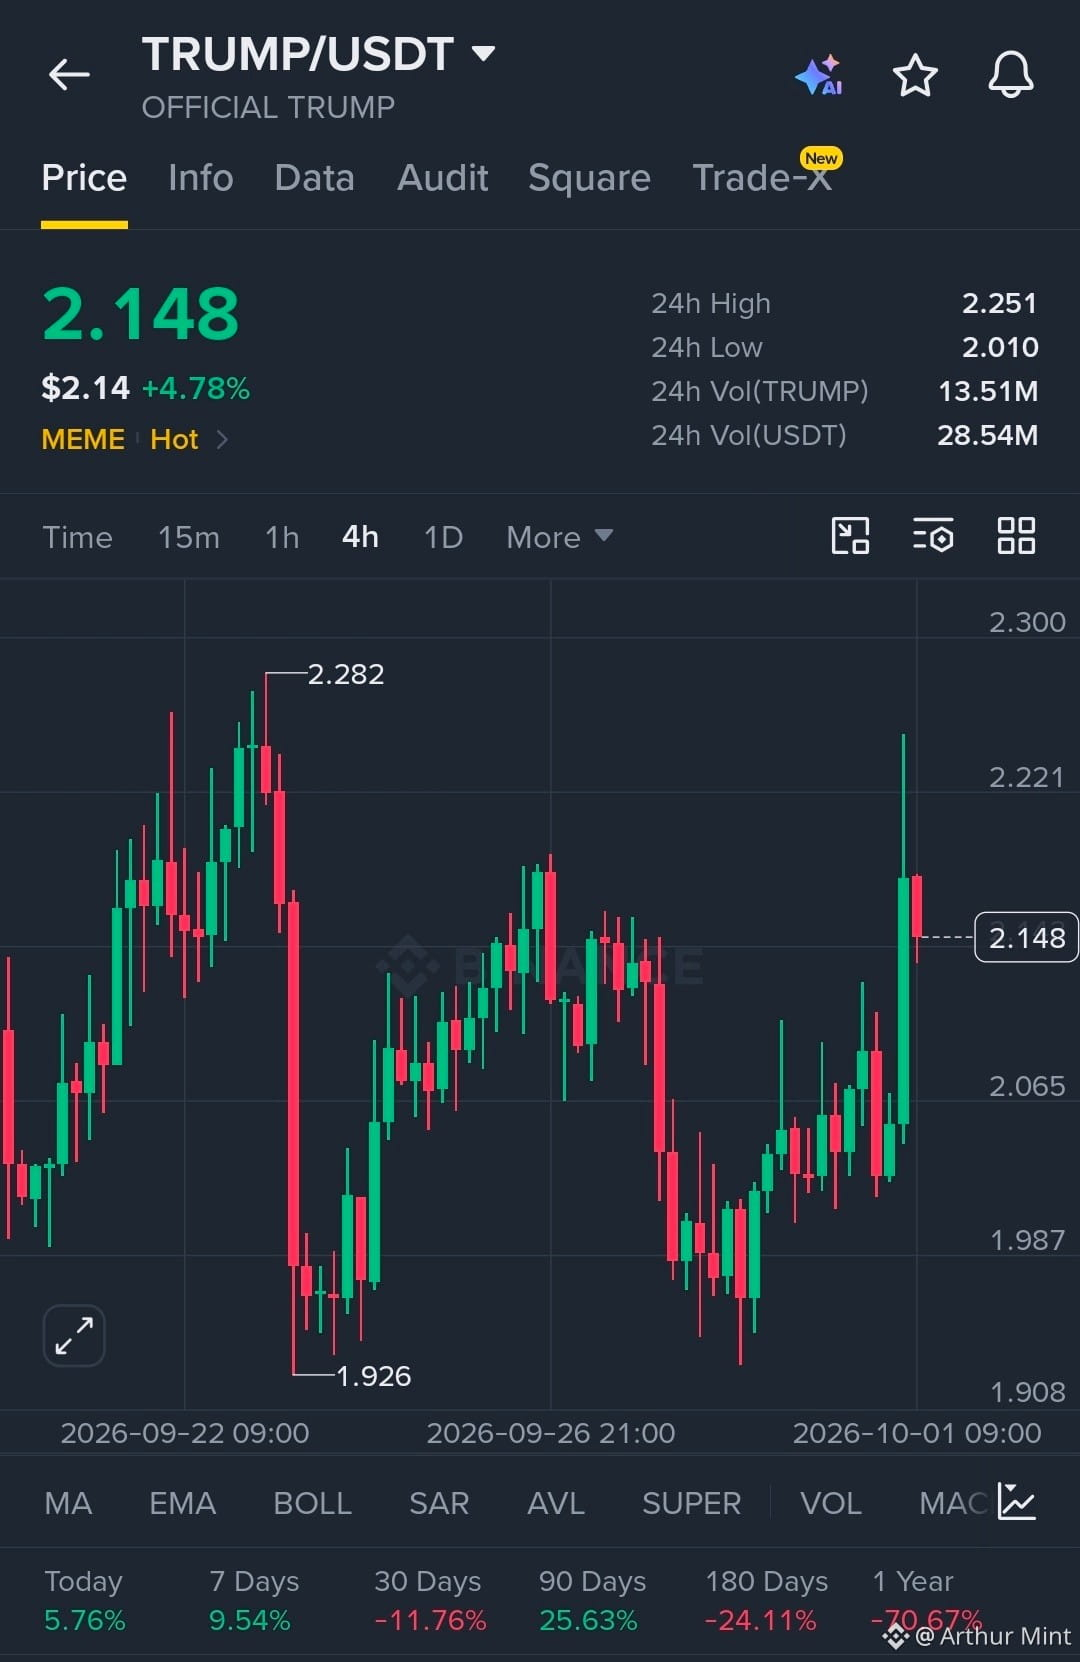
$TRUMP is showing strong bullish momentum.
Structure remains bullish with buyers holding control.
EP
2.13–2.15
TP
TP1 2.22
TP2 2.28
TP3 2.35
SL
2.01
Liquidity above 2.22 remains the key target, with reaction around 2.28 confirming continuation. Structure stays bullish while price holds the 2.01 support zone.
Let’s go $TRUMP
$TRUMP is showing strong bullish momentum.
Structure remains bullish with buyers holding control.
EP
2.13–2.15
TP
TP1 2.22
TP2 2.28
TP3 2.35
SL
2.01
Liquidity above 2.22 remains the key target, with reaction around 2.28 confirming continuation. Structure stays bullish while price holds the 2.01 support zone.
Let’s go $TRUMP
Structure remains bullish with buyers holding control.
EP
2.13–2.15
TP
TP1 2.22
TP2 2.28
TP3 2.35
SL
2.01
Liquidity above 2.22 remains the key target, with reaction around 2.28 confirming continuation. Structure stays bullish while price holds the 2.01 support zone.
Let’s go $TRUMP
1
686
·
--
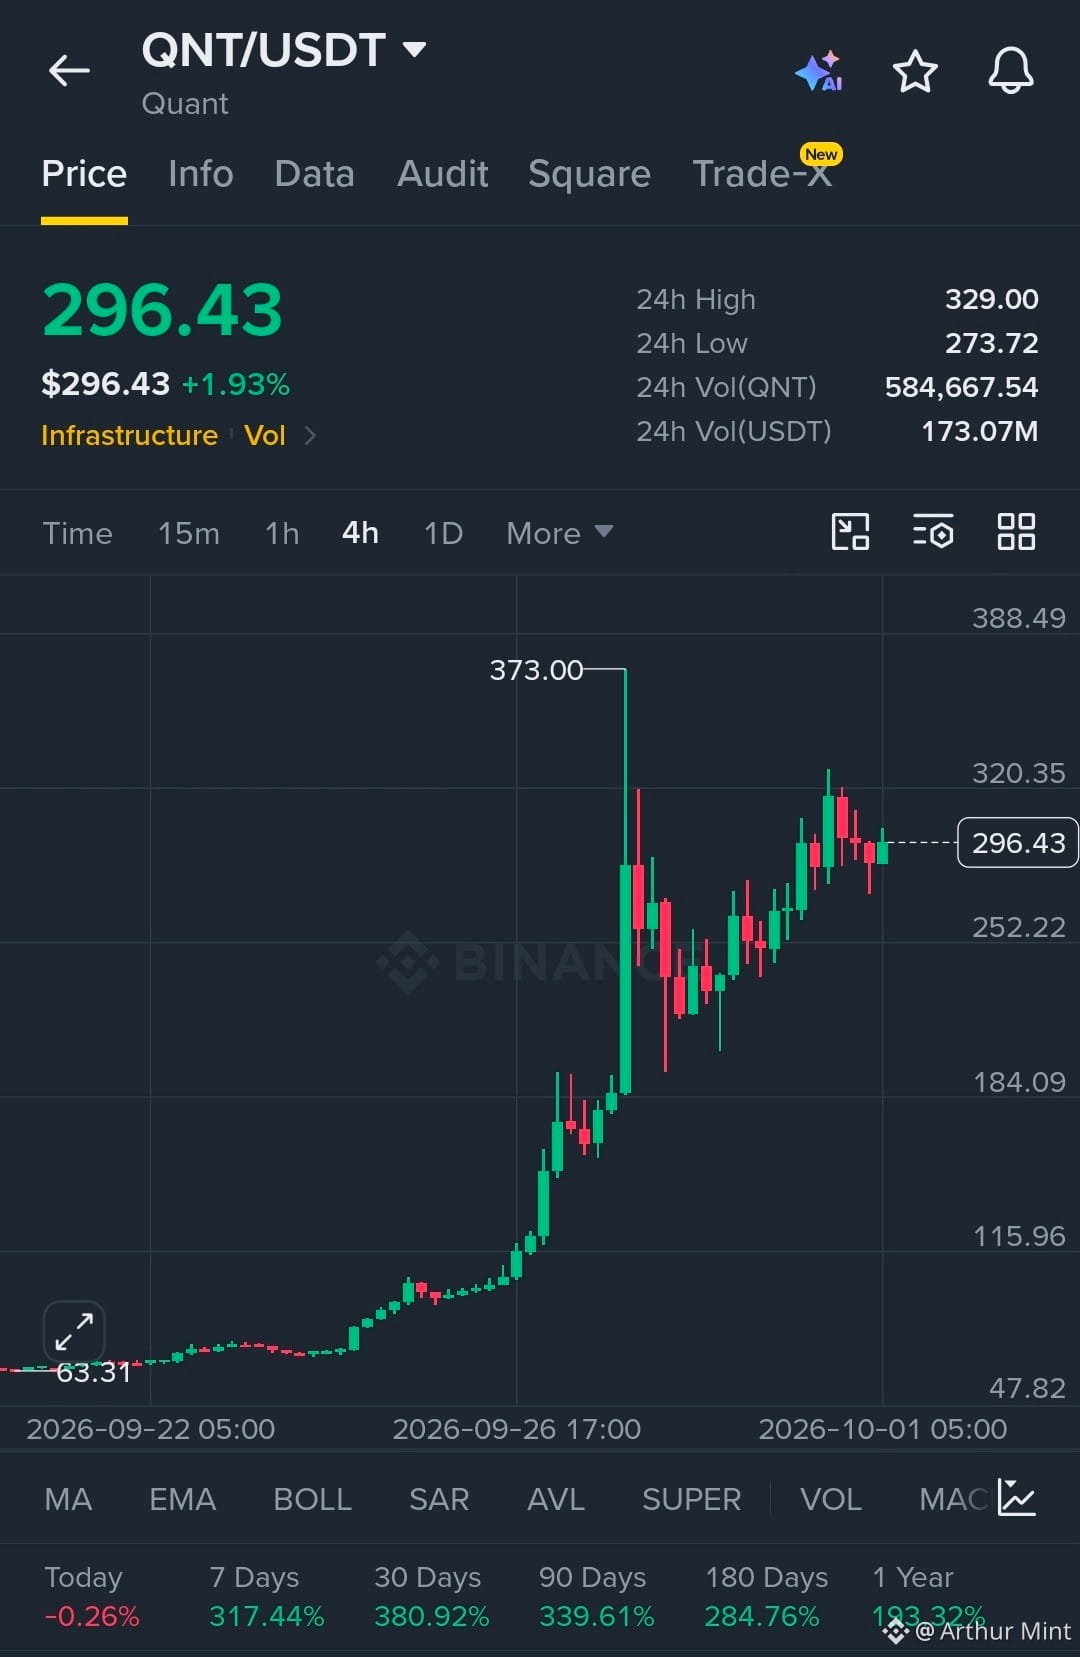
$QNT showing strong bullish momentum with buyers holding control.
Structure remains bullish with higher highs and higher lows intact.
EP
294-298
TP
TP1 320
TP2 340
TP3 373
SL
273
Liquidity above 320 remains the key target, while reaction around 294-298 confirms continuation. Structure stays bullish as long as 273 holds.
Let’s go $QNT
$QNT showing strong bullish momentum with buyers holding control.
Structure remains bullish with higher highs and higher lows intact.
EP
294-298
TP
TP1 320
TP2 340
TP3 373
SL
273
Liquidity above 320 remains the key target, while reaction around 294-298 confirms continuation. Structure stays bullish as long as 273 holds.
Let’s go $QNT
Structure remains bullish with higher highs and higher lows intact.
EP
294-298
TP
TP1 320
TP2 340
TP3 373
SL
273
Liquidity above 320 remains the key target, while reaction around 294-298 confirms continuation. Structure stays bullish as long as 273 holds.
Let’s go $QNT
1
620
Connectez-vous pour découvrir plus de contenu
Rejoignez la communauté mondiale des adeptes de cryptomonnaies sur Binance Square
⚡️ Suviez les dernières informations importantes sur les cryptomonnaies.
💬 Jugé digne de confiance par la plus grande plateforme d’échange de cryptomonnaies au monde.
👍 Découvrez les connaissances que partagent les créateurs vérifiés.
Adresse e-mail/Nº de téléphone
Sujets d’actualité
BinanceLaunchesBinanceIntelligence
558,439 vues
3,547 mentions
Picture this: you are juggling five different analytics tabs, watching order books flicker, and trying to decipher whether a sudden price spike is genuine volume or just another liquidity trap.
Most traders end up losing money not because they lack passion, but because they are constantly drowning in noisy data and entering positions five minutes too late. When information is fragmented across dozens of complex dashboards, retail investors usually end up holding the bag while faster players front-run the actionable insights.
The rollout of Binance Intelligence feels very similar to the early days when on-chain analytics first went mainstream. Back in previous cycles, tracking wallet movements or sentiment shifts required specialized technical setups. Having deep market analytics and pattern recognition integrated directly into the core trading interface changes the dynamic, much like when real-time order flow data became accessible to everyday holders of $BNB and $BTC.
When retail gets access to structured intelligence directly at the point of execution, the edge shifts from who has the fastest raw data feeds to who can actually interpret market context better. We saw a similar maturation curve with $ETH analytics years ago, where better data transparency gradually reduced blind FOMO and forced traders to develop disciplined risk management.
Do you think integrated intelligence tools will actually level the playing field for retail traders, or will sophisticated algorithms always stay one step ahead?
#BinanceLaunchesBinanceIntelligence #BitcoinTargets2026OpenAt #ETHUp70
Evonne Dashiell
·1 mentions J’aime
·204 vues
BitcoinTargets2026OpenAt$87570
5,190 vues
107 mentions
BitcoinRejectedAt$87KThirdTime
3,882 vues
83 mentions