

khizarhayat99
3.1k Publications

khizarhayat99
Signaler
Bloquer l’utilisateur
Ouvert au trading
Trade régulièrement
3.7 an(s)
248 Suivis
96 Abonnés
146 J’aime
Publications
Portefeuille
Tous
Citations
Major tokens and sectors
Large-cap strength remains intact. $BTC is up about 0.8% over 24 hours, $ETH about 1.3%, and $SOL about 5.3%, showing continued support for the beta-heavy part of the market.
High-beta Layer 1 and infrastructure names are leading. SUI is up roughly 12.3%, AVAX 8.7%, and DOT 8.4%, which points to rotation into faster-moving alt segments rather than a purely BTC-led session.
Meme exposure is also participating. DOGE is up around 8.3%, signaling that speculative appetite has picked up alongside core majors.
Leadership is uneven. XRP is down about 1.3% and BNB is slightly red, so this is not a full-market melt-up; it is a selective rally with stronger flows into specific narratives.
{spot}(SOLUSDT)
{spot}(ETHUSDT)
{spot}(BTCUSDT)
Major tokens and sectors
Large-cap strength remains intact. $BTC is up about 0.8% over 24 hours, $ETH about 1.3%, and $SOL about 5.3%, showing continued support for the beta-heavy part of the market.
High-beta Layer 1 and infrastructure names are leading. SUI is up roughly 12.3%, AVAX 8.7%, and DOT 8.4%, which points to rotation into faster-moving alt segments rather than a purely BTC-led session.
Meme exposure is also participating. DOGE is up around 8.3%, signaling that speculative appetite has picked up alongside core majors.
Leadership is uneven. XRP is down about 1.3% and BNB is slightly red, so this is not a full-market melt-up; it is a selective rally with stronger flows into specific narratives.
Large-cap strength remains intact. $BTC is up about 0.8% over 24 hours, $ETH about 1.3%, and $SOL about 5.3%, showing continued support for the beta-heavy part of the market.
High-beta Layer 1 and infrastructure names are leading. SUI is up roughly 12.3%, AVAX 8.7%, and DOT 8.4%, which points to rotation into faster-moving alt segments rather than a purely BTC-led session.
Meme exposure is also participating. DOGE is up around 8.3%, signaling that speculative appetite has picked up alongside core majors.
Leadership is uneven. XRP is down about 1.3% and BNB is slightly red, so this is not a full-market melt-up; it is a selective rally with stronger flows into specific narratives.
49
"You have $10,000 to deploy today, but you can only lock in ONE token for the rest of the run. Which one are you riding with? 👇
$TAO $SUI | $NEAR $SEI | $HBAR $AVAX | $FET $QNT | $SOL $ONDO
Drop your pick below and tell me why! ⬇️🔥"
{spot}(NEARUSDT)
{spot}(SUIUSDT)
{spot}(TAOUSDT)
"You have $10,000 to deploy today, but you can only lock in ONE token for the rest of the run. Which one are you riding with? 👇
$TAO $SUI | $NEAR $SEI | $HBAR $AVAX | $FET $QNT | $SOL $ONDO
Drop your pick below and tell me why! ⬇️🔥"
$TAO $SUI | $NEAR $SEI | $HBAR $AVAX | $FET $QNT | $SOL $ONDO
Drop your pick below and tell me why! ⬇️🔥"

3
627
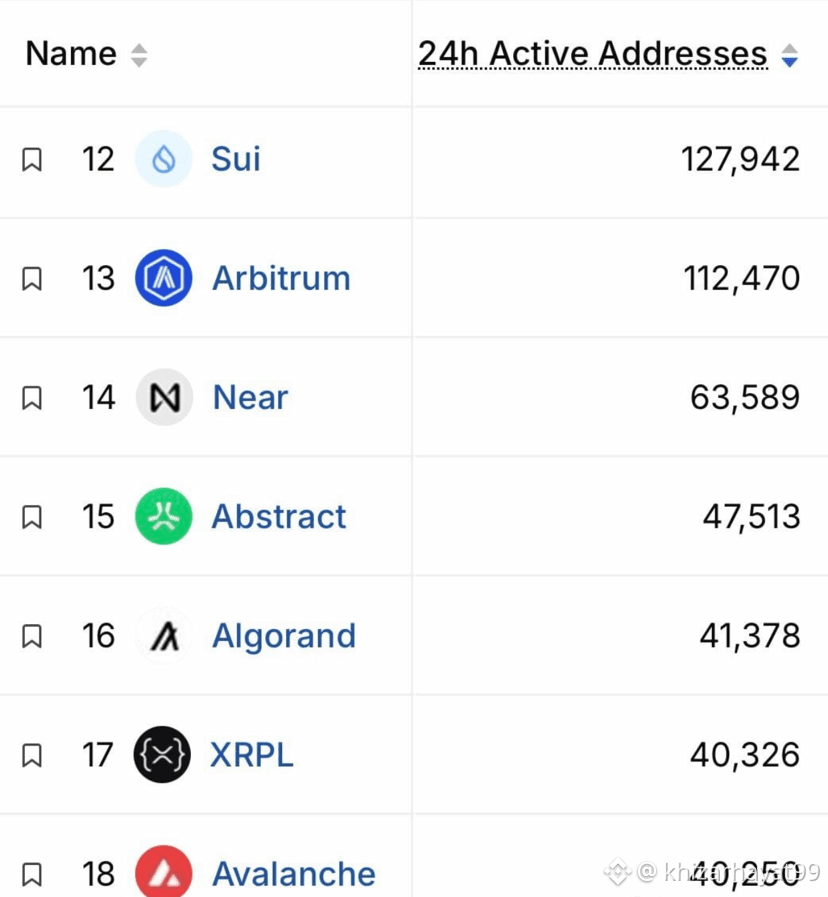
"Bags packed but we need MORE. 🎒🚀 Scooping up extra $SUI , $UNI ,and$NEAR immediately. These are not the charts you want to fade right now. ‼️🔥"
{future}(NEARUSDT)
{future}(UNIUSDT)
{future}(SUIUSDT)
"Bags packed but we need MORE. 🎒🚀 Scooping up extra $SUI , $UNI ,and$NEAR immediately. These are not the charts you want to fade right now. ‼️🔥"
1
26
If you could only buy ONE crypto today, which are you choosing❓❓
$TAO
$SUI
$NEAR
#SEI
#HBAR
$AVAX
$FET
$QNT
$SOL
$ONDO
{future}(NEARUSDT)
{future}(TAOUSDT)
{future}(SUIUSDT)
If you could only buy ONE crypto today, which are you choosing❓❓
$TAO
$SUI
$NEAR
#SEI
#HBAR
$AVAX
$FET
$QNT
$SOL
$ONDO
$TAO
$SUI
$NEAR
#SEI
#HBAR
$AVAX
$FET
$QNT
$SOL
$ONDO

4
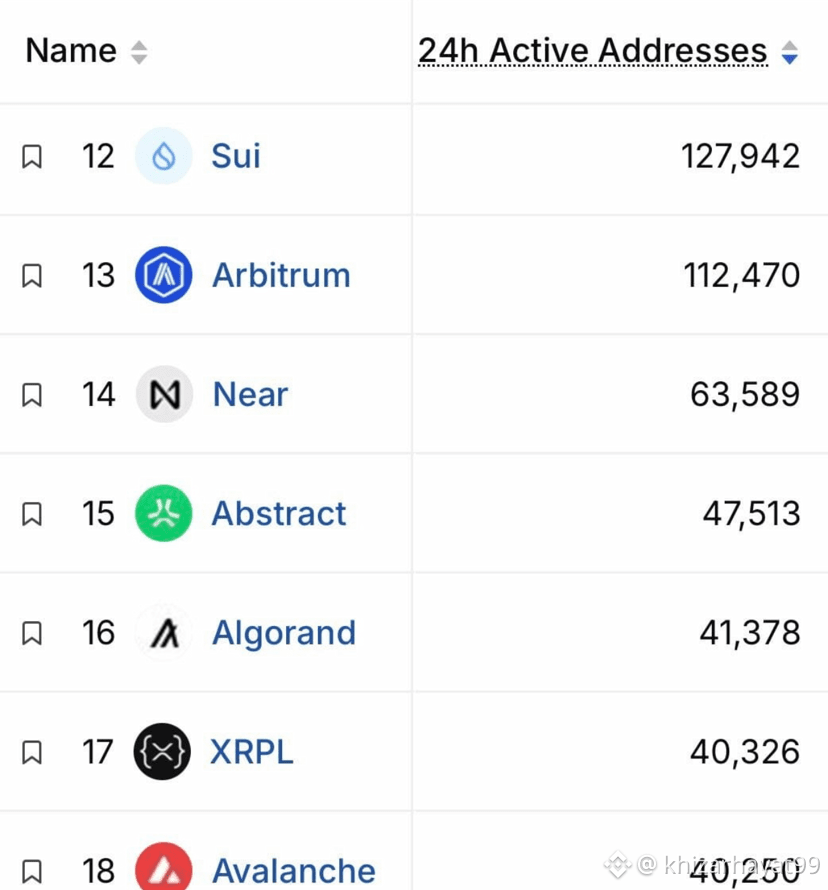
Buy more $SUI $UNI $NEAR ..‼️‼️
{spot}(NEARUSDT)
{spot}(UNIUSDT)
{spot}(SUIUSDT)
Buy more $SUI $UNI $NEAR ..‼️‼️
10
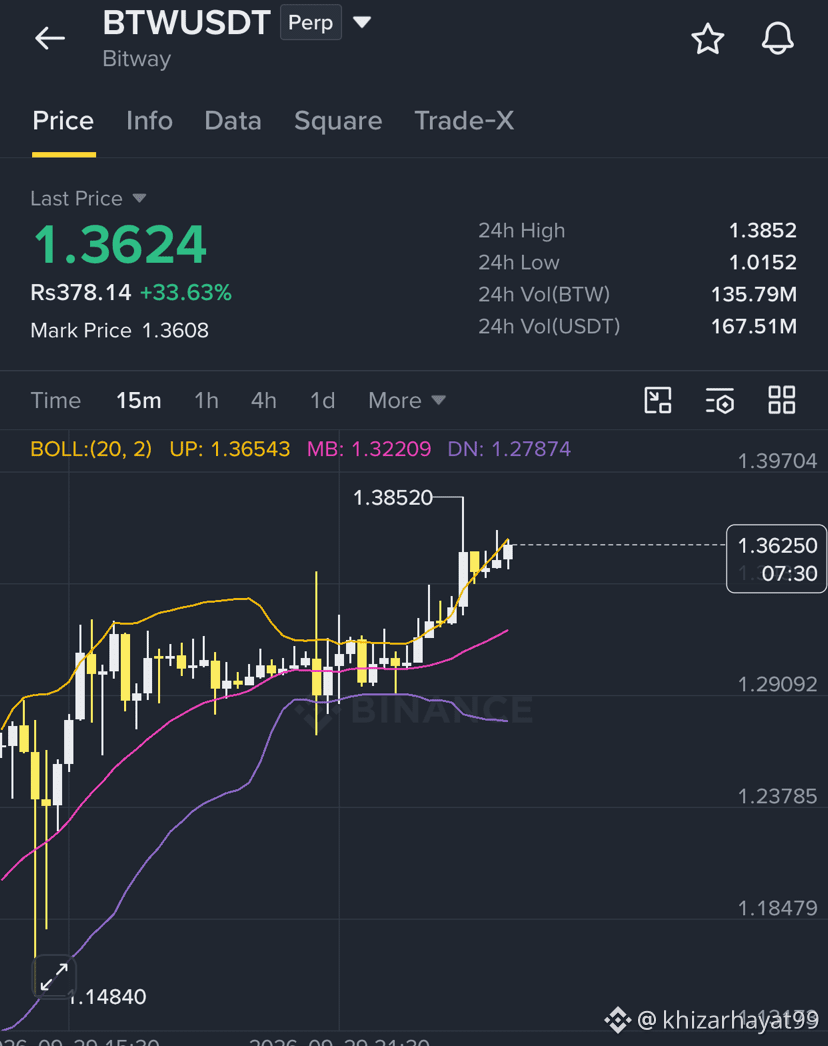
Scalp Setup: $BTW /USDT (15-Minute Breakout)
With BTW approaching the $1.3500 pivot, the focus shifts to whether it can clear this resistance and make a push toward the recent $1.40 local highs. Here is a 15-minute scalp setup designed for momentum continuation.
Key Technical Parameters
Metric / Level Value Notes
Bias Bullish Continuation (Scalp) Playing the breakout and momentum above the $1.35 pivot
Ideal Entry Zone $1.3450 – $1.3550 Breakout confirmation and subsequent 15m retest of support
Invalidation / Stop Loss $1.3280 Below the immediate 15m consolidation base (Risk: ~1.6%)
Take Profit 1 (TP1) $1.3750 First liquidity pool / minor resistance (~1.8% upside)
Take Profit 2 (TP2) $1.4000 Retest of the major 24-hour local high (~3.7% upside)
Take Profit 3 (TP3) $1.4350 Blue-sky breakout extension (~6.3% upside)
Risk / Reward Ratio 1 : 2.3 Calculated to TP2
Trade Execution Plan
Entry Strategy:
Breakout & Retest: Wait for a strong 15m candle to close above $1.3500. Place limit bids between $1.3450 and $1.3520 to catch the immediate retest/throwback before the next leg up.
Aggressive: Market buy a portion on the cross of $1.3500 if volume indicates strong buying pressure, leaving room to add on a dip.
Risk Management:
Because the stop loss is tight (~1.6%), position sizing can be slightly larger than a swing trade, but overall risk should remain fixed (e.g., 1% of total account equity).
Once TP1 ($1.3750) is secured, take 30-50% off the table and move the Stop Loss to Breakeven ($1.3500) to protect capital against a fakeout.
Invalidation Criteria:
A 15m candle failing to hold the breakout and closing back below $1.3280 indicates a liquidity sweep/bull trap, invalidating the long setup.
How would you like to manage this 1.3500 setup?
{future}(BTWUSDT)
Scalp Setup: $BTW /USDT (15-Minute Breakout)
With BTW approaching the $1.3500 pivot, the focus shifts to whether it can clear this resistance and make a push toward the recent $1.40 local highs. Here is a 15-minute scalp setup designed for momentum continuation.
Key Technical Parameters
Metric / Level Value Notes
Bias Bullish Continuation (Scalp) Playing the breakout and momentum above the $1.35 pivot
Ideal Entry Zone $1.3450 – $1.3550 Breakout confirmation and subsequent 15m retest of support
Invalidation / Stop Loss $1.3280 Below the immediate 15m consolidation base (Risk: ~1.6%)
Take Profit 1 (TP1) $1.3750 First liquidity pool / minor resistance (~1.8% upside)
Take Profit 2 (TP2) $1.4000 Retest of the major 24-hour local high (~3.7% upside)
Take Profit 3 (TP3) $1.4350 Blue-sky breakout extension (~6.3% upside)
Risk / Reward Ratio 1 : 2.3 Calculated to TP2
Trade Execution Plan
Entry Strategy:
Breakout & Retest: Wait for a strong 15m candle to close above $1.3500. Place limit bids between $1.3450 and $1.3520 to catch the immediate retest/throwback before the next leg up.
Aggressive: Market buy a portion on the cross of $1.3500 if volume indicates strong buying pressure, leaving room to add on a dip.
Risk Management:
Because the stop loss is tight (~1.6%), position sizing can be slightly larger than a swing trade, but overall risk should remain fixed (e.g., 1% of total account equity).
Once TP1 ($1.3750) is secured, take 30-50% off the table and move the Stop Loss to Breakeven ($1.3500) to protect capital against a fakeout.
Invalidation Criteria:
A 15m candle failing to hold the breakout and closing back below $1.3280 indicates a liquidity sweep/bull trap, invalidating the long setup.
How would you like to manage this 1.3500 setup?
With BTW approaching the $1.3500 pivot, the focus shifts to whether it can clear this resistance and make a push toward the recent $1.40 local highs. Here is a 15-minute scalp setup designed for momentum continuation.
Key Technical Parameters
Metric / Level Value Notes
Bias Bullish Continuation (Scalp) Playing the breakout and momentum above the $1.35 pivot
Ideal Entry Zone $1.3450 – $1.3550 Breakout confirmation and subsequent 15m retest of support
Invalidation / Stop Loss $1.3280 Below the immediate 15m consolidation base (Risk: ~1.6%)
Take Profit 1 (TP1) $1.3750 First liquidity pool / minor resistance (~1.8% upside)
Take Profit 2 (TP2) $1.4000 Retest of the major 24-hour local high (~3.7% upside)
Take Profit 3 (TP3) $1.4350 Blue-sky breakout extension (~6.3% upside)
Risk / Reward Ratio 1 : 2.3 Calculated to TP2
Trade Execution Plan
Entry Strategy:
Breakout & Retest: Wait for a strong 15m candle to close above $1.3500. Place limit bids between $1.3450 and $1.3520 to catch the immediate retest/throwback before the next leg up.
Aggressive: Market buy a portion on the cross of $1.3500 if volume indicates strong buying pressure, leaving room to add on a dip.
Risk Management:
Because the stop loss is tight (~1.6%), position sizing can be slightly larger than a swing trade, but overall risk should remain fixed (e.g., 1% of total account equity).
Once TP1 ($1.3750) is secured, take 30-50% off the table and move the Stop Loss to Breakeven ($1.3500) to protect capital against a fakeout.
Invalidation Criteria:
A 15m candle failing to hold the breakout and closing back below $1.3280 indicates a liquidity sweep/bull trap, invalidating the long setup.
How would you like to manage this 1.3500 setup?
80
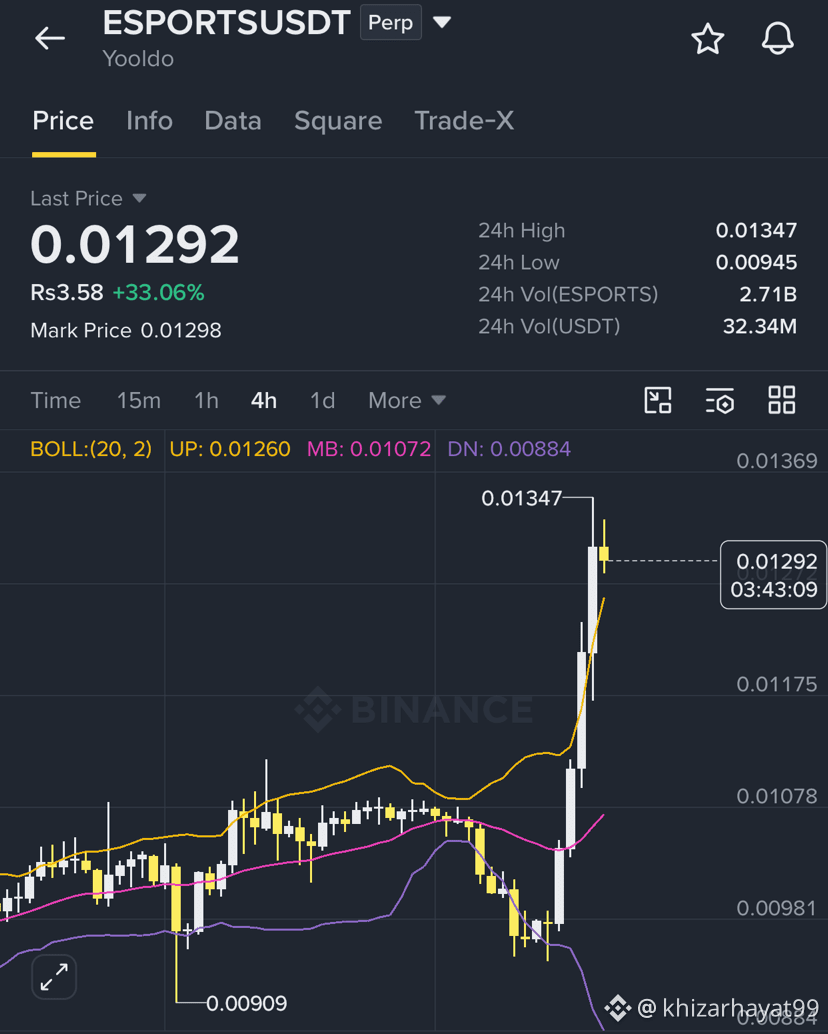
Trade Setup: $ESPORTS /USDT (4-Hour Bullish Structure)
Here is a structured long setup based on the 4H market structure around the 0.13 level.
Key Technical Parameters
Metric / Level Value Notes
Bias Bullish 4H higher-high / higher-low market structure
Ideal Entry Zone 0.1250 – 0.1320 Re-test of local broken resistance turned support
Invalidation / Stop Loss 0.1180 Below recent 4H swing low (Risk: ~8.5%)
Take Profit 1 (TP1) 0.1500 Next liquidity zone / local high (~15% upside)
Take Profit 2 (TP2) 0.1780 Structural resistance level (~36% upside)
Take Profit 3 (TP3) 0.2350 Major high timeframe expansion target (~80% upside)
Risk / Reward Ratio 1 : 4.2 Calculated to TP2
Trade Execution Plan
Entry Strategy:
Aggressive: Limit order spread in the 0.1280 – 0.1310 region.
Conservative: Wait for a 4H candle to close above 0.1350 with expanding volume to confirm momentum before entering on a minor 15m pullback.
Risk Management:
Keep overall trade position size under 1–2% of portfolio risk due to higher volatility in low-cap / perpetual contracts.
Once TP1 (0.1500) is hit, take 30–50% profits off the table and trail Stop Loss to Breakeven (0.1300).
Invalidation Criteria:
A 4H body close below 0.1180 breaks the market structure, invalidating the long setup.
Would you like to refine or analyze this setup further?
{future}(ESPORTSUSDT)
Trade Setup: $ESPORTS /USDT (4-Hour Bullish Structure)
Here is a structured long setup based on the 4H market structure around the 0.13 level.
Key Technical Parameters
Metric / Level Value Notes
Bias Bullish 4H higher-high / higher-low market structure
Ideal Entry Zone 0.1250 – 0.1320 Re-test of local broken resistance turned support
Invalidation / Stop Loss 0.1180 Below recent 4H swing low (Risk: ~8.5%)
Take Profit 1 (TP1) 0.1500 Next liquidity zone / local high (~15% upside)
Take Profit 2 (TP2) 0.1780 Structural resistance level (~36% upside)
Take Profit 3 (TP3) 0.2350 Major high timeframe expansion target (~80% upside)
Risk / Reward Ratio 1 : 4.2 Calculated to TP2
Trade Execution Plan
Entry Strategy:
Aggressive: Limit order spread in the 0.1280 – 0.1310 region.
Conservative: Wait for a 4H candle to close above 0.1350 with expanding volume to confirm momentum before entering on a minor 15m pullback.
Risk Management:
Keep overall trade position size under 1–2% of portfolio risk due to higher volatility in low-cap / perpetual contracts.
Once TP1 (0.1500) is hit, take 30–50% profits off the table and trail Stop Loss to Breakeven (0.1300).
Invalidation Criteria:
A 4H body close below 0.1180 breaks the market structure, invalidating the long setup.
Would you like to refine or analyze this setup further?
Here is a structured long setup based on the 4H market structure around the 0.13 level.
Key Technical Parameters
Metric / Level Value Notes
Bias Bullish 4H higher-high / higher-low market structure
Ideal Entry Zone 0.1250 – 0.1320 Re-test of local broken resistance turned support
Invalidation / Stop Loss 0.1180 Below recent 4H swing low (Risk: ~8.5%)
Take Profit 1 (TP1) 0.1500 Next liquidity zone / local high (~15% upside)
Take Profit 2 (TP2) 0.1780 Structural resistance level (~36% upside)
Take Profit 3 (TP3) 0.2350 Major high timeframe expansion target (~80% upside)
Risk / Reward Ratio 1 : 4.2 Calculated to TP2
Trade Execution Plan
Entry Strategy:
Aggressive: Limit order spread in the 0.1280 – 0.1310 region.
Conservative: Wait for a 4H candle to close above 0.1350 with expanding volume to confirm momentum before entering on a minor 15m pullback.
Risk Management:
Keep overall trade position size under 1–2% of portfolio risk due to higher volatility in low-cap / perpetual contracts.
Once TP1 (0.1500) is hit, take 30–50% profits off the table and trail Stop Loss to Breakeven (0.1300).
Invalidation Criteria:
A 4H body close below 0.1180 breaks the market structure, invalidating the long setup.
Would you like to refine or analyze this setup further?
51
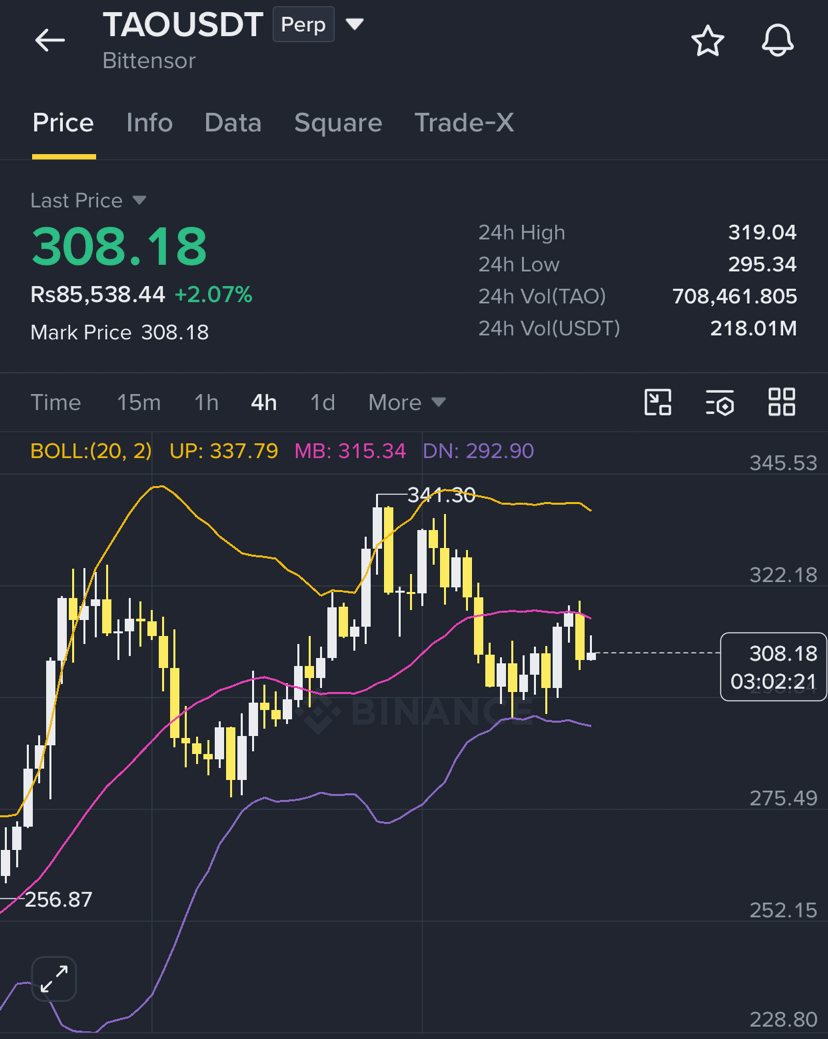
An actionable trade plan and technical breakdown for $TAO USDT based on a 4-Hour bullish structure holding above the $308 level:
Key Technical Analysis & Context
Demand Zone ($295 – $308): Price is retesting a key prior resistance zone on the 4H timeframe, now acting as flipped support.
Market Structure: TAO maintains a series of higher highs and higher lows following the recent momentum expansion from sub-$300 levels.
Trend & Indicators: The $300 area aligns with psychological support and short-term EMA moving averages (20/50 EMA on 4H). Holding above $300 keeps the macro continuation structure bullish.
Trade Plan & Execution Matrix
Parameter Value Details / Notes
Trade Direction LONG Trend continuation off the 4H demand / flipped support zone
Entry Zone $302 – $310 Limit scaling in near the $308 pivot zone
Stop Loss (SL) $288.00 Placed below the structural 4H swing low (~6.2% risk)
Take Profit 1 (TP1) $340.00 Local swing high / major resistance level (partial exit & SL to BE)
Take Profit 2 (TP2) $375.00 High-timeframe liquidity sweep / 1.618 Fib extension
Take Profit 3 (TP3) $420.00 Major expansion target towards $400+ key resistance
Risk / Reward Ratio ~1 : 3.3 (Calculated to TP2)
Trade Management & Execution Rules
Confirmation: Confirm a 4H candle body close above $300 with a lower shadow/wick showing absorption before expanding full position size.
Risk Allocation: Keep account exposure capped at 1–2% risk per position given the volatility of AI sector tokens.
Invalidation: A 4H candle body close below $288.00 breaks the higher-low sequence and invalidates the bullish thesis.
{future}(TAOUSDT)
An actionable trade plan and technical breakdown for $TAO USDT based on a 4-Hour bullish structure holding above the $308 level:
Key Technical Analysis & Context
Demand Zone ($295 – $308): Price is retesting a key prior resistance zone on the 4H timeframe, now acting as flipped support.
Market Structure: TAO maintains a series of higher highs and higher lows following the recent momentum expansion from sub-$300 levels.
Trend & Indicators: The $300 area aligns with psychological support and short-term EMA moving averages (20/50 EMA on 4H). Holding above $300 keeps the macro continuation structure bullish.
Trade Plan & Execution Matrix
Parameter Value Details / Notes
Trade Direction LONG Trend continuation off the 4H demand / flipped support zone
Entry Zone $302 – $310 Limit scaling in near the $308 pivot zone
Stop Loss (SL) $288.00 Placed below the structural 4H swing low (~6.2% risk)
Take Profit 1 (TP1) $340.00 Local swing high / major resistance level (partial exit & SL to BE)
Take Profit 2 (TP2) $375.00 High-timeframe liquidity sweep / 1.618 Fib extension
Take Profit 3 (TP3) $420.00 Major expansion target towards $400+ key resistance
Risk / Reward Ratio ~1 : 3.3 (Calculated to TP2)
Trade Management & Execution Rules
Confirmation: Confirm a 4H candle body close above $300 with a lower shadow/wick showing absorption before expanding full position size.
Risk Allocation: Keep account exposure capped at 1–2% risk per position given the volatility of AI sector tokens.
Invalidation: A 4H candle body close below $288.00 breaks the higher-low sequence and invalidates the bullish thesis.
Key Technical Analysis & Context
Demand Zone ($295 – $308): Price is retesting a key prior resistance zone on the 4H timeframe, now acting as flipped support.
Market Structure: TAO maintains a series of higher highs and higher lows following the recent momentum expansion from sub-$300 levels.
Trend & Indicators: The $300 area aligns with psychological support and short-term EMA moving averages (20/50 EMA on 4H). Holding above $300 keeps the macro continuation structure bullish.
Trade Plan & Execution Matrix
Parameter Value Details / Notes
Trade Direction LONG Trend continuation off the 4H demand / flipped support zone
Entry Zone $302 – $310 Limit scaling in near the $308 pivot zone
Stop Loss (SL) $288.00 Placed below the structural 4H swing low (~6.2% risk)
Take Profit 1 (TP1) $340.00 Local swing high / major resistance level (partial exit & SL to BE)
Take Profit 2 (TP2) $375.00 High-timeframe liquidity sweep / 1.618 Fib extension
Take Profit 3 (TP3) $420.00 Major expansion target towards $400+ key resistance
Risk / Reward Ratio ~1 : 3.3 (Calculated to TP2)
Trade Management & Execution Rules
Confirmation: Confirm a 4H candle body close above $300 with a lower shadow/wick showing absorption before expanding full position size.
Risk Allocation: Keep account exposure capped at 1–2% risk per position given the volatility of AI sector tokens.
Invalidation: A 4H candle body close below $288.00 breaks the higher-low sequence and invalidates the bullish thesis.
11
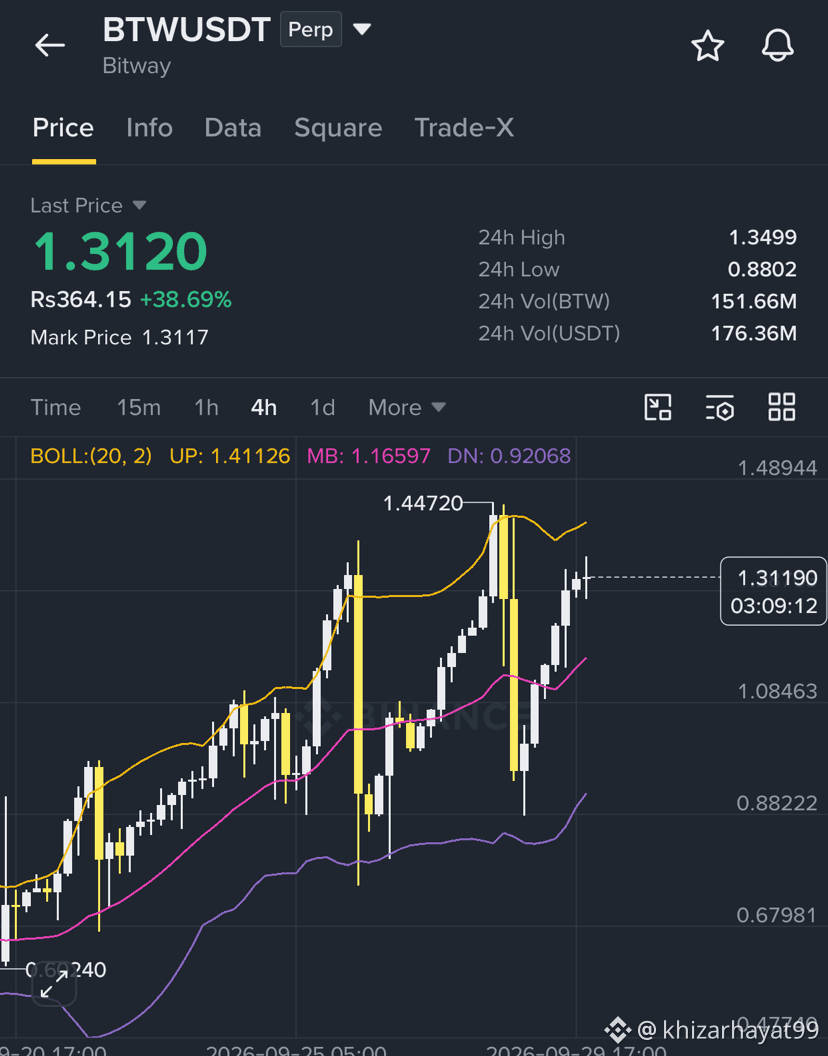
Here is the updated long trade plan and technical breakdown for $BTW USDT based on the 4-Hour bullish structure around $1.3120:
Key Technical Context
Current Pivot Zone: $1.3000 – $1.3150 (Holding key higher-low support on the 4H timeframe).
4H Market Structure: Price is consolidating above the $1.3000 psychological baseline following a recent expansion phase. Retaining this level is critical to maintain the short-term bullish continuation structure.
Trend Confirmation: Looking for 4H candle closes above the 20/50 EMA cluster to signal renewed buyer momentum toward higher liquidity pools.
Trade Plan & Execution Matrix
Parameter Value Details / Notes
Trade Direction LONG Trend continuation setup off 4H demand zone
Entry Zone $1.3000 – $1.3150 Scale in near support / retest of demand floor
Stop Loss (SL) $1.2250 Structural invalidation below key 4H swing low (~6.5% risk)
Take Profit 1 (TP1) $1.4450 Immediate resistance target (Secure partials & move SL to breakeven)
Take Profit 2 (TP2) $1.5800 1.618 Fibonacci extension target
Take Profit 3 (TP3) $1.7500 Major expansion / liquidity sweep target
Risk / Reward Ratio ~1 : 3.0 (Calculated to TP2)
Trade Execution Guidelines
Confirmation: Confirm a 4H candle close (bullish pin bar, engulfing, or strong absorption wick) above $1.3000 before sizing in fully.
Risk Control: Cap total trade exposure to 1–2% of portfolio risk to account for intraday volatility.
Invalidation: A 4H candle body close below $1.2250 breaks the higher-low sequence and invalidates the bullish setup.
{future}(BTWUSDT)
Here is the updated long trade plan and technical breakdown for $BTW USDT based on the 4-Hour bullish structure around $1.3120:
Key Technical Context
Current Pivot Zone: $1.3000 – $1.3150 (Holding key higher-low support on the 4H timeframe).
4H Market Structure: Price is consolidating above the $1.3000 psychological baseline following a recent expansion phase. Retaining this level is critical to maintain the short-term bullish continuation structure.
Trend Confirmation: Looking for 4H candle closes above the 20/50 EMA cluster to signal renewed buyer momentum toward higher liquidity pools.
Trade Plan & Execution Matrix
Parameter Value Details / Notes
Trade Direction LONG Trend continuation setup off 4H demand zone
Entry Zone $1.3000 – $1.3150 Scale in near support / retest of demand floor
Stop Loss (SL) $1.2250 Structural invalidation below key 4H swing low (~6.5% risk)
Take Profit 1 (TP1) $1.4450 Immediate resistance target (Secure partials & move SL to breakeven)
Take Profit 2 (TP2) $1.5800 1.618 Fibonacci extension target
Take Profit 3 (TP3) $1.7500 Major expansion / liquidity sweep target
Risk / Reward Ratio ~1 : 3.0 (Calculated to TP2)
Trade Execution Guidelines
Confirmation: Confirm a 4H candle close (bullish pin bar, engulfing, or strong absorption wick) above $1.3000 before sizing in fully.
Risk Control: Cap total trade exposure to 1–2% of portfolio risk to account for intraday volatility.
Invalidation: A 4H candle body close below $1.2250 breaks the higher-low sequence and invalidates the bullish setup.
Key Technical Context
Current Pivot Zone: $1.3000 – $1.3150 (Holding key higher-low support on the 4H timeframe).
4H Market Structure: Price is consolidating above the $1.3000 psychological baseline following a recent expansion phase. Retaining this level is critical to maintain the short-term bullish continuation structure.
Trend Confirmation: Looking for 4H candle closes above the 20/50 EMA cluster to signal renewed buyer momentum toward higher liquidity pools.
Trade Plan & Execution Matrix
Parameter Value Details / Notes
Trade Direction LONG Trend continuation setup off 4H demand zone
Entry Zone $1.3000 – $1.3150 Scale in near support / retest of demand floor
Stop Loss (SL) $1.2250 Structural invalidation below key 4H swing low (~6.5% risk)
Take Profit 1 (TP1) $1.4450 Immediate resistance target (Secure partials & move SL to breakeven)
Take Profit 2 (TP2) $1.5800 1.618 Fibonacci extension target
Take Profit 3 (TP3) $1.7500 Major expansion / liquidity sweep target
Risk / Reward Ratio ~1 : 3.0 (Calculated to TP2)
Trade Execution Guidelines
Confirmation: Confirm a 4H candle close (bullish pin bar, engulfing, or strong absorption wick) above $1.3000 before sizing in fully.
Risk Control: Cap total trade exposure to 1–2% of portfolio risk to account for intraday volatility.
Invalidation: A 4H candle body close below $1.2250 breaks the higher-low sequence and invalidates the bullish setup.
1
78
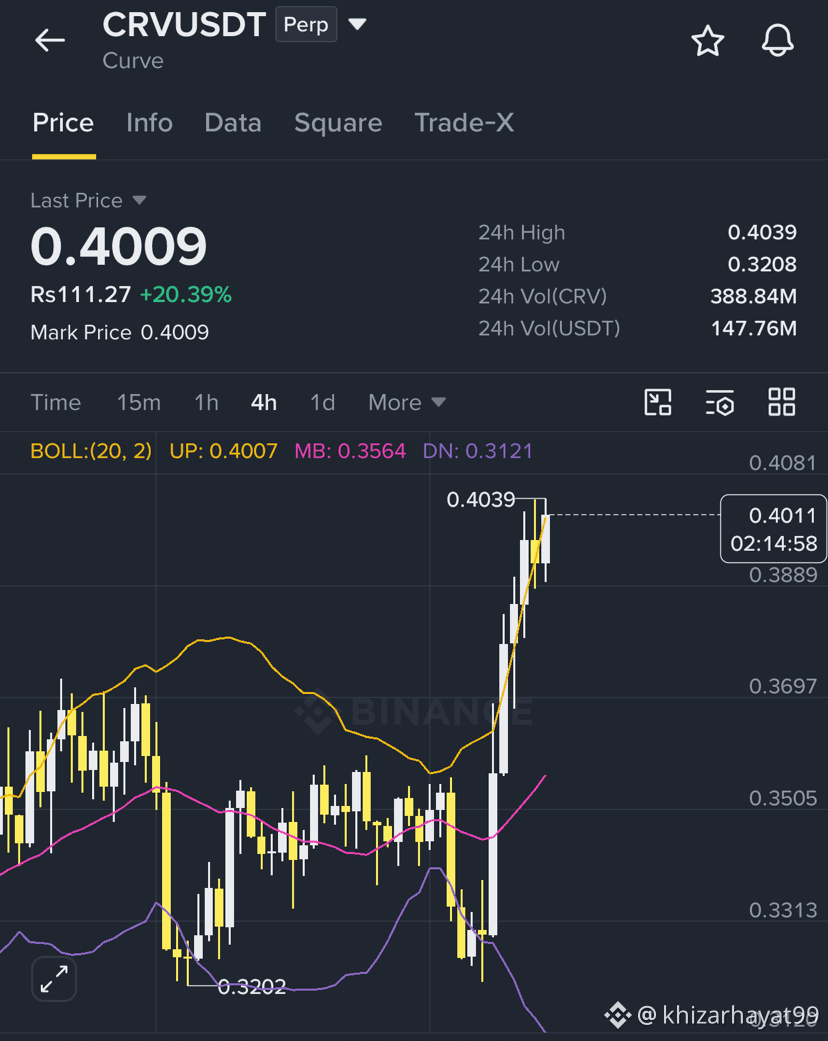
Independent technical evaluation for the $CRV /USDT 4-hour market structure, centered around the 0.4000 key horizontal pivot and volume expansion signal:
Technical Breakdown & Volume Dynamics
Market Structure (4H)
Key Pivot at $0.4000: The $0.4000 level represents a strong historical psychological and structural pivot. Reclaiming $0.4000 with volume confirms a shift in local market structure (MSB / Change of Character) from range-bound consolidation to bullish expansion.
Volume Expansion Signal: A volume spike accompanying the move above $0.40 indicates institutional absorption rather than a retail liquidity sweep. Continued holding above $0.40 converts former macro resistance into active support.
Key Level Map
Invalidation / Support Zone: $0.3720 – $0.3880 (Breakout base / previous 4H higher low).
Immediate Resistance (TP1): $0.4450 – $0.4600 (Next 4H supply block & local liquidity pool).
Secondary Target (TP2): $0.5100 – $0.5300 (Macro range highs / major structural supply).
Extended Target (TP3): $0.6000 (Extended expansion zone).
{future}(CRVUSDT)
Independent technical evaluation for the $CRV /USDT 4-hour market structure, centered around the 0.4000 key horizontal pivot and volume expansion signal:
Technical Breakdown & Volume Dynamics
Market Structure (4H)
Key Pivot at $0.4000: The $0.4000 level represents a strong historical psychological and structural pivot. Reclaiming $0.4000 with volume confirms a shift in local market structure (MSB / Change of Character) from range-bound consolidation to bullish expansion.
Volume Expansion Signal: A volume spike accompanying the move above $0.40 indicates institutional absorption rather than a retail liquidity sweep. Continued holding above $0.40 converts former macro resistance into active support.
Key Level Map
Invalidation / Support Zone: $0.3720 – $0.3880 (Breakout base / previous 4H higher low).
Immediate Resistance (TP1): $0.4450 – $0.4600 (Next 4H supply block & local liquidity pool).
Secondary Target (TP2): $0.5100 – $0.5300 (Macro range highs / major structural supply).
Extended Target (TP3): $0.6000 (Extended expansion zone).
Technical Breakdown & Volume Dynamics
Market Structure (4H)
Key Pivot at $0.4000: The $0.4000 level represents a strong historical psychological and structural pivot. Reclaiming $0.4000 with volume confirms a shift in local market structure (MSB / Change of Character) from range-bound consolidation to bullish expansion.
Volume Expansion Signal: A volume spike accompanying the move above $0.40 indicates institutional absorption rather than a retail liquidity sweep. Continued holding above $0.40 converts former macro resistance into active support.
Key Level Map
Invalidation / Support Zone: $0.3720 – $0.3880 (Breakout base / previous 4H higher low).
Immediate Resistance (TP1): $0.4450 – $0.4600 (Next 4H supply block & local liquidity pool).
Secondary Target (TP2): $0.5100 – $0.5300 (Macro range highs / major structural supply).
Extended Target (TP3): $0.6000 (Extended expansion zone).
55
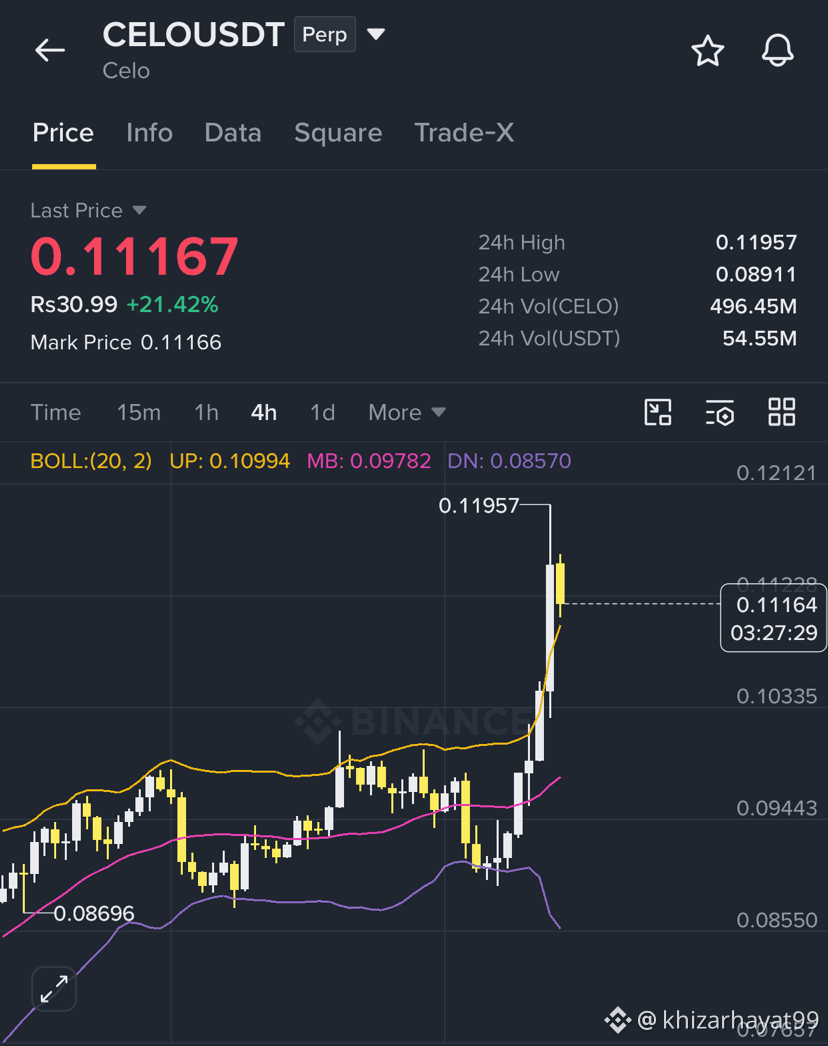
Independent technical assessment for the $CELO /USDT 4-hour timeframe structure based on the 0.1120 price level:
Technical Breakdown & Market Context
Macro Trend & Base Formation
Market Structure: At $0.1120, CELO is trading near historical lower-range support zones. On higher timeframes, the price has compressed following prolonged distribution, forming a base structure.
4-Hour Bias: Holding above $0.1100–$0.1120 indicates localized buyer defense (higher low or consolidation demand zone). However, a confirmed bullish market structure break (MSB) requires a clean displacement above the local lower-high swing points (typically around $0.1250–$0.1300).
Key Technical Levels
Immediate Support / Invalidated Level: $0.1080 – $0.1110 (A 4H close below $0.1080 invalidates the immediate bullish higher-low thesis).
Immediate Resistance: $0.1220 – $0.1250 (First major liquidity pool & EMA cluster).
Primary Target (TP1): $0.1380 – $0.1420 (4H supply zone/swing high).
Secondary Target (TP2): $0.1650 (Extended range resistance).
Trade Setup Blueprint
If executing a 4H bullish long setup at or near 0.11200:
Entry Zone: $0.1110 – $0.1130 (Wait for a 4H bullish confirmation candle, e.g., hammer or bullish engulfing, or a lower-timeframe shift in market structure).
Stop Loss (SL): $0.1065 (Placed below recent swing lows / demand zone to maintain a proper risk profile).
Take Profit 1 (TP1): $0.1250 (Secure partial profits / move SL to entry).
Take Profit 2 (TP2): $0.1400
Risk/Reward Ratio (R:R): ~3.2 : 1 (to TP2).
Execution Checklist & Precautions
Volume & Displacement: Confirm that any bounce off $0.1120 is accompanied by expanding buying volume. Weak-volume bounces often result in bear flags or range continuation.
Bitcoin Correlation: Low-cap altcoin setups require BTC stability; ensure BTC is not breaking down through key support levels simultaneously.
Risk Management: Never risk more than 1–2% of total portfolio equity on single altcoin setups.
{future}(CELOUSDT)
Independent technical assessment for the $CELO /USDT 4-hour timeframe structure based on the 0.1120 price level:
Technical Breakdown & Market Context
Macro Trend & Base Formation
Market Structure: At $0.1120, CELO is trading near historical lower-range support zones. On higher timeframes, the price has compressed following prolonged distribution, forming a base structure.
4-Hour Bias: Holding above $0.1100–$0.1120 indicates localized buyer defense (higher low or consolidation demand zone). However, a confirmed bullish market structure break (MSB) requires a clean displacement above the local lower-high swing points (typically around $0.1250–$0.1300).
Key Technical Levels
Immediate Support / Invalidated Level: $0.1080 – $0.1110 (A 4H close below $0.1080 invalidates the immediate bullish higher-low thesis).
Immediate Resistance: $0.1220 – $0.1250 (First major liquidity pool & EMA cluster).
Primary Target (TP1): $0.1380 – $0.1420 (4H supply zone/swing high).
Secondary Target (TP2): $0.1650 (Extended range resistance).
Trade Setup Blueprint
If executing a 4H bullish long setup at or near 0.11200:
Entry Zone: $0.1110 – $0.1130 (Wait for a 4H bullish confirmation candle, e.g., hammer or bullish engulfing, or a lower-timeframe shift in market structure).
Stop Loss (SL): $0.1065 (Placed below recent swing lows / demand zone to maintain a proper risk profile).
Take Profit 1 (TP1): $0.1250 (Secure partial profits / move SL to entry).
Take Profit 2 (TP2): $0.1400
Risk/Reward Ratio (R:R): ~3.2 : 1 (to TP2).
Execution Checklist & Precautions
Volume & Displacement: Confirm that any bounce off $0.1120 is accompanied by expanding buying volume. Weak-volume bounces often result in bear flags or range continuation.
Bitcoin Correlation: Low-cap altcoin setups require BTC stability; ensure BTC is not breaking down through key support levels simultaneously.
Risk Management: Never risk more than 1–2% of total portfolio equity on single altcoin setups.
Technical Breakdown & Market Context
Macro Trend & Base Formation
Market Structure: At $0.1120, CELO is trading near historical lower-range support zones. On higher timeframes, the price has compressed following prolonged distribution, forming a base structure.
4-Hour Bias: Holding above $0.1100–$0.1120 indicates localized buyer defense (higher low or consolidation demand zone). However, a confirmed bullish market structure break (MSB) requires a clean displacement above the local lower-high swing points (typically around $0.1250–$0.1300).
Key Technical Levels
Immediate Support / Invalidated Level: $0.1080 – $0.1110 (A 4H close below $0.1080 invalidates the immediate bullish higher-low thesis).
Immediate Resistance: $0.1220 – $0.1250 (First major liquidity pool & EMA cluster).
Primary Target (TP1): $0.1380 – $0.1420 (4H supply zone/swing high).
Secondary Target (TP2): $0.1650 (Extended range resistance).
Trade Setup Blueprint
If executing a 4H bullish long setup at or near 0.11200:
Entry Zone: $0.1110 – $0.1130 (Wait for a 4H bullish confirmation candle, e.g., hammer or bullish engulfing, or a lower-timeframe shift in market structure).
Stop Loss (SL): $0.1065 (Placed below recent swing lows / demand zone to maintain a proper risk profile).
Take Profit 1 (TP1): $0.1250 (Secure partial profits / move SL to entry).
Take Profit 2 (TP2): $0.1400
Risk/Reward Ratio (R:R): ~3.2 : 1 (to TP2).
Execution Checklist & Precautions
Volume & Displacement: Confirm that any bounce off $0.1120 is accompanied by expanding buying volume. Weak-volume bounces often result in bear flags or range continuation.
Bitcoin Correlation: Low-cap altcoin setups require BTC stability; ensure BTC is not breaking down through key support levels simultaneously.
Risk Management: Never risk more than 1–2% of total portfolio equity on single altcoin setups.
67
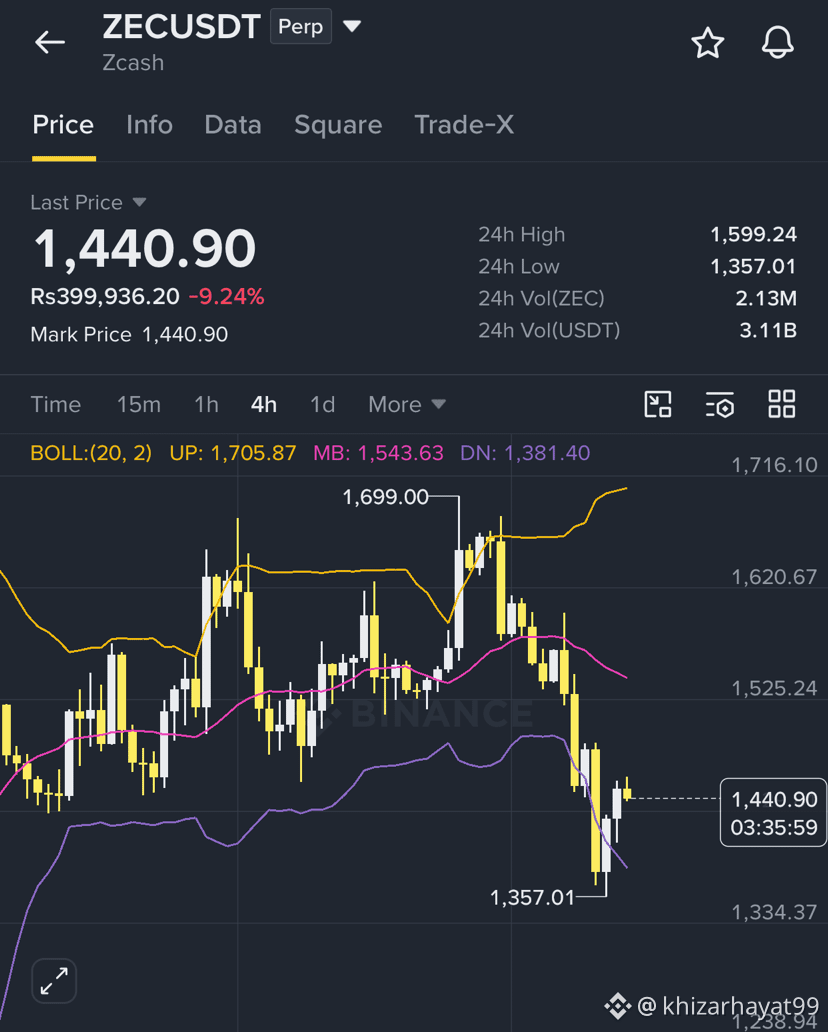
Here is a 4-hour market structure bearish short trade setup for $ZEC /USDT targeting a breakdown around the $1,440 key resistance and high-timeframe liquidity zone.
On the 4-hour timeframe, $1,440 represents an overhead structural resistance and supply block. If price shows exhaustion near this level, a rejection setup offers a favorable risk-to-reward ratio. Conversely, a clean 4H breakout above $1,440 invalidates the bearish structure and flips the bias to long.
Bearish Rejection (Short Setup)
Triggered if price tests $1,440 and prints clear exhaustion on the 4H chart (e.g., long upper wicks, bearish engulfing candle, or declining buy volume near resistance).
Entry Zone: $1,420 – $1,445
Stop Loss (SL): $1,515 (Above local high-wick rejection / ~5.2% risk)
Take Profit Targets:
TP1: $1,320 (Local 4H support / 20 EMA area)
TP2: $1,230 (Mid-range consolidation level)
TP3: $1,120 (Lower demand block / key swing low)
{future}(ZECUSDT)
Here is a 4-hour market structure bearish short trade setup for $ZEC /USDT targeting a breakdown around the $1,440 key resistance and high-timeframe liquidity zone.
On the 4-hour timeframe, $1,440 represents an overhead structural resistance and supply block. If price shows exhaustion near this level, a rejection setup offers a favorable risk-to-reward ratio. Conversely, a clean 4H breakout above $1,440 invalidates the bearish structure and flips the bias to long.
Bearish Rejection (Short Setup)
Triggered if price tests $1,440 and prints clear exhaustion on the 4H chart (e.g., long upper wicks, bearish engulfing candle, or declining buy volume near resistance).
Entry Zone: $1,420 – $1,445
Stop Loss (SL): $1,515 (Above local high-wick rejection / ~5.2% risk)
Take Profit Targets:
TP1: $1,320 (Local 4H support / 20 EMA area)
TP2: $1,230 (Mid-range consolidation level)
TP3: $1,120 (Lower demand block / key swing low)
On the 4-hour timeframe, $1,440 represents an overhead structural resistance and supply block. If price shows exhaustion near this level, a rejection setup offers a favorable risk-to-reward ratio. Conversely, a clean 4H breakout above $1,440 invalidates the bearish structure and flips the bias to long.
Bearish Rejection (Short Setup)
Triggered if price tests $1,440 and prints clear exhaustion on the 4H chart (e.g., long upper wicks, bearish engulfing candle, or declining buy volume near resistance).
Entry Zone: $1,420 – $1,445
Stop Loss (SL): $1,515 (Above local high-wick rejection / ~5.2% risk)
Take Profit Targets:
TP1: $1,320 (Local 4H support / 20 EMA area)
TP2: $1,230 (Mid-range consolidation level)
TP3: $1,120 (Lower demand block / key swing low)
1
120
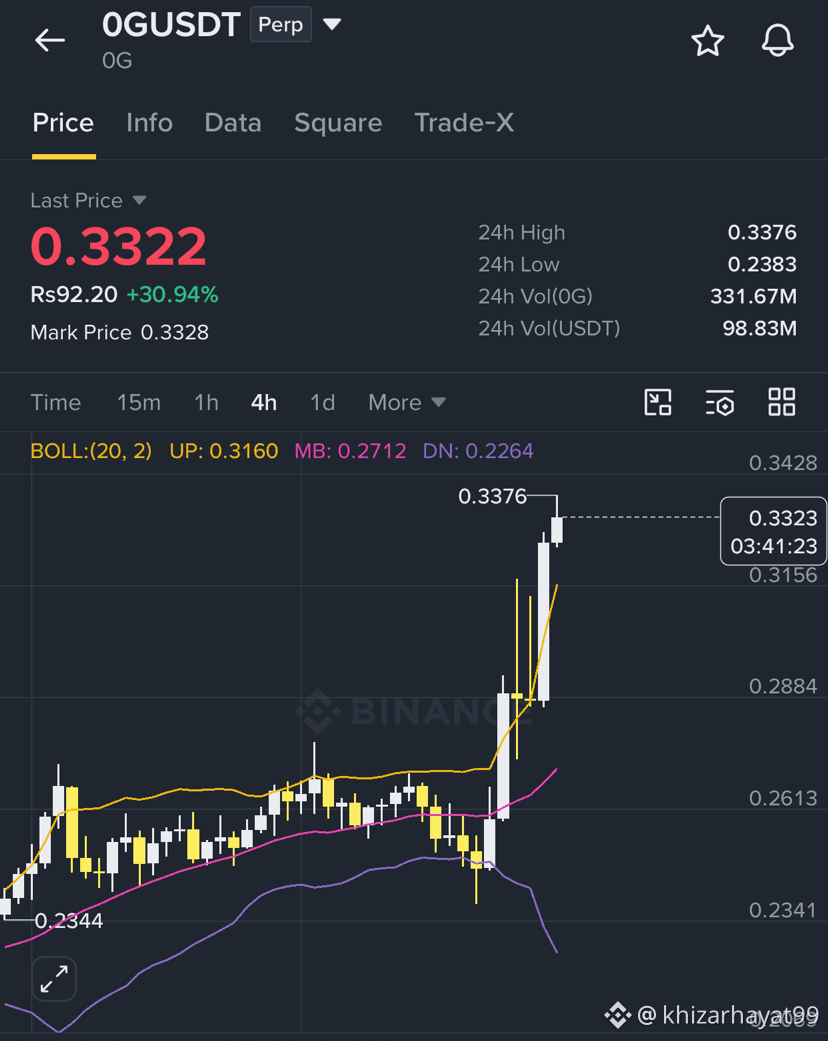
Here is a 4-hour market structure long setup for $0G /USDT targeting a breakout around the $0.3300 structural pivot and high-timeframe liquidity level.
On the 4-hour chart, $0.3300 represents an overhead supply boundary and key structural resistance. A clean 4H breakout and retest above $0.3300 confirms high-timeframe bullish continuation, while a pullback into lower 4H demand provides a higher risk-to-reward long entry.
Scenario A: Bullish Breakout & Retest (Long Setup)
Triggered when price cleanly breaks above $0.3300 on strong 4H buy volume and holds $0.3300 as flipped support on a retest.
Trigger / Entry Zone: $0.3310 – $0.3360 (On 4H retest confirmation)
Stop Loss (SL): $0.3120 (Below breakout candle base / ~5.7% risk)
Take Profit Targets:
TP1: $0.3650 (Initial momentum expansion / supply zone)
TP2: $0.4000 (Psychological target & key liquidity grab)
TP3: $0.4450 (1.618 Fibonacci extension)
{future}(0GUSDT)
Here is a 4-hour market structure long setup for $0G /USDT targeting a breakout around the $0.3300 structural pivot and high-timeframe liquidity level.
On the 4-hour chart, $0.3300 represents an overhead supply boundary and key structural resistance. A clean 4H breakout and retest above $0.3300 confirms high-timeframe bullish continuation, while a pullback into lower 4H demand provides a higher risk-to-reward long entry.
Scenario A: Bullish Breakout & Retest (Long Setup)
Triggered when price cleanly breaks above $0.3300 on strong 4H buy volume and holds $0.3300 as flipped support on a retest.
Trigger / Entry Zone: $0.3310 – $0.3360 (On 4H retest confirmation)
Stop Loss (SL): $0.3120 (Below breakout candle base / ~5.7% risk)
Take Profit Targets:
TP1: $0.3650 (Initial momentum expansion / supply zone)
TP2: $0.4000 (Psychological target & key liquidity grab)
TP3: $0.4450 (1.618 Fibonacci extension)
On the 4-hour chart, $0.3300 represents an overhead supply boundary and key structural resistance. A clean 4H breakout and retest above $0.3300 confirms high-timeframe bullish continuation, while a pullback into lower 4H demand provides a higher risk-to-reward long entry.
Scenario A: Bullish Breakout & Retest (Long Setup)
Triggered when price cleanly breaks above $0.3300 on strong 4H buy volume and holds $0.3300 as flipped support on a retest.
Trigger / Entry Zone: $0.3310 – $0.3360 (On 4H retest confirmation)
Stop Loss (SL): $0.3120 (Below breakout candle base / ~5.7% risk)
Take Profit Targets:
TP1: $0.3650 (Initial momentum expansion / supply zone)
TP2: $0.4000 (Psychological target & key liquidity grab)
TP3: $0.4450 (1.618 Fibonacci extension)
1
115
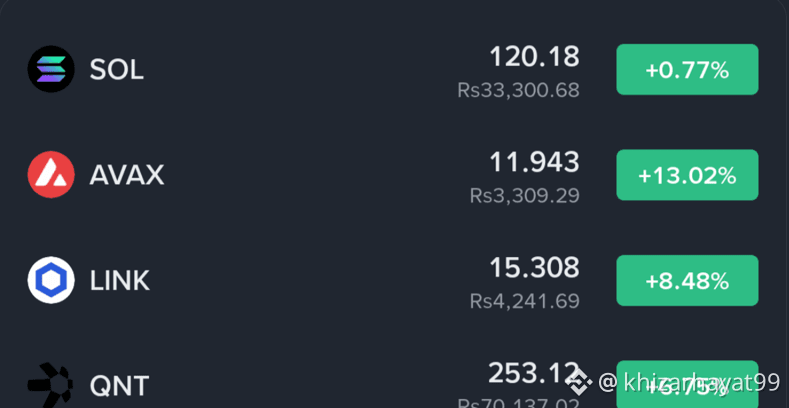
ALTCOIN RECOVERY UNDERWAY — SUPPORTS ARE HOLDING THE LINE 🛡️
#Altcoins are bouncing back strong after the recent dip! Key support zones held firm, buyers stepped right back in, and momentum is shifting back to the bulls.
⚡ $SOL : +0.77%
⚡ $AVAX : +13.02%
⚡ $LINK : +8.48%
⚡ $QNT : +6.75%
This is textbook market behavior: Support holds → Buyers absorb → Expansion follows.
As long as these structural levels remain protected, the bullish recovery is intact and higher targets are loading 🚀
{future}(LINKUSDT)
{future}(AVAXUSDT)
{future}(SOLUSDT)
ALTCOIN RECOVERY UNDERWAY — SUPPORTS ARE HOLDING THE LINE 🛡️
#Altcoins are bouncing back strong after the recent dip! Key support zones held firm, buyers stepped right back in, and momentum is shifting back to the bulls.
⚡ $SOL : +0.77%
⚡ $AVAX : +13.02%
⚡ $LINK : +8.48%
⚡ $QNT : +6.75%
This is textbook market behavior: Support holds → Buyers absorb → Expansion follows.
As long as these structural levels remain protected, the bullish recovery is intact and higher targets are loading 🚀
#Altcoins are bouncing back strong after the recent dip! Key support zones held firm, buyers stepped right back in, and momentum is shifting back to the bulls.
⚡ $SOL : +0.77%
⚡ $AVAX : +13.02%
⚡ $LINK : +8.48%
⚡ $QNT : +6.75%
This is textbook market behavior: Support holds → Buyers absorb → Expansion follows.
As long as these structural levels remain protected, the bullish recovery is intact and higher targets are loading 🚀
107
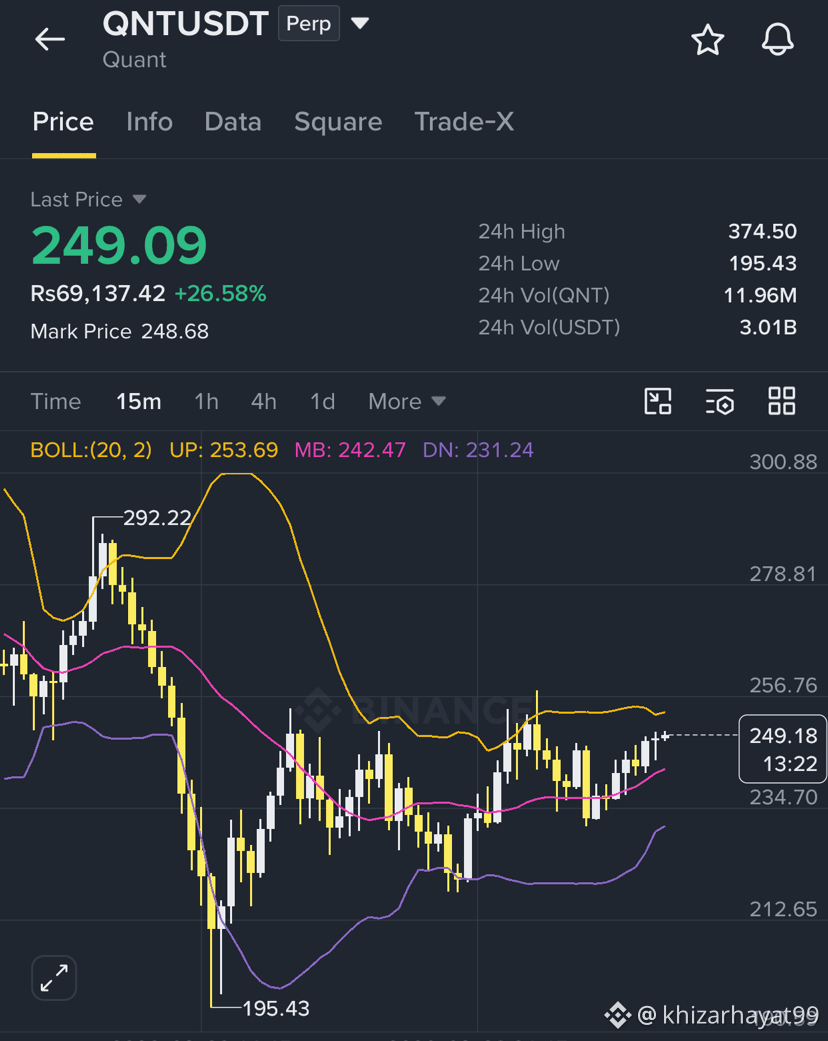
Here is a 15-minute long scalp setup for $QNT /USDT aligned with the bullish 4-hour market structure around the $247 level.
On the 4-hour timeframe, QNT maintains a strong bullish market structure (higher highs and higher lows) targeting upper liquidity near $255–$260. On the 15-minute timeframe, $247 serves as the immediate key structural pivot and local resistance.
15-Minute Bullish Breakout & Retest (Long Scalp)
Triggered when price breaks above $247 with expanding volume and holds $247 as flipped local support on a 15m candle retest.
Entry Zone: $246.80 – $247.80 (On 15m retest confirmation)
Stop Loss (SL): $243.20 (Below 15m breakout candle base / ~1.5% risk)
Take Profit Targets:
TP1: $252.00 (Quick lock-in / 4H swing high test)
TP2: $257.50 (Primary liquidity grab zone)
TP3: $264.00 (Upper 4H expansion level)
{future}(QNTUSDT)
Here is a 15-minute long scalp setup for $QNT /USDT aligned with the bullish 4-hour market structure around the $247 level.
On the 4-hour timeframe, QNT maintains a strong bullish market structure (higher highs and higher lows) targeting upper liquidity near $255–$260. On the 15-minute timeframe, $247 serves as the immediate key structural pivot and local resistance.
15-Minute Bullish Breakout & Retest (Long Scalp)
Triggered when price breaks above $247 with expanding volume and holds $247 as flipped local support on a 15m candle retest.
Entry Zone: $246.80 – $247.80 (On 15m retest confirmation)
Stop Loss (SL): $243.20 (Below 15m breakout candle base / ~1.5% risk)
Take Profit Targets:
TP1: $252.00 (Quick lock-in / 4H swing high test)
TP2: $257.50 (Primary liquidity grab zone)
TP3: $264.00 (Upper 4H expansion level)
On the 4-hour timeframe, QNT maintains a strong bullish market structure (higher highs and higher lows) targeting upper liquidity near $255–$260. On the 15-minute timeframe, $247 serves as the immediate key structural pivot and local resistance.
15-Minute Bullish Breakout & Retest (Long Scalp)
Triggered when price breaks above $247 with expanding volume and holds $247 as flipped local support on a 15m candle retest.
Entry Zone: $246.80 – $247.80 (On 15m retest confirmation)
Stop Loss (SL): $243.20 (Below 15m breakout candle base / ~1.5% risk)
Take Profit Targets:
TP1: $252.00 (Quick lock-in / 4H swing high test)
TP2: $257.50 (Primary liquidity grab zone)
TP3: $264.00 (Upper 4H expansion level)
124
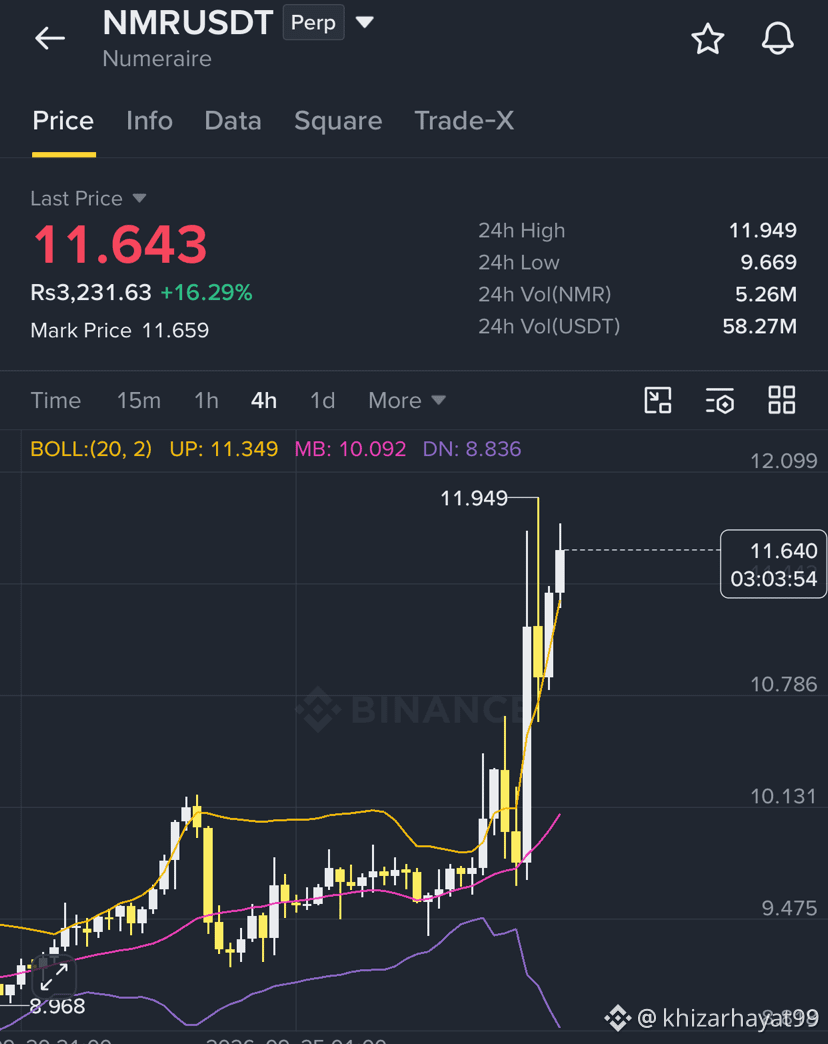
Here is the best 4-hour trade setup for $NMR /USDT centered around the $11.600 resistance and key liquidity level.
On the 4-hour chart, $11.600 represents an overhead supply cluster and horizontal breakout pivot. A clean 4H close above this level signals high-timeframe bullish continuation toward the $13.00+ liquidity block, while rejection around $11.600 sets up a high risk-to-reward short trade.
Scenario A: Bullish Breakout & Retest (Long Setup)
Triggered if price cleanly breaks above $11.600 on expanding 4H buy volume and holds $11.600 as flipped support on a retest.
Entry Zone: $11.620 – $11.780 (On 4H retest confirmation)
Stop Loss (SL): $10.950 (Below breakout candle base / ~5.7% risk)
Take Profit Targets:
TP1: $12.800 (Initial momentum expansion / supply zone)
TP2: $14.100 (1.618 Fib extension / main liquidity target)
TP3: $15.500 (Macro continuation extension)
{future}(NMRUSDT)
Here is the best 4-hour trade setup for $NMR /USDT centered around the $11.600 resistance and key liquidity level.
On the 4-hour chart, $11.600 represents an overhead supply cluster and horizontal breakout pivot. A clean 4H close above this level signals high-timeframe bullish continuation toward the $13.00+ liquidity block, while rejection around $11.600 sets up a high risk-to-reward short trade.
Scenario A: Bullish Breakout & Retest (Long Setup)
Triggered if price cleanly breaks above $11.600 on expanding 4H buy volume and holds $11.600 as flipped support on a retest.
Entry Zone: $11.620 – $11.780 (On 4H retest confirmation)
Stop Loss (SL): $10.950 (Below breakout candle base / ~5.7% risk)
Take Profit Targets:
TP1: $12.800 (Initial momentum expansion / supply zone)
TP2: $14.100 (1.618 Fib extension / main liquidity target)
TP3: $15.500 (Macro continuation extension)
On the 4-hour chart, $11.600 represents an overhead supply cluster and horizontal breakout pivot. A clean 4H close above this level signals high-timeframe bullish continuation toward the $13.00+ liquidity block, while rejection around $11.600 sets up a high risk-to-reward short trade.
Scenario A: Bullish Breakout & Retest (Long Setup)
Triggered if price cleanly breaks above $11.600 on expanding 4H buy volume and holds $11.600 as flipped support on a retest.
Entry Zone: $11.620 – $11.780 (On 4H retest confirmation)
Stop Loss (SL): $10.950 (Below breakout candle base / ~5.7% risk)
Take Profit Targets:
TP1: $12.800 (Initial momentum expansion / supply zone)
TP2: $14.100 (1.618 Fib extension / main liquidity target)
TP3: $15.500 (Macro continuation extension)
26
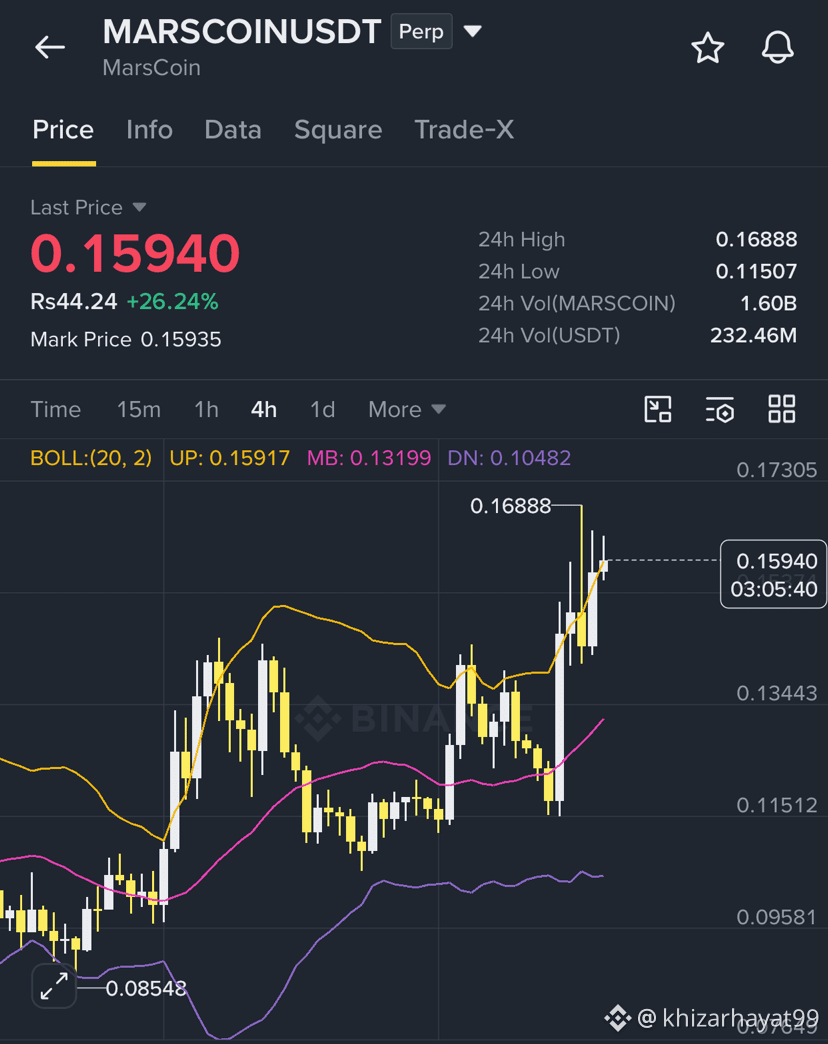
Here is a 4-hour trade setup for $MARSCOIN /USDT focused on the key $0.1600 resistance and psychological level.
On the 4-hour chart, $0.1600 represents an overhead supply boundary and recent high area. A clean breakout and hold above this level triggers a bullish continuation, while exhaustion around this zone provides a high-R:R short setup.
Scenario A: Bullish Breakout & Retest (Long Setup)
If price breaks cleanly above $0.1600 on strong 4H buy volume and holds $0.1600 as new support on a retest.
Trigger / Entry Zone: $0.1605 – $0.1630 (On 4H retest confirmation)
Stop Loss (SL): $0.1510 (Below the breakout candle base / ~5.8% risk)
Take Profit Targets:
TP1: $0.1780 (Initial momentum expansion)
TP2: $0.1950 (Key liquidity grab / prior high)
TP3: $0.2150 (Extended 1.618 Fib projection)
{future}(MARSCOINUSDT)
Here is a 4-hour trade setup for $MARSCOIN /USDT focused on the key $0.1600 resistance and psychological level.
On the 4-hour chart, $0.1600 represents an overhead supply boundary and recent high area. A clean breakout and hold above this level triggers a bullish continuation, while exhaustion around this zone provides a high-R:R short setup.
Scenario A: Bullish Breakout & Retest (Long Setup)
If price breaks cleanly above $0.1600 on strong 4H buy volume and holds $0.1600 as new support on a retest.
Trigger / Entry Zone: $0.1605 – $0.1630 (On 4H retest confirmation)
Stop Loss (SL): $0.1510 (Below the breakout candle base / ~5.8% risk)
Take Profit Targets:
TP1: $0.1780 (Initial momentum expansion)
TP2: $0.1950 (Key liquidity grab / prior high)
TP3: $0.2150 (Extended 1.618 Fib projection)
On the 4-hour chart, $0.1600 represents an overhead supply boundary and recent high area. A clean breakout and hold above this level triggers a bullish continuation, while exhaustion around this zone provides a high-R:R short setup.
Scenario A: Bullish Breakout & Retest (Long Setup)
If price breaks cleanly above $0.1600 on strong 4H buy volume and holds $0.1600 as new support on a retest.
Trigger / Entry Zone: $0.1605 – $0.1630 (On 4H retest confirmation)
Stop Loss (SL): $0.1510 (Below the breakout candle base / ~5.8% risk)
Take Profit Targets:
TP1: $0.1780 (Initial momentum expansion)
TP2: $0.1950 (Key liquidity grab / prior high)
TP3: $0.2150 (Extended 1.618 Fib projection)
42
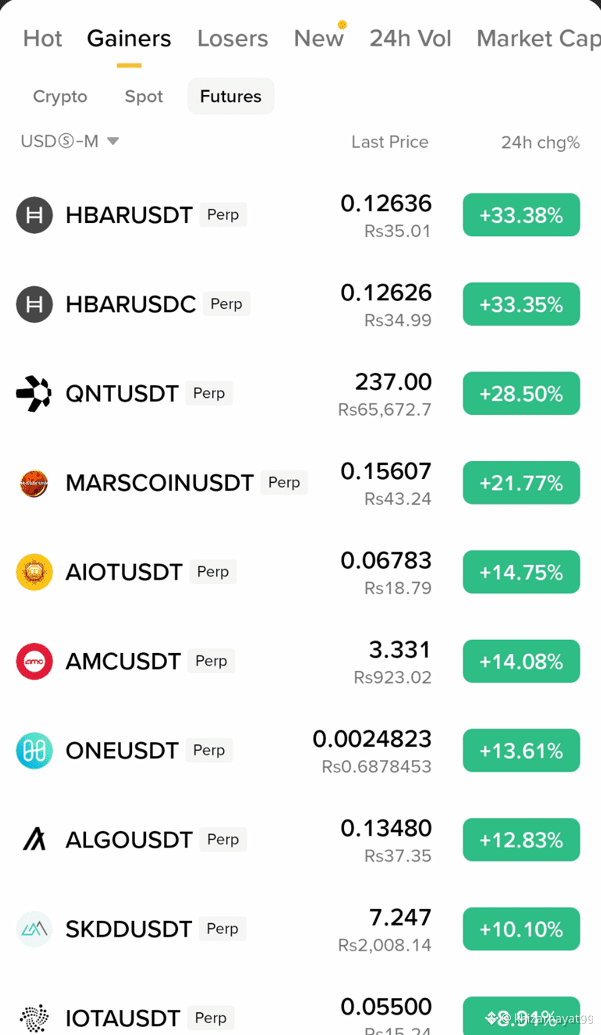
Altcoins are waking up hard‼️‼️
$HBAR +33.38%
$QNT +28.50%
$MARSCOIN +21.77%
AIOT +14.75%
AMC +14.08%
buyers are clearly chasing momentum today some serious moves across the board.
{future}(MARSCOINUSDT)
{future}(QNTUSDT)
{future}(HBARUSDT)
Altcoins are waking up hard‼️‼️
$HBAR +33.38%
$QNT +28.50%
$MARSCOIN +21.77%
AIOT +14.75%
AMC +14.08%
buyers are clearly chasing momentum today some serious moves across the board.
$HBAR +33.38%
$QNT +28.50%
$MARSCOIN +21.77%
AIOT +14.75%
AMC +14.08%
buyers are clearly chasing momentum today some serious moves across the board.
7
Meme Super Cycle will send…
$DOGE 10x
$SHIB 50x
$PEPE 30x
#FLOKI 60x
{alpha}(CT_195TMacq4TDUw5q8NFBwmbY4RLXvzvG5JTkvi)
{spot}(SHIBUSDT)
{future}(DOGEUSDT)
Meme Super Cycle will send…
$DOGE 10x
$SHIB 50x
$PEPE 30x
#FLOKI 60x
$DOGE 10x
$SHIB 50x
$PEPE 30x
#FLOKI 60x

8
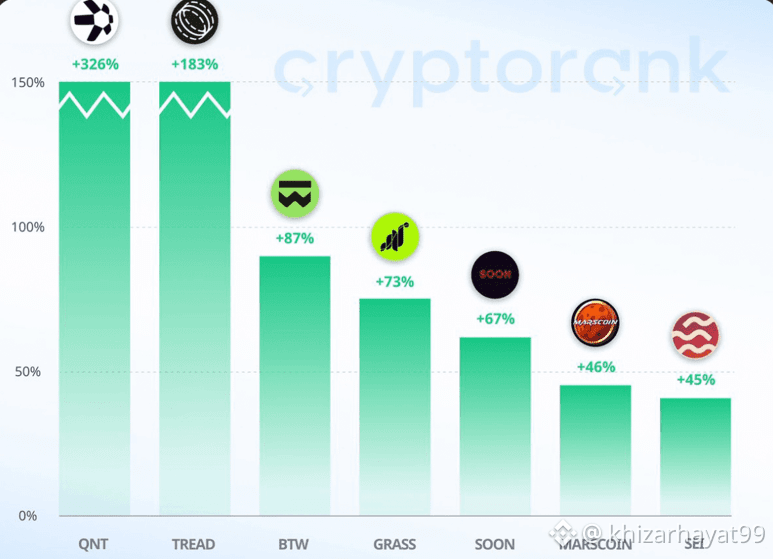
Biggest Weekly moves…‼️‼️‼️
$QNT +326%
$BTW +87%
$GRASS +73%
#SOON +67%
$MARSCOIN +46%
$SEI +45%
{future}(GRASSUSDT)
{future}(BTWUSDT)
{future}(QNTUSDT)
Biggest Weekly moves…‼️‼️‼️
$QNT +326%
$BTW +87%
$GRASS +73%
#SOON +67%
$MARSCOIN +46%
$SEI +45%
$QNT +326%
$BTW +87%
$GRASS +73%
#SOON +67%
$MARSCOIN +46%
$SEI +45%
10
Connectez-vous pour découvrir plus de contenu
Rejoignez la communauté mondiale des adeptes de cryptomonnaies sur Binance Square
⚡️ Suviez les dernières informations importantes sur les cryptomonnaies.
💬 Jugé digne de confiance par la plus grande plateforme d’échange de cryptomonnaies au monde.
👍 Découvrez les connaissances que partagent les créateurs vérifiés.
Adresse e-mail/Nº de téléphone
Sujets d’actualité
TrumpRejectsAIRulesForVoluntaryAudits
1,956 vues
131 mentions
Super Intelligence" & The AI Policy Shift: Self-Policing or a Risky Gamble?
Nurul Hasnat Samir
·0 mentions J’aime
·335 vues
BitgetHotWalletBreachTiedToThirdPartySecurityFlaw
905 vues
99 mentions
OpenAIUnveilsAlwaysOnAgentDots
2,002 vues
147 mentions