
Ethan_Blake
17.7k Posts

Ethan_Blake
 Square Verified+
Report
Block User
Content Creator | Crypto Market Analysis | My Own Trading Ideas | Follow Me & Join The Journey | 100K Followers Is My Dream
Open Trade
High-Frequency Trader
1.7 Years
245 Following
40.3K+ Followers
22.2K+ Liked
Posts
Portfolio
All
Quotes
Live
PINNED
·
--
all Guy's please follow me 🎁🎁🎁🎁🎁🎁🎁🎁🎁🎁🎁🎁🎁🎁🎁🎁🎁🎁🎁🎁🎁🎁🎁🎁🎁
all Guy's please follow me 🎁🎁🎁🎁🎁🎁🎁🎁🎁🎁🎁🎁🎁🎁🎁🎁🎁🎁🎁🎁🎁🎁🎁🎁🎁

88
1
4
145
·
--
Bullish
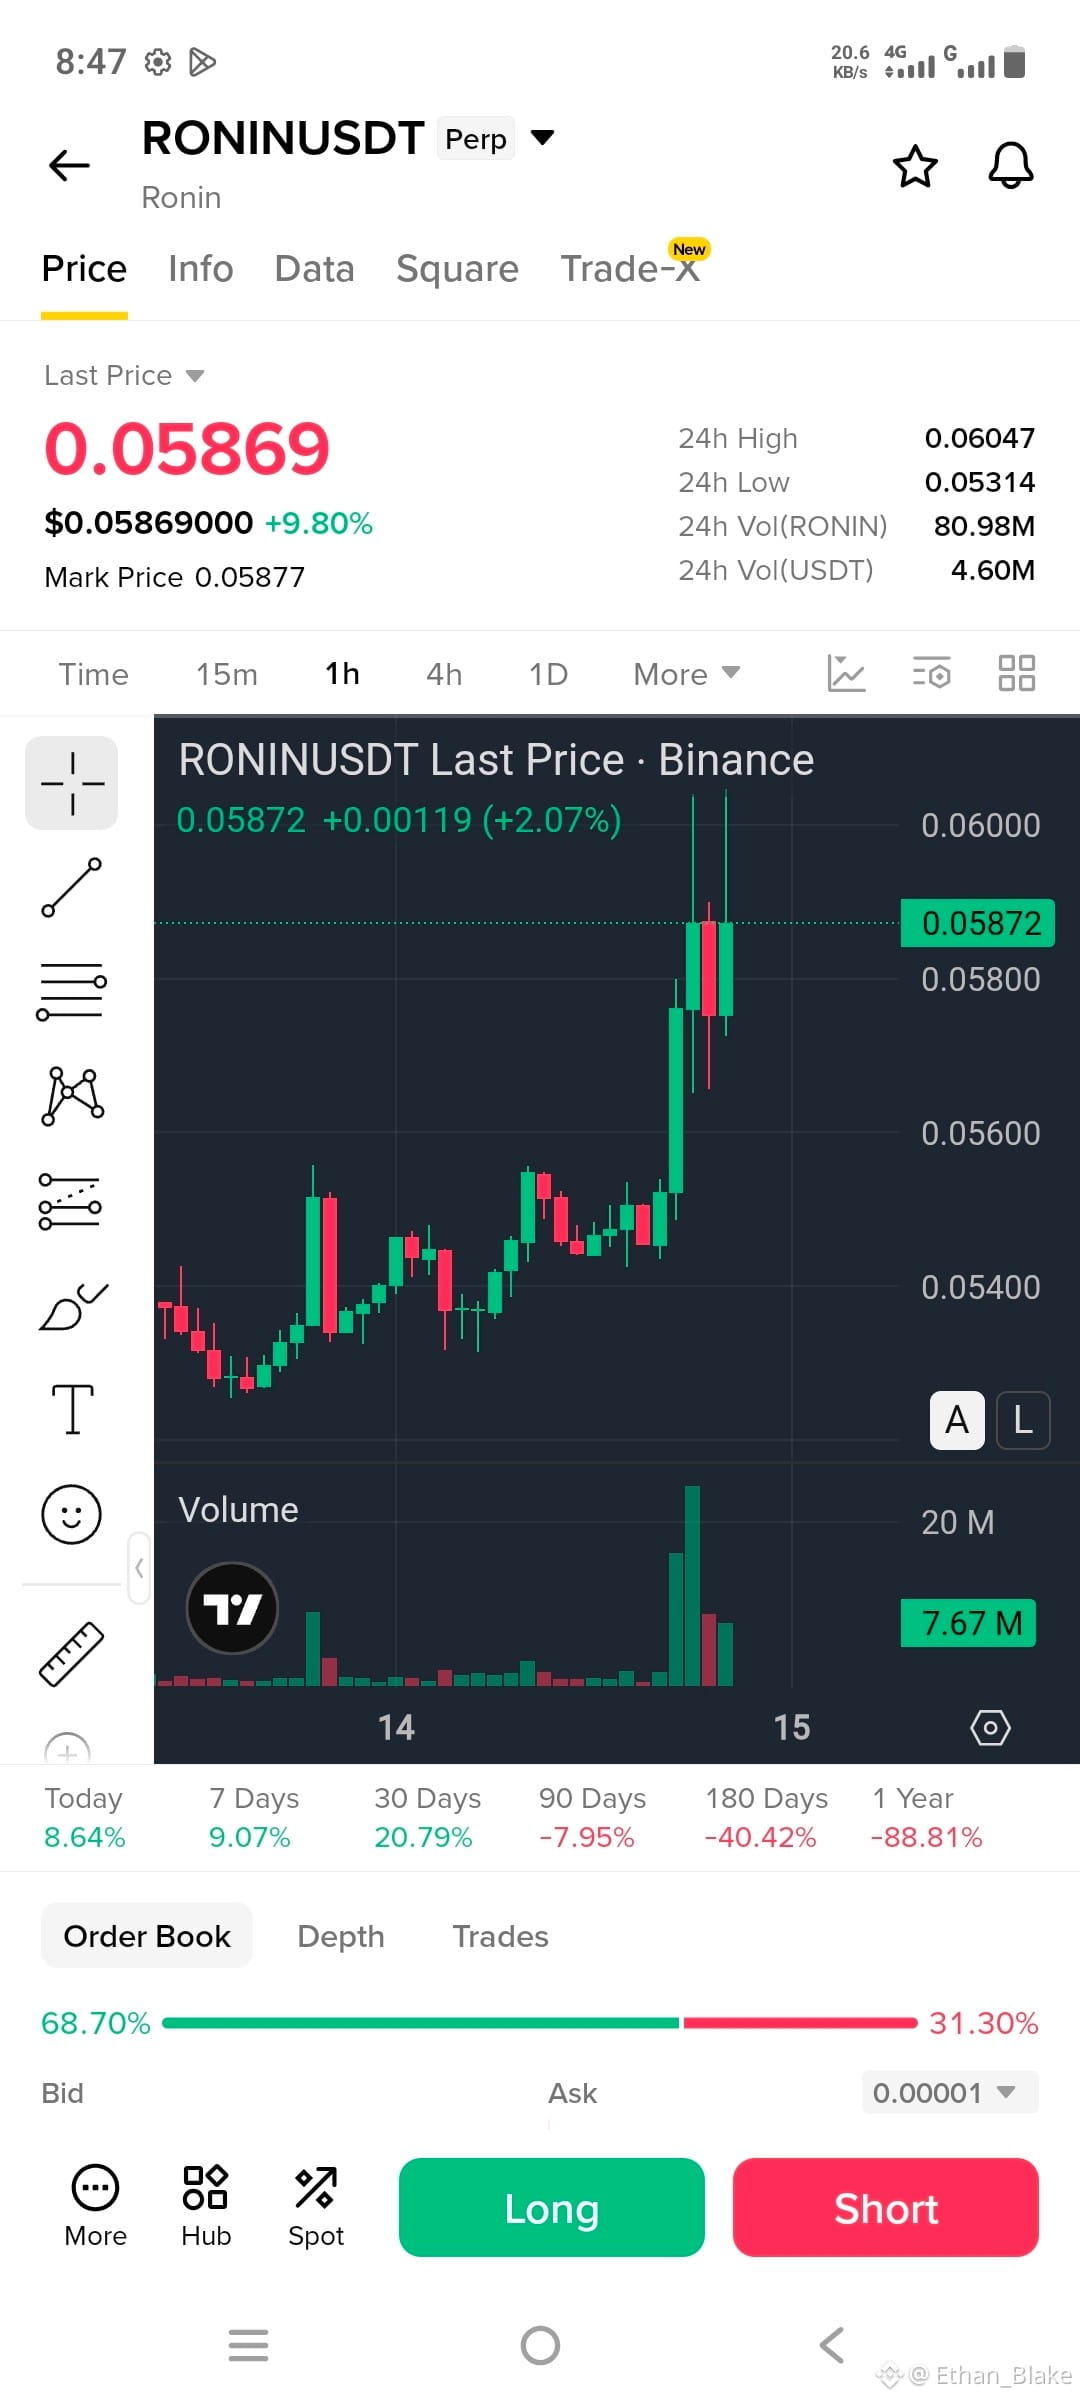
🚀 $RONIN LONG SETUP
I’m watching a potential LONG setup on $RONIN with 10x isolated leverage...👇
Entry Zone: $0.05750 – $0.05820
TP 1: $0.05950
TP 2: $0.06050
TP 3: $0.06200
TP 4: $0.06400
SL (Invalidation): $0.05520
👀 Watching price action closely near this key level.
$RONIN USDT
{future}(RONINUSDT)
Setup Logic:
• $0.05750–$0.05820 is the key action zone after the strong 1H breakout and volume expansion.
• Invalidation: Losing $0.05520 would weaken the bullish structure and invalidate the setup.
• $0.06000–$0.06050 is the immediate resistance area to watch.
• Note: Wait for a retest into the entry zone and confirmation before execution. Do not chase the breakout candle.
Risk Tip:
Capital preservation first. Avoid chasing candles and manage leverage responsibly relative to your Stop Loss. With the SL roughly 4%+ below the entry area, 10x keeps leverage conservative.
— Ethan_Blake
🚀 $RONIN LONG SETUP
I’m watching a potential LONG setup on $RONIN with 10x isolated leverage...👇
Entry Zone: $0.05750 – $0.05820
TP 1: $0.05950
TP 2: $0.06050
TP 3: $0.06200
TP 4: $0.06400
SL (Invalidation): $0.05520
👀 Watching price action closely near this key level.
$RONIN USDT
Setup Logic:
• $0.05750–$0.05820 is the key action zone after the strong 1H breakout and volume expansion.
• Invalidation: Losing $0.05520 would weaken the bullish structure and invalidate the setup.
• $0.06000–$0.06050 is the immediate resistance area to watch.
• Note: Wait for a retest into the entry zone and confirmation before execution. Do not chase the breakout candle.
Risk Tip:
Capital preservation first. Avoid chasing candles and manage leverage responsibly relative to your Stop Loss. With the SL roughly 4%+ below the entry area, 10x keeps leverage conservative.
— Ethan_Blake
I’m watching a potential LONG setup on $RONIN with 10x isolated leverage...👇
Entry Zone: $0.05750 – $0.05820
TP 1: $0.05950
TP 2: $0.06050
TP 3: $0.06200
TP 4: $0.06400
SL (Invalidation): $0.05520
👀 Watching price action closely near this key level.
$RONIN USDT
Setup Logic:
• $0.05750–$0.05820 is the key action zone after the strong 1H breakout and volume expansion.
• Invalidation: Losing $0.05520 would weaken the bullish structure and invalidate the setup.
• $0.06000–$0.06050 is the immediate resistance area to watch.
• Note: Wait for a retest into the entry zone and confirmation before execution. Do not chase the breakout candle.
Risk Tip:
Capital preservation first. Avoid chasing candles and manage leverage responsibly relative to your Stop Loss. With the SL roughly 4%+ below the entry area, 10x keeps leverage conservative.
— Ethan_Blake
19
·
--
Bullish
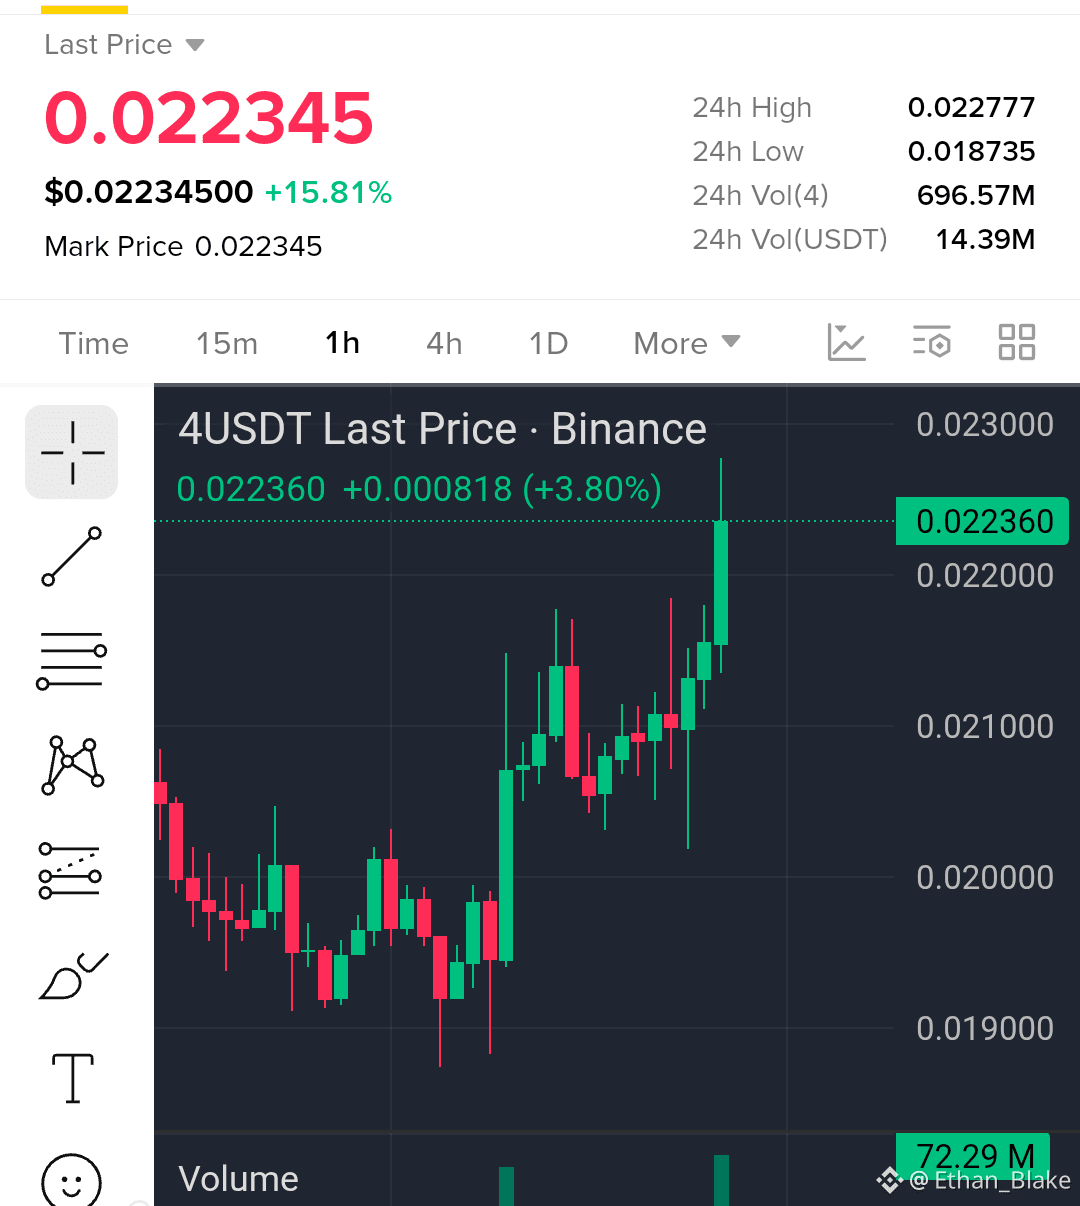
🚀 $4 — LONG SETUP
I’m watching a potential LONG setup on $4 with 10x isolated leverage...👇
Entry Zone: $0.02200 – $0.02230
TP 1: $0.02280
TP 2: $0.02320
TP 3: $0.02380
TP 4: $0.02450
SL (Invalidation): $0.02130
👀 Watching price action closely near this key level.
$4 USDT
{future}(4USDT)
Setup Logic:
• $0.02200–$0.02230 is the key action zone based on the current 1H market structure.
• Invalidation: Losing $0.02130 would invalidate this bullish setup.
• The recent push toward the $0.02277 area shows strong momentum, but a pullback/retest is preferable to chasing.
• Note: Wait for a retest into the entry zone and confirmation before execution.
Risk Tip:
Capital preservation first. Avoid chasing candles and manage leverage responsibly relative to your Stop Loss. The ~4.5%+ SL distance supports keeping leverage conservative.
— Ethan_Blake
🚀 $4 — LONG SETUP
I’m watching a potential LONG setup on $4 with 10x isolated leverage...👇
Entry Zone: $0.02200 – $0.02230
TP 1: $0.02280
TP 2: $0.02320
TP 3: $0.02380
TP 4: $0.02450
SL (Invalidation): $0.02130
👀 Watching price action closely near this key level.
$4 USDT
Setup Logic:
• $0.02200–$0.02230 is the key action zone based on the current 1H market structure.
• Invalidation: Losing $0.02130 would invalidate this bullish setup.
• The recent push toward the $0.02277 area shows strong momentum, but a pullback/retest is preferable to chasing.
• Note: Wait for a retest into the entry zone and confirmation before execution.
Risk Tip:
Capital preservation first. Avoid chasing candles and manage leverage responsibly relative to your Stop Loss. The ~4.5%+ SL distance supports keeping leverage conservative.
— Ethan_Blake
I’m watching a potential LONG setup on $4 with 10x isolated leverage...👇
Entry Zone: $0.02200 – $0.02230
TP 1: $0.02280
TP 2: $0.02320
TP 3: $0.02380
TP 4: $0.02450
SL (Invalidation): $0.02130
👀 Watching price action closely near this key level.
$4 USDT
Setup Logic:
• $0.02200–$0.02230 is the key action zone based on the current 1H market structure.
• Invalidation: Losing $0.02130 would invalidate this bullish setup.
• The recent push toward the $0.02277 area shows strong momentum, but a pullback/retest is preferable to chasing.
• Note: Wait for a retest into the entry zone and confirmation before execution.
Risk Tip:
Capital preservation first. Avoid chasing candles and manage leverage responsibly relative to your Stop Loss. The ~4.5%+ SL distance supports keeping leverage conservative.
— Ethan_Blake
151
·
--
Bullish
🔻 $BR — SHORT SETUP
I’m watching a potential SHORT setup on $BR U with 5x isolated leverage (educational setup). 👇
Entry Zone: $0.525 – $0.540
TP 1: $0.500
TP 2: $0.475
TP 3: $0.450
TP 4: $0.436
SL (Invalidation): $0.560
👀 Watching price action closely near this key level.
$BR UUSDT
{future}(BRUSDT)
Setup Logic: • $0.525–$0.540 is the key rejection zone after the sharp 1H rally.
• Invalidation: A sustained move above $0.560 would weaken the short setup.
• Note: Wait for a retest into the entry zone and bearish confirmation before execution. Do not FOMO into a short.
Risk Tip:
Capital preservation first. BRU is extremely volatile after an +80% move, so avoid chasing candles and keep leverage conservative relative to the Stop Loss.
— Ethan_Blake
🔻 $BR — SHORT SETUP
I’m watching a potential SHORT setup on $BR U with 5x isolated leverage (educational setup). 👇
Entry Zone: $0.525 – $0.540
TP 1: $0.500
TP 2: $0.475
TP 3: $0.450
TP 4: $0.436
SL (Invalidation): $0.560
👀 Watching price action closely near this key level.
$BR UUSDT
Setup Logic: • $0.525–$0.540 is the key rejection zone after the sharp 1H rally.
• Invalidation: A sustained move above $0.560 would weaken the short setup.
• Note: Wait for a retest into the entry zone and bearish confirmation before execution. Do not FOMO into a short.
Risk Tip:
Capital preservation first. BRU is extremely volatile after an +80% move, so avoid chasing candles and keep leverage conservative relative to the Stop Loss.
— Ethan_Blake
I’m watching a potential SHORT setup on $BR U with 5x isolated leverage (educational setup). 👇
Entry Zone: $0.525 – $0.540
TP 1: $0.500
TP 2: $0.475
TP 3: $0.450
TP 4: $0.436
SL (Invalidation): $0.560
👀 Watching price action closely near this key level.
$BR UUSDT
Setup Logic: • $0.525–$0.540 is the key rejection zone after the sharp 1H rally.
• Invalidation: A sustained move above $0.560 would weaken the short setup.
• Note: Wait for a retest into the entry zone and bearish confirmation before execution. Do not FOMO into a short.
Risk Tip:
Capital preservation first. BRU is extremely volatile after an +80% move, so avoid chasing candles and keep leverage conservative relative to the Stop Loss.
— Ethan_Blake
131
·
--
Bullish
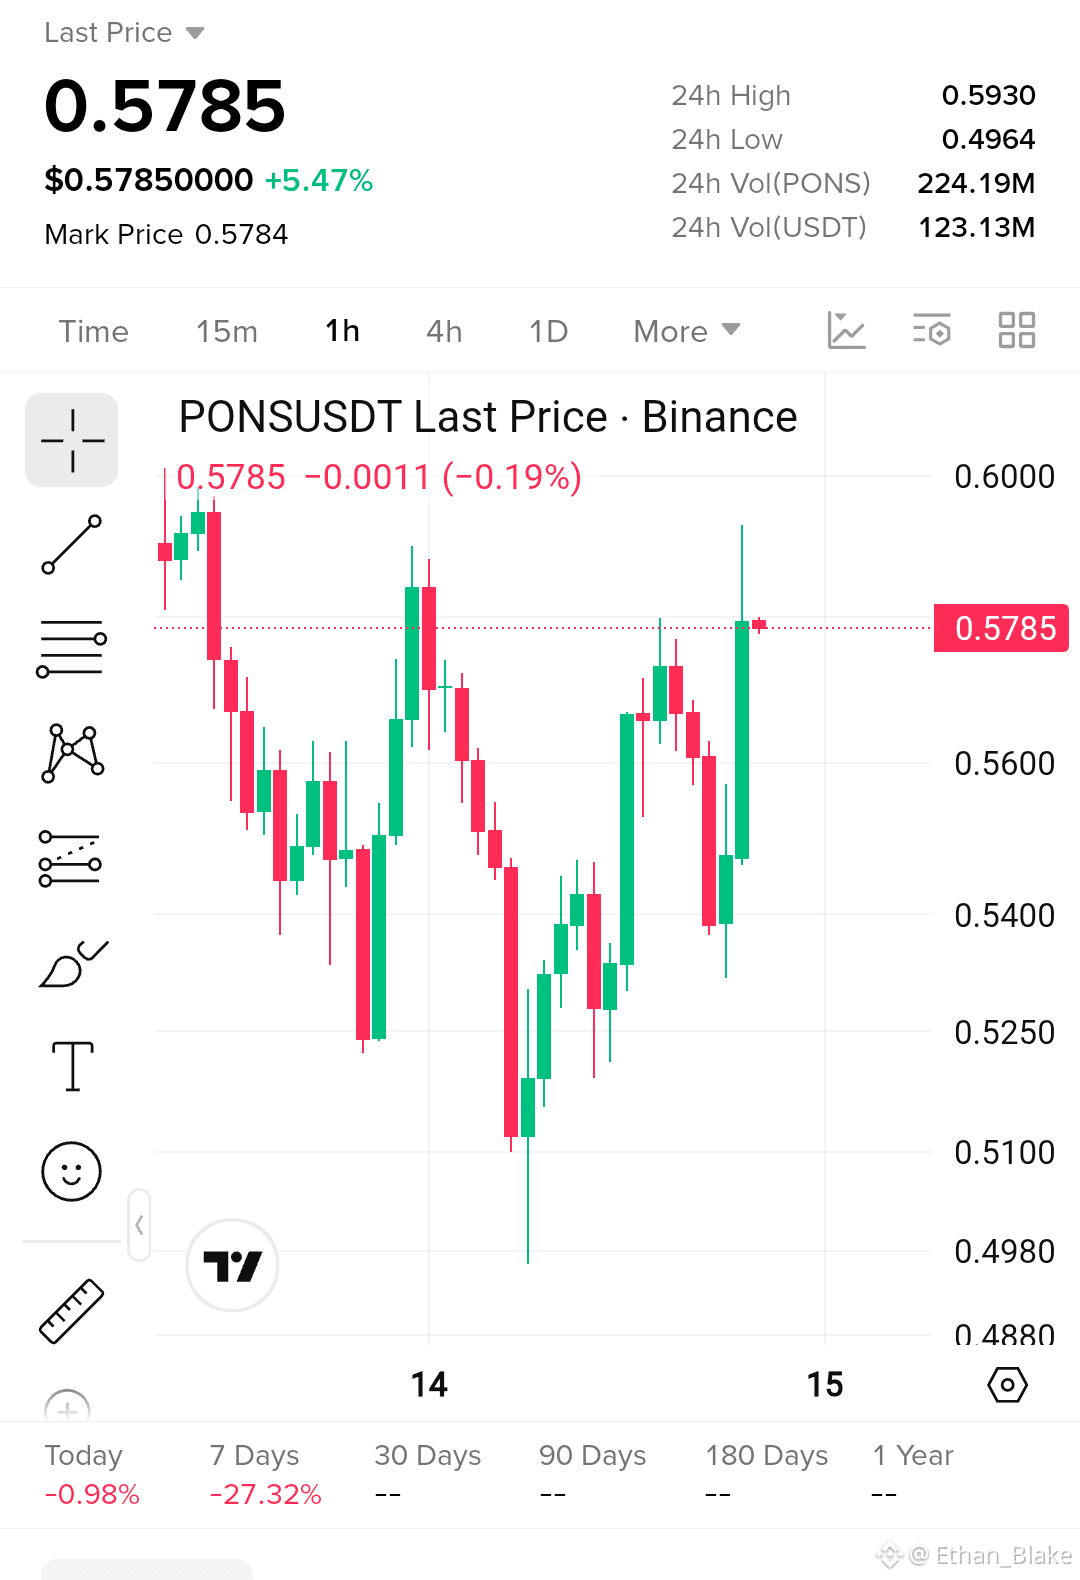
🚀 $PONS — LONG SETUP
I’m watching a potential LONG setup on $PONS with 10x isolated leverage (educational setup; high-risk leveraged trading). 👇
Entry Zone: $0.568 – $0.574
TP 1: $0.585
TP 2: $0.593
TP 3: $0.600
TP 4: $0.610
SL (Invalidation): $0.558
👀 Watching price action closely near this key level.
$PONS USDT
{future}(PONSUSDT)
Setup Logic: • $0.568–$0.574 is the key action zone based on the recent 1H structure.
• Invalidation: Losing $0.558 would weaken this bullish setup.
• Note: Wait for a retest into the entry zone and confirmation before execution—don’t FOMO into the spike.
Risk Tip:
Capital preservation first. The chart is volatile, so avoid chasing candles and keep leverage conservative relative to your Stop Loss.
— Ethan_Blake
🚀 $PONS — LONG SETUP
I’m watching a potential LONG setup on $PONS with 10x isolated leverage (educational setup; high-risk leveraged trading). 👇
Entry Zone: $0.568 – $0.574
TP 1: $0.585
TP 2: $0.593
TP 3: $0.600
TP 4: $0.610
SL (Invalidation): $0.558
👀 Watching price action closely near this key level.
$PONS USDT
Setup Logic: • $0.568–$0.574 is the key action zone based on the recent 1H structure.
• Invalidation: Losing $0.558 would weaken this bullish setup.
• Note: Wait for a retest into the entry zone and confirmation before execution—don’t FOMO into the spike.
Risk Tip:
Capital preservation first. The chart is volatile, so avoid chasing candles and keep leverage conservative relative to your Stop Loss.
— Ethan_Blake
I’m watching a potential LONG setup on $PONS with 10x isolated leverage (educational setup; high-risk leveraged trading). 👇
Entry Zone: $0.568 – $0.574
TP 1: $0.585
TP 2: $0.593
TP 3: $0.600
TP 4: $0.610
SL (Invalidation): $0.558
👀 Watching price action closely near this key level.
$PONS USDT
Setup Logic: • $0.568–$0.574 is the key action zone based on the recent 1H structure.
• Invalidation: Losing $0.558 would weaken this bullish setup.
• Note: Wait for a retest into the entry zone and confirmation before execution—don’t FOMO into the spike.
Risk Tip:
Capital preservation first. The chart is volatile, so avoid chasing candles and keep leverage conservative relative to your Stop Loss.
— Ethan_Blake
210
·
--
Bullish
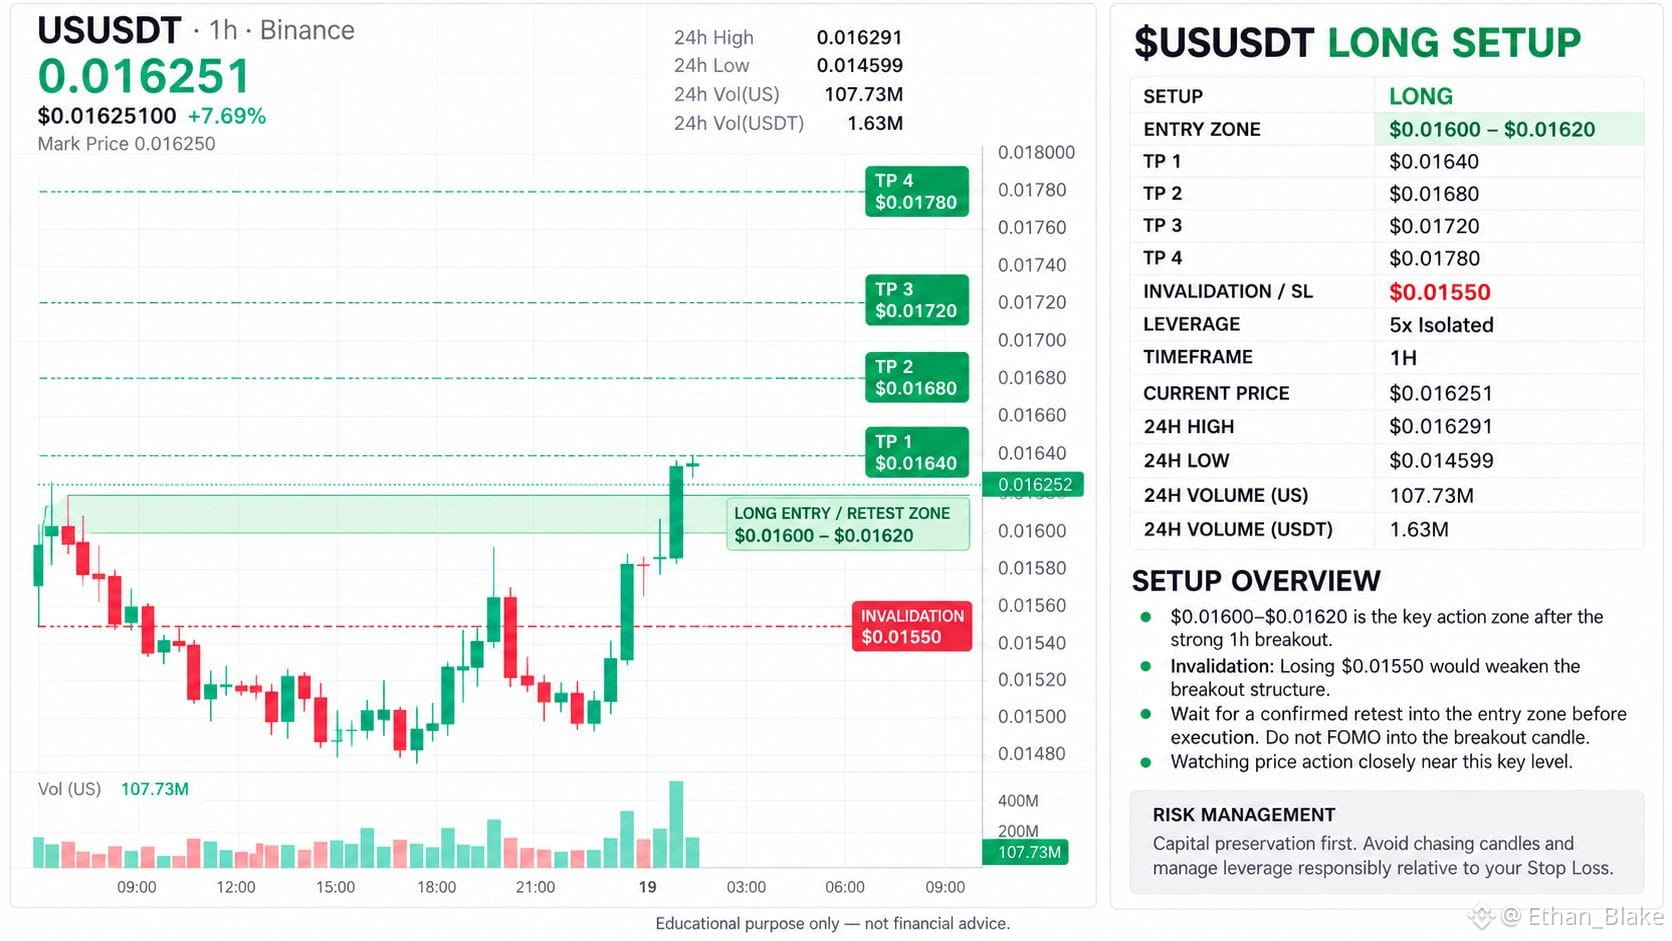
🚀 $US — LONG SETUP
I’m watching a potential LONG setup on $US with 5x isolated leverage...👇
Entry Zone: $0.01600 – $0.01620
TP 1: $0.01640
TP 2: $0.01680
TP 3: $0.01720
TP 4: $0.01780
SL (Invalidation): $0.01550
👀 Watching price action closely near this key level.
$US USDT
{future}(USUSDT)
Setup Logic: • $0.01600–$0.01620 is the key action zone after the strong 1h breakout.
• Invalidation: Losing $0.01550 would weaken the breakout structure.
• Note: Wait for a confirmed retest into the entry zone before execution. Do not FOMO into the breakout candle.
Risk Tip:
Capital preservation first. Avoid chasing candles and manage leverage responsibly relative to your Stop Loss.
— Ethan_Blake
🚀 $US — LONG SETUP
I’m watching a potential LONG setup on $US with 5x isolated leverage...👇
Entry Zone: $0.01600 – $0.01620
TP 1: $0.01640
TP 2: $0.01680
TP 3: $0.01720
TP 4: $0.01780
SL (Invalidation): $0.01550
👀 Watching price action closely near this key level.
$US USDT
Setup Logic: • $0.01600–$0.01620 is the key action zone after the strong 1h breakout.
• Invalidation: Losing $0.01550 would weaken the breakout structure.
• Note: Wait for a confirmed retest into the entry zone before execution. Do not FOMO into the breakout candle.
Risk Tip:
Capital preservation first. Avoid chasing candles and manage leverage responsibly relative to your Stop Loss.
— Ethan_Blake
I’m watching a potential LONG setup on $US with 5x isolated leverage...👇
Entry Zone: $0.01600 – $0.01620
TP 1: $0.01640
TP 2: $0.01680
TP 3: $0.01720
TP 4: $0.01780
SL (Invalidation): $0.01550
👀 Watching price action closely near this key level.
$US USDT
Setup Logic: • $0.01600–$0.01620 is the key action zone after the strong 1h breakout.
• Invalidation: Losing $0.01550 would weaken the breakout structure.
• Note: Wait for a confirmed retest into the entry zone before execution. Do not FOMO into the breakout candle.
Risk Tip:
Capital preservation first. Avoid chasing candles and manage leverage responsibly relative to your Stop Loss.
— Ethan_Blake
94
·
--
Bullish
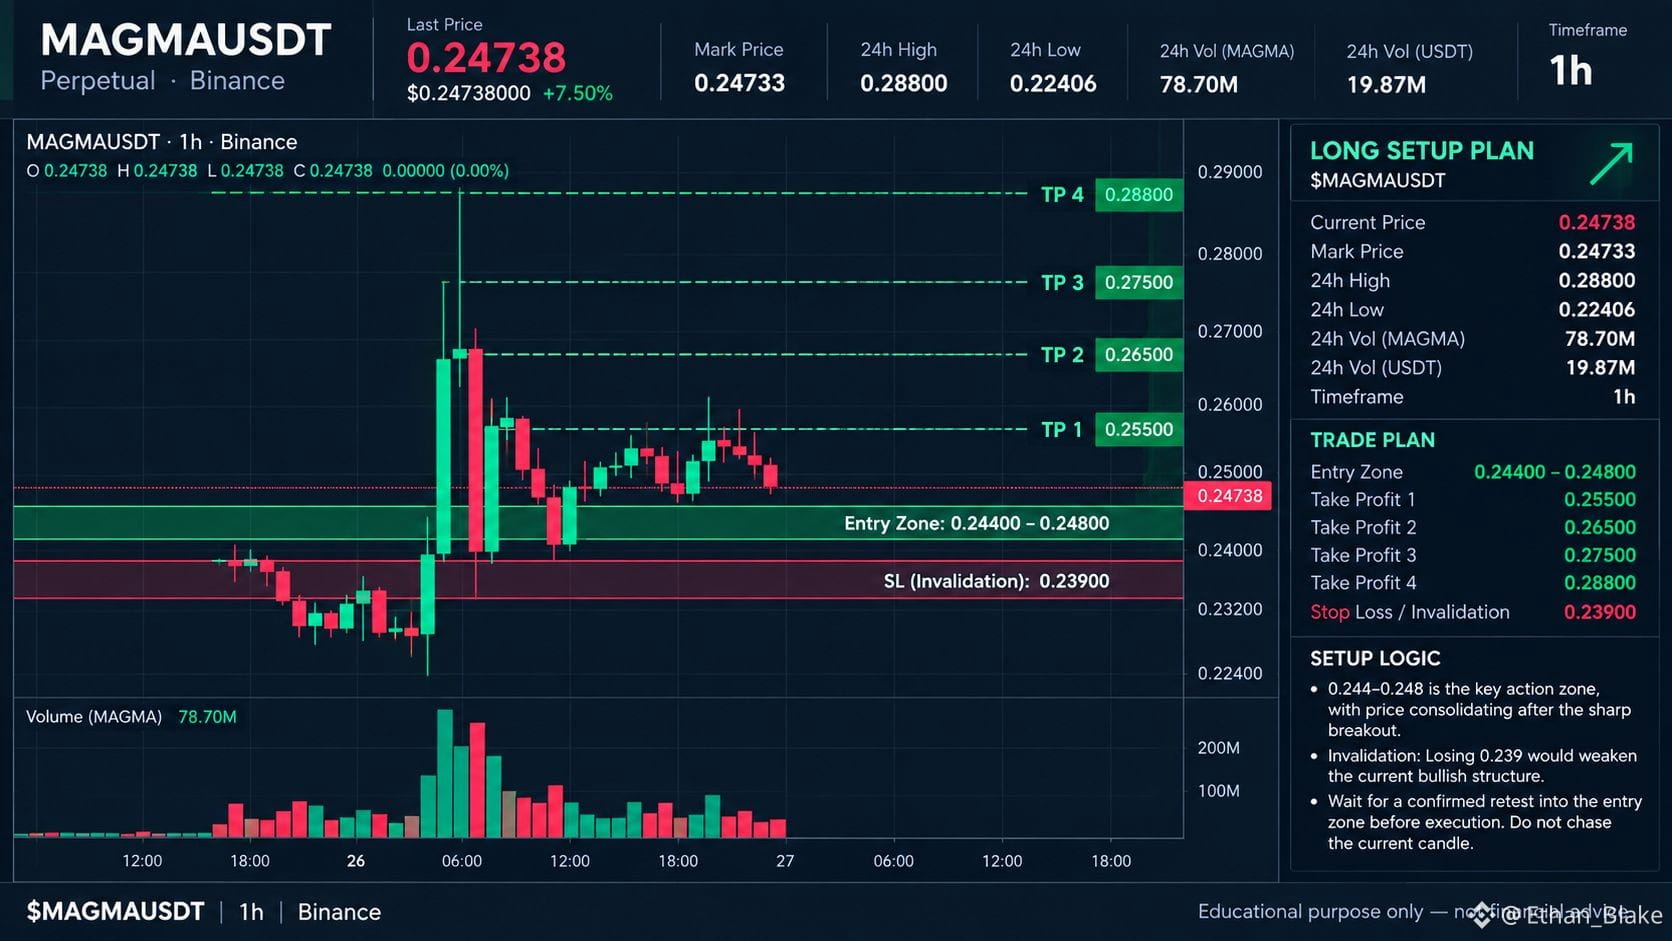
🚀 $MAGMA LONG SETUP
I’m watching a potential LONG setup on $MAGMA with 5x isolated leverage...👇
Entry Zone: $0.244 – $0.248
TP 1: $0.255
TP 2: $0.265
TP 3: $0.275
TP 4: $0.288
SL (Invalidation): $0.239
👀 Watching price action closely near this key level.
$MAGMA USDT
{future}(MAGMAUSDT)
Setup Logic: • $0.244–$0.248 is the key action zone, with price consolidating after the sharp breakout.
• Invalidation: Losing $0.239 would weaken the current bullish structure.
• Note: Wait for a confirmed retest into the entry zone before execution. Do not chase the current candle.
Risk Tip:
Capital preservation first. Avoid chasing candles and manage leverage responsibly relative to your Stop Loss.
— Ethan_Blake
🚀 $MAGMA LONG SETUP
I’m watching a potential LONG setup on $MAGMA with 5x isolated leverage...👇
Entry Zone: $0.244 – $0.248
TP 1: $0.255
TP 2: $0.265
TP 3: $0.275
TP 4: $0.288
SL (Invalidation): $0.239
👀 Watching price action closely near this key level.
$MAGMA USDT
Setup Logic: • $0.244–$0.248 is the key action zone, with price consolidating after the sharp breakout.
• Invalidation: Losing $0.239 would weaken the current bullish structure.
• Note: Wait for a confirmed retest into the entry zone before execution. Do not chase the current candle.
Risk Tip:
Capital preservation first. Avoid chasing candles and manage leverage responsibly relative to your Stop Loss.
— Ethan_Blake
I’m watching a potential LONG setup on $MAGMA with 5x isolated leverage...👇
Entry Zone: $0.244 – $0.248
TP 1: $0.255
TP 2: $0.265
TP 3: $0.275
TP 4: $0.288
SL (Invalidation): $0.239
👀 Watching price action closely near this key level.
$MAGMA USDT
Setup Logic: • $0.244–$0.248 is the key action zone, with price consolidating after the sharp breakout.
• Invalidation: Losing $0.239 would weaken the current bullish structure.
• Note: Wait for a confirmed retest into the entry zone before execution. Do not chase the current candle.
Risk Tip:
Capital preservation first. Avoid chasing candles and manage leverage responsibly relative to your Stop Loss.
— Ethan_Blake
77
·
--
Bullish
{future}(AVAAIUSDT)
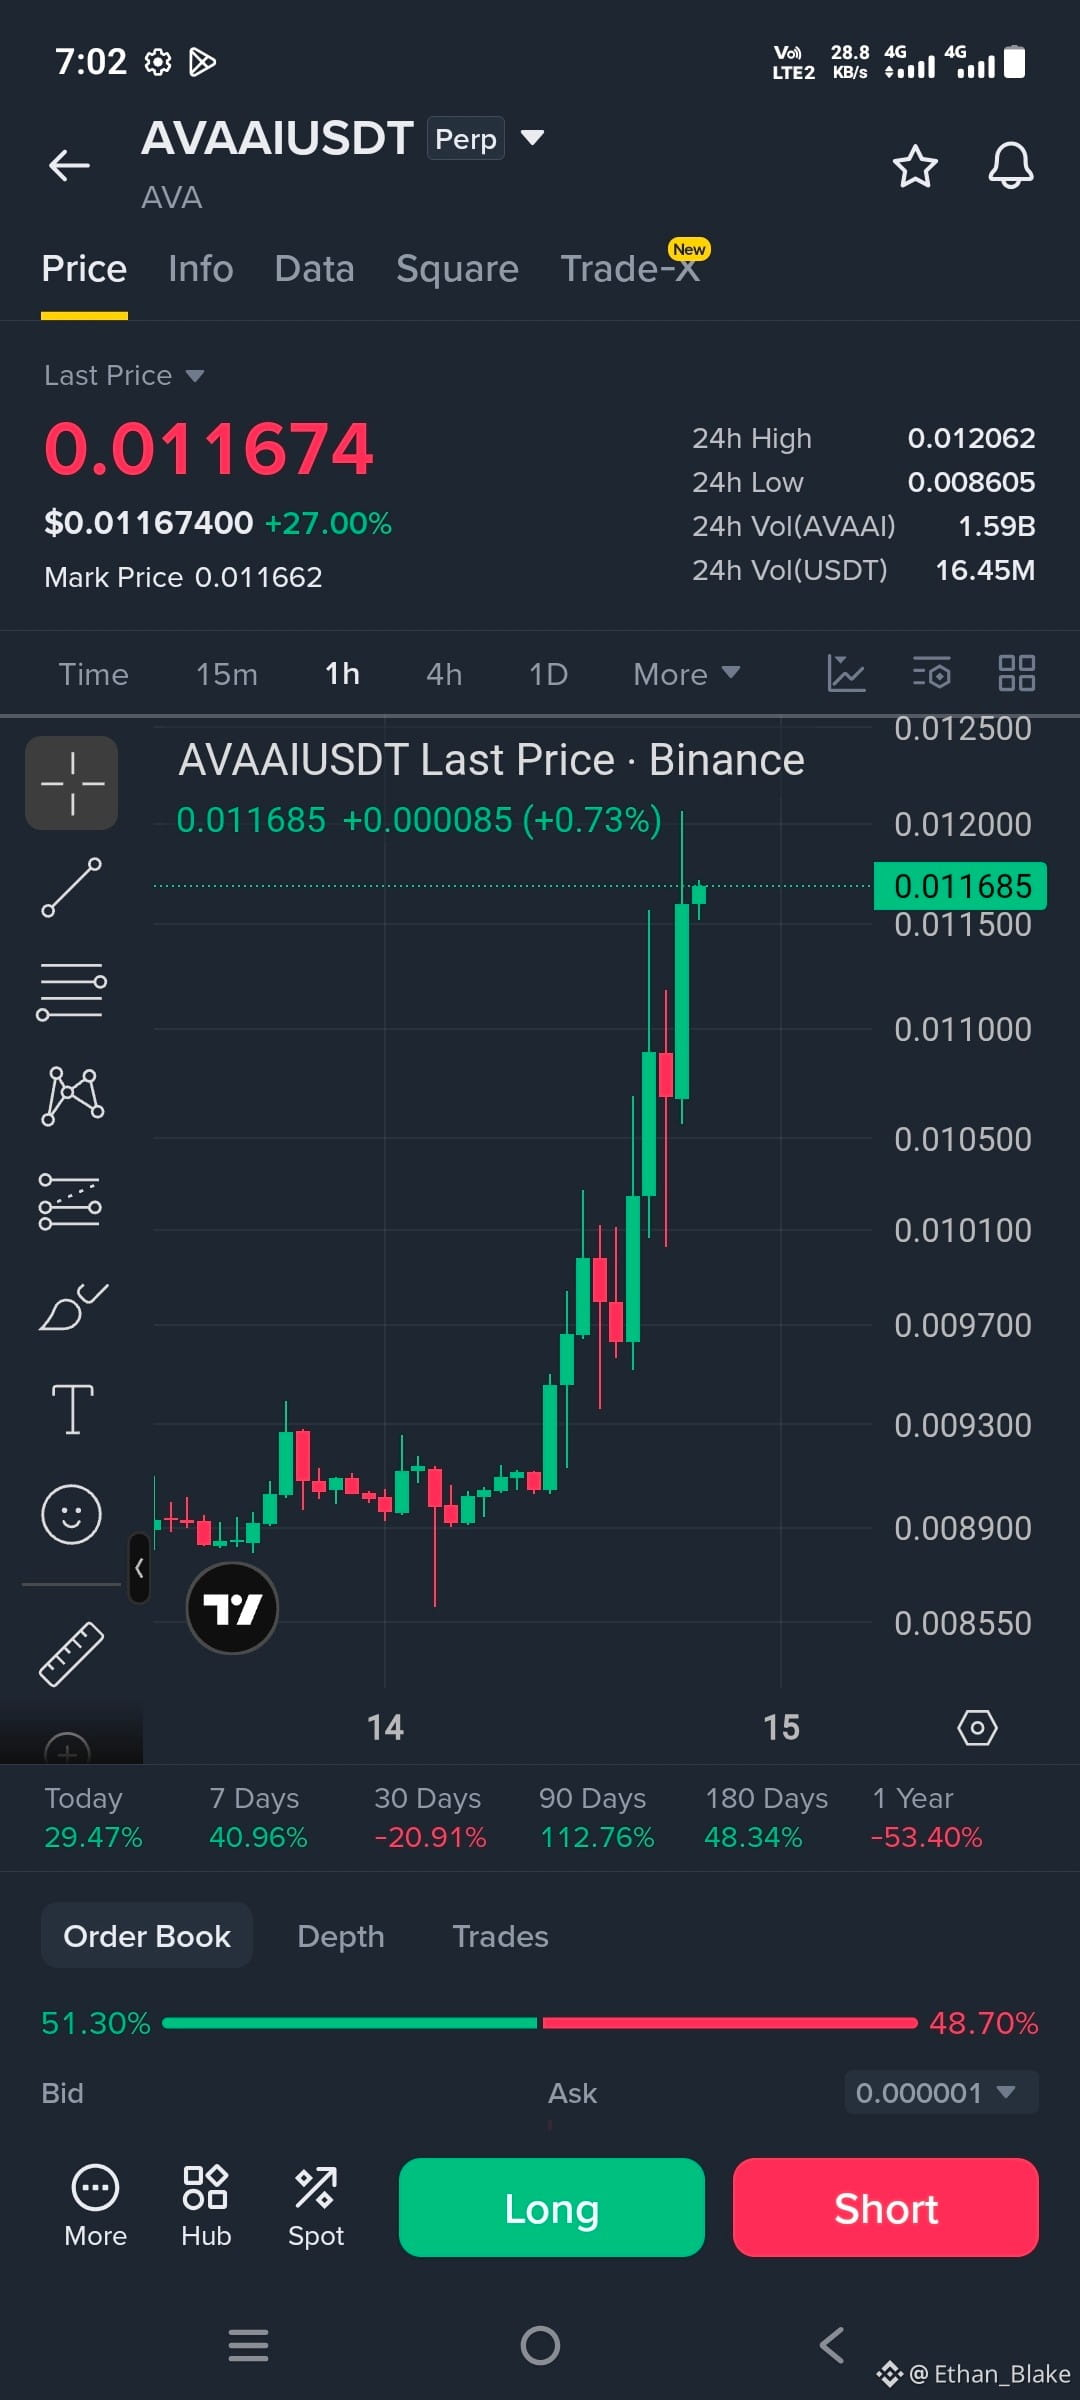
🚀 $AVAAI LONG SETUP
I’m watching a potential LONG setup on $AVAAI with 3x isolated leverage...👇
Entry Zone: $0.01130 – $0.01155
TP 1: $0.01210
TP 2: $0.01250
TP 3: $0.01300
TP 4: $0.01380
SL (Invalidation): $0.01075
👀 Watching price action closely near this key level.
$AVAAI USDT
Setup Logic: • $0.01130–$0.01155 is the key action zone for a potential retest after the strong 1h breakout.
• Invalidation: Losing $0.01075 weakens the bullish structure.
• Note: Wait for a confirmed retest into the entry zone before execution. Do not FOMO into the current pump.
Risk Tip:
Capital preservation first. The recent move is already extended, so avoid chasing candles. 3x leverage keeps the leverage conservative relative to the SL distance.
— Ethan_Blake
🚀 $AVAAI LONG SETUP
I’m watching a potential LONG setup on $AVAAI with 3x isolated leverage...👇
Entry Zone: $0.01130 – $0.01155
TP 1: $0.01210
TP 2: $0.01250
TP 3: $0.01300
TP 4: $0.01380
SL (Invalidation): $0.01075
👀 Watching price action closely near this key level.
$AVAAI USDT
Setup Logic: • $0.01130–$0.01155 is the key action zone for a potential retest after the strong 1h breakout.
• Invalidation: Losing $0.01075 weakens the bullish structure.
• Note: Wait for a confirmed retest into the entry zone before execution. Do not FOMO into the current pump.
Risk Tip:
Capital preservation first. The recent move is already extended, so avoid chasing candles. 3x leverage keeps the leverage conservative relative to the SL distance.
— Ethan_Blake
I’m watching a potential LONG setup on $AVAAI with 3x isolated leverage...👇
Entry Zone: $0.01130 – $0.01155
TP 1: $0.01210
TP 2: $0.01250
TP 3: $0.01300
TP 4: $0.01380
SL (Invalidation): $0.01075
👀 Watching price action closely near this key level.
$AVAAI USDT
Setup Logic: • $0.01130–$0.01155 is the key action zone for a potential retest after the strong 1h breakout.
• Invalidation: Losing $0.01075 weakens the bullish structure.
• Note: Wait for a confirmed retest into the entry zone before execution. Do not FOMO into the current pump.
Risk Tip:
Capital preservation first. The recent move is already extended, so avoid chasing candles. 3x leverage keeps the leverage conservative relative to the SL distance.
— Ethan_Blake
1
128
·
--
Bullish
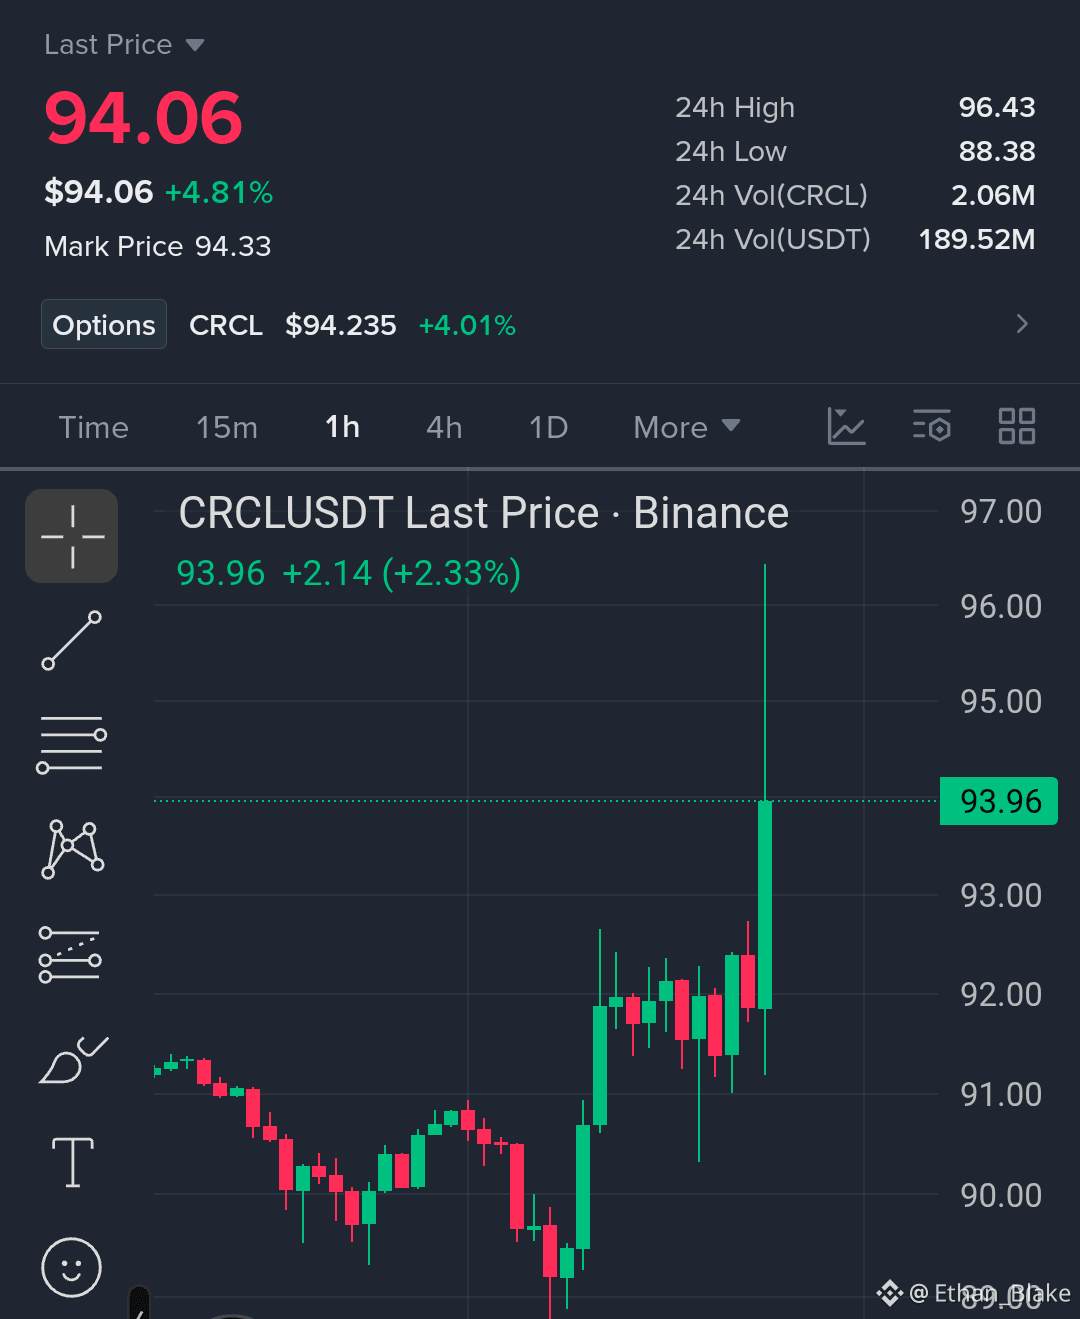
🚀 $CRCL LONG SETUP
I’m watching a potential LONG setup on $CRCL with 15x isolated leverage...👇
Entry Zone: $93.20 – $93.80
TP 1: $95.00
TP 2: $96.40
TP 3: $97.00
TP 4: $98.50
SL (Invalidation): $92.00
👀 Watching price action closely near this key level.
$CRCL USDT
{future}(CRCLUSDT)
Setup Logic: • $93.20–$93.80 is the key action zone based on the breakout and current 1H market structure.
• Invalidation: Losing $92.00 weakens the bullish structure and invalidates this setup.
• Note: Wait for a retest and confirmation inside the entry zone before execution. Do not FOMO into the breakout.
Risk Tip:
Capital preservation first. The SL is roughly 1.3–1.9% from the entry zone, so 15x keeps leverage more conservative than the maximum implied by the SL distance. Manage risk responsibly and avoid chasing candles.
— Ethan_Blake
🚀 $CRCL LONG SETUP
I’m watching a potential LONG setup on $CRCL with 15x isolated leverage...👇
Entry Zone: $93.20 – $93.80
TP 1: $95.00
TP 2: $96.40
TP 3: $97.00
TP 4: $98.50
SL (Invalidation): $92.00
👀 Watching price action closely near this key level.
$CRCL USDT
Setup Logic: • $93.20–$93.80 is the key action zone based on the breakout and current 1H market structure.
• Invalidation: Losing $92.00 weakens the bullish structure and invalidates this setup.
• Note: Wait for a retest and confirmation inside the entry zone before execution. Do not FOMO into the breakout.
Risk Tip:
Capital preservation first. The SL is roughly 1.3–1.9% from the entry zone, so 15x keeps leverage more conservative than the maximum implied by the SL distance. Manage risk responsibly and avoid chasing candles.
— Ethan_Blake
I’m watching a potential LONG setup on $CRCL with 15x isolated leverage...👇
Entry Zone: $93.20 – $93.80
TP 1: $95.00
TP 2: $96.40
TP 3: $97.00
TP 4: $98.50
SL (Invalidation): $92.00
👀 Watching price action closely near this key level.
$CRCL USDT
Setup Logic: • $93.20–$93.80 is the key action zone based on the breakout and current 1H market structure.
• Invalidation: Losing $92.00 weakens the bullish structure and invalidates this setup.
• Note: Wait for a retest and confirmation inside the entry zone before execution. Do not FOMO into the breakout.
Risk Tip:
Capital preservation first. The SL is roughly 1.3–1.9% from the entry zone, so 15x keeps leverage more conservative than the maximum implied by the SL distance. Manage risk responsibly and avoid chasing candles.
— Ethan_Blake
2
231
·
--
Bullish
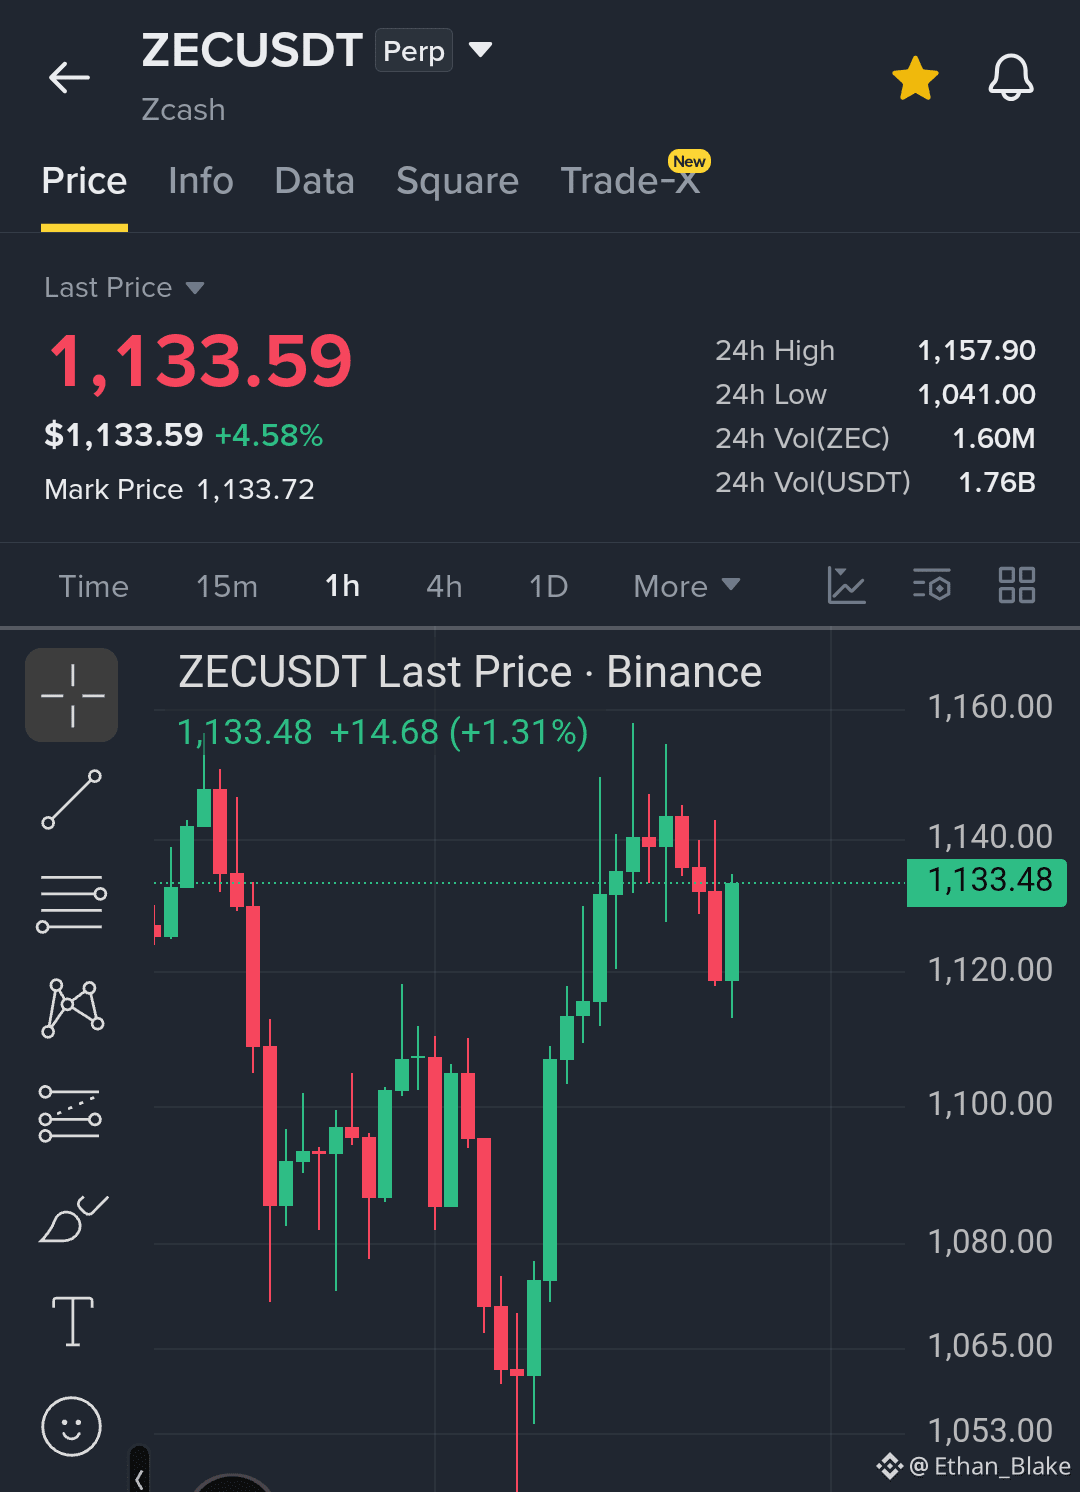
🚀 $ZEC LONG SETUP
I’m watching a potential LONG setup on $ZEC with 10x isolated leverage...👇
Entry Zone: $1,125 – $1,135
TP 1: $1,145
TP 2: $1,158
TP 3: $1,180
TP 4: $1,200
SL (Invalidation): $1,110
👀 Watching price action closely near this key level.
$ZEC USDT
{future}(ZECUSDT)
Setup Logic:
• $1,125–$1,135 is the key action zone around the recent breakout/retest area.
• Invalidation: Losing $1,110 would weaken the bullish structure.
• Note: Wait for a retest into the entry zone and confirmation before execution. Avoid FOMO if price runs without a retest.
Risk Tip:
Capital preservation first. 10x isolated leverage is intentionally conservative relative to the roughly 1–2% invalidation distance. Manage position size carefully and avoid chasing candles.
— Ethan_Blake
🚀 $ZEC LONG SETUP
I’m watching a potential LONG setup on $ZEC with 10x isolated leverage...👇
Entry Zone: $1,125 – $1,135
TP 1: $1,145
TP 2: $1,158
TP 3: $1,180
TP 4: $1,200
SL (Invalidation): $1,110
👀 Watching price action closely near this key level.
$ZEC USDT
Setup Logic:
• $1,125–$1,135 is the key action zone around the recent breakout/retest area.
• Invalidation: Losing $1,110 would weaken the bullish structure.
• Note: Wait for a retest into the entry zone and confirmation before execution. Avoid FOMO if price runs without a retest.
Risk Tip:
Capital preservation first. 10x isolated leverage is intentionally conservative relative to the roughly 1–2% invalidation distance. Manage position size carefully and avoid chasing candles.
— Ethan_Blake
I’m watching a potential LONG setup on $ZEC with 10x isolated leverage...👇
Entry Zone: $1,125 – $1,135
TP 1: $1,145
TP 2: $1,158
TP 3: $1,180
TP 4: $1,200
SL (Invalidation): $1,110
👀 Watching price action closely near this key level.
$ZEC USDT
Setup Logic:
• $1,125–$1,135 is the key action zone around the recent breakout/retest area.
• Invalidation: Losing $1,110 would weaken the bullish structure.
• Note: Wait for a retest into the entry zone and confirmation before execution. Avoid FOMO if price runs without a retest.
Risk Tip:
Capital preservation first. 10x isolated leverage is intentionally conservative relative to the roughly 1–2% invalidation distance. Manage position size carefully and avoid chasing candles.
— Ethan_Blake
1
53
·
--
Bullish
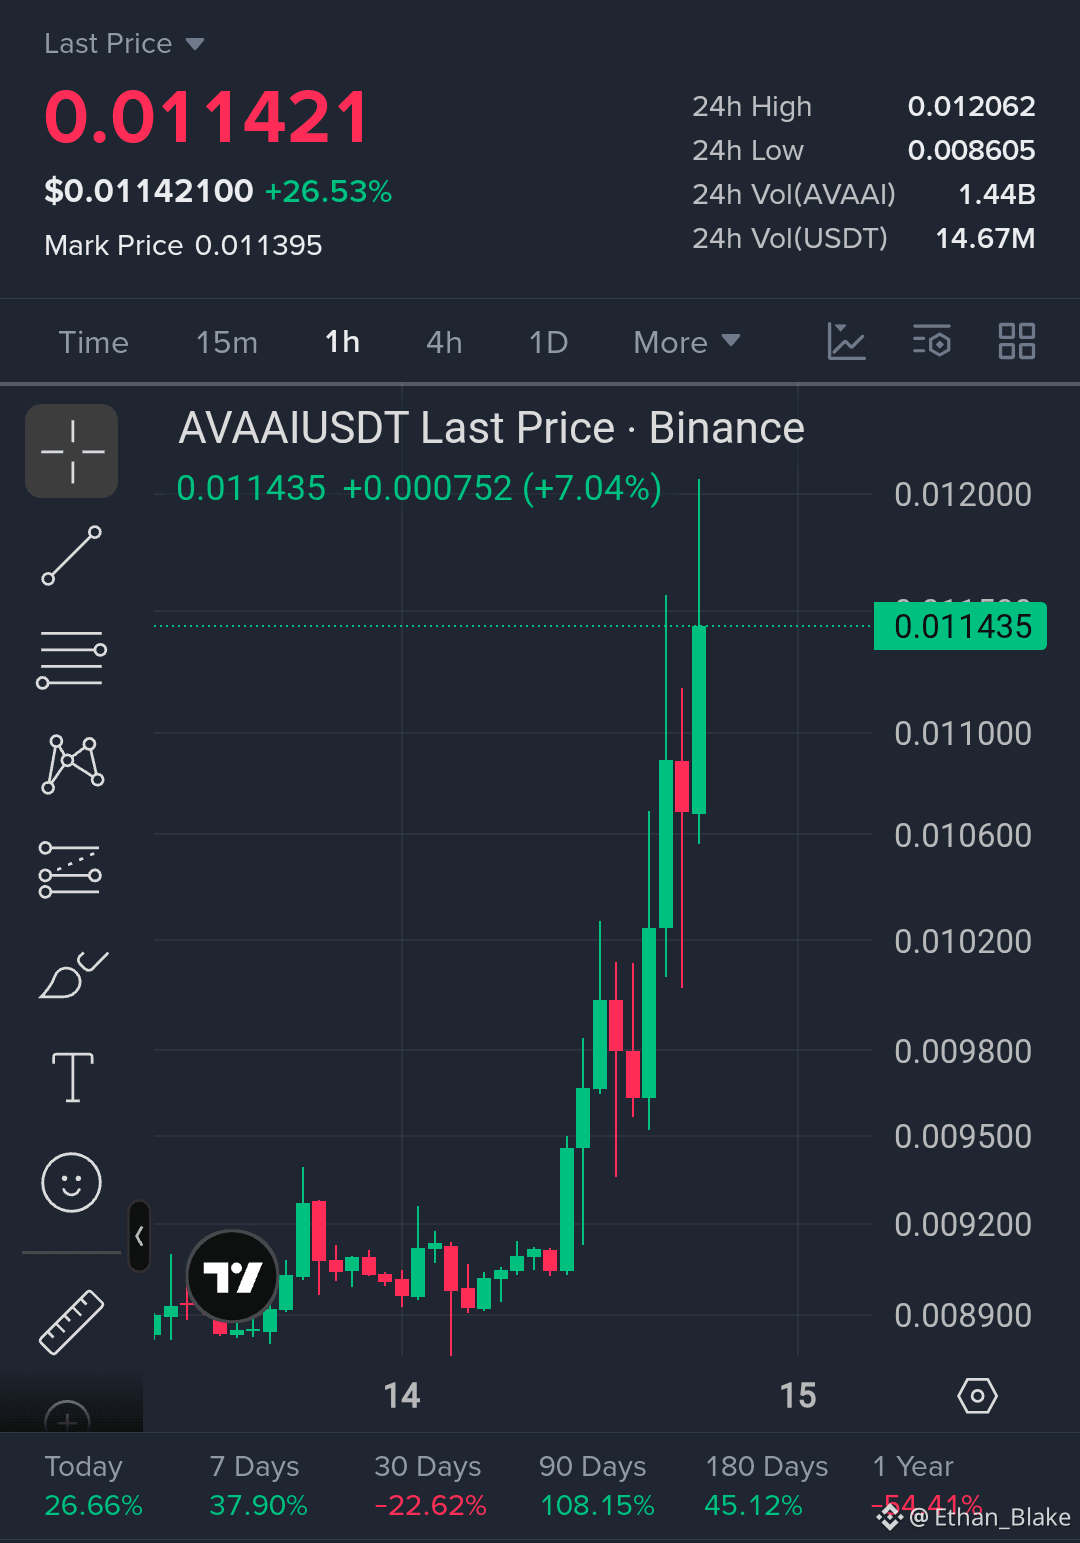
🚀 $AVAAI LONG SETUP
I’m watching a potential LONG setup on $AVAAI with 10x isolated leverage...👇
Entry Zone: $0.01115 – $0.01140
TP 1: $0.01180
TP 2: $0.01206
TP 3: $0.01250
TP 4: $0.01300
SL (Invalidation): $0.01060
👀 Watching price action closely near this key level.
$AVAAI USDT
{future}(AVAAIUSDT)
Setup Logic:
• $0.01115–$0.01140 is the key action zone based on the recent breakout structure.
• Invalidation: Losing $0.01060 weakens this bullish setup.
• Note: Wait for a retest into the entry zone and confirmation before execution. Don't FOMO into the current candle.
Risk Tip:
Capital preservation first. With the SL roughly 7% below the upper entry area, 10x isolated keeps leverage more conservative relative to the invalidation distance. Manage risk responsibly and avoid chasing candles.
— Ethan_Blake
🚀 $AVAAI LONG SETUP
I’m watching a potential LONG setup on $AVAAI with 10x isolated leverage...👇
Entry Zone: $0.01115 – $0.01140
TP 1: $0.01180
TP 2: $0.01206
TP 3: $0.01250
TP 4: $0.01300
SL (Invalidation): $0.01060
👀 Watching price action closely near this key level.
$AVAAI USDT
Setup Logic:
• $0.01115–$0.01140 is the key action zone based on the recent breakout structure.
• Invalidation: Losing $0.01060 weakens this bullish setup.
• Note: Wait for a retest into the entry zone and confirmation before execution. Don't FOMO into the current candle.
Risk Tip:
Capital preservation first. With the SL roughly 7% below the upper entry area, 10x isolated keeps leverage more conservative relative to the invalidation distance. Manage risk responsibly and avoid chasing candles.
— Ethan_Blake
I’m watching a potential LONG setup on $AVAAI with 10x isolated leverage...👇
Entry Zone: $0.01115 – $0.01140
TP 1: $0.01180
TP 2: $0.01206
TP 3: $0.01250
TP 4: $0.01300
SL (Invalidation): $0.01060
👀 Watching price action closely near this key level.
$AVAAI USDT
Setup Logic:
• $0.01115–$0.01140 is the key action zone based on the recent breakout structure.
• Invalidation: Losing $0.01060 weakens this bullish setup.
• Note: Wait for a retest into the entry zone and confirmation before execution. Don't FOMO into the current candle.
Risk Tip:
Capital preservation first. With the SL roughly 7% below the upper entry area, 10x isolated keeps leverage more conservative relative to the invalidation distance. Manage risk responsibly and avoid chasing candles.
— Ethan_Blake
36
·
--
Bearish
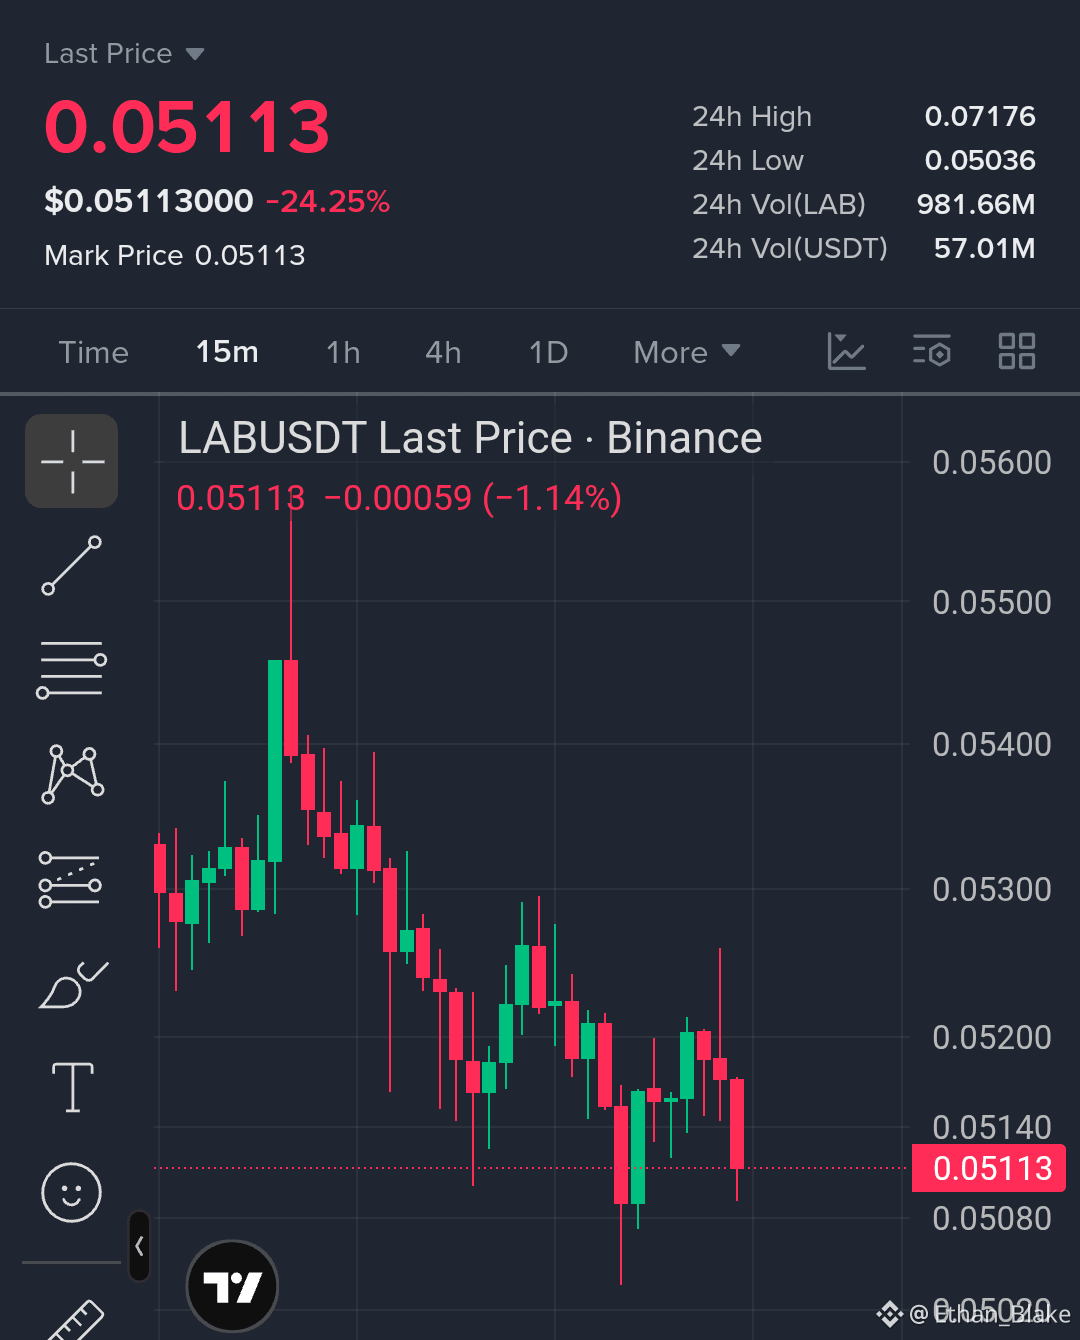
🔻 $LAB SHORT SETUP
I’m watching a potential SHORT setup on $LAB with 3x – 5x isolated leverage...👇
Entry Zone: $0.05200 – $0.05350 TP 1: $0.04950 TP 2: $0.04700 TP 3: $0.04400 TP 4: $0.04000
SL (Invalidation): $0.05620
👀 Watching price action closely near this key level.
$LAB USDT
{future}(LABUSDT)
Setup Logic: • $0.05200–$0.05350 is the key lower-high resistance zone following heavy bearish momentum and breakdown. • Invalidation: A candle close above $0.05620 invalidates this short bias. • Note: Wait for price to pullback/retest into the resistance zone before execution to avoid selling at the bottom.
Risk Tip: Capital preservation first. Avoid chasing red candles, keep leverage low on high-volatility drops, and stick to strict risk management.
— Ethan_Blake
🔻 $LAB SHORT SETUP
I’m watching a potential SHORT setup on $LAB with 3x – 5x isolated leverage...👇
Entry Zone: $0.05200 – $0.05350 TP 1: $0.04950 TP 2: $0.04700 TP 3: $0.04400 TP 4: $0.04000
SL (Invalidation): $0.05620
👀 Watching price action closely near this key level.
$LAB USDT
Setup Logic: • $0.05200–$0.05350 is the key lower-high resistance zone following heavy bearish momentum and breakdown. • Invalidation: A candle close above $0.05620 invalidates this short bias. • Note: Wait for price to pullback/retest into the resistance zone before execution to avoid selling at the bottom.
Risk Tip: Capital preservation first. Avoid chasing red candles, keep leverage low on high-volatility drops, and stick to strict risk management.
— Ethan_Blake
I’m watching a potential SHORT setup on $LAB with 3x – 5x isolated leverage...👇
Entry Zone: $0.05200 – $0.05350 TP 1: $0.04950 TP 2: $0.04700 TP 3: $0.04400 TP 4: $0.04000
SL (Invalidation): $0.05620
👀 Watching price action closely near this key level.
$LAB USDT
Setup Logic: • $0.05200–$0.05350 is the key lower-high resistance zone following heavy bearish momentum and breakdown. • Invalidation: A candle close above $0.05620 invalidates this short bias. • Note: Wait for price to pullback/retest into the resistance zone before execution to avoid selling at the bottom.
Risk Tip: Capital preservation first. Avoid chasing red candles, keep leverage low on high-volatility drops, and stick to strict risk management.
— Ethan_Blake
150
·
--
Bullish
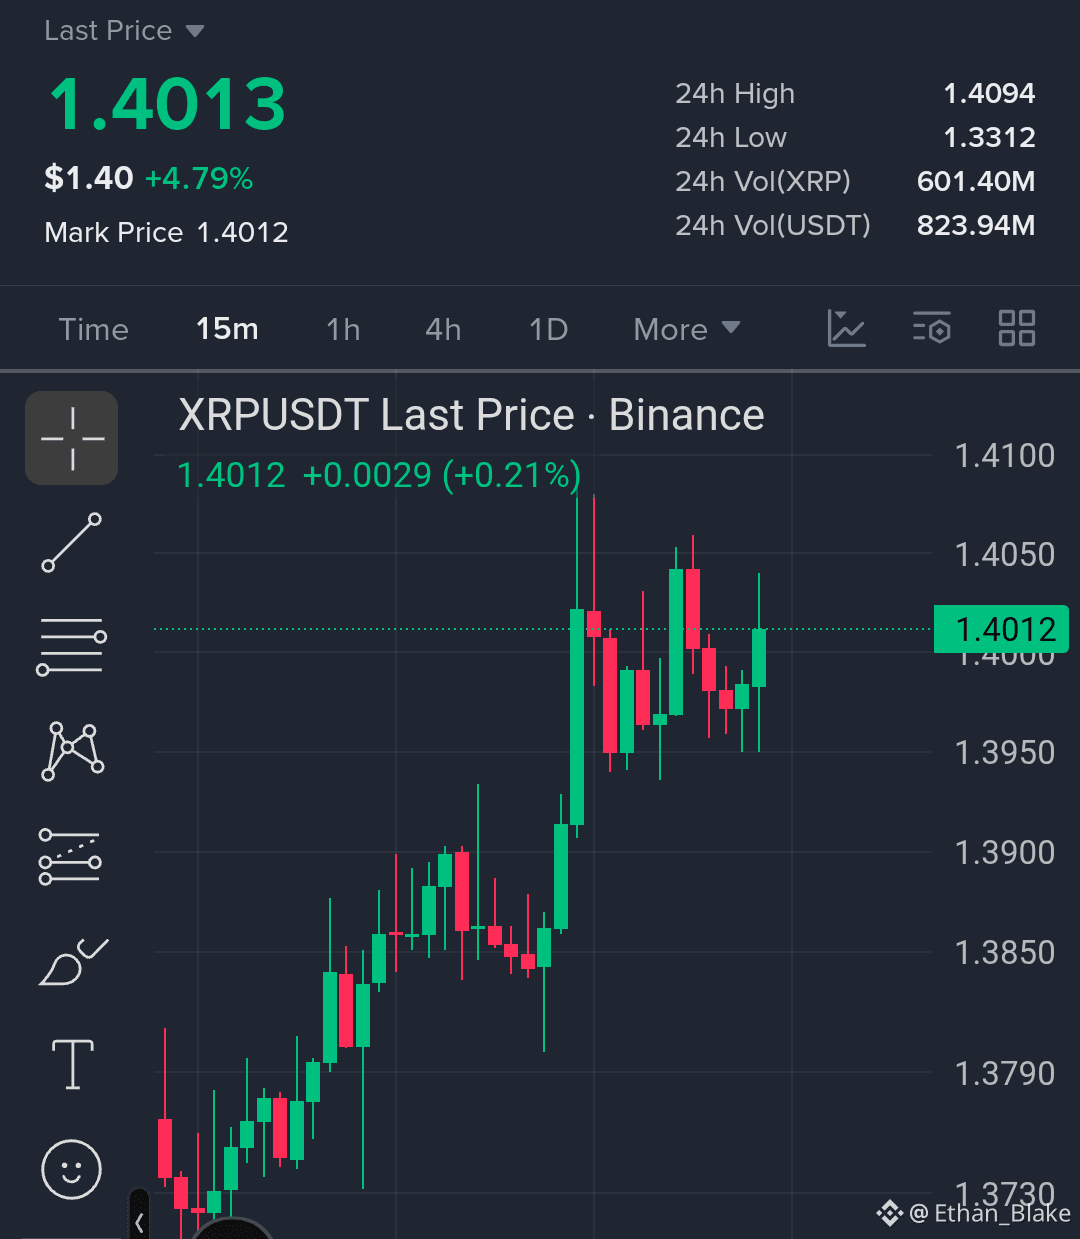
🚀 $XRP LONG SETUP
I’m watching a potential LONG setup on $XRP with 5x isolated leverage...👇
Entry Zone: $1.397 – $1.401
TP 1: $1.405
TP 2: $1.409
TP 3: $1.415
TP 4: $1.420
SL (Invalidation): $1.389
👀 Watching price action closely near this key level.
$XRP USDT
{future}(XRPUSDT)
Setup Logic: • $1.397–$1.401 is the key action zone based on the current 15m structure and consolidation after the upward move.
• Invalidation: A sustained move below $1.389 weakens and invalidates this long setup.
• Note: Wait for a retest into the entry zone with confirmation before execution. No FOMO.
Risk Tip:
Capital preservation first. Avoid chasing candles and manage leverage responsibly relative to your Stop Loss.
— Ethan_Blake
🚀 $XRP LONG SETUP
I’m watching a potential LONG setup on $XRP with 5x isolated leverage...👇
Entry Zone: $1.397 – $1.401
TP 1: $1.405
TP 2: $1.409
TP 3: $1.415
TP 4: $1.420
SL (Invalidation): $1.389
👀 Watching price action closely near this key level.
$XRP USDT
Setup Logic: • $1.397–$1.401 is the key action zone based on the current 15m structure and consolidation after the upward move.
• Invalidation: A sustained move below $1.389 weakens and invalidates this long setup.
• Note: Wait for a retest into the entry zone with confirmation before execution. No FOMO.
Risk Tip:
Capital preservation first. Avoid chasing candles and manage leverage responsibly relative to your Stop Loss.
— Ethan_Blake
I’m watching a potential LONG setup on $XRP with 5x isolated leverage...👇
Entry Zone: $1.397 – $1.401
TP 1: $1.405
TP 2: $1.409
TP 3: $1.415
TP 4: $1.420
SL (Invalidation): $1.389
👀 Watching price action closely near this key level.
$XRP USDT
Setup Logic: • $1.397–$1.401 is the key action zone based on the current 15m structure and consolidation after the upward move.
• Invalidation: A sustained move below $1.389 weakens and invalidates this long setup.
• Note: Wait for a retest into the entry zone with confirmation before execution. No FOMO.
Risk Tip:
Capital preservation first. Avoid chasing candles and manage leverage responsibly relative to your Stop Loss.
— Ethan_Blake
68
·
--
Bullish
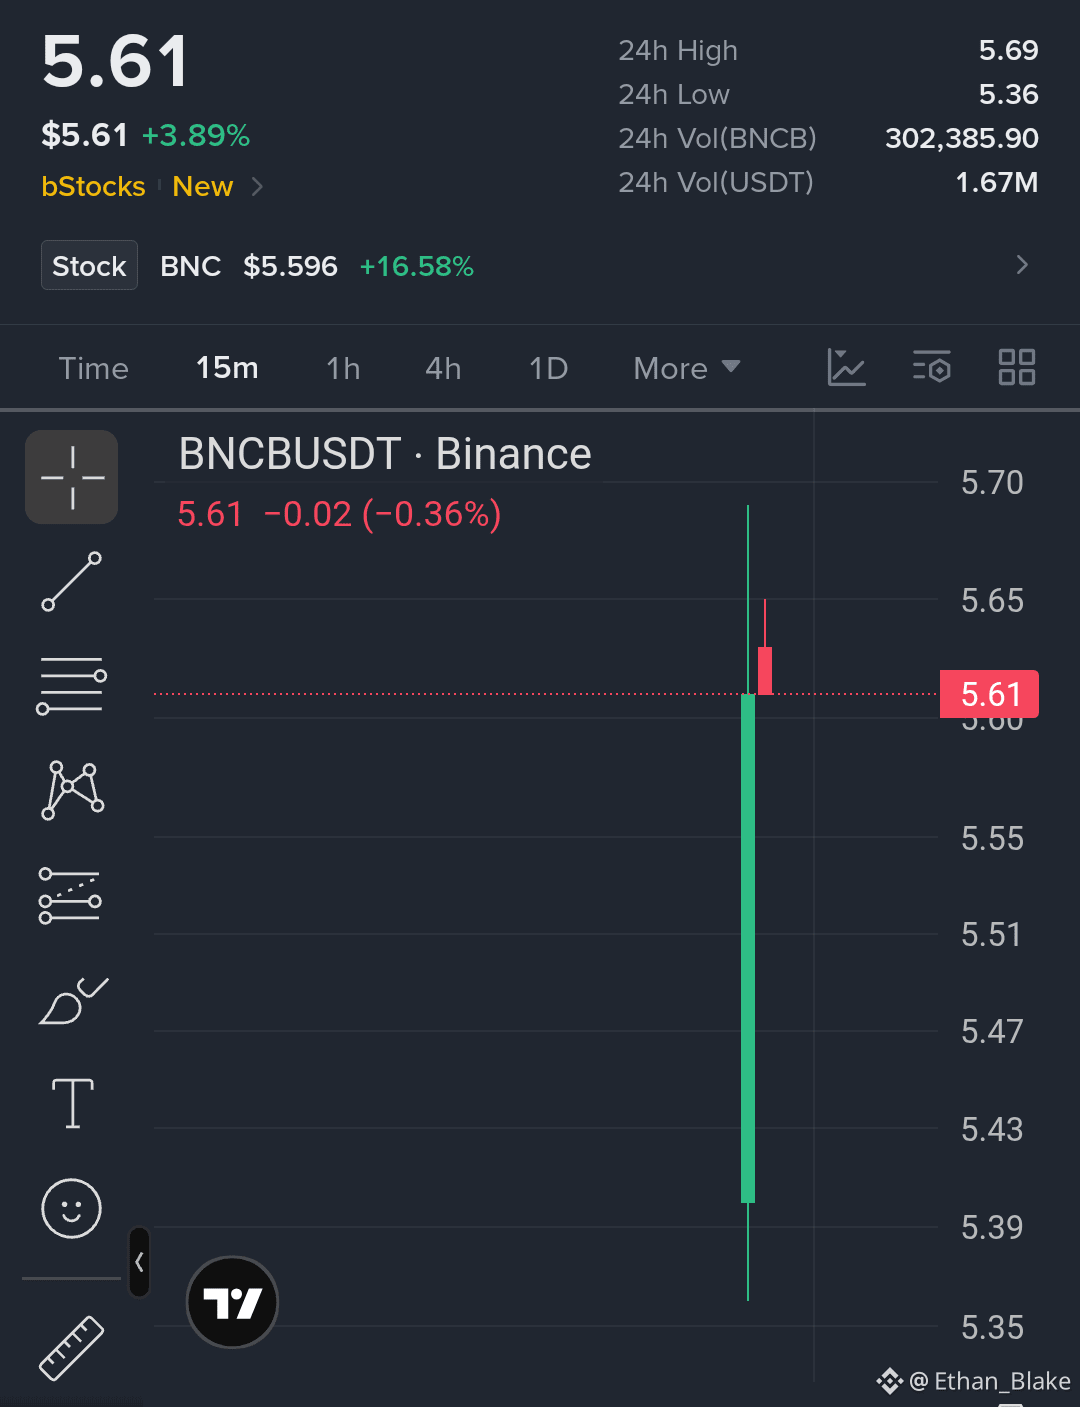
🚀 $BNCB LONG SETUP
I’m watching a potential LONG setup on $BNCB with 10x isolated leverage...👇
Entry Zone: $5.58 – $5.61
TP 1: $5.65
TP 2: $5.69
TP 3: $5.75
TP 4: $5.80
SL (Invalidation): $5.54
👀 Watching price action closely near this key level.
$BNCB USDT
{spot}(BNCBUSDT)
Setup Logic: • $5.58–$5.61 is the key action zone based on the current 15m market structure and breakout candle.
• Invalidation: Losing $5.54 weakens and invalidates this long idea.
• Note: Wait for a retest into the entry zone and confirmation before execution. No FOMO.
Risk Tip:
Capital preservation first. Avoid chasing the breakout candle and manage leverage responsibly relative to your Stop Loss.
— Ethan_Blake
🚀 $BNCB LONG SETUP
I’m watching a potential LONG setup on $BNCB with 10x isolated leverage...👇
Entry Zone: $5.58 – $5.61
TP 1: $5.65
TP 2: $5.69
TP 3: $5.75
TP 4: $5.80
SL (Invalidation): $5.54
👀 Watching price action closely near this key level.
$BNCB USDT
Setup Logic: • $5.58–$5.61 is the key action zone based on the current 15m market structure and breakout candle.
• Invalidation: Losing $5.54 weakens and invalidates this long idea.
• Note: Wait for a retest into the entry zone and confirmation before execution. No FOMO.
Risk Tip:
Capital preservation first. Avoid chasing the breakout candle and manage leverage responsibly relative to your Stop Loss.
— Ethan_Blake
I’m watching a potential LONG setup on $BNCB with 10x isolated leverage...👇
Entry Zone: $5.58 – $5.61
TP 1: $5.65
TP 2: $5.69
TP 3: $5.75
TP 4: $5.80
SL (Invalidation): $5.54
👀 Watching price action closely near this key level.
$BNCB USDT
Setup Logic: • $5.58–$5.61 is the key action zone based on the current 15m market structure and breakout candle.
• Invalidation: Losing $5.54 weakens and invalidates this long idea.
• Note: Wait for a retest into the entry zone and confirmation before execution. No FOMO.
Risk Tip:
Capital preservation first. Avoid chasing the breakout candle and manage leverage responsibly relative to your Stop Loss.
— Ethan_Blake
310
·
--
🚀 ALTCOIN MARKET IS WAKING UP
The bull is charging, charts are climbing, and altcoins are basically saying:
“Okay… who turned the green candles back on?” 😂🐂
🔥 3 Coins to Watch:
🟣 SOL (Solana) — Strong ecosystem & high network activity
🟡 $BNB — Major exchange ecosystem + strong utility
🐕 $DOGE — The meme king that somehow keeps coming back 😂
📈 The altcoin market can move fast, so volatility is part of the game.
$BTC may lead the market… but altcoins are waiting for their turn to run. 🚀
🚀 ALTCOIN MARKET IS WAKING UP
The bull is charging, charts are climbing, and altcoins are basically saying:
“Okay… who turned the green candles back on?” 😂🐂
🔥 3 Coins to Watch:
🟣 SOL (Solana) — Strong ecosystem & high network activity
🟡 $BNB — Major exchange ecosystem + strong utility
🐕 $DOGE — The meme king that somehow keeps coming back 😂
📈 The altcoin market can move fast, so volatility is part of the game.
$BTC may lead the market… but altcoins are waiting for their turn to run. 🚀
The bull is charging, charts are climbing, and altcoins are basically saying:
“Okay… who turned the green candles back on?” 😂🐂
🔥 3 Coins to Watch:
🟣 SOL (Solana) — Strong ecosystem & high network activity
🟡 $BNB — Major exchange ecosystem + strong utility
🐕 $DOGE — The meme king that somehow keeps coming back 😂
📈 The altcoin market can move fast, so volatility is part of the game.
$BTC may lead the market… but altcoins are waiting for their turn to run. 🚀

1
62
·
--
Bullish
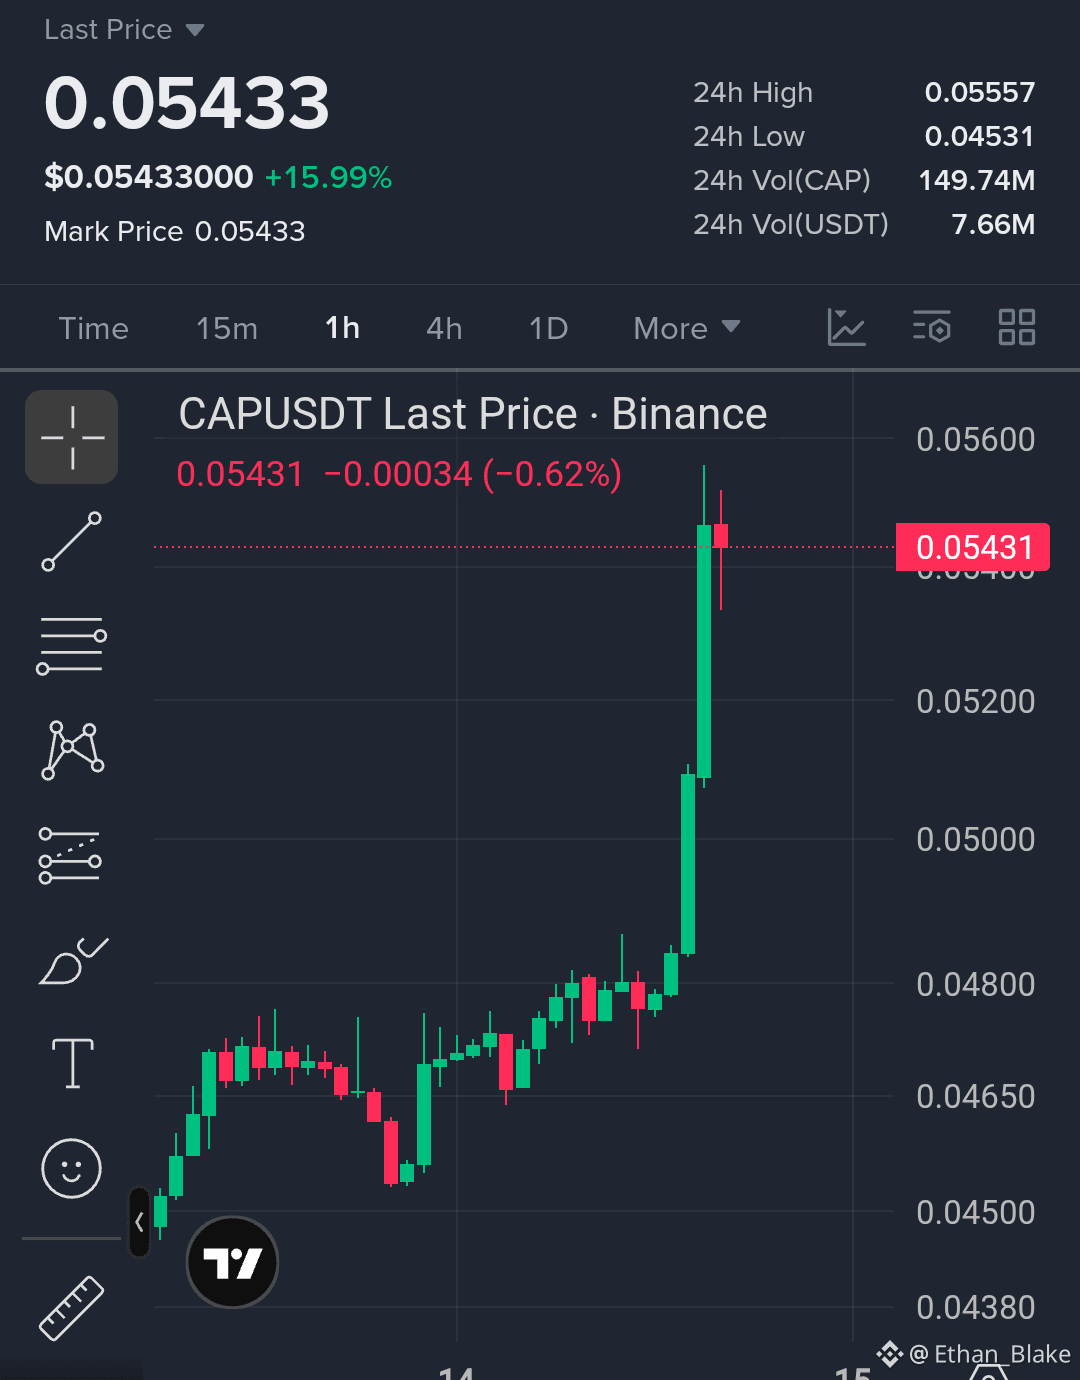
🚀 $CAP LONG SETUP
I’m watching a potential LONG setup on $CAP with 8x isolated leverage...👇
Entry Zone: $0.05380 – $0.05420
TP 1: $0.05550
TP 2: $0.05650
TP 3: $0.05800
TP 4: $0.06000
SL (Invalidation): $0.05280
👀 Watching price action closely near this key level.
$CAP USDT
{future}(CAPUSDT)
Setup Logic:
• $0.05380–$0.05420 is the key action zone based on the breakout and current 1H market structure.
• Invalidation: A sustained move below $0.05280 weakens/invalidates this setup.
• Note: Wait for a retest into the entry zone and confirmation before execution. Don’t FOMO into the breakout.
Risk Tip:
Capital preservation first. The SL is roughly 2%–3% from the entry zone, so 8x keeps leverage more conservative relative to the invalidation distance. Avoid chasing candles and manage risk responsibly.
— Ethan_Blake
🚀 $CAP LONG SETUP
I’m watching a potential LONG setup on $CAP with 8x isolated leverage...👇
Entry Zone: $0.05380 – $0.05420
TP 1: $0.05550
TP 2: $0.05650
TP 3: $0.05800
TP 4: $0.06000
SL (Invalidation): $0.05280
👀 Watching price action closely near this key level.
$CAP USDT
Setup Logic:
• $0.05380–$0.05420 is the key action zone based on the breakout and current 1H market structure.
• Invalidation: A sustained move below $0.05280 weakens/invalidates this setup.
• Note: Wait for a retest into the entry zone and confirmation before execution. Don’t FOMO into the breakout.
Risk Tip:
Capital preservation first. The SL is roughly 2%–3% from the entry zone, so 8x keeps leverage more conservative relative to the invalidation distance. Avoid chasing candles and manage risk responsibly.
— Ethan_Blake
I’m watching a potential LONG setup on $CAP with 8x isolated leverage...👇
Entry Zone: $0.05380 – $0.05420
TP 1: $0.05550
TP 2: $0.05650
TP 3: $0.05800
TP 4: $0.06000
SL (Invalidation): $0.05280
👀 Watching price action closely near this key level.
$CAP USDT
Setup Logic:
• $0.05380–$0.05420 is the key action zone based on the breakout and current 1H market structure.
• Invalidation: A sustained move below $0.05280 weakens/invalidates this setup.
• Note: Wait for a retest into the entry zone and confirmation before execution. Don’t FOMO into the breakout.
Risk Tip:
Capital preservation first. The SL is roughly 2%–3% from the entry zone, so 8x keeps leverage more conservative relative to the invalidation distance. Avoid chasing candles and manage risk responsibly.
— Ethan_Blake
50
·
--
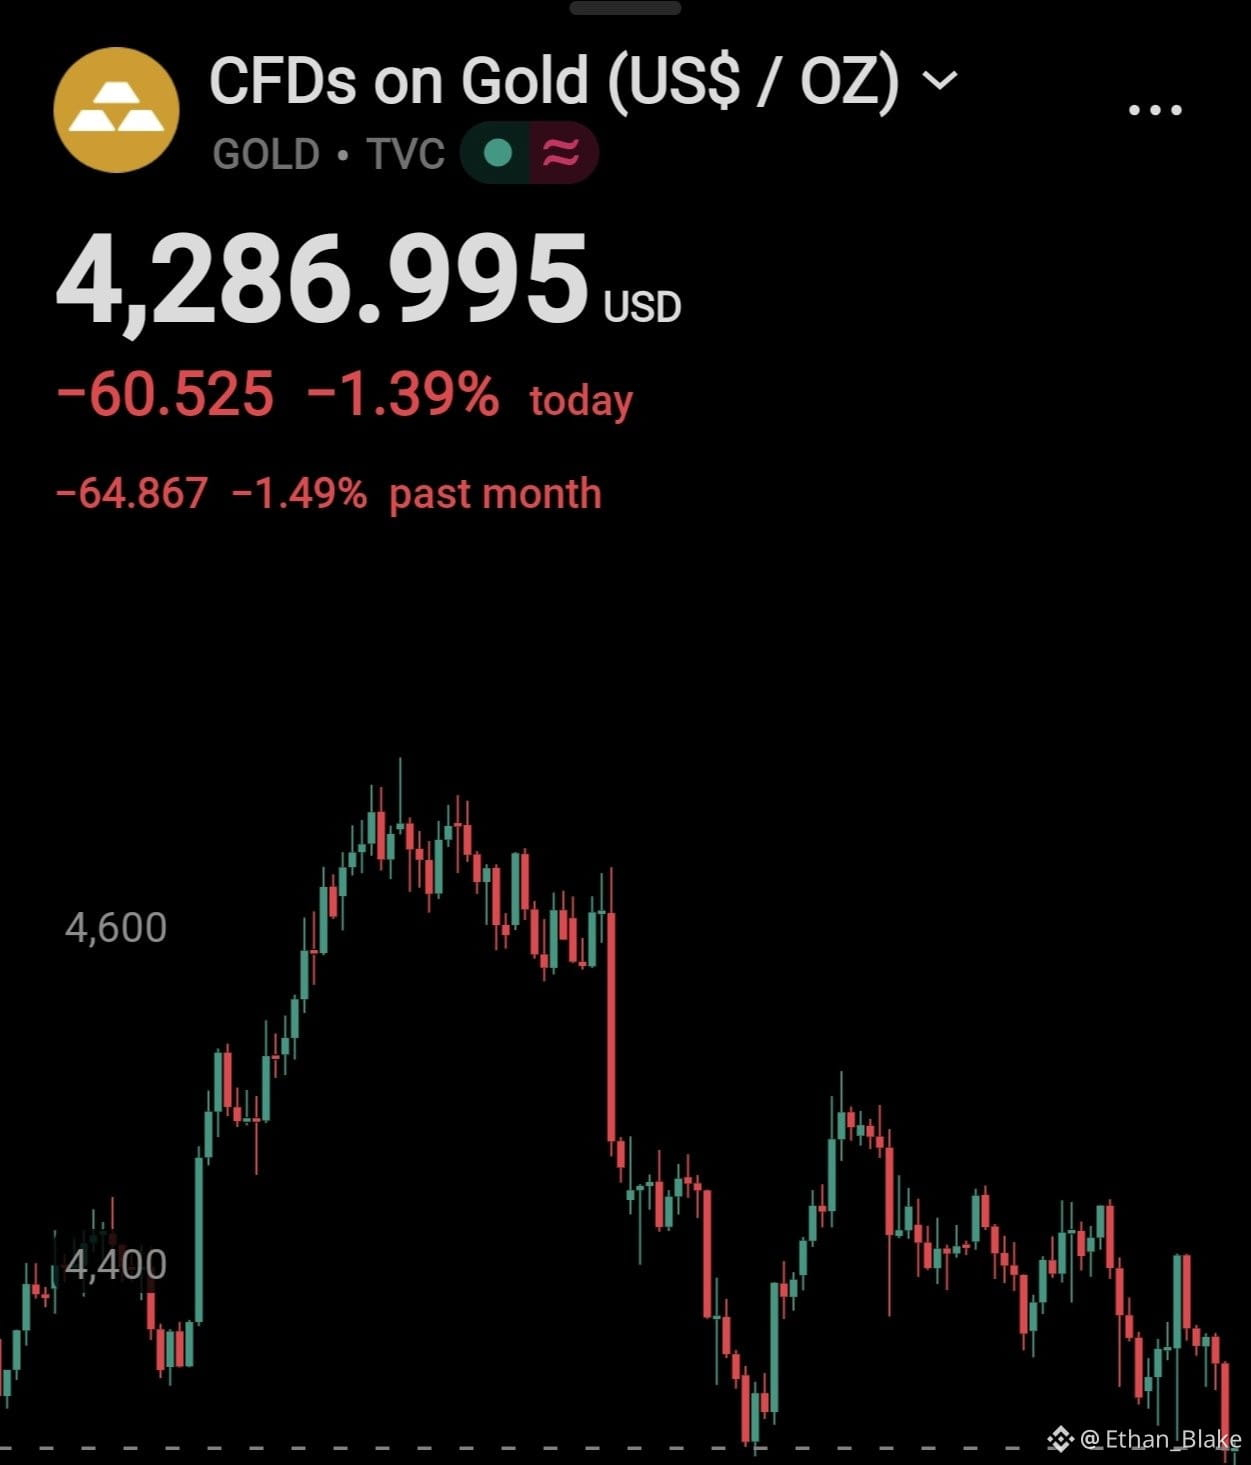
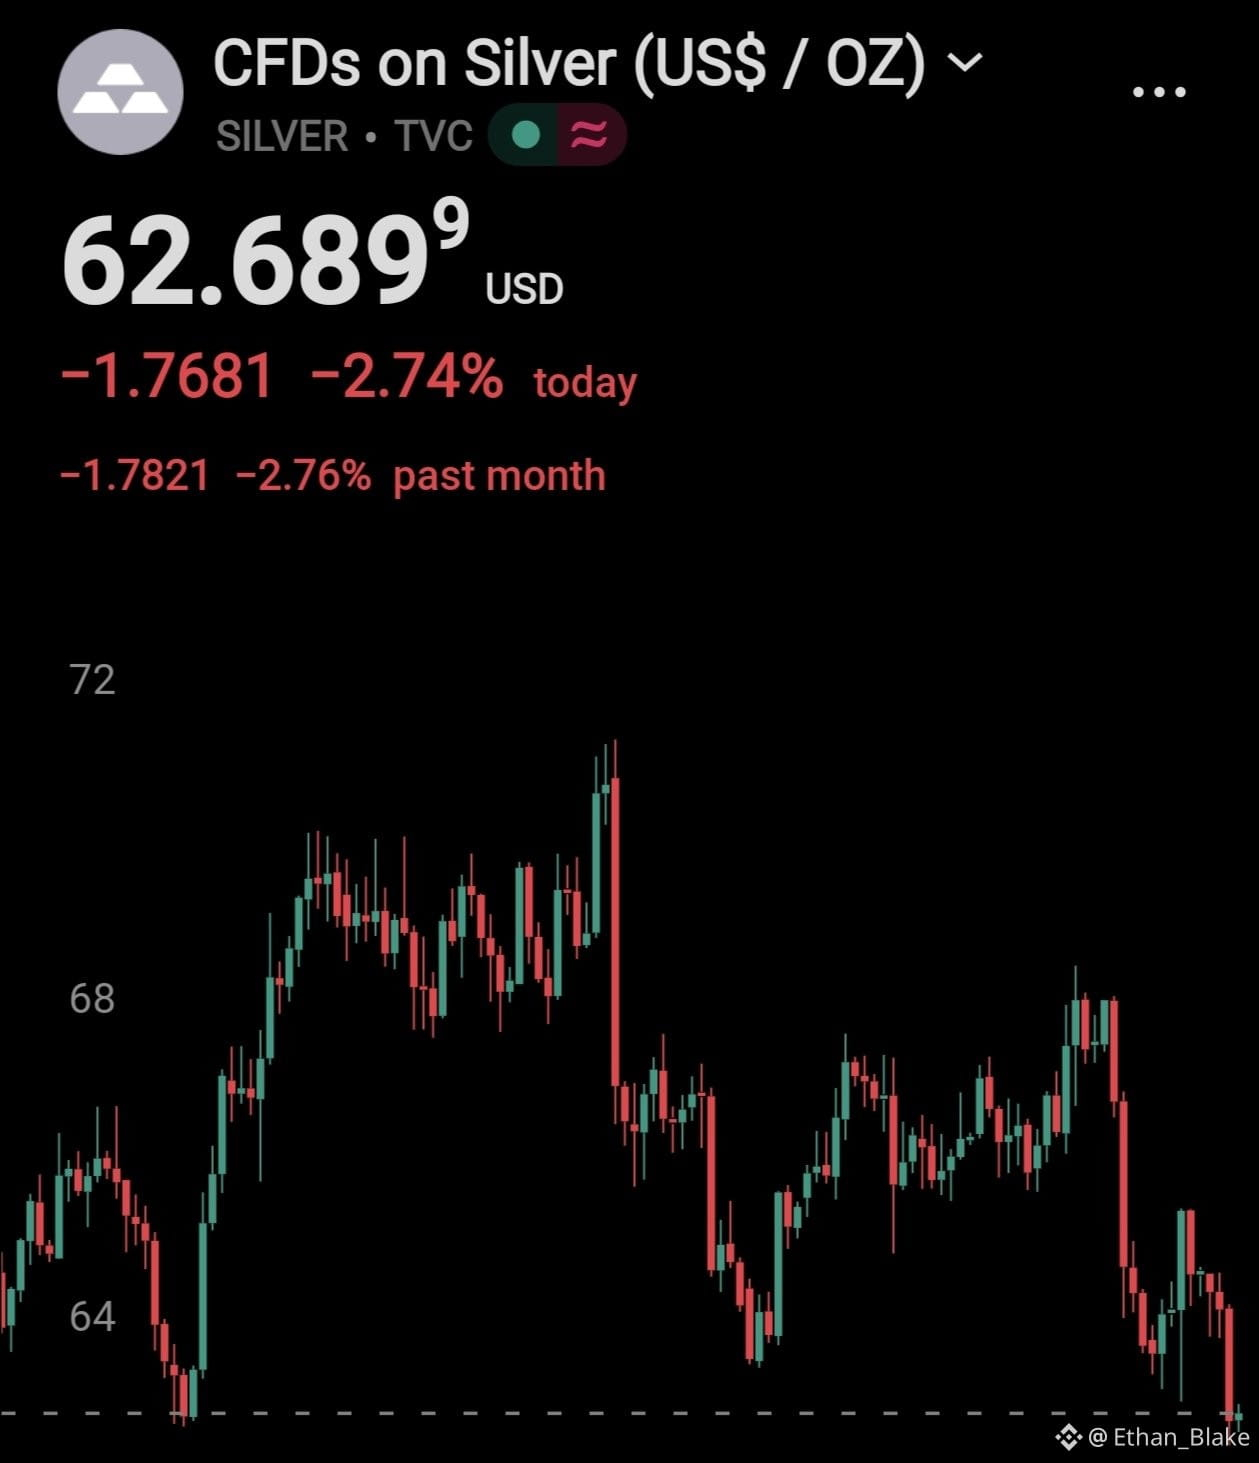
💥 $𝟲𝟱𝟬 𝗕𝗜𝗟𝗟𝗜𝗢𝗡 𝗪𝗜𝗣𝗘𝗗 𝗢𝗨𝗧 𝗙𝗥𝗢𝗠 𝗚𝗢𝗟𝗗 & 𝗦𝗜𝗟𝗩𝗘𝗥 𝗜𝗡 𝟳 𝗛𝗢𝗨𝗥𝗦.
🥇🥈 𝗕𝗢𝗧𝗛 𝗛𝗜𝗧 𝗡𝗘𝗪 𝟱-𝗪𝗘𝗘𝗞 𝗟𝗢𝗪𝗦.
💥 $𝟲𝟱𝟬 𝗕𝗜𝗟𝗟𝗜𝗢𝗡 𝗪𝗜𝗣𝗘𝗗 𝗢𝗨𝗧 𝗙𝗥𝗢𝗠 𝗚𝗢𝗟𝗗 & 𝗦𝗜𝗟𝗩𝗘𝗥 𝗜𝗡 𝟳 𝗛𝗢𝗨𝗥𝗦.
🥇🥈 𝗕𝗢𝗧𝗛 𝗛𝗜𝗧 𝗡𝗘𝗪 𝟱-𝗪𝗘𝗘𝗞 𝗟𝗢𝗪𝗦.
🥇🥈 𝗕𝗢𝗧𝗛 𝗛𝗜𝗧 𝗡𝗘𝗪 𝟱-𝗪𝗘𝗘𝗞 𝗟𝗢𝗪𝗦.
1
236
·
--
Bullish
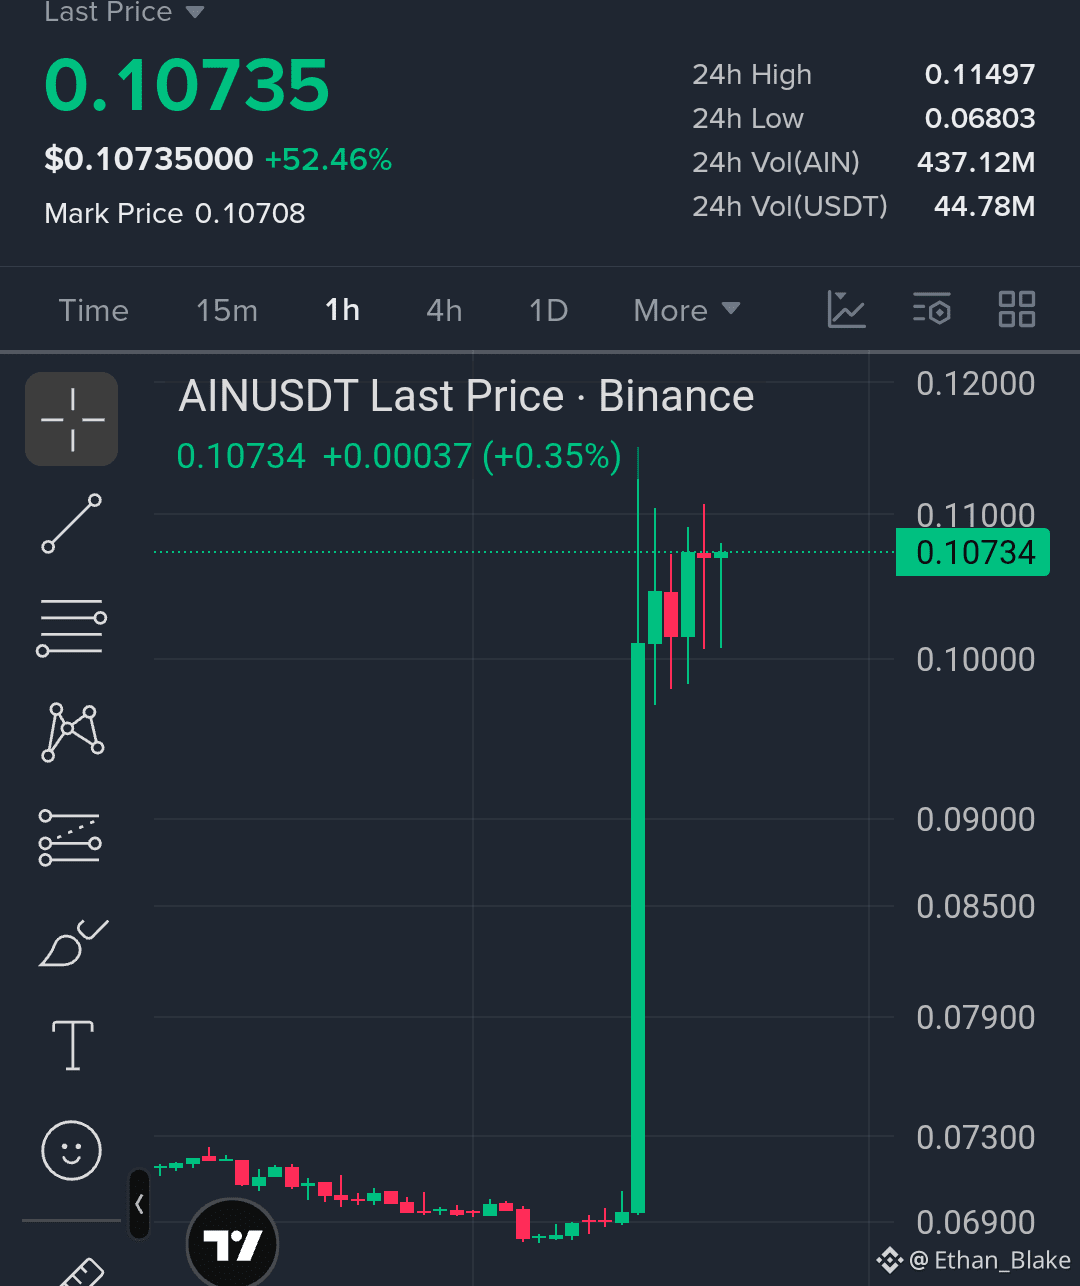
🚀 $AIN LONG SETUP
I’m watching a potential LONG setup on $AIN with 10x isolated leverage...👇
Entry Zone: $0.1045 – $0.1065
TP 1: $0.1100
TP 2: $0.1145
TP 3: $0.1200
TP 4: $0.1250
SL (Invalidation): $0.1015
👀 Watching price action closely near this key level.
$AIN USDT
{future}(AINUSDT)
Setup Logic:
• $0.1045–$0.1065 is the key action zone after the breakout and consolidation.
• Invalidation: Losing and holding below $0.1015 weakens this bullish setup.
• Note: Wait for a retest into the entry zone and confirmation before execution. Do not FOMO into the spike.
Risk Tip:
Capital preservation first. Avoid chasing candles and manage leverage responsibly relative to your Stop Loss. The ~2.8% SL distance makes 10x a more conservative choice than aggressive leverage.
— Ethan_Blake
🚀 $AIN LONG SETUP
I’m watching a potential LONG setup on $AIN with 10x isolated leverage...👇
Entry Zone: $0.1045 – $0.1065
TP 1: $0.1100
TP 2: $0.1145
TP 3: $0.1200
TP 4: $0.1250
SL (Invalidation): $0.1015
👀 Watching price action closely near this key level.
$AIN USDT
Setup Logic:
• $0.1045–$0.1065 is the key action zone after the breakout and consolidation.
• Invalidation: Losing and holding below $0.1015 weakens this bullish setup.
• Note: Wait for a retest into the entry zone and confirmation before execution. Do not FOMO into the spike.
Risk Tip:
Capital preservation first. Avoid chasing candles and manage leverage responsibly relative to your Stop Loss. The ~2.8% SL distance makes 10x a more conservative choice than aggressive leverage.
— Ethan_Blake
I’m watching a potential LONG setup on $AIN with 10x isolated leverage...👇
Entry Zone: $0.1045 – $0.1065
TP 1: $0.1100
TP 2: $0.1145
TP 3: $0.1200
TP 4: $0.1250
SL (Invalidation): $0.1015
👀 Watching price action closely near this key level.
$AIN USDT
Setup Logic:
• $0.1045–$0.1065 is the key action zone after the breakout and consolidation.
• Invalidation: Losing and holding below $0.1015 weakens this bullish setup.
• Note: Wait for a retest into the entry zone and confirmation before execution. Do not FOMO into the spike.
Risk Tip:
Capital preservation first. Avoid chasing candles and manage leverage responsibly relative to your Stop Loss. The ~2.8% SL distance makes 10x a more conservative choice than aggressive leverage.
— Ethan_Blake
77
·
--
Bullish
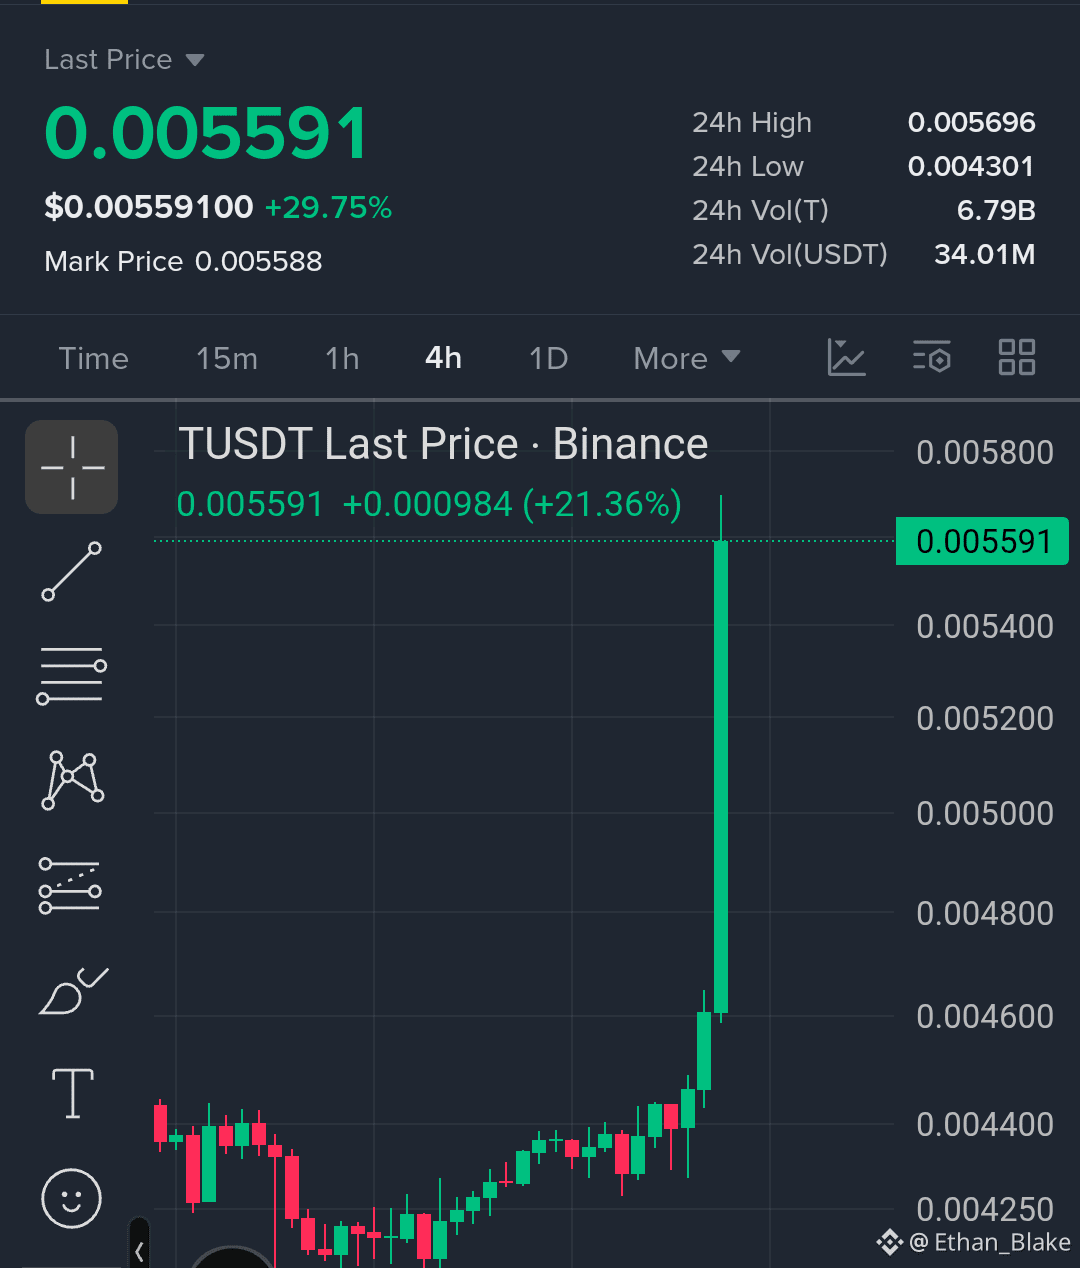
🚀 $T LONG SETUP
I’m watching a potential LONG setup on $T with 8x isolated leverage...👇
Entry Zone: $0.00525 – $0.00540
TP 1: $0.00570
TP 2: $0.00590
TP 3: $0.00620
TP 4: $0.00650
SL (Invalidation): $0.00505
👀 Watching price action closely near this key level.
$T USDT
{future}(TUSDT)
Setup Logic: • $0.00525–$0.00540 is the key action zone for a potential retest after the sharp 4H breakout.
• Invalidation: A sustained move below $0.00505 would weaken the breakout structure and invalidate this setup.
• Note: Wait for a confirmed retest into the entry zone before execution. Do NOT chase the massive breakout candle.
Risk Tip:
Capital preservation first. Avoid chasing candles and manage leverage responsibly relative to your Stop Loss.
— Ethan_Blake
🚀 $T LONG SETUP
I’m watching a potential LONG setup on $T with 8x isolated leverage...👇
Entry Zone: $0.00525 – $0.00540
TP 1: $0.00570
TP 2: $0.00590
TP 3: $0.00620
TP 4: $0.00650
SL (Invalidation): $0.00505
👀 Watching price action closely near this key level.
$T USDT
Setup Logic: • $0.00525–$0.00540 is the key action zone for a potential retest after the sharp 4H breakout.
• Invalidation: A sustained move below $0.00505 would weaken the breakout structure and invalidate this setup.
• Note: Wait for a confirmed retest into the entry zone before execution. Do NOT chase the massive breakout candle.
Risk Tip:
Capital preservation first. Avoid chasing candles and manage leverage responsibly relative to your Stop Loss.
— Ethan_Blake
I’m watching a potential LONG setup on $T with 8x isolated leverage...👇
Entry Zone: $0.00525 – $0.00540
TP 1: $0.00570
TP 2: $0.00590
TP 3: $0.00620
TP 4: $0.00650
SL (Invalidation): $0.00505
👀 Watching price action closely near this key level.
$T USDT
Setup Logic: • $0.00525–$0.00540 is the key action zone for a potential retest after the sharp 4H breakout.
• Invalidation: A sustained move below $0.00505 would weaken the breakout structure and invalidate this setup.
• Note: Wait for a confirmed retest into the entry zone before execution. Do NOT chase the massive breakout candle.
Risk Tip:
Capital preservation first. Avoid chasing candles and manage leverage responsibly relative to your Stop Loss.
— Ethan_Blake
100
·
--
Bullish
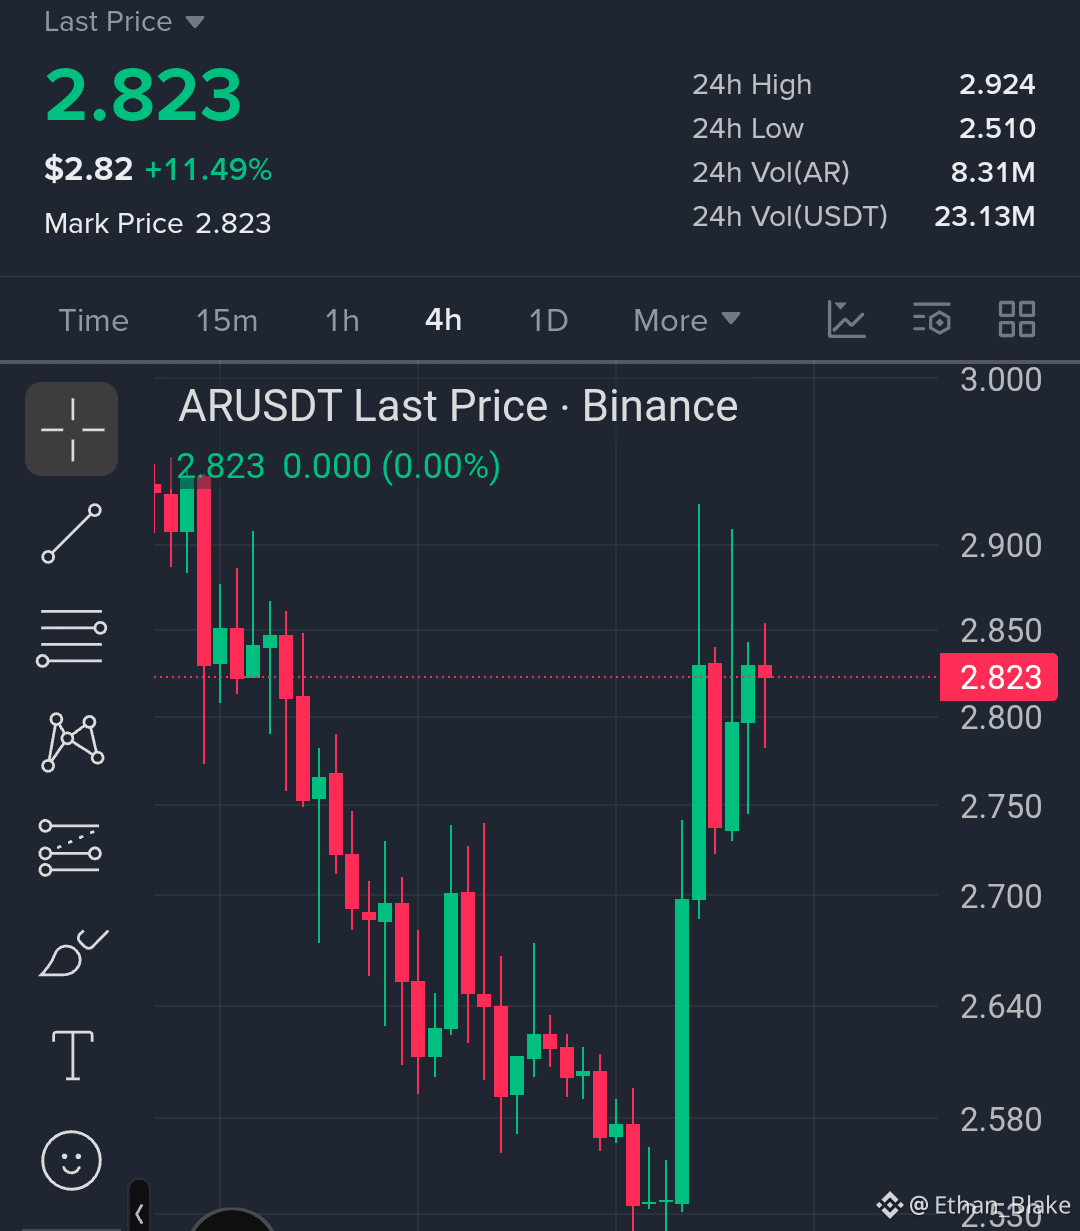
🚀 $AR LONG SETUP
I’m watching a potential LONG setup on $AR with 10x isolated leverage...👇
Entry Zone: $2.78 – $2.80
TP 1: $2.85
TP 2: $2.90
TP 3: $2.924
TP 4: $3.00
SL (Invalidation): $2.73
👀 Watching price action closely near this key level.
$AR USDT
{future}(ARUSDT)
Setup Logic: • $2.78–$2.80 is the key action zone based on the recent 4H breakout and pullback structure.
• Invalidation: Losing $2.73 would weaken the bullish structure and invalidate this setup.
• Note: Wait for a confirmed retest and reaction inside the entry zone before execution. Don’t FOMO into the current candle.
Risk Tip:
Capital preservation first. Avoid chasing candles and manage leverage responsibly relative to your Stop Loss.
— Ethan_Blake
🚀 $AR LONG SETUP
I’m watching a potential LONG setup on $AR with 10x isolated leverage...👇
Entry Zone: $2.78 – $2.80
TP 1: $2.85
TP 2: $2.90
TP 3: $2.924
TP 4: $3.00
SL (Invalidation): $2.73
👀 Watching price action closely near this key level.
$AR USDT
Setup Logic: • $2.78–$2.80 is the key action zone based on the recent 4H breakout and pullback structure.
• Invalidation: Losing $2.73 would weaken the bullish structure and invalidate this setup.
• Note: Wait for a confirmed retest and reaction inside the entry zone before execution. Don’t FOMO into the current candle.
Risk Tip:
Capital preservation first. Avoid chasing candles and manage leverage responsibly relative to your Stop Loss.
— Ethan_Blake
I’m watching a potential LONG setup on $AR with 10x isolated leverage...👇
Entry Zone: $2.78 – $2.80
TP 1: $2.85
TP 2: $2.90
TP 3: $2.924
TP 4: $3.00
SL (Invalidation): $2.73
👀 Watching price action closely near this key level.
$AR USDT
Setup Logic: • $2.78–$2.80 is the key action zone based on the recent 4H breakout and pullback structure.
• Invalidation: Losing $2.73 would weaken the bullish structure and invalidate this setup.
• Note: Wait for a confirmed retest and reaction inside the entry zone before execution. Don’t FOMO into the current candle.
Risk Tip:
Capital preservation first. Avoid chasing candles and manage leverage responsibly relative to your Stop Loss.
— Ethan_Blake
101
Log in to explore more content
Join global crypto users on Binance Square
⚡️ Get latest and useful information about crypto.
💬 Trusted by the world’s largest crypto exchange.
👍 Discover real insights from verified creators.
Email / Phone number