

WangLin_抄底
2.8k Posts

WangLin_抄底
 Square Verified+
Report
Block User
深度学习预测模型 | 智能大数据行情分析
Open Trade

ETH Holder
Frequent Trader
1.8 Years
3.4K+ Following
37.5K+ Followers
41.0K+ Liked
Posts
Portfolio
All
Quotes
Videos
Live
PINNED
·
--
Article
MARKET STRUCTURE EXPLAINEDWhen price approaches any support/resistance level you have 3 types of decisions:
1️⃣→ Bet on a breakout (Momentum).
2️⃣→ Bet on a bounce (Mean reversion).
3️⃣→ Take no trade.
As a Trader you have to get used to picking Option 3... a lot.
Before jumping into a trade it can be quite helpful to have a little bit of context.
Looking at the current Market Structure is a good place to start.
🐂Bullish Market Structure: higher highs and higher lows.🐻Bearish Market Structure: lower lows and lower highs.
Break in Market Structure
Just because price currently has Bullish Structure doesn't mean that it will just go up forever.
There are going to be times where the structure "breaks" and price can potentially turn around and start moving in another direction.
Just because a Lower High comes in does NOT mean the structure has broken yetThe structure is only broken when the Lower Low comes in.A Lower Low = the break of the most recent swing low that was formed.Just because a Higher Low comes in does NOT mean the structure has broken yet.The structure is only broken when the Higher High comes in.A Higher High = the breach of the most recent swing high that was formed.
Mean-Reverting Markets (ranging)
When the direction of price isn't clear because it just keeps reversing from the same highs/lows over and over again, this is a Mean Reverting Environment.
This type of environment is:
✅the BEST for trading reversals❌the WORST for trading breakouts
Momentum Markets (trending)
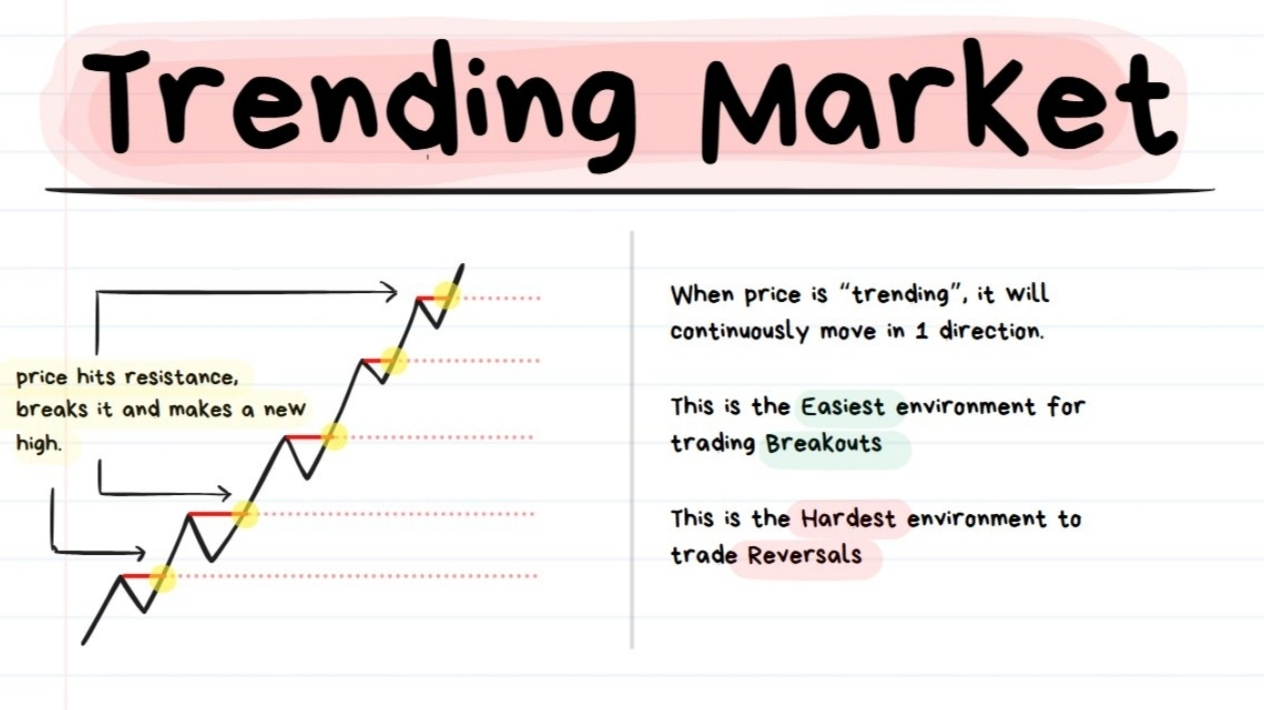
When the Market Structure of a move appears to be Bullish or Bearish for a consistently long duration, then you're looking at Trending Price Action.
Common characteristic of strong Trending Price Action:
Price hits a resistance and then effortlessly breaks through it, drifting to the next resistance.Then when it reaches the next level, it breaks through that again and the cycle continues.
This type of environment is:
✅the BEST for trading breakouts❌the WORST for trading reversals
📝Summary Lesson :
Every trade fits one of three decisions:
1️⃣→ Bet on a breakout (momentum).
2️⃣→ Bet on a bounce (mean reversion).
3️⃣→ Take no trade.
Your job as a Trader: identify the environment and choose the option
1. Market Structure
Bullish: higher highs + higher lowsBearish: lower lows + lower highsBreak of structure: confirmed only when price breaches the most recent swing high/low.
2. Market Environments
A. Momentum (Trending)
Price consistently breaks through levels and continues in one direction.✅ Best for breakouts❌ Worst for reversals
B. Mean-Reverting (Ranging)
Price repeatedly bounces between similar highs/lows.✅ Best for reversals
❌ Worst for breakouts#btc #bitcoin
{future}(BTCUSDT)
MARKET STRUCTURE EXPLAINED
When price approaches any support/resistance level you have 3 types of decisions:
1️⃣→ Bet on a breakout (Momentum).
2️⃣→ Bet on a bounce (Mean reversion).
3️⃣→ Take no trade.
As a Trader you have to get used to picking Option 3... a lot.
Before jumping into a trade it can be quite helpful to have a little bit of context.
Looking at the current Market Structure is a good place to start.
🐂Bullish Market Structure: higher highs and higher lows.🐻Bearish Market Structure: lower lows and lower highs.
Break in Market Structure
Just because price currently has Bullish Structure doesn't mean that it will just go up forever.
There are going to be times where the structure "breaks" and price can potentially turn around and start moving in another direction.
Just because a Lower High comes in does NOT mean the structure has broken yetThe structure is only broken when the Lower Low comes in.A Lower Low = the break of the most recent swing low that was formed.Just because a Higher Low comes in does NOT mean the structure has broken yet.The structure is only broken when the Higher High comes in.A Higher High = the breach of the most recent swing high that was formed.
Mean-Reverting Markets (ranging)
When the direction of price isn't clear because it just keeps reversing from the same highs/lows over and over again, this is a Mean Reverting Environment.
This type of environment is:
✅the BEST for trading reversals❌the WORST for trading breakouts
Momentum Markets (trending)
When the Market Structure of a move appears to be Bullish or Bearish for a consistently long duration, then you're looking at Trending Price Action.
Common characteristic of strong Trending Price Action:
Price hits a resistance and then effortlessly breaks through it, drifting to the next resistance.Then when it reaches the next level, it breaks through that again and the cycle continues.
This type of environment is:
✅the BEST for trading breakouts❌the WORST for trading reversals
📝Summary Lesson :
Every trade fits one of three decisions:
1️⃣→ Bet on a breakout (momentum).
2️⃣→ Bet on a bounce (mean reversion).
3️⃣→ Take no trade.
Your job as a Trader: identify the environment and choose the option
1. Market Structure
Bullish: higher highs + higher lowsBearish: lower lows + lower highsBreak of structure: confirmed only when price breaches the most recent swing high/low.
2. Market Environments
A. Momentum (Trending)
Price consistently breaks through levels and continues in one direction.✅ Best for breakouts❌ Worst for reversals
B. Mean-Reverting (Ranging)
Price repeatedly bounces between similar highs/lows.✅ Best for reversals
❌ Worst for breakouts#btc #bitcoin
1️⃣→ Bet on a breakout (Momentum).
2️⃣→ Bet on a bounce (Mean reversion).
3️⃣→ Take no trade.
As a Trader you have to get used to picking Option 3... a lot.
Before jumping into a trade it can be quite helpful to have a little bit of context.
Looking at the current Market Structure is a good place to start.
🐂Bullish Market Structure: higher highs and higher lows.🐻Bearish Market Structure: lower lows and lower highs.
Break in Market Structure
Just because price currently has Bullish Structure doesn't mean that it will just go up forever.
There are going to be times where the structure "breaks" and price can potentially turn around and start moving in another direction.
Just because a Lower High comes in does NOT mean the structure has broken yetThe structure is only broken when the Lower Low comes in.A Lower Low = the break of the most recent swing low that was formed.Just because a Higher Low comes in does NOT mean the structure has broken yet.The structure is only broken when the Higher High comes in.A Higher High = the breach of the most recent swing high that was formed.
Mean-Reverting Markets (ranging)
When the direction of price isn't clear because it just keeps reversing from the same highs/lows over and over again, this is a Mean Reverting Environment.
This type of environment is:
✅the BEST for trading reversals❌the WORST for trading breakouts
Momentum Markets (trending)
When the Market Structure of a move appears to be Bullish or Bearish for a consistently long duration, then you're looking at Trending Price Action.
Common characteristic of strong Trending Price Action:
Price hits a resistance and then effortlessly breaks through it, drifting to the next resistance.Then when it reaches the next level, it breaks through that again and the cycle continues.
This type of environment is:
✅the BEST for trading breakouts❌the WORST for trading reversals
📝Summary Lesson :
Every trade fits one of three decisions:
1️⃣→ Bet on a breakout (momentum).
2️⃣→ Bet on a bounce (mean reversion).
3️⃣→ Take no trade.
Your job as a Trader: identify the environment and choose the option
1. Market Structure
Bullish: higher highs + higher lowsBearish: lower lows + lower highsBreak of structure: confirmed only when price breaches the most recent swing high/low.
2. Market Environments
A. Momentum (Trending)
Price consistently breaks through levels and continues in one direction.✅ Best for breakouts❌ Worst for reversals
B. Mean-Reverting (Ranging)
Price repeatedly bounces between similar highs/lows.✅ Best for reversals
❌ Worst for breakouts#btc #bitcoin
16
6
71
10.2k
·
--
Bullish
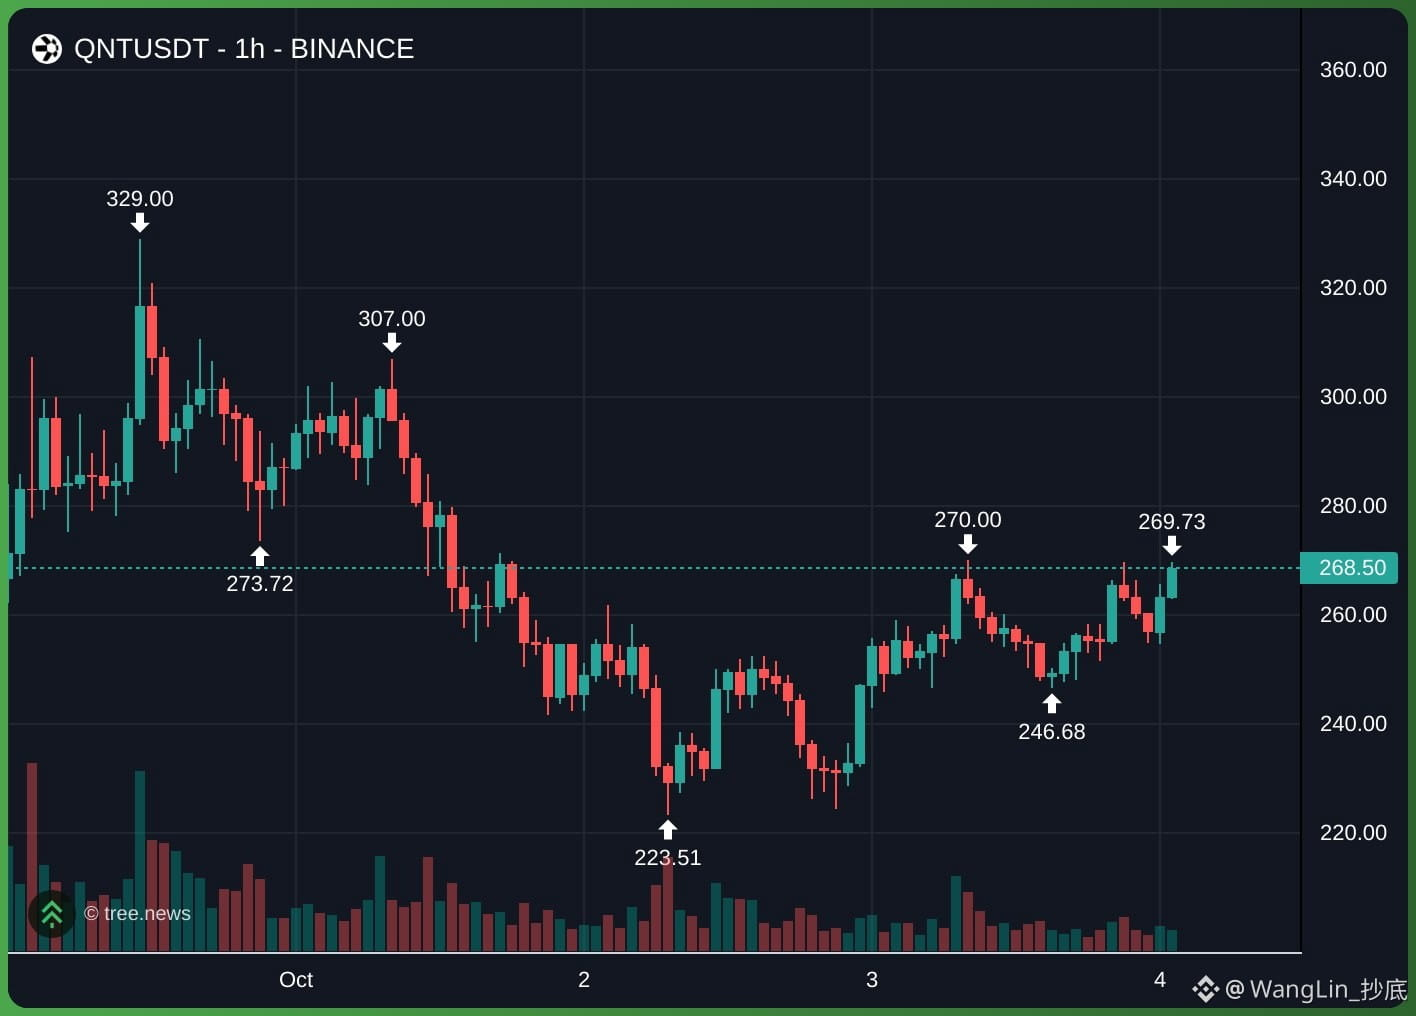
$QNT has already formed a solid bottom at 224. It is now forming a higher low (224 → 247 → current 269). The market is currently testing the key resistance zone at 270. A break above this level is needed to confirm a shift in momentum.
· Recent price action shows that after a sharp sell-off, buyers have stepped back in, but the market remains cautious near the 270 resistance area. A clear breakout or rejection here will determine the next major move.
🟢 Long scenario (preferred)
· Rationale: The market is recovering from a major swing low (224). A higher low is forming on the 1-hour chart, indicating strong buyer strength.
· $QNT long entry: pull back to 250–255 or break and close above 270 with bullish confirmation
· Stop loss: below 225
· Take profit:
· TP1: 300
· TP2: 330
🔴 Short scenario (alternative)
· Rationale: The 270 area is a strong resistance zone (previous local highs were at 270 and 269). If the price is rejected here on strong volume, it may pull back to lower support zones.
· $QNT short entry: after confirmation that 270 is rejected
· Stop loss: above 280
· Take profit:
· TP1: 247
· TP2: 224
· TP3: 200
Support me—trade right here👇
{future}(QNTUSDT)
#qnt #quant
$QNT has already formed a solid bottom at 224. It is now forming a higher low (224 → 247 → current 269). The market is currently testing the key resistance zone at 270. A break above this level is needed to confirm a shift in momentum.
· Recent price action shows that after a sharp sell-off, buyers have stepped back in, but the market remains cautious near the 270 resistance area. A clear breakout or rejection here will determine the next major move.
🟢 Long scenario (preferred)
· Rationale: The market is recovering from a major swing low (224). A higher low is forming on the 1-hour chart, indicating strong buyer strength.
· $QNT long entry: pull back to 250–255 or break and close above 270 with bullish confirmation
· Stop loss: below 225
· Take profit:
· TP1: 300
· TP2: 330
🔴 Short scenario (alternative)
· Rationale: The 270 area is a strong resistance zone (previous local highs were at 270 and 269). If the price is rejected here on strong volume, it may pull back to lower support zones.
· $QNT short entry: after confirmation that 270 is rejected
· Stop loss: above 280
· Take profit:
· TP1: 247
· TP2: 224
· TP3: 200
Support me—trade right here👇
#qnt #quant
· Recent price action shows that after a sharp sell-off, buyers have stepped back in, but the market remains cautious near the 270 resistance area. A clear breakout or rejection here will determine the next major move.
🟢 Long scenario (preferred)
· Rationale: The market is recovering from a major swing low (224). A higher low is forming on the 1-hour chart, indicating strong buyer strength.
· $QNT long entry: pull back to 250–255 or break and close above 270 with bullish confirmation
· Stop loss: below 225
· Take profit:
· TP1: 300
· TP2: 330
🔴 Short scenario (alternative)
· Rationale: The 270 area is a strong resistance zone (previous local highs were at 270 and 269). If the price is rejected here on strong volume, it may pull back to lower support zones.
· $QNT short entry: after confirmation that 270 is rejected
· Stop loss: above 280
· Take profit:
· TP1: 247
· TP2: 224
· TP3: 200
Support me—trade right here👇
#qnt #quant
4
1.7k
·
--
Bearish
WangLin_抄底
·
--
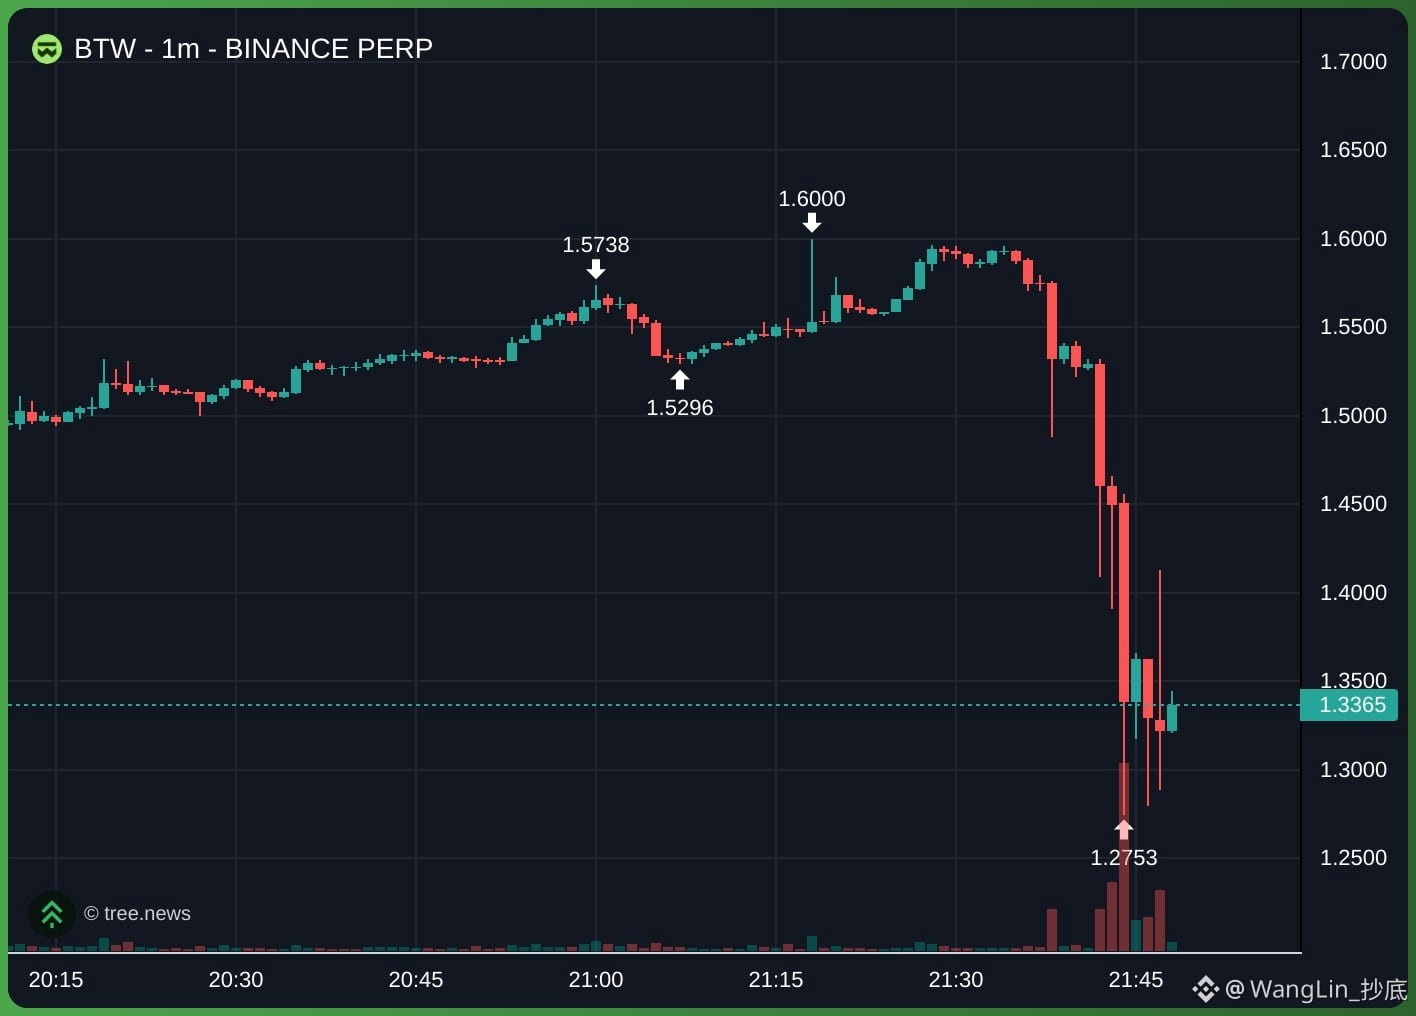
$BTW Overall trend is bullish.
· Short term (1H): Neutral. Currently consolidating in a range between 1.35 and 1.49, indicating indecision in the market with relatively high volatility.
🚀 Trading scenarios
🟢 $BTW Long scenarios
· Long entry: 1.38 - 1.40 (backtest the recent breakout zone)
· Stop loss (SL): Below 1.32
· Take profit (TP): 1.49 (recent high), 1.55 (next major resistance level)
⚠️ The 1.25 level is a key structural support for the 4-hour trend; a breakdown below it will invalidate the medium-term bullish trend
$BTW Short scenarios
· Rationale: If the resistance zone at 1.45 - 1.49 holds, it may form lower highs and lead to a deeper pullback
· Short entry: 1.47 - 1.49 (short at highs near resistance)
· Stop loss (SL): Above 1.52 (recent swing high)
· Take profit (TP): 1.35 (mid-range support), 1.28 (major swing low)
Support me and trade right here👇
#btw #bitway
· Short term (1H): Neutral. Currently consolidating in a range between 1.35 and 1.49, indicating indecision in the market with relatively high volatility.
🚀 Trading scenarios
🟢 $BTW Long scenarios
· Long entry: 1.38 - 1.40 (backtest the recent breakout zone)
· Stop loss (SL): Below 1.32
· Take profit (TP): 1.49 (recent high), 1.55 (next major resistance level)
⚠️ The 1.25 level is a key structural support for the 4-hour trend; a breakdown below it will invalidate the medium-term bullish trend
$BTW Short scenarios
· Rationale: If the resistance zone at 1.45 - 1.49 holds, it may form lower highs and lead to a deeper pullback
· Short entry: 1.47 - 1.49 (short at highs near resistance)
· Stop loss (SL): Above 1.52 (recent swing high)
· Take profit (TP): 1.35 (mid-range support), 1.28 (major swing low)
Support me and trade right here👇
#btw #bitway
1.2k
·
--
Bullish
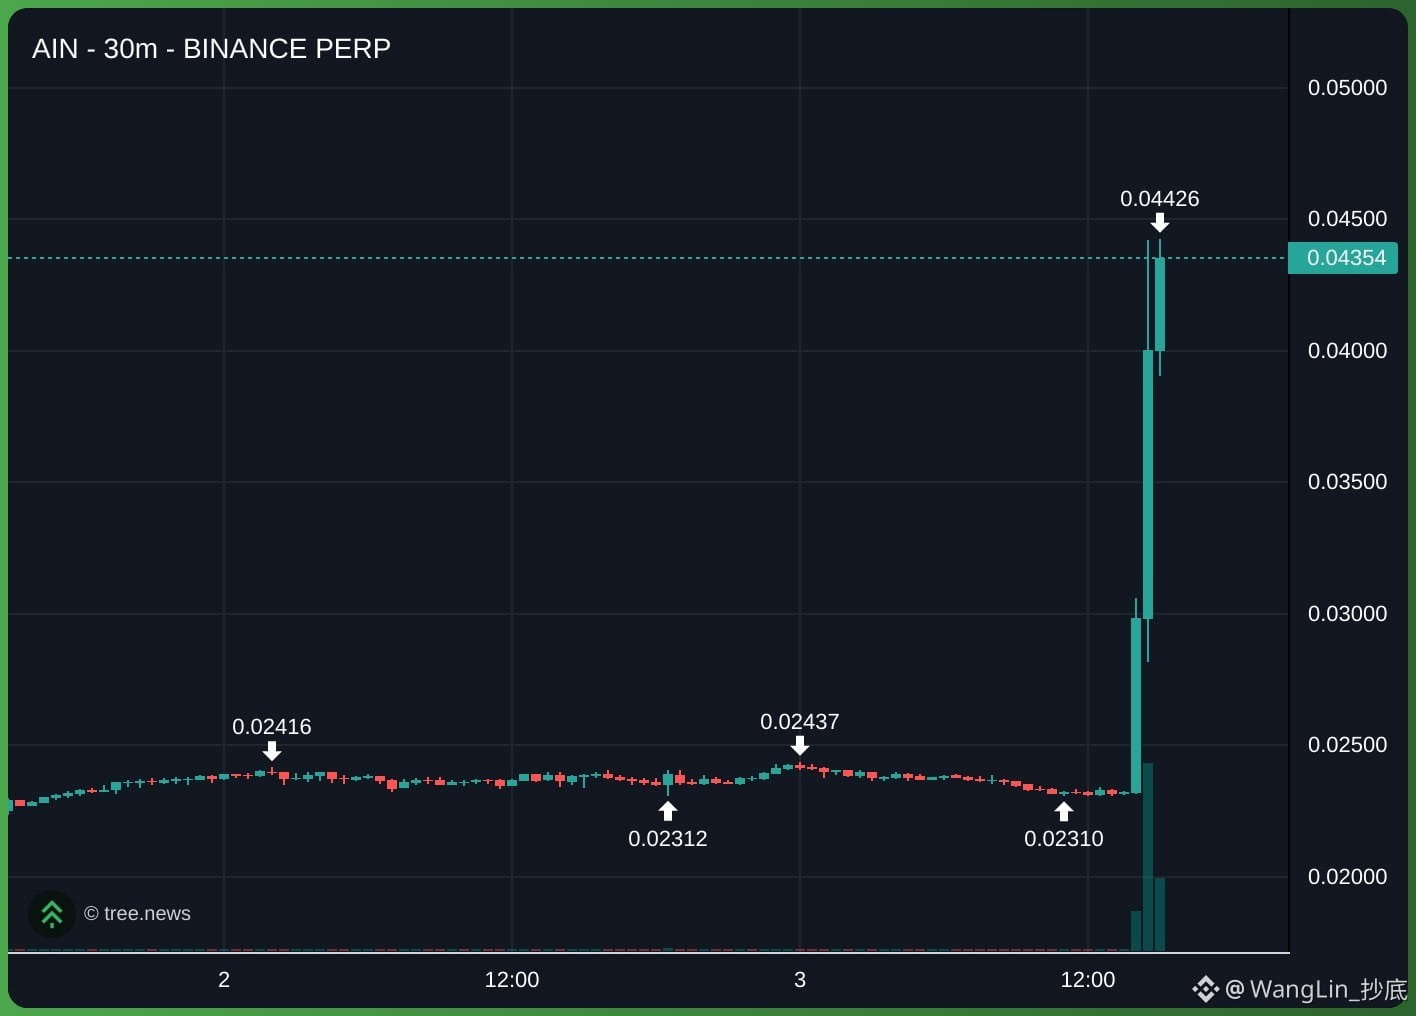
$AIN strongly bullish. The price action is severely overextended and may trigger a short squeeze.
Currently, the price is consolidating near the peak (0.043 - 0.044).
🟢 $AIN long setup
· Long entry: Look for a pullback into the 0.035 - 0.038 zone (a 30%-50% retracement of the recent rally). If you see a deeper wick/pin to 0.030, that is also a high-probability entry point.
· Stop loss: below 0.025
· Take profit:
· TP1: 0.044 (recent high)
· TP2: 0.050 (psychological resistance level)
· TP3: 0.055
If you support me, trade right here👇
{future}(AINUSDT)
#ain #InfinityGround
$AIN strongly bullish. The price action is severely overextended and may trigger a short squeeze.
Currently, the price is consolidating near the peak (0.043 - 0.044).
🟢 $AIN long setup
· Long entry: Look for a pullback into the 0.035 - 0.038 zone (a 30%-50% retracement of the recent rally). If you see a deeper wick/pin to 0.030, that is also a high-probability entry point.
· Stop loss: below 0.025
· Take profit:
· TP1: 0.044 (recent high)
· TP2: 0.050 (psychological resistance level)
· TP3: 0.055
If you support me, trade right here👇
#ain #InfinityGround
Currently, the price is consolidating near the peak (0.043 - 0.044).
🟢 $AIN long setup
· Long entry: Look for a pullback into the 0.035 - 0.038 zone (a 30%-50% retracement of the recent rally). If you see a deeper wick/pin to 0.030, that is also a high-probability entry point.
· Stop loss: below 0.025
· Take profit:
· TP1: 0.044 (recent high)
· TP2: 0.050 (psychological resistance level)
· TP3: 0.055
If you support me, trade right here👇
#ain #InfinityGround
1
1.2k
·
--
Bearish
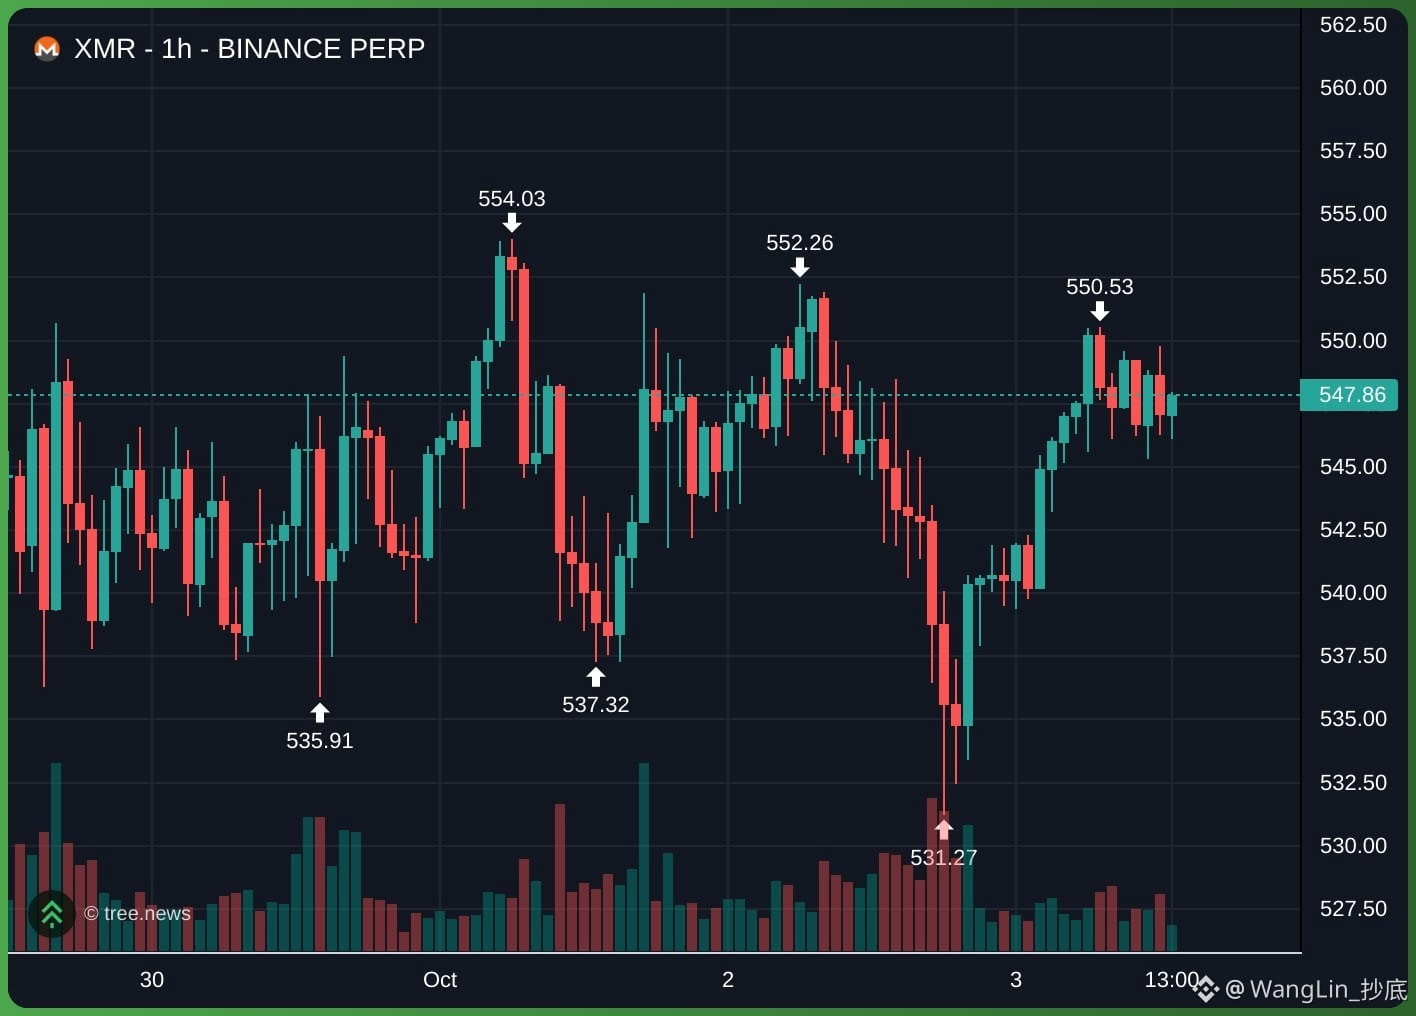
$XMR Overall structure is bearish. The asset is in a clear downtrend, forming lower highs from the 637 peak down to the 554 level.
· 🟡 Short-term (1 hour): The recent rebound from 531 is currently an oversold bounce within this larger bearish channel. The main resistance zones are at 554 and 583.
🎯 Trading Plan
🔴 $XMR Short setup (preferred)
· Rationale: The 4-hour macro trend is bearish, and the 1-hour rebound is approaching a strong resistance area (554).
· Entry short: 550 - 554 (looking for rejection from this resistance or a failed breakout)
· Stop loss (SL): Above 561 (recent local high)
· Take profit (TP): 540, 532, 525
🟢 $XMR Long setup (secondary)
· Rationale: A valid long would only be triggered if the price breaks through and holds above the 554 resistance level, shifting the macro trend to neutral. Otherwise, a deeper pullback into the structural support zone is needed for a safer entry.
· Entry long: 532 - 535 (deep retracement)
· Stop loss (SL): Below 520 (recent structural support)
· Take profit (TP): 565, 575, 583
If you support me, trade right here👇
{future}(XMRUSDT)
#xmr #monero
$XMR Overall structure is bearish. The asset is in a clear downtrend, forming lower highs from the 637 peak down to the 554 level.
· 🟡 Short-term (1 hour): The recent rebound from 531 is currently an oversold bounce within this larger bearish channel. The main resistance zones are at 554 and 583.
🎯 Trading Plan
🔴 $XMR Short setup (preferred)
· Rationale: The 4-hour macro trend is bearish, and the 1-hour rebound is approaching a strong resistance area (554).
· Entry short: 550 - 554 (looking for rejection from this resistance or a failed breakout)
· Stop loss (SL): Above 561 (recent local high)
· Take profit (TP): 540, 532, 525
🟢 $XMR Long setup (secondary)
· Rationale: A valid long would only be triggered if the price breaks through and holds above the 554 resistance level, shifting the macro trend to neutral. Otherwise, a deeper pullback into the structural support zone is needed for a safer entry.
· Entry long: 532 - 535 (deep retracement)
· Stop loss (SL): Below 520 (recent structural support)
· Take profit (TP): 565, 575, 583
If you support me, trade right here👇
#xmr #monero
· 🟡 Short-term (1 hour): The recent rebound from 531 is currently an oversold bounce within this larger bearish channel. The main resistance zones are at 554 and 583.
🎯 Trading Plan
🔴 $XMR Short setup (preferred)
· Rationale: The 4-hour macro trend is bearish, and the 1-hour rebound is approaching a strong resistance area (554).
· Entry short: 550 - 554 (looking for rejection from this resistance or a failed breakout)
· Stop loss (SL): Above 561 (recent local high)
· Take profit (TP): 540, 532, 525
🟢 $XMR Long setup (secondary)
· Rationale: A valid long would only be triggered if the price breaks through and holds above the 554 resistance level, shifting the macro trend to neutral. Otherwise, a deeper pullback into the structural support zone is needed for a safer entry.
· Entry long: 532 - 535 (deep retracement)
· Stop loss (SL): Below 520 (recent structural support)
· Take profit (TP): 565, 575, 583
If you support me, trade right here👇
#xmr #monero
239
·
--
Bullish
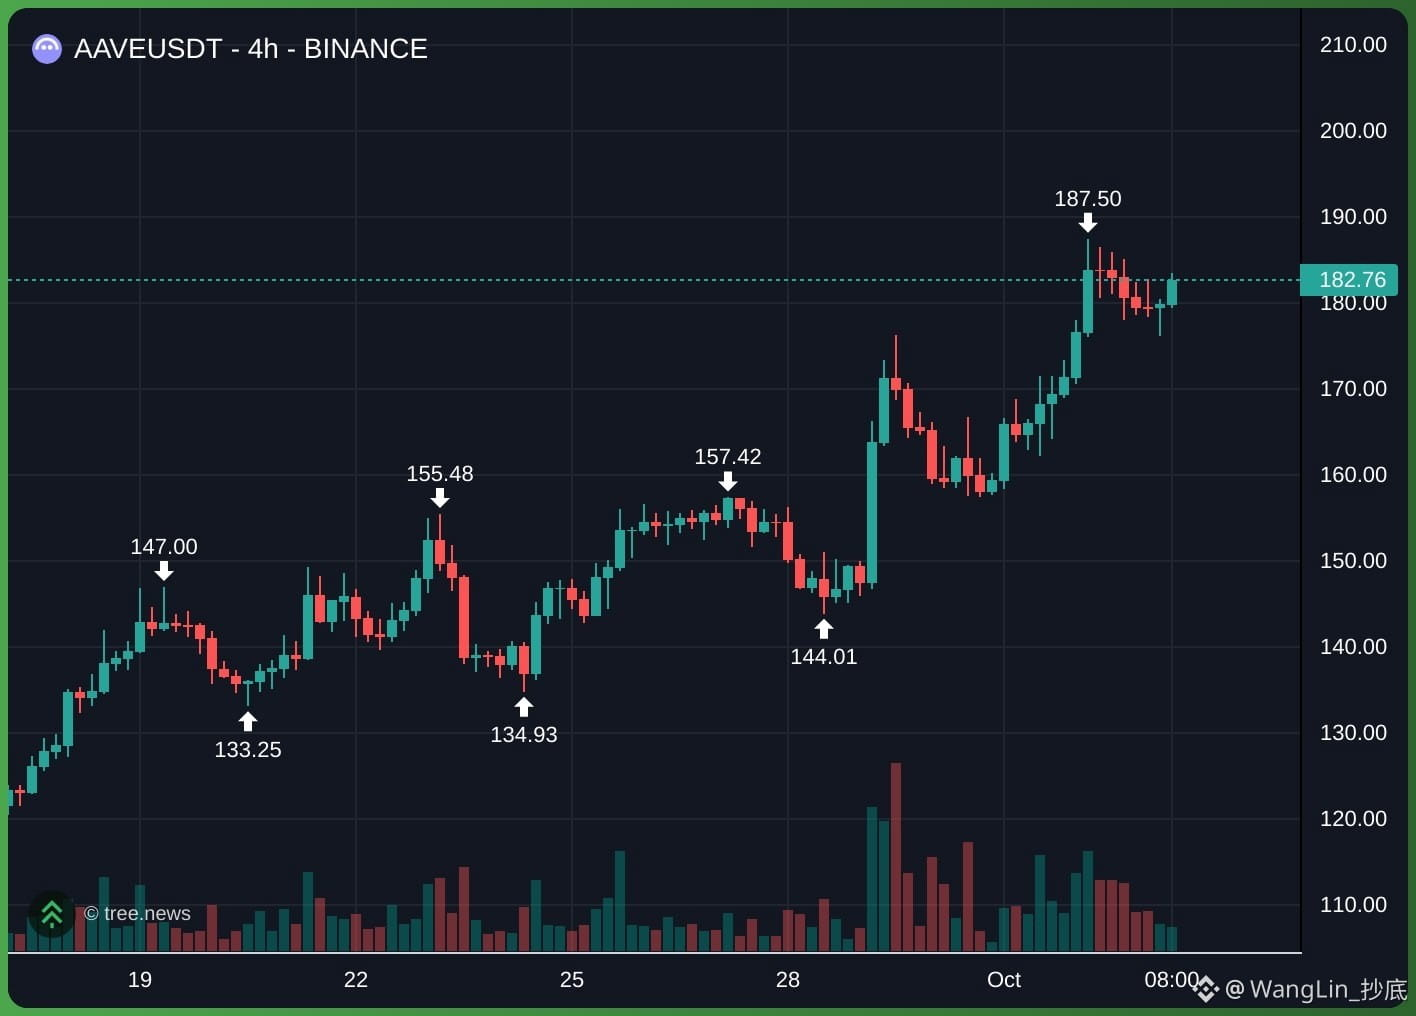
$AAVE strongly bullish. The price has formed clear higher highs (147 to 155 to 157 to 187) and higher lows (133 to 134 to 144 to 176). After touching a local high, it is currently in a healthy pullback.
· During the pullback, volume decreases, indicating a healthy correction rather than a trend reversal.
🟢 Long scenario (primary bias)
· Enter long on $AAVE : 176 - 182
· Stop loss: below 170 (recent swing low and psychological support)
· Take profit: 187 (recent high), 195 (next resistance level), 200 (major psychological level)
⚠️ Note: 170 is a key pivot level. If price breaks below 170 with strong volume, the bullish outlook will be invalidated and a deeper pullback toward 157 may follow.
🔴 Short scenario (alternative)
· Rationale: If price fails to reclaim 187 and meets strong rejection, a deeper pullback could occur, retesting lower support levels.
· Enter short on $AAVE : 186 - 187 (short on a high at the main resistance zone)
· Stop loss: above 191 (recent swing high; bearish setup invalidated)
· Take profit: 176 (recent low), 170 (immediate structural support)
If you support me, trade right here👇
{future}(AAVEUSDT)
#aave
$AAVE strongly bullish. The price has formed clear higher highs (147 to 155 to 157 to 187) and higher lows (133 to 134 to 144 to 176). After touching a local high, it is currently in a healthy pullback.
· During the pullback, volume decreases, indicating a healthy correction rather than a trend reversal.
🟢 Long scenario (primary bias)
· Enter long on $AAVE : 176 - 182
· Stop loss: below 170 (recent swing low and psychological support)
· Take profit: 187 (recent high), 195 (next resistance level), 200 (major psychological level)
⚠️ Note: 170 is a key pivot level. If price breaks below 170 with strong volume, the bullish outlook will be invalidated and a deeper pullback toward 157 may follow.
🔴 Short scenario (alternative)
· Rationale: If price fails to reclaim 187 and meets strong rejection, a deeper pullback could occur, retesting lower support levels.
· Enter short on $AAVE : 186 - 187 (short on a high at the main resistance zone)
· Stop loss: above 191 (recent swing high; bearish setup invalidated)
· Take profit: 176 (recent low), 170 (immediate structural support)
If you support me, trade right here👇
#aave
· During the pullback, volume decreases, indicating a healthy correction rather than a trend reversal.
🟢 Long scenario (primary bias)
· Enter long on $AAVE : 176 - 182
· Stop loss: below 170 (recent swing low and psychological support)
· Take profit: 187 (recent high), 195 (next resistance level), 200 (major psychological level)
⚠️ Note: 170 is a key pivot level. If price breaks below 170 with strong volume, the bullish outlook will be invalidated and a deeper pullback toward 157 may follow.
🔴 Short scenario (alternative)
· Rationale: If price fails to reclaim 187 and meets strong rejection, a deeper pullback could occur, retesting lower support levels.
· Enter short on $AAVE : 186 - 187 (short on a high at the main resistance zone)
· Stop loss: above 191 (recent swing high; bearish setup invalidated)
· Take profit: 176 (recent low), 170 (immediate structural support)
If you support me, trade right here👇
#aave
1
688
·
--
Bullish
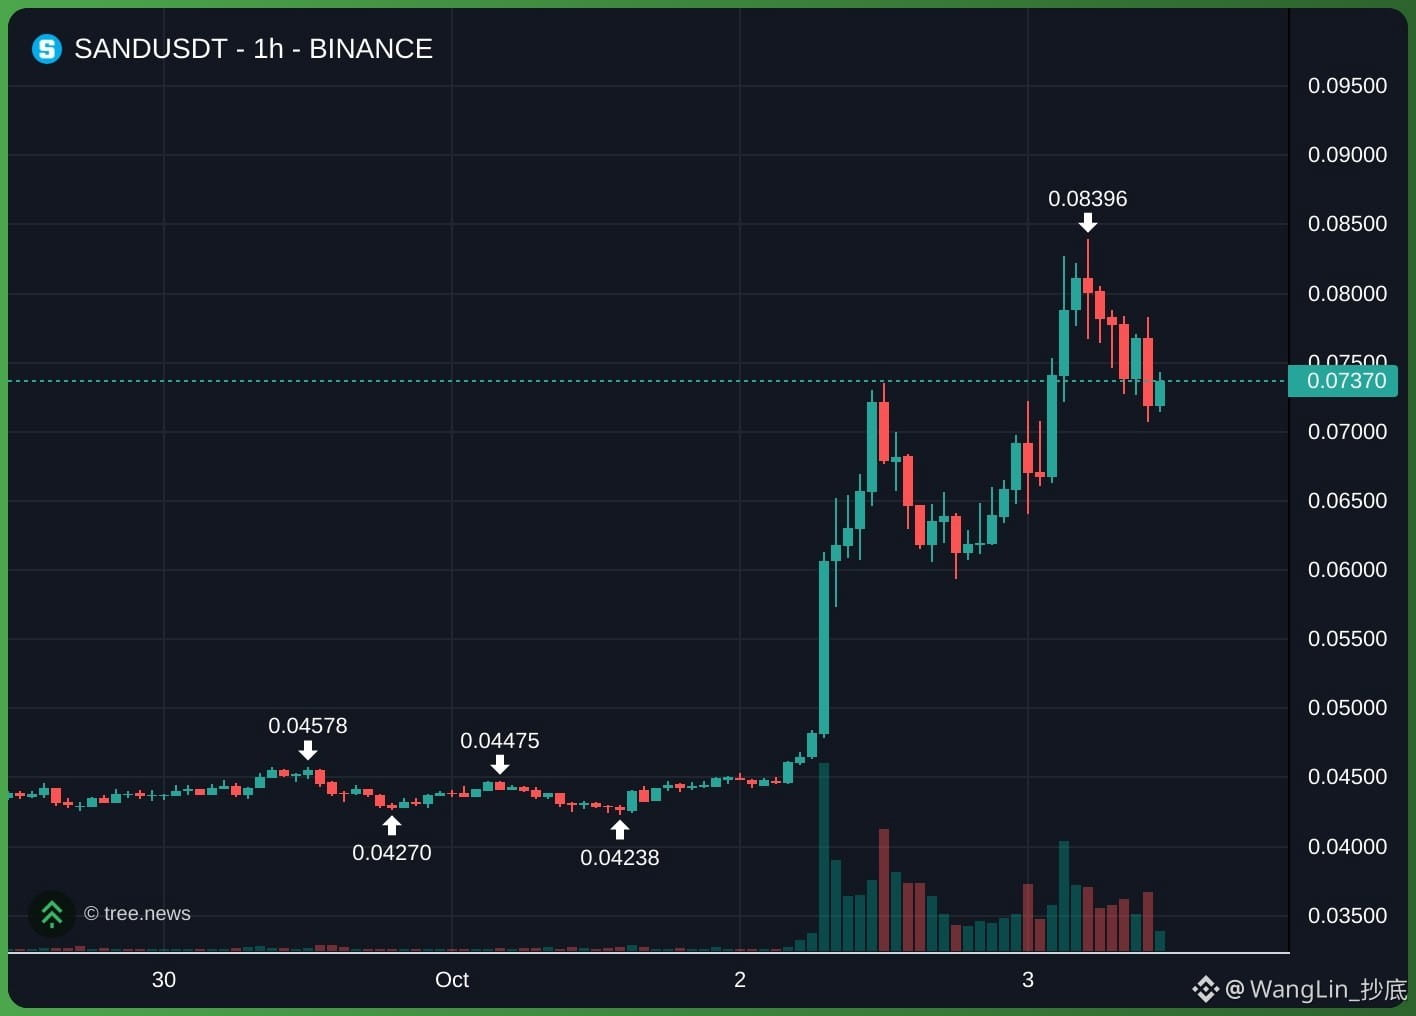
$SAND Macro trends are strong and bullish. We are currently in a healthy pullback and consolidation phase.
· Short term (1H): The trend is bearish to neutral. It is currently consolidating around 0.073, indicating that the downside momentum is slowing.
🚀 Trading Scenarios
🟢 $SAND Long scenario (primary bias)
· Rationale: Align with the dominant 4-hour macro uptrend.
· Long entry: 0.070 - 0.073
· Stop loss: below 0.060 (immediate structural support)
· Take profit: 0.080 (local resistance), 0.084 (recent high)
⚠️ Note: 0.060 is a key pivot level. If the price strongly breaks below 0.060, the mid-term bullish outlook will be invalidated, and a deeper pullback may follow.
🔴 $SAND Short scenario (alternative)
· Rationale: If the price fails to hold the psychological level at 0.070, it may confirm a deeper pullback and potentially fill the downside gap below the pre-breakout region.
· Short entry: 0.075 - 0.078 (short on a rebound if resistance is rejected)
· Stop loss: above 0.082 (recent swing high)
· Take profit: 0.069 (recent low), 0.060 (major structural support)
If you support me, trade directly here 👇
{future}(SANDUSDT)
#sand #sandbox
$SAND Macro trends are strong and bullish. We are currently in a healthy pullback and consolidation phase.
· Short term (1H): The trend is bearish to neutral. It is currently consolidating around 0.073, indicating that the downside momentum is slowing.
🚀 Trading Scenarios
🟢 $SAND Long scenario (primary bias)
· Rationale: Align with the dominant 4-hour macro uptrend.
· Long entry: 0.070 - 0.073
· Stop loss: below 0.060 (immediate structural support)
· Take profit: 0.080 (local resistance), 0.084 (recent high)
⚠️ Note: 0.060 is a key pivot level. If the price strongly breaks below 0.060, the mid-term bullish outlook will be invalidated, and a deeper pullback may follow.
🔴 $SAND Short scenario (alternative)
· Rationale: If the price fails to hold the psychological level at 0.070, it may confirm a deeper pullback and potentially fill the downside gap below the pre-breakout region.
· Short entry: 0.075 - 0.078 (short on a rebound if resistance is rejected)
· Stop loss: above 0.082 (recent swing high)
· Take profit: 0.069 (recent low), 0.060 (major structural support)
If you support me, trade directly here 👇
#sand #sandbox
· Short term (1H): The trend is bearish to neutral. It is currently consolidating around 0.073, indicating that the downside momentum is slowing.
🚀 Trading Scenarios
🟢 $SAND Long scenario (primary bias)
· Rationale: Align with the dominant 4-hour macro uptrend.
· Long entry: 0.070 - 0.073
· Stop loss: below 0.060 (immediate structural support)
· Take profit: 0.080 (local resistance), 0.084 (recent high)
⚠️ Note: 0.060 is a key pivot level. If the price strongly breaks below 0.060, the mid-term bullish outlook will be invalidated, and a deeper pullback may follow.
🔴 $SAND Short scenario (alternative)
· Rationale: If the price fails to hold the psychological level at 0.070, it may confirm a deeper pullback and potentially fill the downside gap below the pre-breakout region.
· Short entry: 0.075 - 0.078 (short on a rebound if resistance is rejected)
· Stop loss: above 0.082 (recent swing high)
· Take profit: 0.069 (recent low), 0.060 (major structural support)
If you support me, trade directly here 👇
#sand #sandbox
703
·
--
Bullish
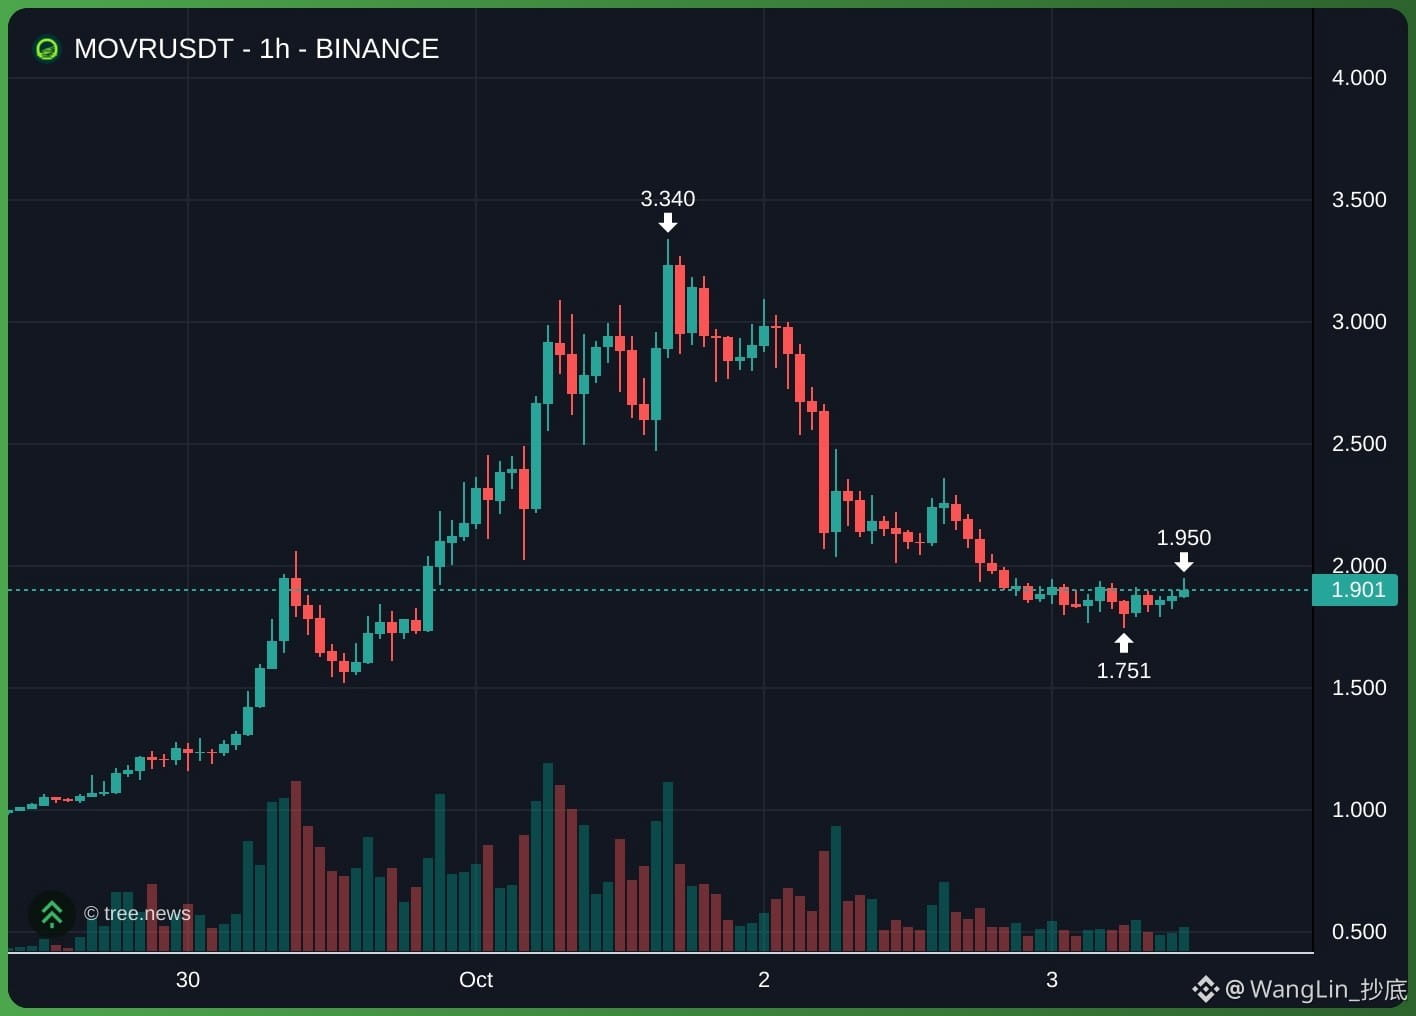
$MOVR Macro Trend Still Looks Bullish
· Short Term (1H): The trend is bearish to neutral. It is currently consolidating around 1.9, indicating that downward momentum is slowing.
🚀 Trading Scenarios
🟢 $MOVR Long Scenario (Main Bias)
· Rationale: Aligns with the dominant 4-hour macro uptrend.
· Long entry: 1.8 - 1.9
· Stop loss: Below 1.6 (recent swing low)
· Take profit: 2.3, 2.7 (next resistance zones)
⚠️ Note: The 1.6 level is a key pivot. If the price breaks below 1.6 with volume, the mid-term bullish outlook will be invalidated and a deeper pullback may follow.
🔴 $MOVR Short Scenario (Alternative)
· Rationale: If the price fails to reclaim the psychological level of 2.0, it may form a lower high and continue the bearish retracement.
· Short entry: 1.9 - 2.0 (if rejection occurs, short on the rebound)
· Stop loss: Above 2.1 (recent swing high)
· Take profit: 1.7 (recent low), 1.4 (next structural level)
If you’re with me, trade right here👇
{future}(MOVRUSDT)
#movr #moonriver
$MOVR Macro Trend Still Looks Bullish
· Short Term (1H): The trend is bearish to neutral. It is currently consolidating around 1.9, indicating that downward momentum is slowing.
🚀 Trading Scenarios
🟢 $MOVR Long Scenario (Main Bias)
· Rationale: Aligns with the dominant 4-hour macro uptrend.
· Long entry: 1.8 - 1.9
· Stop loss: Below 1.6 (recent swing low)
· Take profit: 2.3, 2.7 (next resistance zones)
⚠️ Note: The 1.6 level is a key pivot. If the price breaks below 1.6 with volume, the mid-term bullish outlook will be invalidated and a deeper pullback may follow.
🔴 $MOVR Short Scenario (Alternative)
· Rationale: If the price fails to reclaim the psychological level of 2.0, it may form a lower high and continue the bearish retracement.
· Short entry: 1.9 - 2.0 (if rejection occurs, short on the rebound)
· Stop loss: Above 2.1 (recent swing high)
· Take profit: 1.7 (recent low), 1.4 (next structural level)
If you’re with me, trade right here👇
#movr #moonriver
· Short Term (1H): The trend is bearish to neutral. It is currently consolidating around 1.9, indicating that downward momentum is slowing.
🚀 Trading Scenarios
🟢 $MOVR Long Scenario (Main Bias)
· Rationale: Aligns with the dominant 4-hour macro uptrend.
· Long entry: 1.8 - 1.9
· Stop loss: Below 1.6 (recent swing low)
· Take profit: 2.3, 2.7 (next resistance zones)
⚠️ Note: The 1.6 level is a key pivot. If the price breaks below 1.6 with volume, the mid-term bullish outlook will be invalidated and a deeper pullback may follow.
🔴 $MOVR Short Scenario (Alternative)
· Rationale: If the price fails to reclaim the psychological level of 2.0, it may form a lower high and continue the bearish retracement.
· Short entry: 1.9 - 2.0 (if rejection occurs, short on the rebound)
· Stop loss: Above 2.1 (recent swing high)
· Take profit: 1.7 (recent low), 1.4 (next structural level)
If you’re with me, trade right here👇
#movr #moonriver
922
·
--
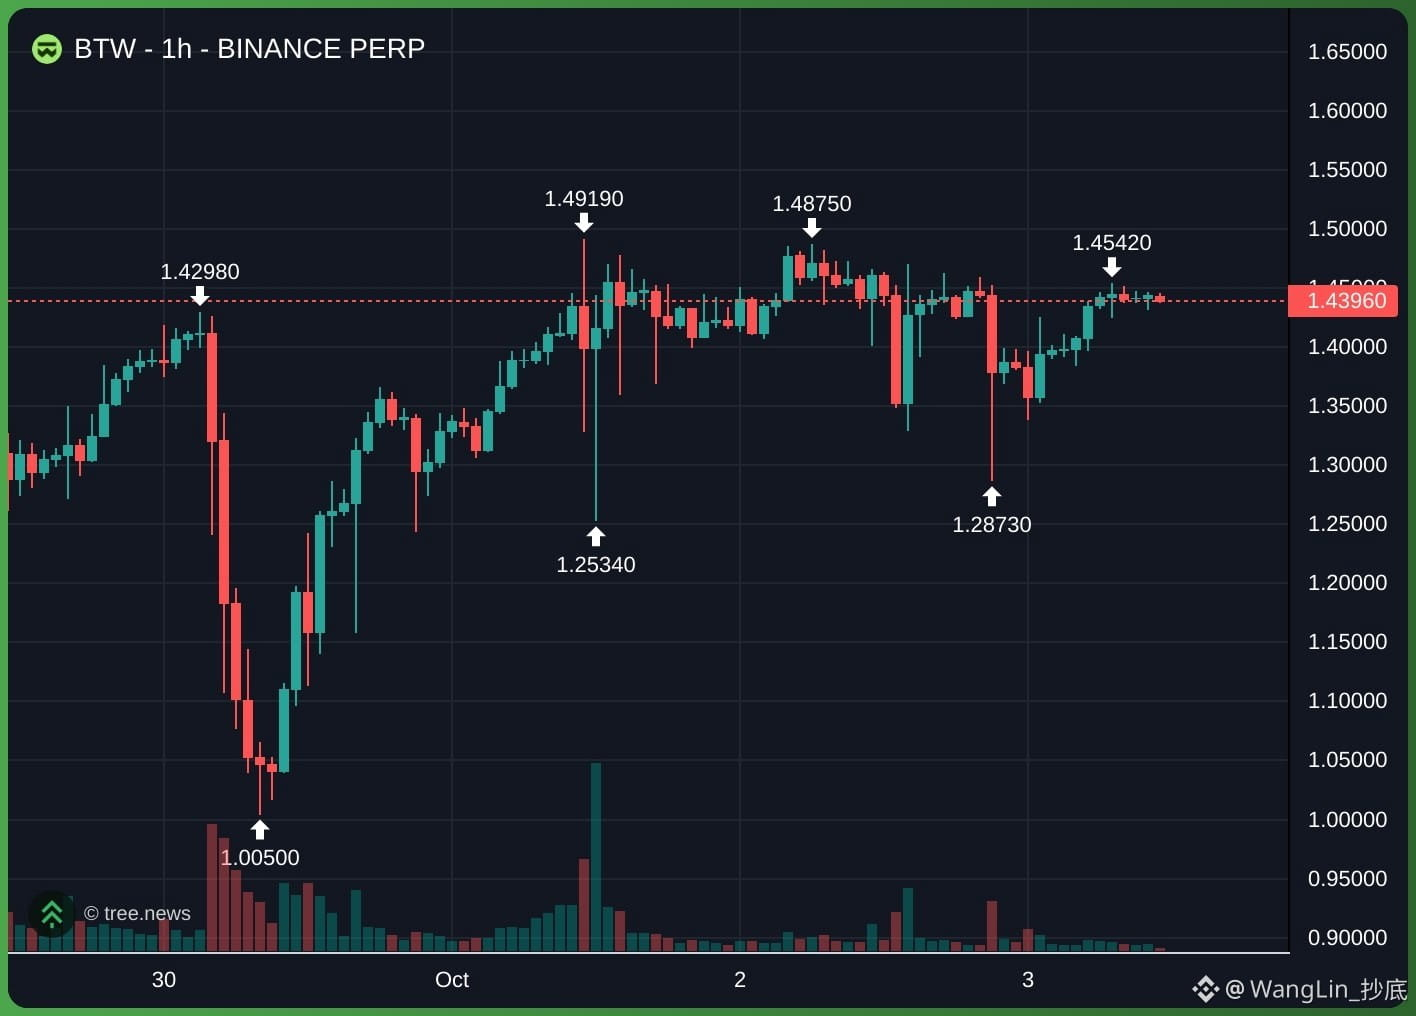
$BTW Overall trend is bullish.
· Short term (1H): Neutral. Currently consolidating in a range between 1.35 and 1.49, indicating indecision in the market with relatively high volatility.
🚀 Trading scenarios
🟢 $BTW Long scenarios
· Long entry: 1.38 - 1.40 (backtest the recent breakout zone)
· Stop loss (SL): Below 1.32
· Take profit (TP): 1.49 (recent high), 1.55 (next major resistance level)
⚠️ The 1.25 level is a key structural support for the 4-hour trend; a breakdown below it will invalidate the medium-term bullish trend
$BTW Short scenarios
· Rationale: If the resistance zone at 1.45 - 1.49 holds, it may form lower highs and lead to a deeper pullback
· Short entry: 1.47 - 1.49 (short at highs near resistance)
· Stop loss (SL): Above 1.52 (recent swing high)
· Take profit (TP): 1.35 (mid-range support), 1.28 (major swing low)
Support me and trade right here👇
{future}(BTWUSDT)
#btw #bitway
$BTW Overall trend is bullish.
· Short term (1H): Neutral. Currently consolidating in a range between 1.35 and 1.49, indicating indecision in the market with relatively high volatility.
🚀 Trading scenarios
🟢 $BTW Long scenarios
· Long entry: 1.38 - 1.40 (backtest the recent breakout zone)
· Stop loss (SL): Below 1.32
· Take profit (TP): 1.49 (recent high), 1.55 (next major resistance level)
⚠️ The 1.25 level is a key structural support for the 4-hour trend; a breakdown below it will invalidate the medium-term bullish trend
$BTW Short scenarios
· Rationale: If the resistance zone at 1.45 - 1.49 holds, it may form lower highs and lead to a deeper pullback
· Short entry: 1.47 - 1.49 (short at highs near resistance)
· Stop loss (SL): Above 1.52 (recent swing high)
· Take profit (TP): 1.35 (mid-range support), 1.28 (major swing low)
Support me and trade right here👇
#btw #bitway
· Short term (1H): Neutral. Currently consolidating in a range between 1.35 and 1.49, indicating indecision in the market with relatively high volatility.
🚀 Trading scenarios
🟢 $BTW Long scenarios
· Long entry: 1.38 - 1.40 (backtest the recent breakout zone)
· Stop loss (SL): Below 1.32
· Take profit (TP): 1.49 (recent high), 1.55 (next major resistance level)
⚠️ The 1.25 level is a key structural support for the 4-hour trend; a breakdown below it will invalidate the medium-term bullish trend
$BTW Short scenarios
· Rationale: If the resistance zone at 1.45 - 1.49 holds, it may form lower highs and lead to a deeper pullback
· Short entry: 1.47 - 1.49 (short at highs near resistance)
· Stop loss (SL): Above 1.52 (recent swing high)
· Take profit (TP): 1.35 (mid-range support), 1.28 (major swing low)
Support me and trade right here👇
#btw #bitway
1
1k
·
--
Bullish
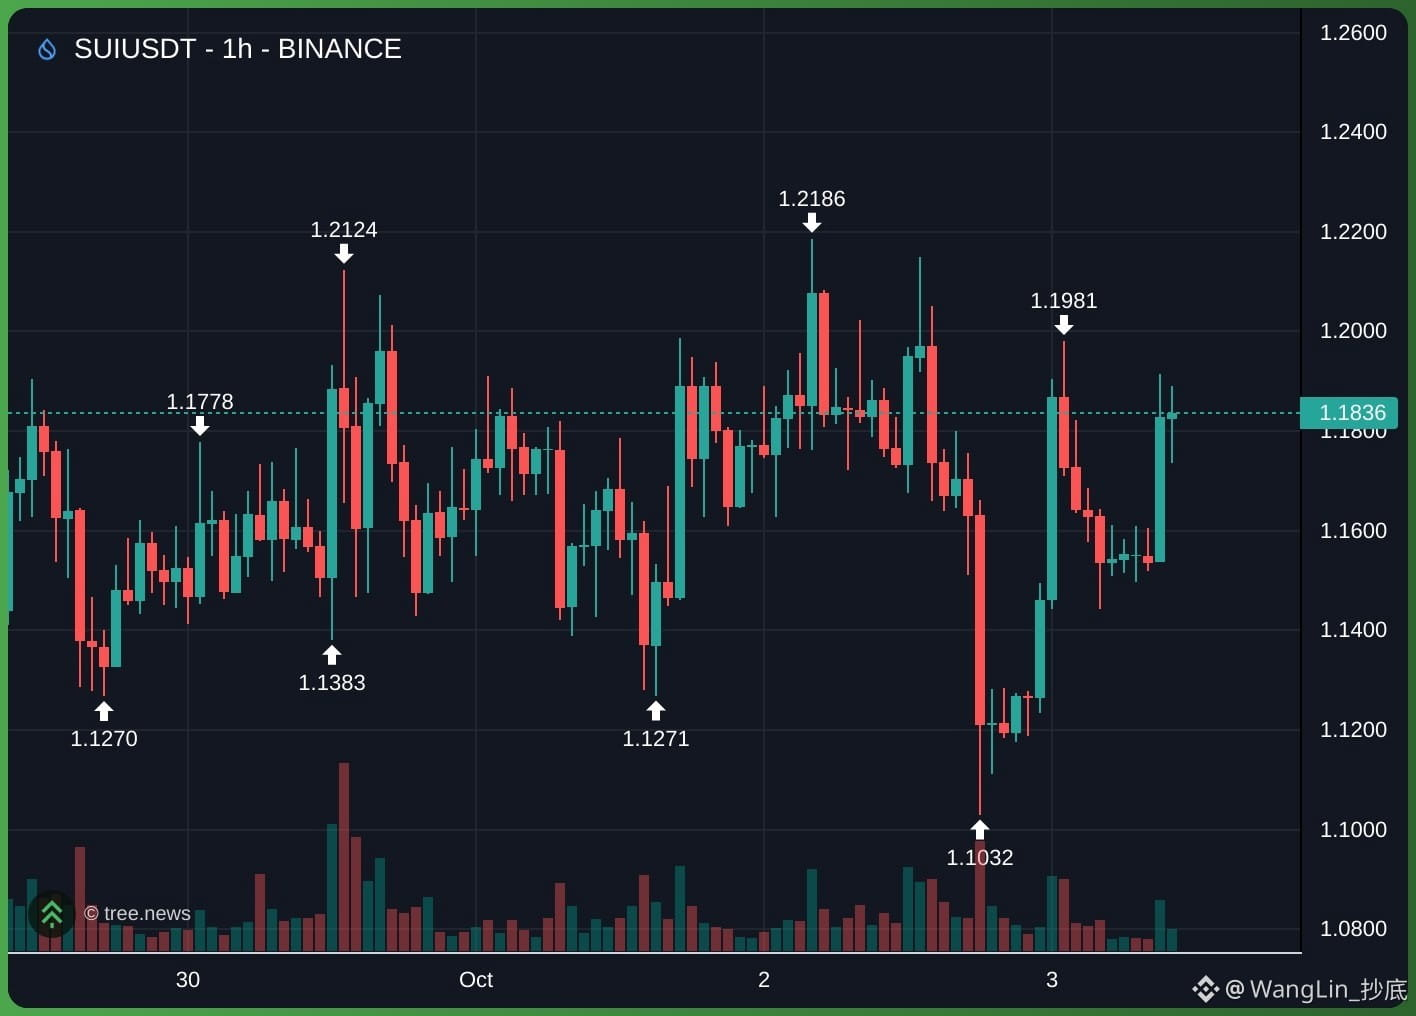
$SUI remains bullish, showing a continuous rising low sequence (0.93, 1.09, 1.10)
· Key levels: Immediate resistance at 1.21, and immediate support at 1.15 and 1.13
🚀 Long scenario (preferred)
· Long $SUI entry: 1.15 - 1.18 (slight pullback)
· Stop-loss: Below 1.07
· Take-profit:
· TP1: 1.21 (immediate resistance)
· TP2: 1.29 (local high)
· TP3: 1.35 (medium-term extension target)
🔻 Short scenario (alternative)
Logic: Counter-trend scalp. If 1.21 resistance holds, a short-term pullback may occur
· Short $SUI entry: 1.20 - 1.21 (if clear rejection appears)
· Stop-loss: Above 1.23 (recent rejection high)
· Take-profit:
· TP1: 1.15 (recent breakout zone)
· TP2: 1.10 (major swing low support)
If you support me, trade right here with me👇
{future}(SUIUSDT)
#sui
$SUI remains bullish, showing a continuous rising low sequence (0.93, 1.09, 1.10)
· Key levels: Immediate resistance at 1.21, and immediate support at 1.15 and 1.13
🚀 Long scenario (preferred)
· Long $SUI entry: 1.15 - 1.18 (slight pullback)
· Stop-loss: Below 1.07
· Take-profit:
· TP1: 1.21 (immediate resistance)
· TP2: 1.29 (local high)
· TP3: 1.35 (medium-term extension target)
🔻 Short scenario (alternative)
Logic: Counter-trend scalp. If 1.21 resistance holds, a short-term pullback may occur
· Short $SUI entry: 1.20 - 1.21 (if clear rejection appears)
· Stop-loss: Above 1.23 (recent rejection high)
· Take-profit:
· TP1: 1.15 (recent breakout zone)
· TP2: 1.10 (major swing low support)
If you support me, trade right here with me👇
#sui
· Key levels: Immediate resistance at 1.21, and immediate support at 1.15 and 1.13
🚀 Long scenario (preferred)
· Long $SUI entry: 1.15 - 1.18 (slight pullback)
· Stop-loss: Below 1.07
· Take-profit:
· TP1: 1.21 (immediate resistance)
· TP2: 1.29 (local high)
· TP3: 1.35 (medium-term extension target)
🔻 Short scenario (alternative)
Logic: Counter-trend scalp. If 1.21 resistance holds, a short-term pullback may occur
· Short $SUI entry: 1.20 - 1.21 (if clear rejection appears)
· Stop-loss: Above 1.23 (recent rejection high)
· Take-profit:
· TP1: 1.15 (recent breakout zone)
· TP2: 1.10 (major swing low support)
If you support me, trade right here with me👇
#sui
1
1.2k
·
--
Bullish
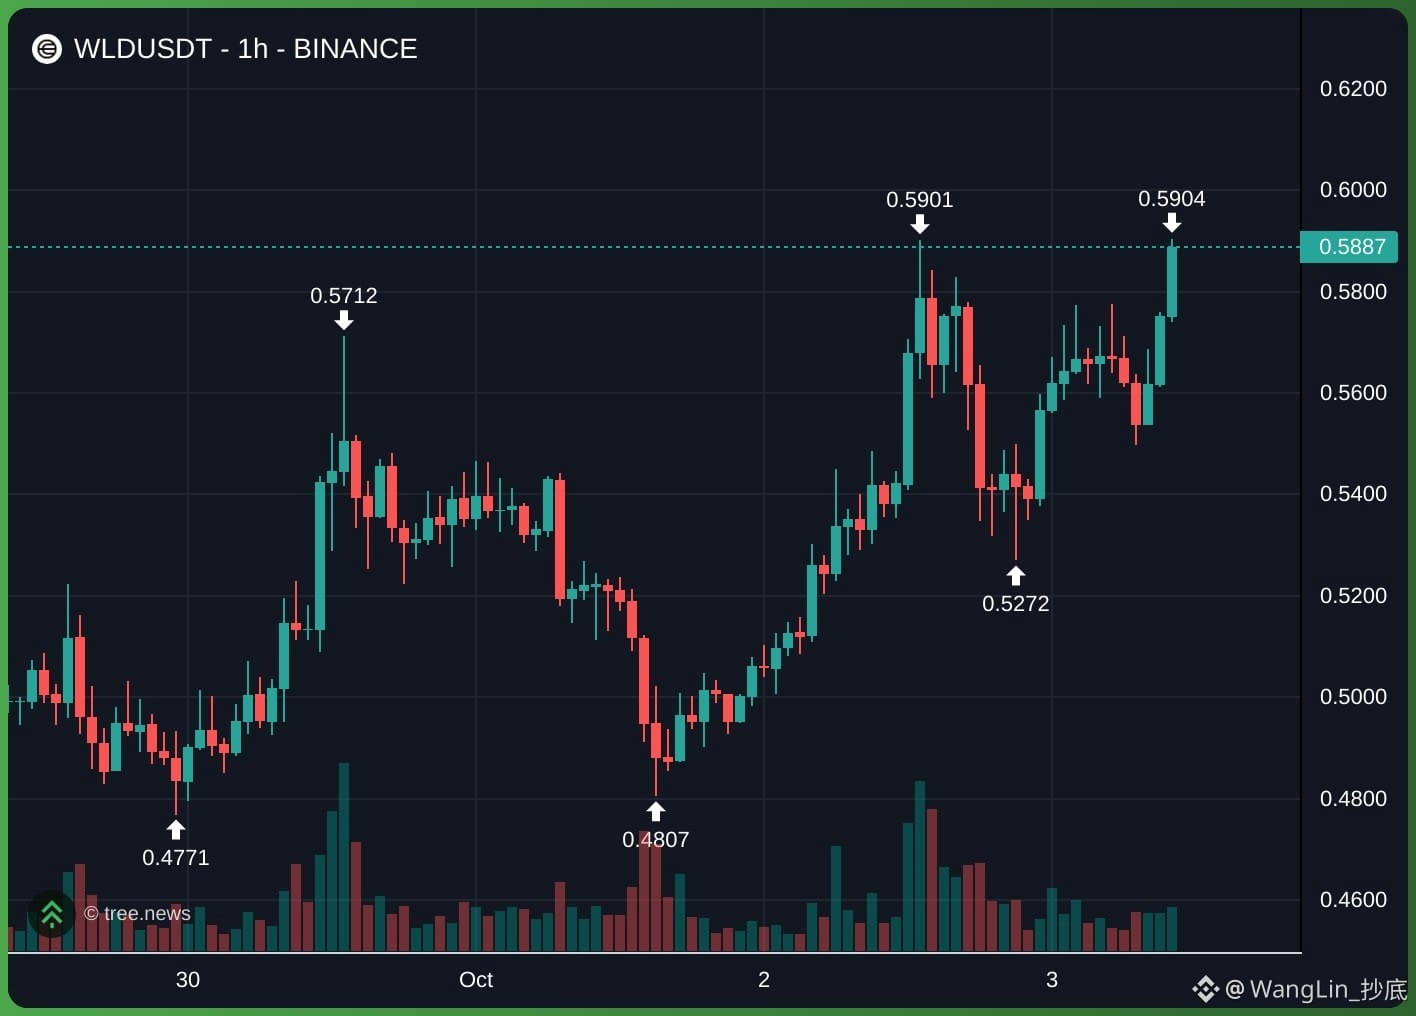
$WLD bullish. The feature is that it continues to form higher lows (0.40, 0.46, 0.52). The price is currently challenging the main resistance zone at 0.59.
· Key levels: Immediate resistance is at 0.59, while immediate support is at 0.57 and 0.55.
🚀 Long scenario (preferred)
· $WLD long entry: 0.55 - 0.58 (pullback retest)
· Stop-loss: below 0.52 (recent 1-hour swing low)
· Take-profit:
· TP1: 0.60 (psychological resistance)
· TP2: 0.63 (next supply zone)
· TP3: 0.65 (mid-term extension target)
🔻 Short scenario (high risk)
Logic: Contrarian scalping. If 0.59 resistance holds, a short-term pullback may occur.
· $WLD short entry: 0.59 - 0.60 (if clear rejection appears)
· Stop-loss: above 0.61 (recent high)
· Take-profit:
· TP1: 0.55 (recent breakout zone)
· TP2: 0.52 (swing low support)
If you support me, just trade here directly👇
{future}(WLDUSDT)
#wld #worldcoin
$WLD bullish. The feature is that it continues to form higher lows (0.40, 0.46, 0.52). The price is currently challenging the main resistance zone at 0.59.
· Key levels: Immediate resistance is at 0.59, while immediate support is at 0.57 and 0.55.
🚀 Long scenario (preferred)
· $WLD long entry: 0.55 - 0.58 (pullback retest)
· Stop-loss: below 0.52 (recent 1-hour swing low)
· Take-profit:
· TP1: 0.60 (psychological resistance)
· TP2: 0.63 (next supply zone)
· TP3: 0.65 (mid-term extension target)
🔻 Short scenario (high risk)
Logic: Contrarian scalping. If 0.59 resistance holds, a short-term pullback may occur.
· $WLD short entry: 0.59 - 0.60 (if clear rejection appears)
· Stop-loss: above 0.61 (recent high)
· Take-profit:
· TP1: 0.55 (recent breakout zone)
· TP2: 0.52 (swing low support)
If you support me, just trade here directly👇
#wld #worldcoin
· Key levels: Immediate resistance is at 0.59, while immediate support is at 0.57 and 0.55.
🚀 Long scenario (preferred)
· $WLD long entry: 0.55 - 0.58 (pullback retest)
· Stop-loss: below 0.52 (recent 1-hour swing low)
· Take-profit:
· TP1: 0.60 (psychological resistance)
· TP2: 0.63 (next supply zone)
· TP3: 0.65 (mid-term extension target)
🔻 Short scenario (high risk)
Logic: Contrarian scalping. If 0.59 resistance holds, a short-term pullback may occur.
· $WLD short entry: 0.59 - 0.60 (if clear rejection appears)
· Stop-loss: above 0.61 (recent high)
· Take-profit:
· TP1: 0.55 (recent breakout zone)
· TP2: 0.52 (swing low support)
If you support me, just trade here directly👇
#wld #worldcoin
WangLin_抄底
·
--
Bullish$WLD strong uptrend, clearly shows a series of higher highs and higher lows. Recent breakout above 0.58 confirms bullish momentum
· Current price action suggests a temporary exhaustion, making a pullback highly probable before next leg up
🎯 Trading Scenarios
🟢 $WLD LONG SCENARIO (Preferred)
· Entry: 0.54 - 0.55 (Wait for pullback to previous breakout zone and structural support)
· Stop Loss: below 0.49 (break below this level invalidates bullish structure)
· Take Profit:
· TP 1: 0.59 (Retest recent swing high)
· TP 2: 0.62 (Next psychological resistance)
🔴 SHORT SCENARIO (Alternative - Counter-Trend Scalp)
· Rationale: Catching a quick correction due to the overextended vertical move. This is highly risky as it goes against the primary trend
· Entry: 0.58 - 0.59 (If price rejects heavily at current high)
· Stop Loss: above 0.61 (breakout continuation)
· Take Profit:
· TP 1: 0.55 (Immediate structural support)
· TP 2: 0.52 (Major previous consolidation zone)
Support me just Trade here👇
#wld #worldcoin
· Current price action suggests a temporary exhaustion, making a pullback highly probable before next leg up
🎯 Trading Scenarios
🟢 $WLD LONG SCENARIO (Preferred)
· Entry: 0.54 - 0.55 (Wait for pullback to previous breakout zone and structural support)
· Stop Loss: below 0.49 (break below this level invalidates bullish structure)
· Take Profit:
· TP 1: 0.59 (Retest recent swing high)
· TP 2: 0.62 (Next psychological resistance)
🔴 SHORT SCENARIO (Alternative - Counter-Trend Scalp)
· Rationale: Catching a quick correction due to the overextended vertical move. This is highly risky as it goes against the primary trend
· Entry: 0.58 - 0.59 (If price rejects heavily at current high)
· Stop Loss: above 0.61 (breakout continuation)
· Take Profit:
· TP 1: 0.55 (Immediate structural support)
· TP 2: 0.52 (Major previous consolidation zone)
Support me just Trade here👇
#wld #worldcoin
1
1.1k
·
--
Bearish
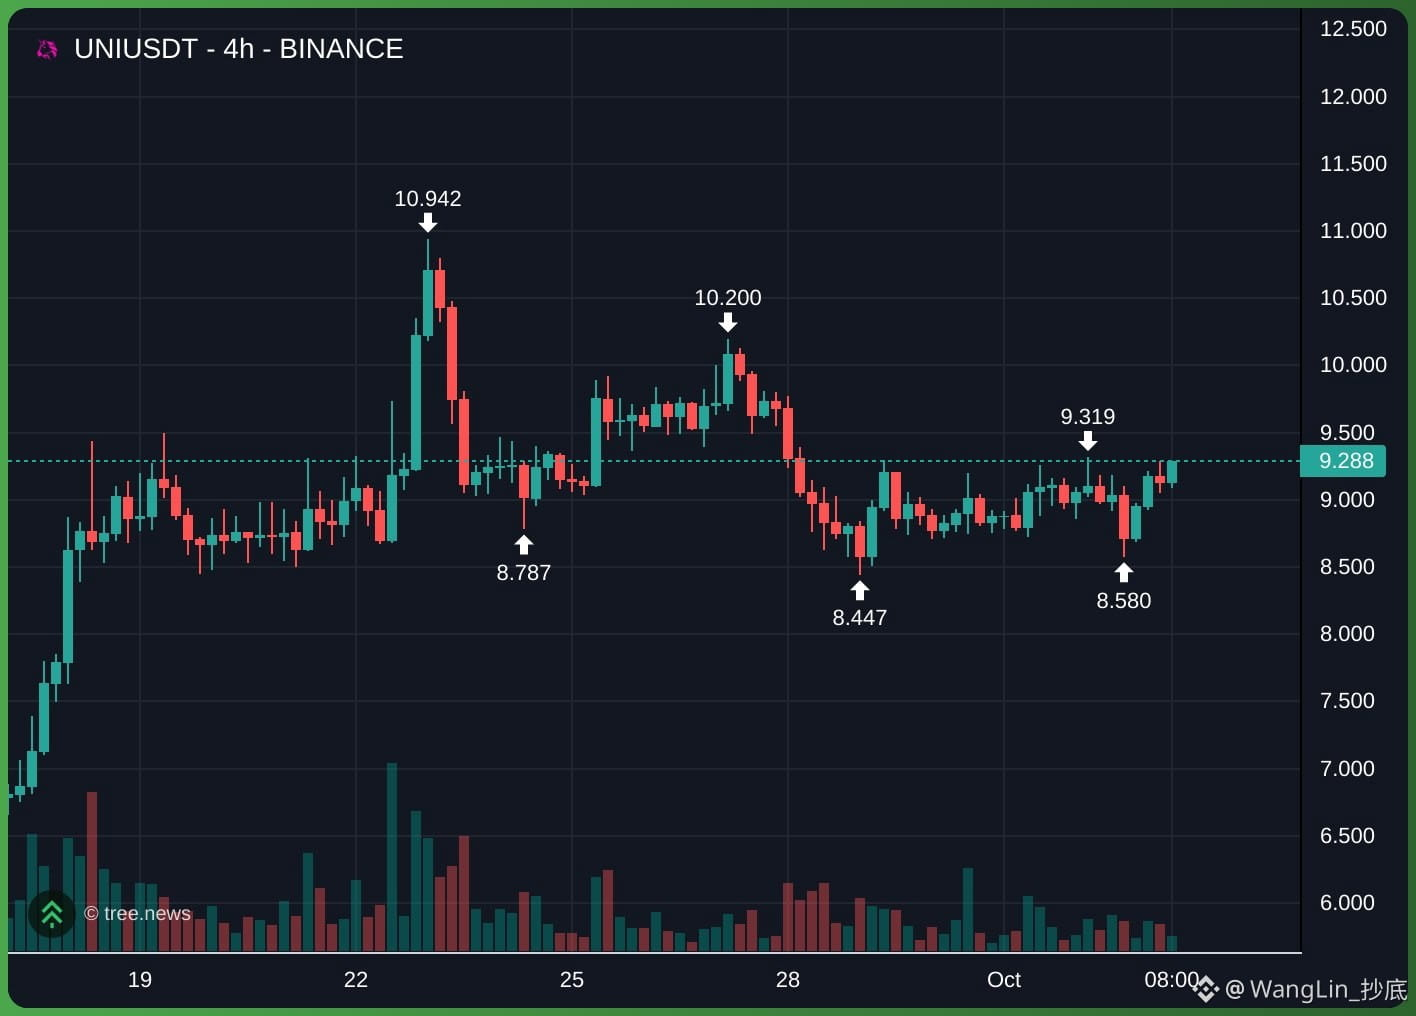
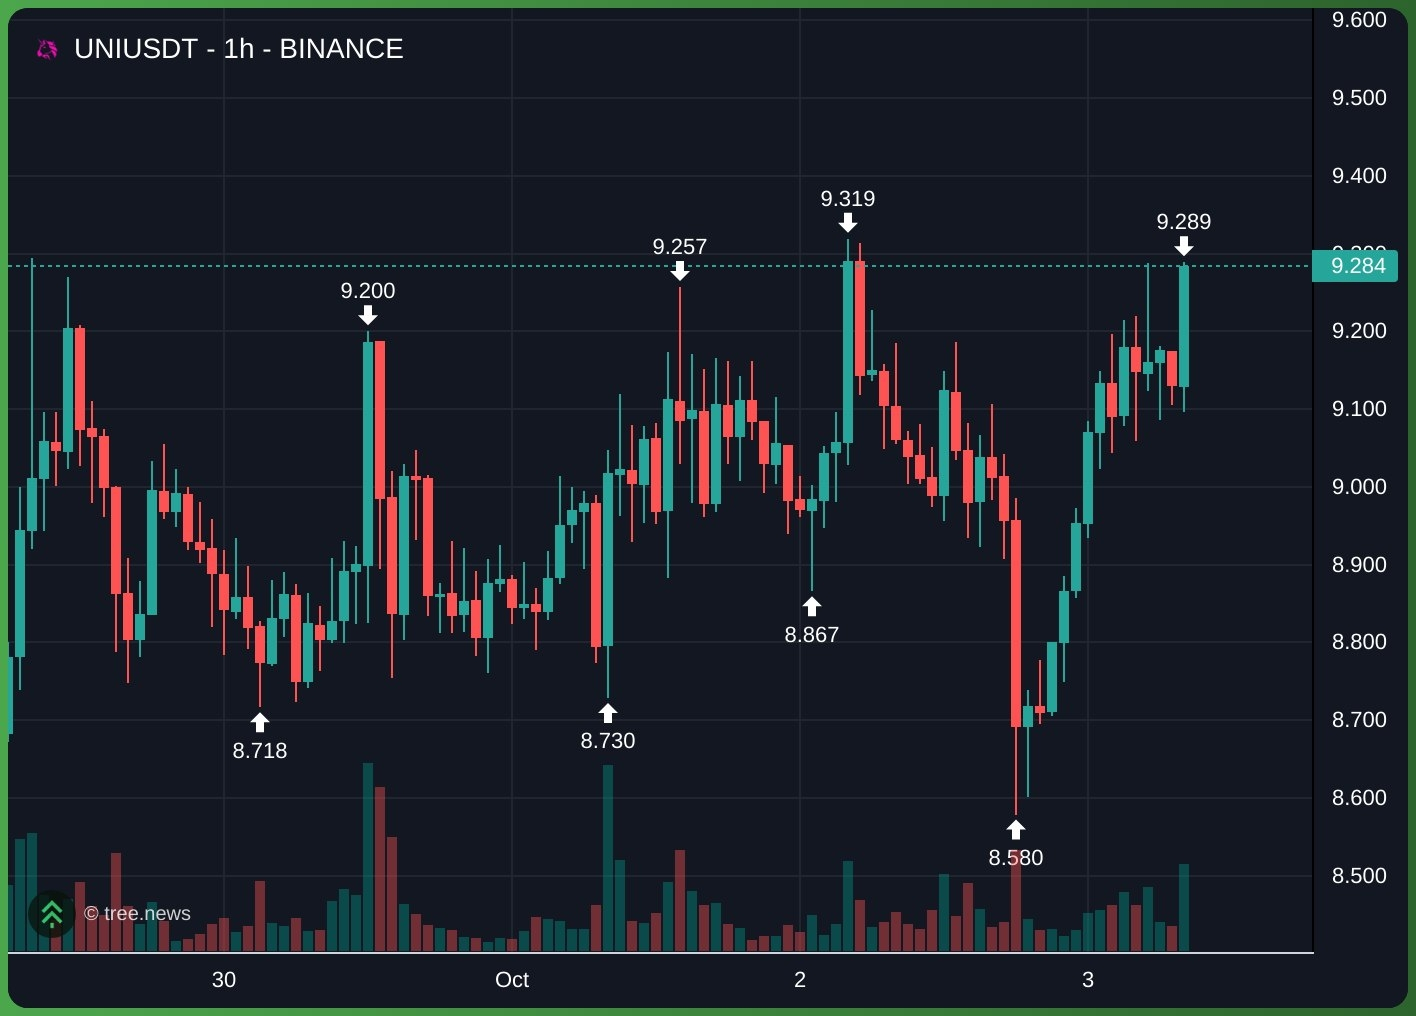
$UNI The overall trend still remains bearish.
Price reached a major high at 10.9, then formed a lower high at 10.2, confirming the downtrend structure.
· Short-term (1H): In the short term, the trend is bullish. Price is forming a higher low (from 8.6 to 8.9) and is currently pushing upward, testing a strong local resistance around 9.3. Momentum is bullish, but there is clear overhead suppression at the top.
🎯 Trading scenario (due to 4H resistance, prioritize shorting)
🔴 $UNI Short (priority) scenario
· Rationale: The 4H chart shows price is approaching a strong supply zone. The 1H chart suggests a possible double-top formation around 9.3. The rejection here (pullback) aligns with the dominant medium-term bearish trend.
· Entry short: 9.2 - 9.3
· Stop loss (SL): Above 9.5 (recent swing high)
· Take profit (TP):
· TP1: 9.0 (local support)
· TP2: 8.8 (mid support)
· TP3: 8.6 (recent swing low)
If you support my view, trade right here👇
{future}(UNIUSDT)
⚠️ Note: Before entering the short scenario, wait for a clear bearish reversal candlestick near 9.3 (rejection candle). If price breaks through and holds above 9.4, then the short bias is invalidated—look for long opportunities instead.#uni #uniswap
$UNI The overall trend still remains bearish.
Price reached a major high at 10.9, then formed a lower high at 10.2, confirming the downtrend structure.
· Short-term (1H): In the short term, the trend is bullish. Price is forming a higher low (from 8.6 to 8.9) and is currently pushing upward, testing a strong local resistance around 9.3. Momentum is bullish, but there is clear overhead suppression at the top.
🎯 Trading scenario (due to 4H resistance, prioritize shorting)
🔴 $UNI Short (priority) scenario
· Rationale: The 4H chart shows price is approaching a strong supply zone. The 1H chart suggests a possible double-top formation around 9.3. The rejection here (pullback) aligns with the dominant medium-term bearish trend.
· Entry short: 9.2 - 9.3
· Stop loss (SL): Above 9.5 (recent swing high)
· Take profit (TP):
· TP1: 9.0 (local support)
· TP2: 8.8 (mid support)
· TP3: 8.6 (recent swing low)
If you support my view, trade right here👇
⚠️ Note: Before entering the short scenario, wait for a clear bearish reversal candlestick near 9.3 (rejection candle). If price breaks through and holds above 9.4, then the short bias is invalidated—look for long opportunities instead.#uni #uniswap
Price reached a major high at 10.9, then formed a lower high at 10.2, confirming the downtrend structure.
· Short-term (1H): In the short term, the trend is bullish. Price is forming a higher low (from 8.6 to 8.9) and is currently pushing upward, testing a strong local resistance around 9.3. Momentum is bullish, but there is clear overhead suppression at the top.
🎯 Trading scenario (due to 4H resistance, prioritize shorting)
🔴 $UNI Short (priority) scenario
· Rationale: The 4H chart shows price is approaching a strong supply zone. The 1H chart suggests a possible double-top formation around 9.3. The rejection here (pullback) aligns with the dominant medium-term bearish trend.
· Entry short: 9.2 - 9.3
· Stop loss (SL): Above 9.5 (recent swing high)
· Take profit (TP):
· TP1: 9.0 (local support)
· TP2: 8.8 (mid support)
· TP3: 8.6 (recent swing low)
If you support my view, trade right here👇
⚠️ Note: Before entering the short scenario, wait for a clear bearish reversal candlestick near 9.3 (rejection candle). If price breaks through and holds above 9.4, then the short bias is invalidated—look for long opportunities instead.#uni #uniswap
879
·
--
Bearish
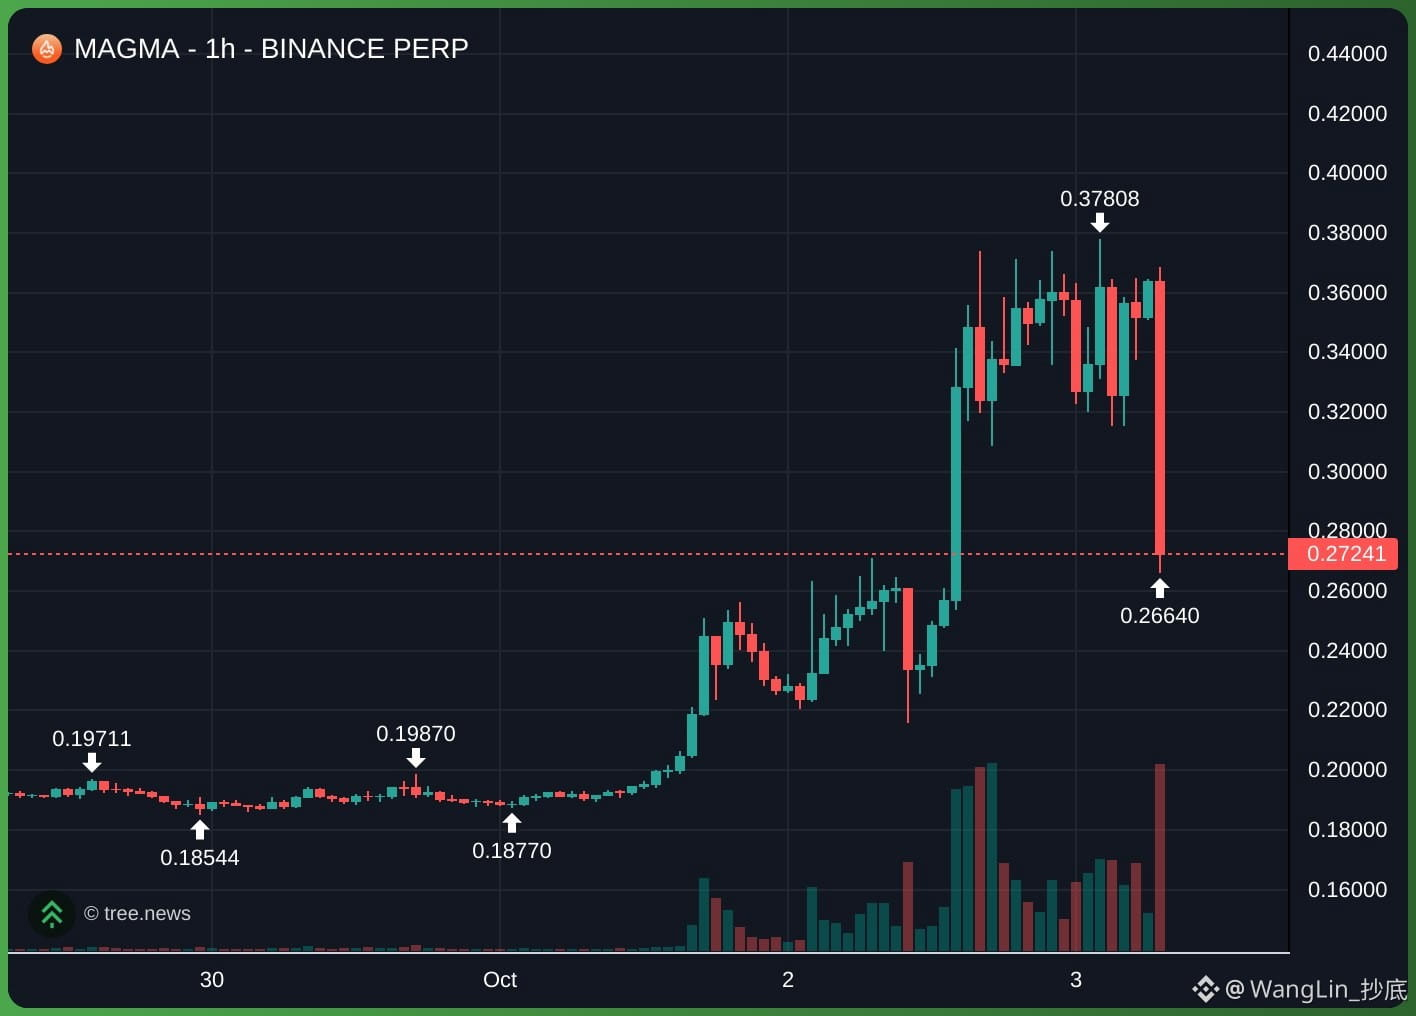
$MAGMA The current trend is strongly bearish. In a very short period of time, the price dropped sharply from 0.38 to a low of 0.26.
The market is currently consolidating near the lows.
🐻 $MAGMA Short scenario (preferred)
· Short entry: 0.29 - 0.30 (wait for a retest of this resistance zone)
· Stop loss: above 0.33 (recent local swing high)
· Take profit: 0.26 (recent swing low), then 0.23 (the previous consolidation zone)
🐂 $MAGMA Long scenario: high-risk counter-trend intraday trade; only valid if a strong reversal pattern forms at the main support level
· Long entry: 0.26 - 0.27 (current support zone; watch for strong bounce confirmation)
· Stop loss: below 0.23 (recent flash-crash low)
· Take profit: 0.30 (resistance level), then 0.33
Support me—trade right here👇
{future}(MAGMAUSDT)
#magma #magmafinance
$MAGMA The current trend is strongly bearish. In a very short period of time, the price dropped sharply from 0.38 to a low of 0.26.
The market is currently consolidating near the lows.
🐻 $MAGMA Short scenario (preferred)
· Short entry: 0.29 - 0.30 (wait for a retest of this resistance zone)
· Stop loss: above 0.33 (recent local swing high)
· Take profit: 0.26 (recent swing low), then 0.23 (the previous consolidation zone)
🐂 $MAGMA Long scenario: high-risk counter-trend intraday trade; only valid if a strong reversal pattern forms at the main support level
· Long entry: 0.26 - 0.27 (current support zone; watch for strong bounce confirmation)
· Stop loss: below 0.23 (recent flash-crash low)
· Take profit: 0.30 (resistance level), then 0.33
Support me—trade right here👇
#magma #magmafinance
The market is currently consolidating near the lows.
🐻 $MAGMA Short scenario (preferred)
· Short entry: 0.29 - 0.30 (wait for a retest of this resistance zone)
· Stop loss: above 0.33 (recent local swing high)
· Take profit: 0.26 (recent swing low), then 0.23 (the previous consolidation zone)
🐂 $MAGMA Long scenario: high-risk counter-trend intraday trade; only valid if a strong reversal pattern forms at the main support level
· Long entry: 0.26 - 0.27 (current support zone; watch for strong bounce confirmation)
· Stop loss: below 0.23 (recent flash-crash low)
· Take profit: 0.30 (resistance level), then 0.33
Support me—trade right here👇
#magma #magmafinance
WangLin_抄底
·
--
Bullish🔥 $MAGMA strong uptrend with massive volume,
$MAGMA Long Pullback Entry
· Entry: Place a Limit Order in 0.30 - 0.31 zone. This area was previously strong resistance and will now act as support
· Stop Loss: below 0.28 (bottom of previous correction)
· Take Profit:
· TP1: 0.34 (recent peak)
· TP2: 0.36-0.40
Support me just Trade here👇
#magma
$MAGMA Long Pullback Entry
· Entry: Place a Limit Order in 0.30 - 0.31 zone. This area was previously strong resistance and will now act as support
· Stop Loss: below 0.28 (bottom of previous correction)
· Take Profit:
· TP1: 0.34 (recent peak)
· TP2: 0.36-0.40
Support me just Trade here👇
#magma
300
·
--
Bearish
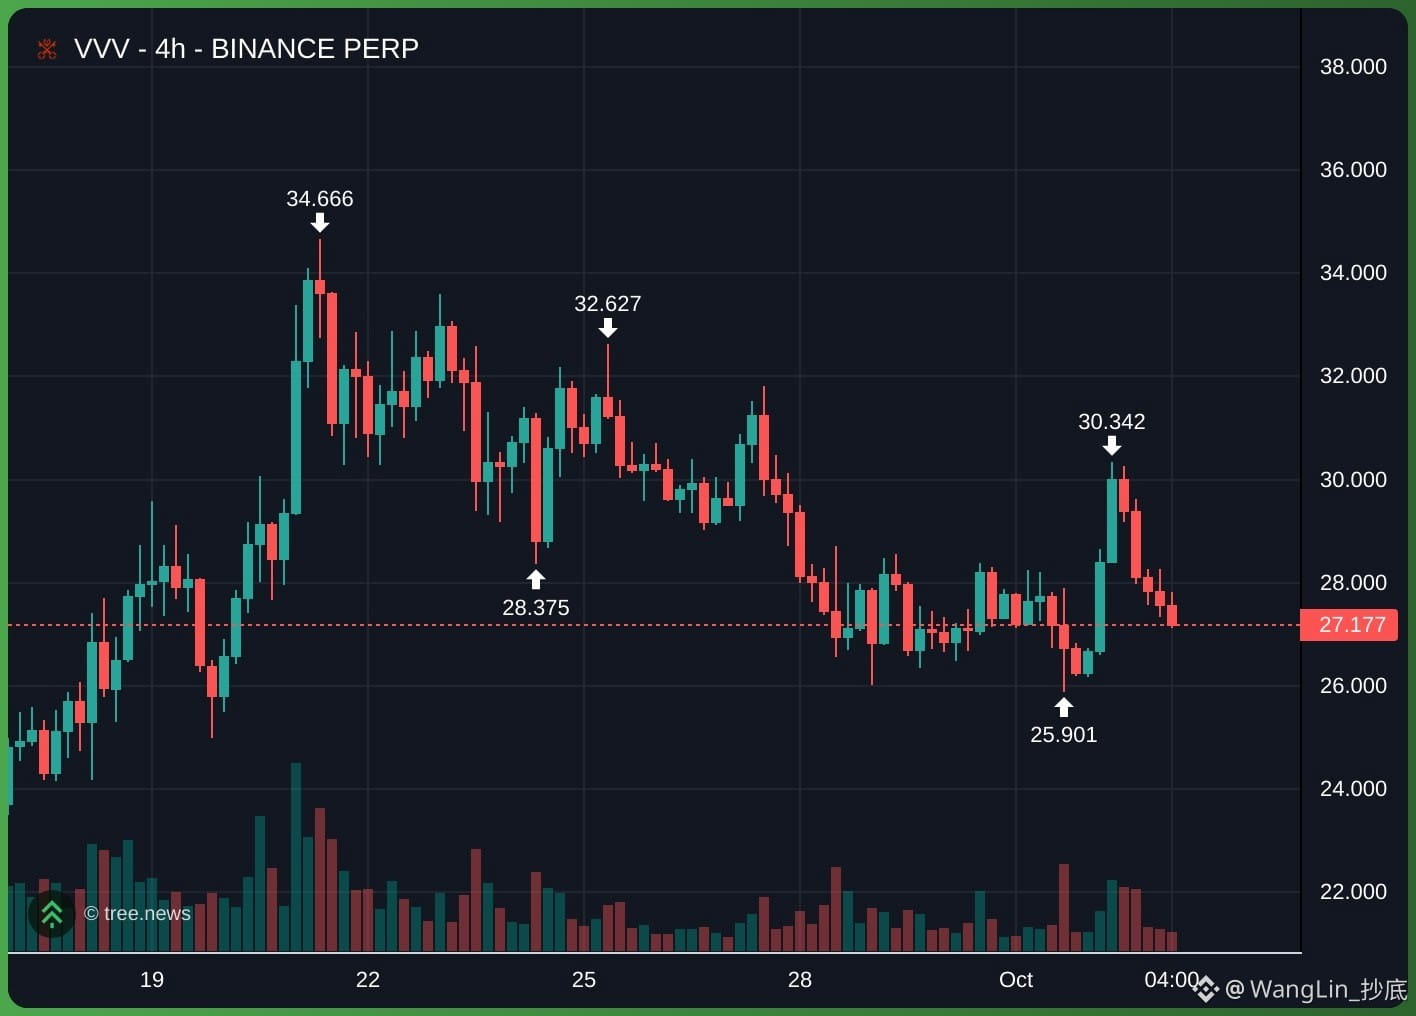
$VVV overall structure is bearish. The charts show a clear sequence of lower highs and lower lows (35 -> 33 -> 30).
Currently testing immediate support around 27
🐻 $VVV short scenario (preferred)
· Short entry: 28 - 29 (wait for a retest of this resistance zone)
· Stop loss: above 31.5 (recent swing high)
· Take profit: 26 (recent swing low), then 25 (major psychological support level)
Support me—trade right here👇
{future}(VVVUSDT)
#vvv #VeniceToken
$VVV overall structure is bearish. The charts show a clear sequence of lower highs and lower lows (35 -> 33 -> 30).
Currently testing immediate support around 27
🐻 $VVV short scenario (preferred)
· Short entry: 28 - 29 (wait for a retest of this resistance zone)
· Stop loss: above 31.5 (recent swing high)
· Take profit: 26 (recent swing low), then 25 (major psychological support level)
Support me—trade right here👇
#vvv #VeniceToken
Currently testing immediate support around 27
🐻 $VVV short scenario (preferred)
· Short entry: 28 - 29 (wait for a retest of this resistance zone)
· Stop loss: above 31.5 (recent swing high)
· Take profit: 26 (recent swing low), then 25 (major psychological support level)
Support me—trade right here👇
#vvv #VeniceToken
385
·
--
Bearish
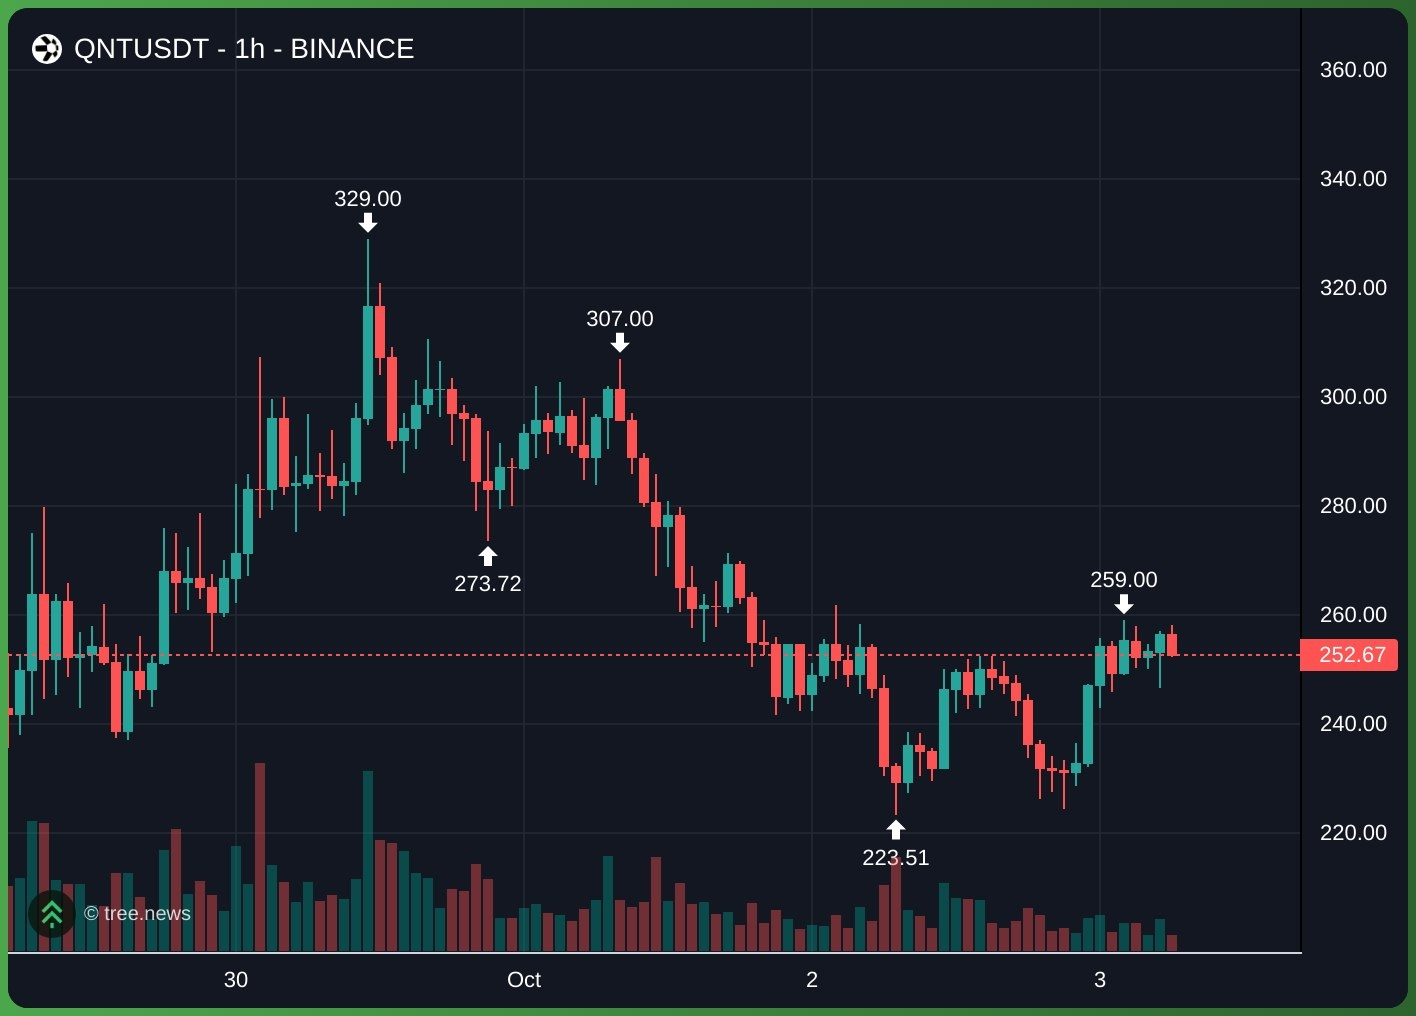
$QNT a clear bearish structure. Price is forming lower highs (peaks at 329, 307, and 259) and lower lows (bottoms at 274 and 224).
· The current rebound is likely a relief bounce before another drop.
🔴 Preferred trading scenario: SELL (sell on rallies)
· 🎯 $QNT short entry: 258 to 265 (aligned with the recent lower high at 259 and forming immediate resistance)
· 🛑 Stop loss: above 276 (the previous important lower high. If price breaks this level, the bearish structure fails)
· 💰 Take profit:
· TP 1: 230 (recent local low)
· TP 2: 210 (the next psychological support level)
Support me—trade right here👇
{future}(QNTUSDT)
#qnt #quant
$QNT a clear bearish structure. Price is forming lower highs (peaks at 329, 307, and 259) and lower lows (bottoms at 274 and 224).
· The current rebound is likely a relief bounce before another drop.
🔴 Preferred trading scenario: SELL (sell on rallies)
· 🎯 $QNT short entry: 258 to 265 (aligned with the recent lower high at 259 and forming immediate resistance)
· 🛑 Stop loss: above 276 (the previous important lower high. If price breaks this level, the bearish structure fails)
· 💰 Take profit:
· TP 1: 230 (recent local low)
· TP 2: 210 (the next psychological support level)
Support me—trade right here👇
#qnt #quant
· The current rebound is likely a relief bounce before another drop.
🔴 Preferred trading scenario: SELL (sell on rallies)
· 🎯 $QNT short entry: 258 to 265 (aligned with the recent lower high at 259 and forming immediate resistance)
· 🛑 Stop loss: above 276 (the previous important lower high. If price breaks this level, the bearish structure fails)
· 💰 Take profit:
· TP 1: 230 (recent local low)
· TP 2: 210 (the next psychological support level)
Support me—trade right here👇
#qnt #quant
WangLin_抄底
·
--
Bullish$QNT overall structure remains bearish unless it reclaims the key resistance level.
· Short-term (1 hour): Bullish rebound. Price strongly rebounded from 224 to a local high of 259 and is currently pulling back to 253.
· Key levels:
· Resistance: 259, 274, 307
· Support: 240, 224
🟢 $QNT Long setup (preferred)
· Background: Short-term momentum is upward. The recent rebound from 224 suggests the local recovery may continue.
· Long entry: 250 - 254 (after breakout and retest)
· Stop loss: Below 235 (recent local support)
· Take profit:
· Take profit 1 (TP 1): 259 (local high)
· Take profit 2 (TP 2): 274 (resistance)
· Take profit 3 (TP 3): 307 (major lower high)
🔴 $QNT Short setup
· Background: The medium-term trend is still severely bearish. If price fails to break above 259 or is rejected at 274, the broader downtrend is likely to continue.
· Short entry: 259 - 265 (local resistance rejection)
· Stop loss: Above 277 (resistance zone)
· Take profit:
· Take profit 1 (TP 1): 240 (psychological support)
· Take profit 2 (TP 2): 224 (recent swing low)
Support me—trade right here👇
#qnt #quant
· Short-term (1 hour): Bullish rebound. Price strongly rebounded from 224 to a local high of 259 and is currently pulling back to 253.
· Key levels:
· Resistance: 259, 274, 307
· Support: 240, 224
🟢 $QNT Long setup (preferred)
· Background: Short-term momentum is upward. The recent rebound from 224 suggests the local recovery may continue.
· Long entry: 250 - 254 (after breakout and retest)
· Stop loss: Below 235 (recent local support)
· Take profit:
· Take profit 1 (TP 1): 259 (local high)
· Take profit 2 (TP 2): 274 (resistance)
· Take profit 3 (TP 3): 307 (major lower high)
🔴 $QNT Short setup
· Background: The medium-term trend is still severely bearish. If price fails to break above 259 or is rejected at 274, the broader downtrend is likely to continue.
· Short entry: 259 - 265 (local resistance rejection)
· Stop loss: Above 277 (resistance zone)
· Take profit:
· Take profit 1 (TP 1): 240 (psychological support)
· Take profit 2 (TP 2): 224 (recent swing low)
Support me—trade right here👇
#qnt #quant
2
1.9k
·
--
Bearish
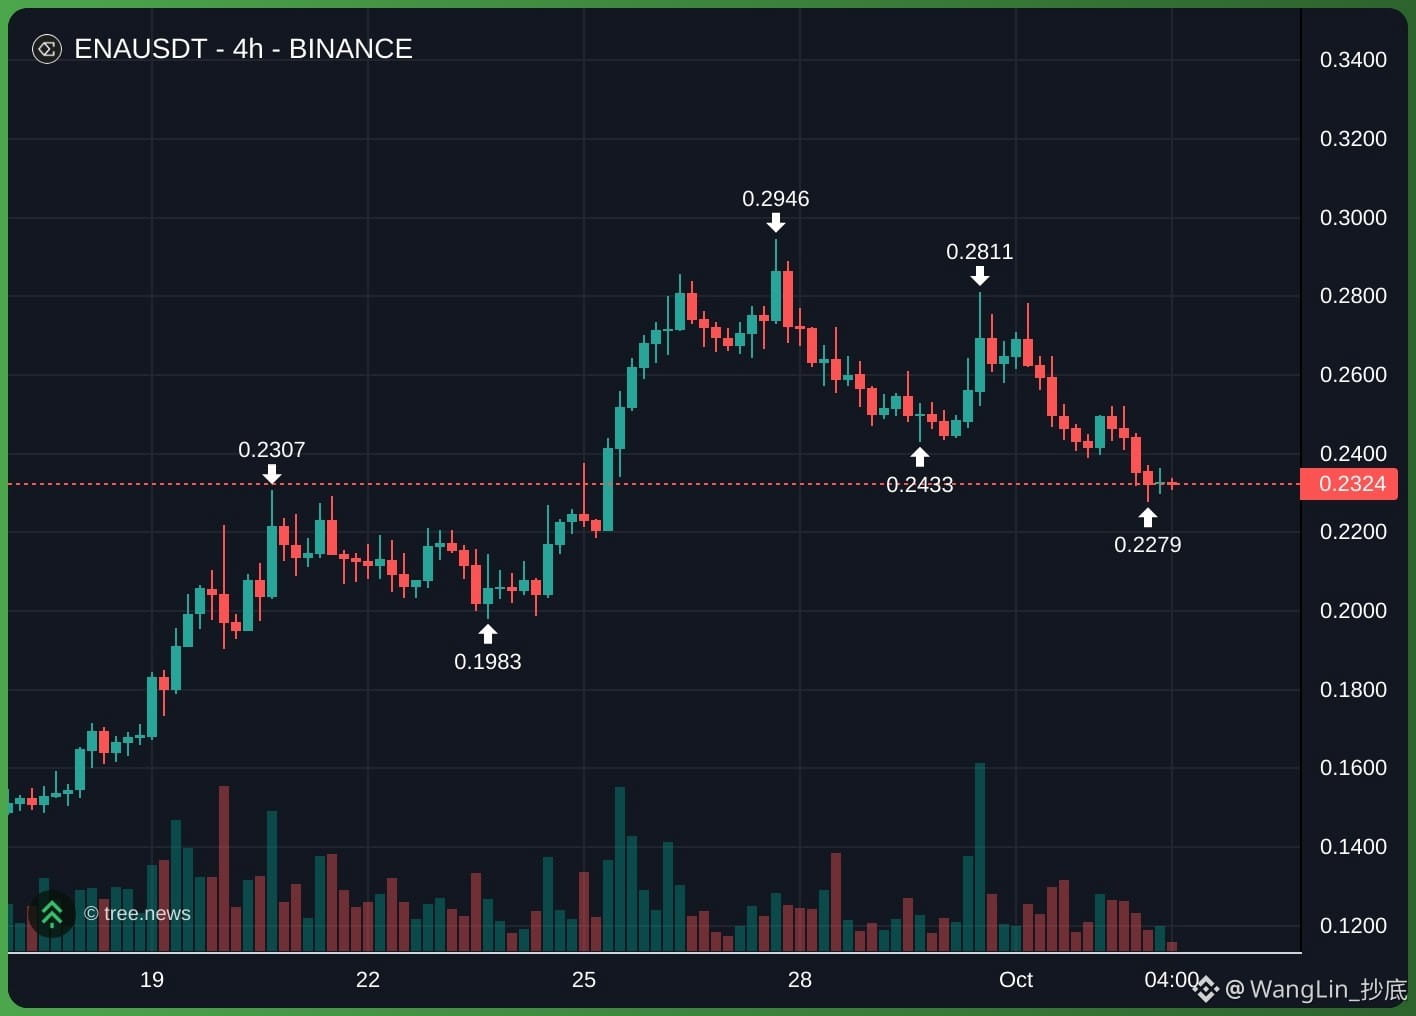
$ENA shows a clear bearish trend, characterized by distinct lower highs (0.28 -> 0.25 -> 0.23) and lower lows (0.24 -> 0.22). The market is currently in a pullback phase and has broken below the 0.24 support level. Price is now testing the key demand zone around 0.22 - 0.23.
📉 $ENA short (preferred)
· Short entry point: 0.24 - 0.25 (wait for a rejection/confirmation at the 0.24 resistance level)
· Stop loss: above 0.26 (the most recent lower high)
· Take profit:
· TP1: 0.22 (current local low)
· TP2: 0.19 (previous major swing low)
Support me with a trade here👇
{future}(ENAUSDT)
💡 Summary: The market is at a critical juncture. A break below 0.22 may accelerate the downtrend toward 0.19. Conversely, reclaiming 0.24 may signal a short-term reversal. Until 0.24 is reclaimed, the preferred strategy is to short the retracement.#ena #ethena
$ENA shows a clear bearish trend, characterized by distinct lower highs (0.28 -> 0.25 -> 0.23) and lower lows (0.24 -> 0.22). The market is currently in a pullback phase and has broken below the 0.24 support level. Price is now testing the key demand zone around 0.22 - 0.23.
📉 $ENA short (preferred)
· Short entry point: 0.24 - 0.25 (wait for a rejection/confirmation at the 0.24 resistance level)
· Stop loss: above 0.26 (the most recent lower high)
· Take profit:
· TP1: 0.22 (current local low)
· TP2: 0.19 (previous major swing low)
Support me with a trade here👇
💡 Summary: The market is at a critical juncture. A break below 0.22 may accelerate the downtrend toward 0.19. Conversely, reclaiming 0.24 may signal a short-term reversal. Until 0.24 is reclaimed, the preferred strategy is to short the retracement.#ena #ethena
📉 $ENA short (preferred)
· Short entry point: 0.24 - 0.25 (wait for a rejection/confirmation at the 0.24 resistance level)
· Stop loss: above 0.26 (the most recent lower high)
· Take profit:
· TP1: 0.22 (current local low)
· TP2: 0.19 (previous major swing low)
Support me with a trade here👇
💡 Summary: The market is at a critical juncture. A break below 0.22 may accelerate the downtrend toward 0.19. Conversely, reclaiming 0.24 may signal a short-term reversal. Until 0.24 is reclaimed, the preferred strategy is to short the retracement.#ena #ethena
836
·
--
Bullish
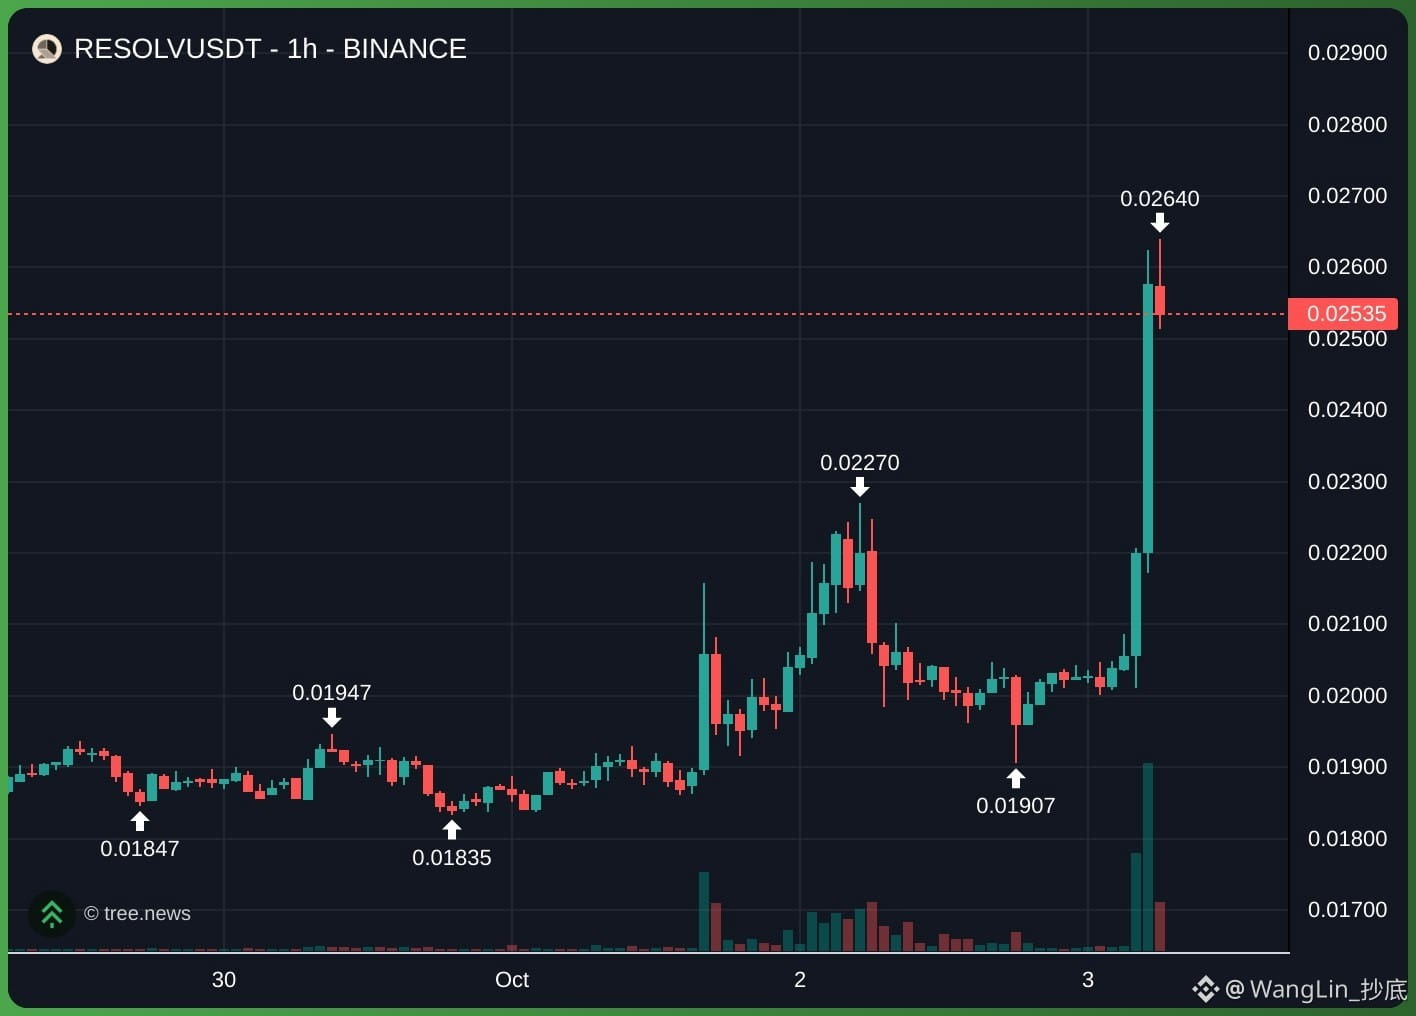
$RESOLV is extremely bullish, but it is seriously overextended. The last candlestick on the 15-minute and 30-minute charts is a red bearish candle with a long upper wick, indicating a rejection at the 0.026 resistance level. Before further upside continues, a healthy pullback or consolidation is likely.
🚀 Trading setup: Long (preferred)
· Entry for $RESOLV : 0.024 - 0.025 (wait for the price to retrace back into the previously broken-out zone)
· Stop-loss: below 0.022 (recent support area)
· Take-profit:
· TP 1: 0.026 (retest of the current local high)
· TP 2: 0.028 (psychological extension level and Fibonacci projection level)
If you support me, that’s it for the trade 👇
{future}(RESOLVUSDT)
#Resolv
$RESOLV is extremely bullish, but it is seriously overextended. The last candlestick on the 15-minute and 30-minute charts is a red bearish candle with a long upper wick, indicating a rejection at the 0.026 resistance level. Before further upside continues, a healthy pullback or consolidation is likely.
🚀 Trading setup: Long (preferred)
· Entry for $RESOLV : 0.024 - 0.025 (wait for the price to retrace back into the previously broken-out zone)
· Stop-loss: below 0.022 (recent support area)
· Take-profit:
· TP 1: 0.026 (retest of the current local high)
· TP 2: 0.028 (psychological extension level and Fibonacci projection level)
If you support me, that’s it for the trade 👇
#Resolv
🚀 Trading setup: Long (preferred)
· Entry for $RESOLV : 0.024 - 0.025 (wait for the price to retrace back into the previously broken-out zone)
· Stop-loss: below 0.022 (recent support area)
· Take-profit:
· TP 1: 0.026 (retest of the current local high)
· TP 2: 0.028 (psychological extension level and Fibonacci projection level)
If you support me, that’s it for the trade 👇
#Resolv
774
·
--
Bullish
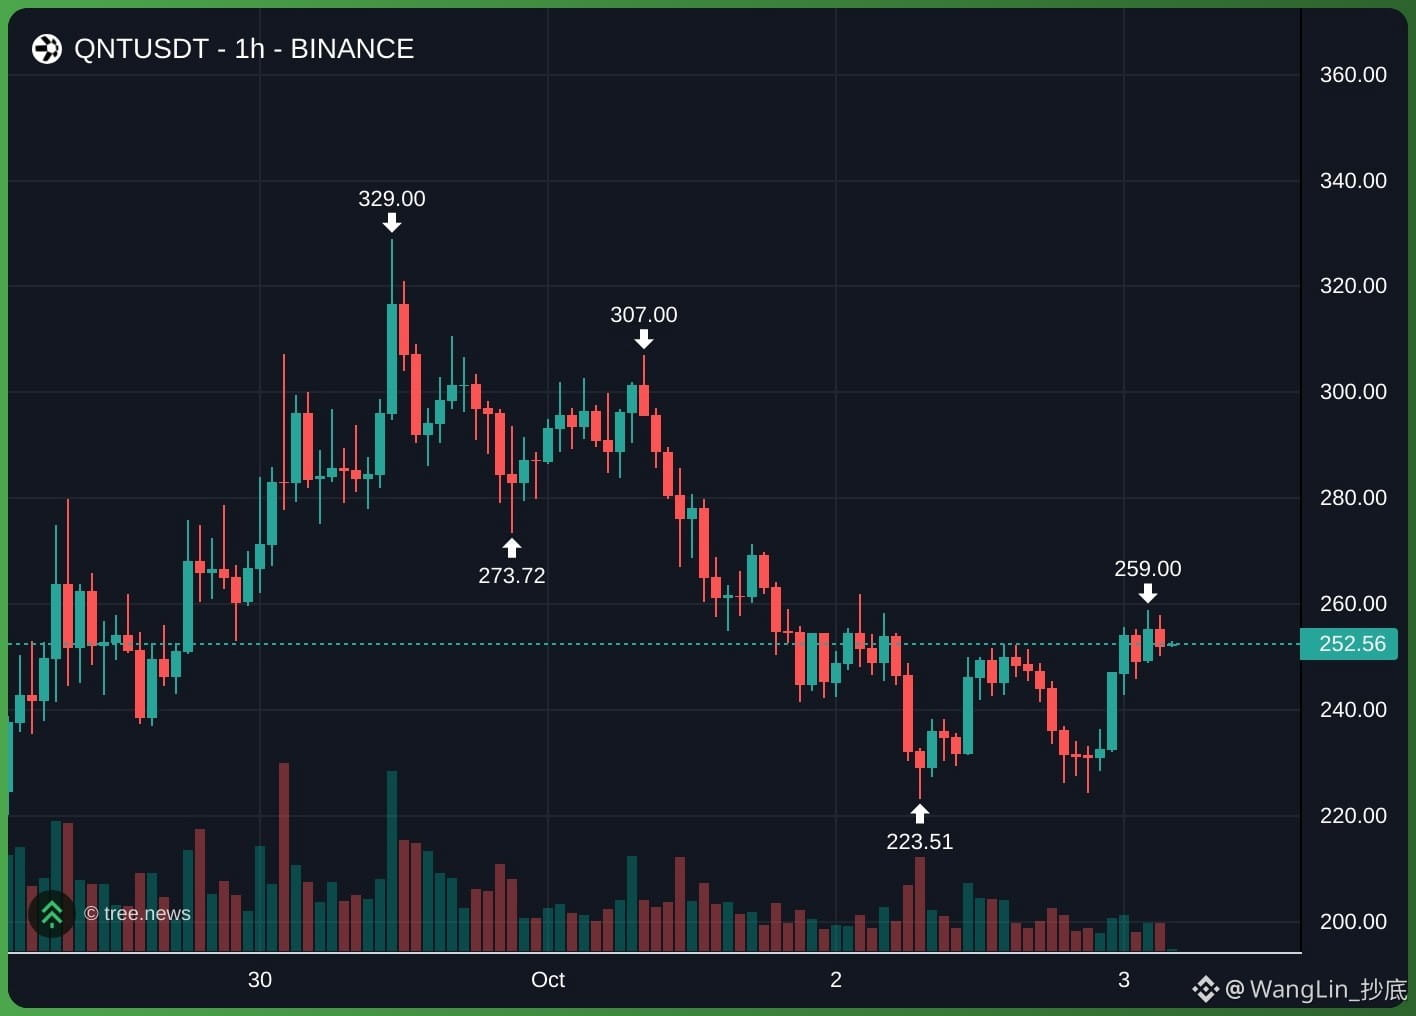
$QNT overall structure remains bearish unless it reclaims the key resistance level.
· Short-term (1 hour): Bullish rebound. Price strongly rebounded from 224 to a local high of 259 and is currently pulling back to 253.
· Key levels:
· Resistance: 259, 274, 307
· Support: 240, 224
🟢 $QNT Long setup (preferred)
· Background: Short-term momentum is upward. The recent rebound from 224 suggests the local recovery may continue.
· Long entry: 250 - 254 (after breakout and retest)
· Stop loss: Below 235 (recent local support)
· Take profit:
· Take profit 1 (TP 1): 259 (local high)
· Take profit 2 (TP 2): 274 (resistance)
· Take profit 3 (TP 3): 307 (major lower high)
🔴 $QNT Short setup
· Background: The medium-term trend is still severely bearish. If price fails to break above 259 or is rejected at 274, the broader downtrend is likely to continue.
· Short entry: 259 - 265 (local resistance rejection)
· Stop loss: Above 277 (resistance zone)
· Take profit:
· Take profit 1 (TP 1): 240 (psychological support)
· Take profit 2 (TP 2): 224 (recent swing low)
Support me—trade right here👇
{future}(QNTUSDT)
#qnt #quant
$QNT overall structure remains bearish unless it reclaims the key resistance level.
· Short-term (1 hour): Bullish rebound. Price strongly rebounded from 224 to a local high of 259 and is currently pulling back to 253.
· Key levels:
· Resistance: 259, 274, 307
· Support: 240, 224
🟢 $QNT Long setup (preferred)
· Background: Short-term momentum is upward. The recent rebound from 224 suggests the local recovery may continue.
· Long entry: 250 - 254 (after breakout and retest)
· Stop loss: Below 235 (recent local support)
· Take profit:
· Take profit 1 (TP 1): 259 (local high)
· Take profit 2 (TP 2): 274 (resistance)
· Take profit 3 (TP 3): 307 (major lower high)
🔴 $QNT Short setup
· Background: The medium-term trend is still severely bearish. If price fails to break above 259 or is rejected at 274, the broader downtrend is likely to continue.
· Short entry: 259 - 265 (local resistance rejection)
· Stop loss: Above 277 (resistance zone)
· Take profit:
· Take profit 1 (TP 1): 240 (psychological support)
· Take profit 2 (TP 2): 224 (recent swing low)
Support me—trade right here👇
#qnt #quant
· Short-term (1 hour): Bullish rebound. Price strongly rebounded from 224 to a local high of 259 and is currently pulling back to 253.
· Key levels:
· Resistance: 259, 274, 307
· Support: 240, 224
🟢 $QNT Long setup (preferred)
· Background: Short-term momentum is upward. The recent rebound from 224 suggests the local recovery may continue.
· Long entry: 250 - 254 (after breakout and retest)
· Stop loss: Below 235 (recent local support)
· Take profit:
· Take profit 1 (TP 1): 259 (local high)
· Take profit 2 (TP 2): 274 (resistance)
· Take profit 3 (TP 3): 307 (major lower high)
🔴 $QNT Short setup
· Background: The medium-term trend is still severely bearish. If price fails to break above 259 or is rejected at 274, the broader downtrend is likely to continue.
· Short entry: 259 - 265 (local resistance rejection)
· Stop loss: Above 277 (resistance zone)
· Take profit:
· Take profit 1 (TP 1): 240 (psychological support)
· Take profit 2 (TP 2): 224 (recent swing low)
Support me—trade right here👇
#qnt #quant
WangLin_抄底
·
--
Bearish$QNT steady downtrend and forming clear lower highs 373 -> 320 -> 307, breaking key support levels, showing strong bearish momentum, with no signs of reversal yet
🔴 $QNT SHORT Scenario (Primary)
· Entry: Look for a retest 235 - 245 resistance zone
· SL: Above 270 recent swing high
· TP:
· TP1: 225
· TP2: 210
· TP3: 200
🟢 $QNT LONG Scenario (High risk - Scalp Only)
· Entry: Consider a bounce from demand zone at 220 - 225
· SL: Below 215 (local low)
· TP:
· TP1: 240
· TP2: 260
· TP3: 280
Support me just Trade here👇
#qnt #quant
🔴 $QNT SHORT Scenario (Primary)
· Entry: Look for a retest 235 - 245 resistance zone
· SL: Above 270 recent swing high
· TP:
· TP1: 225
· TP2: 210
· TP3: 200
🟢 $QNT LONG Scenario (High risk - Scalp Only)
· Entry: Consider a bounce from demand zone at 220 - 225
· SL: Below 215 (local low)
· TP:
· TP1: 240
· TP2: 260
· TP3: 280
Support me just Trade here👇
#qnt #quant
3
1
1
1.6k
·
--
Bullish
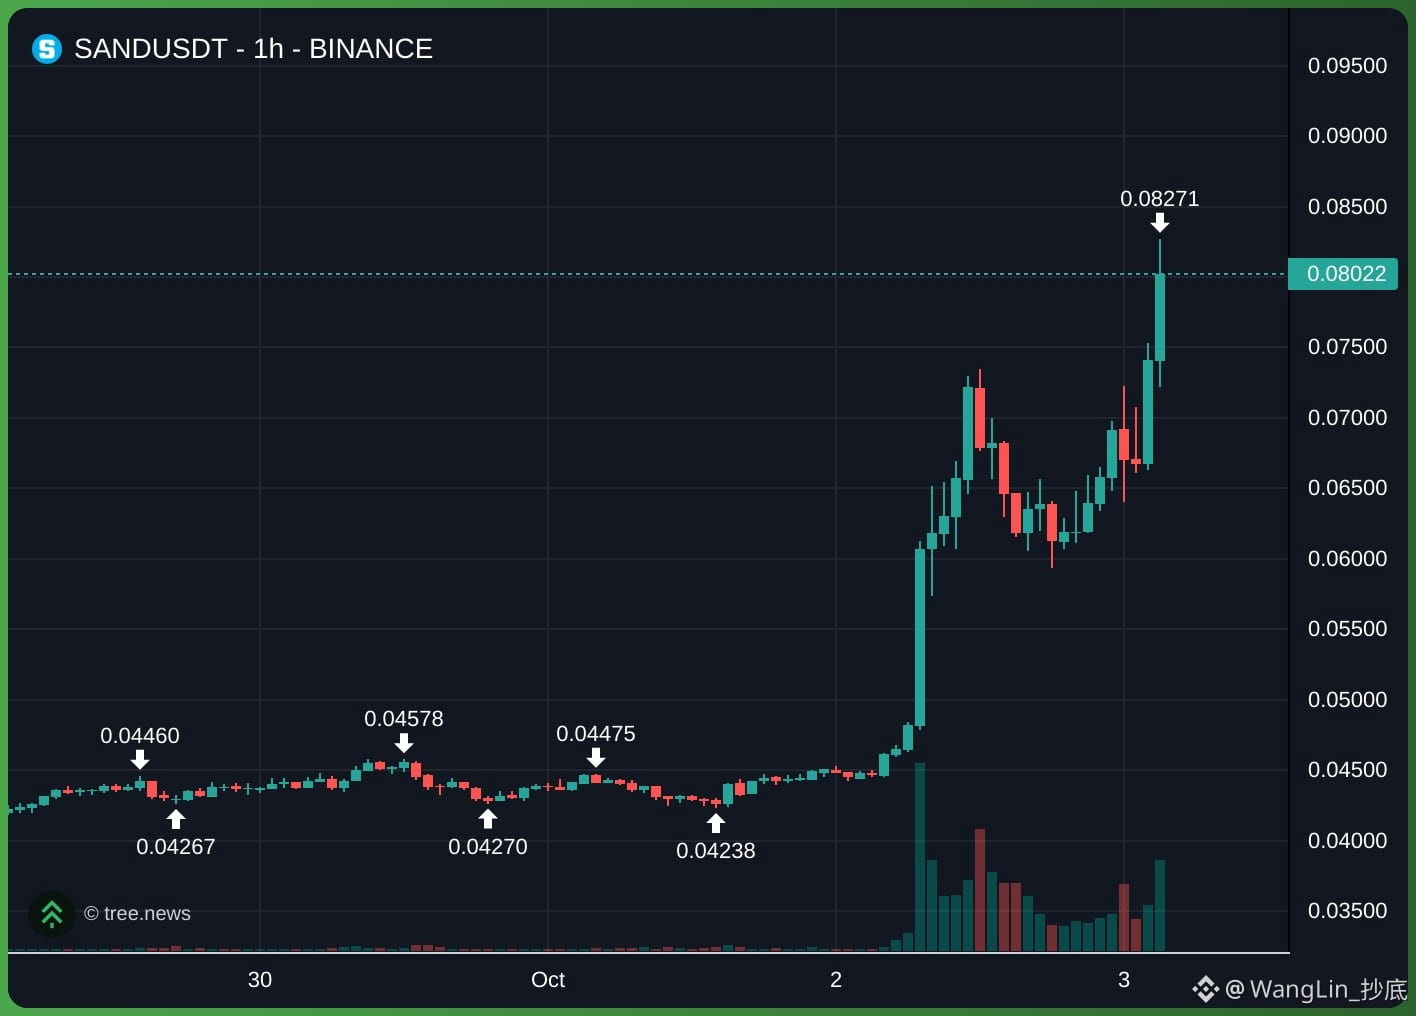
$SAND is extremely bullish. The previous resistance zones of 0.049 and 0.060 have now become strong support levels.
· The current price is consolidating around 0.080. A healthy pullback or sideways movement is needed to cool off the overbought indicators, and then the next wave of upward momentum can begin.
Preferred strategy: Go LONG (due to strong momentum and large inflows of capital)
🟢 $SAND LONG setup (main):
· Entry: wait for a pullback into the key support zone
· Entry Zone 1 (aggressive): 0.075 - 0.078 (local support on the 1-hour chart)
· Entry Zone 2 (conservative): 0.065 - 0.070 (the prior breakout retest area)
· Stop Loss: below 0.063 (a break below this level would invalidate the bullish momentum and suggest a deeper pullback)
· Take Profit:
· TP 1: 0.082 (recent local high)
· TP 2: 0.090 (psychological resistance)
· TP 3: 0.100 (mid-term main target)
Support me—trade right here👇
{future}(SANDUSDT)
#sand #sandbox
$SAND is extremely bullish. The previous resistance zones of 0.049 and 0.060 have now become strong support levels.
· The current price is consolidating around 0.080. A healthy pullback or sideways movement is needed to cool off the overbought indicators, and then the next wave of upward momentum can begin.
Preferred strategy: Go LONG (due to strong momentum and large inflows of capital)
🟢 $SAND LONG setup (main):
· Entry: wait for a pullback into the key support zone
· Entry Zone 1 (aggressive): 0.075 - 0.078 (local support on the 1-hour chart)
· Entry Zone 2 (conservative): 0.065 - 0.070 (the prior breakout retest area)
· Stop Loss: below 0.063 (a break below this level would invalidate the bullish momentum and suggest a deeper pullback)
· Take Profit:
· TP 1: 0.082 (recent local high)
· TP 2: 0.090 (psychological resistance)
· TP 3: 0.100 (mid-term main target)
Support me—trade right here👇
#sand #sandbox
· The current price is consolidating around 0.080. A healthy pullback or sideways movement is needed to cool off the overbought indicators, and then the next wave of upward momentum can begin.
Preferred strategy: Go LONG (due to strong momentum and large inflows of capital)
🟢 $SAND LONG setup (main):
· Entry: wait for a pullback into the key support zone
· Entry Zone 1 (aggressive): 0.075 - 0.078 (local support on the 1-hour chart)
· Entry Zone 2 (conservative): 0.065 - 0.070 (the prior breakout retest area)
· Stop Loss: below 0.063 (a break below this level would invalidate the bullish momentum and suggest a deeper pullback)
· Take Profit:
· TP 1: 0.082 (recent local high)
· TP 2: 0.090 (psychological resistance)
· TP 3: 0.100 (mid-term main target)
Support me—trade right here👇
#sand #sandbox
WangLin_抄底
·
--
Bullish$SAND strongly bullish but overextended & retracing.
It is currently undergoing a sharp pullback, trading around 0.064 as early buyers take profits.
📈 Trading Scenarios
🟢 $SAND LONG SCENARIO (Preferred)
Given strong macro breakout, overall trend remains upward. However, buying at the current price 0.064 is chasing. Wait for price to stabilize at key support zones.
· Entry: 0.058 - 0.060 (aligns with previous breakout area and psychological support)
· Stop Loss: below 0.052
· Take Profit:
· TP1: 0.070 (Re-test recent highs and psychological resistance)
· TP2: 0.073 (Local peak)
· TP3: 0.080 (Psychological extension and Fibonacci target)
🔴 $SAND SHORT SCENARIO (Alternative)
Only consider this if price fails to reclaim key resistance and shows clear rejection
· Entry: 0.066 - 0.068 (If price bounces weakly and gets rejected here)
· Stop Loss: above 0.074 (recent local high)
· Take Profit:
· TP1: 0.058 (Recent pullback low)
· TP2: 0.050 (Previous accumulation range top)
Support me just Trade here👇
#sand #sandbox
It is currently undergoing a sharp pullback, trading around 0.064 as early buyers take profits.
📈 Trading Scenarios
🟢 $SAND LONG SCENARIO (Preferred)
Given strong macro breakout, overall trend remains upward. However, buying at the current price 0.064 is chasing. Wait for price to stabilize at key support zones.
· Entry: 0.058 - 0.060 (aligns with previous breakout area and psychological support)
· Stop Loss: below 0.052
· Take Profit:
· TP1: 0.070 (Re-test recent highs and psychological resistance)
· TP2: 0.073 (Local peak)
· TP3: 0.080 (Psychological extension and Fibonacci target)
🔴 $SAND SHORT SCENARIO (Alternative)
Only consider this if price fails to reclaim key resistance and shows clear rejection
· Entry: 0.066 - 0.068 (If price bounces weakly and gets rejected here)
· Stop Loss: above 0.074 (recent local high)
· Take Profit:
· TP1: 0.058 (Recent pullback low)
· TP2: 0.050 (Previous accumulation range top)
Support me just Trade here👇
#sand #sandbox
1.1k
·
--
Bearish
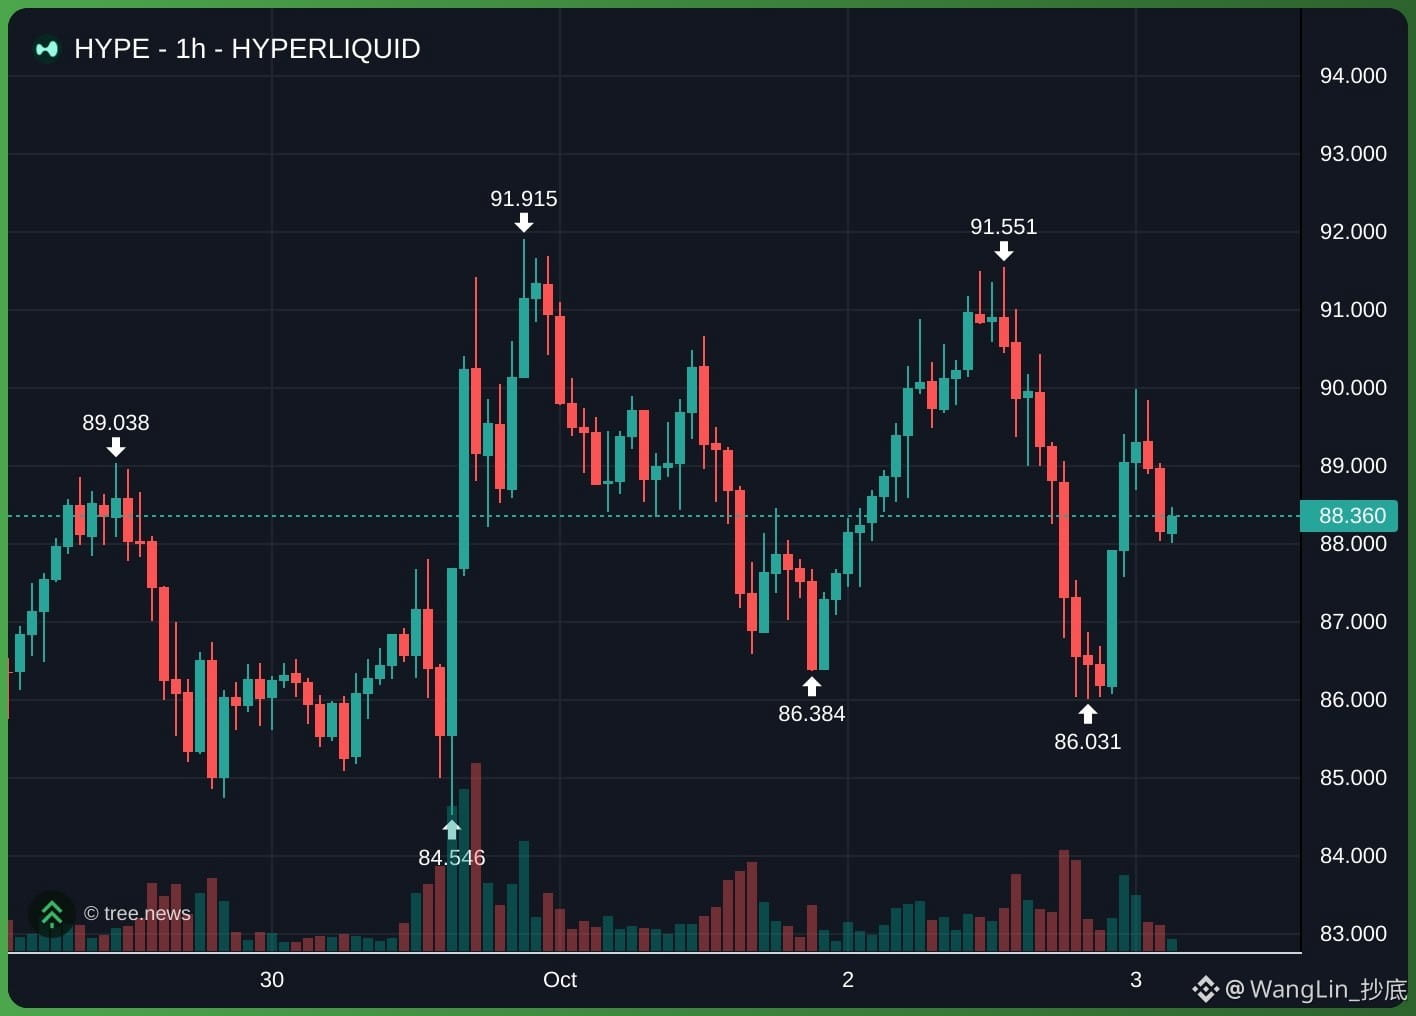
$HYPE bearish 📉. The chart shows a clear sequence of lower highs (98 -> 94 -> 92) and lower lows (90 -> 85 -> 86).
· After being sharply rejected from the 91 area, the price is currently consolidating around 88. Since the price failed to reclaim the key resistance level, the short-term structure remains weak.
🎯 Trading Scenarios
🔴 $HYPE Short (main bias)
· Short entry: 89 to 91 (wait for a rejection signal to appear at this resistance zone)
· Stop loss: above 93 (recent lower high)
· Take profit 1: 86 (recent local support)
· Take profit 2: 84 (major low support)
🟢 $HYPE Long (counter-trend, high risk)
· Background: Only take this trade if the main support at 84-86 holds strong and a strong reversal pattern appears
· Long entry: 85 to 86
· Stop loss: below 82 (recent swing low)
· Take profit 1: 89 (local resistance)
· Take profit 2: 91 (the previously rejected zone)
Support me with this trade 👇
{future}(HYPEUSDT)
#hype #hyperliquid
$HYPE bearish 📉. The chart shows a clear sequence of lower highs (98 -> 94 -> 92) and lower lows (90 -> 85 -> 86).
· After being sharply rejected from the 91 area, the price is currently consolidating around 88. Since the price failed to reclaim the key resistance level, the short-term structure remains weak.
🎯 Trading Scenarios
🔴 $HYPE Short (main bias)
· Short entry: 89 to 91 (wait for a rejection signal to appear at this resistance zone)
· Stop loss: above 93 (recent lower high)
· Take profit 1: 86 (recent local support)
· Take profit 2: 84 (major low support)
🟢 $HYPE Long (counter-trend, high risk)
· Background: Only take this trade if the main support at 84-86 holds strong and a strong reversal pattern appears
· Long entry: 85 to 86
· Stop loss: below 82 (recent swing low)
· Take profit 1: 89 (local resistance)
· Take profit 2: 91 (the previously rejected zone)
Support me with this trade 👇
#hype #hyperliquid
· After being sharply rejected from the 91 area, the price is currently consolidating around 88. Since the price failed to reclaim the key resistance level, the short-term structure remains weak.
🎯 Trading Scenarios
🔴 $HYPE Short (main bias)
· Short entry: 89 to 91 (wait for a rejection signal to appear at this resistance zone)
· Stop loss: above 93 (recent lower high)
· Take profit 1: 86 (recent local support)
· Take profit 2: 84 (major low support)
🟢 $HYPE Long (counter-trend, high risk)
· Background: Only take this trade if the main support at 84-86 holds strong and a strong reversal pattern appears
· Long entry: 85 to 86
· Stop loss: below 82 (recent swing low)
· Take profit 1: 89 (local resistance)
· Take profit 2: 91 (the previously rejected zone)
Support me with this trade 👇
#hype #hyperliquid
824
Log in to explore more content
Join global crypto users on Binance Square
⚡️ Get latest and useful information about crypto.
💬 Trusted by the world’s largest crypto exchange.
👍 Discover real insights from verified creators.
Email / Phone number
Trending Topics
SECHaltsCryptoETFReviewsAmidFundingLapse
878 views
69 Discussing
#SECHaltsCryptoETFReviewsAmidFundingLapse
SEC Halts Crypto ETF Reviews Amid Funding Lapse
The U.S. Securities and Exchange Commission (SEC) has reportedly paused certain cryptocurrency ETF review activities amid a government funding lapse.
This development has created uncertainty in the crypto market, particularly for investors and companies waiting for regulatory decisions on crypto-related exchange-traded funds (ETFs).
Impact on the Crypto Market
The delay could affect the approval timeline of pending crypto ETF applications. Investors are closely monitoring the situation as regulatory clarity remains an important factor in the growth of the digital asset industry.
Although the pause does not necessarily mean that crypto ETF applications will be rejected, it highlights how government funding disruptions can influence financial regulatory processes.
What Happens Next?
Market participants will be watching for updates on government funding and the SEC's ability to resume normal operations.
Crypto ETFs remain an important topic for institutional adoption, market development, and investor confidence.
Conclusion: The temporary halt highlights the importance of regulatory stability for the future of cryptocurrency investments.
#Crypto #Bitcoin #ETF #SEC #CryptoNews #Blockchain #Binance
King2112
·0 Likes
·14 views
ZcashETFPostsFirstWeeklyOutflow$93.6M
54,165 views
165 Discussing
GreekPoliceBustCryptoScamRingArrest17
155,899 views
1,092 Discussing