

Main
Before you start trading futures on Binance, you need to be thoroughly familiar with how the platform works and all its capabilities.
In this guide, we cover the basic questions and settings that are important when trading perpetual futures on Binance.
Always be aware of the risks associated with futures trading. You should start trading only when you are sufficiently prepared and have a good understanding of how the product works.

There is a lot to learn about futures trading. Before you begin, you must thoroughly master the technical skills and basic principles of trading. At first glance, the Binance Futures user interface may seem very complex, but this guide will help you quickly understand its main features and working aspects.
How to create an account on Binance Futures
To open an account on the Binance Futures platform, you will need a Binance account. To do this, go to the Binance website and click “Register” in the upper right corner of the screen. Then follow these steps:
Enter your email address and create a strong password. If you have a referral ID, paste it into the appropriate field. Click "Create an account" to continue.
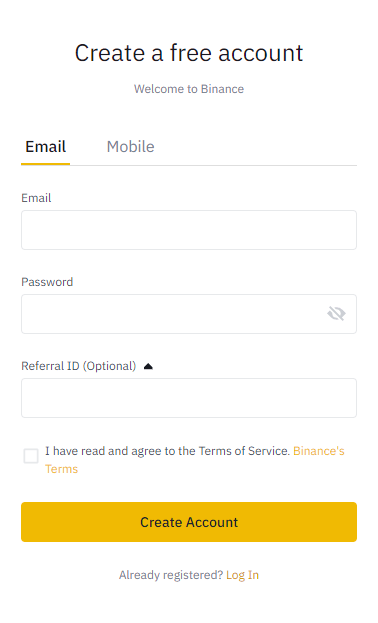
You will soon receive a confirmation email. To complete your registration, follow the instructions in the email.
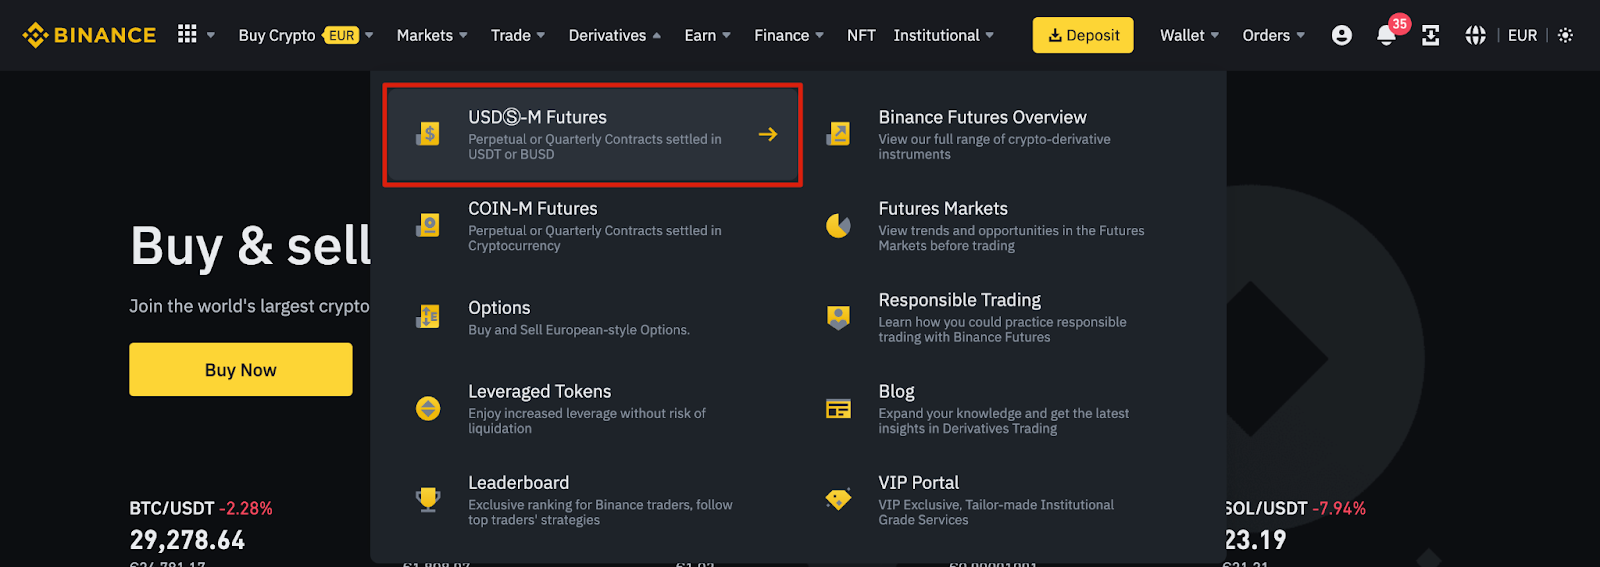
Next, log into your Binance account, hover over “Derivatives” in the top bar and select “USD(S)-M Futures.”
Click the "Open Now" button to activate your Binance Futures account. You will then be able to trade futures on Binance. Please note that training and training are required to operate this product responsibly.

If you're new to futures trading, check out the Binance Futures FAQ for details of the available contracts. If you are not ready to risk real money, you can start with the Binance Futures test network.
Top up your Binance Futures balance
To fund your balance on the Binance Futures platform, you will need funds in your Binance account. They can be in a deposit wallet, a fiat wallet, a spot wallet, a margin wallet, or an options wallet. If you do not have funds on your balance, we recommend that you read the How to Enter Cryptocurrency on Binance guide.
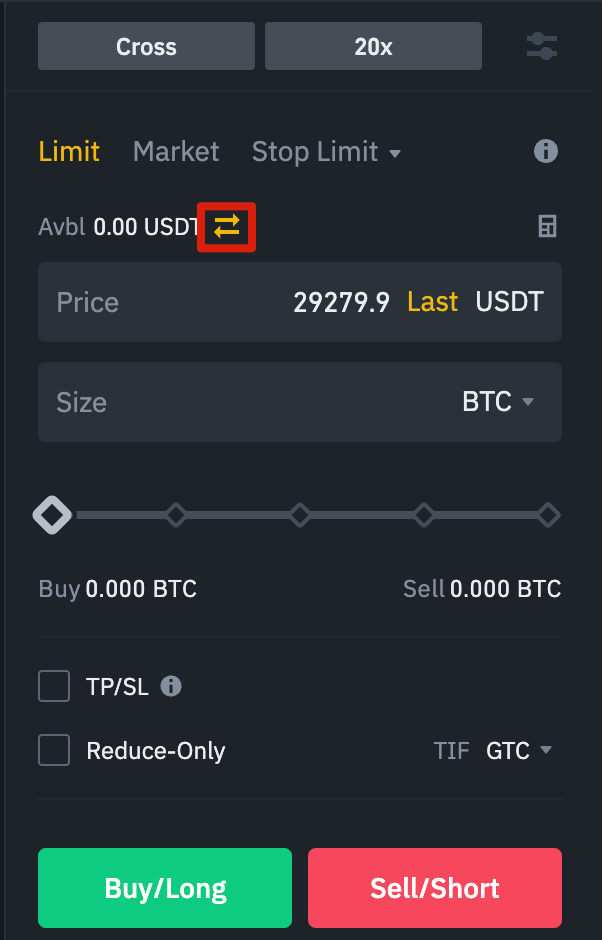
To transfer funds to your futures wallet, click the transfer icon on the right side of the Binance Futures page.
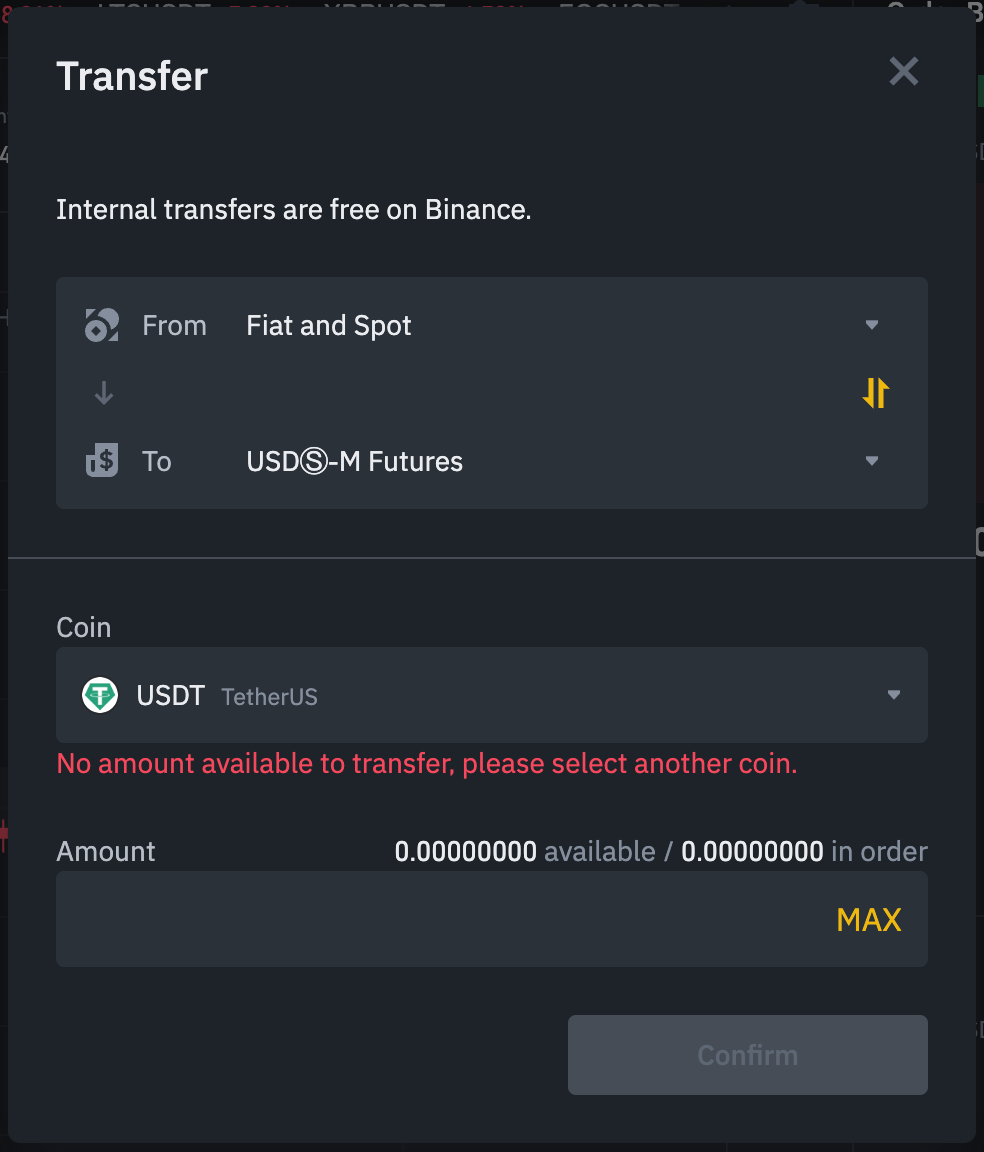
Specify the transfer amount, select the source wallet and click “Confirm”. After this, the funds should arrive in your futures wallet. If necessary, you can also change the translation direction.
Binance Futures Interface Overview
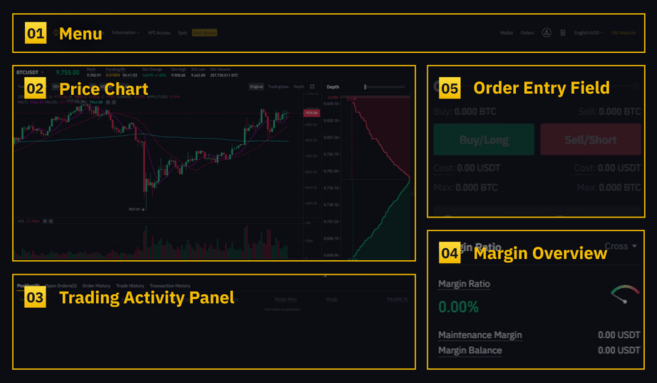
1. The menu area contains links to other Binance pages such as COIN-M Futures, Options, Trading Strategies, and Activity. The Information tab contains links to futures FAQs, as well as sections on API access, funding rates, index prices, and other market data.
On the right side of the top panel there is a section where you can go to your Binance account and easily track wallet balances and orders within the entire Binance ecosystem.
2. In the “Price Graph” section you can perform the following actions:
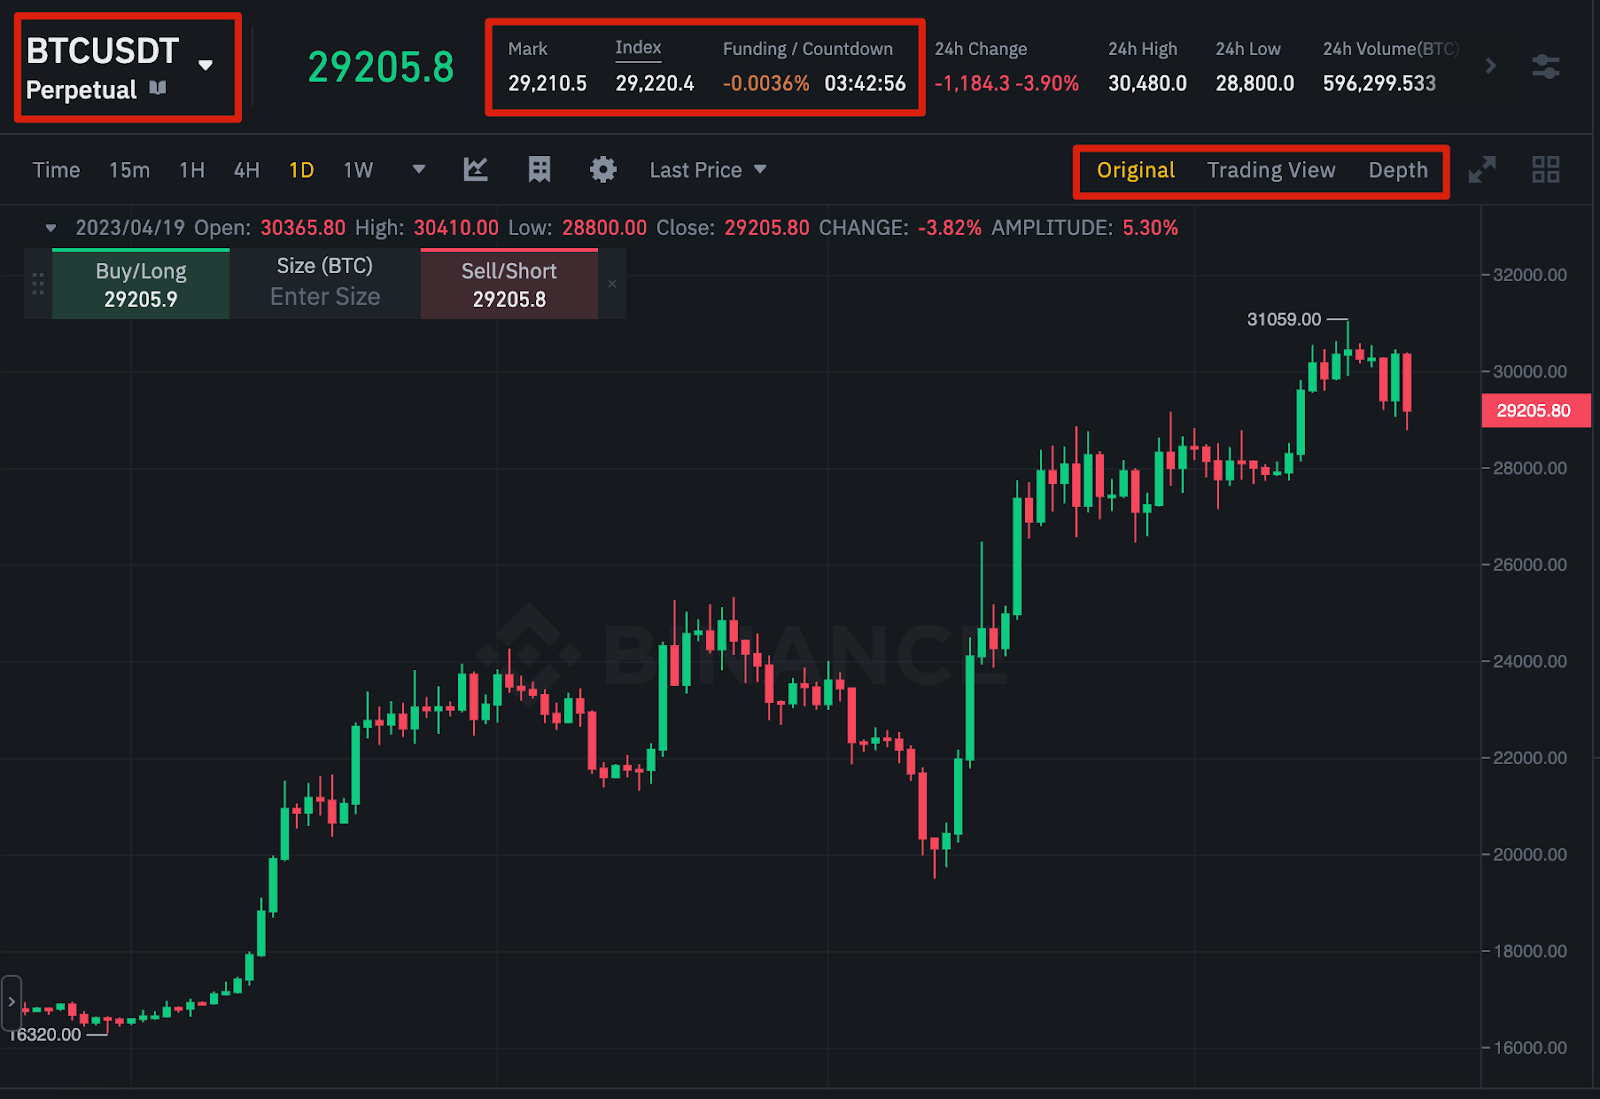
Select a contract by hovering your mouse over the name of the current contract (BTCUSDT by default).
View marking price. This is an important indicator by which liquidation occurs.
View the expected funding rate and countdown timer to the next funding round.
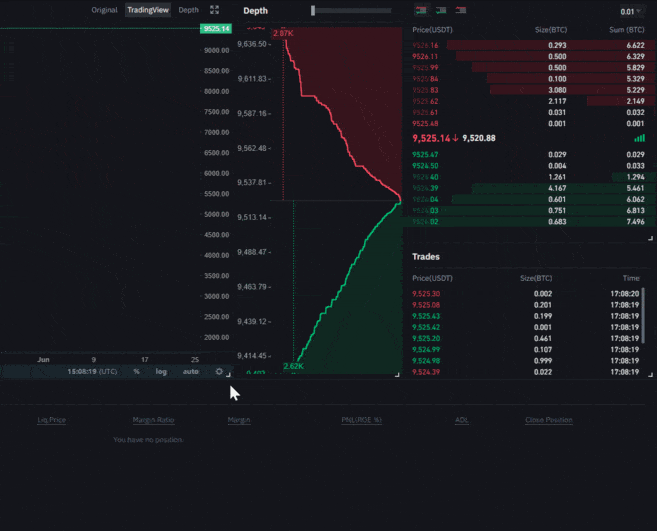
Study the current chart. Here you can switch between the basic version and the built-in TradingView chart, and visually evaluate the current order book depth in real time using the depth button.
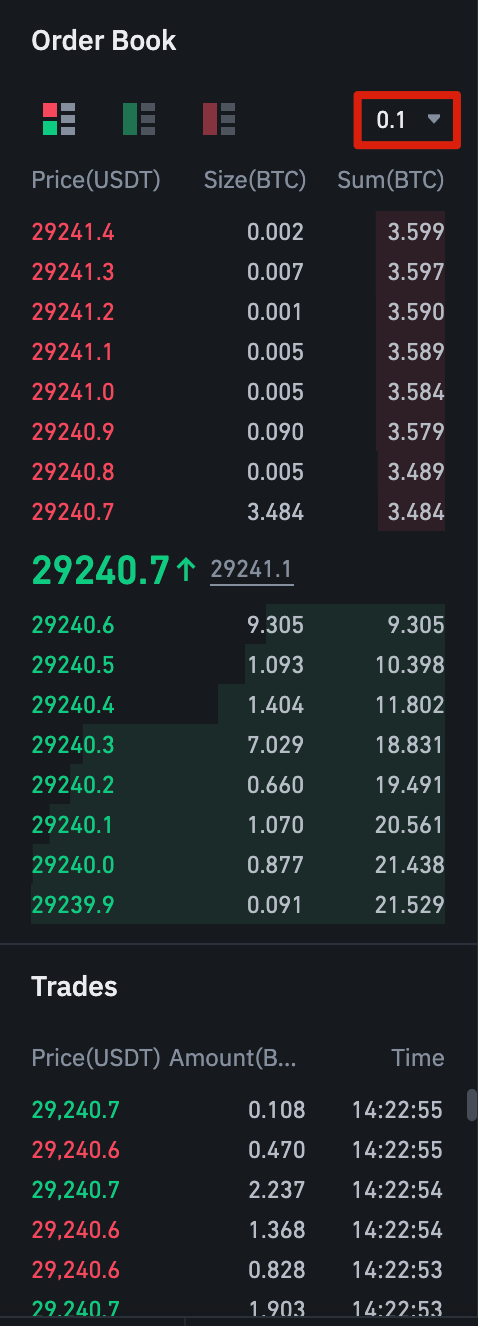
Monitor order book data in real time. You can adjust the order book accuracy in the drop-down menu in the upper right corner of the area (default 0.01).
Track transaction history on the platform.
3. The Trading Activity Dashboard allows you to track your trading activity on the futures platform. Here, on different tabs, you can monitor the current status of positions, view open and executed orders, as well as the complete history of trading and transactions for a certain period.
It's also where you can track positions in the Automatic Deleveraging Queue, or ADL (this metric is important during periods of high volatility).

4. In the “Margin Trading Review” section, you can view available assets, transfer funds and purchase cryptocurrency. Information about the current contract and positions is also available here. Be sure to keep an eye on the margin ratio to avoid liquidation.
Click "Transfer" to transfer funds between the futures wallet and other wallets in the Binance ecosystem.

5. In the “Order Entry” field, set the parameters of buy (long) and sell (short) orders. A detailed description of existing order types is provided later in this article. At the top you can also switch between cross margin and isolated margin modes. To adjust your leverage, click on your current leverage level (default is 20x).

In all modules and sections, you can change the sizes of elements. The arrow in the bottom right corner of the module means you can move it and change its size. This makes it easy to personalize the interface.
Setting up leverage
Binance Futures allows you to manually adjust your leverage. To select a contract, in the upper left corner of the page, hover your mouse over the current contract (BTCUSDT by default).

To adjust leverage, go to the order entry field and click on the current leverage level (default 20x). Select the size you want using the slider or enter the number you want and then click Confirm.

Please note that the larger the position, the lower the amount of leverage available. And vice versa: the smaller the position size, the greater the available leverage. The higher the leverage, the higher the risk of liquidation.
As always, a trader should carefully evaluate the amount of leverage used and the risk involved.
What is the difference between the mark price and the latest price?
To avoid unnecessary liquidations due to price spikes during periods of high volatility, Binance Futures uses last price and mark price parameters.
The last price is the last traded value of the contract. In other words, the last trade in the trading history determines the latest price. It is used to calculate realized PnL (profit and loss).
Price marking is intended to prevent price manipulation. It is calculated based on funding data and a basket of prices from several spot exchanges. Based on the marking price, the liquidation price and unrealized PnL are calculated.

Please note that the marked price and the final price may vary.
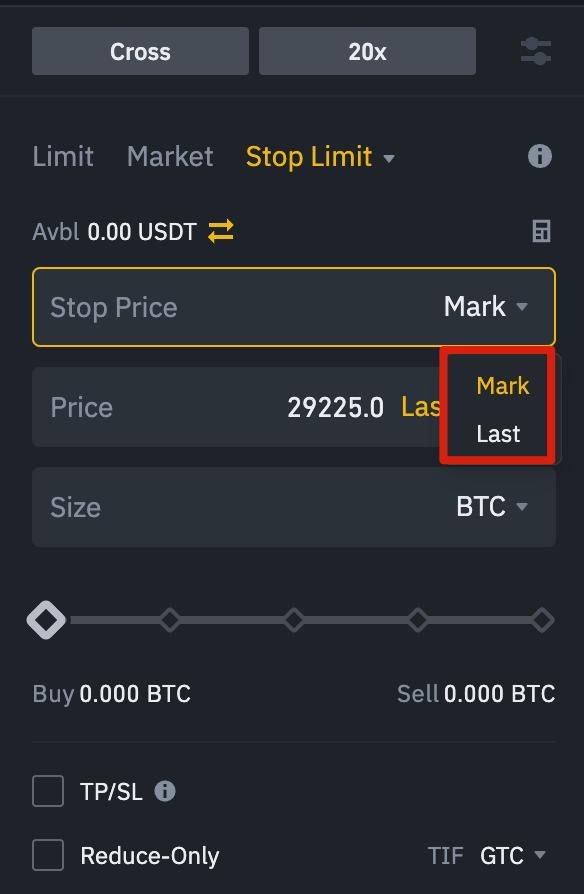
Setting a stop price
When choosing an order type that is triggered based on the stop price, you can choose the last price or the mark price as the trigger threshold. To do this, select the desired option from the corresponding drop-down menu in the order entry field.
Available types of orders and scenarios for their use
When placing an order, you can choose from several types.
Limit order
A limit order is placed on the order book with a specific limit price. In this case, the order will be executed only if the market price reaches the limit price or crosses this threshold (for the better). Thus, limit orders are used to buy at a lower price or sell at a higher price relative to the market.
Market order
A market order is an order to buy or sell at the best market price. It is executed based on limit orders that were previously placed in the order book. When you place a market order, you will pay a taker fee.
Limit stop order
The best way to understand how a limit stop order works is to divide it into two parts: the stop price and the limit price. The stop price is responsible for placing a limit order if the asset reaches a certain value, and the limit price is the predetermined value of the placed limit order. When the stop price is reached, the limit order immediately appears in the order book.
The limit price and stop price can be the same, but this is not necessary. For a sell order, it is safer to set the stop price (activation price) slightly above the limit price, and for a buy order - slightly lower. This will increase the chances of the limit order being executed once the stop price is reached.
Market stop order
Like a limit stop order, a market stop order is triggered by the stop price. The difference is that when the stop price is reached, the order becomes a market order.
Limit take profit
A limit take profit is similar to a limit stop order. It also has an activation price, which triggers the order, and a limit price, at which the order is added to the order book. The key difference between a limit stop order and a limit take profit order is that the latter can only be used to reduce open positions.
Take profit limit can be useful for managing risk and locking in profits at certain price levels. It can also be used in combination with other order types, such as limit stop orders, to better control positions.
Please note that these do not include OCO orders. For example, if a limit stop order is triggered while you have an active limit take profit, the latter remains active until you manually cancel it. You can set a take profit limit on the Stop Limit tab in the order entry field.
Market take profit
Like the limit take profit, the market take profit is activated by the stop price. The difference is that when the stop price is reached, the order becomes a market order. You can set a market take profit in the “Stop Market” tab in the order entry field.
Trailing stop order
A trailing stop order helps lock in profits by limiting potential losses on open positions. In the case of a long position, the trailing stop price moves up along with the price.
When the price falls, the trailing stop price stops again. If the price moves a certain percentage (called variance percentage) in the other direction, a sell order is issued. The same thing happens with a short position, but in reverse. A trailing stop price moves down with the market, but stops if the market starts to rise. If the price moves a certain percentage in the other direction, a buy order is issued.
The activation price is the desired price level that, when reached, will trigger a trailing stop order. If you do not specify an activation price, the default will be the current latest price or mark price. The activation price can be set at the bottom of the order entry field.
Deviation percentage is a percentage that determines how closely a trailing stop price will follow price movements. Thus, with a deviation percentage of 1%, the trailing stop price will continue to follow the price at a distance of 1% if the price moves in the desired direction. If the price moves in the opposite direction by more than 1%, a buy or sell order is placed (depending on the direction of the trade).
How to Use the Binance Futures Calculator
At the top of the order entry field there is a calculator to calculate the value before entering a long (long) or short (short) position. You can adjust the leverage slider on each tab to use as a basis for your calculations.
The calculator contains three tabs:
PNL - To calculate initial margin, profit and loss (PnL), and return on equity (ROE) based on estimated entry and exit prices and position size.
Target price - to calculate the price at which you need to close a position to achieve your desired percentage return.
Liquidation Price - To calculate the liquidation price based on your wallet balance, estimated entry price, and position size.
Here you can watch video instructions.
How to use hedging mode
In hedging mode, you can simultaneously open long and short positions on the same contract. This feature can be useful for a trader who is bullish on an asset in the long term, but bearish in the short term. In hedging mode, short-term short positions do not affect long positions.
By default, the position is in one-way mode, which does not allow you to open long and short positions on the same contract at the same time. If you try to do this, the positions will simply cancel each other. To use hedging mode, you need to enable it manually:
In the top right corner of the screen, select Settings.
Go to the Position Mode tab and select Hedge Mode.

Before changing the position mode, make sure that you do not have any open orders or positions.
Financing rate and its verification
The funding rate ensures that the price of a perpetual futures contract remains as close as possible to the price of the underlying asset (spot). Essentially, traders pay each other based on their open positions. Whether either party receives payment is determined by the difference between the perpetual futures price and the spot price.
With positive financing, long positions pay short positions, and with negative financing, short positions pay long positions.
You can learn more from our article What are perpetual futures contracts.
What does it mean? Depending on open positions and funding rates, traders either pay or receive payment. Binance Futures pays out every eight hours. At the top of the page, next to the mark price, you can check the timing and estimated financing rate for the next period.
To check historical funding rates for each contract, hover over the Information tab and select Funding Rate History.
Placement only mode, order expiration date (TIF) and position reduction
If you open limit orders, you can use the placement and order expiration only (TIF) options. Additional characteristics of limit orders depend on them. They can be found at the bottom of the order entry field. The "place only" option means that the order will be added to the order book and will not be immediately matched to an existing order. This is suitable for those who want to pay commission as a maker.
The TIF option allows you to specify the period for which your orders will remain active before being executed or expiring. For this option, you can select one of the following options:
A GTC order (Good Until Cancelled) will remain valid until executed or cancelled.
An IOC order (Immediate or Cancel) will be executed immediately (in whole or in part). If partially executed, the remaining part of the order is cancelled.
A FOK (Fulfill or Cancel) order must be fully executed immediately after placement. Otherwise it is not executed at all.
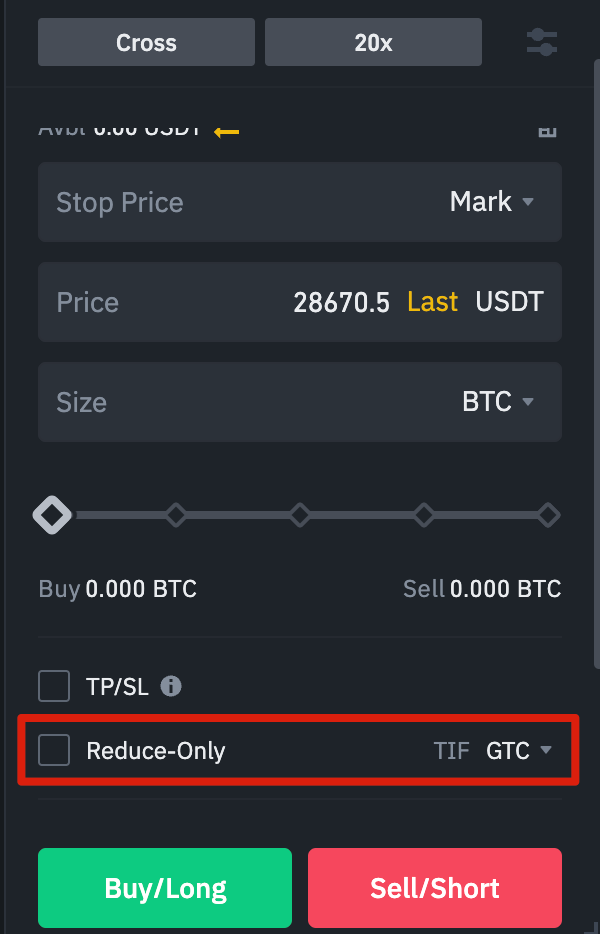
When you use one-way mode, checking the Reduce Only checkbox ensures that the order can only reduce the size of the current position and never increase it.
Conditions for liquidating positions
Liquidation occurs when the margin balance falls below the required maintenance margin. Margin Balance is the Binance Futures account balance including unrealized PnL (Profit and Loss). Thus, profits and losses directly affect the change in the margin balance. If you use cross margin mode, the total balance is calculated for all positions. If you use isolated margin mode, the balance is distributed between positions.
Maintenance margin is the minimum amount required to keep open positions active. The amount of funds required depends on the size of the position: larger positions require a higher maintenance margin to keep them active.
You can check the current margin ratio in the lower right corner. Once the margin ratio reaches 100%, all positions will be liquidated.
When a liquidation occurs, all open orders are forcibly cancelled. Ideally, you should monitor the status of your positions to avoid automatic liquidation, which involves paying additional fees. If your position is close to liquidation, you may want to skip the automatic trigger and close it manually.
Automatic removal of borrowed funds and its consequences
When a trader's account balance becomes negative, an insurance fund is used to cover losses. However, during times of high market volatility, conditions may arise where the insurance fund may not be able to absorb losses and will have to reduce the number of open positions to cover them. This means that open positions may be subject to reduction.
The order of position reduction is determined by the queue, the beginning of which is formed from orders with the maximum leverage and possible profit. To find your queue position number, select ADL from the Positions tab at the top of the page.

Conclusion
A traditional futures contract is a derivative that obligates traders to buy or sell an asset at a specific price in the future. Unlike traditional futures contracts, perpetual futures contracts do not have a settlement date. However, derivatives can be confusing for inexperienced traders, so it is important to understand how contracts work before taking financial risks. You can test the platform without risking real funds using the Binance Futures test network.
Additional Information
(Blog) Articles about futures
(Blog) What is the long/short ratio and what does it reflect in cryptocurrency futures?
(Blog) Six Strategies to Reduce Liquidation Risk When Trading Crypto Futures
Risk warning. Digital asset prices may be volatile. The value of the funds invested may go up and down. You may not get your invested funds back. You are solely responsible for your investment decisions. Binance is not responsible for your possible losses. Futures trading in particular is subject to high market risk and price volatility. If there is a sudden price change, there is a chance that your entire margin balance will be liquidated. Past performance is no guarantee of future performance. Before entering into a transaction, you should make an independent assessment of the appropriateness of the transaction, taking into account your own objectives and circumstances, including the risks and potential rewards. If necessary, contact your advisor. This information should not be considered financial or investment advice. To learn more about how to protect yourself, visit our Responsible Trading page. To learn more, please read our Terms of Use and Risk Disclosure.
Trading in cryptocurrency derivatives may be restricted in certain jurisdictions or regions or only to certain users (subject to legal and regulatory requirements). This content is intended only for those users who are authorized to access and receive such products and services, and is not intended for restricted users. When accessing or using any products or services offered or available on Binance, you are responsible for reviewing any applicable restrictions or requirements regarding those products and services that apply in the country or region from which you (or another person from your name) interact with these products and services. Binance reserves the right to change the terms and conditions and impose further restrictions on access to and use of any products and/or services offered at its sole discretion at any time and without notice.