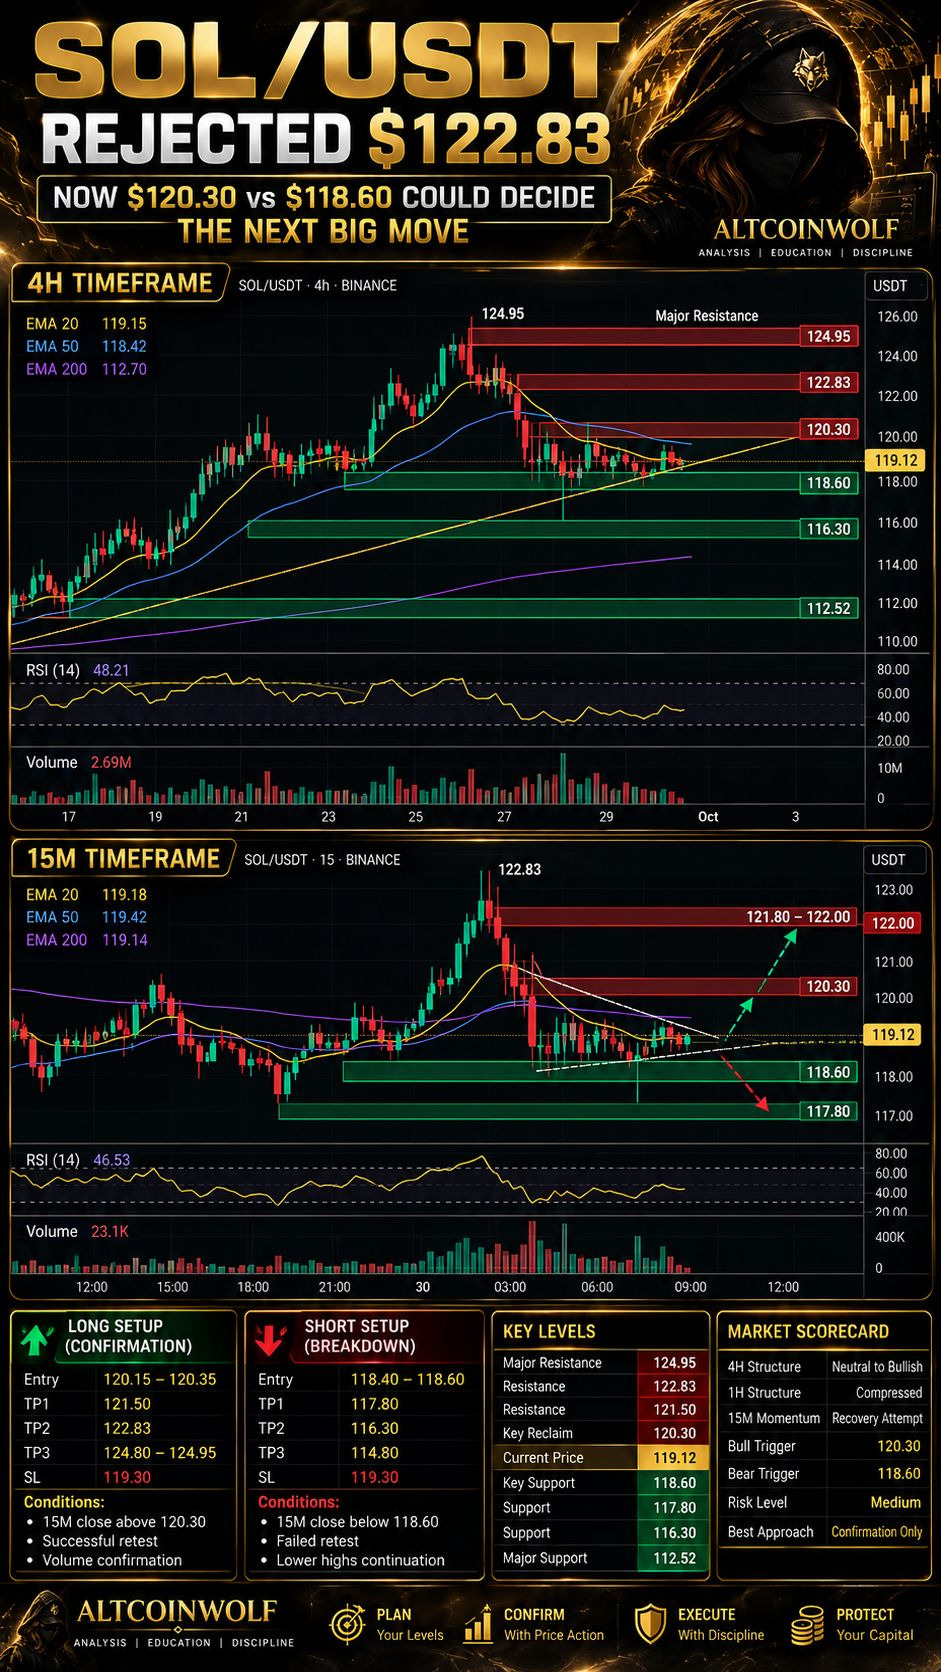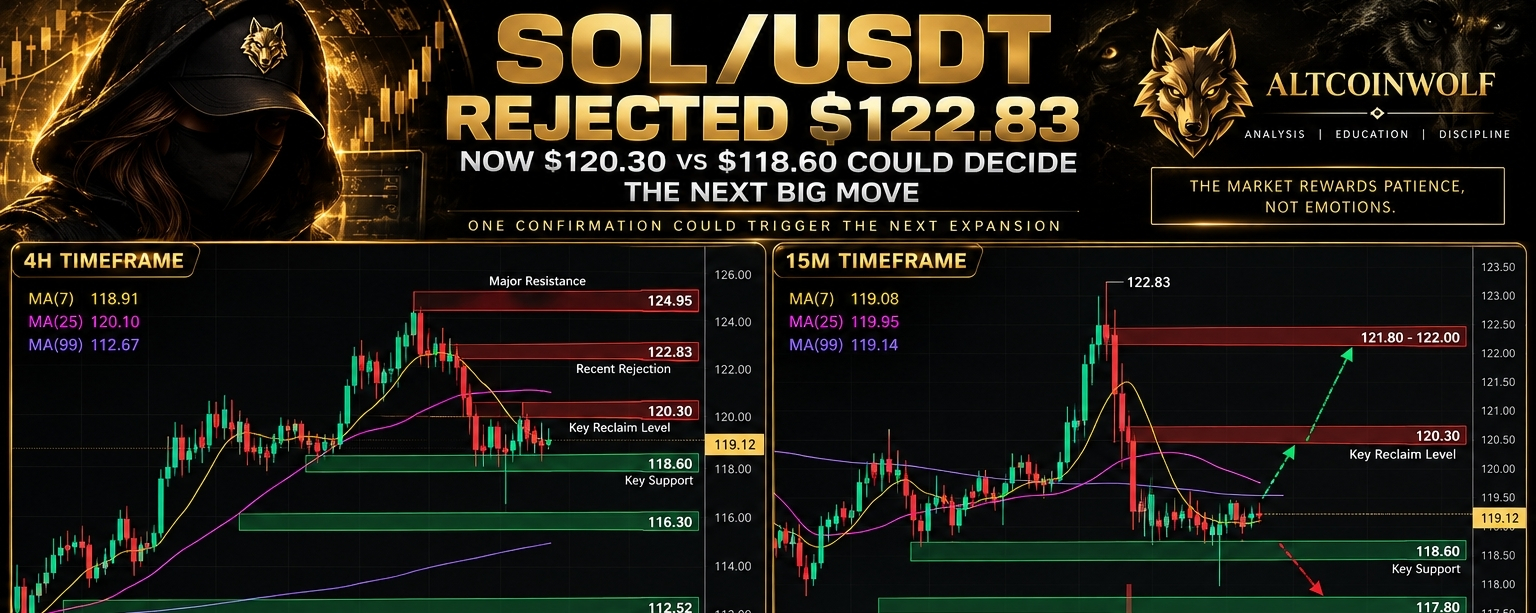

SOL/USDT is trading near $119.12 after a sharp rejection from $122.83. The market is now compressed between two important levels, and the next confirmed break could define the short-term direction.
Solana is back in a decision zone.
After pushing aggressively toward $122.83, SOL failed to hold the breakout and quickly slipped back toward the $119 area. That rejection changed the short-term structure and created a clear battle between buyers and sellers.
For traders, the important levels are now simple:
$120.30 = bullish confirmation
$118.60 = bearish confirmation
Between those levels, the risk of getting trapped increases.
The better approach is not to predict the next candle. It is to wait for the market to confirm which side is actually taking control.
SOL/USDT Market Snapshot
At the time of this analysis, SOL is trading around $119.12.
The broader 4-hour structure remains relatively constructive, but short-term momentum has weakened following the rejection from $122.83.
That creates an interesting situation:
Higher-timeframe structure has not fully broken.
Short-term momentum is no longer strongly bullish.
Price is sitting between nearby support and resistance.
Both long and short opportunities exist, but neither should be taken blindly.
This is exactly the type of environment where confirmation matters more than prediction.
4-Hour Analysis: The Bigger Trend Is Still Holding
The 4H chart shows that SOL previously rallied from approximately $112.52 to a local high near $124.95.
That move established a stronger higher-timeframe recovery structure.
However, price has since cooled and moved back toward the $119 region.
4H Moving Averages
MA(7): $118.91
MA(25): $120.10
MA(99): $112.67
The current price is sitting close to the MA7 but remains around the MA25 resistance area.
This suggests that short-term momentum has weakened without completely destroying the broader recovery structure.
The MA99 remains considerably below current price, which is important because it shows that SOL is still trading above a major higher-timeframe dynamic support.
Key 4H Support
The first important support region sits around:
$117.30–$118.00
If this area fails, the next important level is around:
$116.30
A much deeper correction would bring the $112.50–$112.70 area back into focus.
Key 4H Resistance
The first resistance zone is:
$120.10–$120.50
Above that, traders should watch:
$121.50–$122.83
The major higher-timeframe breakout level remains near:
$124.95
4H Conclusion
The 4H picture is best described as neutral to mildly bullish, but momentum needs to improve.
SOL has not broken down structurally, yet buyers still need to prove that they can reclaim the $120 area.
1-Hour Analysis: The Real Battle Is Around $120
The 1H chart gives us the clearest view of the current conflict.
SOL pushed toward $122.83, failed to hold above the breakout area, and then sold off sharply.
That failure matters because strong breakouts should usually show acceptance above resistance.
Instead, price returned toward the previous trading range.
1H Moving Averages
MA(7): $119.94
MA(25): $119.11
MA(99): $120.13
The three moving averages are compressed around current price.
That usually tells us the market is in a transition phase.
There is no clean directional advantage yet.
What Buyers Need
For buyers to regain control, SOL needs to reclaim:
$119.90–$120.30
A strong close and hold above this zone would improve the probability of continuation toward:
$121.20 → $122.83 → $124.95
What Sellers Need
For sellers to gain control, SOL needs to break below:
$118.60
That would expose:
$117.80 → $116.30
A failure to defend those levels could eventually lead to a deeper higher-timeframe pullback.
15-Minute Analysis: Where Execution Matters
The 15M chart is where the trade setup becomes more actionable.
After the rejection from $122.83, SOL dropped sharply and attempted to stabilize near the high-$118 region.
Price is now bouncing, but the recovery is still incomplete.
15M Moving Averages
MA(7): $119.08
MA(25): $119.95
MA(99): $119.14
Price is hovering near MA7 and MA99, while MA25 remains overhead.
This creates a simple message:
buyers are trying to recover, but they have not yet regained control.
A bounce alone is not confirmation.
The market needs to reclaim resistance and hold above it.
Volume: Why the Next Expansion Could Matter
Volume increased during both the move toward $122.83 and the selloff that followed.
After that volatility spike, participation began to cool as price moved back toward the $119 region.
This often happens when the market transitions from expansion into compression.
The implication is important:
The next high-volume move away from the current range could carry more information than the small candles forming inside it.
That is why forcing a trade in the middle of the range is unnecessarEducation: A Rejection Is Not Automatically Bearish
One of the most common trading mistakes is assuming that every rejection means the market must now collapse.
That is not how professional market analysis works.
A rejection simply tells us that buyers failed to maintain control at a particular level.
The next question is:
Can price reclaim the lost level?
If SOL recovers above $120.30 and holds it, the rejection becomes less important.
If price continues failing below $120.30 and later loses $118.60, then the rejection becomes more meaningful.
This is why professional traders focus on confirmation and invalidation, rather than emotional prediction.
AltcoinWolF Premium Trade Setup
Long Setup 1: Confirmation Reclaim
This is the cleaner bullish scenario.
Entry
Wait for SOL to reclaim $120.30 and hold above it.
Preferred entry area:
$120.15–$120.35
Stop Loss
$119.30
Targets
TP1: $121.50
TP2: $122.83
TP3: $124.80–$124.95
Why This Trade?
This setup avoids buying directly into resistance.
Instead, it asks buyers to prove control first.
A successful reclaim followed by a retest gives the trade a clearer invalidation point and a more professional execution structure.
Long Setup 2: Support-Reclaim Entry
This setup is more aggressive.
If SOL sweeps below the $118.30–$118.60 area but quickly reclaims support, a reversal entry may become attractive.
Entry
$118.65–$118.90
Stop Loss
$117.70
Targets
TP1: $120.00
TP2: $121.20
TP3: $122.80
Confirmation Needed
Do not simply buy because price touches support.
Look for:
rejection wick
bullish reclaim candle
buyers defending the zone
improving volume
No confirmation means no trade.
Short Setup 1: Breakdown Confirmation
The bearish scenario becomes stronger if SOL loses $118.60 and then fails to reclaim it.
Entry
$118.40–$118.60
Stop Loss
$119.30
Targets
TP1: $117.60–$117.80
TP2: $116.30
TP3: $114.80
Why This Trade?
A clean break below support would weaken the current recovery structure and could open the door to lower liquidity zones.
The best version of this setup is not the first wick below support.
It is the breakdown followed by a failed retest.
Short Setup 2: Resistance Rejection
If SOL rallies back toward the $120 area but fails again, a rejection setup may appear.
Entry
$119.90–$120.20
Stop Loss
$120.70
Targets
TP1: $118.80
TP2: $117.80
TP3: $116.30
This setup becomes stronger if the rejection is supported by clear selling volume and a strong bearish candle.
The No-Trade Zone
The most important zone today is:
$118.60–$120.30
This is where many traders are likely to force bad entries.
Buying here means buying directly below resistance.
Shorting here means shorting directly above support.
Neither side has a clean structural advantage.
AltcoinWolF rule:
No confirmation = no forced trade.
Sometimes the best trade is the one you do not take.
Confirmation vs Invalidation
Bullish Confirmation
The bullish case becomes stronger if:
SOL closes above $120.30
resistance turns into support
volume improves
the 1H structure begins forming higher highs again
Bullish Invalidation
The bullish idea weakens if price fails to reclaim $120.30 and loses $118.60.
Bearish Confirmation
The bearish case becomes stronger if:
SOL closes below $118.60
the retest fails
lower highs continue forming
selling volume remains elevated
Bearish Invalidation
The bearish idea weakens if SOL reclaims and holds above $120.30.
AltcoinWolF Market Scorecard
Asset: SOL/USDT
Current Price: ~$119.12
4H Structure: Constructive but cooling
1H Structure: Compressed / neutral
15M Momentum: Recovery attempt
Bullish Trigger: $120.30
Bearish Trigger: $118.60
Major Resistance: $122.83 / $124.95
Major Support: $117.80 / $116.30
Current Trade Quality: Weak inside the middle of the range
Preferred Strategy: Confirmation → Retest → Execution
Final Call
SOL does not need a prediction right now.
It needs proof.
The rejection from $122.83 weakened short-term momentum, but the broader structure has not yet broken.
That leaves traders with a very clear map:
Above $120.30: buyers begin regaining control.
Below $118.60: sellers gain a stronger structural advantage.
Between those levels: patience remains the better decision.
The goal is not to enter every move.
The goal is to enter when structure, confirmation, and risk all align.
AltcoinWolF Premium Education Takeaway
Good traders do not ask:
“Will SOL go up or down?”
They ask:
“What needs to happen before I have an edge?”
That small change in thinking can completely change trading behavior.
Instead of predicting:
Plan.
Instead of chasing:
Confirm.
Instead of hoping:
Define invalidation.
That is how a trading process becomes repeatable.
Full trade analysis is now live on AltcoinWolF Insights. Entry • TP • SL included. Read it before your next move. 🐺
The market rewards patience, not emotions. Wait for confirmation, protect your capital, and let the charts lead the way. — AltcoinWolF
#AltcoinWolF #QNTRises287% #TrumpRejectsAIRulesForVoluntaryAudits #Altcoin #sol $SOL