

khizarhayat99
3.1k Posts

khizarhayat99
Report
Block User
Open Trade
Frequent Trader
3.7 Years
248 Following
96 Followers
146 Liked
Posts
Portfolio
All
Quotes
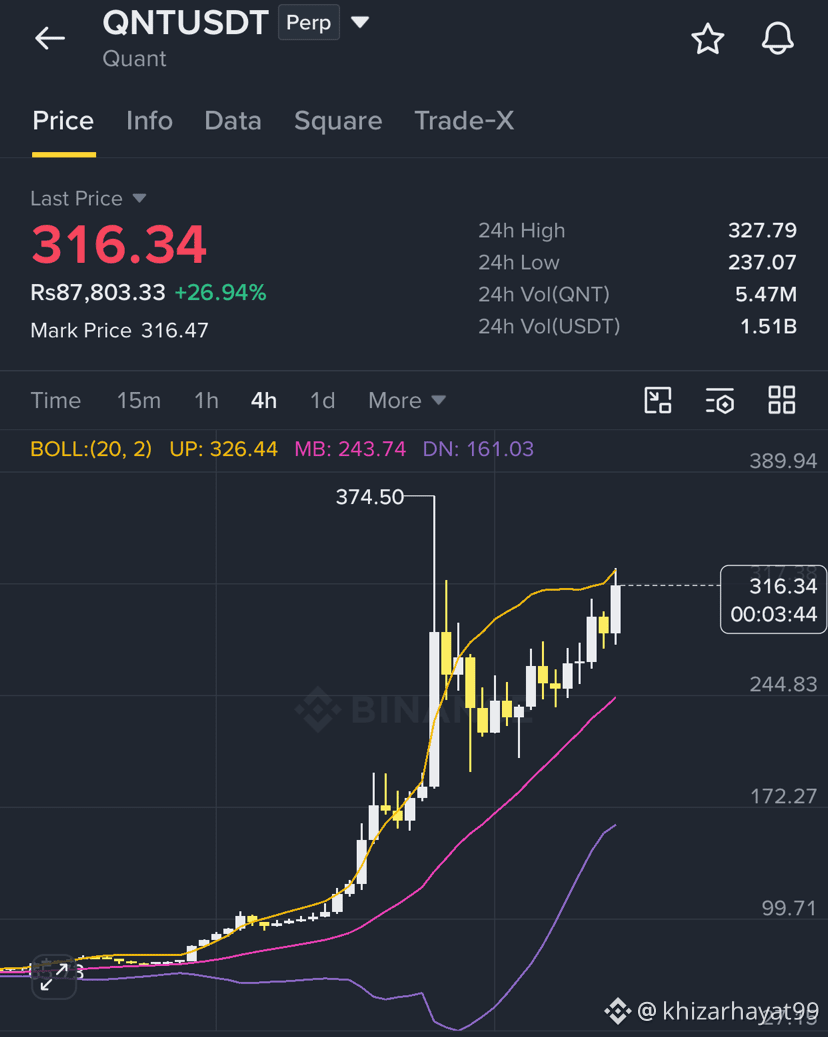
With $QNT /USDT trading around ~$282–$288 following recent momentum, targeting $316 on a 15-Minute (15m) Long Scalp requires strict lower-timeframe execution to avoid buying right into local supply around $300–$310.
Trade Setup Execution Framework (15m Scalp)
Current Market Context: Strong momentum on HTF, testing intermediate resistance near $300.
Scalp Objective: Capture an aggressive continuation surge toward $316.00 after a shallow pullback or liquidity grab.
Parameter Level / Zone Execution Rationale
Ideal Entry $280.00 – $284.00 Retracement into the 15m Fair Value Gap (FVG) or 0.618 Fib level of the latest 15m impulse.
Stop Loss (SL) ~$273.50 Placed strictly below the local 15m Higher Low / swing low. A 15m close below this invalidates immediate scalp structure.
Take Profit 1 (TP1) $300.00 Re-test of local swing high / supply level. Move SL to Breakeven (BE) and lock in 40% partial profits.
Take Profit 2 (TP2) $308.00 Intermediary liquidity pool before the macro target.
Take Profit 3 (TP3) $316.00 Final target / complete exit at the key supply zone.
Key Scalp Triggers (Must Wait For Confirmation)
Liquidity Sweep & CHoCH: Wait for price to sweep local 15m sell-side liquidity (taking out previous 15m low) followed by an immediate 3m/5m Change of Character (CHoCH) back to the upside.
Volume Expansion: Ensure the rejection out of the entry zone comes on expanding buy volume, not a slow grind.
Risk Management: Maintain a minimum 1:3 Risk-to-Reward (R:R) ratio based on your exact entry wick. Keep position size capped at 0.5%–1.0% of total account equity given high low-timeframe volatility near local highs.
{future}(QNTUSDT)
With $QNT /USDT trading around ~$282–$288 following recent momentum, targeting $316 on a 15-Minute (15m) Long Scalp requires strict lower-timeframe execution to avoid buying right into local supply around $300–$310.
Trade Setup Execution Framework (15m Scalp)
Current Market Context: Strong momentum on HTF, testing intermediate resistance near $300.
Scalp Objective: Capture an aggressive continuation surge toward $316.00 after a shallow pullback or liquidity grab.
Parameter Level / Zone Execution Rationale
Ideal Entry $280.00 – $284.00 Retracement into the 15m Fair Value Gap (FVG) or 0.618 Fib level of the latest 15m impulse.
Stop Loss (SL) ~$273.50 Placed strictly below the local 15m Higher Low / swing low. A 15m close below this invalidates immediate scalp structure.
Take Profit 1 (TP1) $300.00 Re-test of local swing high / supply level. Move SL to Breakeven (BE) and lock in 40% partial profits.
Take Profit 2 (TP2) $308.00 Intermediary liquidity pool before the macro target.
Take Profit 3 (TP3) $316.00 Final target / complete exit at the key supply zone.
Key Scalp Triggers (Must Wait For Confirmation)
Liquidity Sweep & CHoCH: Wait for price to sweep local 15m sell-side liquidity (taking out previous 15m low) followed by an immediate 3m/5m Change of Character (CHoCH) back to the upside.
Volume Expansion: Ensure the rejection out of the entry zone comes on expanding buy volume, not a slow grind.
Risk Management: Maintain a minimum 1:3 Risk-to-Reward (R:R) ratio based on your exact entry wick. Keep position size capped at 0.5%–1.0% of total account equity given high low-timeframe volatility near local highs.
Trade Setup Execution Framework (15m Scalp)
Current Market Context: Strong momentum on HTF, testing intermediate resistance near $300.
Scalp Objective: Capture an aggressive continuation surge toward $316.00 after a shallow pullback or liquidity grab.
Parameter Level / Zone Execution Rationale
Ideal Entry $280.00 – $284.00 Retracement into the 15m Fair Value Gap (FVG) or 0.618 Fib level of the latest 15m impulse.
Stop Loss (SL) ~$273.50 Placed strictly below the local 15m Higher Low / swing low. A 15m close below this invalidates immediate scalp structure.
Take Profit 1 (TP1) $300.00 Re-test of local swing high / supply level. Move SL to Breakeven (BE) and lock in 40% partial profits.
Take Profit 2 (TP2) $308.00 Intermediary liquidity pool before the macro target.
Take Profit 3 (TP3) $316.00 Final target / complete exit at the key supply zone.
Key Scalp Triggers (Must Wait For Confirmation)
Liquidity Sweep & CHoCH: Wait for price to sweep local 15m sell-side liquidity (taking out previous 15m low) followed by an immediate 3m/5m Change of Character (CHoCH) back to the upside.
Volume Expansion: Ensure the rejection out of the entry zone comes on expanding buy volume, not a slow grind.
Risk Management: Maintain a minimum 1:3 Risk-to-Reward (R:R) ratio based on your exact entry wick. Keep position size capped at 0.5%–1.0% of total account equity given high low-timeframe volatility near local highs.
97
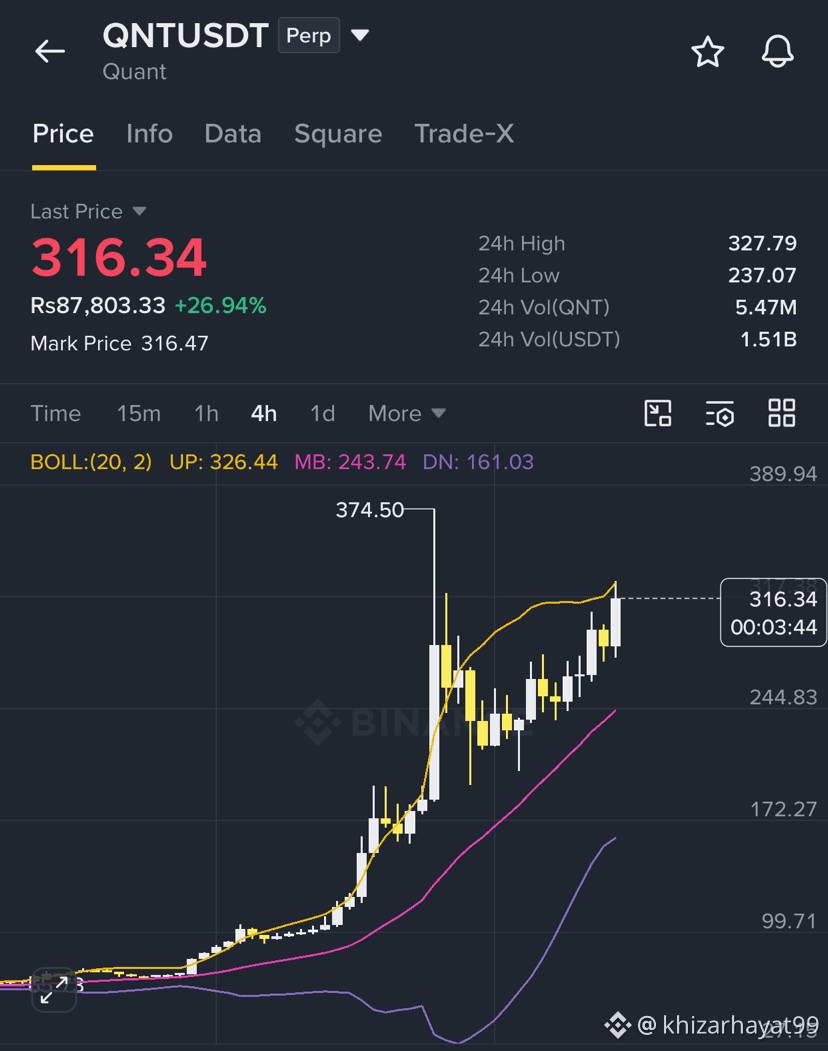
To execute or evaluate a 4-Hour (4H) Market Structure Long Setup on $QNT /USDT targeting the $316 macro resistance/liquidity zone, the setup must align with bullish market structure rules (Higher Highs & Higher Lows) on the 4H timeframe.
1. Market Structure Context (4H Timeframe)
Structural Bias: Bullish continuation following a Change of Character (CHoCH) or Break of Structure (BOS) above recent 4H lower highs.
Macro Destination ($316): Represents a significant higher-timeframe (HTF) major resistance and key liquidity pool. Reaching this target requires sustained buying momentum without breaking local structure.
2. Conceptual Trade Execution Framework
Parameter Execution Zone Rationale
Entry Zone Discount Demand / 4H Order Block Re-entry on a pullback into the 0.618–0.786 Fibonacci retracement or unmitigated 4H Fair Value Gap (FVG).
Stop Loss (SL) Below Local Swing Low Placed strictly below the structural 4H Higher Low. A 4H candle close below this level invalidates the bullish structure.
Take Profit 1 (TP1) Recent 4H Swing High Partial profit taking / move SL to Breakeven (BE).
Take Profit 2 (TP2) Intermediate HTF Supply Locking in 50%–70% of the position as price approaches local range resistance.
Take Profit 3 (TP3) $316.00 Target Full exit / liquidity sweep of the major HTF resistance level.
3. Key Confirmation Signals
Before entering a limit or market order on a 4H pullback, confirm the following triggers:
Price Action Confirmation: Bullish rejection wicks or a 4H bullish engulfing candle closing inside the demand zone.
Volume & Momentum: Volume expansion on impulsive upward moves and declining volume during the corrective retracement.
Risk-to-Reward Ratio (R:R): Ensure the entry allows for at least a 1:3 R:R given the distance to the $316 target relative to the structural SL.
Market Context: Keep track of Bitcoin ($BTC) stability, as heavy BTC drawdowns often invalidate altcoin market structures.
{future}(QNTUSDT)
To execute or evaluate a 4-Hour (4H) Market Structure Long Setup on $QNT /USDT targeting the $316 macro resistance/liquidity zone, the setup must align with bullish market structure rules (Higher Highs & Higher Lows) on the 4H timeframe.
1. Market Structure Context (4H Timeframe)
Structural Bias: Bullish continuation following a Change of Character (CHoCH) or Break of Structure (BOS) above recent 4H lower highs.
Macro Destination ($316): Represents a significant higher-timeframe (HTF) major resistance and key liquidity pool. Reaching this target requires sustained buying momentum without breaking local structure.
2. Conceptual Trade Execution Framework
Parameter Execution Zone Rationale
Entry Zone Discount Demand / 4H Order Block Re-entry on a pullback into the 0.618–0.786 Fibonacci retracement or unmitigated 4H Fair Value Gap (FVG).
Stop Loss (SL) Below Local Swing Low Placed strictly below the structural 4H Higher Low. A 4H candle close below this level invalidates the bullish structure.
Take Profit 1 (TP1) Recent 4H Swing High Partial profit taking / move SL to Breakeven (BE).
Take Profit 2 (TP2) Intermediate HTF Supply Locking in 50%–70% of the position as price approaches local range resistance.
Take Profit 3 (TP3) $316.00 Target Full exit / liquidity sweep of the major HTF resistance level.
3. Key Confirmation Signals
Before entering a limit or market order on a 4H pullback, confirm the following triggers:
Price Action Confirmation: Bullish rejection wicks or a 4H bullish engulfing candle closing inside the demand zone.
Volume & Momentum: Volume expansion on impulsive upward moves and declining volume during the corrective retracement.
Risk-to-Reward Ratio (R:R): Ensure the entry allows for at least a 1:3 R:R given the distance to the $316 target relative to the structural SL.
Market Context: Keep track of Bitcoin ($BTC) stability, as heavy BTC drawdowns often invalidate altcoin market structures.
1. Market Structure Context (4H Timeframe)
Structural Bias: Bullish continuation following a Change of Character (CHoCH) or Break of Structure (BOS) above recent 4H lower highs.
Macro Destination ($316): Represents a significant higher-timeframe (HTF) major resistance and key liquidity pool. Reaching this target requires sustained buying momentum without breaking local structure.
2. Conceptual Trade Execution Framework
Parameter Execution Zone Rationale
Entry Zone Discount Demand / 4H Order Block Re-entry on a pullback into the 0.618–0.786 Fibonacci retracement or unmitigated 4H Fair Value Gap (FVG).
Stop Loss (SL) Below Local Swing Low Placed strictly below the structural 4H Higher Low. A 4H candle close below this level invalidates the bullish structure.
Take Profit 1 (TP1) Recent 4H Swing High Partial profit taking / move SL to Breakeven (BE).
Take Profit 2 (TP2) Intermediate HTF Supply Locking in 50%–70% of the position as price approaches local range resistance.
Take Profit 3 (TP3) $316.00 Target Full exit / liquidity sweep of the major HTF resistance level.
3. Key Confirmation Signals
Before entering a limit or market order on a 4H pullback, confirm the following triggers:
Price Action Confirmation: Bullish rejection wicks or a 4H bullish engulfing candle closing inside the demand zone.
Volume & Momentum: Volume expansion on impulsive upward moves and declining volume during the corrective retracement.
Risk-to-Reward Ratio (R:R): Ensure the entry allows for at least a 1:3 R:R given the distance to the $316 target relative to the structural SL.
Market Context: Keep track of Bitcoin ($BTC) stability, as heavy BTC drawdowns often invalidate altcoin market structures.
80
$GTC /USDT — 4-Hour Bullish Structure Long Setup
Trade Parameters
Bias: Bullish Continuation / Breakout Retest
Timeframe: 4-Hour (4H)
Entry Zone: $0.11400 – $0.11580 (accumulation / horizontal support retest zone)
Stop Loss (SL): $0.10850 (below recent 4H market structure low / invalidation)
Risk/Reward Ratio: ~1:3+
Take Profit Targets
TP1: $0.12650 (First local 4H horizontal supply / high-volume node)
TP2: $0.13800 (Major liquidity pool / structural resistance)
TP3: $0.15200 (Extended expansion target for breakout continuation)
Execution & Confluence Checklist
Structure Hold: Look for a solid 4H candle body close remaining above $0.11500 to confirm support conversion and structure preservation.
Volume Delta: Verify expanding buy volume on upward pushes relative to diminishing sell volume during the retest phase.
Lower Timeframe Trigger (15m / 1H): Look for a Change of Character (CHoCH) or a Higher High/Higher Low market structure shift before full entry commitment.
Momentum: RSI consolidating near or above the 50 midpoint on the 4H chart, indicating underlying bullish strength with ample room to run.
Risk Management Rules
Cap maximum account risk strictly at 1–2% per trade.
Shift Stop Loss to Breakeven (BE) immediately upon securing TP1.
Take partial profits (30–50% of total size) at TP1 to de-risk the position.
{future}(GTCUSDT)
$GTC /USDT — 4-Hour Bullish Structure Long Setup
Trade Parameters
Bias: Bullish Continuation / Breakout Retest
Timeframe: 4-Hour (4H)
Entry Zone: $0.11400 – $0.11580 (accumulation / horizontal support retest zone)
Stop Loss (SL): $0.10850 (below recent 4H market structure low / invalidation)
Risk/Reward Ratio: ~1:3+
Take Profit Targets
TP1: $0.12650 (First local 4H horizontal supply / high-volume node)
TP2: $0.13800 (Major liquidity pool / structural resistance)
TP3: $0.15200 (Extended expansion target for breakout continuation)
Execution & Confluence Checklist
Structure Hold: Look for a solid 4H candle body close remaining above $0.11500 to confirm support conversion and structure preservation.
Volume Delta: Verify expanding buy volume on upward pushes relative to diminishing sell volume during the retest phase.
Lower Timeframe Trigger (15m / 1H): Look for a Change of Character (CHoCH) or a Higher High/Higher Low market structure shift before full entry commitment.
Momentum: RSI consolidating near or above the 50 midpoint on the 4H chart, indicating underlying bullish strength with ample room to run.
Risk Management Rules
Cap maximum account risk strictly at 1–2% per trade.
Shift Stop Loss to Breakeven (BE) immediately upon securing TP1.
Take partial profits (30–50% of total size) at TP1 to de-risk the position.
Trade Parameters
Bias: Bullish Continuation / Breakout Retest
Timeframe: 4-Hour (4H)
Entry Zone: $0.11400 – $0.11580 (accumulation / horizontal support retest zone)
Stop Loss (SL): $0.10850 (below recent 4H market structure low / invalidation)
Risk/Reward Ratio: ~1:3+
Take Profit Targets
TP1: $0.12650 (First local 4H horizontal supply / high-volume node)
TP2: $0.13800 (Major liquidity pool / structural resistance)
TP3: $0.15200 (Extended expansion target for breakout continuation)
Execution & Confluence Checklist
Structure Hold: Look for a solid 4H candle body close remaining above $0.11500 to confirm support conversion and structure preservation.
Volume Delta: Verify expanding buy volume on upward pushes relative to diminishing sell volume during the retest phase.
Lower Timeframe Trigger (15m / 1H): Look for a Change of Character (CHoCH) or a Higher High/Higher Low market structure shift before full entry commitment.
Momentum: RSI consolidating near or above the 50 midpoint on the 4H chart, indicating underlying bullish strength with ample room to run.
Risk Management Rules
Cap maximum account risk strictly at 1–2% per trade.
Shift Stop Loss to Breakeven (BE) immediately upon securing TP1.
Take partial profits (30–50% of total size) at TP1 to de-risk the position.
31
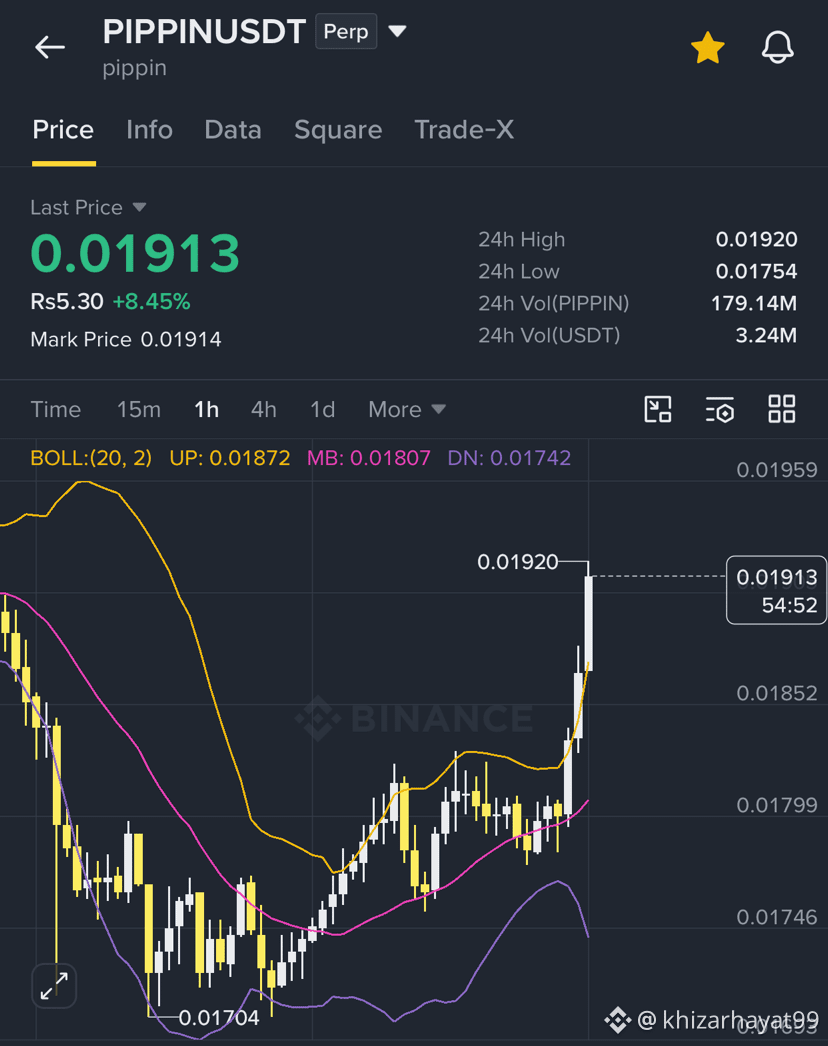
$PIPPIN /USDT — 15-Minute Bullish Scalp Setup
Trade Parameters
Bias: Bullish Scalp Continuation
Timeframe: 15-Minute (15m)
Entry Zone: $0.01890 – $0.01912 (Order block / local demand retest)
Stop Loss (SL): $0.01845 (Below 15m structural low / invalidation)
Risk/Reward Ratio: ~1:2.5+
Take Profit Targets
TP1: $0.01965 (First local liquidity sweep / immediate resistance)
TP2: $0.02020 (Key horizontal supply level)
TP3: $0.02100 (Extended scalp target on volume expansion)
Execution & Confluence Checklist
15m Structure: Look for a high-volume 15m candle close above $0.01912 to confirm local momentum holding.
Volume Delta: Verify strong buy volume entering near $0.01900 to ensure buyers are defending the zone.
RSI Alignment: 15m RSI rebounding off the 45–50 midpoint level indicating healthy continuation without immediate exhaustion.
Risk Management Rules
Position Sizing: Treat as a quick scalp—cap risk strictly at 0.5%–1% of capital.
Stop to Breakeven: Shift SL to BE as soon as TP1 ($0.01965) is hit.
Quick Execution: Take 50%+ off the table at TP1 to secure realized profits given high short-term volatility.
{future}(PIPPINUSDT)
$PIPPIN /USDT — 15-Minute Bullish Scalp Setup
Trade Parameters
Bias: Bullish Scalp Continuation
Timeframe: 15-Minute (15m)
Entry Zone: $0.01890 – $0.01912 (Order block / local demand retest)
Stop Loss (SL): $0.01845 (Below 15m structural low / invalidation)
Risk/Reward Ratio: ~1:2.5+
Take Profit Targets
TP1: $0.01965 (First local liquidity sweep / immediate resistance)
TP2: $0.02020 (Key horizontal supply level)
TP3: $0.02100 (Extended scalp target on volume expansion)
Execution & Confluence Checklist
15m Structure: Look for a high-volume 15m candle close above $0.01912 to confirm local momentum holding.
Volume Delta: Verify strong buy volume entering near $0.01900 to ensure buyers are defending the zone.
RSI Alignment: 15m RSI rebounding off the 45–50 midpoint level indicating healthy continuation without immediate exhaustion.
Risk Management Rules
Position Sizing: Treat as a quick scalp—cap risk strictly at 0.5%–1% of capital.
Stop to Breakeven: Shift SL to BE as soon as TP1 ($0.01965) is hit.
Quick Execution: Take 50%+ off the table at TP1 to secure realized profits given high short-term volatility.
Trade Parameters
Bias: Bullish Scalp Continuation
Timeframe: 15-Minute (15m)
Entry Zone: $0.01890 – $0.01912 (Order block / local demand retest)
Stop Loss (SL): $0.01845 (Below 15m structural low / invalidation)
Risk/Reward Ratio: ~1:2.5+
Take Profit Targets
TP1: $0.01965 (First local liquidity sweep / immediate resistance)
TP2: $0.02020 (Key horizontal supply level)
TP3: $0.02100 (Extended scalp target on volume expansion)
Execution & Confluence Checklist
15m Structure: Look for a high-volume 15m candle close above $0.01912 to confirm local momentum holding.
Volume Delta: Verify strong buy volume entering near $0.01900 to ensure buyers are defending the zone.
RSI Alignment: 15m RSI rebounding off the 45–50 midpoint level indicating healthy continuation without immediate exhaustion.
Risk Management Rules
Position Sizing: Treat as a quick scalp—cap risk strictly at 0.5%–1% of capital.
Stop to Breakeven: Shift SL to BE as soon as TP1 ($0.01965) is hit.
Quick Execution: Take 50%+ off the table at TP1 to secure realized profits given high short-term volatility.
45
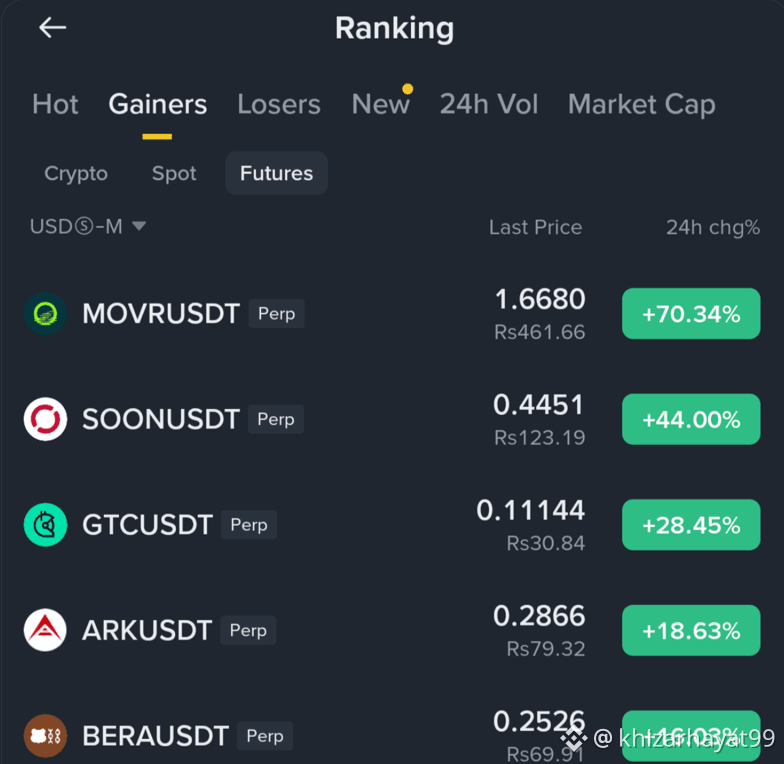
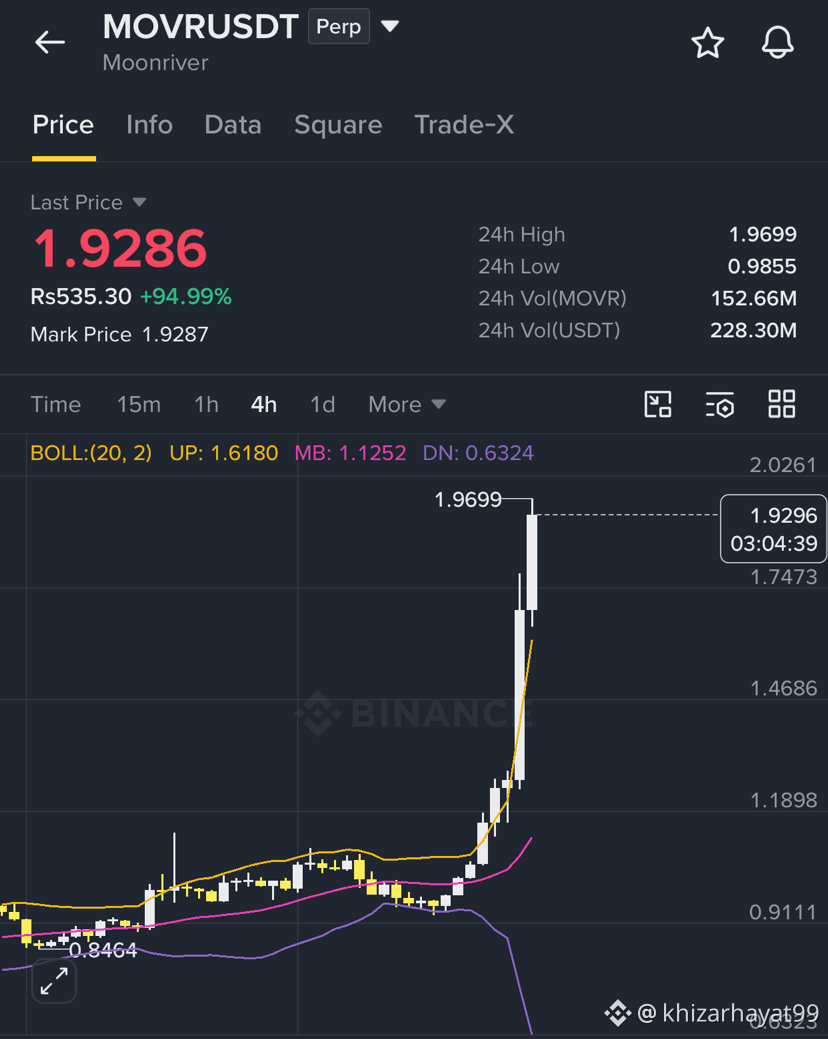
🔥 ALTCOINS EXPLODING — TOP GAINERS ON THE MOVE 🔥
Selected futures names are pumping hard while the rest of the market chops sideways:
🚀 $MOVR : +70.34%
⚡ $SOON : +44.00%
📈 $GTC : +28.45%
💥 $ARK : +18.63%
💎 $BERA : +16.03%
MOVRisleadingthechargewithmassivevolume,whileSOON continues its strong upward trend.
⚠️ Pro Tip: Heat is high, but chasing green candles post-pump is a classic FOMO trap. Patience pays—wait for a proper retest or a fresh structural setup before pulling the trigger! 🤝
{future}(GTCUSDT)
{future}(SOONUSDT)
{future}(MOVRUSDT)
🔥 ALTCOINS EXPLODING — TOP GAINERS ON THE MOVE 🔥
Selected futures names are pumping hard while the rest of the market chops sideways:
🚀 $MOVR : +70.34%
⚡ $SOON : +44.00%
📈 $GTC : +28.45%
💥 $ARK : +18.63%
💎 $BERA : +16.03%
MOVRisleadingthechargewithmassivevolume,whileSOON continues its strong upward trend.
⚠️ Pro Tip: Heat is high, but chasing green candles post-pump is a classic FOMO trap. Patience pays—wait for a proper retest or a fresh structural setup before pulling the trigger! 🤝
Selected futures names are pumping hard while the rest of the market chops sideways:
🚀 $MOVR : +70.34%
⚡ $SOON : +44.00%
📈 $GTC : +28.45%
💥 $ARK : +18.63%
💎 $BERA : +16.03%
MOVRisleadingthechargewithmassivevolume,whileSOON continues its strong upward trend.
⚠️ Pro Tip: Heat is high, but chasing green candles post-pump is a classic FOMO trap. Patience pays—wait for a proper retest or a fresh structural setup before pulling the trigger! 🤝
288
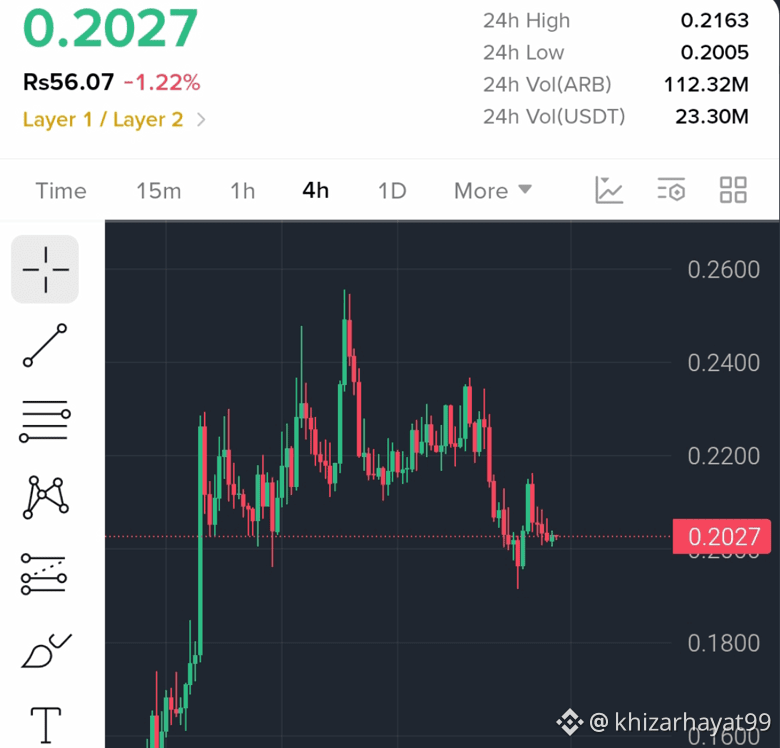
Opened a 10x Short on $ARB 📉
🎯 Entry: $0.2025 – $0.2040
💰 Targets: $0.1990 | $0.1960
🛑 Invalidation (SL): $0.2070
Risk strictly managed. Let’s see how this plays out! 🤝
{future}(ARBUSDT)
Opened a 10x Short on $ARB 📉
🎯 Entry: $0.2025 – $0.2040
💰 Targets: $0.1990 | $0.1960
🛑 Invalidation (SL): $0.2070
Risk strictly managed. Let’s see how this plays out! 🤝
🎯 Entry: $0.2025 – $0.2040
💰 Targets: $0.1990 | $0.1960
🛑 Invalidation (SL): $0.2070
Risk strictly managed. Let’s see how this plays out! 🤝
61
$MOVR /USDT — 4-Hour Bullish Structure Long Setup
Trade Parameters
Bias: Bullish Continuation / Reclaim
Timeframe: 4-Hour (4H)
Entry Zone: $1.9000 – $1.9250 (accumulation / support retest zone)
Stop Loss (SL): $1.8350 (below recent 4H swing low / structural invalidation)
Risk/Reward Ratio: ~1:3+ (depending on execution)
Take Profit Targets
TP1: $2.0800 (First major 4H horizontal supply / local resistance)
TP2: $2.2800 (Liquidity pool above recent high)
TP3: $2.5200 (Extended target for macro breakout continuation)
Execution & Confluence Checklist
Structure Shift: Look for a 4H candle body close solidifying above $1.9200 to confirm support conversion.
Volume Profile: Confirm volume expansion on bullish candles compared to declining volume during the pullback to $1.9200.
Lower Timeframe Trigger (15m / 1H): Look for a change of character (CHoCH) or a Higher High/Higher Low formation on the 15m/1H charts before committing full size.
Momentum: RSI resetting near/above 45–50 level on the 4H, indicating room for the next leg up without being overbought.
Risk Management Rules
Keep total risk strictly capped at 1–2% of account equity.
Move Stop Loss to Breakeven (BE) once TP1 is secured.
Take partial profits at TP1 (e.g., 30–50% of position) to de-risk the trade.
{future}(MOVRUSDT)
$MOVR /USDT — 4-Hour Bullish Structure Long Setup
Trade Parameters
Bias: Bullish Continuation / Reclaim
Timeframe: 4-Hour (4H)
Entry Zone: $1.9000 – $1.9250 (accumulation / support retest zone)
Stop Loss (SL): $1.8350 (below recent 4H swing low / structural invalidation)
Risk/Reward Ratio: ~1:3+ (depending on execution)
Take Profit Targets
TP1: $2.0800 (First major 4H horizontal supply / local resistance)
TP2: $2.2800 (Liquidity pool above recent high)
TP3: $2.5200 (Extended target for macro breakout continuation)
Execution & Confluence Checklist
Structure Shift: Look for a 4H candle body close solidifying above $1.9200 to confirm support conversion.
Volume Profile: Confirm volume expansion on bullish candles compared to declining volume during the pullback to $1.9200.
Lower Timeframe Trigger (15m / 1H): Look for a change of character (CHoCH) or a Higher High/Higher Low formation on the 15m/1H charts before committing full size.
Momentum: RSI resetting near/above 45–50 level on the 4H, indicating room for the next leg up without being overbought.
Risk Management Rules
Keep total risk strictly capped at 1–2% of account equity.
Move Stop Loss to Breakeven (BE) once TP1 is secured.
Take partial profits at TP1 (e.g., 30–50% of position) to de-risk the trade.
Trade Parameters
Bias: Bullish Continuation / Reclaim
Timeframe: 4-Hour (4H)
Entry Zone: $1.9000 – $1.9250 (accumulation / support retest zone)
Stop Loss (SL): $1.8350 (below recent 4H swing low / structural invalidation)
Risk/Reward Ratio: ~1:3+ (depending on execution)
Take Profit Targets
TP1: $2.0800 (First major 4H horizontal supply / local resistance)
TP2: $2.2800 (Liquidity pool above recent high)
TP3: $2.5200 (Extended target for macro breakout continuation)
Execution & Confluence Checklist
Structure Shift: Look for a 4H candle body close solidifying above $1.9200 to confirm support conversion.
Volume Profile: Confirm volume expansion on bullish candles compared to declining volume during the pullback to $1.9200.
Lower Timeframe Trigger (15m / 1H): Look for a change of character (CHoCH) or a Higher High/Higher Low formation on the 15m/1H charts before committing full size.
Momentum: RSI resetting near/above 45–50 level on the 4H, indicating room for the next leg up without being overbought.
Risk Management Rules
Keep total risk strictly capped at 1–2% of account equity.
Move Stop Loss to Breakeven (BE) once TP1 is secured.
Take partial profits at TP1 (e.g., 30–50% of position) to de-risk the trade.
209
Major tokens and sectors
Large-cap strength remains intact. $BTC is up about 0.8% over 24 hours, $ETH about 1.3%, and $SOL about 5.3%, showing continued support for the beta-heavy part of the market.
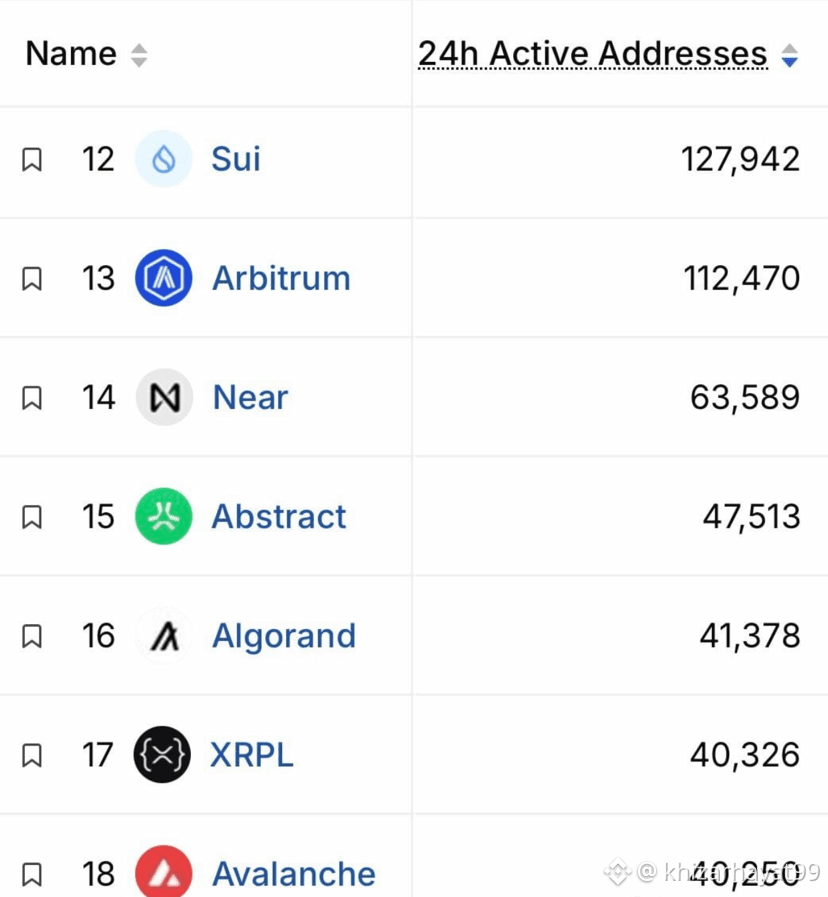
High-beta Layer 1 and infrastructure names are leading. SUI is up roughly 12.3%, AVAX 8.7%, and DOT 8.4%, which points to rotation into faster-moving alt segments rather than a purely BTC-led session.
Meme exposure is also participating. DOGE is up around 8.3%, signaling that speculative appetite has picked up alongside core majors.
Leadership is uneven. XRP is down about 1.3% and BNB is slightly red, so this is not a full-market melt-up; it is a selective rally with stronger flows into specific narratives.
{spot}(SOLUSDT)
{spot}(ETHUSDT)
{spot}(BTCUSDT)
Major tokens and sectors
Large-cap strength remains intact. $BTC is up about 0.8% over 24 hours, $ETH about 1.3%, and $SOL about 5.3%, showing continued support for the beta-heavy part of the market.
High-beta Layer 1 and infrastructure names are leading. SUI is up roughly 12.3%, AVAX 8.7%, and DOT 8.4%, which points to rotation into faster-moving alt segments rather than a purely BTC-led session.
Meme exposure is also participating. DOGE is up around 8.3%, signaling that speculative appetite has picked up alongside core majors.
Leadership is uneven. XRP is down about 1.3% and BNB is slightly red, so this is not a full-market melt-up; it is a selective rally with stronger flows into specific narratives.
Large-cap strength remains intact. $BTC is up about 0.8% over 24 hours, $ETH about 1.3%, and $SOL about 5.3%, showing continued support for the beta-heavy part of the market.
High-beta Layer 1 and infrastructure names are leading. SUI is up roughly 12.3%, AVAX 8.7%, and DOT 8.4%, which points to rotation into faster-moving alt segments rather than a purely BTC-led session.
Meme exposure is also participating. DOGE is up around 8.3%, signaling that speculative appetite has picked up alongside core majors.
Leadership is uneven. XRP is down about 1.3% and BNB is slightly red, so this is not a full-market melt-up; it is a selective rally with stronger flows into specific narratives.
51
"You have $10,000 to deploy today, but you can only lock in ONE token for the rest of the run. Which one are you riding with? 👇
$TAO $SUI | $NEAR $SEI | $HBAR $AVAX | $FET $QNT | $SOL $ONDO
Drop your pick below and tell me why! ⬇️🔥"
{spot}(NEARUSDT)
{spot}(SUIUSDT)
{spot}(TAOUSDT)
"You have $10,000 to deploy today, but you can only lock in ONE token for the rest of the run. Which one are you riding with? 👇
$TAO $SUI | $NEAR $SEI | $HBAR $AVAX | $FET $QNT | $SOL $ONDO
Drop your pick below and tell me why! ⬇️🔥"
$TAO $SUI | $NEAR $SEI | $HBAR $AVAX | $FET $QNT | $SOL $ONDO
Drop your pick below and tell me why! ⬇️🔥"

3
758
"Bags packed but we need MORE. 🎒🚀 Scooping up extra $SUI , $UNI ,and$NEAR immediately. These are not the charts you want to fade right now. ‼️🔥"
{future}(NEARUSDT)
{future}(UNIUSDT)
{future}(SUIUSDT)
"Bags packed but we need MORE. 🎒🚀 Scooping up extra $SUI , $UNI ,and$NEAR immediately. These are not the charts you want to fade right now. ‼️🔥"
1
27
If you could only buy ONE crypto today, which are you choosing❓❓
$TAO
$SUI
$NEAR
#SEI
#HBAR
$AVAX
$FET
$QNT
$SOL
$ONDO
{future}(NEARUSDT)
{future}(TAOUSDT)
{future}(SUIUSDT)
If you could only buy ONE crypto today, which are you choosing❓❓
$TAO
$SUI
$NEAR
#SEI
#HBAR
$AVAX
$FET
$QNT
$SOL
$ONDO
$TAO
$SUI
$NEAR
#SEI
#HBAR
$AVAX
$FET
$QNT
$SOL
$ONDO

4
Buy more $SUI $UNI $NEAR ..‼️‼️
{spot}(NEARUSDT)
{spot}(UNIUSDT)
{spot}(SUIUSDT)
Buy more $SUI $UNI $NEAR ..‼️‼️
10
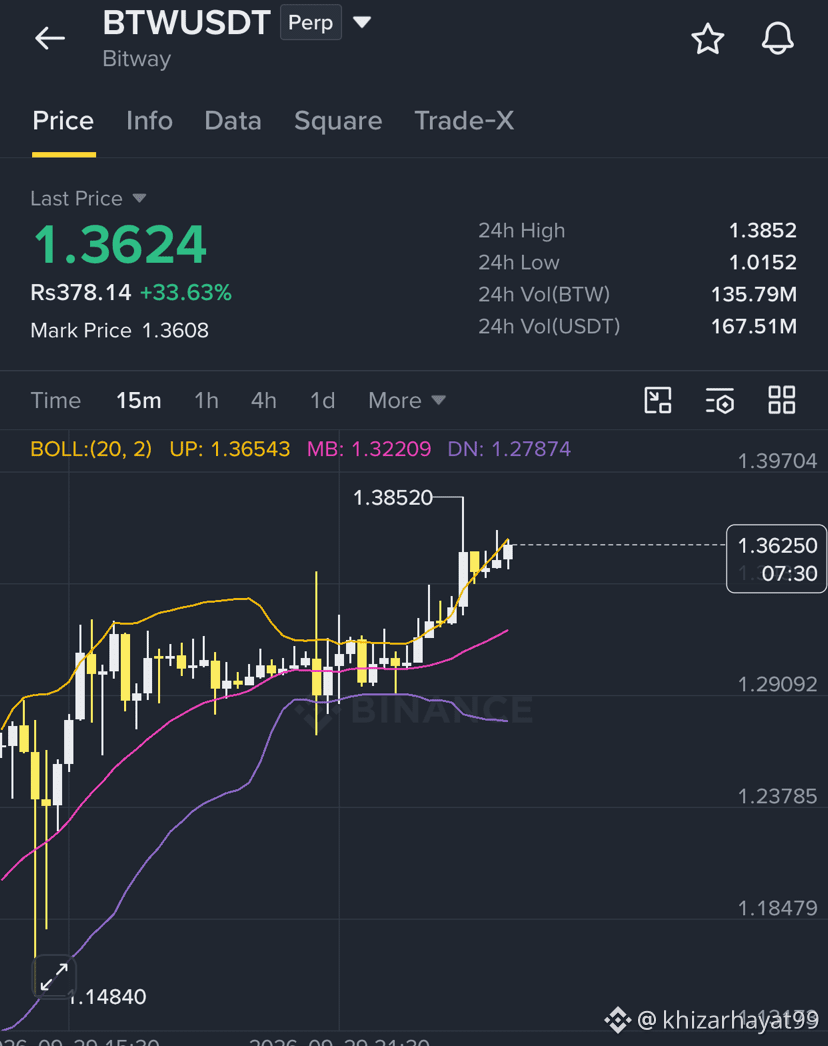
Scalp Setup: $BTW /USDT (15-Minute Breakout)
With BTW approaching the $1.3500 pivot, the focus shifts to whether it can clear this resistance and make a push toward the recent $1.40 local highs. Here is a 15-minute scalp setup designed for momentum continuation.
Key Technical Parameters
Metric / Level Value Notes
Bias Bullish Continuation (Scalp) Playing the breakout and momentum above the $1.35 pivot
Ideal Entry Zone $1.3450 – $1.3550 Breakout confirmation and subsequent 15m retest of support
Invalidation / Stop Loss $1.3280 Below the immediate 15m consolidation base (Risk: ~1.6%)
Take Profit 1 (TP1) $1.3750 First liquidity pool / minor resistance (~1.8% upside)
Take Profit 2 (TP2) $1.4000 Retest of the major 24-hour local high (~3.7% upside)
Take Profit 3 (TP3) $1.4350 Blue-sky breakout extension (~6.3% upside)
Risk / Reward Ratio 1 : 2.3 Calculated to TP2
Trade Execution Plan
Entry Strategy:
Breakout & Retest: Wait for a strong 15m candle to close above $1.3500. Place limit bids between $1.3450 and $1.3520 to catch the immediate retest/throwback before the next leg up.
Aggressive: Market buy a portion on the cross of $1.3500 if volume indicates strong buying pressure, leaving room to add on a dip.
Risk Management:
Because the stop loss is tight (~1.6%), position sizing can be slightly larger than a swing trade, but overall risk should remain fixed (e.g., 1% of total account equity).
Once TP1 ($1.3750) is secured, take 30-50% off the table and move the Stop Loss to Breakeven ($1.3500) to protect capital against a fakeout.
Invalidation Criteria:
A 15m candle failing to hold the breakout and closing back below $1.3280 indicates a liquidity sweep/bull trap, invalidating the long setup.
How would you like to manage this 1.3500 setup?
{future}(BTWUSDT)
Scalp Setup: $BTW /USDT (15-Minute Breakout)
With BTW approaching the $1.3500 pivot, the focus shifts to whether it can clear this resistance and make a push toward the recent $1.40 local highs. Here is a 15-minute scalp setup designed for momentum continuation.
Key Technical Parameters
Metric / Level Value Notes
Bias Bullish Continuation (Scalp) Playing the breakout and momentum above the $1.35 pivot
Ideal Entry Zone $1.3450 – $1.3550 Breakout confirmation and subsequent 15m retest of support
Invalidation / Stop Loss $1.3280 Below the immediate 15m consolidation base (Risk: ~1.6%)
Take Profit 1 (TP1) $1.3750 First liquidity pool / minor resistance (~1.8% upside)
Take Profit 2 (TP2) $1.4000 Retest of the major 24-hour local high (~3.7% upside)
Take Profit 3 (TP3) $1.4350 Blue-sky breakout extension (~6.3% upside)
Risk / Reward Ratio 1 : 2.3 Calculated to TP2
Trade Execution Plan
Entry Strategy:
Breakout & Retest: Wait for a strong 15m candle to close above $1.3500. Place limit bids between $1.3450 and $1.3520 to catch the immediate retest/throwback before the next leg up.
Aggressive: Market buy a portion on the cross of $1.3500 if volume indicates strong buying pressure, leaving room to add on a dip.
Risk Management:
Because the stop loss is tight (~1.6%), position sizing can be slightly larger than a swing trade, but overall risk should remain fixed (e.g., 1% of total account equity).
Once TP1 ($1.3750) is secured, take 30-50% off the table and move the Stop Loss to Breakeven ($1.3500) to protect capital against a fakeout.
Invalidation Criteria:
A 15m candle failing to hold the breakout and closing back below $1.3280 indicates a liquidity sweep/bull trap, invalidating the long setup.
How would you like to manage this 1.3500 setup?
With BTW approaching the $1.3500 pivot, the focus shifts to whether it can clear this resistance and make a push toward the recent $1.40 local highs. Here is a 15-minute scalp setup designed for momentum continuation.
Key Technical Parameters
Metric / Level Value Notes
Bias Bullish Continuation (Scalp) Playing the breakout and momentum above the $1.35 pivot
Ideal Entry Zone $1.3450 – $1.3550 Breakout confirmation and subsequent 15m retest of support
Invalidation / Stop Loss $1.3280 Below the immediate 15m consolidation base (Risk: ~1.6%)
Take Profit 1 (TP1) $1.3750 First liquidity pool / minor resistance (~1.8% upside)
Take Profit 2 (TP2) $1.4000 Retest of the major 24-hour local high (~3.7% upside)
Take Profit 3 (TP3) $1.4350 Blue-sky breakout extension (~6.3% upside)
Risk / Reward Ratio 1 : 2.3 Calculated to TP2
Trade Execution Plan
Entry Strategy:
Breakout & Retest: Wait for a strong 15m candle to close above $1.3500. Place limit bids between $1.3450 and $1.3520 to catch the immediate retest/throwback before the next leg up.
Aggressive: Market buy a portion on the cross of $1.3500 if volume indicates strong buying pressure, leaving room to add on a dip.
Risk Management:
Because the stop loss is tight (~1.6%), position sizing can be slightly larger than a swing trade, but overall risk should remain fixed (e.g., 1% of total account equity).
Once TP1 ($1.3750) is secured, take 30-50% off the table and move the Stop Loss to Breakeven ($1.3500) to protect capital against a fakeout.
Invalidation Criteria:
A 15m candle failing to hold the breakout and closing back below $1.3280 indicates a liquidity sweep/bull trap, invalidating the long setup.
How would you like to manage this 1.3500 setup?
80
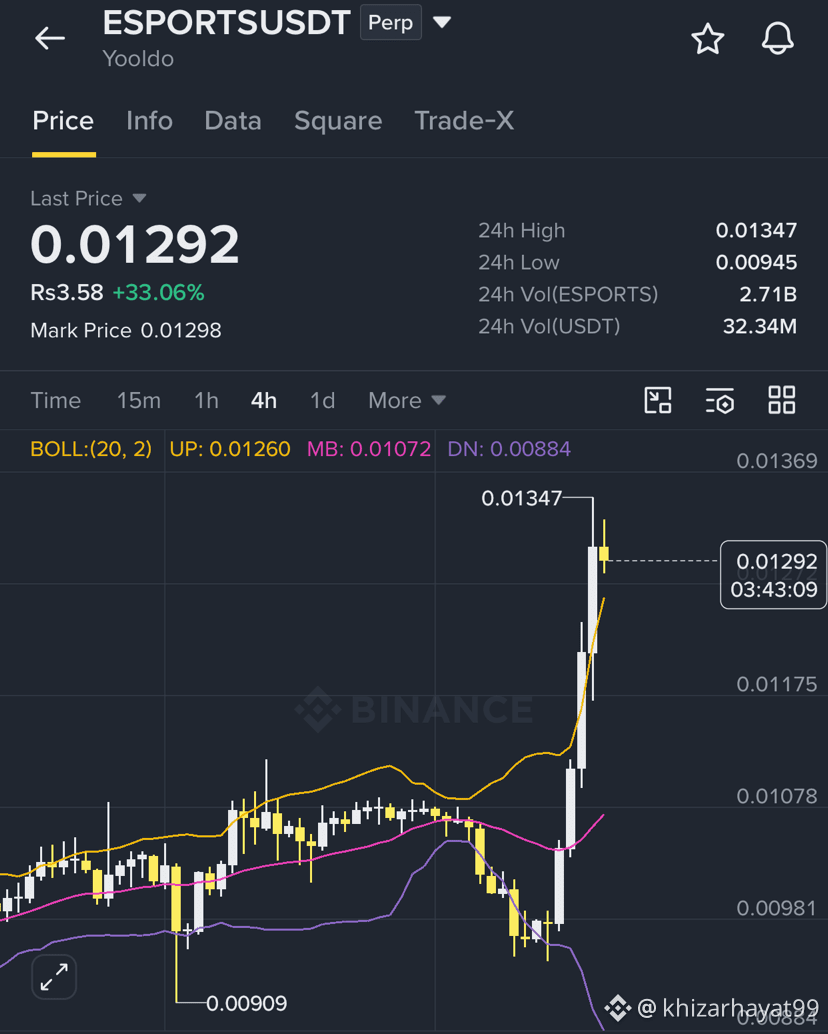
Trade Setup: $ESPORTS /USDT (4-Hour Bullish Structure)
Here is a structured long setup based on the 4H market structure around the 0.13 level.
Key Technical Parameters
Metric / Level Value Notes
Bias Bullish 4H higher-high / higher-low market structure
Ideal Entry Zone 0.1250 – 0.1320 Re-test of local broken resistance turned support
Invalidation / Stop Loss 0.1180 Below recent 4H swing low (Risk: ~8.5%)
Take Profit 1 (TP1) 0.1500 Next liquidity zone / local high (~15% upside)
Take Profit 2 (TP2) 0.1780 Structural resistance level (~36% upside)
Take Profit 3 (TP3) 0.2350 Major high timeframe expansion target (~80% upside)
Risk / Reward Ratio 1 : 4.2 Calculated to TP2
Trade Execution Plan
Entry Strategy:
Aggressive: Limit order spread in the 0.1280 – 0.1310 region.
Conservative: Wait for a 4H candle to close above 0.1350 with expanding volume to confirm momentum before entering on a minor 15m pullback.
Risk Management:
Keep overall trade position size under 1–2% of portfolio risk due to higher volatility in low-cap / perpetual contracts.
Once TP1 (0.1500) is hit, take 30–50% profits off the table and trail Stop Loss to Breakeven (0.1300).
Invalidation Criteria:
A 4H body close below 0.1180 breaks the market structure, invalidating the long setup.
Would you like to refine or analyze this setup further?
{future}(ESPORTSUSDT)
Trade Setup: $ESPORTS /USDT (4-Hour Bullish Structure)
Here is a structured long setup based on the 4H market structure around the 0.13 level.
Key Technical Parameters
Metric / Level Value Notes
Bias Bullish 4H higher-high / higher-low market structure
Ideal Entry Zone 0.1250 – 0.1320 Re-test of local broken resistance turned support
Invalidation / Stop Loss 0.1180 Below recent 4H swing low (Risk: ~8.5%)
Take Profit 1 (TP1) 0.1500 Next liquidity zone / local high (~15% upside)
Take Profit 2 (TP2) 0.1780 Structural resistance level (~36% upside)
Take Profit 3 (TP3) 0.2350 Major high timeframe expansion target (~80% upside)
Risk / Reward Ratio 1 : 4.2 Calculated to TP2
Trade Execution Plan
Entry Strategy:
Aggressive: Limit order spread in the 0.1280 – 0.1310 region.
Conservative: Wait for a 4H candle to close above 0.1350 with expanding volume to confirm momentum before entering on a minor 15m pullback.
Risk Management:
Keep overall trade position size under 1–2% of portfolio risk due to higher volatility in low-cap / perpetual contracts.
Once TP1 (0.1500) is hit, take 30–50% profits off the table and trail Stop Loss to Breakeven (0.1300).
Invalidation Criteria:
A 4H body close below 0.1180 breaks the market structure, invalidating the long setup.
Would you like to refine or analyze this setup further?
Here is a structured long setup based on the 4H market structure around the 0.13 level.
Key Technical Parameters
Metric / Level Value Notes
Bias Bullish 4H higher-high / higher-low market structure
Ideal Entry Zone 0.1250 – 0.1320 Re-test of local broken resistance turned support
Invalidation / Stop Loss 0.1180 Below recent 4H swing low (Risk: ~8.5%)
Take Profit 1 (TP1) 0.1500 Next liquidity zone / local high (~15% upside)
Take Profit 2 (TP2) 0.1780 Structural resistance level (~36% upside)
Take Profit 3 (TP3) 0.2350 Major high timeframe expansion target (~80% upside)
Risk / Reward Ratio 1 : 4.2 Calculated to TP2
Trade Execution Plan
Entry Strategy:
Aggressive: Limit order spread in the 0.1280 – 0.1310 region.
Conservative: Wait for a 4H candle to close above 0.1350 with expanding volume to confirm momentum before entering on a minor 15m pullback.
Risk Management:
Keep overall trade position size under 1–2% of portfolio risk due to higher volatility in low-cap / perpetual contracts.
Once TP1 (0.1500) is hit, take 30–50% profits off the table and trail Stop Loss to Breakeven (0.1300).
Invalidation Criteria:
A 4H body close below 0.1180 breaks the market structure, invalidating the long setup.
Would you like to refine or analyze this setup further?
51
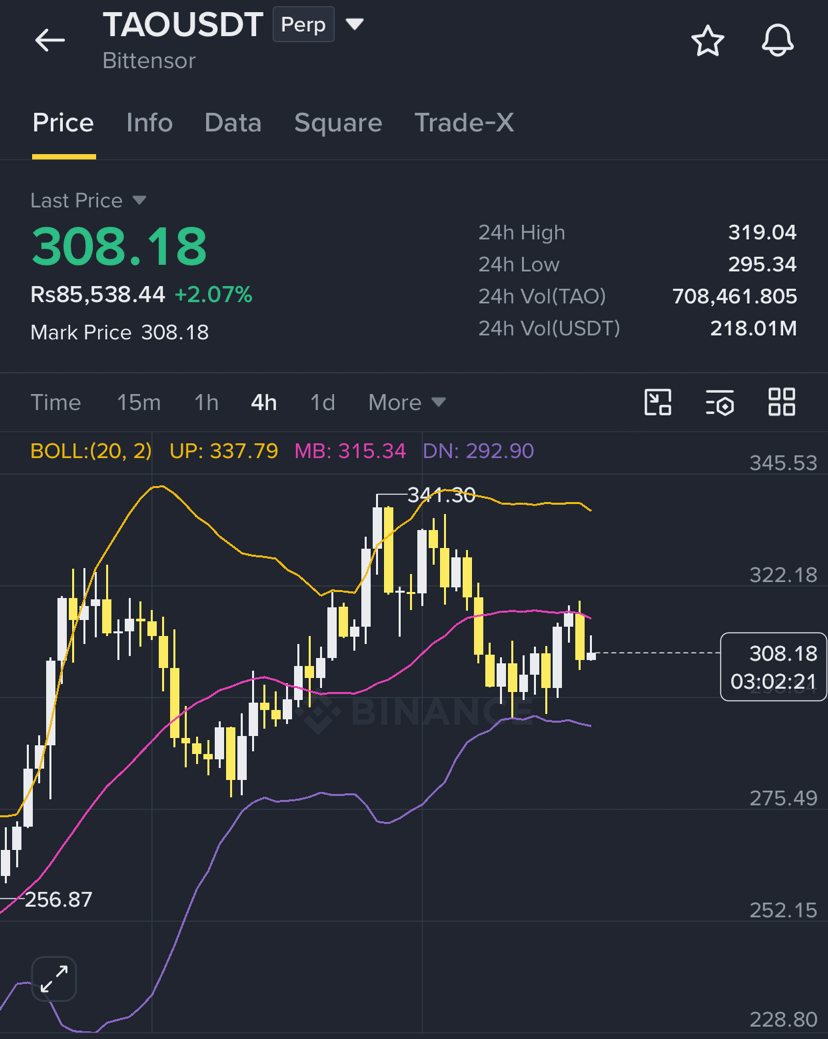
An actionable trade plan and technical breakdown for $TAO USDT based on a 4-Hour bullish structure holding above the $308 level:
Key Technical Analysis & Context
Demand Zone ($295 – $308): Price is retesting a key prior resistance zone on the 4H timeframe, now acting as flipped support.
Market Structure: TAO maintains a series of higher highs and higher lows following the recent momentum expansion from sub-$300 levels.
Trend & Indicators: The $300 area aligns with psychological support and short-term EMA moving averages (20/50 EMA on 4H). Holding above $300 keeps the macro continuation structure bullish.
Trade Plan & Execution Matrix
Parameter Value Details / Notes
Trade Direction LONG Trend continuation off the 4H demand / flipped support zone
Entry Zone $302 – $310 Limit scaling in near the $308 pivot zone
Stop Loss (SL) $288.00 Placed below the structural 4H swing low (~6.2% risk)
Take Profit 1 (TP1) $340.00 Local swing high / major resistance level (partial exit & SL to BE)
Take Profit 2 (TP2) $375.00 High-timeframe liquidity sweep / 1.618 Fib extension
Take Profit 3 (TP3) $420.00 Major expansion target towards $400+ key resistance
Risk / Reward Ratio ~1 : 3.3 (Calculated to TP2)
Trade Management & Execution Rules
Confirmation: Confirm a 4H candle body close above $300 with a lower shadow/wick showing absorption before expanding full position size.
Risk Allocation: Keep account exposure capped at 1–2% risk per position given the volatility of AI sector tokens.
Invalidation: A 4H candle body close below $288.00 breaks the higher-low sequence and invalidates the bullish thesis.
{future}(TAOUSDT)
An actionable trade plan and technical breakdown for $TAO USDT based on a 4-Hour bullish structure holding above the $308 level:
Key Technical Analysis & Context
Demand Zone ($295 – $308): Price is retesting a key prior resistance zone on the 4H timeframe, now acting as flipped support.
Market Structure: TAO maintains a series of higher highs and higher lows following the recent momentum expansion from sub-$300 levels.
Trend & Indicators: The $300 area aligns with psychological support and short-term EMA moving averages (20/50 EMA on 4H). Holding above $300 keeps the macro continuation structure bullish.
Trade Plan & Execution Matrix
Parameter Value Details / Notes
Trade Direction LONG Trend continuation off the 4H demand / flipped support zone
Entry Zone $302 – $310 Limit scaling in near the $308 pivot zone
Stop Loss (SL) $288.00 Placed below the structural 4H swing low (~6.2% risk)
Take Profit 1 (TP1) $340.00 Local swing high / major resistance level (partial exit & SL to BE)
Take Profit 2 (TP2) $375.00 High-timeframe liquidity sweep / 1.618 Fib extension
Take Profit 3 (TP3) $420.00 Major expansion target towards $400+ key resistance
Risk / Reward Ratio ~1 : 3.3 (Calculated to TP2)
Trade Management & Execution Rules
Confirmation: Confirm a 4H candle body close above $300 with a lower shadow/wick showing absorption before expanding full position size.
Risk Allocation: Keep account exposure capped at 1–2% risk per position given the volatility of AI sector tokens.
Invalidation: A 4H candle body close below $288.00 breaks the higher-low sequence and invalidates the bullish thesis.
Key Technical Analysis & Context
Demand Zone ($295 – $308): Price is retesting a key prior resistance zone on the 4H timeframe, now acting as flipped support.
Market Structure: TAO maintains a series of higher highs and higher lows following the recent momentum expansion from sub-$300 levels.
Trend & Indicators: The $300 area aligns with psychological support and short-term EMA moving averages (20/50 EMA on 4H). Holding above $300 keeps the macro continuation structure bullish.
Trade Plan & Execution Matrix
Parameter Value Details / Notes
Trade Direction LONG Trend continuation off the 4H demand / flipped support zone
Entry Zone $302 – $310 Limit scaling in near the $308 pivot zone
Stop Loss (SL) $288.00 Placed below the structural 4H swing low (~6.2% risk)
Take Profit 1 (TP1) $340.00 Local swing high / major resistance level (partial exit & SL to BE)
Take Profit 2 (TP2) $375.00 High-timeframe liquidity sweep / 1.618 Fib extension
Take Profit 3 (TP3) $420.00 Major expansion target towards $400+ key resistance
Risk / Reward Ratio ~1 : 3.3 (Calculated to TP2)
Trade Management & Execution Rules
Confirmation: Confirm a 4H candle body close above $300 with a lower shadow/wick showing absorption before expanding full position size.
Risk Allocation: Keep account exposure capped at 1–2% risk per position given the volatility of AI sector tokens.
Invalidation: A 4H candle body close below $288.00 breaks the higher-low sequence and invalidates the bullish thesis.
11
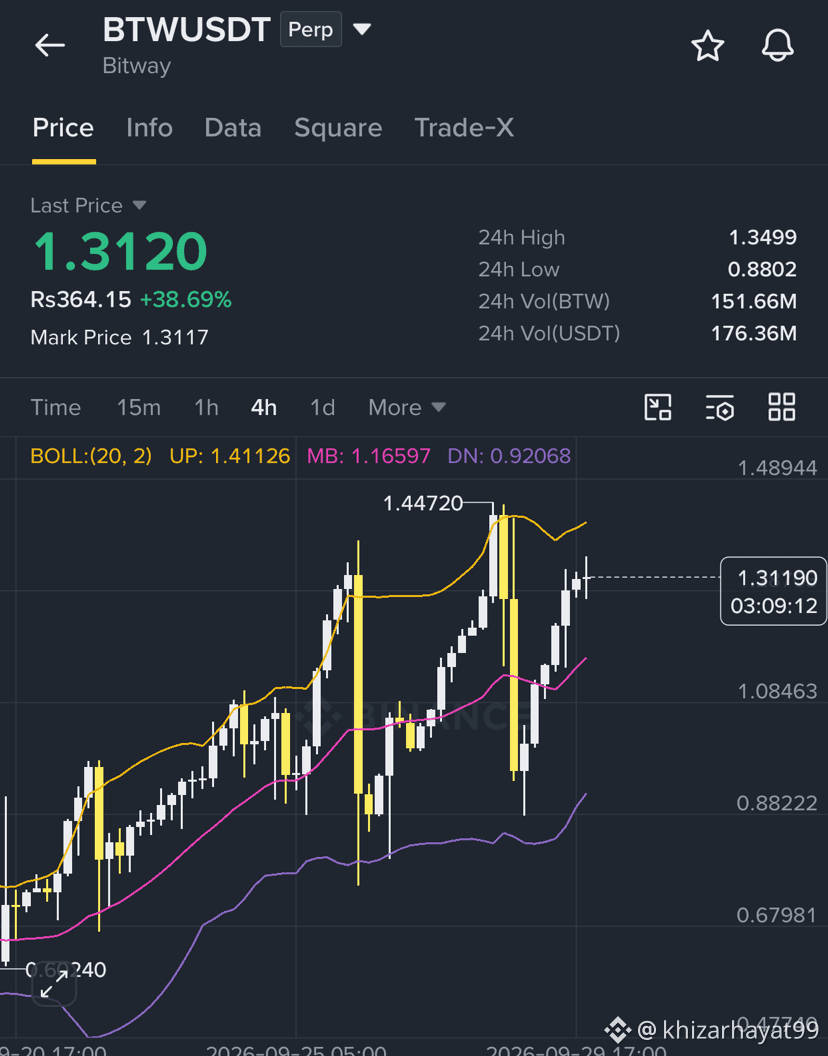
Here is the updated long trade plan and technical breakdown for $BTW USDT based on the 4-Hour bullish structure around $1.3120:
Key Technical Context
Current Pivot Zone: $1.3000 – $1.3150 (Holding key higher-low support on the 4H timeframe).
4H Market Structure: Price is consolidating above the $1.3000 psychological baseline following a recent expansion phase. Retaining this level is critical to maintain the short-term bullish continuation structure.
Trend Confirmation: Looking for 4H candle closes above the 20/50 EMA cluster to signal renewed buyer momentum toward higher liquidity pools.
Trade Plan & Execution Matrix
Parameter Value Details / Notes
Trade Direction LONG Trend continuation setup off 4H demand zone
Entry Zone $1.3000 – $1.3150 Scale in near support / retest of demand floor
Stop Loss (SL) $1.2250 Structural invalidation below key 4H swing low (~6.5% risk)
Take Profit 1 (TP1) $1.4450 Immediate resistance target (Secure partials & move SL to breakeven)
Take Profit 2 (TP2) $1.5800 1.618 Fibonacci extension target
Take Profit 3 (TP3) $1.7500 Major expansion / liquidity sweep target
Risk / Reward Ratio ~1 : 3.0 (Calculated to TP2)
Trade Execution Guidelines
Confirmation: Confirm a 4H candle close (bullish pin bar, engulfing, or strong absorption wick) above $1.3000 before sizing in fully.
Risk Control: Cap total trade exposure to 1–2% of portfolio risk to account for intraday volatility.
Invalidation: A 4H candle body close below $1.2250 breaks the higher-low sequence and invalidates the bullish setup.
{future}(BTWUSDT)
Here is the updated long trade plan and technical breakdown for $BTW USDT based on the 4-Hour bullish structure around $1.3120:
Key Technical Context
Current Pivot Zone: $1.3000 – $1.3150 (Holding key higher-low support on the 4H timeframe).
4H Market Structure: Price is consolidating above the $1.3000 psychological baseline following a recent expansion phase. Retaining this level is critical to maintain the short-term bullish continuation structure.
Trend Confirmation: Looking for 4H candle closes above the 20/50 EMA cluster to signal renewed buyer momentum toward higher liquidity pools.
Trade Plan & Execution Matrix
Parameter Value Details / Notes
Trade Direction LONG Trend continuation setup off 4H demand zone
Entry Zone $1.3000 – $1.3150 Scale in near support / retest of demand floor
Stop Loss (SL) $1.2250 Structural invalidation below key 4H swing low (~6.5% risk)
Take Profit 1 (TP1) $1.4450 Immediate resistance target (Secure partials & move SL to breakeven)
Take Profit 2 (TP2) $1.5800 1.618 Fibonacci extension target
Take Profit 3 (TP3) $1.7500 Major expansion / liquidity sweep target
Risk / Reward Ratio ~1 : 3.0 (Calculated to TP2)
Trade Execution Guidelines
Confirmation: Confirm a 4H candle close (bullish pin bar, engulfing, or strong absorption wick) above $1.3000 before sizing in fully.
Risk Control: Cap total trade exposure to 1–2% of portfolio risk to account for intraday volatility.
Invalidation: A 4H candle body close below $1.2250 breaks the higher-low sequence and invalidates the bullish setup.
Key Technical Context
Current Pivot Zone: $1.3000 – $1.3150 (Holding key higher-low support on the 4H timeframe).
4H Market Structure: Price is consolidating above the $1.3000 psychological baseline following a recent expansion phase. Retaining this level is critical to maintain the short-term bullish continuation structure.
Trend Confirmation: Looking for 4H candle closes above the 20/50 EMA cluster to signal renewed buyer momentum toward higher liquidity pools.
Trade Plan & Execution Matrix
Parameter Value Details / Notes
Trade Direction LONG Trend continuation setup off 4H demand zone
Entry Zone $1.3000 – $1.3150 Scale in near support / retest of demand floor
Stop Loss (SL) $1.2250 Structural invalidation below key 4H swing low (~6.5% risk)
Take Profit 1 (TP1) $1.4450 Immediate resistance target (Secure partials & move SL to breakeven)
Take Profit 2 (TP2) $1.5800 1.618 Fibonacci extension target
Take Profit 3 (TP3) $1.7500 Major expansion / liquidity sweep target
Risk / Reward Ratio ~1 : 3.0 (Calculated to TP2)
Trade Execution Guidelines
Confirmation: Confirm a 4H candle close (bullish pin bar, engulfing, or strong absorption wick) above $1.3000 before sizing in fully.
Risk Control: Cap total trade exposure to 1–2% of portfolio risk to account for intraday volatility.
Invalidation: A 4H candle body close below $1.2250 breaks the higher-low sequence and invalidates the bullish setup.
1
78
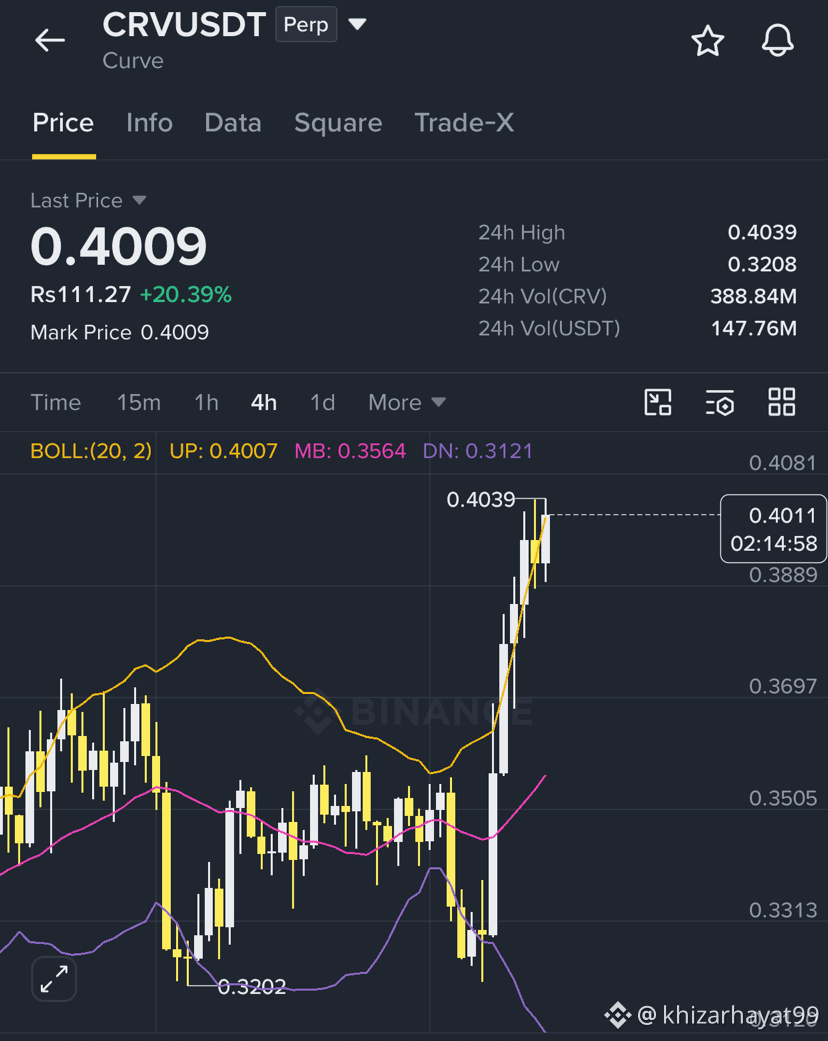
Independent technical evaluation for the $CRV /USDT 4-hour market structure, centered around the 0.4000 key horizontal pivot and volume expansion signal:
Technical Breakdown & Volume Dynamics
Market Structure (4H)
Key Pivot at $0.4000: The $0.4000 level represents a strong historical psychological and structural pivot. Reclaiming $0.4000 with volume confirms a shift in local market structure (MSB / Change of Character) from range-bound consolidation to bullish expansion.
Volume Expansion Signal: A volume spike accompanying the move above $0.40 indicates institutional absorption rather than a retail liquidity sweep. Continued holding above $0.40 converts former macro resistance into active support.
Key Level Map
Invalidation / Support Zone: $0.3720 – $0.3880 (Breakout base / previous 4H higher low).
Immediate Resistance (TP1): $0.4450 – $0.4600 (Next 4H supply block & local liquidity pool).
Secondary Target (TP2): $0.5100 – $0.5300 (Macro range highs / major structural supply).
Extended Target (TP3): $0.6000 (Extended expansion zone).
{future}(CRVUSDT)
Independent technical evaluation for the $CRV /USDT 4-hour market structure, centered around the 0.4000 key horizontal pivot and volume expansion signal:
Technical Breakdown & Volume Dynamics
Market Structure (4H)
Key Pivot at $0.4000: The $0.4000 level represents a strong historical psychological and structural pivot. Reclaiming $0.4000 with volume confirms a shift in local market structure (MSB / Change of Character) from range-bound consolidation to bullish expansion.
Volume Expansion Signal: A volume spike accompanying the move above $0.40 indicates institutional absorption rather than a retail liquidity sweep. Continued holding above $0.40 converts former macro resistance into active support.
Key Level Map
Invalidation / Support Zone: $0.3720 – $0.3880 (Breakout base / previous 4H higher low).
Immediate Resistance (TP1): $0.4450 – $0.4600 (Next 4H supply block & local liquidity pool).
Secondary Target (TP2): $0.5100 – $0.5300 (Macro range highs / major structural supply).
Extended Target (TP3): $0.6000 (Extended expansion zone).
Technical Breakdown & Volume Dynamics
Market Structure (4H)
Key Pivot at $0.4000: The $0.4000 level represents a strong historical psychological and structural pivot. Reclaiming $0.4000 with volume confirms a shift in local market structure (MSB / Change of Character) from range-bound consolidation to bullish expansion.
Volume Expansion Signal: A volume spike accompanying the move above $0.40 indicates institutional absorption rather than a retail liquidity sweep. Continued holding above $0.40 converts former macro resistance into active support.
Key Level Map
Invalidation / Support Zone: $0.3720 – $0.3880 (Breakout base / previous 4H higher low).
Immediate Resistance (TP1): $0.4450 – $0.4600 (Next 4H supply block & local liquidity pool).
Secondary Target (TP2): $0.5100 – $0.5300 (Macro range highs / major structural supply).
Extended Target (TP3): $0.6000 (Extended expansion zone).
55
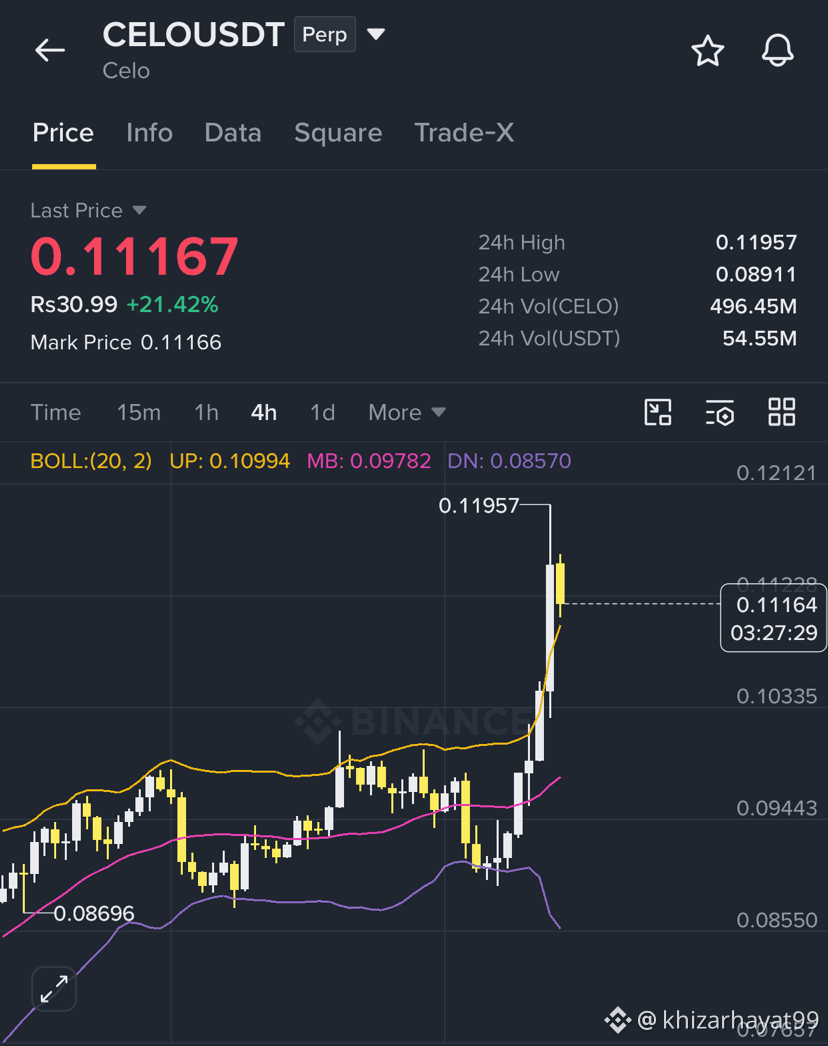
Independent technical assessment for the $CELO /USDT 4-hour timeframe structure based on the 0.1120 price level:
Technical Breakdown & Market Context
Macro Trend & Base Formation
Market Structure: At $0.1120, CELO is trading near historical lower-range support zones. On higher timeframes, the price has compressed following prolonged distribution, forming a base structure.
4-Hour Bias: Holding above $0.1100–$0.1120 indicates localized buyer defense (higher low or consolidation demand zone). However, a confirmed bullish market structure break (MSB) requires a clean displacement above the local lower-high swing points (typically around $0.1250–$0.1300).
Key Technical Levels
Immediate Support / Invalidated Level: $0.1080 – $0.1110 (A 4H close below $0.1080 invalidates the immediate bullish higher-low thesis).
Immediate Resistance: $0.1220 – $0.1250 (First major liquidity pool & EMA cluster).
Primary Target (TP1): $0.1380 – $0.1420 (4H supply zone/swing high).
Secondary Target (TP2): $0.1650 (Extended range resistance).
Trade Setup Blueprint
If executing a 4H bullish long setup at or near 0.11200:
Entry Zone: $0.1110 – $0.1130 (Wait for a 4H bullish confirmation candle, e.g., hammer or bullish engulfing, or a lower-timeframe shift in market structure).
Stop Loss (SL): $0.1065 (Placed below recent swing lows / demand zone to maintain a proper risk profile).
Take Profit 1 (TP1): $0.1250 (Secure partial profits / move SL to entry).
Take Profit 2 (TP2): $0.1400
Risk/Reward Ratio (R:R): ~3.2 : 1 (to TP2).
Execution Checklist & Precautions
Volume & Displacement: Confirm that any bounce off $0.1120 is accompanied by expanding buying volume. Weak-volume bounces often result in bear flags or range continuation.
Bitcoin Correlation: Low-cap altcoin setups require BTC stability; ensure BTC is not breaking down through key support levels simultaneously.
Risk Management: Never risk more than 1–2% of total portfolio equity on single altcoin setups.
{future}(CELOUSDT)
Independent technical assessment for the $CELO /USDT 4-hour timeframe structure based on the 0.1120 price level:
Technical Breakdown & Market Context
Macro Trend & Base Formation
Market Structure: At $0.1120, CELO is trading near historical lower-range support zones. On higher timeframes, the price has compressed following prolonged distribution, forming a base structure.
4-Hour Bias: Holding above $0.1100–$0.1120 indicates localized buyer defense (higher low or consolidation demand zone). However, a confirmed bullish market structure break (MSB) requires a clean displacement above the local lower-high swing points (typically around $0.1250–$0.1300).
Key Technical Levels
Immediate Support / Invalidated Level: $0.1080 – $0.1110 (A 4H close below $0.1080 invalidates the immediate bullish higher-low thesis).
Immediate Resistance: $0.1220 – $0.1250 (First major liquidity pool & EMA cluster).
Primary Target (TP1): $0.1380 – $0.1420 (4H supply zone/swing high).
Secondary Target (TP2): $0.1650 (Extended range resistance).
Trade Setup Blueprint
If executing a 4H bullish long setup at or near 0.11200:
Entry Zone: $0.1110 – $0.1130 (Wait for a 4H bullish confirmation candle, e.g., hammer or bullish engulfing, or a lower-timeframe shift in market structure).
Stop Loss (SL): $0.1065 (Placed below recent swing lows / demand zone to maintain a proper risk profile).
Take Profit 1 (TP1): $0.1250 (Secure partial profits / move SL to entry).
Take Profit 2 (TP2): $0.1400
Risk/Reward Ratio (R:R): ~3.2 : 1 (to TP2).
Execution Checklist & Precautions
Volume & Displacement: Confirm that any bounce off $0.1120 is accompanied by expanding buying volume. Weak-volume bounces often result in bear flags or range continuation.
Bitcoin Correlation: Low-cap altcoin setups require BTC stability; ensure BTC is not breaking down through key support levels simultaneously.
Risk Management: Never risk more than 1–2% of total portfolio equity on single altcoin setups.
Technical Breakdown & Market Context
Macro Trend & Base Formation
Market Structure: At $0.1120, CELO is trading near historical lower-range support zones. On higher timeframes, the price has compressed following prolonged distribution, forming a base structure.
4-Hour Bias: Holding above $0.1100–$0.1120 indicates localized buyer defense (higher low or consolidation demand zone). However, a confirmed bullish market structure break (MSB) requires a clean displacement above the local lower-high swing points (typically around $0.1250–$0.1300).
Key Technical Levels
Immediate Support / Invalidated Level: $0.1080 – $0.1110 (A 4H close below $0.1080 invalidates the immediate bullish higher-low thesis).
Immediate Resistance: $0.1220 – $0.1250 (First major liquidity pool & EMA cluster).
Primary Target (TP1): $0.1380 – $0.1420 (4H supply zone/swing high).
Secondary Target (TP2): $0.1650 (Extended range resistance).
Trade Setup Blueprint
If executing a 4H bullish long setup at or near 0.11200:
Entry Zone: $0.1110 – $0.1130 (Wait for a 4H bullish confirmation candle, e.g., hammer or bullish engulfing, or a lower-timeframe shift in market structure).
Stop Loss (SL): $0.1065 (Placed below recent swing lows / demand zone to maintain a proper risk profile).
Take Profit 1 (TP1): $0.1250 (Secure partial profits / move SL to entry).
Take Profit 2 (TP2): $0.1400
Risk/Reward Ratio (R:R): ~3.2 : 1 (to TP2).
Execution Checklist & Precautions
Volume & Displacement: Confirm that any bounce off $0.1120 is accompanied by expanding buying volume. Weak-volume bounces often result in bear flags or range continuation.
Bitcoin Correlation: Low-cap altcoin setups require BTC stability; ensure BTC is not breaking down through key support levels simultaneously.
Risk Management: Never risk more than 1–2% of total portfolio equity on single altcoin setups.
67
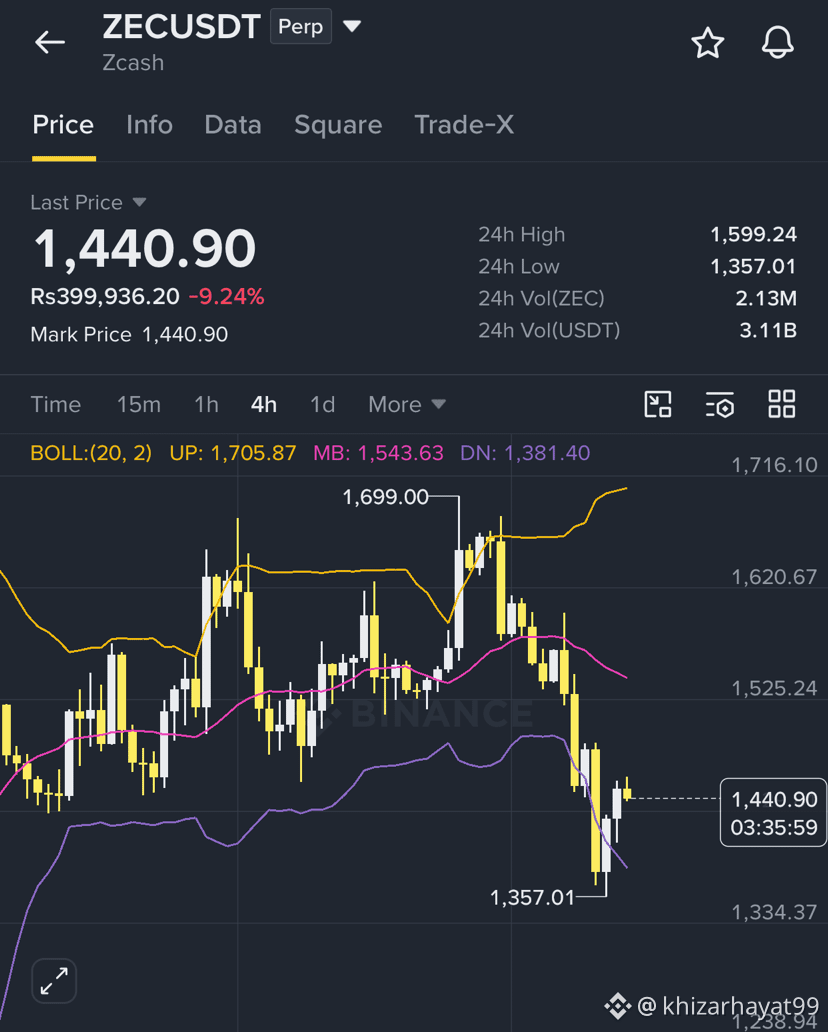
Here is a 4-hour market structure bearish short trade setup for $ZEC /USDT targeting a breakdown around the $1,440 key resistance and high-timeframe liquidity zone.
On the 4-hour timeframe, $1,440 represents an overhead structural resistance and supply block. If price shows exhaustion near this level, a rejection setup offers a favorable risk-to-reward ratio. Conversely, a clean 4H breakout above $1,440 invalidates the bearish structure and flips the bias to long.
Bearish Rejection (Short Setup)
Triggered if price tests $1,440 and prints clear exhaustion on the 4H chart (e.g., long upper wicks, bearish engulfing candle, or declining buy volume near resistance).
Entry Zone: $1,420 – $1,445
Stop Loss (SL): $1,515 (Above local high-wick rejection / ~5.2% risk)
Take Profit Targets:
TP1: $1,320 (Local 4H support / 20 EMA area)
TP2: $1,230 (Mid-range consolidation level)
TP3: $1,120 (Lower demand block / key swing low)
{future}(ZECUSDT)
Here is a 4-hour market structure bearish short trade setup for $ZEC /USDT targeting a breakdown around the $1,440 key resistance and high-timeframe liquidity zone.
On the 4-hour timeframe, $1,440 represents an overhead structural resistance and supply block. If price shows exhaustion near this level, a rejection setup offers a favorable risk-to-reward ratio. Conversely, a clean 4H breakout above $1,440 invalidates the bearish structure and flips the bias to long.
Bearish Rejection (Short Setup)
Triggered if price tests $1,440 and prints clear exhaustion on the 4H chart (e.g., long upper wicks, bearish engulfing candle, or declining buy volume near resistance).
Entry Zone: $1,420 – $1,445
Stop Loss (SL): $1,515 (Above local high-wick rejection / ~5.2% risk)
Take Profit Targets:
TP1: $1,320 (Local 4H support / 20 EMA area)
TP2: $1,230 (Mid-range consolidation level)
TP3: $1,120 (Lower demand block / key swing low)
On the 4-hour timeframe, $1,440 represents an overhead structural resistance and supply block. If price shows exhaustion near this level, a rejection setup offers a favorable risk-to-reward ratio. Conversely, a clean 4H breakout above $1,440 invalidates the bearish structure and flips the bias to long.
Bearish Rejection (Short Setup)
Triggered if price tests $1,440 and prints clear exhaustion on the 4H chart (e.g., long upper wicks, bearish engulfing candle, or declining buy volume near resistance).
Entry Zone: $1,420 – $1,445
Stop Loss (SL): $1,515 (Above local high-wick rejection / ~5.2% risk)
Take Profit Targets:
TP1: $1,320 (Local 4H support / 20 EMA area)
TP2: $1,230 (Mid-range consolidation level)
TP3: $1,120 (Lower demand block / key swing low)
1
120
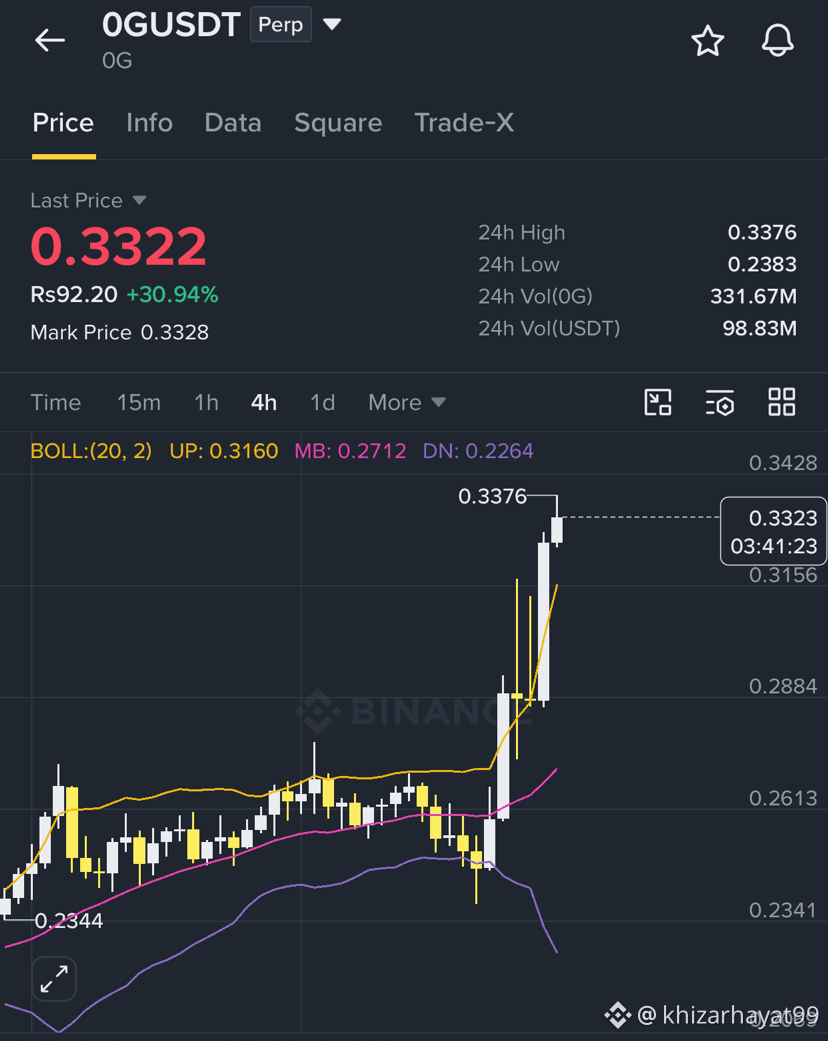
Here is a 4-hour market structure long setup for $0G /USDT targeting a breakout around the $0.3300 structural pivot and high-timeframe liquidity level.
On the 4-hour chart, $0.3300 represents an overhead supply boundary and key structural resistance. A clean 4H breakout and retest above $0.3300 confirms high-timeframe bullish continuation, while a pullback into lower 4H demand provides a higher risk-to-reward long entry.
Scenario A: Bullish Breakout & Retest (Long Setup)
Triggered when price cleanly breaks above $0.3300 on strong 4H buy volume and holds $0.3300 as flipped support on a retest.
Trigger / Entry Zone: $0.3310 – $0.3360 (On 4H retest confirmation)
Stop Loss (SL): $0.3120 (Below breakout candle base / ~5.7% risk)
Take Profit Targets:
TP1: $0.3650 (Initial momentum expansion / supply zone)
TP2: $0.4000 (Psychological target & key liquidity grab)
TP3: $0.4450 (1.618 Fibonacci extension)
{future}(0GUSDT)
Here is a 4-hour market structure long setup for $0G /USDT targeting a breakout around the $0.3300 structural pivot and high-timeframe liquidity level.
On the 4-hour chart, $0.3300 represents an overhead supply boundary and key structural resistance. A clean 4H breakout and retest above $0.3300 confirms high-timeframe bullish continuation, while a pullback into lower 4H demand provides a higher risk-to-reward long entry.
Scenario A: Bullish Breakout & Retest (Long Setup)
Triggered when price cleanly breaks above $0.3300 on strong 4H buy volume and holds $0.3300 as flipped support on a retest.
Trigger / Entry Zone: $0.3310 – $0.3360 (On 4H retest confirmation)
Stop Loss (SL): $0.3120 (Below breakout candle base / ~5.7% risk)
Take Profit Targets:
TP1: $0.3650 (Initial momentum expansion / supply zone)
TP2: $0.4000 (Psychological target & key liquidity grab)
TP3: $0.4450 (1.618 Fibonacci extension)
On the 4-hour chart, $0.3300 represents an overhead supply boundary and key structural resistance. A clean 4H breakout and retest above $0.3300 confirms high-timeframe bullish continuation, while a pullback into lower 4H demand provides a higher risk-to-reward long entry.
Scenario A: Bullish Breakout & Retest (Long Setup)
Triggered when price cleanly breaks above $0.3300 on strong 4H buy volume and holds $0.3300 as flipped support on a retest.
Trigger / Entry Zone: $0.3310 – $0.3360 (On 4H retest confirmation)
Stop Loss (SL): $0.3120 (Below breakout candle base / ~5.7% risk)
Take Profit Targets:
TP1: $0.3650 (Initial momentum expansion / supply zone)
TP2: $0.4000 (Psychological target & key liquidity grab)
TP3: $0.4450 (1.618 Fibonacci extension)
1
115
Log in to explore more content
Join global crypto users on Binance Square
⚡️ Get latest and useful information about crypto.
💬 Trusted by the world’s largest crypto exchange.
👍 Discover real insights from verified creators.
Email / Phone number
Trending Topics
BitcoinClears$85200
0 views
13 Discussing
The rebound's spark was doused with a bucket of cold water again
In the early morning, $ETH first probed 2660, then oscillated upward steadily, reaching a high of 2723. Unfortunately, the selling pressure above was relentless, and the price retreated back down. Missing the chance to enter at the high is indeed a bit regrettable. This current rebound feels more like a correction than a reversal.
$BTC is weaker. It barely touched 85200 during the day but was pushed down at night. Next, we’ll see if 84500 can hold; if it breaks, it might test a new low again.
EGC9999
·0 Likes
·70 views
AltcoinSeasonIndexHoldsAbove60For5Days
311 views
118 Discussing
BitcoinSlipsBelow$84000
691 views
52 Discussing