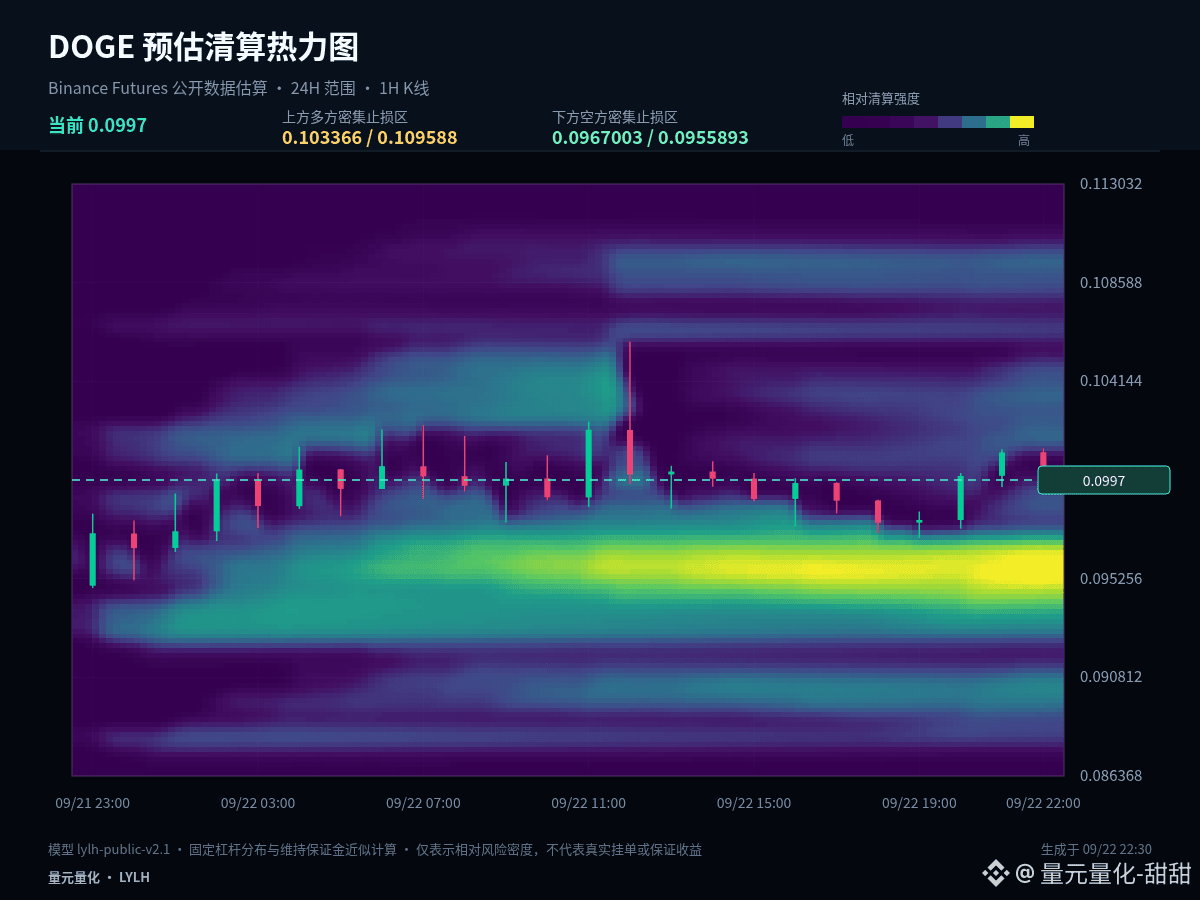
$DOGE #DOGE From a layout perspective, the key is not to chase already occurred fluctuations, but to determine in advance the position you are willing to wait for. Current price: 0.09967, 1 hour: -1.28%, 24 hours: +6.55%.
In terms of cycle alignment, 24 hours is still +6.55%, while 1 hour has pulled back to -1.28%, which looks more like cooling within an uptrend structure. If the retracement does not break the key support, it falls under normal rotation; if support is lost and the rebound lacks strength, then short-term initiative shifts from bulls to bears.
The first observation zone is 0.100375, used to judge whether a typical pullback has ended. The second observation zone is 0.09486, used to judge whether a deeper retracement can find support and form a turnaround. On the upside, pay attention to 0.10589; after a breakout, a pullback confirmation is needed to avoid mistaking a brief wick-through for the trend already being activated.
For positioning, you need to distinguish between spot and derivatives. If you already hold spot, you can manage in segments around key levels without frequently flipping directions due to a single 1-hour candlestick. If you are in no position, waiting for confirmation and entering in batches is more composed. Derivatives place more emphasis on entry location and invalidation conditions. When volatility increases, proactively reduce position size to avoid turning short-term judgment into passive holding.
The purpose of scaling in is not to endlessly average down costs; it is to control the pace while the structure remains valid. Once key support fails, you should stop the original layout plan and wait for a new price range to form.
A trading plan must include invalidation conditions. If your judgment is correct, you can realize gains in stages. If your judgment is wrong, you must also allow yourself to exit—you cannot use adding positions to disguise the fact that the initial logic has already changed. Market conditions will update, and your viewpoint should adjust according to price evidence.
#AIStocksWhatNext
In terms of cycle alignment, 24 hours is still +6.55%, while 1 hour has pulled back to -1.28%, which looks more like cooling within an uptrend structure. If the retracement does not break the key support, it falls under normal rotation; if support is lost and the rebound lacks strength, then short-term initiative shifts from bulls to bears.
The first observation zone is 0.100375, used to judge whether a typical pullback has ended. The second observation zone is 0.09486, used to judge whether a deeper retracement can find support and form a turnaround. On the upside, pay attention to 0.10589; after a breakout, a pullback confirmation is needed to avoid mistaking a brief wick-through for the trend already being activated.
For positioning, you need to distinguish between spot and derivatives. If you already hold spot, you can manage in segments around key levels without frequently flipping directions due to a single 1-hour candlestick. If you are in no position, waiting for confirmation and entering in batches is more composed. Derivatives place more emphasis on entry location and invalidation conditions. When volatility increases, proactively reduce position size to avoid turning short-term judgment into passive holding.
The purpose of scaling in is not to endlessly average down costs; it is to control the pace while the structure remains valid. Once key support fails, you should stop the original layout plan and wait for a new price range to form.
A trading plan must include invalidation conditions. If your judgment is correct, you can realize gains in stages. If your judgment is wrong, you must also allow yourself to exit—you cannot use adding positions to disguise the fact that the initial logic has already changed. Market conditions will update, and your viewpoint should adjust according to price evidence.
#AIStocksWhatNext