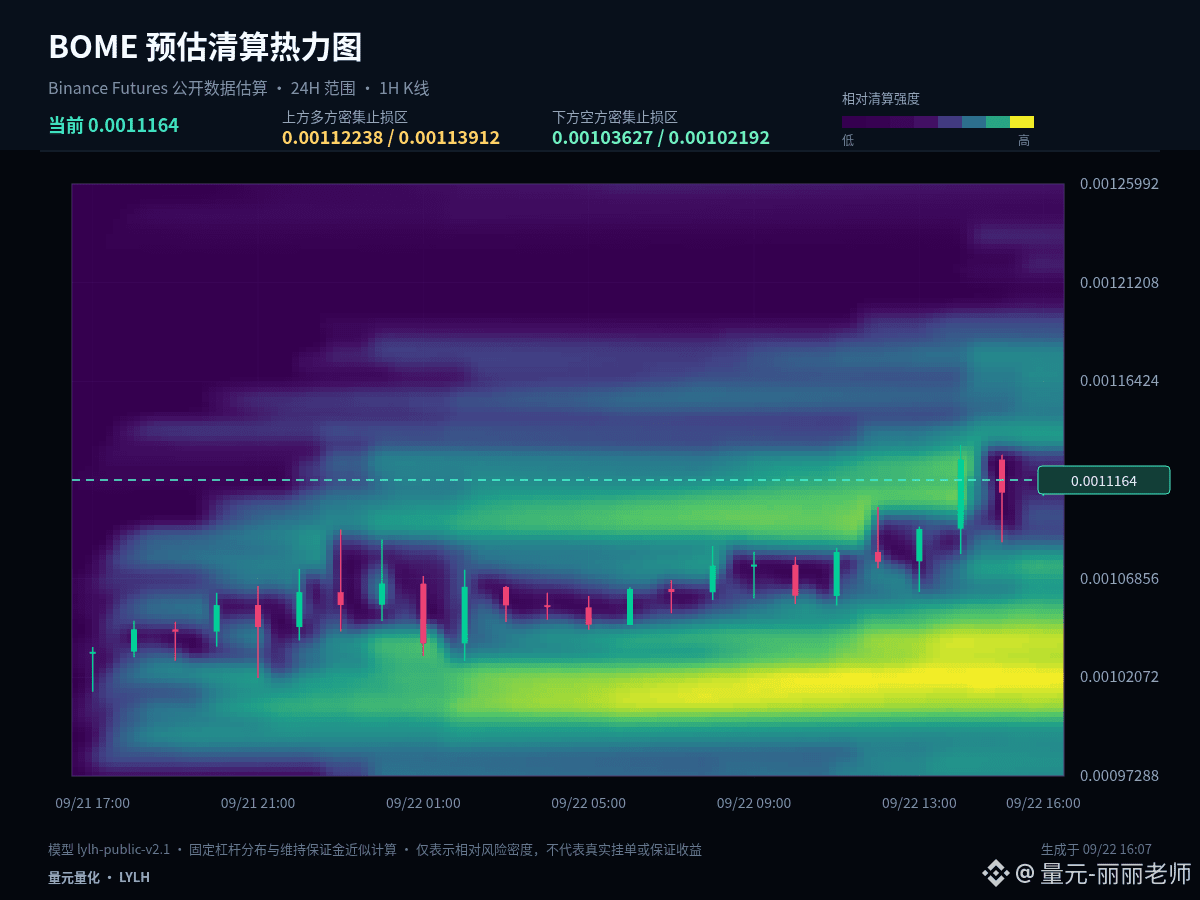
$BOME #BOME a clear one-way move has not yet formed; the 1-hour and 24-hour rhythms are still pulling against each other. In this phase, focus on the boundaries of the range rather than the color of every individual candlestick.
As of now, the 1-hour is +0.34% and the 24-hour is +10.6%; the two cycles have not yet formed a sufficiently clear directional alignment. In range-bound market conditions, the tolerance for chasing and killing trades is lower. It’s more suitable to confirm the direction using the upper boundary, confirm support using the lower boundary, and treat the midline only as the line separating strength and weakness.
On key levels: 0.00107795 is the current structure’s midline, and it’s the first standard for judging whether a pullback is healthy. As long as price can stabilize above it, bulls still have the initiative. The next target to watch is 0.0011415 on the upside. If price falls back below the midline, shift attention to the secondary support at 0.0010144.
For the next path, handle it in three ways: if there’s an effective hold above 0.0011415, wait for a pullback that doesn’t break before assessing continuation; if it breaks down below 0.0010144, prioritize risk control and wait for new support; if it continues to oscillate around 0.00107795, treat it as rotation within the range and don’t repeatedly chase direction from the middle.
For people who already hold positions, the key is to manage based on whether support has failed—not to be dragged by every fluctuation. For people with no position, prioritize waiting for a breakout and pullback, or confirmation of support. Spot can be built in batches; for derivatives, shorten the decision chain: first set the stop-loss level, then decide whether to participate.
The focus of contracts isn’t to predict every single candlestick; it’s to ensure there’s a rationale for entry, trimming, and exiting. Do less until there’s confirmation. If a key level fails, redo the plan—control single-trade risk first, then discuss potential upside/downside space.
#MultiversXPlansHardForkRecovery
As of now, the 1-hour is +0.34% and the 24-hour is +10.6%; the two cycles have not yet formed a sufficiently clear directional alignment. In range-bound market conditions, the tolerance for chasing and killing trades is lower. It’s more suitable to confirm the direction using the upper boundary, confirm support using the lower boundary, and treat the midline only as the line separating strength and weakness.
On key levels: 0.00107795 is the current structure’s midline, and it’s the first standard for judging whether a pullback is healthy. As long as price can stabilize above it, bulls still have the initiative. The next target to watch is 0.0011415 on the upside. If price falls back below the midline, shift attention to the secondary support at 0.0010144.
For the next path, handle it in three ways: if there’s an effective hold above 0.0011415, wait for a pullback that doesn’t break before assessing continuation; if it breaks down below 0.0010144, prioritize risk control and wait for new support; if it continues to oscillate around 0.00107795, treat it as rotation within the range and don’t repeatedly chase direction from the middle.
For people who already hold positions, the key is to manage based on whether support has failed—not to be dragged by every fluctuation. For people with no position, prioritize waiting for a breakout and pullback, or confirmation of support. Spot can be built in batches; for derivatives, shorten the decision chain: first set the stop-loss level, then decide whether to participate.
The focus of contracts isn’t to predict every single candlestick; it’s to ensure there’s a rationale for entry, trimming, and exiting. Do less until there’s confirmation. If a key level fails, redo the plan—control single-trade risk first, then discuss potential upside/downside space.
#MultiversXPlansHardForkRecovery