
BlockChain Z
6.3k Posts

BlockChain Z
Square Content Creator
Open Trade
Occasional Trader
1.6 Years
6 Following
7.8K+ Followers
8.0K+ Liked
Posts
Portfolio
All
Quotes
Videos
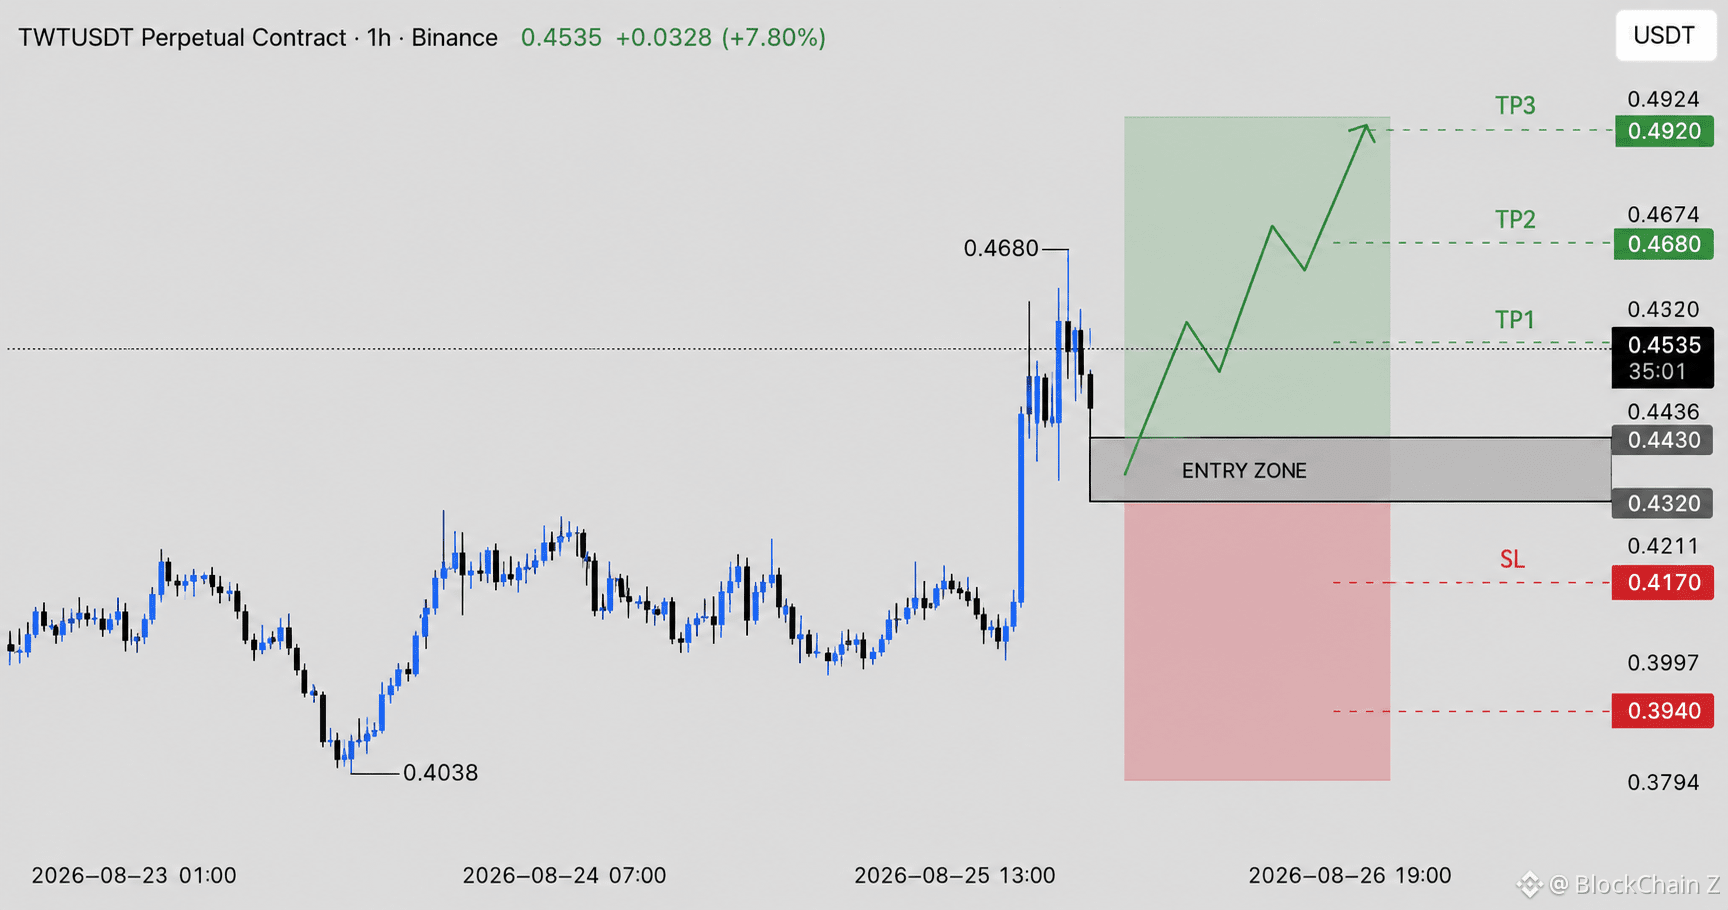
$TWT LONG SETUP 🚀
TWT is showing a strong bullish breakout on the 1H chart, and the current structure suggests that a controlled pullback could provide the next long opportunity.
📌 TRADE PLAN
🟢 Entry Zone: 0.4320 – 0.4430
🎯 TP1: 0.4535
🎯 TP2: 0.4680
🎯 TP3: 0.4920
🛑 Stop Loss: 0.4170
Bias: 🟢 BULLISH
Invalidation: Below 0.4170
🔥 WHY THIS SETUP?
TWT has broken strongly out of its previous consolidation structure, moving from the 0.40 area toward 0.4680 with aggressive bullish momentum. The breakout candle shows that buyers have stepped in with strength, while the current pullback is relatively controlled.
The 0.4320–0.4430 region is the key area to watch. This zone sits below the current price and can potentially act as a retest/support area after the breakout. If buyers defend this zone and price begins forming higher lows, the setup becomes significantly stronger.
The first major objective is 0.4535, followed by 0.4680. A clean breakout and hold above 0.4680 could open the path toward the larger 0.4920 target.
TWT is showing a strong bullish breakout on the 1H chart, and the current structure suggests that a controlled pullback could provide the next long opportunity.
📌 TRADE PLAN
🟢 Entry Zone: 0.4320 – 0.4430
🎯 TP1: 0.4535
🎯 TP2: 0.4680
🎯 TP3: 0.4920
🛑 Stop Loss: 0.4170
Bias: 🟢 BULLISH
Invalidation: Below 0.4170
🔥 WHY THIS SETUP?
TWT has broken strongly out of its previous consolidation structure, moving from the 0.40 area toward 0.4680 with aggressive bullish momentum. The breakout candle shows that buyers have stepped in with strength, while the current pullback is relatively controlled.
The 0.4320–0.4430 region is the key area to watch. This zone sits below the current price and can potentially act as a retest/support area after the breakout. If buyers defend this zone and price begins forming higher lows, the setup becomes significantly stronger.
The first major objective is 0.4535, followed by 0.4680. A clean breakout and hold above 0.4680 could open the path toward the larger 0.4920 target.
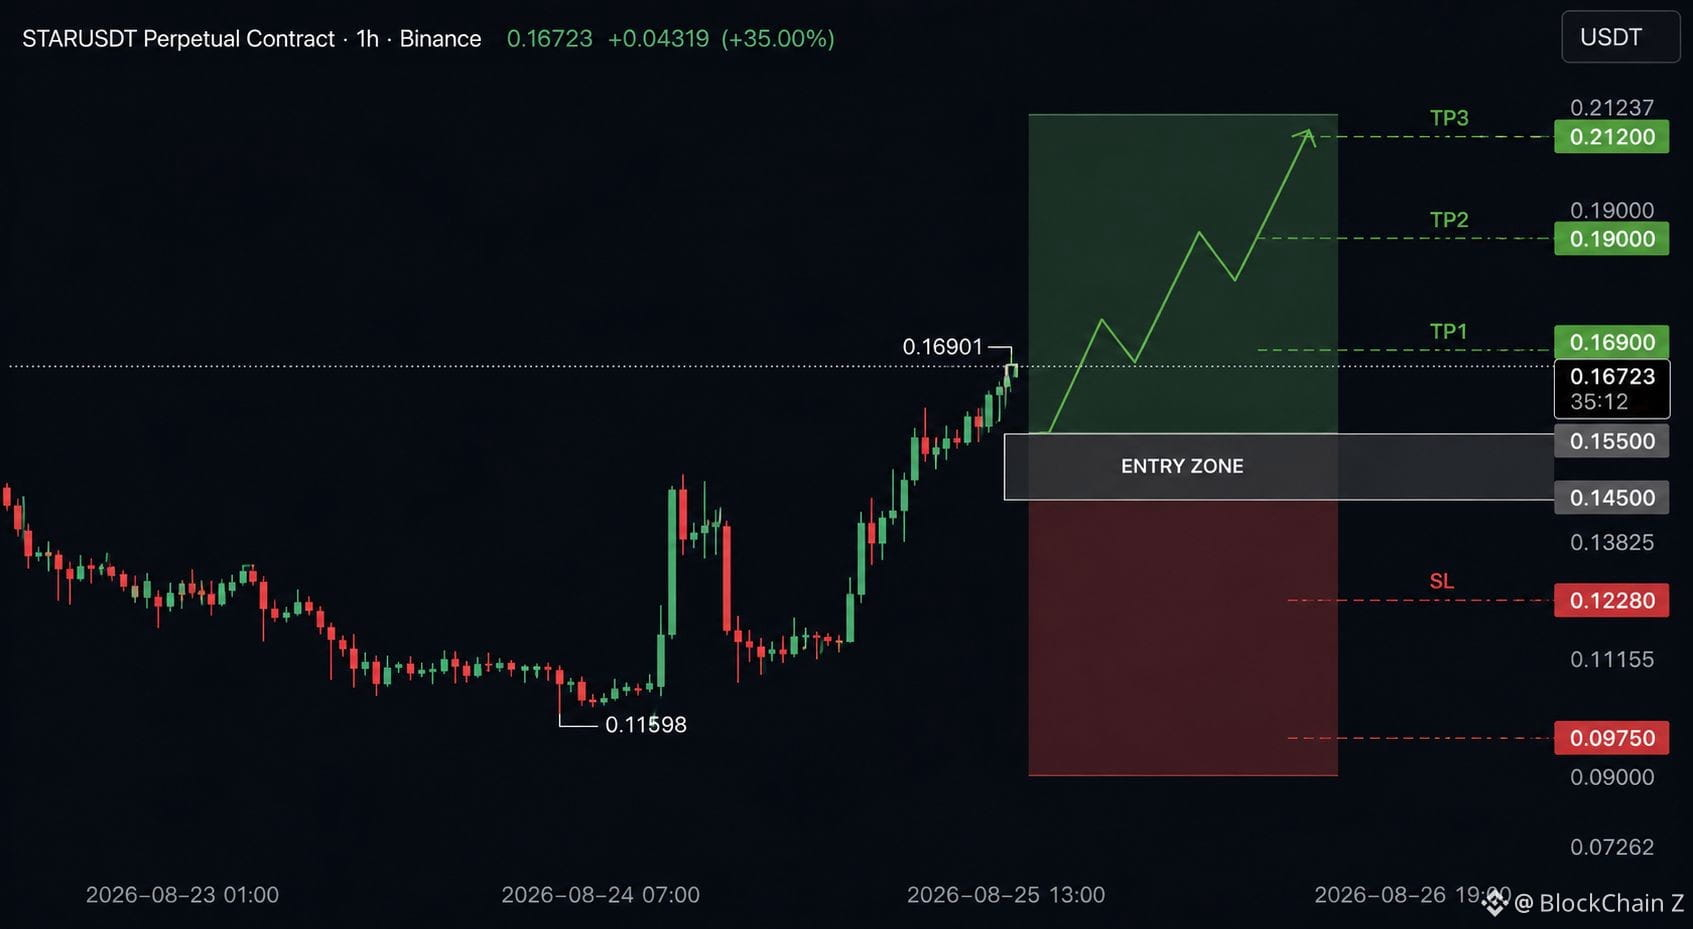
$STAR LONG SETUP 🚀
A strong bullish structure is developing, with price pushing toward the 0.1690 resistance after a powerful recovery from the 0.11598 low.
The 1H chart is showing a clear sequence of higher highs and higher lows, supported by strong upward momentum. Price is currently around 0.16723, very close to the marked 0.16901 local high. This makes the next pullback especially important.
📌 TRADE PLAN
🟢 Entry Zone: 0.14500 – 0.15500
🎯 TP1: 0.16900
🎯 TP2: 0.19000
🎯 TP3: 0.21200
🛑 Stop Loss: 0.12280
Bias: 🟢 BULLISH
Invalidation: Below 0.12280
🔥 Why this setup?
The move from approximately 0.116 has produced a strong recovery, and price is now maintaining a bullish structure rather than giving back the entire impulse. The 0.145–0.155 region is the key area to watch for a healthy retracement.
If price pulls back into this zone and buyers defend it, the first objective is a retest of 0.16900. A confirmed breakout above that level could create momentum toward 0.19000, followed by the larger 0.21200 target.
The ideal approach is not to chase the current candle after the strong run. Waiting for a pullback into the entry zone with bullish confirmation provides a cleaner risk/reward structure.
A strong bullish structure is developing, with price pushing toward the 0.1690 resistance after a powerful recovery from the 0.11598 low.
The 1H chart is showing a clear sequence of higher highs and higher lows, supported by strong upward momentum. Price is currently around 0.16723, very close to the marked 0.16901 local high. This makes the next pullback especially important.
📌 TRADE PLAN
🟢 Entry Zone: 0.14500 – 0.15500
🎯 TP1: 0.16900
🎯 TP2: 0.19000
🎯 TP3: 0.21200
🛑 Stop Loss: 0.12280
Bias: 🟢 BULLISH
Invalidation: Below 0.12280
🔥 Why this setup?
The move from approximately 0.116 has produced a strong recovery, and price is now maintaining a bullish structure rather than giving back the entire impulse. The 0.145–0.155 region is the key area to watch for a healthy retracement.
If price pulls back into this zone and buyers defend it, the first objective is a retest of 0.16900. A confirmed breakout above that level could create momentum toward 0.19000, followed by the larger 0.21200 target.
The ideal approach is not to chase the current candle after the strong run. Waiting for a pullback into the entry zone with bullish confirmation provides a cleaner risk/reward structure.
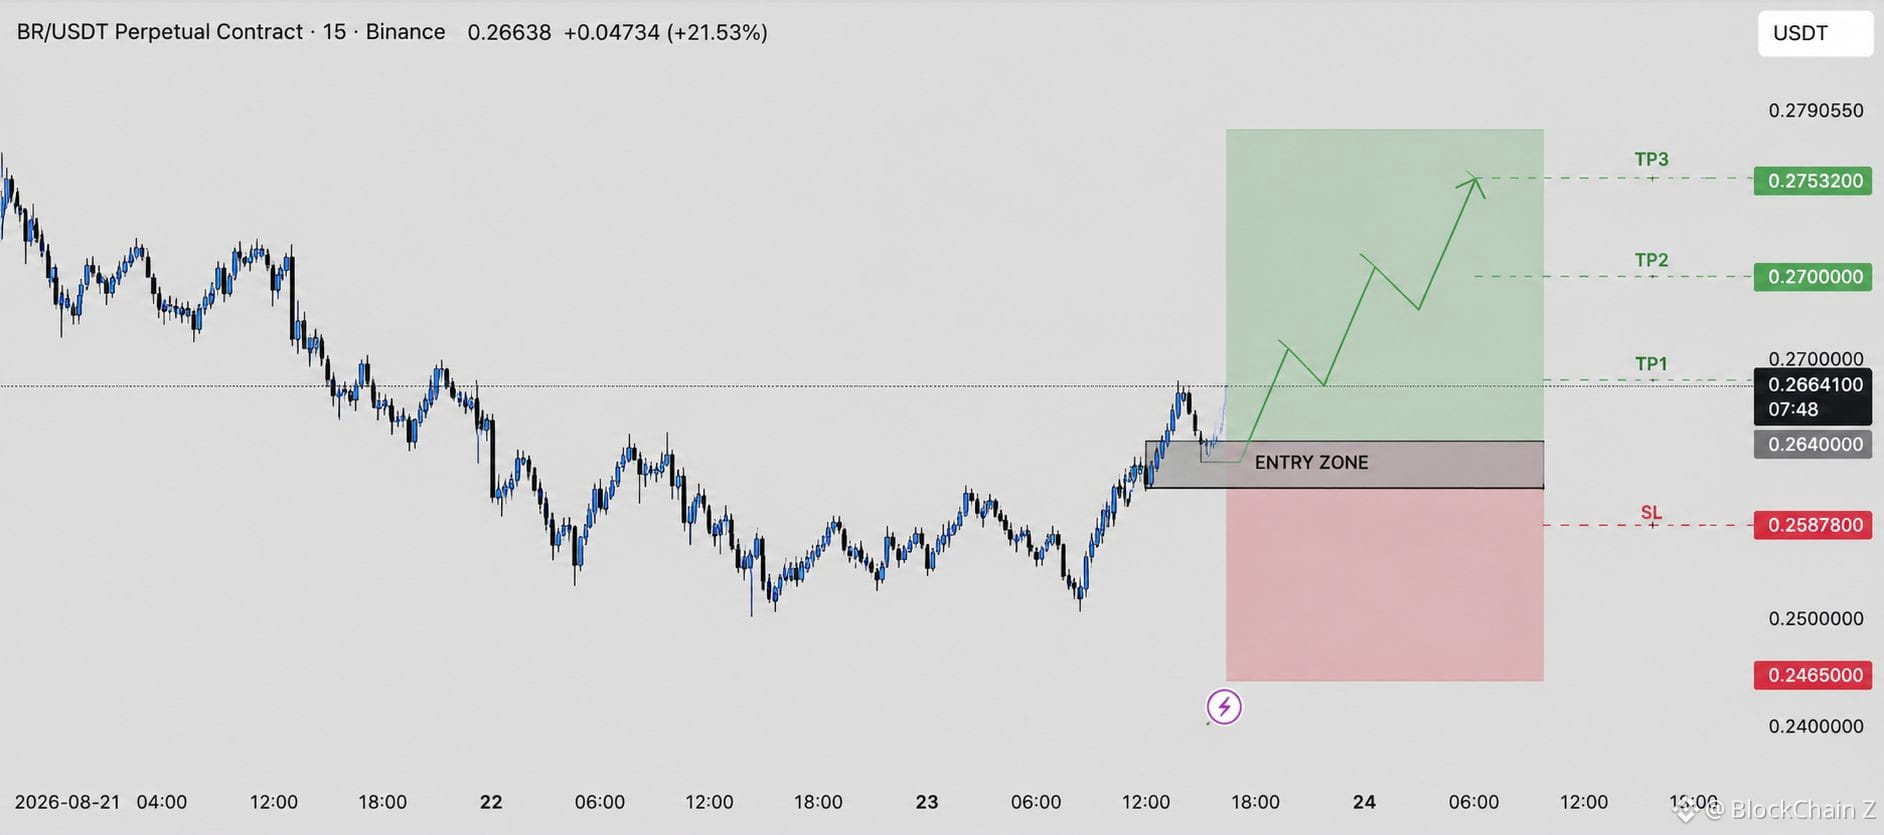
$BR LONG SETUP
Strong recovery structure on the 15M chart with price reclaiming the 0.2640–0.2660 area. A successful hold here can open the way toward the next resistance levels.
Entry Zone: 0.2640 – 0.2664
TP1: 0.2664
TP2: 0.2700
TP3: 0.2753
Stop Loss: 0.2588
Bias: 🟢 BULLISH
Invalidation: Below 0.2588
🔥 Best setup is a pullback into the entry zone followed by bullish confirmation rather than chasing the breakout.
Strong recovery structure on the 15M chart with price reclaiming the 0.2640–0.2660 area. A successful hold here can open the way toward the next resistance levels.
Entry Zone: 0.2640 – 0.2664
TP1: 0.2664
TP2: 0.2700
TP3: 0.2753
Stop Loss: 0.2588
Bias: 🟢 BULLISH
Invalidation: Below 0.2588
🔥 Best setup is a pullback into the entry zone followed by bullish confirmation rather than chasing the breakout.
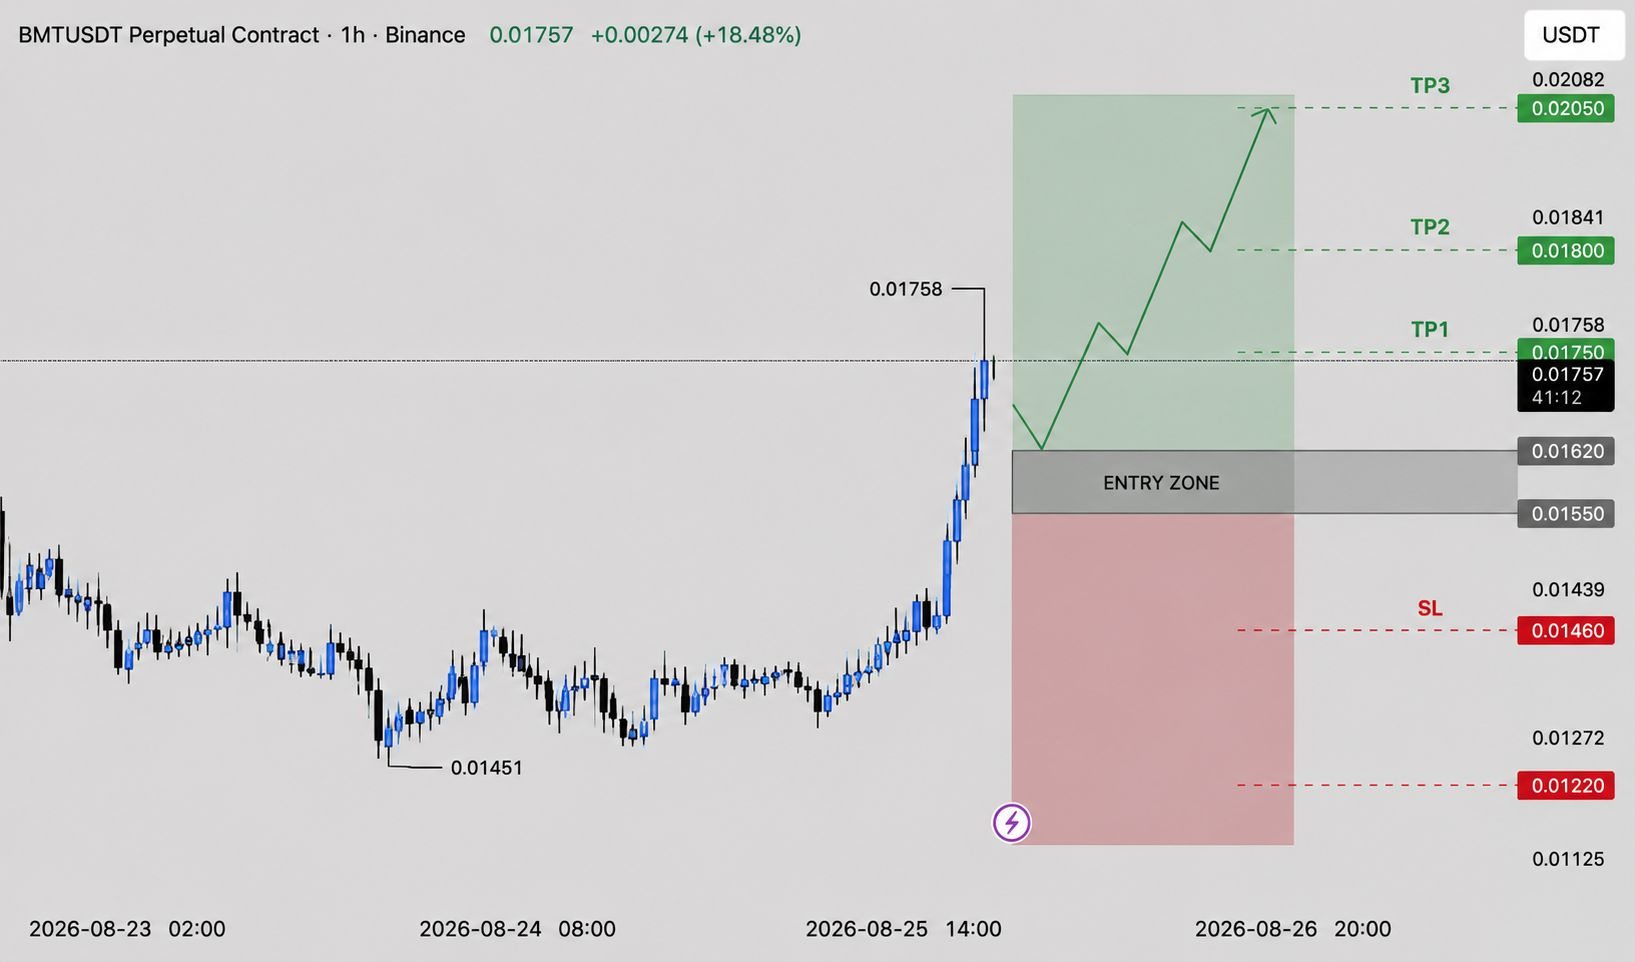
$BMT STRONG BREAKOUT, LONG SETUP
BMT is showing a powerful 1H breakout with strong bullish momentum. After spending significant time consolidating around the lower range, price has pushed sharply higher and printed a fresh local high near 0.01758.
The important part now is not chasing the breakout. A pullback toward the marked entry area would provide a much cleaner risk-to-reward setup.
📌 TRADE PLAN
🟢 Entry Zone: 0.01550 – 0.01620
🎯 TP1: 0.01750
🎯 TP2: 0.01800
🎯 TP3: 0.02050
🛑 Stop Loss: 0.01460
🔥 WHY THIS SETUP?
BMT has broken out of its previous consolidation structure with a strong sequence of bullish candles. The move from the 0.01451 area shows that buyers have stepped in aggressively, and the latest impulse has taken price toward 0.01758.
The highlighted 0.01550–0.01620 region is important because it can act as the breakout-retest zone. If price pulls back into this area and buyers defend it, the bullish continuation structure remains valid.
The first objective is 0.01750, which sits around the current breakout/high area. A clean reclaim and hold above this level can open the path toward 0.01800.
If momentum continues and volume remains supportive, the larger target is 0.02050, giving the setup a substantial upside potential from the entry zone.
BMT is showing a powerful 1H breakout with strong bullish momentum. After spending significant time consolidating around the lower range, price has pushed sharply higher and printed a fresh local high near 0.01758.
The important part now is not chasing the breakout. A pullback toward the marked entry area would provide a much cleaner risk-to-reward setup.
📌 TRADE PLAN
🟢 Entry Zone: 0.01550 – 0.01620
🎯 TP1: 0.01750
🎯 TP2: 0.01800
🎯 TP3: 0.02050
🛑 Stop Loss: 0.01460
🔥 WHY THIS SETUP?
BMT has broken out of its previous consolidation structure with a strong sequence of bullish candles. The move from the 0.01451 area shows that buyers have stepped in aggressively, and the latest impulse has taken price toward 0.01758.
The highlighted 0.01550–0.01620 region is important because it can act as the breakout-retest zone. If price pulls back into this area and buyers defend it, the bullish continuation structure remains valid.
The first objective is 0.01750, which sits around the current breakout/high area. A clean reclaim and hold above this level can open the path toward 0.01800.
If momentum continues and volume remains supportive, the larger target is 0.02050, giving the setup a substantial upside potential from the entry zone.
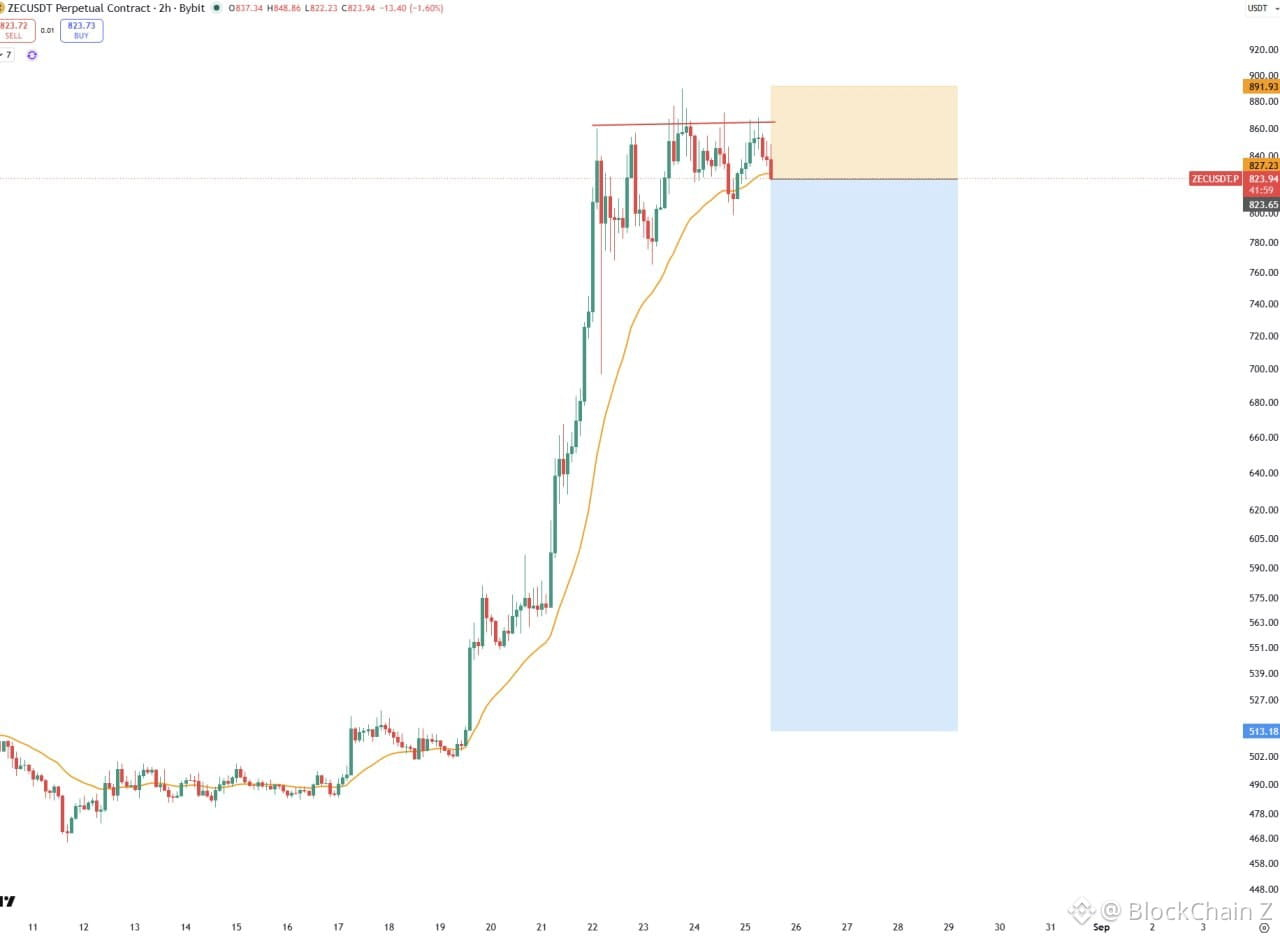
$ZEC SHORT SETUP
Price is trading below the Bollinger mid-band (834.70) and pressing the lower band around 802.69, showing short-term bearish momentum.
Short Entry: 802–815
TP1: 790
TP2: 766
TP3: 740
Stop Loss: 835
Bias: 🔴 Bearish
Invalidation: 1H close above 835
$TAC
$ONG
Price is trading below the Bollinger mid-band (834.70) and pressing the lower band around 802.69, showing short-term bearish momentum.
Short Entry: 802–815
TP1: 790
TP2: 766
TP3: 740
Stop Loss: 835
Bias: 🔴 Bearish
Invalidation: 1H close above 835
$TAC
$ONG
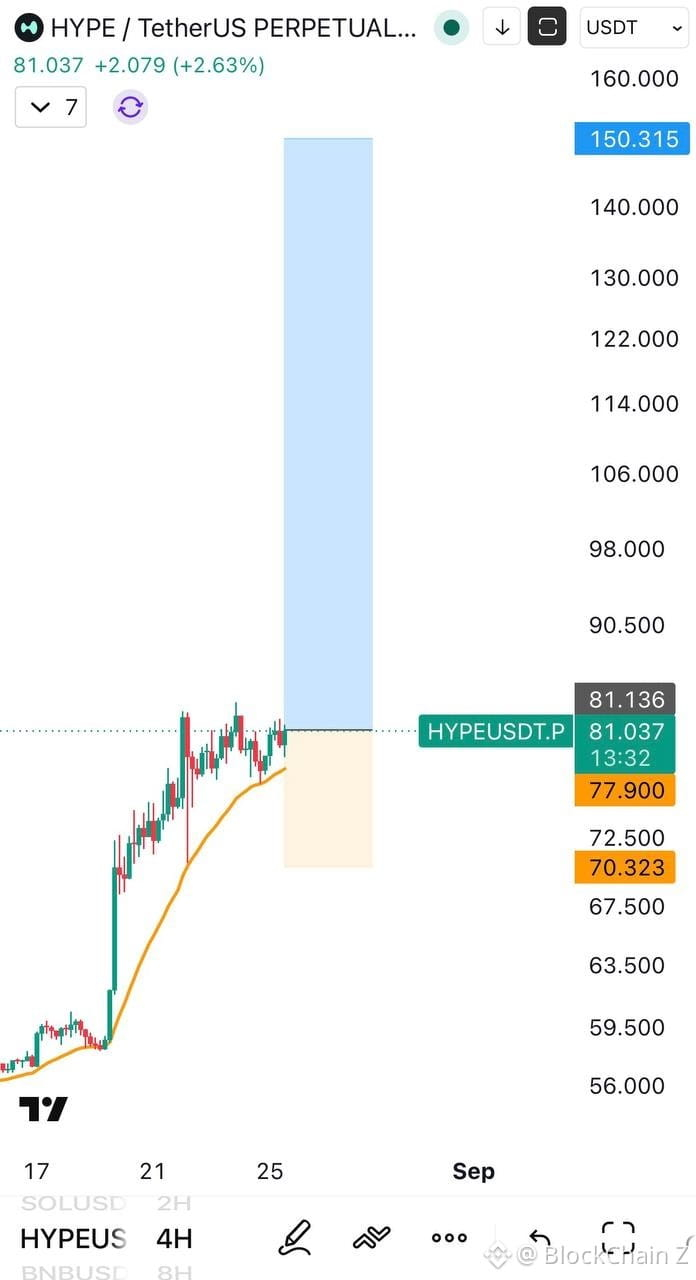
$HYPE LONG SETUP
Strong bullish structure with price holding above the rising MA and consolidating near 81.
Entry: 77.90 – 81.00
TP1: 90.50
TP2: 106.00
TP3: 122.00
Final Target: 150.31
Stop Loss: 70.32
Bias: 🟢 BULLISH
Invalidation: Below 70.32
$TAC
$ONG
Strong bullish structure with price holding above the rising MA and consolidating near 81.
Entry: 77.90 – 81.00
TP1: 90.50
TP2: 106.00
TP3: 122.00
Final Target: 150.31
Stop Loss: 70.32
Bias: 🟢 BULLISH
Invalidation: Below 70.32
$TAC
$ONG
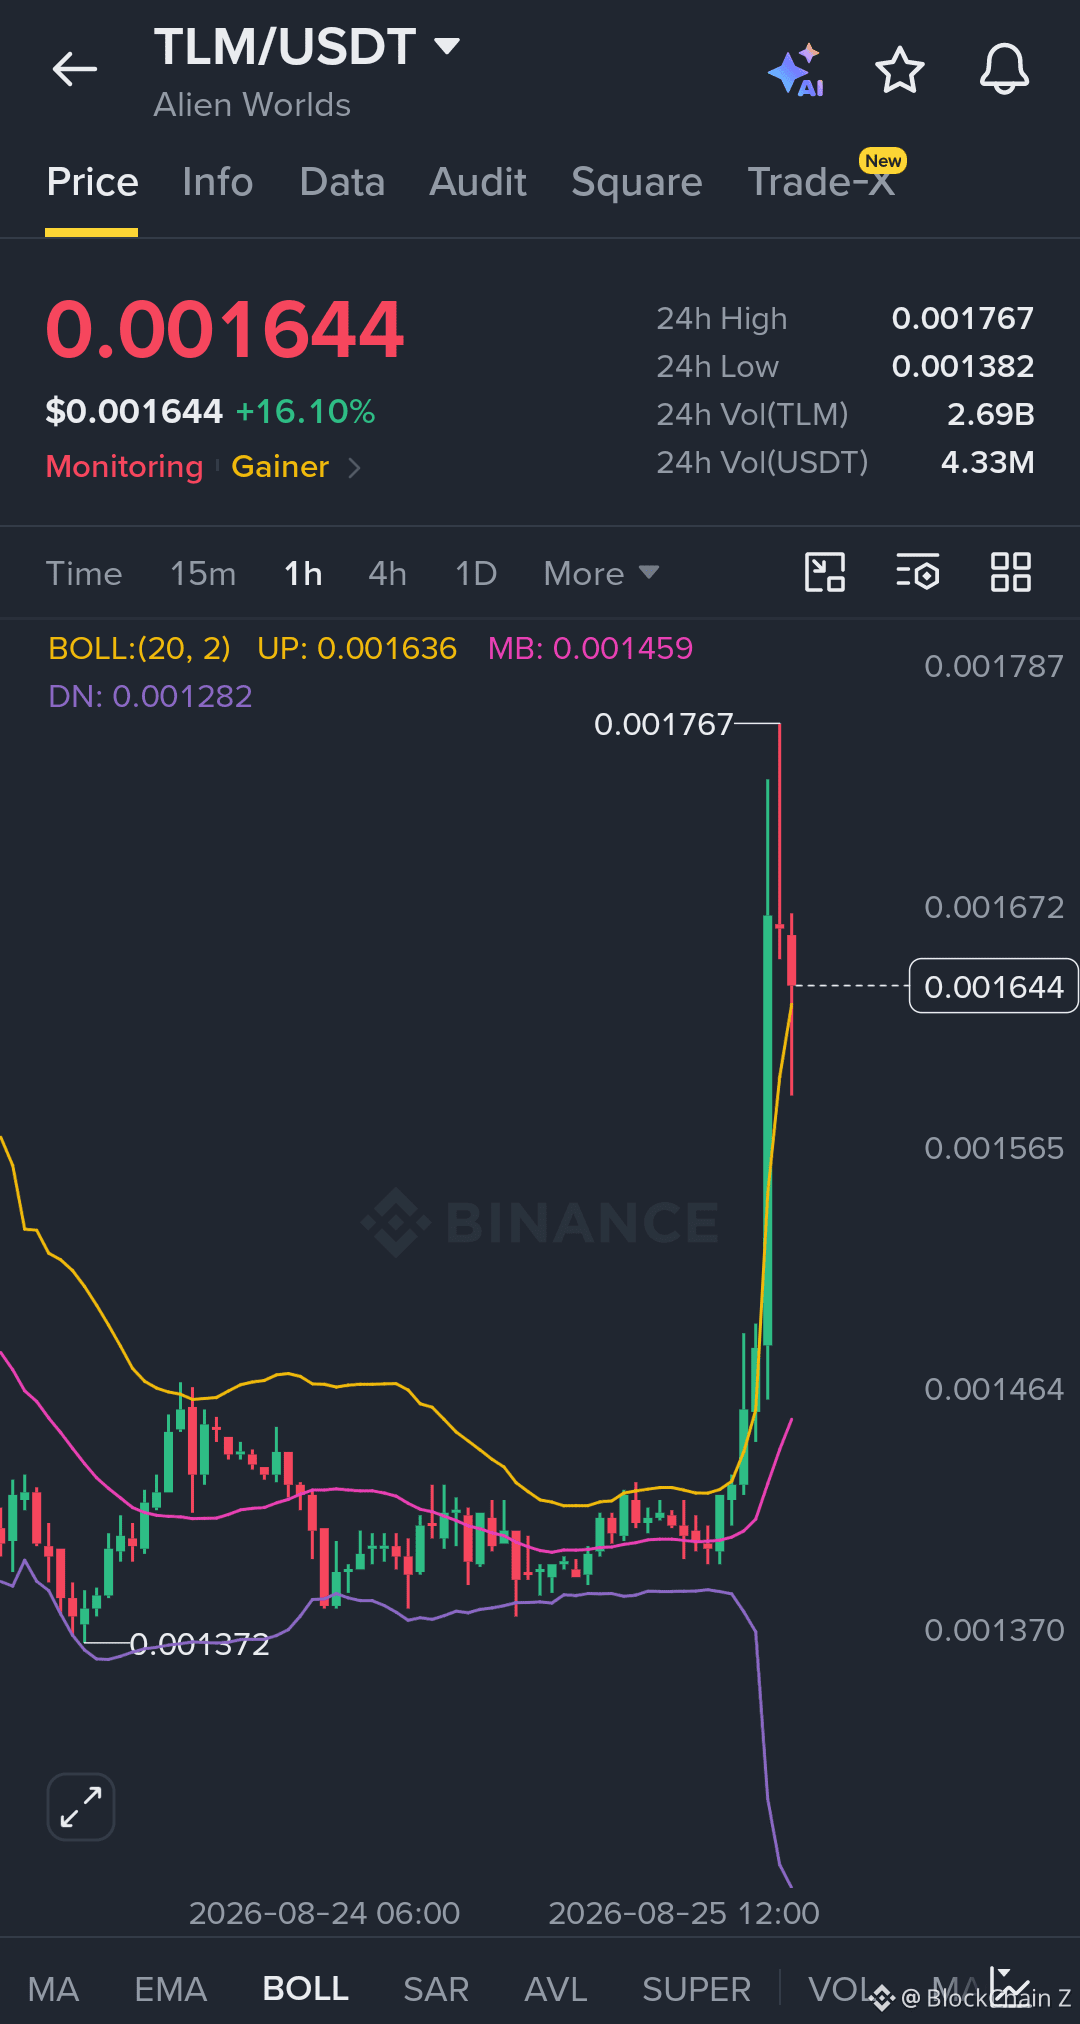
Coin #TLM /USDT
$TLM
Position: LONG
Leverage: Cross 10× To 50×
Entries: 0.00153 - 0.00148
Targets: 🎯 0.00158, 0.00165, 0.00178
Stop Loss: 0.00143
$TAC
$PROM
$TLM
Position: LONG
Leverage: Cross 10× To 50×
Entries: 0.00153 - 0.00148
Targets: 🎯 0.00158, 0.00165, 0.00178
Stop Loss: 0.00143
$TAC
$PROM
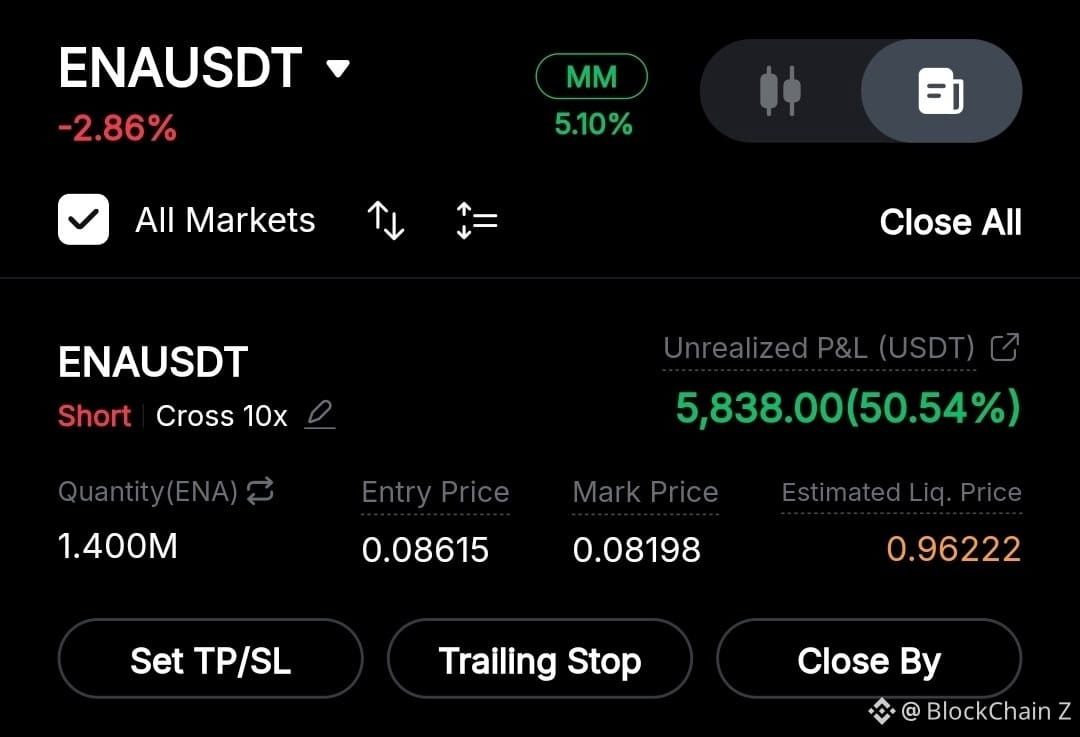
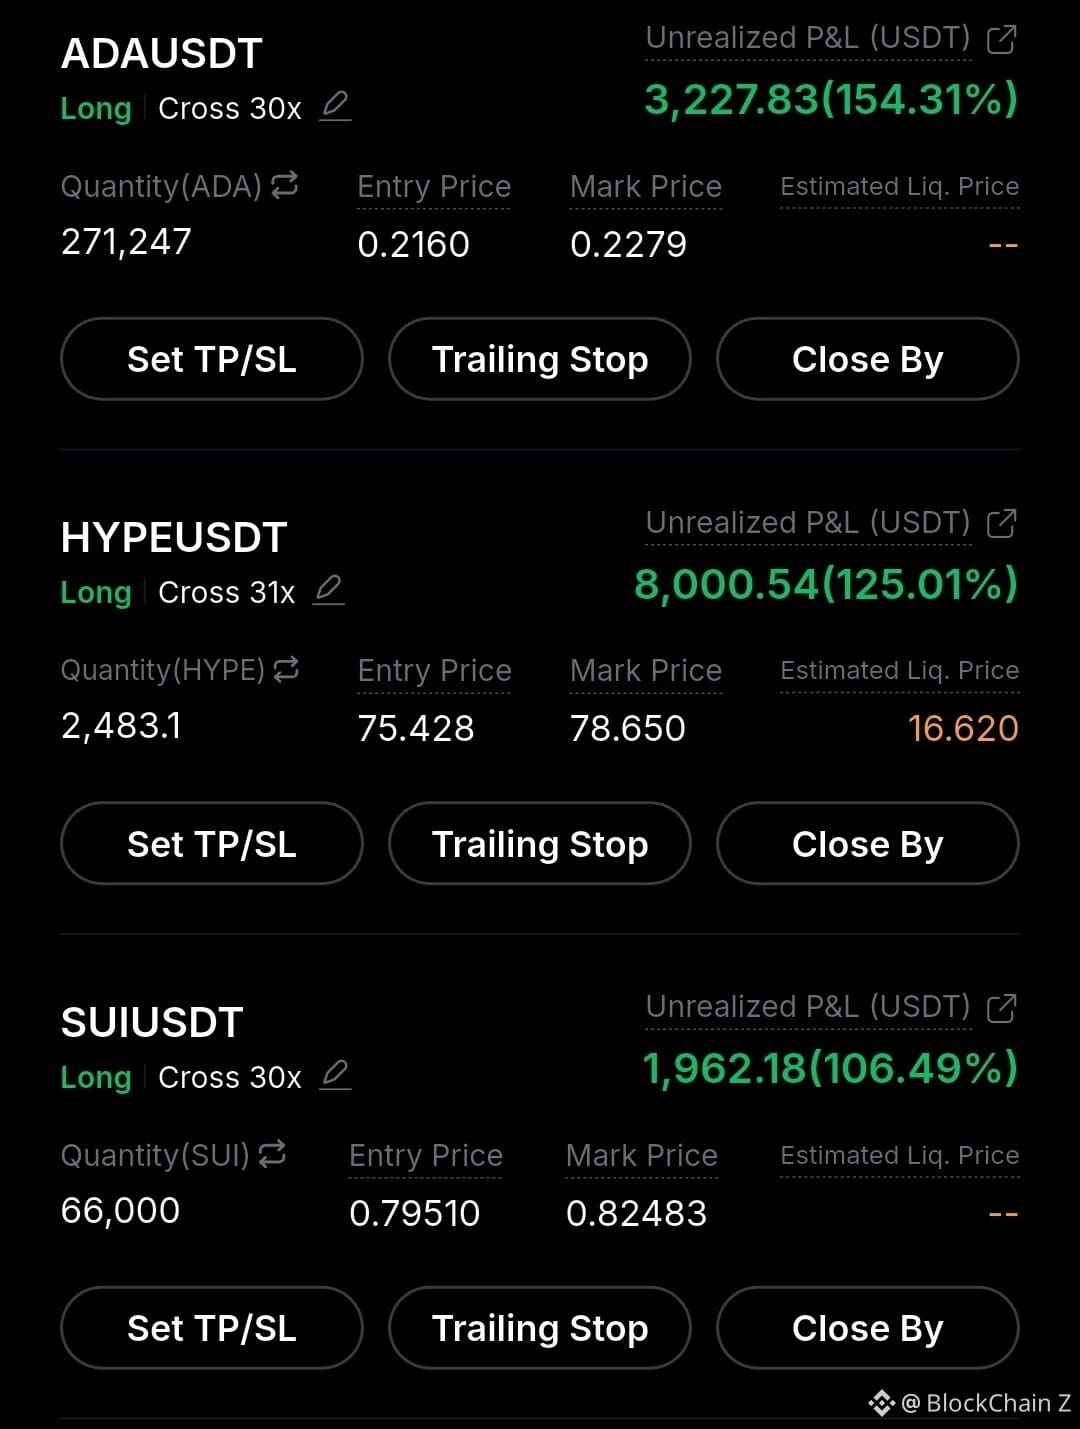
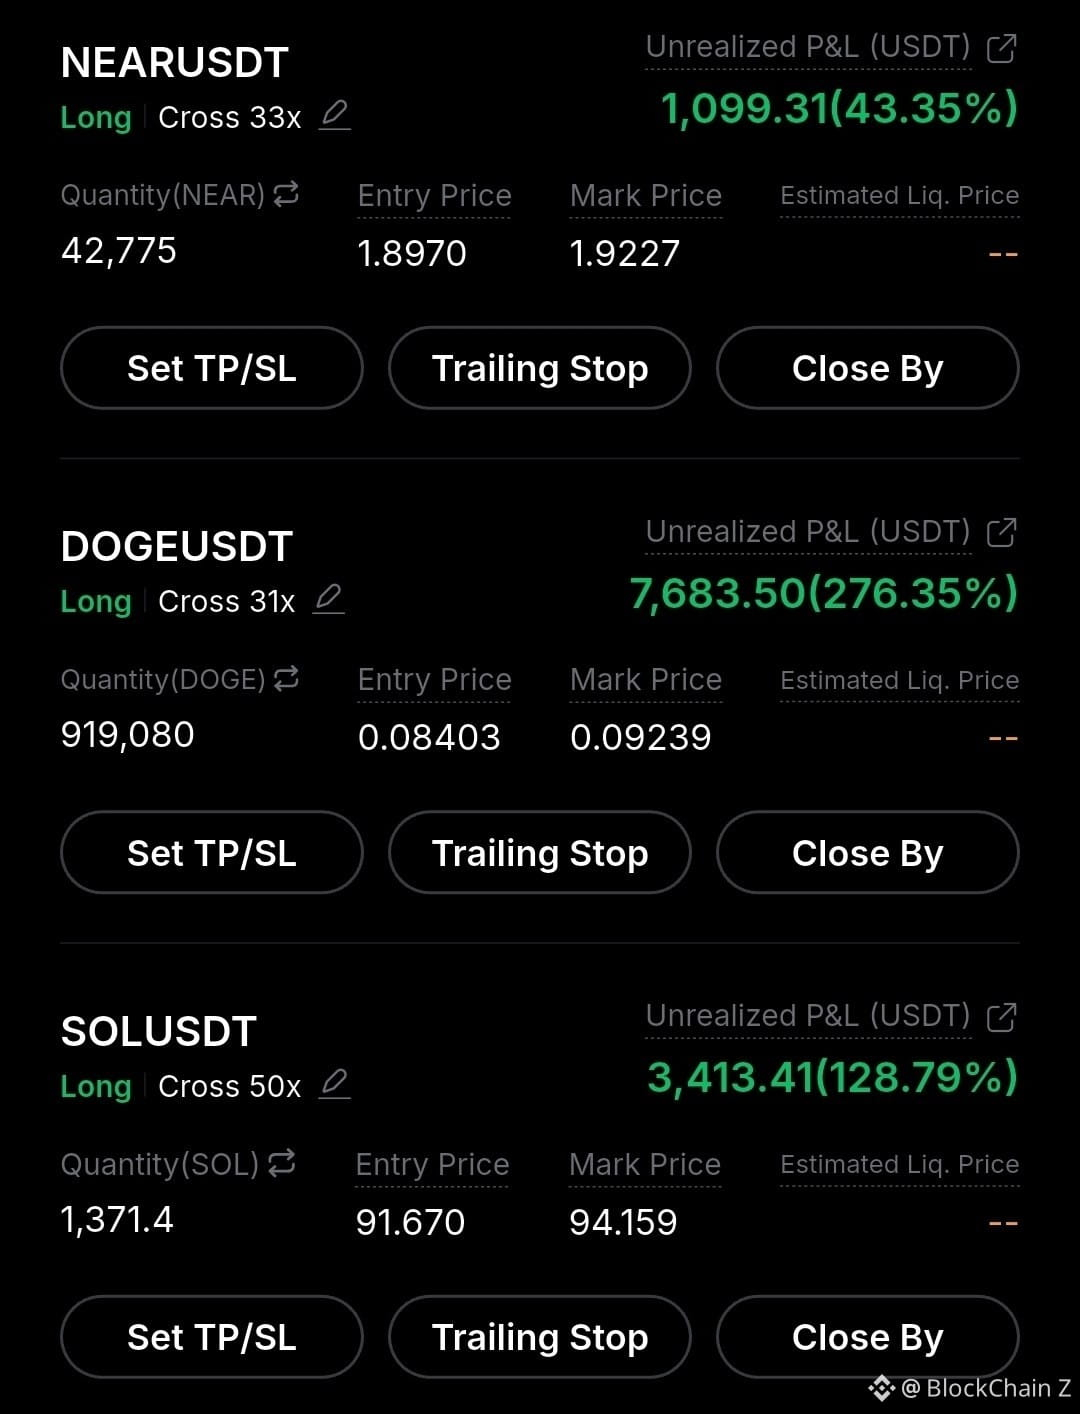
I am still opening the positions and I have not closed yet the market will continue in the coming days 👌🔥🔥
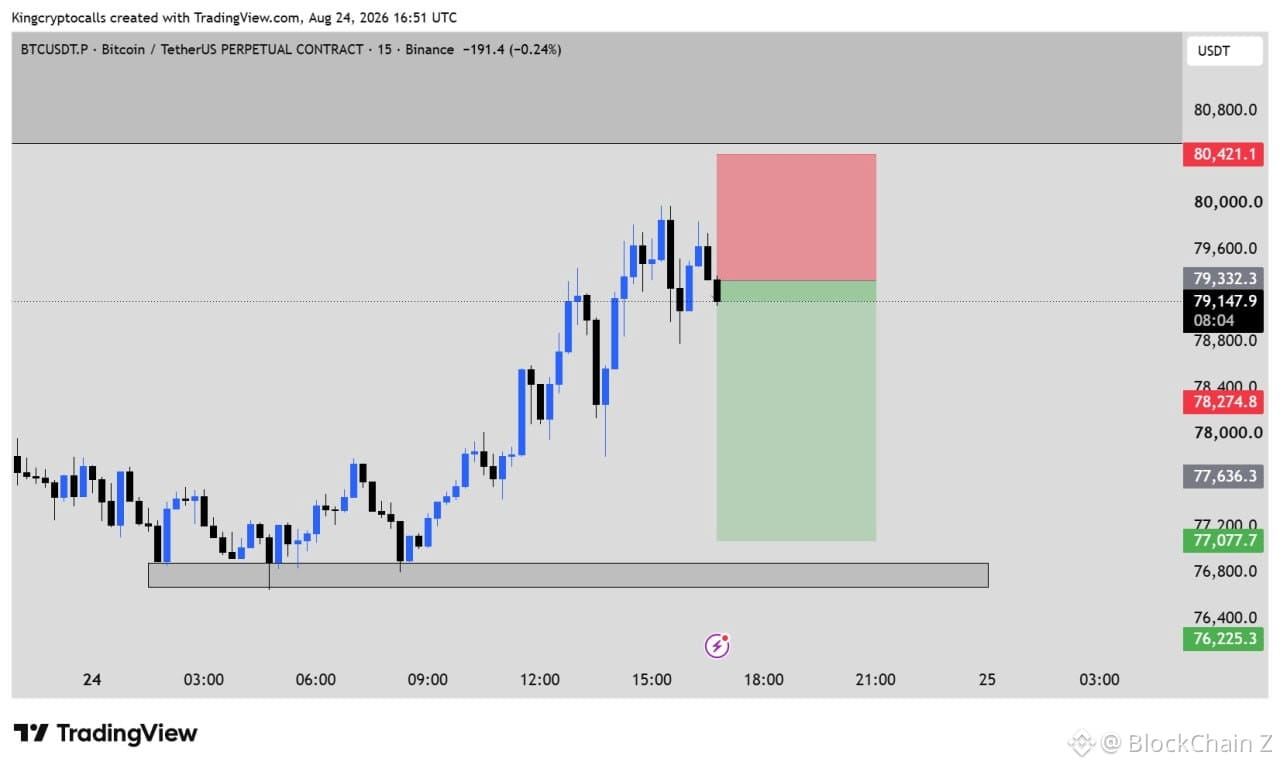
BIG: Over $240M in shorts got liquidated in the past hour as $BTC
broke past $80K, surging toward $81K.
broke past $80K, surging toward $81K.


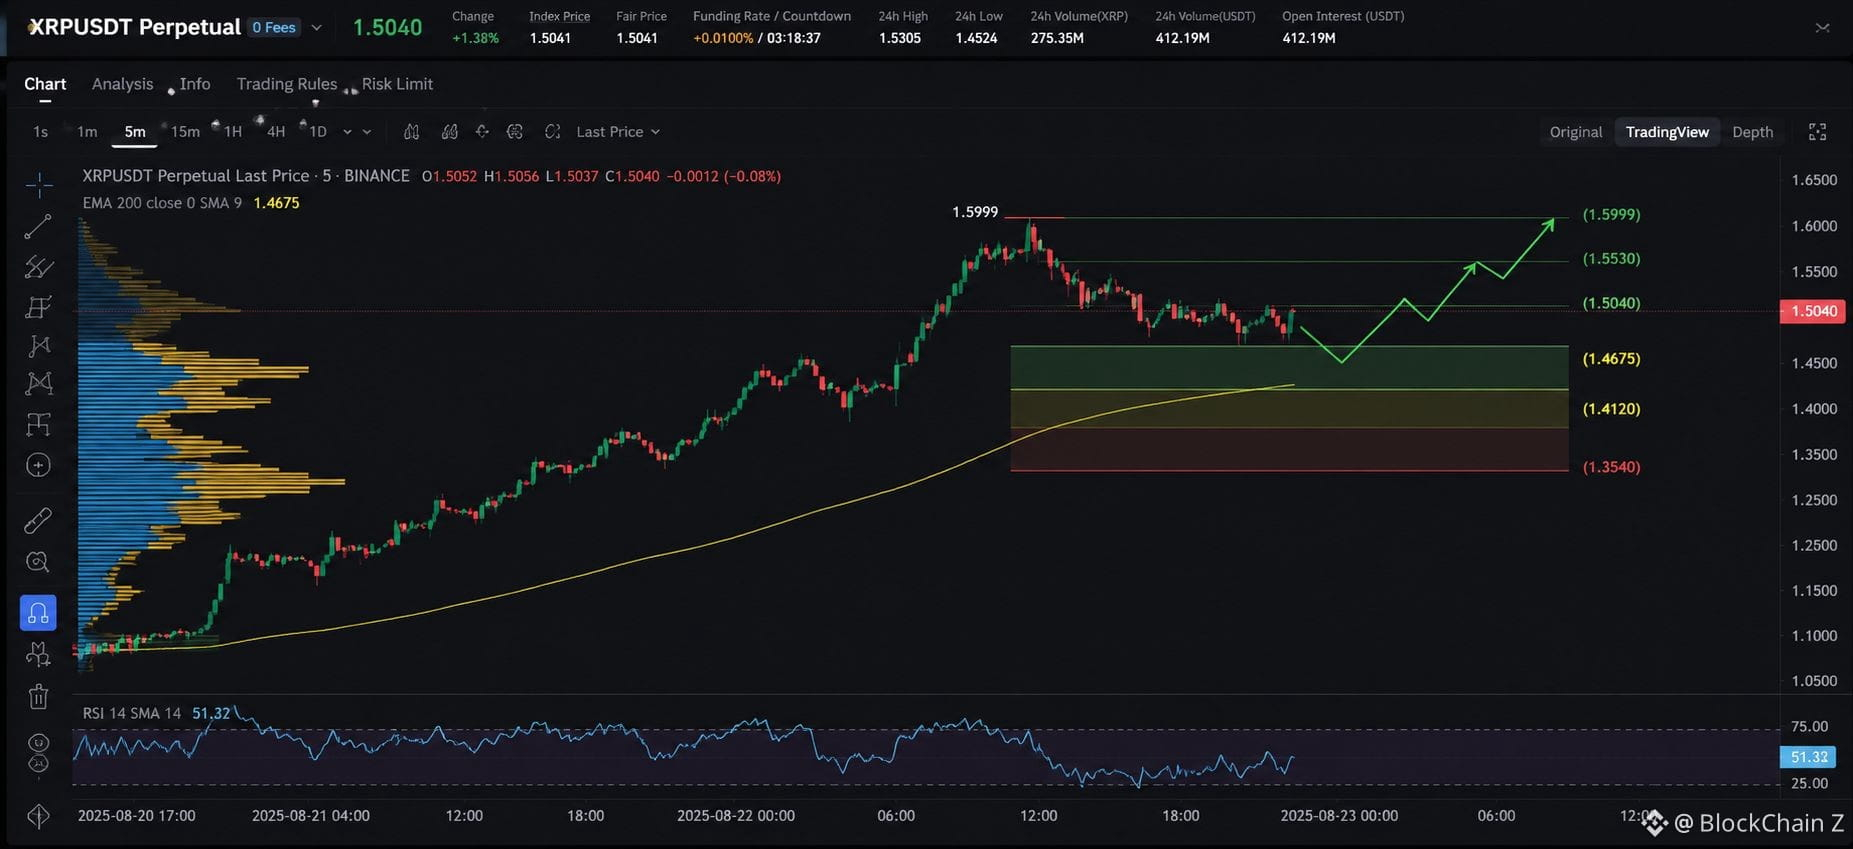
$XRP is holding a strong bullish structure above the 200 EMA, with a pullback setting up the next move higher.
XRP Long Trade Plan
Entry: $1.412–$1.467
Stop Loss: $1.354
TP1: $1.553
TP2: $1.599
Why this setup
Strong uptrend with higher highs and higher lows
Price is holding above the 200 EMA
$1.412–$1.467 acts as a key support zone
A bounce from support could push XRP toward $1.553 and $1.599
As long as XRP holds the support zone, I’m looking for continuation toward the next resistance levels.
$TAC
$ONG
XRP Long Trade Plan
Entry: $1.412–$1.467
Stop Loss: $1.354
TP1: $1.553
TP2: $1.599
Why this setup
Strong uptrend with higher highs and higher lows
Price is holding above the 200 EMA
$1.412–$1.467 acts as a key support zone
A bounce from support could push XRP toward $1.553 and $1.599
As long as XRP holds the support zone, I’m looking for continuation toward the next resistance levels.
$TAC
$ONG
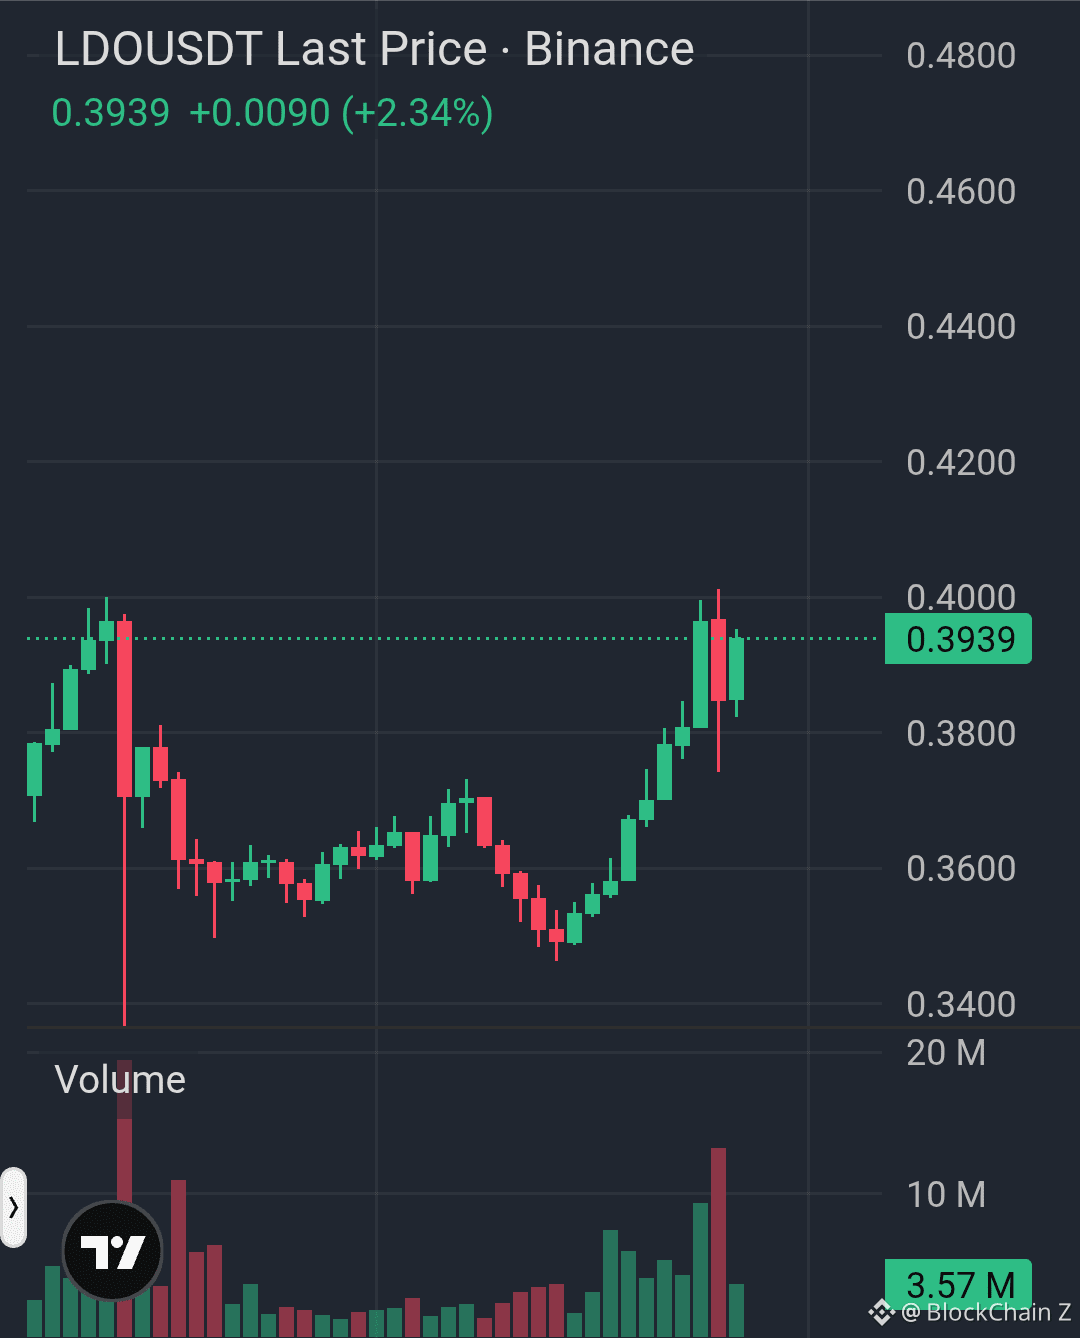
$LDO is showing a strong recovery from the 0.35 area, with buyers pushing price back toward the key 0.40 resistance. The recent volume expansion supports the bullish momentum, but a retest would offer a better entry.
My Setup
Entry Zone: 0.378 – 0.385
TP1: 0.400
TP2: 0.420
TP3: 0.440
Stop Loss: 0.365
The 0.378–0.385 zone is the key retest area. If buyers defend it and reclaim 0.400, the next upside levels are 0.420–0.440.
My Setup
Entry Zone: 0.378 – 0.385
TP1: 0.400
TP2: 0.420
TP3: 0.440
Stop Loss: 0.365
The 0.378–0.385 zone is the key retest area. If buyers defend it and reclaim 0.400, the next upside levels are 0.420–0.440.
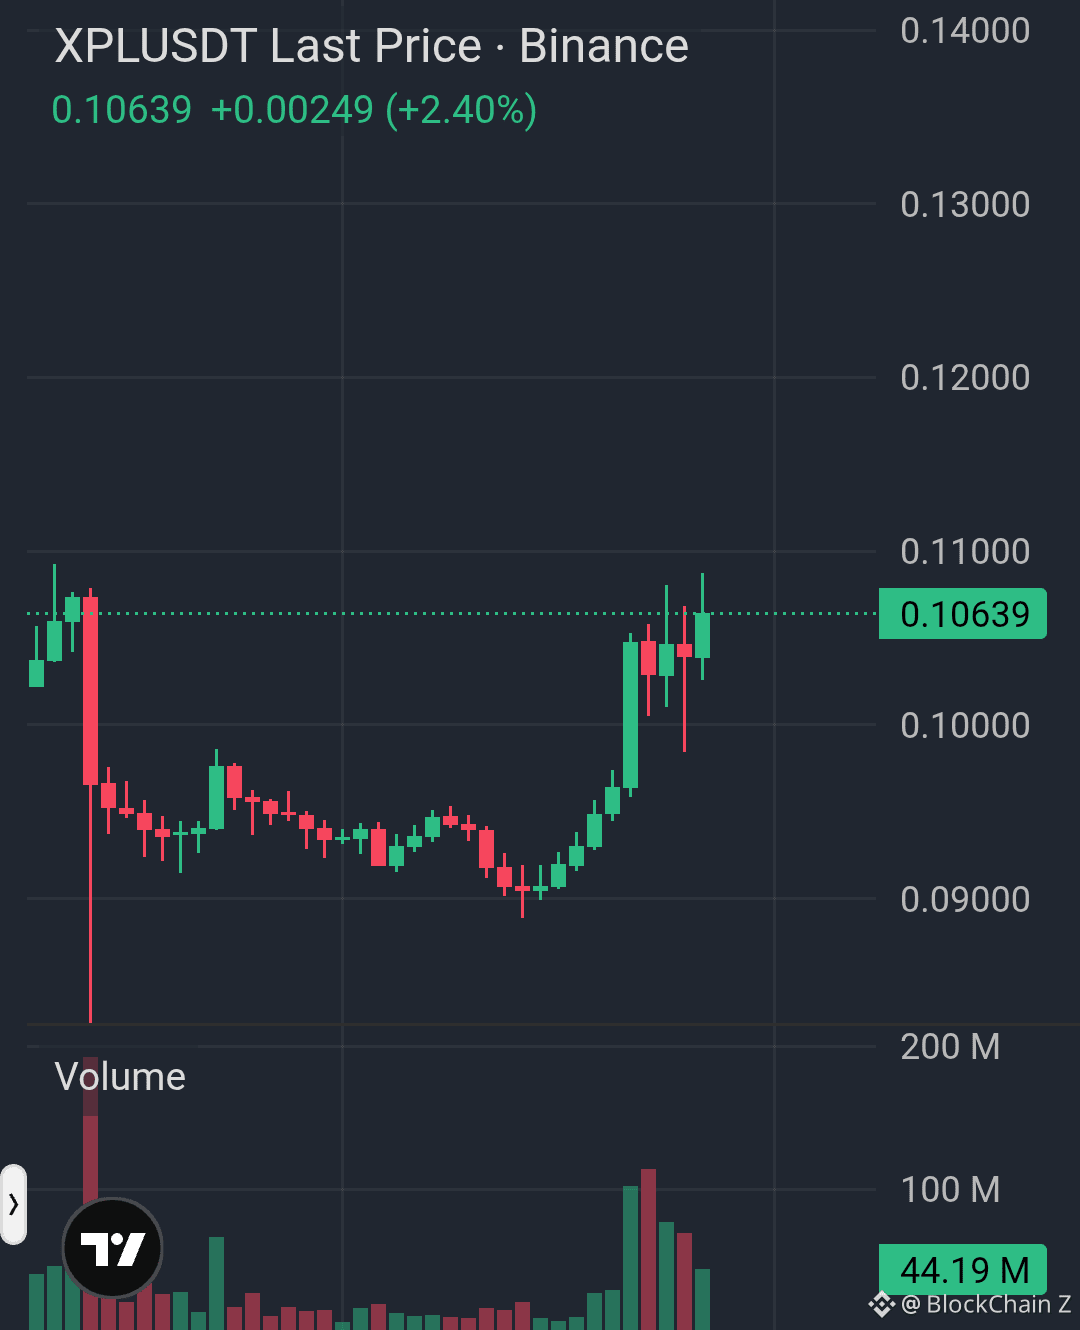
$XPL is showing a strong recovery from the 0.0900 area, with buyers reclaiming 0.1000 on rising volume. Price is now consolidating just below 0.1100 resistance.
My Setup
Entry Zone: 0.1010 – 0.1035
TP1: 0.1100
TP2: 0.1180
TP3: 0.1250
Stop Loss: 0.0960
The 0.1010–0.1035 retest is the key zone. If buyers defend it, a continuation toward 0.1180–0.1250 becomes possible.
My Setup
Entry Zone: 0.1010 – 0.1035
TP1: 0.1100
TP2: 0.1180
TP3: 0.1250
Stop Loss: 0.0960
The 0.1010–0.1035 retest is the key zone. If buyers defend it, a continuation toward 0.1180–0.1250 becomes possible.
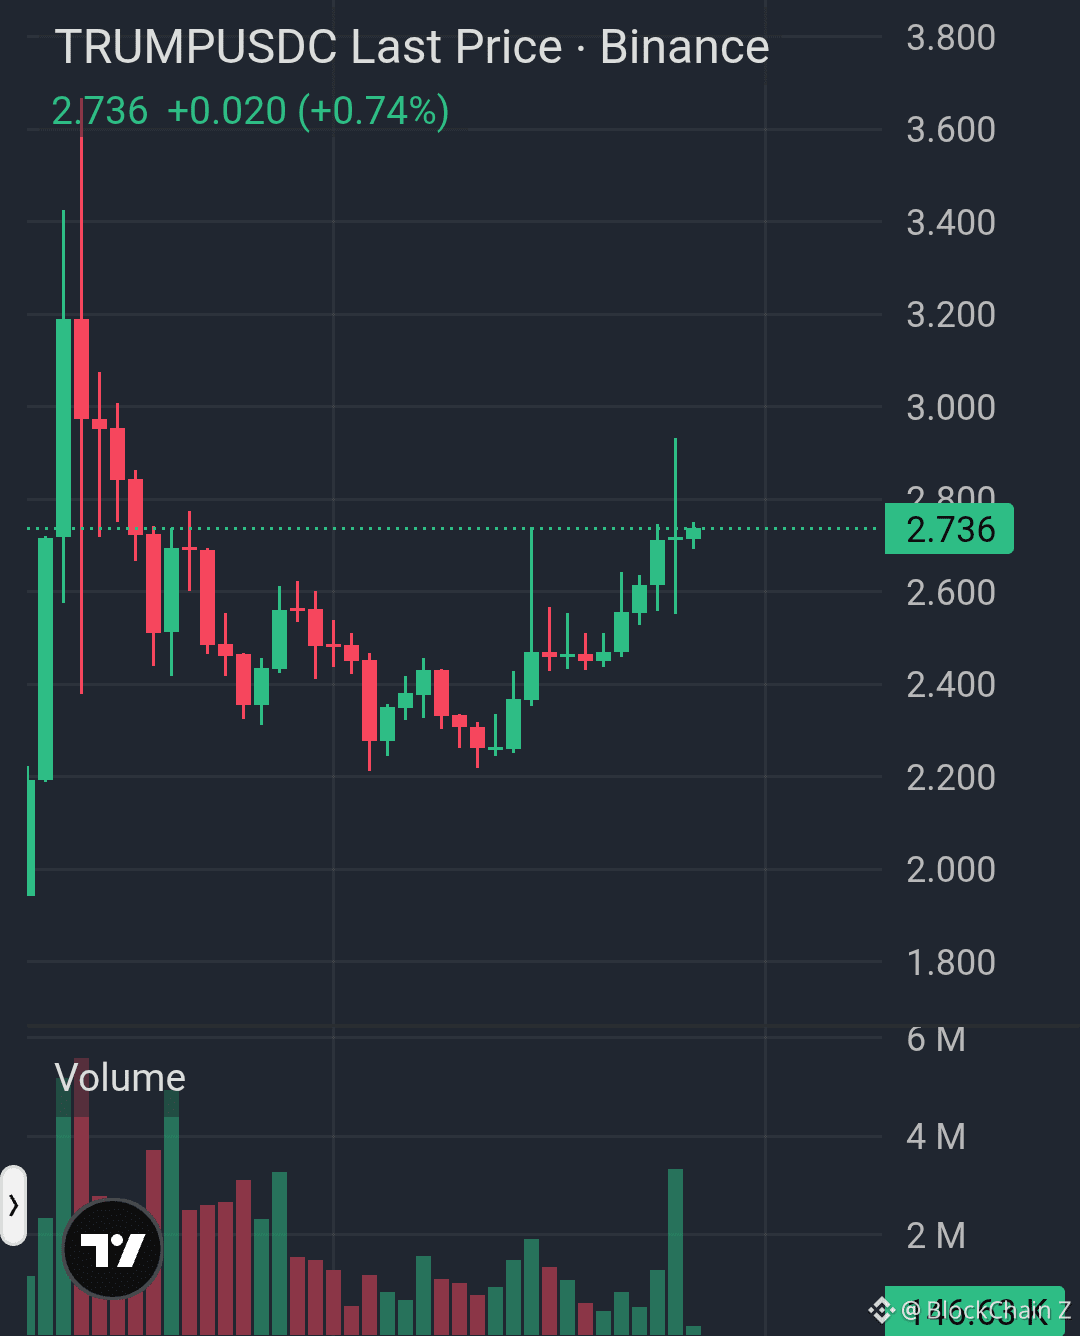
$TRUMP is showing a clear recovery structure after holding the 2.20–2.30 area. Price has reclaimed 2.60 with strong momentum, and the latest volume expansion supports the move.
My Setup
Entry Zone: 2.60 – 2.68
TP1: 2.85
TP2: 3.00
TP3: 3.20
Stop Loss: 2.45
The key is the 2.60–2.68 retest. If buyers defend this zone, continuation toward 3.00 and 3.20 becomes possible. Avoid chasing if price spikes directly into resistance.
$TUT
$AVAX
My Setup
Entry Zone: 2.60 – 2.68
TP1: 2.85
TP2: 3.00
TP3: 3.20
Stop Loss: 2.45
The key is the 2.60–2.68 retest. If buyers defend this zone, continuation toward 3.00 and 3.20 becomes possible. Avoid chasing if price spikes directly into resistance.
$TUT
$AVAX
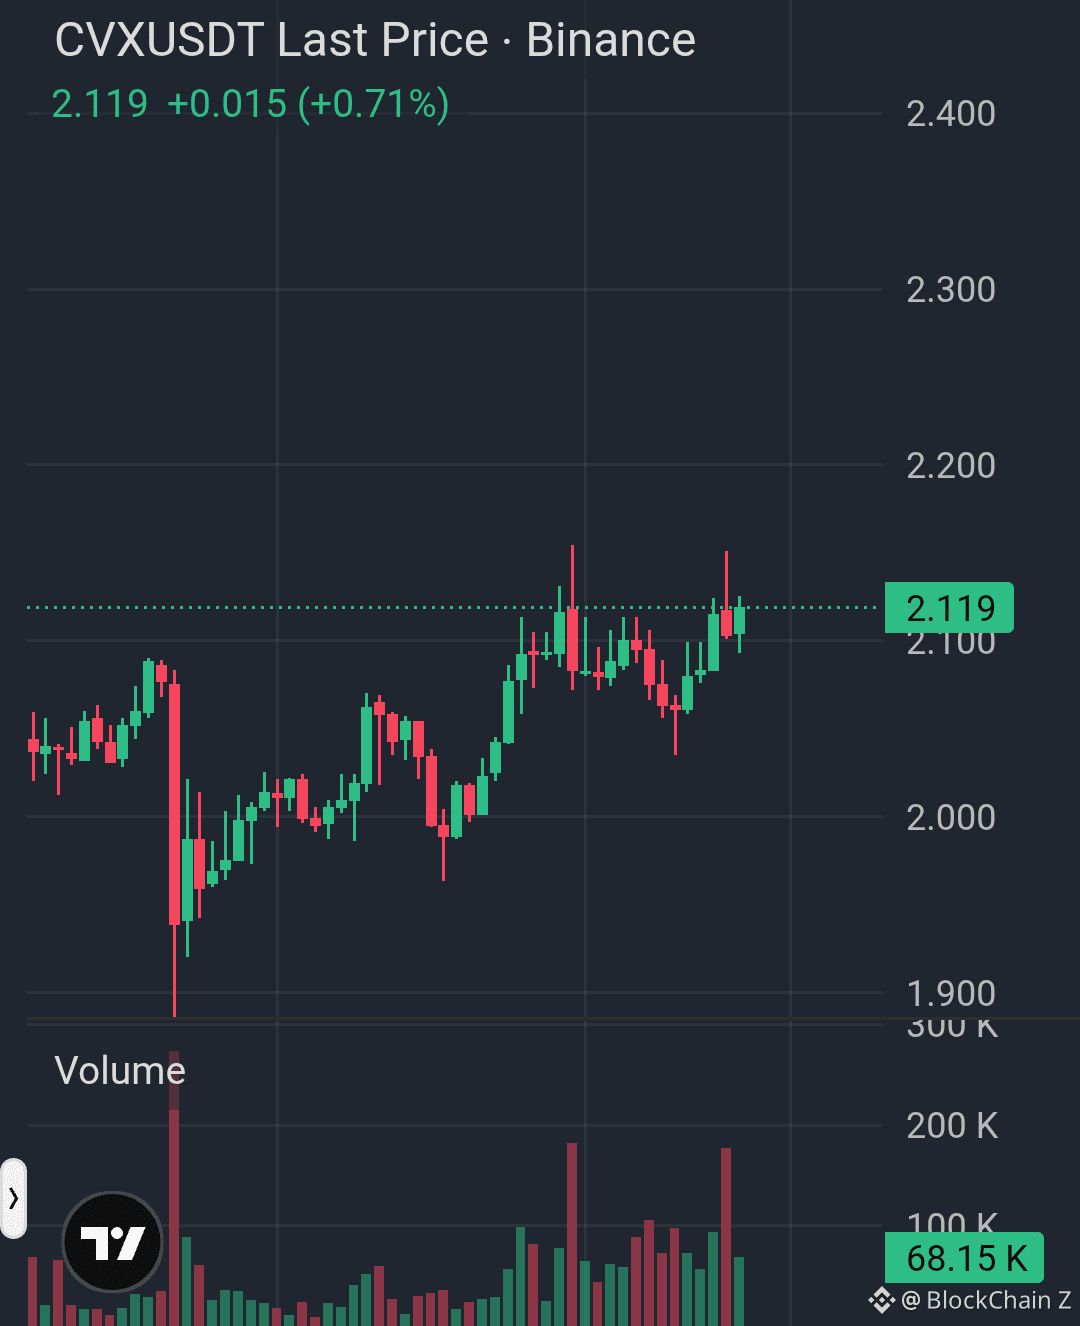
$CVX is building a bullish structure around $2.10, with higher lows forming after the recovery from $1.90. A clean breakout above $2.15 could open the next upside leg.
Long Setup
Entry: $2.08–$2.12
TP1: $2.18
TP2: $2.25
TP3: $2.35
Stop Loss: $2.00
Bullish bias while $2.05–$2.08 holds.
Long Setup
Entry: $2.08–$2.12
TP1: $2.18
TP2: $2.25
TP3: $2.35
Stop Loss: $2.00
Bullish bias while $2.05–$2.08 holds.
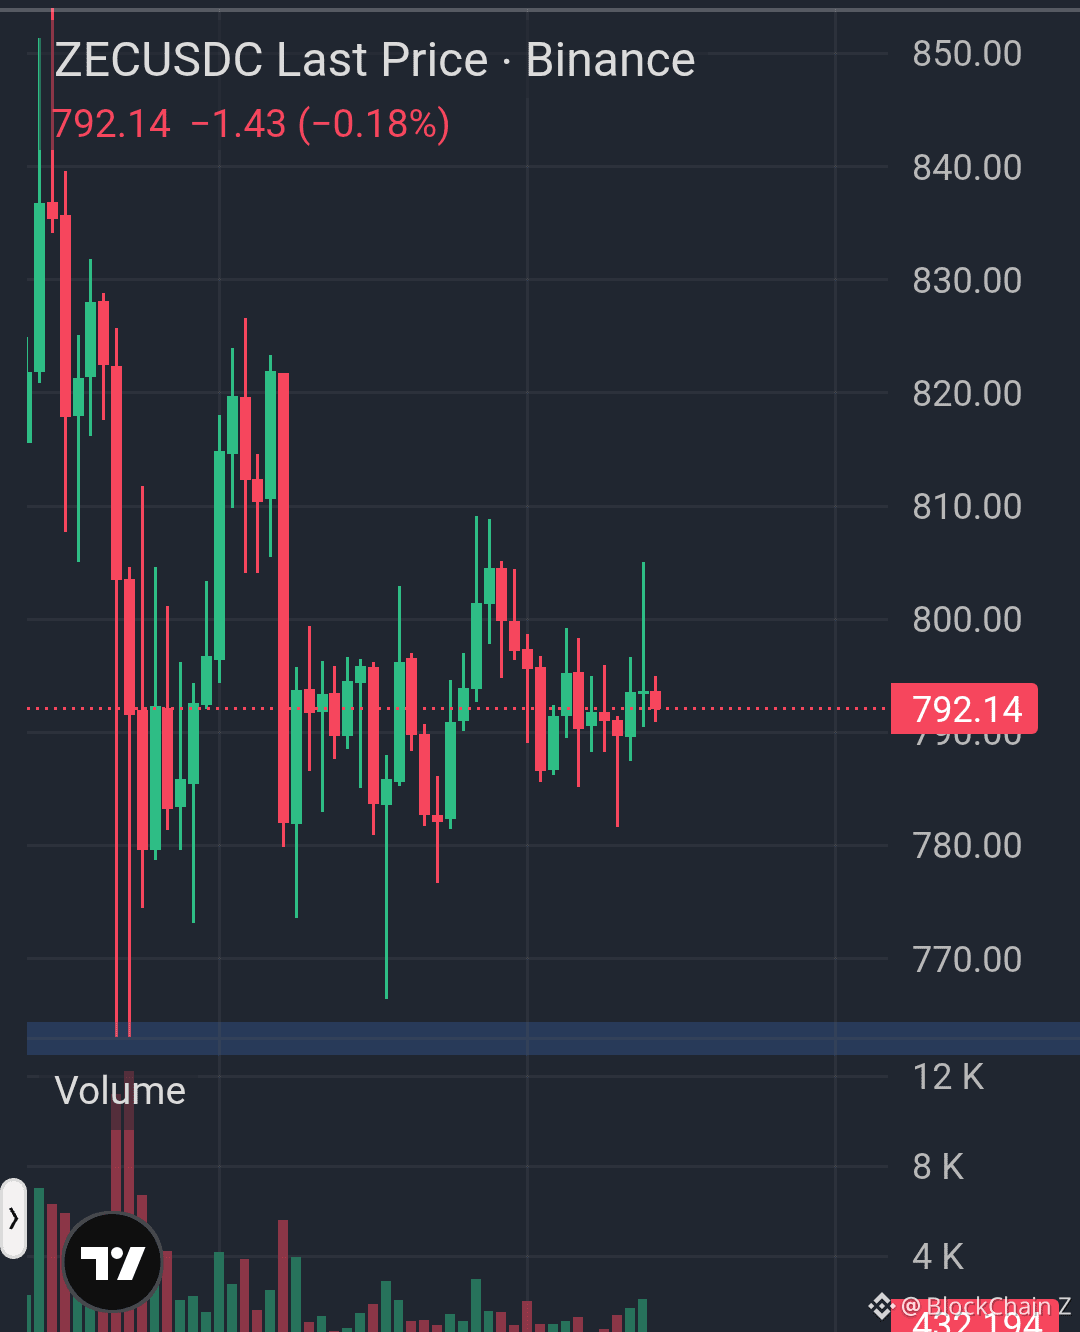
$ZEC is consolidating around $792 after a sharp recovery, with buyers defending the $780–$785 area. A break above $800 could trigger another push higher.
Long Setup
Entry: $788–$795
TP1: $805
TP2: $820
TP3: $840
Stop Loss: $775
Bullish above $780 with confirmation on a clean break of $800.
$POL
$TRUMP
Long Setup
Entry: $788–$795
TP1: $805
TP2: $820
TP3: $840
Stop Loss: $775
Bullish above $780 with confirmation on a clean break of $800.
$POL
$TRUMP
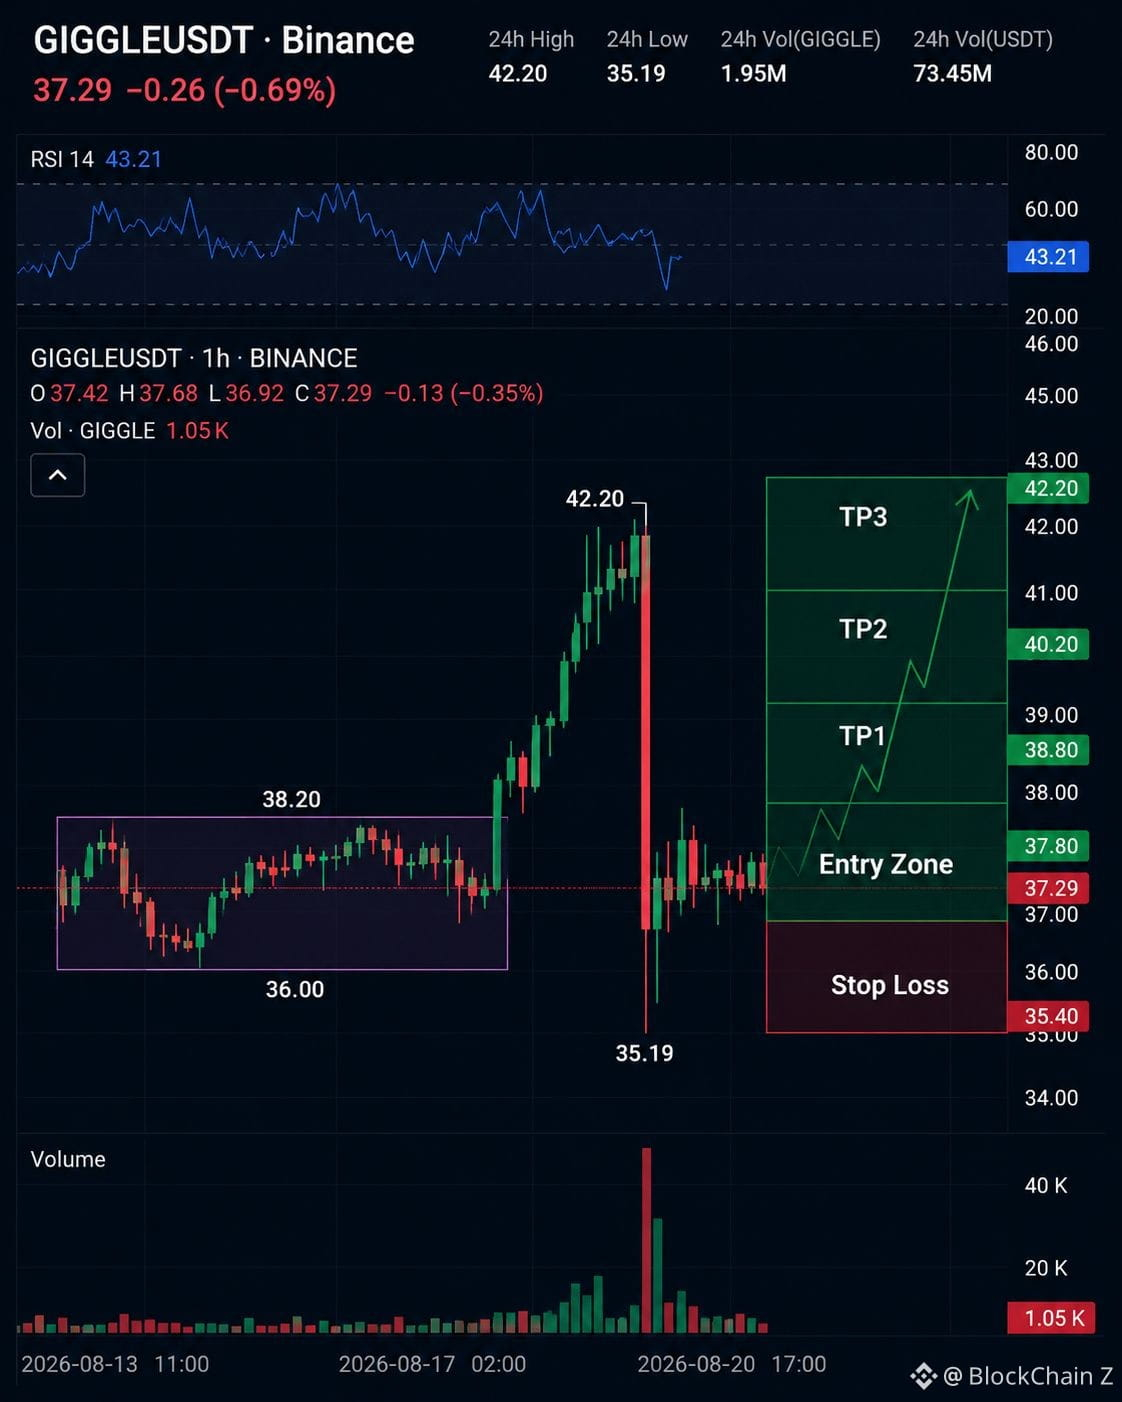
$GIGGLE just survived a violent shakeout — and the retest is getting interesting.
Entry: $37.00–$37.80
SL: $35.40
TP1: $38.80
TP2: $40.20
Final TP: $42.20
After rallying to $42.20, price was aggressively rejected and swept down to $35.19. Buyers quickly reclaimed the $37 area and are now building a base above the previous range.
RSI at 43.21 shows momentum has cooled significantly, leaving room for a recovery if buyers regain control.
A sustained hold above $37.00 could trigger another move toward $38.80, $40.20 and the previous high at $42.20.
As long as $GIGGLE holds above $35.40, the long setup remains valid.
Entry: $37.00–$37.80
SL: $35.40
TP1: $38.80
TP2: $40.20
Final TP: $42.20
After rallying to $42.20, price was aggressively rejected and swept down to $35.19. Buyers quickly reclaimed the $37 area and are now building a base above the previous range.
RSI at 43.21 shows momentum has cooled significantly, leaving room for a recovery if buyers regain control.
A sustained hold above $37.00 could trigger another move toward $38.80, $40.20 and the previous high at $42.20.
As long as $GIGGLE holds above $35.40, the long setup remains valid.
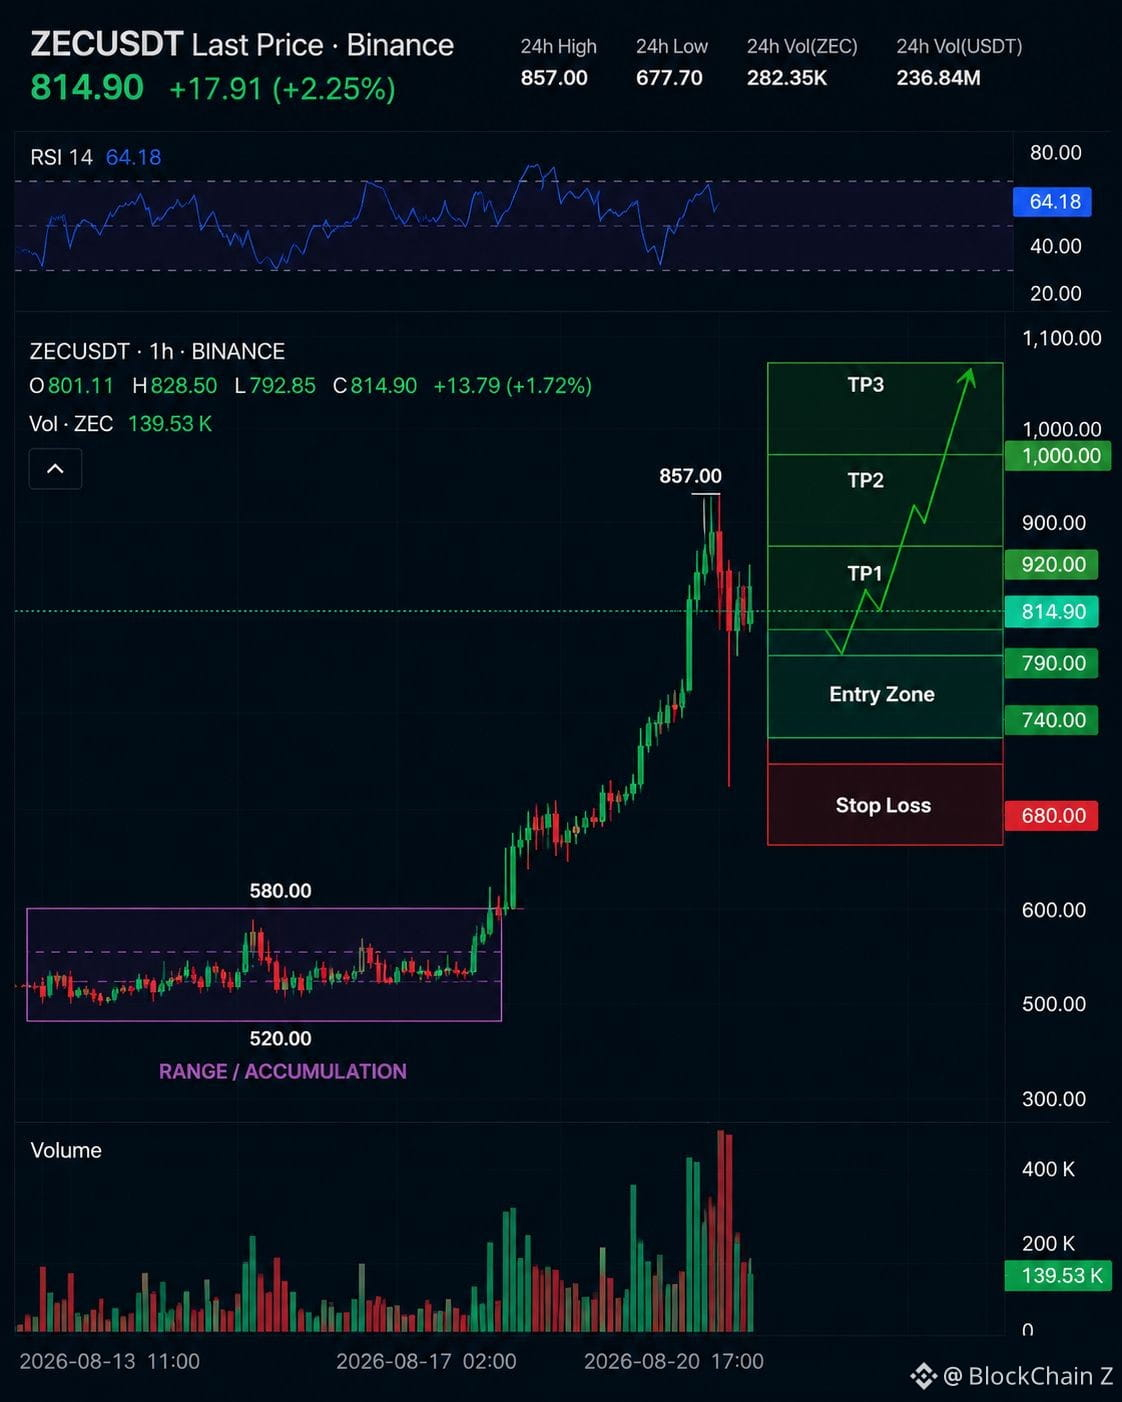
$ZEC Long setup.
Entry zone: 740 - 790
Take profit:
TP1: 920
TP2: 1000
TP3: 1080
Stop loss: 680
$ZAMA
$TRUMP
Entry zone: 740 - 790
Take profit:
TP1: 920
TP2: 1000
TP3: 1080
Stop loss: 680
$ZAMA
$TRUMP
Log in to explore more content