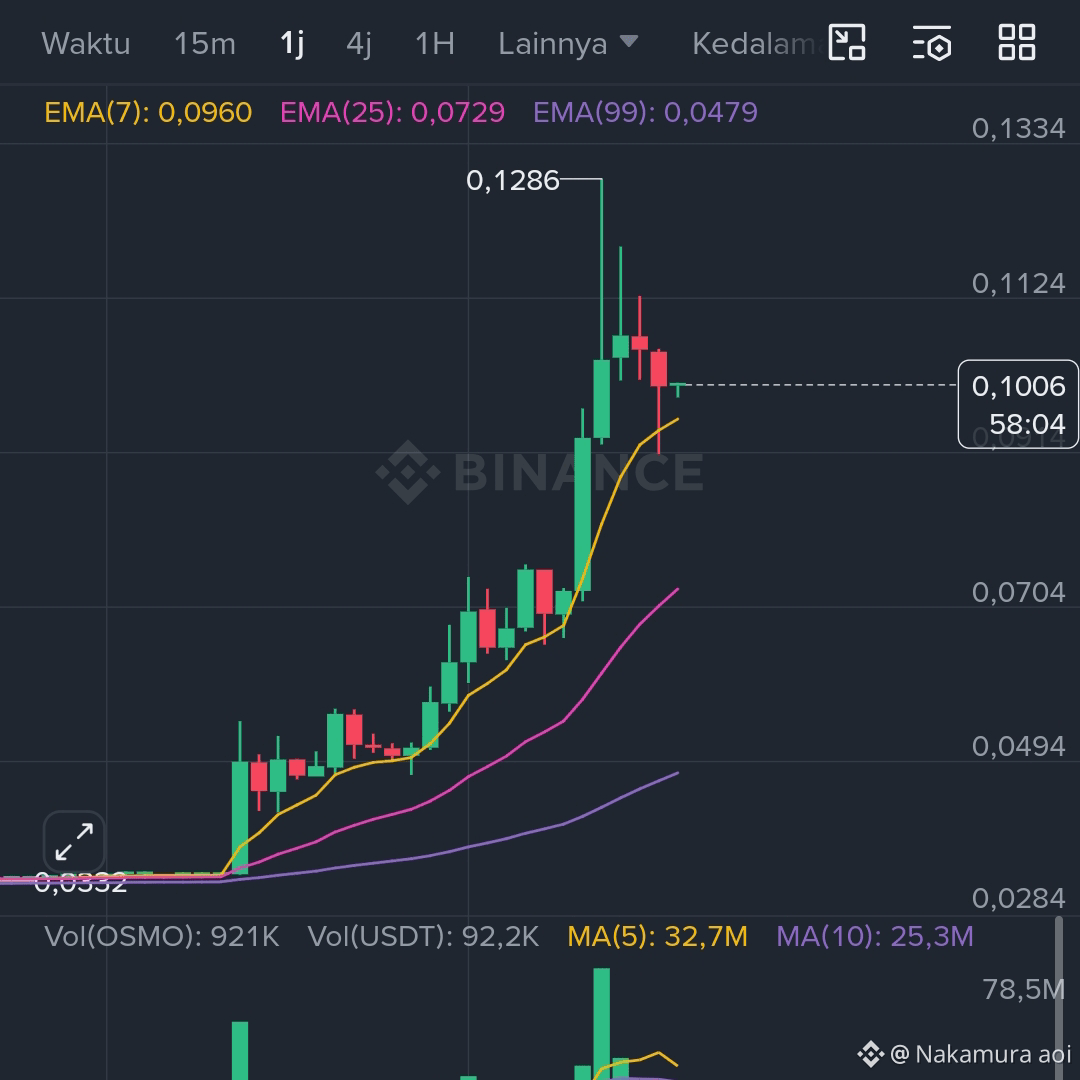
Long Scenario$OSMO
Safe setup (waiting for a pullback):
Entry area: 0.092 – 0.097
Stop loss: below 0.088
TP1: 0.112
TP2: 0.128 (previous high)
Reasoning:
That area is close to the EMA7 and is likely to become new demand.
Risk/reward is healthier compared to an entry above 0.10.
Breakout Scenario
If the 1H candle successfully:
closes strongly above 0.105 – 0.108
with volume increasing
Then we can continue:
TP around 0.118 – 0.128
However, if the breakout is weak and volume is low, it often leads to a fake breakout followed by a quick dump.
Short Scenario
Shorting is safer only if:
the price fails to reclaim 0.105
EMA7 starts to cross down EMA25
a strong rejection candle appears
Short target:
0.092
then 0.085
For coins that have just pumped big like this, the best setup is usually:
wait for a retrace to EMA/demand → then look for longs
not chasing green candles above.
Safe setup (waiting for a pullback):
Entry area: 0.092 – 0.097
Stop loss: below 0.088
TP1: 0.112
TP2: 0.128 (previous high)
Reasoning:
That area is close to the EMA7 and is likely to become new demand.
Risk/reward is healthier compared to an entry above 0.10.
Breakout Scenario
If the 1H candle successfully:
closes strongly above 0.105 – 0.108
with volume increasing
Then we can continue:
TP around 0.118 – 0.128
However, if the breakout is weak and volume is low, it often leads to a fake breakout followed by a quick dump.
Short Scenario
Shorting is safer only if:
the price fails to reclaim 0.105
EMA7 starts to cross down EMA25
a strong rejection candle appears
Short target:
0.092
then 0.085
For coins that have just pumped big like this, the best setup is usually:
wait for a retrace to EMA/demand → then look for longs
not chasing green candles above.