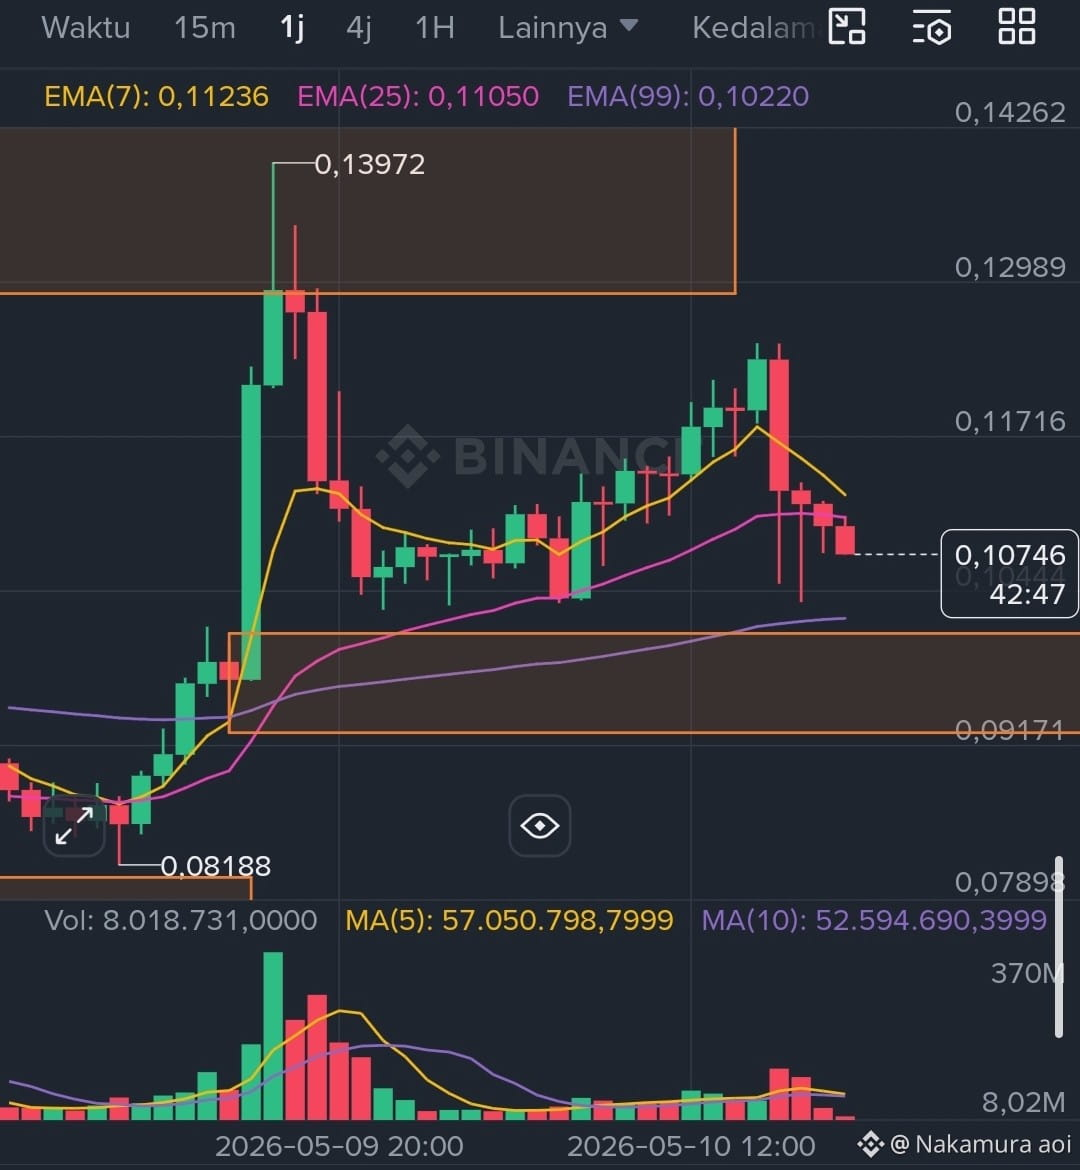
2 Scenarios for $PLAY
1. Bullish Scenario (Long)
Idea
Price is approaching:
EMA99
horizontal support
previous demand area
If a strong rejection appears, a bounce is likely.
Entry Long
0.104 – 0.101
Confirmation
Long lower candle (rejection)
Decreasing red volume
EMA7 starts to rise again on TF 5m–15m
Stop Loss
Below 0.099
Target
TP1: 0.117
TP2: 0.125
TP3: 0.139
2. Bearish Scenario (Short)
Idea
If EMA99 support fails to hold, the market could continue to retrace deeper towards lower demand.
Entry Short
Wait:
clear candle close below 0.102
then failed retest to go up
Short area:
0.102 – 0.104
Stop Loss
Above 0.108
Target
TP1: 0.097
TP2: 0.094
TP3: 0.091
Conclusion
Currently, this area is a decision zone:
hold → long bounce opportunity
breakdown → short continuation opportunity
So, don't rush to enter in the middle of a candle, wait for direction confirmation first.
1. Bullish Scenario (Long)
Idea
Price is approaching:
EMA99
horizontal support
previous demand area
If a strong rejection appears, a bounce is likely.
Entry Long
0.104 – 0.101
Confirmation
Long lower candle (rejection)
Decreasing red volume
EMA7 starts to rise again on TF 5m–15m
Stop Loss
Below 0.099
Target
TP1: 0.117
TP2: 0.125
TP3: 0.139
2. Bearish Scenario (Short)
Idea
If EMA99 support fails to hold, the market could continue to retrace deeper towards lower demand.
Entry Short
Wait:
clear candle close below 0.102
then failed retest to go up
Short area:
0.102 – 0.104
Stop Loss
Above 0.108
Target
TP1: 0.097
TP2: 0.094
TP3: 0.091
Conclusion
Currently, this area is a decision zone:
hold → long bounce opportunity
breakdown → short continuation opportunity
So, don't rush to enter in the middle of a candle, wait for direction confirmation first.