

Nowadays, registering an account on Binance.com – the platform that allows buying and selling various cryptocurrencies (crypto) also known as virtual currency or digital currency – has become simpler than ever. If you are just starting out, the following guide will help you create a Binance account quickly, easily, and safely.
1. Detailed guide on how to register a Binance account on a computer
Step 1: Prepare your Gmail account
First, you need a Gmail account from Google. Please log into this Gmail account on your computer before starting to register for Binance.
Note:
It is advisable to use a separate email address solely for registering a Binance account (or other cryptocurrency exchanges).
Remember your password, and also set up a recovery email and phone number to protect your account if you forget your password.
Step 2: Access the Binance registration page
Access the official link: https://accounts.binance.com/en

.
Here, you will see the registration methods:
Email or phone number: enter the information and then click Next.
Create a password: combine uppercase letters, lowercase letters, numbers, and special characters to enhance security.
Referral code (optional): enter the code TRUSTWEB to receive a 10% discount on transaction fees.
If you choose to verify by email or phone number, Binance will send a verification code for you to enter to complete the registration.
👉 Tip: choose 'Continue with Google' for quick login without needing to remember your Binance password.
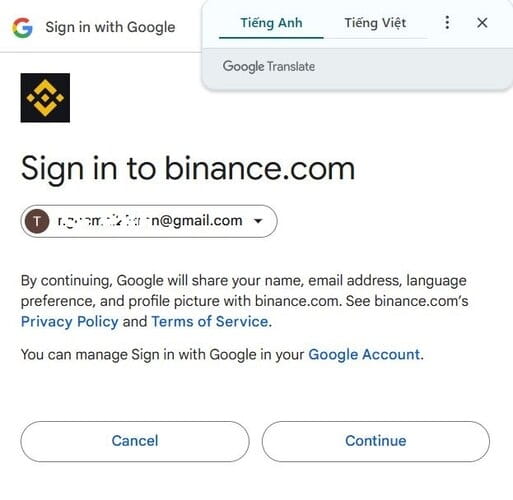
Step 3: Register with Google
Click 'Continue with Google' → select your Gmail account → click Continue to confirm.
Registering through Google helps you log in quickly, sync notifications, and link easily with many other services.
Step 4: Confirm the transaction fee refund
When asked, select 'Yes' to agree to receive a 10% refund on transaction fees later.
If you choose 'No', you will not receive this benefit.
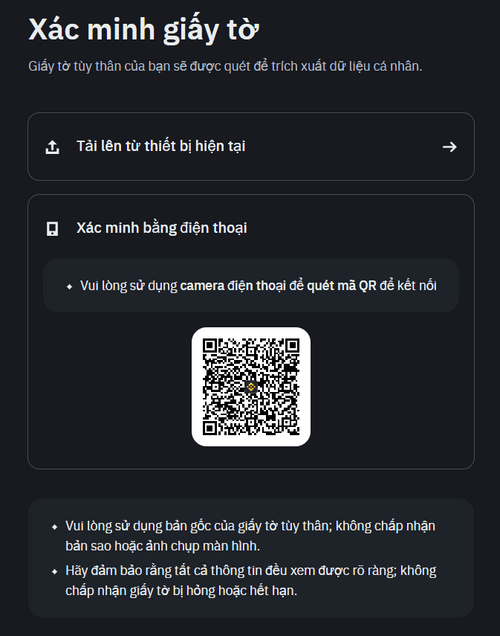
Step 5: Verify identity (KYC)
To increase your withdrawal limit and secure your account, you need to verify your identity with an ID card:
You can upload photos of both sides directly from your computer.
Or scan the QR code to connect your phone and take photos directly.

Step 6: Verify your face
The app will ask you to take a selfie or record a short video for facial recognition.
Please take the photo in a well-lit environment, without wearing glasses, hats, or masks.
Step 7: Wait for approval
Binance will review the profile within a few hours or up to 1-2 days.
Once approved, you can log into the Binance app on your phone to conveniently monitor the market and trade anytime, anywhere.
2. How to register a Binance account on the phone
The process is similar to that on the computer, just that you will need to download the Binance app to your phone.
Step 1: Download the Binance app
Download from CH Play (Android) or App Store (iOS).
Step 2: Choose the registration method
Email or Phone number: enter the information, create a strong password.
Referral code (optional): enter TRUSTWEB to receive a discount on transaction fees.
Registering with Google: it is advisable to choose this method for quicker login, syncing between phone and computer.
Once you have registered on the web, you just need to download the app and log in with the same Gmail account to use it immediately.
3. Guide to first-time trading on Binance
After completing your Binance account registration, you can start buying and selling cryptocurrency in just a few minutes.
First, you need to buy USDT – a stable digital currency (price close to USD), widely used as a payment unit on the exchange.
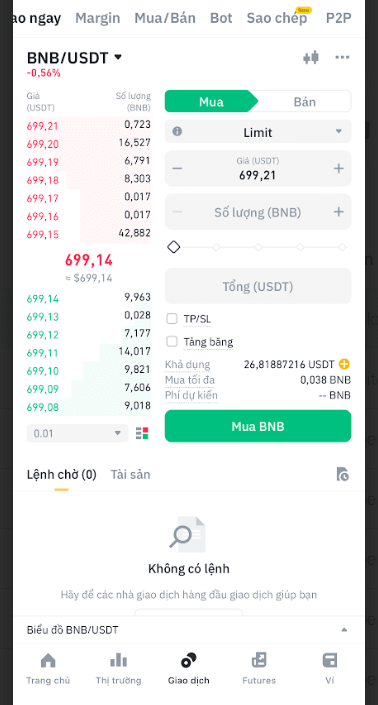
Step 1: Go to the P2P Trading interface
In the Binance app, select the 'Trading' tab, then click 'P2P' (peer-to-peer trading between buyers and sellers).
Here, Binance acts as an intermediary to ensure safety:
The seller only transfers the coin after receiving the money.
The buyer has the right to complain if the coin is not received.
Step 2: Set up the payment method
Click 'Payment' → select 'Bank Transfer' for the fastest and safest transaction.
Step 3: Buy USDT
In the 'Buy' tab, select a seller with a high reputation rating.
Note the 'Limit' section to know the minimum and maximum amounts they accept.
For example: if you want to buy 5,000,000 VND, choose a seller with a minimum limit ≤ 5 million.
After selecting a seller, you can:
Enter the amount in VND, the system will automatically convert it to USDT.
Or enter the amount of USDT you want to buy, and the system will calculate the amount you need to pay.
Then click 'Place Order'.
Step 4: Pay the seller
Binance displays the seller's bank account information.
Open your banking app, transfer within 15 minutes, and enter the correct transaction code in the transfer message (do not add any other characters).
After transferring, return to Binance → select 'Transferred' → the seller will confirm and transfer USDT to your wallet.
Step 5: Check your wallet and start trading
The purchased amount of USDT will be in the Spot Wallet.
From here, you can:
Go to the 'Trading' tab → 'Spot' to buy/sell other coins.
Select the trading pair (e.g., BTC/USDT, BNB/USDT) and place a buy order at your desired price.
You can place a limit order to buy at a lower price or sell when the price increases.
Being flexible in market observation will help you optimize profits and reduce risks.
Summary
Registering a Binance account is now extremely easy – just a few steps with Gmail or phone number.
Remember:
Always secure your email and Binance account,
Complete KYC verification for safe trading and convenient withdrawals,
It is advisable to register using the referral code TRUSTWEB or through this registration link to save on fees.
Wishing you a smooth, safe, and effective cryptocurrency trading experience on Binance!