

masumtrades
1.8k Posts

masumtrades
Report
Block User
I bought BTC at 13$, Addicted to trading, trading for fun, NFA
Open Trade
Frequent Trader
4 Years
0 Following
328 Followers
1.4K+ Liked
Posts
Portfolio
All
Quotes
Videos
·
--
Bullish
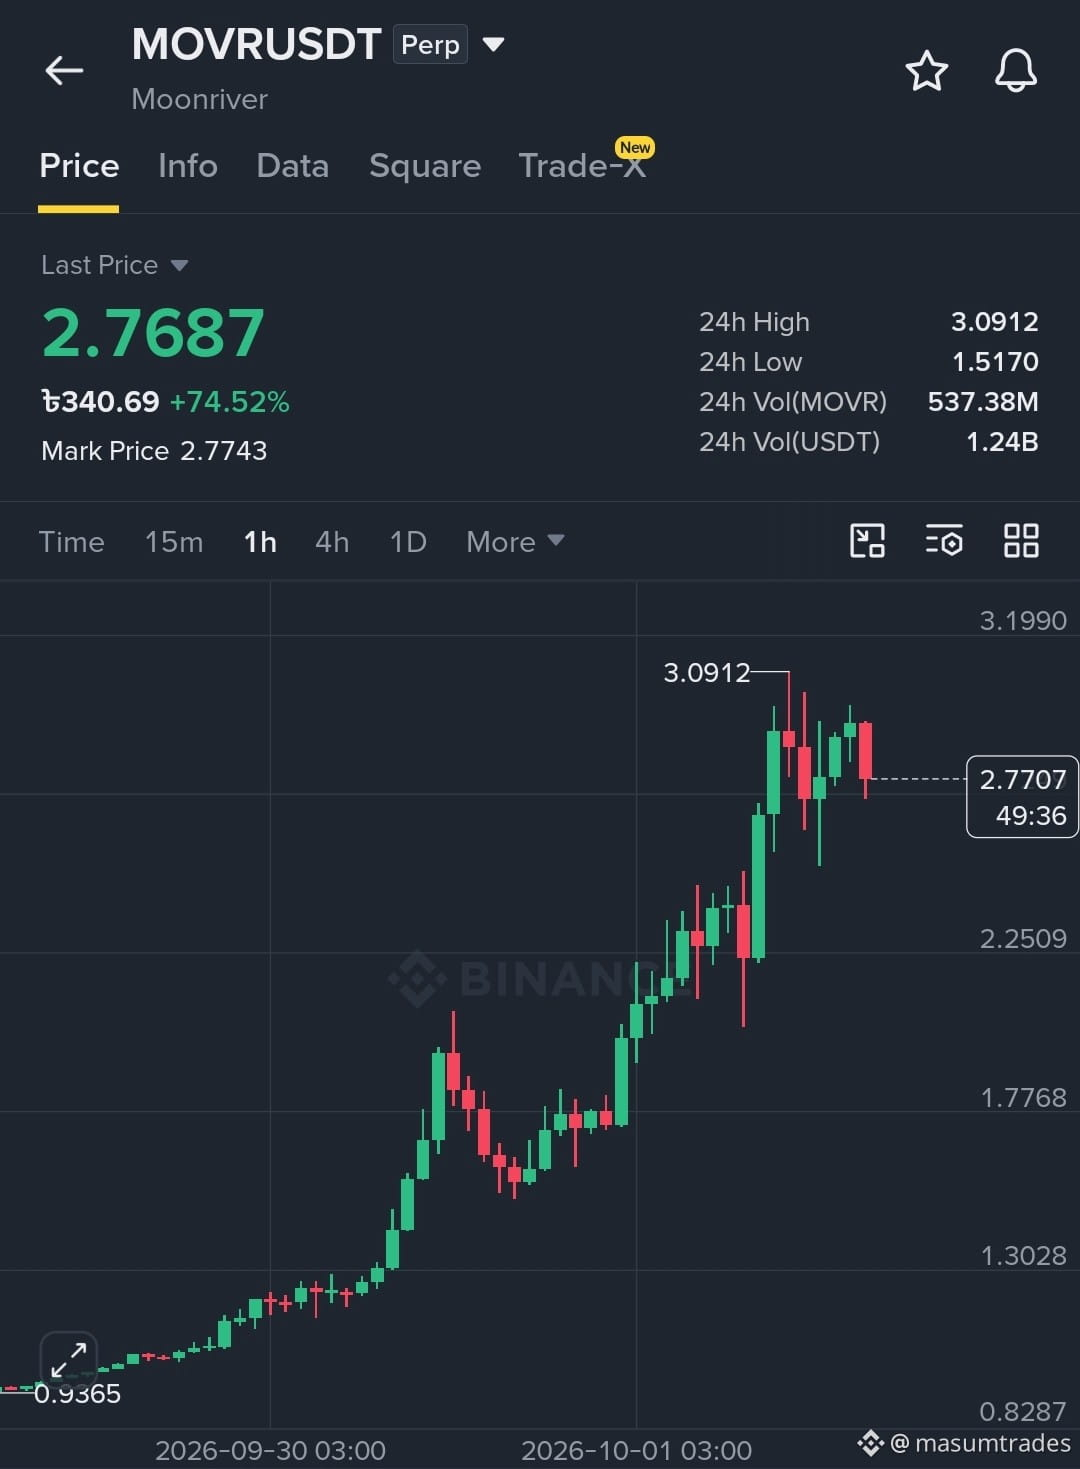
$MOVR MASSIVE BREAKOUT CONTINUES! CAN IT HOLD ABOVE $3.00?
Direction: LONG
{future}(MOVRUSDT)
Entry Zone: 2.5000 - 2.7000
Take-Profit Targets:
Target 1: 3.1000
Target 2: 3.5000
Target 3: 4.0000
Stop Loss: 2.2000
Leverage: 2x - 3x (Isolated)
Key Analysis:
$MOVR has experienced a massive expansion phase, surging over +74% in 24 hours to reach a high of 3.0912. On the 1H chart, after reaching $3.09+, price pulled back slightly toward the 2.7000 - 2.7700 zone for a healthy retest. As long as the price holds above the 2.5000 support level, the bullish structure remains intact for another impulse wave toward the $3.50 - $4.00 resistance targets
$MOVR MASSIVE BREAKOUT CONTINUES! CAN IT HOLD ABOVE $3.00?
Direction: LONG
Entry Zone: 2.5000 - 2.7000
Take-Profit Targets:
Target 1: 3.1000
Target 2: 3.5000
Target 3: 4.0000
Stop Loss: 2.2000
Leverage: 2x - 3x (Isolated)
Key Analysis:
$MOVR has experienced a massive expansion phase, surging over +74% in 24 hours to reach a high of 3.0912. On the 1H chart, after reaching $3.09+, price pulled back slightly toward the 2.7000 - 2.7700 zone for a healthy retest. As long as the price holds above the 2.5000 support level, the bullish structure remains intact for another impulse wave toward the $3.50 - $4.00 resistance targets
Direction: LONG
Entry Zone: 2.5000 - 2.7000
Take-Profit Targets:
Target 1: 3.1000
Target 2: 3.5000
Target 3: 4.0000
Stop Loss: 2.2000
Leverage: 2x - 3x (Isolated)
Key Analysis:
$MOVR has experienced a massive expansion phase, surging over +74% in 24 hours to reach a high of 3.0912. On the 1H chart, after reaching $3.09+, price pulled back slightly toward the 2.7000 - 2.7700 zone for a healthy retest. As long as the price holds above the 2.5000 support level, the bullish structure remains intact for another impulse wave toward the $3.50 - $4.00 resistance targets
151
·
--
Bullish
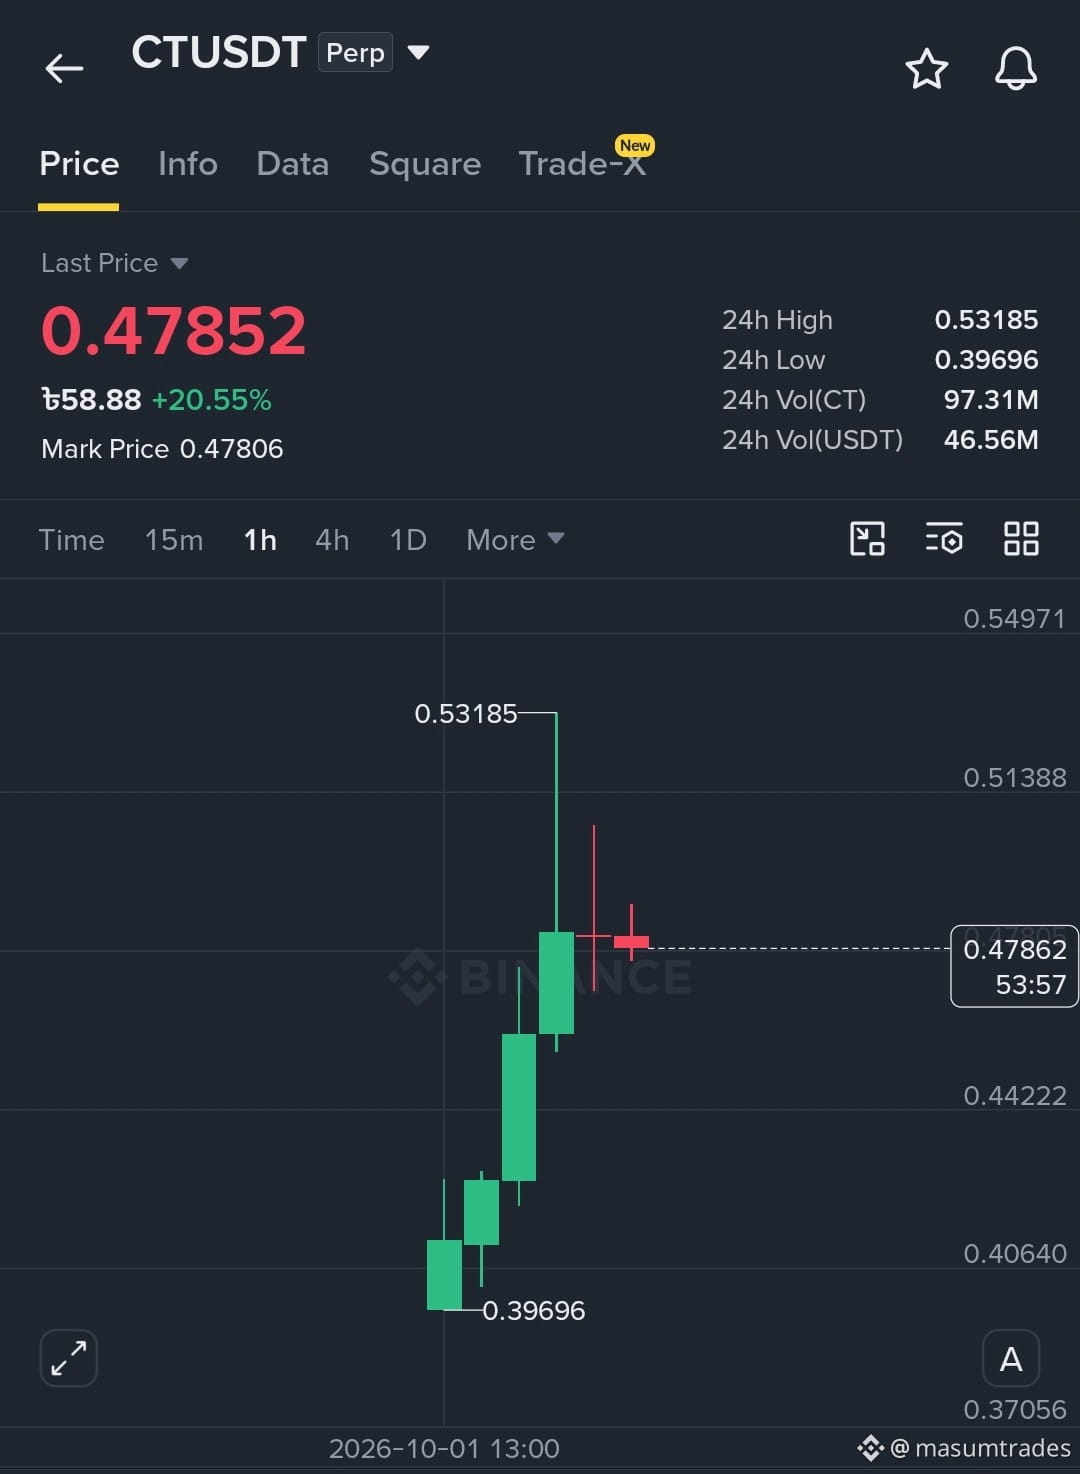
CAN $CT HIT $1.00? REALISTIC RALLY ANALYSIS!
Direction: LONG
{future}(CTUSDT)
Entry Zone: 0.44000 - 0.47800
Take-Profit Targets:
Target 1: 0.53000
Target 2: 0.65000
Target 3: 0.82000
Stop Loss: 0.40000
Leverage: 3x - 5x (Isolated)
Key Analysis:
$CT has experienced a massive vertical breakout on high volume, surging over +20% to touch a 24h high of 0.53185. While a move to $1.00 would require an additional 100%+ rally from current levels, the immediate 1H price action shows consolidation around 0.47800. Holding above the 0.44000 support level keeps the path open for intermediate targets toward 0.65000 and 0.82000 before evaluating a $1.00 extension.
CAN $CT HIT $1.00? REALISTIC RALLY ANALYSIS!
Direction: LONG
Entry Zone: 0.44000 - 0.47800
Take-Profit Targets:
Target 1: 0.53000
Target 2: 0.65000
Target 3: 0.82000
Stop Loss: 0.40000
Leverage: 3x - 5x (Isolated)
Key Analysis:
$CT has experienced a massive vertical breakout on high volume, surging over +20% to touch a 24h high of 0.53185. While a move to $1.00 would require an additional 100%+ rally from current levels, the immediate 1H price action shows consolidation around 0.47800. Holding above the 0.44000 support level keeps the path open for intermediate targets toward 0.65000 and 0.82000 before evaluating a $1.00 extension.
Direction: LONG
Entry Zone: 0.44000 - 0.47800
Take-Profit Targets:
Target 1: 0.53000
Target 2: 0.65000
Target 3: 0.82000
Stop Loss: 0.40000
Leverage: 3x - 5x (Isolated)
Key Analysis:
$CT has experienced a massive vertical breakout on high volume, surging over +20% to touch a 24h high of 0.53185. While a move to $1.00 would require an additional 100%+ rally from current levels, the immediate 1H price action shows consolidation around 0.47800. Holding above the 0.44000 support level keeps the path open for intermediate targets toward 0.65000 and 0.82000 before evaluating a $1.00 extension.
151
·
--
Bullish
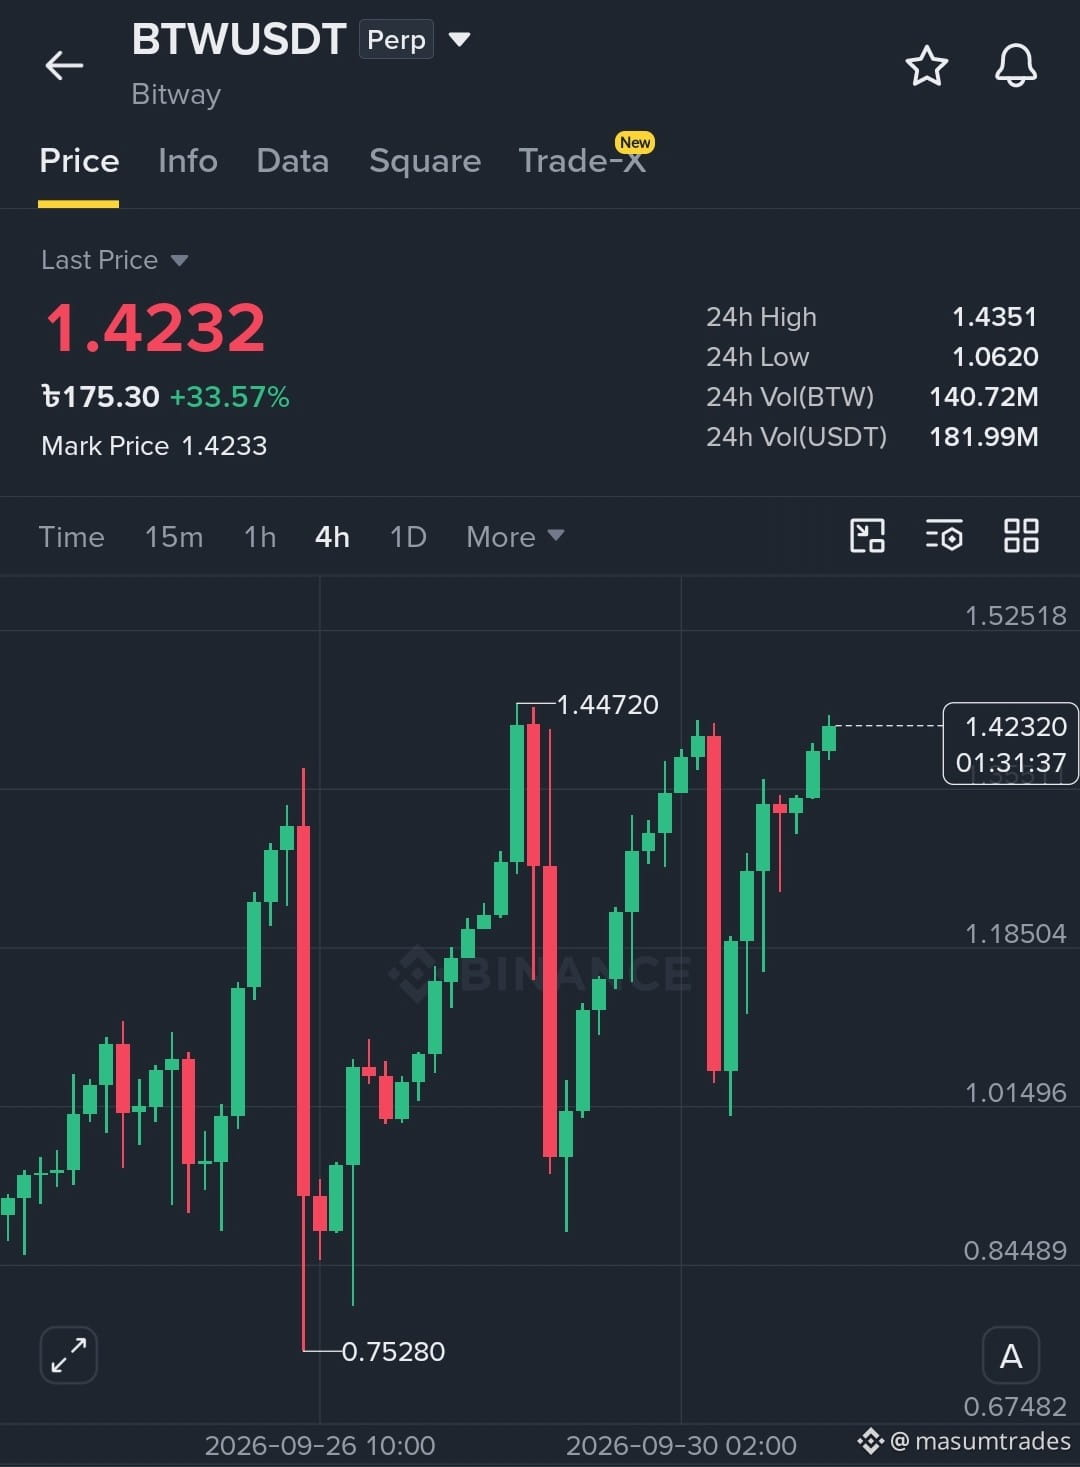
$BTW MOVING STRONGLY TOWARD TARGETS! UPDATE TIME!
Direction: LONG
{future}(BTWUSDT)
Current Status: PROFIT RUNNING
Take-Profit Targets:
Target 1: 1.4450 (Nearing)
Target 2: 1.5200
Target 3: 1.6200
Stop Loss: Move to Entry Price (1.3950)
Leverage: 3x - 5x (Isolated)
Key Analysis:
$BTW is maintaining strong bullish momentum on the 4H chart, climbing toward 1.4230+ after bouncing from our entry zone. As price approaches Target 1 at 1.4450, bullish pressure remains solid for a potential resistance breakout toward higher levels.
$BTW MOVING STRONGLY TOWARD TARGETS! UPDATE TIME!
Direction: LONG
Current Status: PROFIT RUNNING
Take-Profit Targets:
Target 1: 1.4450 (Nearing)
Target 2: 1.5200
Target 3: 1.6200
Stop Loss: Move to Entry Price (1.3950)
Leverage: 3x - 5x (Isolated)
Key Analysis:
$BTW is maintaining strong bullish momentum on the 4H chart, climbing toward 1.4230+ after bouncing from our entry zone. As price approaches Target 1 at 1.4450, bullish pressure remains solid for a potential resistance breakout toward higher levels.
Direction: LONG
Current Status: PROFIT RUNNING
Take-Profit Targets:
Target 1: 1.4450 (Nearing)
Target 2: 1.5200
Target 3: 1.6200
Stop Loss: Move to Entry Price (1.3950)
Leverage: 3x - 5x (Isolated)
Key Analysis:
$BTW is maintaining strong bullish momentum on the 4H chart, climbing toward 1.4230+ after bouncing from our entry zone. As price approaches Target 1 at 1.4450, bullish pressure remains solid for a potential resistance breakout toward higher levels.
322
·
--
Bearish
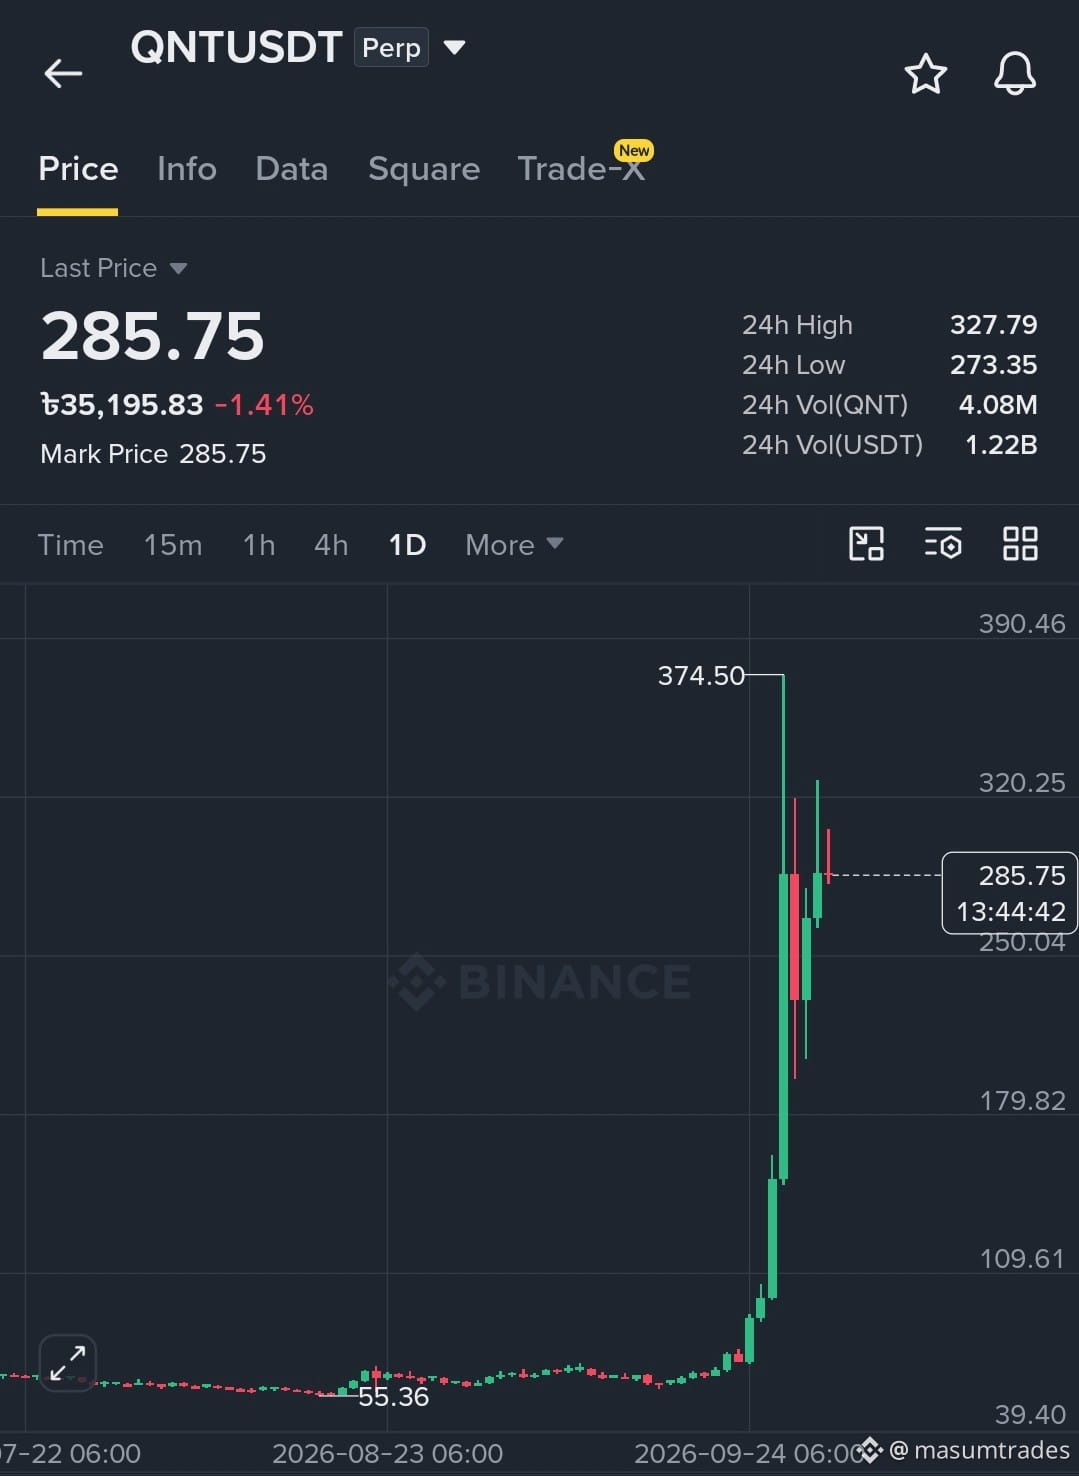
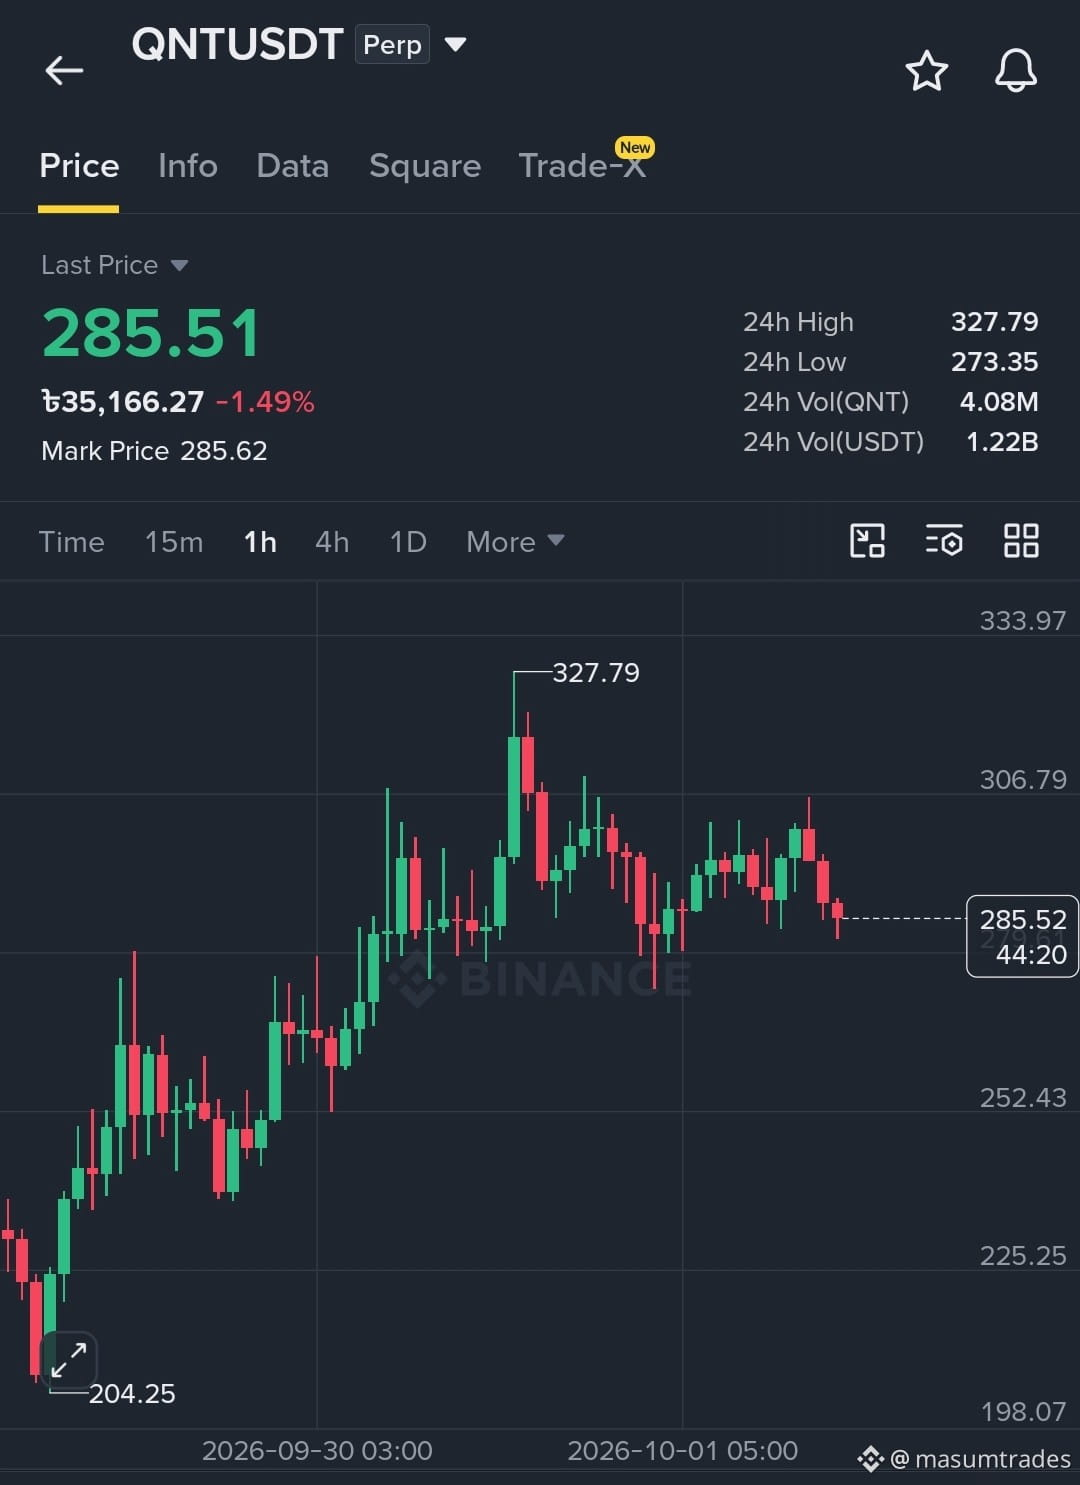
$QNT go short 👇! DOWNTREND CONTINUATION AHEAD?
Direction: SHORT
{future}(QNTUSDT)
Entry Zone: 284.00 - 288.00
Take-Profit Targets:
Target 1: 272.00
Target 2: 255.00
Target 3: 230.00
Stop Loss: 298.00
Leverage: 3x - 5x (Isolated)
Key Analysis:
$QNT is showing continuous bearish rejection after failing to sustain momentum near its local peak of 327.79. The 1H timeframe displays lower highs and lower lows, indicating selling pressure around the 285.00 resistance region and pointing toward a deeper retracement toward macro support.
$QNT go short 👇! DOWNTREND CONTINUATION AHEAD?
Direction: SHORT
Entry Zone: 284.00 - 288.00
Take-Profit Targets:
Target 1: 272.00
Target 2: 255.00
Target 3: 230.00
Stop Loss: 298.00
Leverage: 3x - 5x (Isolated)
Key Analysis:
$QNT is showing continuous bearish rejection after failing to sustain momentum near its local peak of 327.79. The 1H timeframe displays lower highs and lower lows, indicating selling pressure around the 285.00 resistance region and pointing toward a deeper retracement toward macro support.
Direction: SHORT
Entry Zone: 284.00 - 288.00
Take-Profit Targets:
Target 1: 272.00
Target 2: 255.00
Target 3: 230.00
Stop Loss: 298.00
Leverage: 3x - 5x (Isolated)
Key Analysis:
$QNT is showing continuous bearish rejection after failing to sustain momentum near its local peak of 327.79. The 1H timeframe displays lower highs and lower lows, indicating selling pressure around the 285.00 resistance region and pointing toward a deeper retracement toward macro support.
451
·
--
Bullish
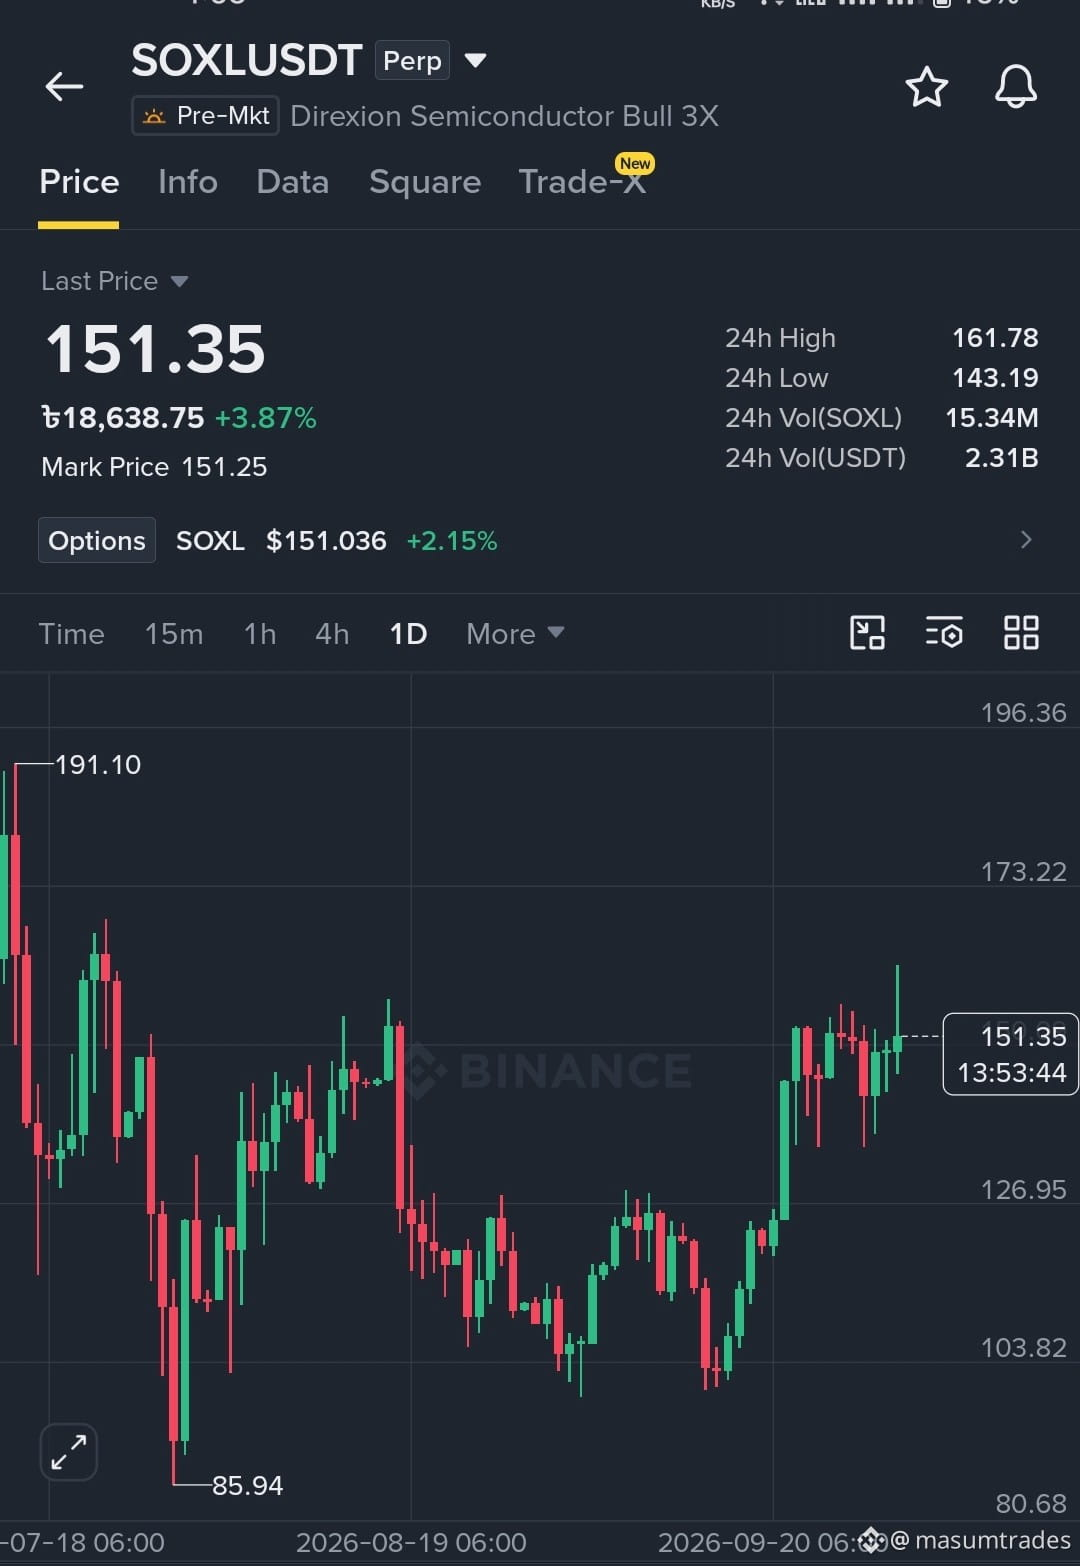
$SOXL READY FOR CONTINUATION AFTER RECENT HIGH?
{future}(SOXLUSDT)
Direction: LONG
Entry Zone: 148.00 - 151.50
Take-Profit Targets:
Target 1: 158.00
Target 2: 165.00
Target 3: 173.00
Stop Loss: 142.00
Leverage: 2x - 3x (Isolated)
Key Analysis:
$SOXL is showing strong macro bullish momentum on the daily timeframe, bouncing cleanly from recent swing lows and pressing higher. On the 4H chart, the price hit a high of 161.78 before a minor pullback toward the current 151.00 region. Holding above the 145.00 - 148.00 support structure keeps the upward trajectory intact for a retest of 161.78+.
$SOXL READY FOR CONTINUATION AFTER RECENT HIGH?
Direction: LONG
Entry Zone: 148.00 - 151.50
Take-Profit Targets:
Target 1: 158.00
Target 2: 165.00
Target 3: 173.00
Stop Loss: 142.00
Leverage: 2x - 3x (Isolated)
Key Analysis:
$SOXL is showing strong macro bullish momentum on the daily timeframe, bouncing cleanly from recent swing lows and pressing higher. On the 4H chart, the price hit a high of 161.78 before a minor pullback toward the current 151.00 region. Holding above the 145.00 - 148.00 support structure keeps the upward trajectory intact for a retest of 161.78+.
Direction: LONG
Entry Zone: 148.00 - 151.50
Take-Profit Targets:
Target 1: 158.00
Target 2: 165.00
Target 3: 173.00
Stop Loss: 142.00
Leverage: 2x - 3x (Isolated)
Key Analysis:
$SOXL is showing strong macro bullish momentum on the daily timeframe, bouncing cleanly from recent swing lows and pressing higher. On the 4H chart, the price hit a high of 161.78 before a minor pullback toward the current 151.00 region. Holding above the 145.00 - 148.00 support structure keeps the upward trajectory intact for a retest of 161.78+.
324
·
--
Bullish
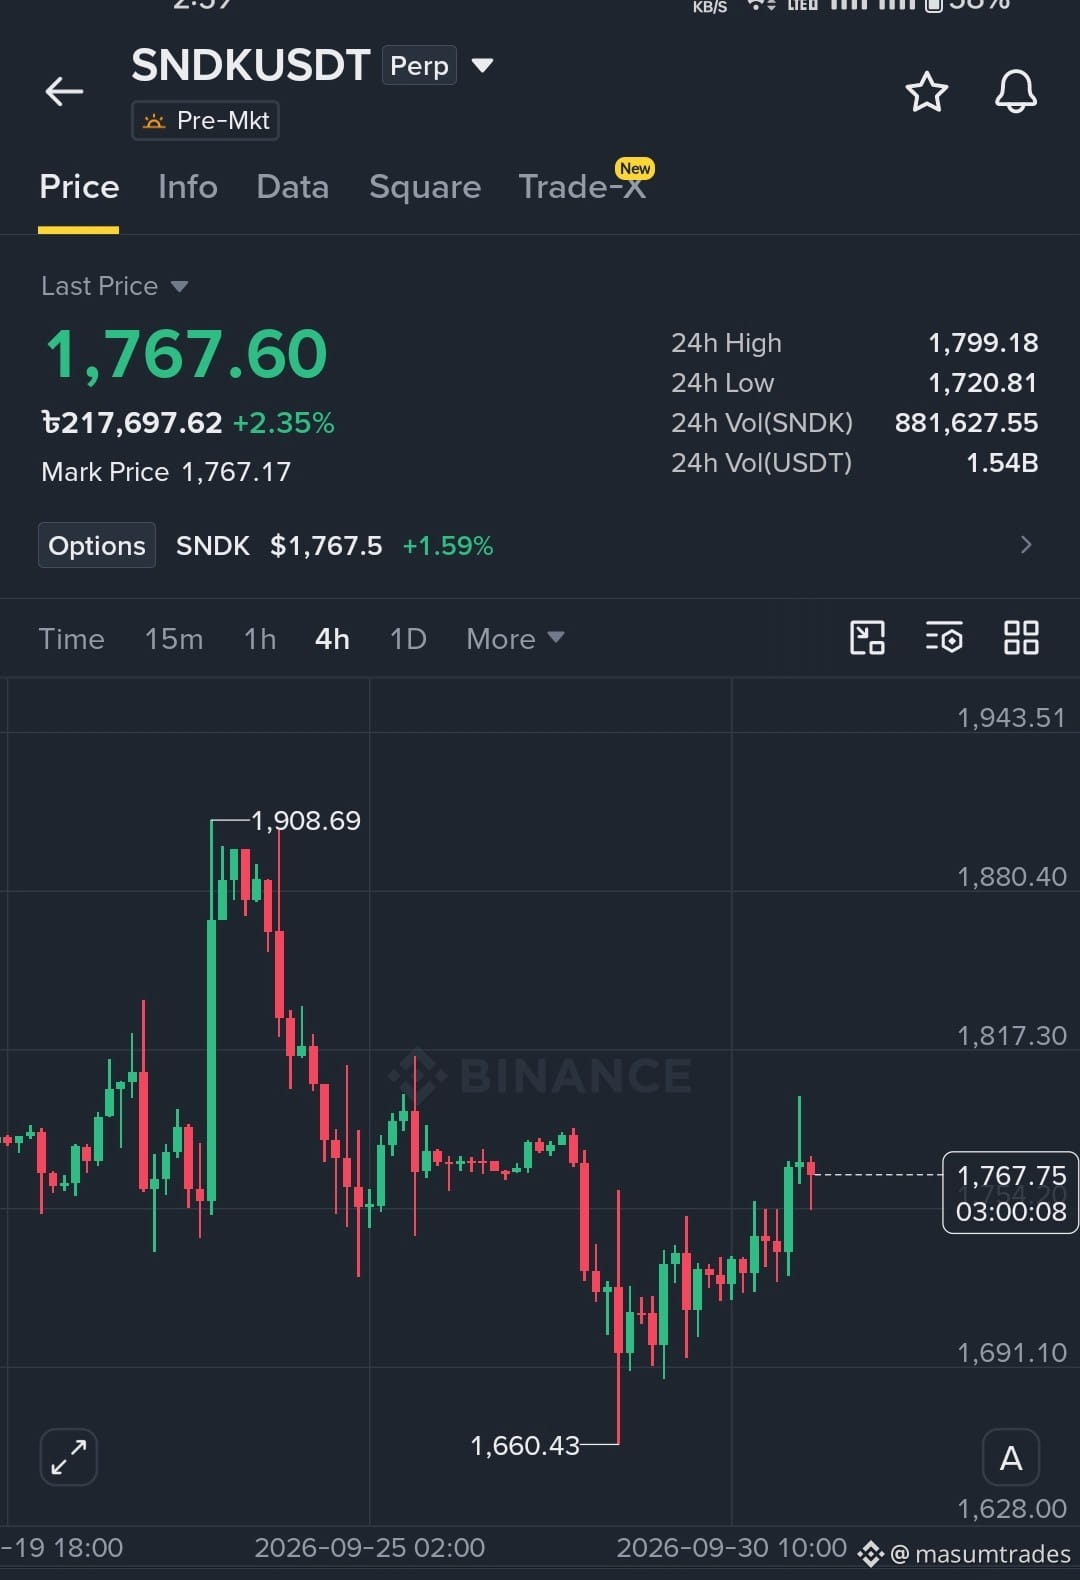
$SNDK FORMING A LOCAL BOTTOM! REBOUND INCOMING?
Direction: LONG
{future}(SNDKUSDT)
Entry Zone: 1,740.00 - 1,770.00
Take-Profit Targets:
Target 1: 1,820.00
Target 2: 1,880.00
Target 3: 1,940.00
Stop Loss: 1,680.00
Leverage: 3x - 5x (Isolated)
Key Analysis:
$SNDK has rebounded strongly after printing a low near 1,660.43 on the 4H timeframe. The price structure shows early signs of a bullish reversal with higher lows forming, indicating buyers are regaining control and pushing toward resistance levels near 1,880.00+.
$SNDK FORMING A LOCAL BOTTOM! REBOUND INCOMING?
Direction: LONG
Entry Zone: 1,740.00 - 1,770.00
Take-Profit Targets:
Target 1: 1,820.00
Target 2: 1,880.00
Target 3: 1,940.00
Stop Loss: 1,680.00
Leverage: 3x - 5x (Isolated)
Key Analysis:
$SNDK has rebounded strongly after printing a low near 1,660.43 on the 4H timeframe. The price structure shows early signs of a bullish reversal with higher lows forming, indicating buyers are regaining control and pushing toward resistance levels near 1,880.00+.
Direction: LONG
Entry Zone: 1,740.00 - 1,770.00
Take-Profit Targets:
Target 1: 1,820.00
Target 2: 1,880.00
Target 3: 1,940.00
Stop Loss: 1,680.00
Leverage: 3x - 5x (Isolated)
Key Analysis:
$SNDK has rebounded strongly after printing a low near 1,660.43 on the 4H timeframe. The price structure shows early signs of a bullish reversal with higher lows forming, indicating buyers are regaining control and pushing toward resistance levels near 1,880.00+.
1
373
·
--
Bullish
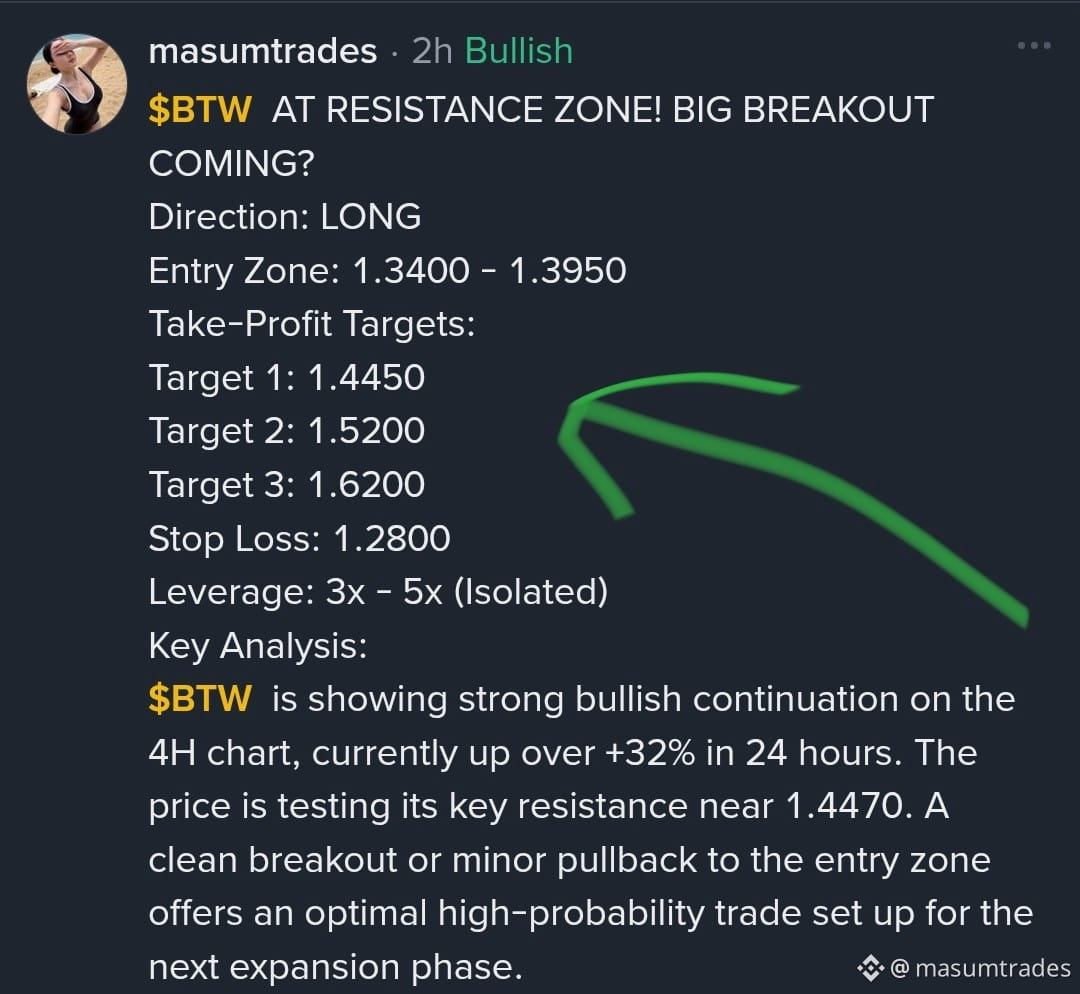
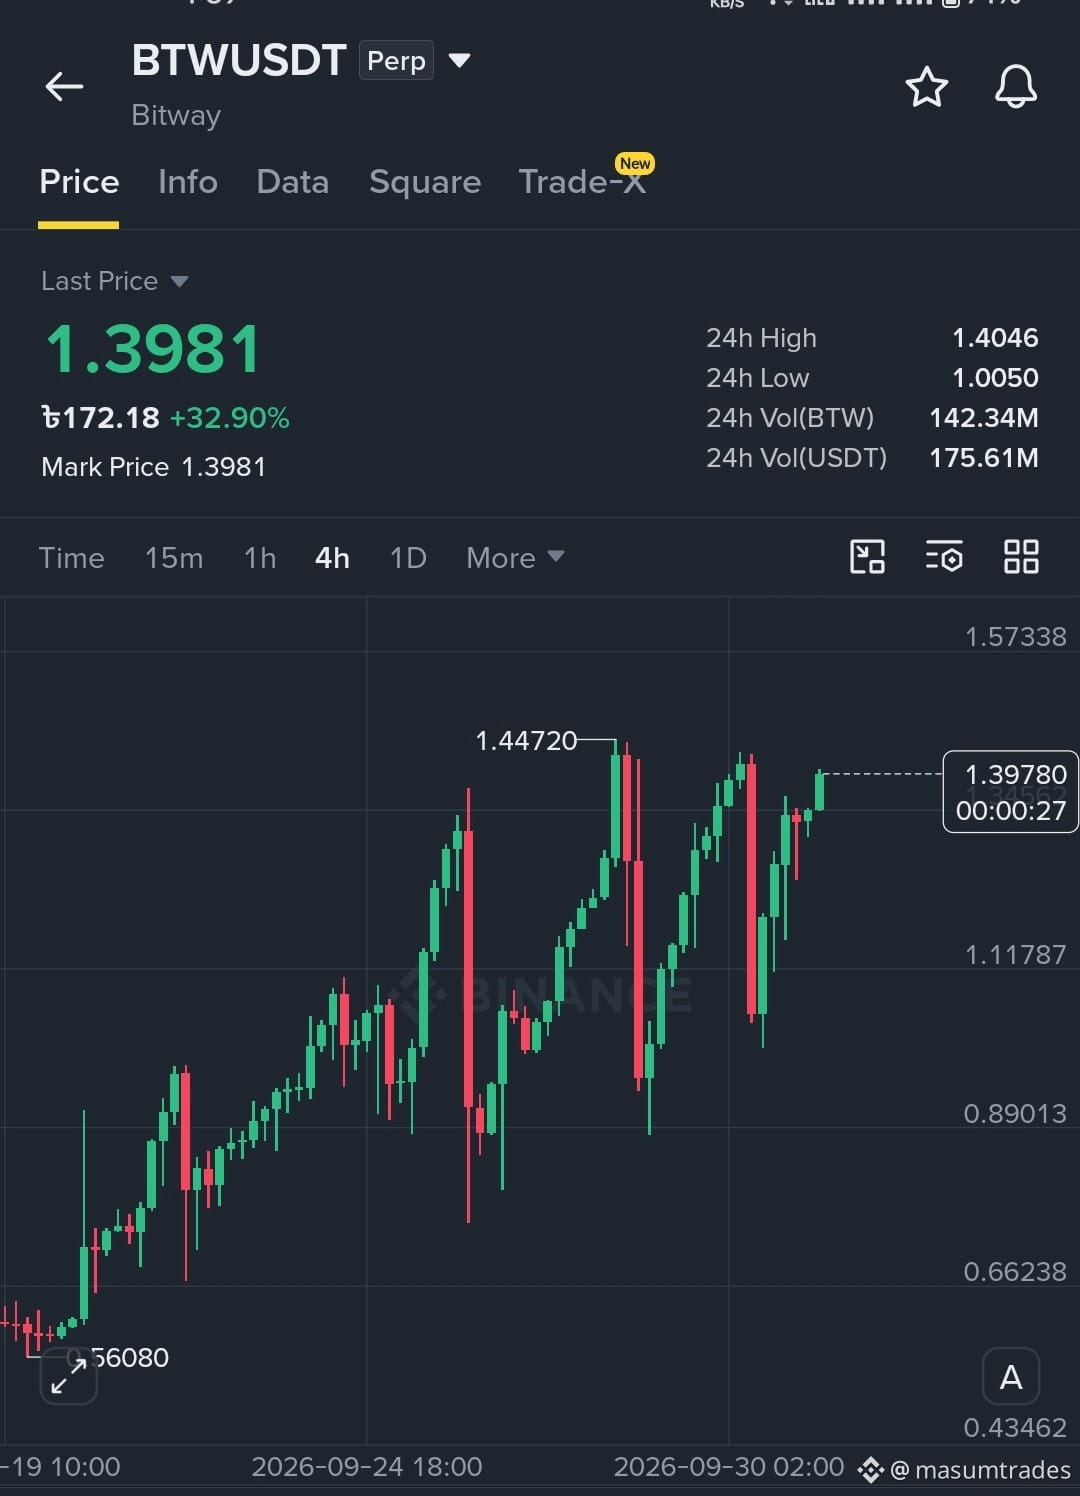
$BTW AT RESISTANCE ZONE! BIG BREAKOUT COMING?
Direction: LONG
{future}(BTWUSDT)
Entry Zone: 1.3400 - 1.3950
Take-Profit Targets:
Target 1: 1.4450
Target 2: 1.5200
Target 3: 1.6200
Stop Loss: 1.2800
Leverage: 3x - 5x (Isolated)
Key Analysis:
$BTW is showing strong bullish continuation on the 4H chart, currently up over +32% in 24 hours. The price is testing its key resistance near 1.4470. A clean breakout or minor pullback to the entry zone offers an optimal high-probability trade set up for the next expansion phase.
#MicronBeatsEarningsLiftsGuidance #AltcoinSeasonIndexHoldsAbove60For5Days
$BTW AT RESISTANCE ZONE! BIG BREAKOUT COMING?
Direction: LONG
Entry Zone: 1.3400 - 1.3950
Take-Profit Targets:
Target 1: 1.4450
Target 2: 1.5200
Target 3: 1.6200
Stop Loss: 1.2800
Leverage: 3x - 5x (Isolated)
Key Analysis:
$BTW is showing strong bullish continuation on the 4H chart, currently up over +32% in 24 hours. The price is testing its key resistance near 1.4470. A clean breakout or minor pullback to the entry zone offers an optimal high-probability trade set up for the next expansion phase.
#MicronBeatsEarningsLiftsGuidance #AltcoinSeasonIndexHoldsAbove60For5Days
Direction: LONG
Entry Zone: 1.3400 - 1.3950
Take-Profit Targets:
Target 1: 1.4450
Target 2: 1.5200
Target 3: 1.6200
Stop Loss: 1.2800
Leverage: 3x - 5x (Isolated)
Key Analysis:
$BTW is showing strong bullish continuation on the 4H chart, currently up over +32% in 24 hours. The price is testing its key resistance near 1.4470. A clean breakout or minor pullback to the entry zone offers an optimal high-probability trade set up for the next expansion phase.
#MicronBeatsEarningsLiftsGuidance #AltcoinSeasonIndexHoldsAbove60For5Days
306
·
--
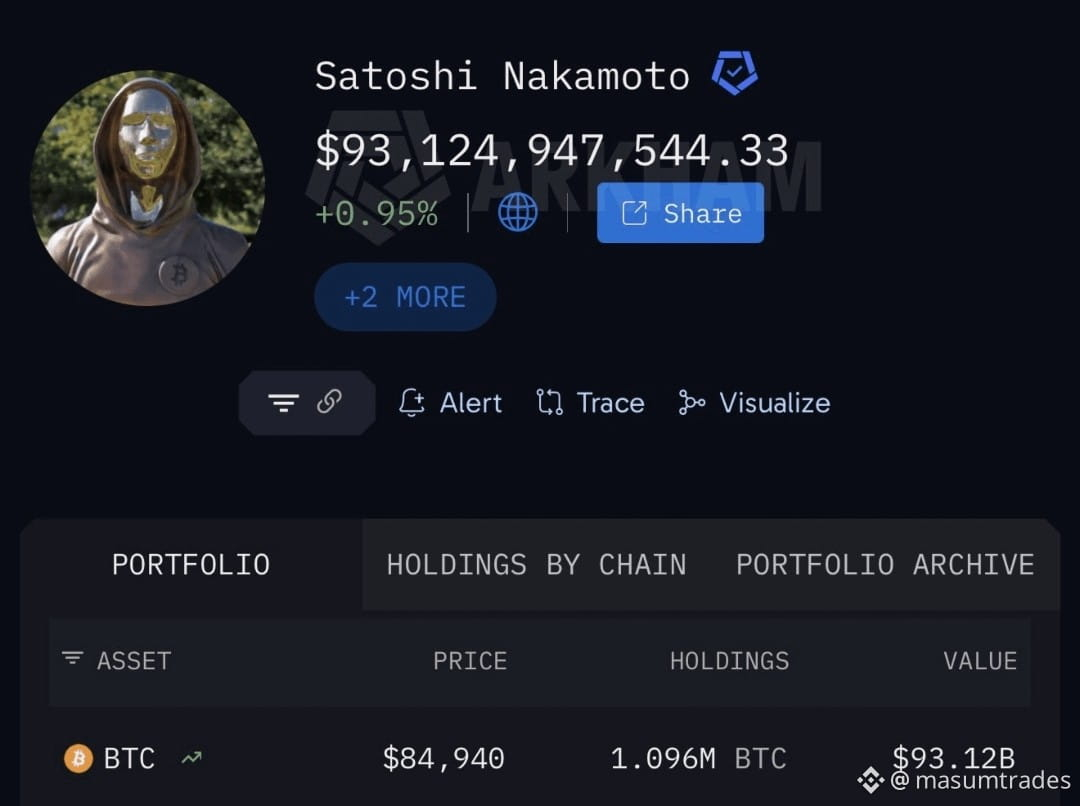
For 16+ years, not a single $BTC cent has been moved.
What's he doing?
{future}(BTCUSDT)
For 16+ years, not a single $BTC cent has been moved.
What's he doing?
What's he doing?
16
·
--
Bullish
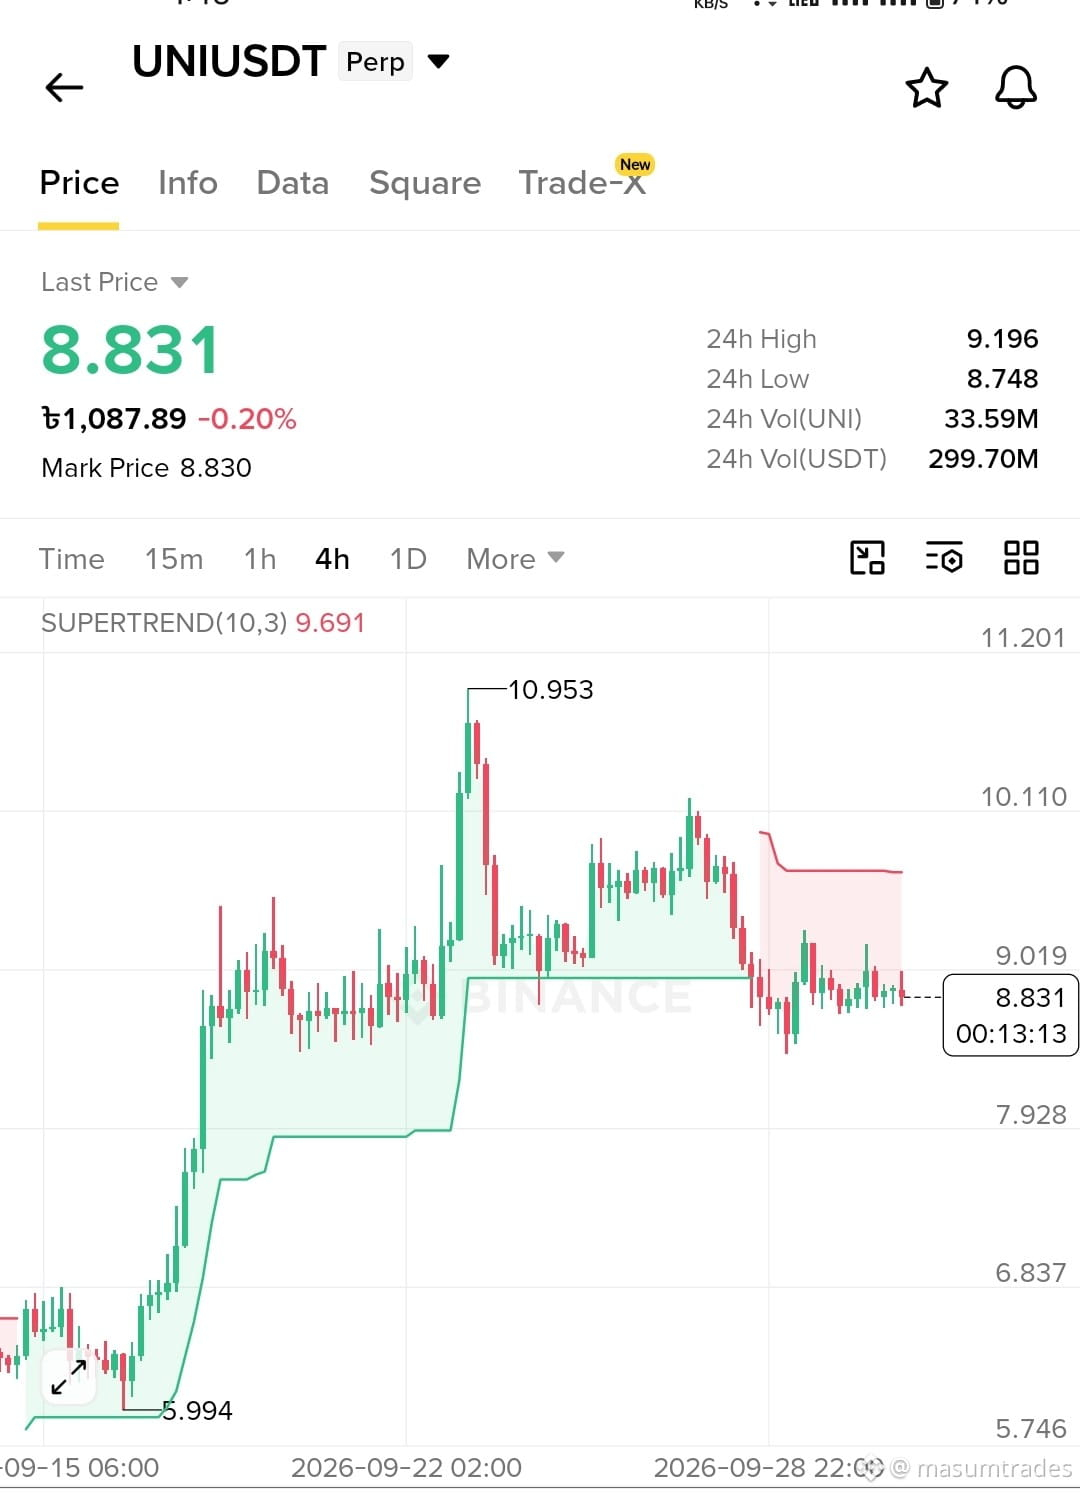
$UNI SWAP RETESTING KEY SUPPORT LEVEL! READY FOR REBOUND OR BREAKDOWN?
Direction: LONG (Bounce Play)
{future}(UNIUSDT)
Entry Zone: 8.600 - 8.850
Take-Profit Targets:
Target 1: 9.300
Target 2: 9.800
Target 3: 10.500
Stop Loss: 8.250
Leverage: 3x - 5x (Isolated)
Key Analysis:
$UNI has experienced a healthy pullback after testing the local peak near 10.953. The daily timeframe remains macro bullish with Supertrend holding green, while the 4-hour chart shows price stabilizing near crucial support around the 8.600 region. A solid entry in this zone provides a high risk-to-reward setup for the next upward push.
$UNI SWAP RETESTING KEY SUPPORT LEVEL! READY FOR REBOUND OR BREAKDOWN?
Direction: LONG (Bounce Play)
Entry Zone: 8.600 - 8.850
Take-Profit Targets:
Target 1: 9.300
Target 2: 9.800
Target 3: 10.500
Stop Loss: 8.250
Leverage: 3x - 5x (Isolated)
Key Analysis:
$UNI has experienced a healthy pullback after testing the local peak near 10.953. The daily timeframe remains macro bullish with Supertrend holding green, while the 4-hour chart shows price stabilizing near crucial support around the 8.600 region. A solid entry in this zone provides a high risk-to-reward setup for the next upward push.
Direction: LONG (Bounce Play)
Entry Zone: 8.600 - 8.850
Take-Profit Targets:
Target 1: 9.300
Target 2: 9.800
Target 3: 10.500
Stop Loss: 8.250
Leverage: 3x - 5x (Isolated)
Key Analysis:
$UNI has experienced a healthy pullback after testing the local peak near 10.953. The daily timeframe remains macro bullish with Supertrend holding green, while the 4-hour chart shows price stabilizing near crucial support around the 8.600 region. A solid entry in this zone provides a high risk-to-reward setup for the next upward push.
32
·
--
Please save my salary 😛😛😛 LoL 😂
$ZEC $Q $BTW
{future}(ZECUSDT)
{future}(QUSDT)
{future}(BTWUSDT)
Please save my salary 😛😛😛 LoL 😂
$ZEC $Q $BTW
$ZEC $Q $BTW

18
·
--
Bearish
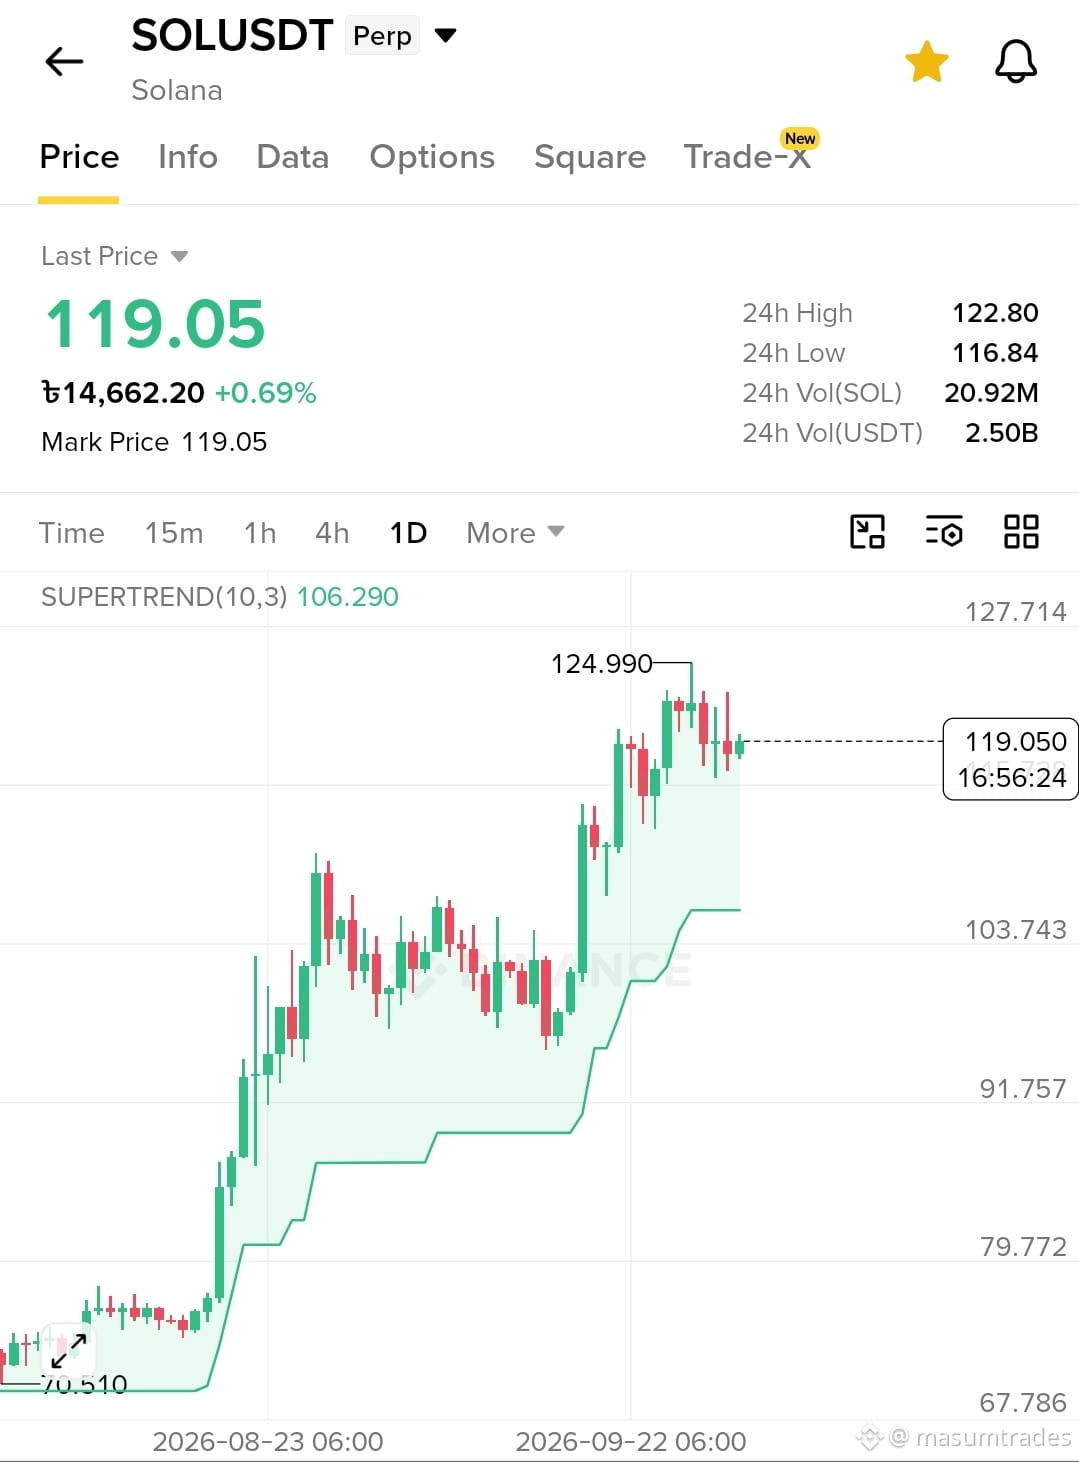
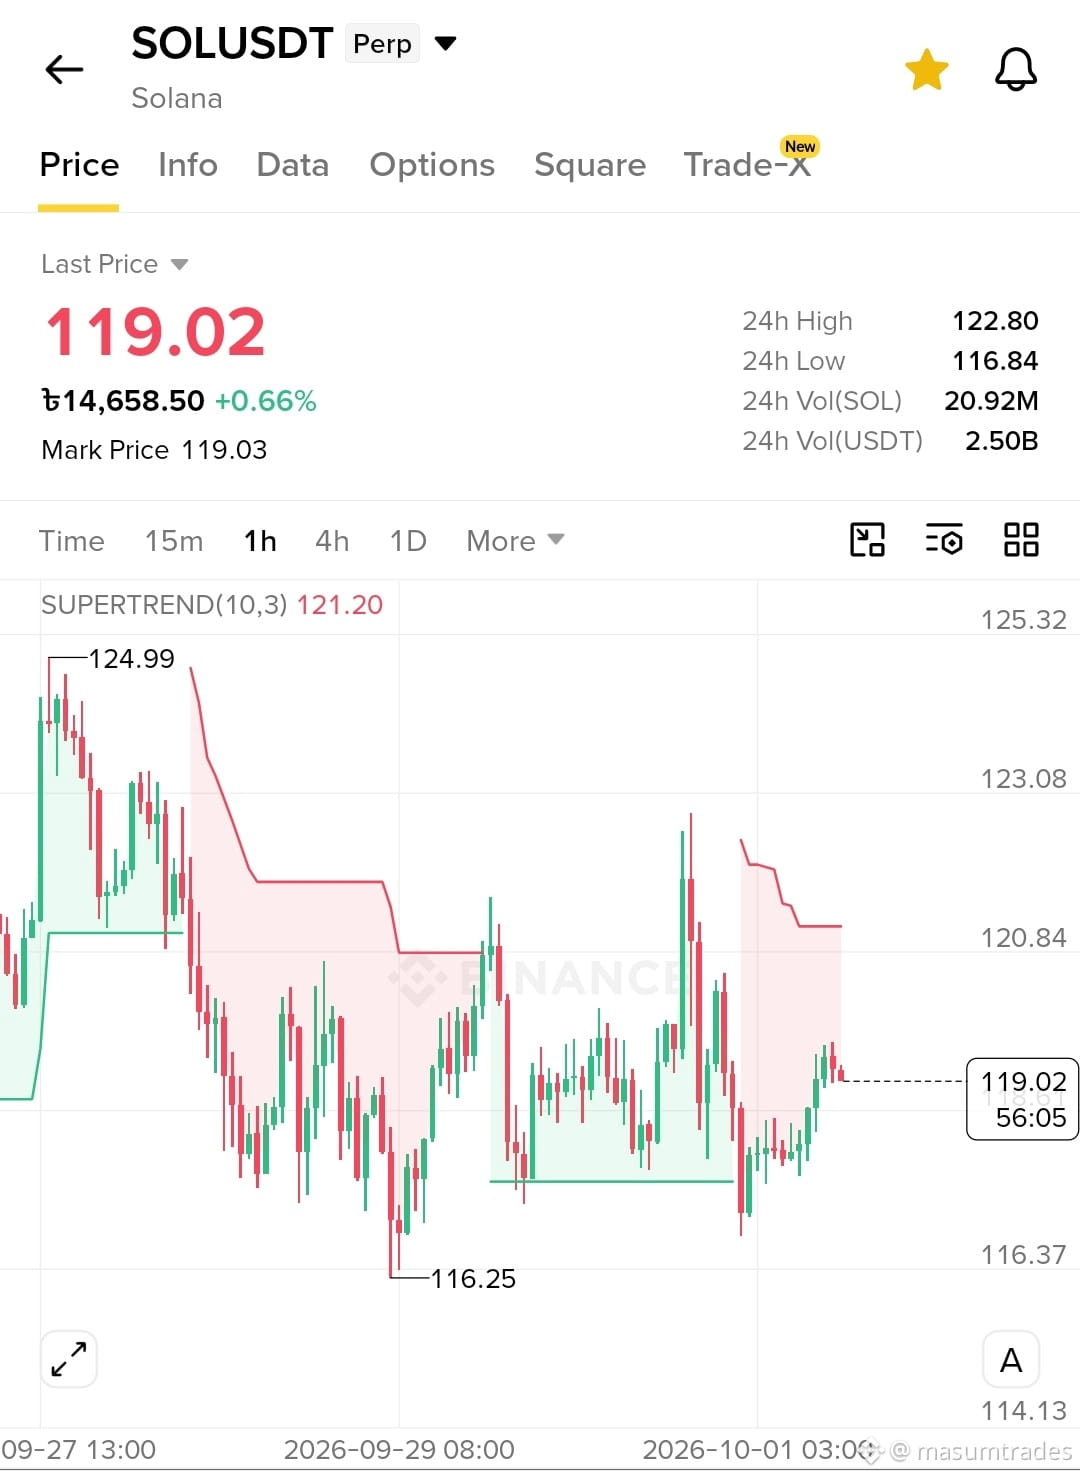
IS SOLANA READY TO DROP BELOW $115? SHORT SETUP IN PLAY! $SOL
Direction: SHORT
{future}(SOLUSDT)
Entry Zone: 119.50 - 121.00
Take-Profit Targets:
Target 1: 116.80
Target 2: 114.50
Target 3: 112.00
Stop Loss: 123.50
Leverage: 3x - 5x (Isolated)
Key Analysis:
$SOL is showing clear rejection at higher resistance levels, with the 1-hour Supertrend shifting bearish at 121.20. Although the daily macro trend remains strong, short-term lower highs indicate selling pressure that could push the price below 115.00 before finding stronger support.
Suggestions:
Consider setting your Take Profit 1 at 116.80 to lock in partial profits before testing key support levels.
Keep your position size controlled to handle short-term volatility during potential relief bounces.
IS SOLANA READY TO DROP BELOW $115? SHORT SETUP IN PLAY! $SOL
Direction: SHORT
Entry Zone: 119.50 - 121.00
Take-Profit Targets:
Target 1: 116.80
Target 2: 114.50
Target 3: 112.00
Stop Loss: 123.50
Leverage: 3x - 5x (Isolated)
Key Analysis:
$SOL is showing clear rejection at higher resistance levels, with the 1-hour Supertrend shifting bearish at 121.20. Although the daily macro trend remains strong, short-term lower highs indicate selling pressure that could push the price below 115.00 before finding stronger support.
Suggestions:
Consider setting your Take Profit 1 at 116.80 to lock in partial profits before testing key support levels.
Keep your position size controlled to handle short-term volatility during potential relief bounces.
Direction: SHORT
Entry Zone: 119.50 - 121.00
Take-Profit Targets:
Target 1: 116.80
Target 2: 114.50
Target 3: 112.00
Stop Loss: 123.50
Leverage: 3x - 5x (Isolated)
Key Analysis:
$SOL is showing clear rejection at higher resistance levels, with the 1-hour Supertrend shifting bearish at 121.20. Although the daily macro trend remains strong, short-term lower highs indicate selling pressure that could push the price below 115.00 before finding stronger support.
Suggestions:
Consider setting your Take Profit 1 at 116.80 to lock in partial profits before testing key support levels.
Keep your position size controlled to handle short-term volatility during potential relief bounces.
42
·
--
Bullish
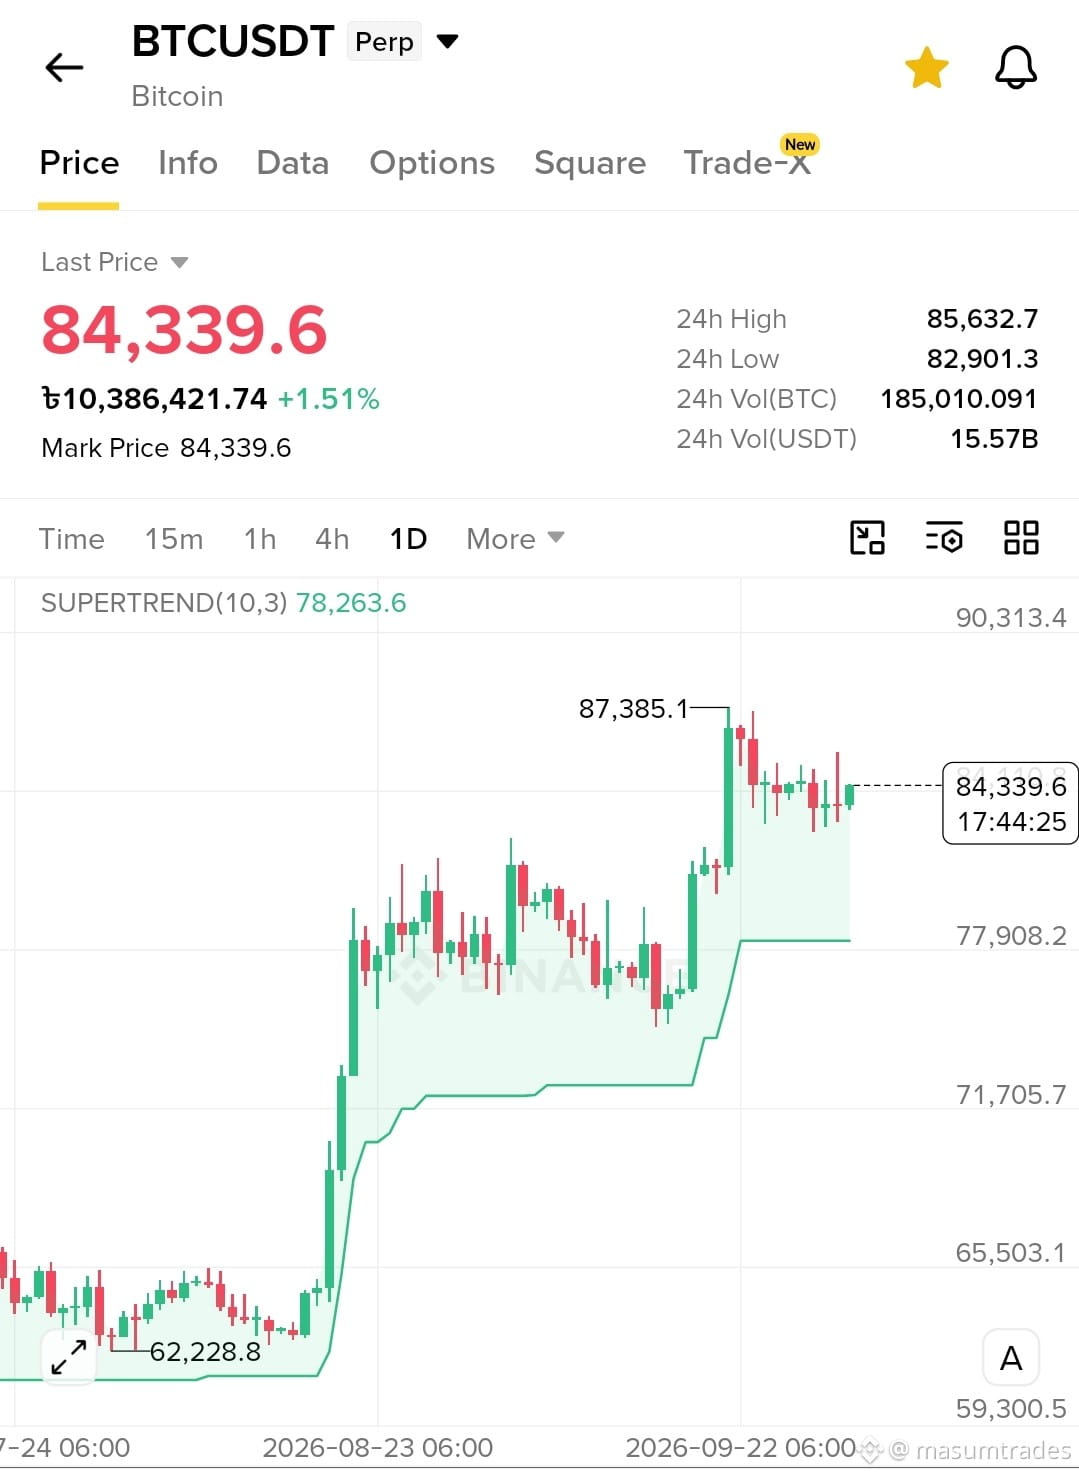
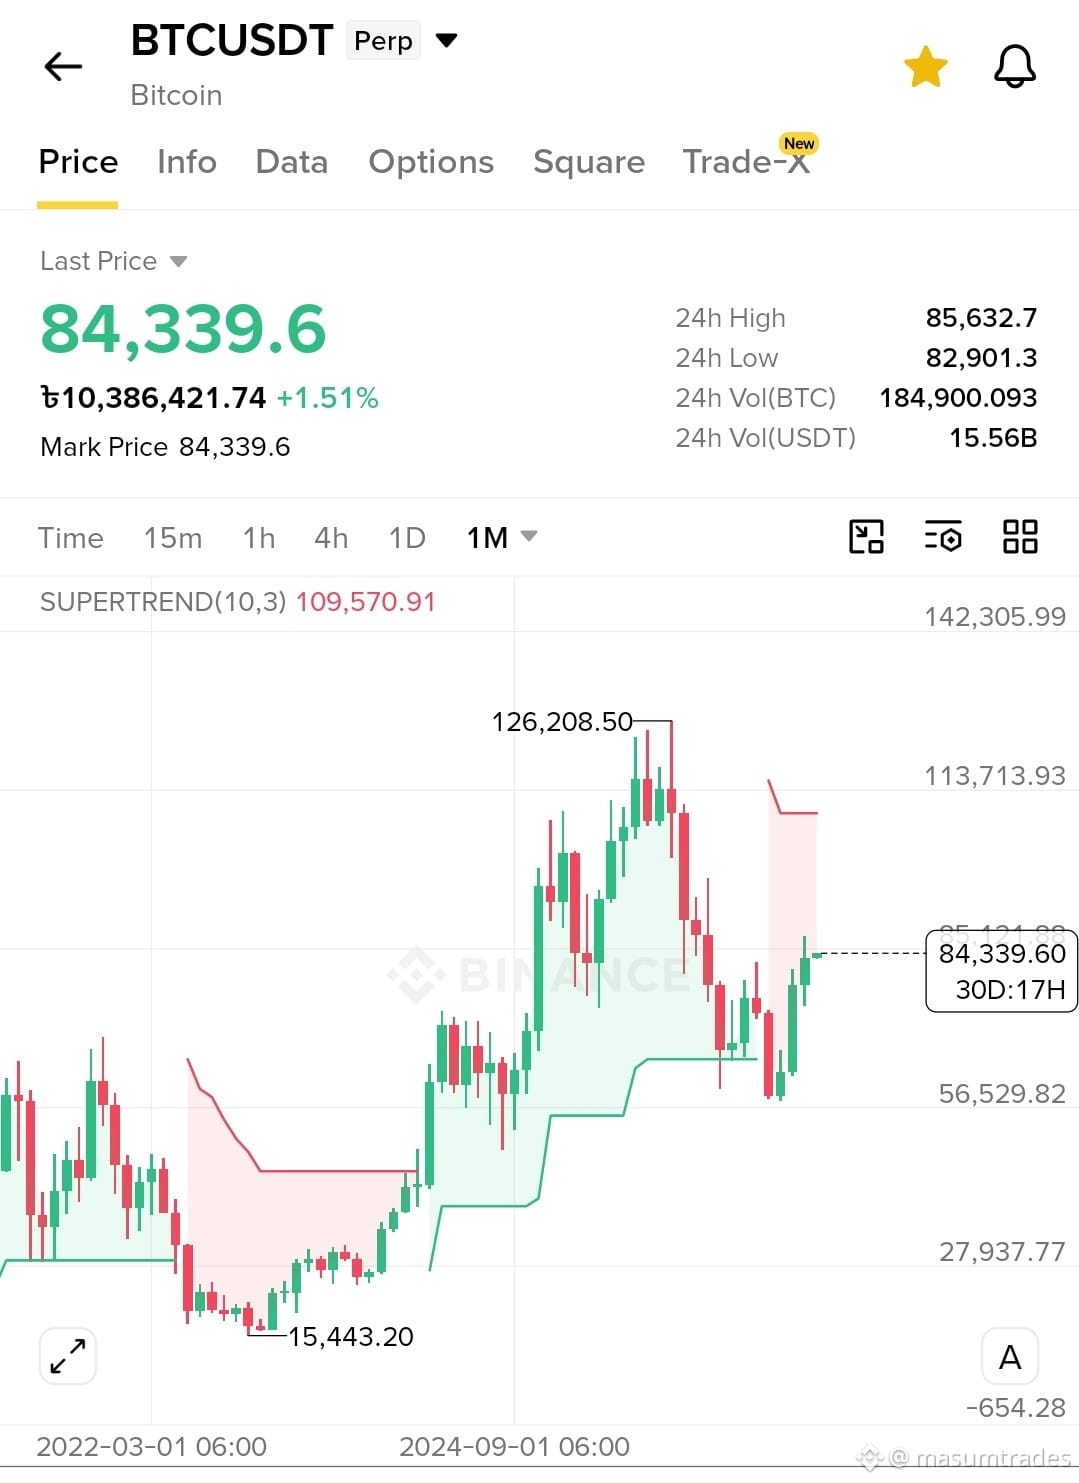
BITCOIN BREAKOUT IS HERE! WHO WAS WAITING FOR 50K? $BTC
Direction: LONG
{future}(BTCUSDT)
Entry Zone: 83,500 - 84,200
Take-Profit Targets:
Target 1: 85,600
Target 2: 87,300
Target 3: 90,000
Stop Loss: 82,000
Leverage: 3x - 5x (Isolated)
Key Analysis:
$BTC is holding strong above 84,000 with solid bullish momentum across the daily chart. The Supertrend indicator remains firmly bullish, signaling continuation toward new local highs as the market rejects lower pullbacks.
BITCOIN BREAKOUT IS HERE! WHO WAS WAITING FOR 50K? $BTC
Direction: LONG
Entry Zone: 83,500 - 84,200
Take-Profit Targets:
Target 1: 85,600
Target 2: 87,300
Target 3: 90,000
Stop Loss: 82,000
Leverage: 3x - 5x (Isolated)
Key Analysis:
$BTC is holding strong above 84,000 with solid bullish momentum across the daily chart. The Supertrend indicator remains firmly bullish, signaling continuation toward new local highs as the market rejects lower pullbacks.
Direction: LONG
Entry Zone: 83,500 - 84,200
Take-Profit Targets:
Target 1: 85,600
Target 2: 87,300
Target 3: 90,000
Stop Loss: 82,000
Leverage: 3x - 5x (Isolated)
Key Analysis:
$BTC is holding strong above 84,000 with solid bullish momentum across the daily chart. The Supertrend indicator remains firmly bullish, signaling continuation toward new local highs as the market rejects lower pullbacks.
36
·
--
Bullish
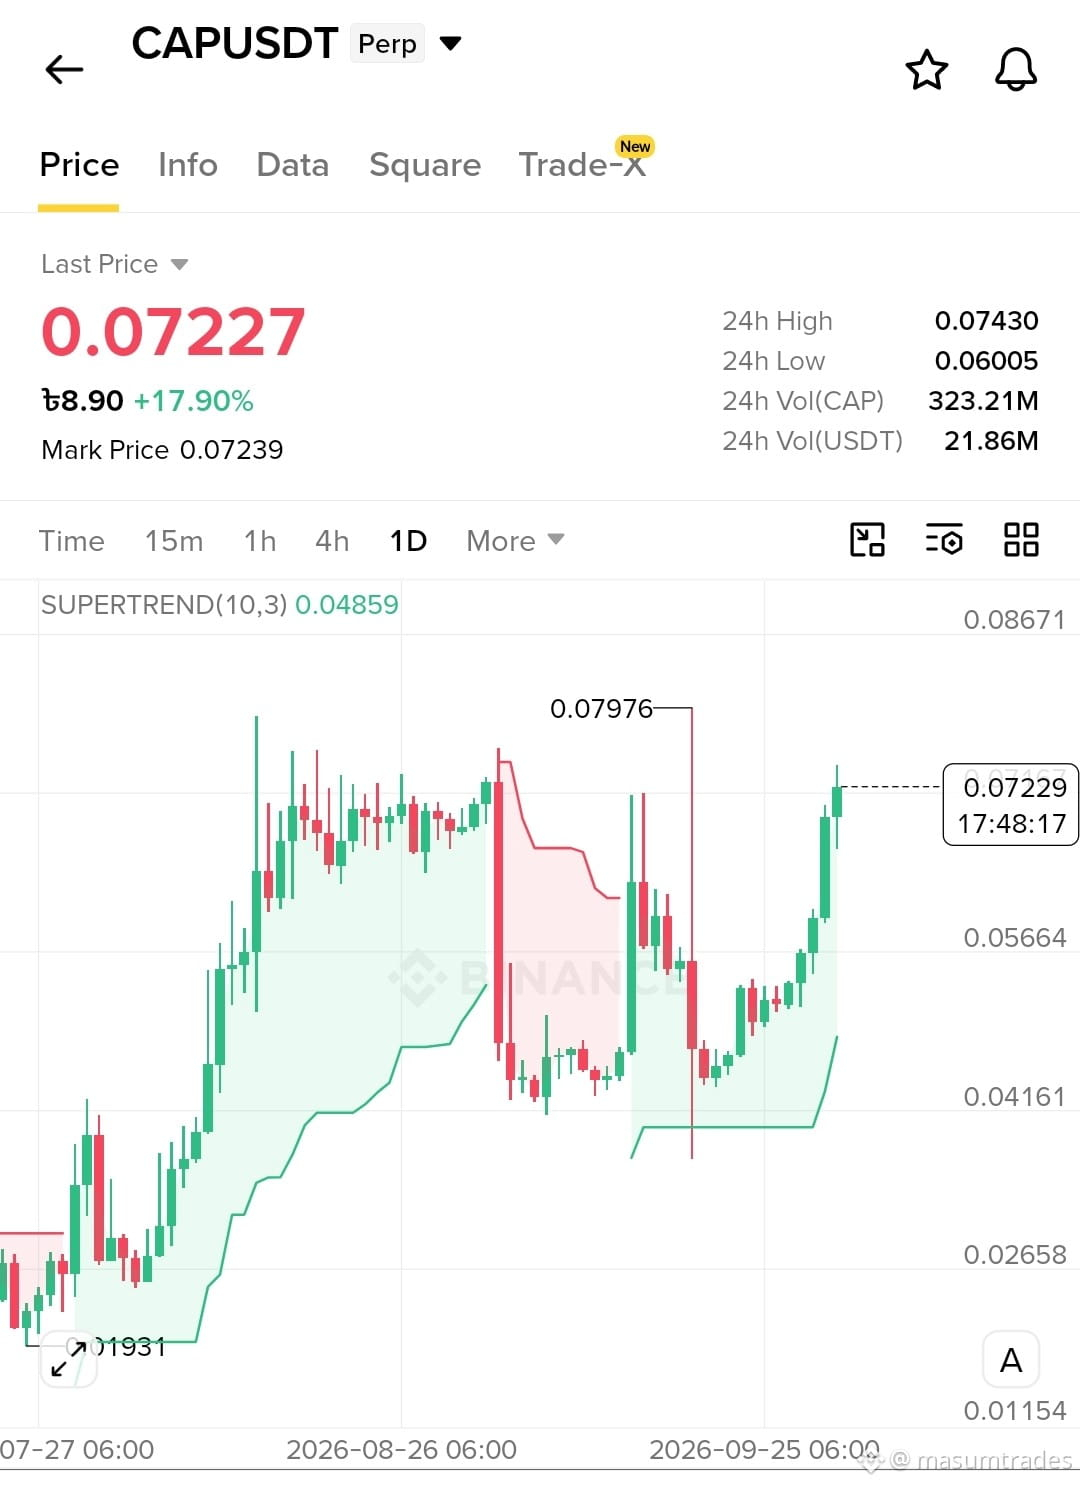
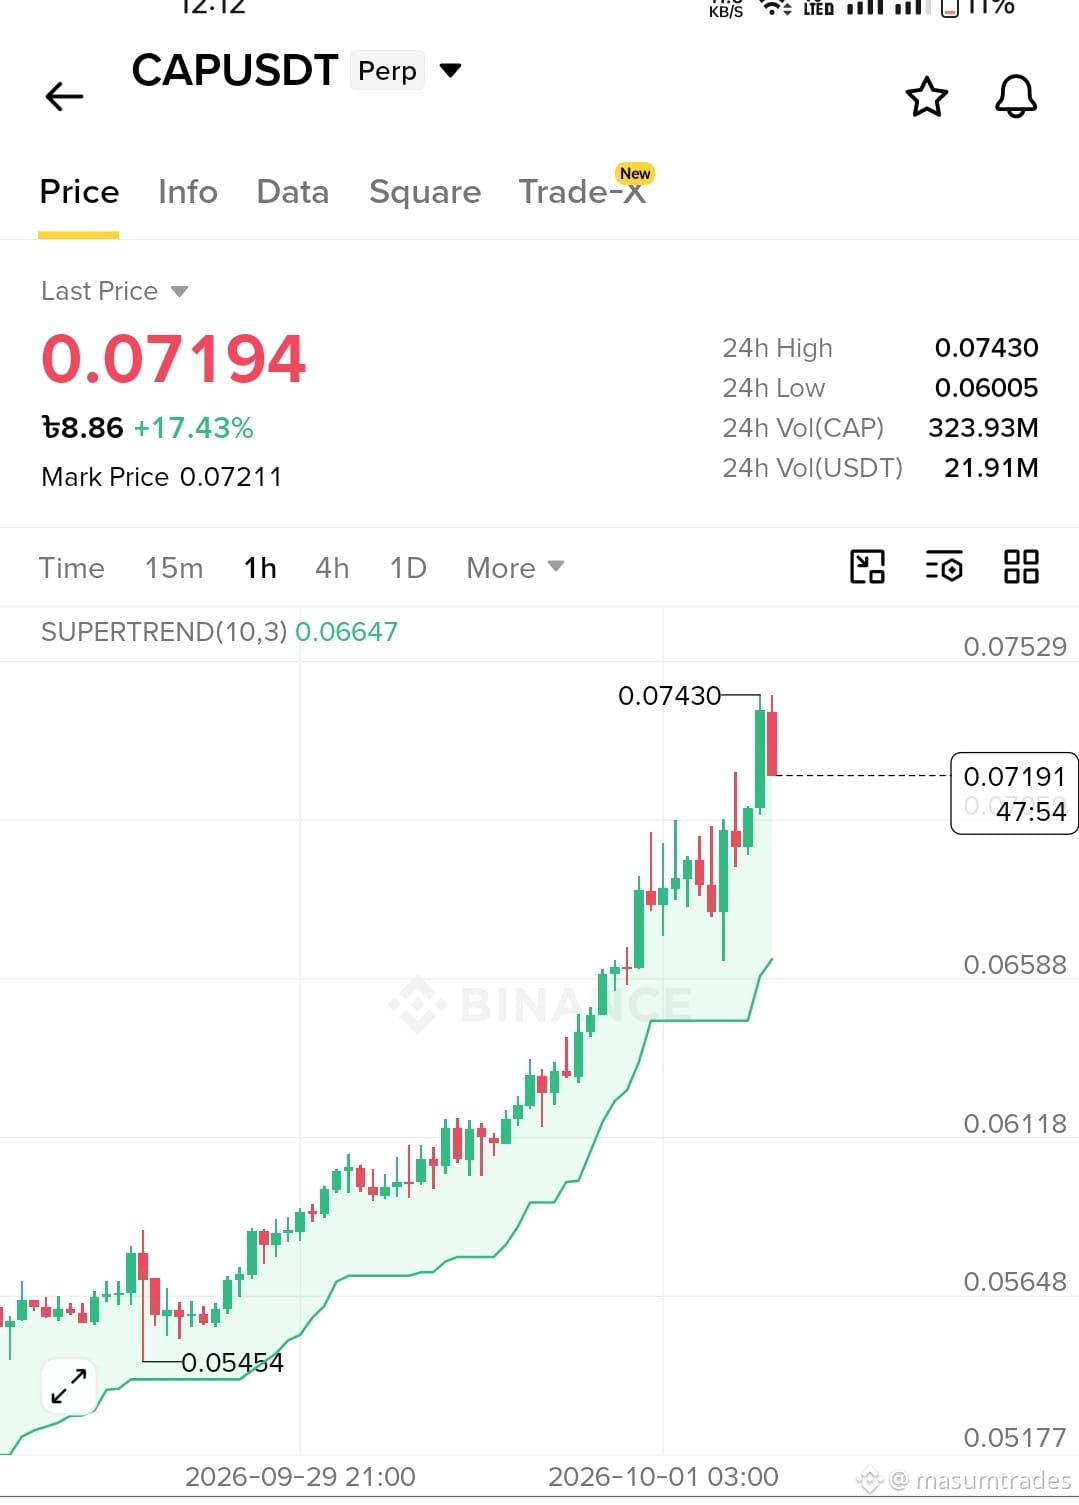
MASSIVE BREAKOUT ON $CAP NEXT TARGET IN SIGHT!
Direction: LONG
{future}(CAPUSDT)
Entry Zone: 0.06800 - 0.07200
Take-Profit Targets:
Target 1: 0.07600
Target 2: 0.08000
Target 3: 0.08800
Stop Loss: 0.06400
Leverage: 3x - 5x (Isolated)
Key Analysis:
$CAP displays dynamic bullish momentum with a solid upward trend on both 1H and 1D timeframes. Supertrend remains green, signaling strong buyer control and potential continuation toward recent highs.
MASSIVE BREAKOUT ON $CAP NEXT TARGET IN SIGHT!
Direction: LONG
Entry Zone: 0.06800 - 0.07200
Take-Profit Targets:
Target 1: 0.07600
Target 2: 0.08000
Target 3: 0.08800
Stop Loss: 0.06400
Leverage: 3x - 5x (Isolated)
Key Analysis:
$CAP displays dynamic bullish momentum with a solid upward trend on both 1H and 1D timeframes. Supertrend remains green, signaling strong buyer control and potential continuation toward recent highs.
Direction: LONG
Entry Zone: 0.06800 - 0.07200
Take-Profit Targets:
Target 1: 0.07600
Target 2: 0.08000
Target 3: 0.08800
Stop Loss: 0.06400
Leverage: 3x - 5x (Isolated)
Key Analysis:
$CAP displays dynamic bullish momentum with a solid upward trend on both 1H and 1D timeframes. Supertrend remains green, signaling strong buyer control and potential continuation toward recent highs.
168
·
--
Bullish
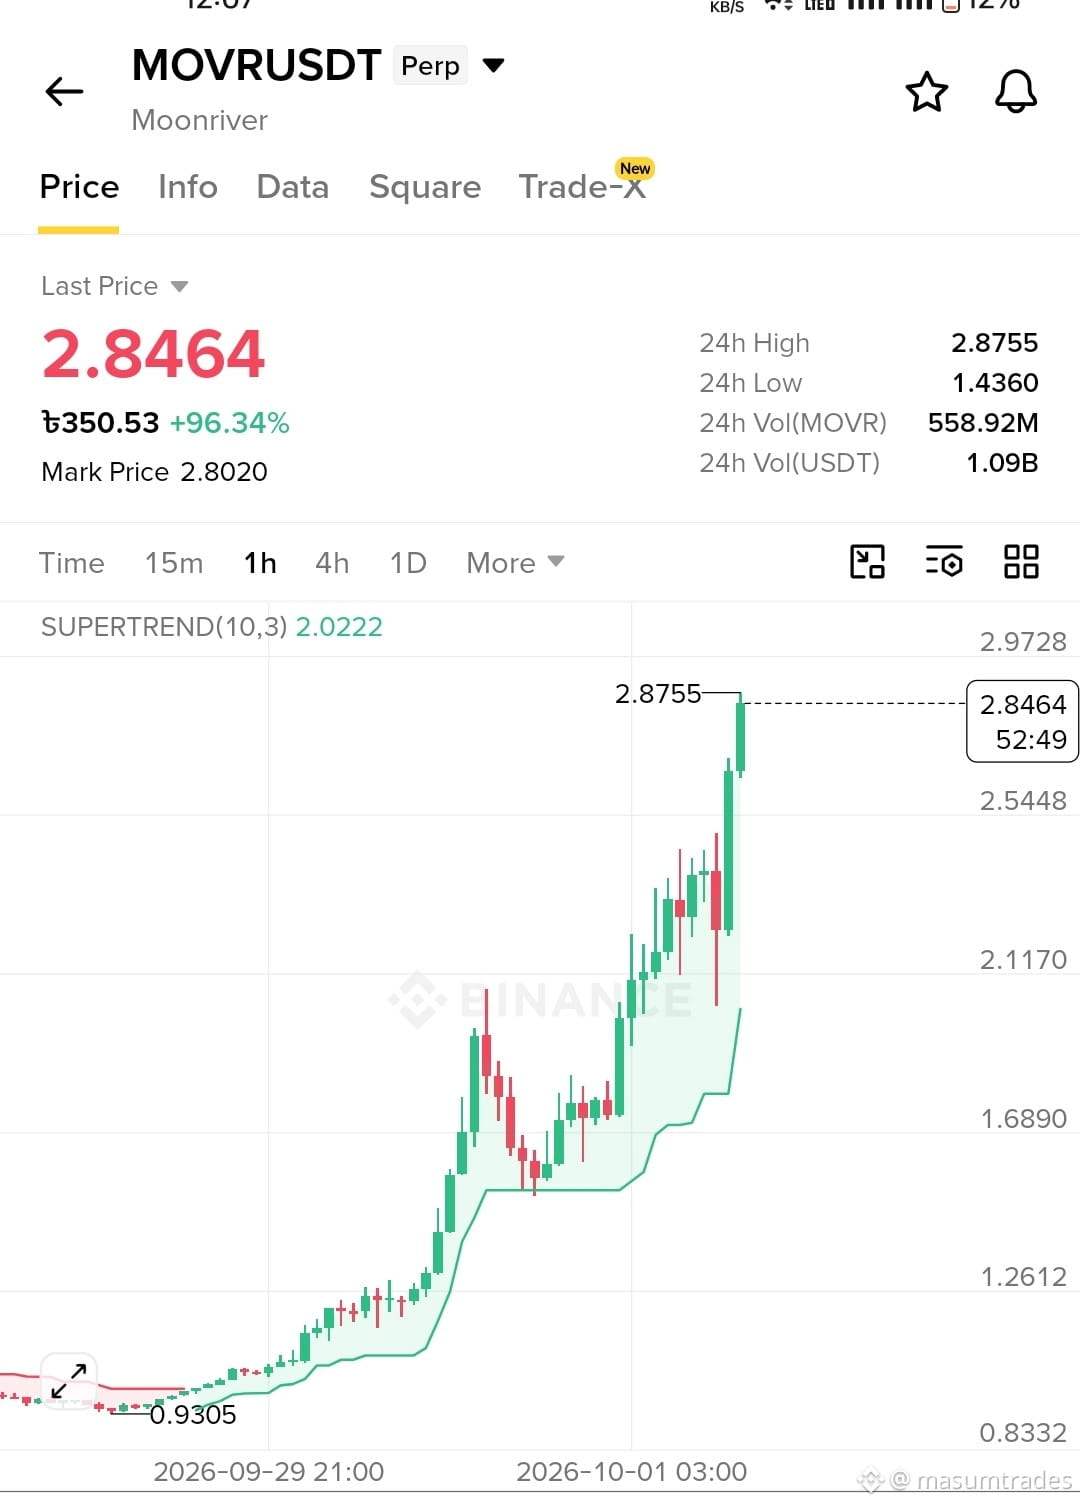
$MOVR Long SIGNAL
Direction: LONG
{future}(MOVRUSDT)
Entry Zone: 2.6500 - 2.7800
Take-Profit Targets:
Target 1: 2.9500
Target 2: 3.2000
Target 3: 3.5000
Stop Loss: 2.4500
Leverage: 3x - 5x (Isolated)
Key Analysis:
MOVR shows massive bullish momentum with high 24h trading volume. The Supertrend indicator remains strong on daily and 1-hour timeframes, pointing to continued upside after minor retests.
Suggestion: Use tight risk management and keep your leverage low to protect your account during volatile moves.
$MOVR Long SIGNAL
Direction: LONG
Entry Zone: 2.6500 - 2.7800
Take-Profit Targets:
Target 1: 2.9500
Target 2: 3.2000
Target 3: 3.5000
Stop Loss: 2.4500
Leverage: 3x - 5x (Isolated)
Key Analysis:
MOVR shows massive bullish momentum with high 24h trading volume. The Supertrend indicator remains strong on daily and 1-hour timeframes, pointing to continued upside after minor retests.
Suggestion: Use tight risk management and keep your leverage low to protect your account during volatile moves.
Direction: LONG
Entry Zone: 2.6500 - 2.7800
Take-Profit Targets:
Target 1: 2.9500
Target 2: 3.2000
Target 3: 3.5000
Stop Loss: 2.4500
Leverage: 3x - 5x (Isolated)
Key Analysis:
MOVR shows massive bullish momentum with high 24h trading volume. The Supertrend indicator remains strong on daily and 1-hour timeframes, pointing to continued upside after minor retests.
Suggestion: Use tight risk management and keep your leverage low to protect your account during volatile moves.
338
·
--
Bullish
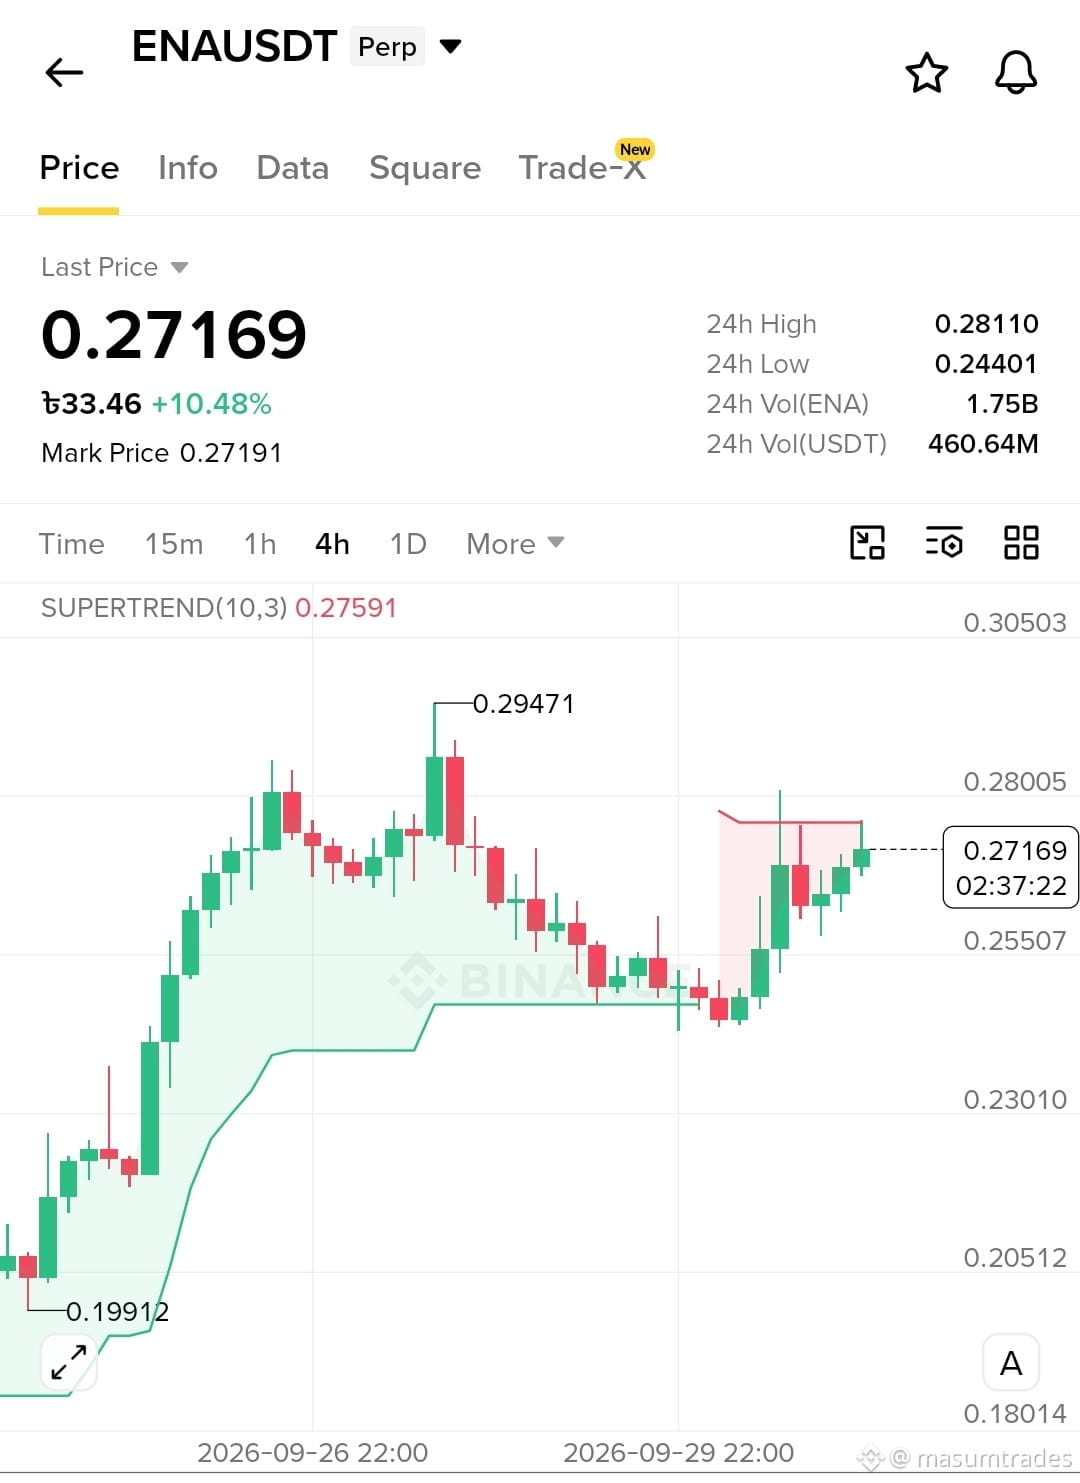
$ENA — LONG SETUP
{future}(ENAUSDT)
$ENA is holding a bullish structure after the recent strong move. I’m watching for a pullback and confirmation rather than chasing the current price.
Entry Zone: 0.2580 – 0.2640
TP1: 0.2720
TP2: 0.2810
TP3: 0.2940
Stop Loss: 0.2490
🔥 Key level: 0.2810
A clean breakout and retest above this area could open the way toward 0.2940.
⚠️ If ENA loses 0.2490 with strong selling pressure, this LONG setup is invalid.
Risk management first. Don't over-leverage.
$ENA — LONG SETUP
$ENA is holding a bullish structure after the recent strong move. I’m watching for a pullback and confirmation rather than chasing the current price.
Entry Zone: 0.2580 – 0.2640
TP1: 0.2720
TP2: 0.2810
TP3: 0.2940
Stop Loss: 0.2490
🔥 Key level: 0.2810
A clean breakout and retest above this area could open the way toward 0.2940.
⚠️ If ENA loses 0.2490 with strong selling pressure, this LONG setup is invalid.
Risk management first. Don't over-leverage.
$ENA is holding a bullish structure after the recent strong move. I’m watching for a pullback and confirmation rather than chasing the current price.
Entry Zone: 0.2580 – 0.2640
TP1: 0.2720
TP2: 0.2810
TP3: 0.2940
Stop Loss: 0.2490
🔥 Key level: 0.2810
A clean breakout and retest above this area could open the way toward 0.2940.
⚠️ If ENA loses 0.2490 with strong selling pressure, this LONG setup is invalid.
Risk management first. Don't over-leverage.
82
·
--
Bearish
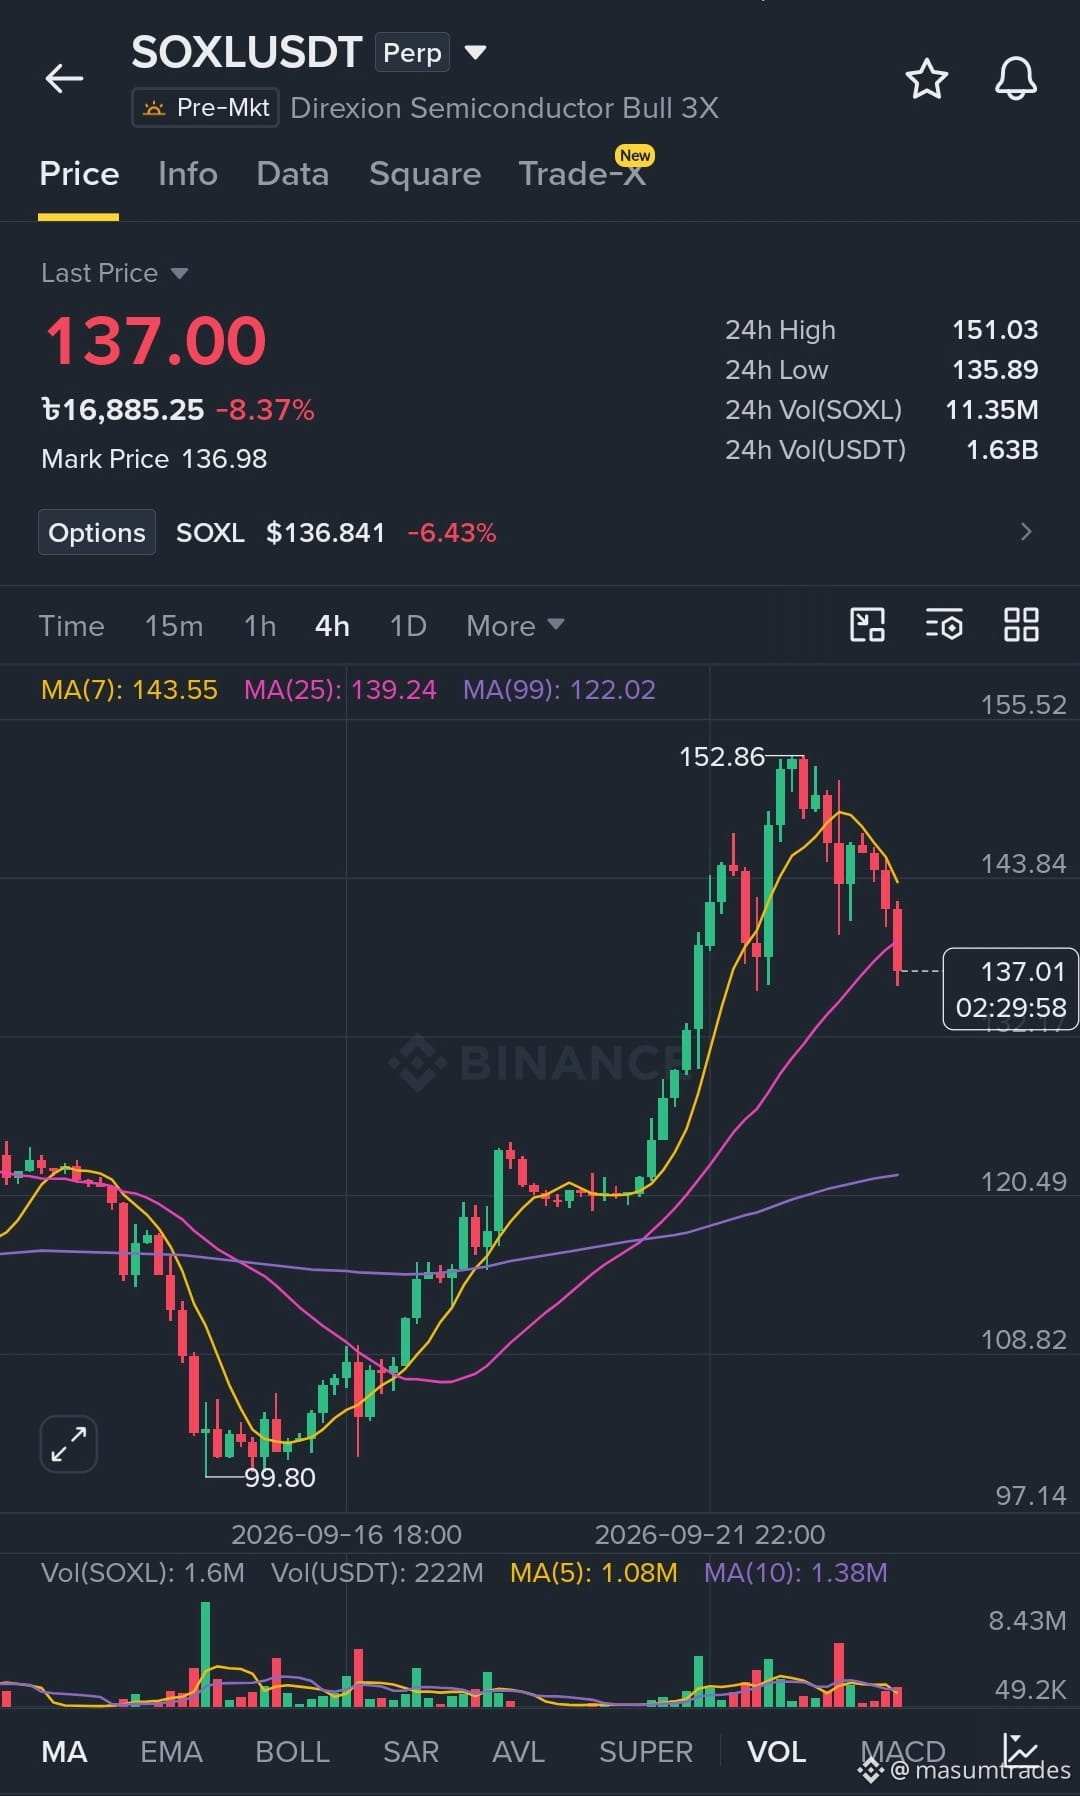
$SOXL rejected from the 152.86 resistance and broke below short-term moving averages, heading toward lower demand support.
{future}(SOXLUSDT)
Trade Type: SHORT
Entry Range: 137.00 - 139.50 (Current Market Price)
Leverage: Cross 5x - 10x
Take-Profit Targets:
Target 1: 131.00
Target 2: 125.00
Target 3: 120.50+
Stop Loss: 144.50
$SOXL rejected from the 152.86 resistance and broke below short-term moving averages, heading toward lower demand support.
Trade Type: SHORT
Entry Range: 137.00 - 139.50 (Current Market Price)
Leverage: Cross 5x - 10x
Take-Profit Targets:
Target 1: 131.00
Target 2: 125.00
Target 3: 120.50+
Stop Loss: 144.50
Trade Type: SHORT
Entry Range: 137.00 - 139.50 (Current Market Price)
Leverage: Cross 5x - 10x
Take-Profit Targets:
Target 1: 131.00
Target 2: 125.00
Target 3: 120.50+
Stop Loss: 144.50
49
·
--
Bearish
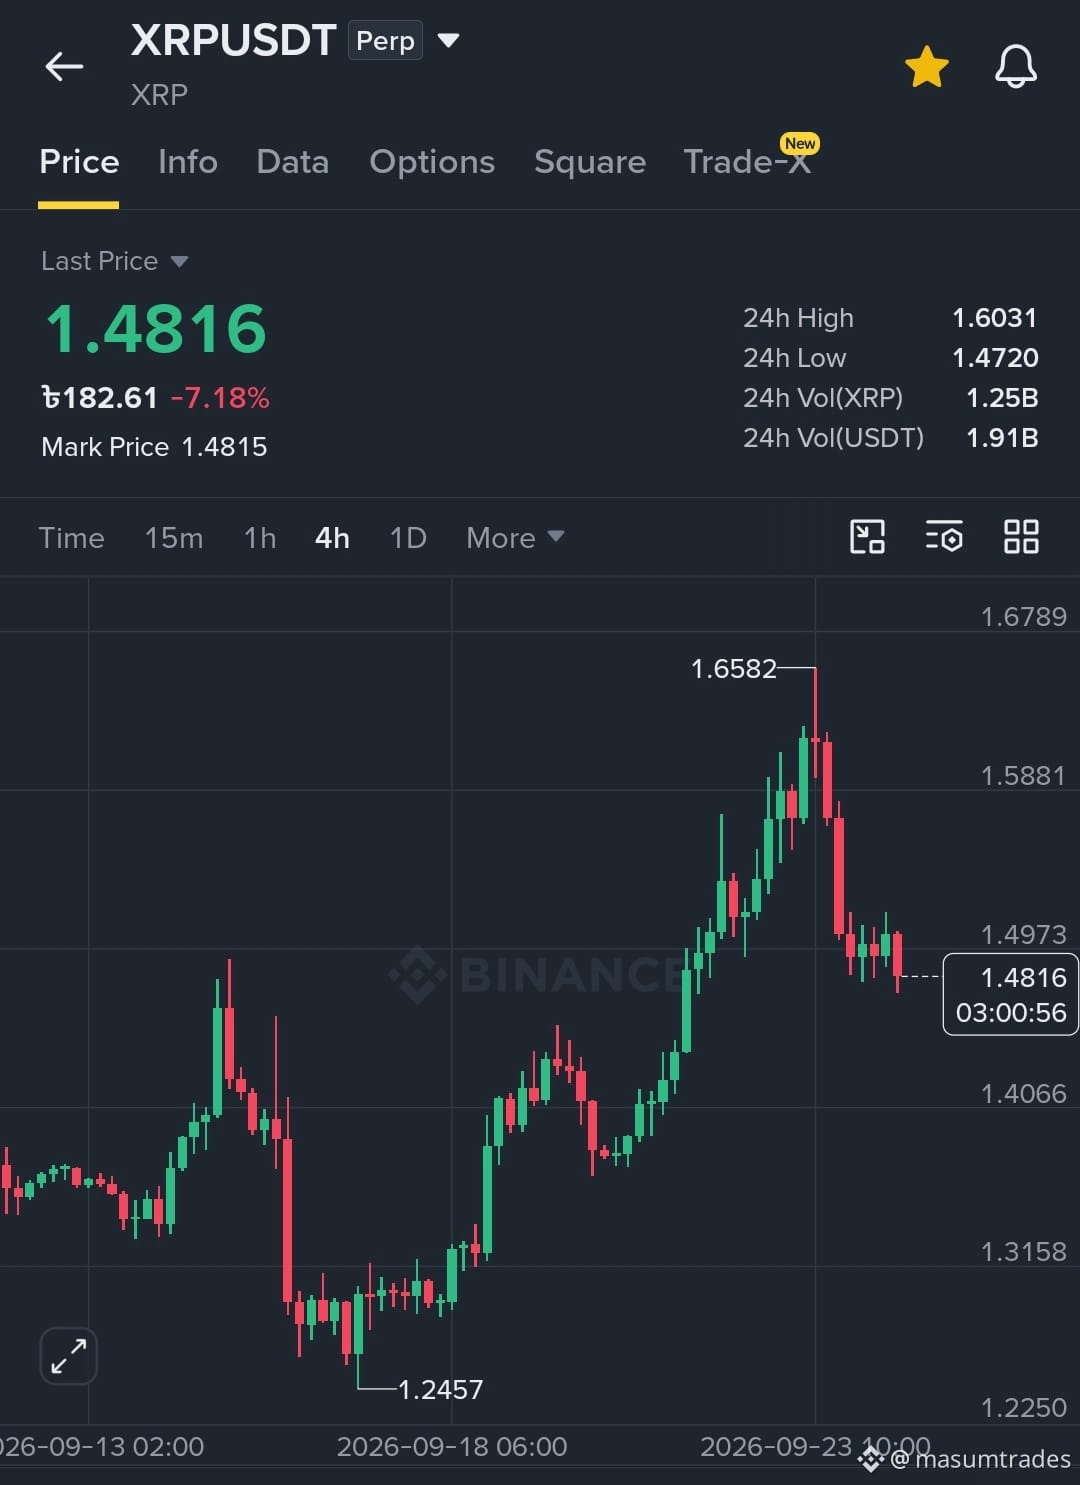
$XRP rejected sharply from the 1.658 supply zone, breaking lower timeframe bullish structure for a deeper retracement toward discount demand.
{future}(XRPUSDT)
Trade Type: SHORT
Entry Range: 1.481 - 1.520 (Current Market Price)
Leverage: Cross 5x - 10x
Take-Profit Targets:
Target 1: 1.435
Target 2: 1.380
Target 3: 1.320+
Stop Loss: 1.575
$XRP rejected sharply from the 1.658 supply zone, breaking lower timeframe bullish structure for a deeper retracement toward discount demand.
Trade Type: SHORT
Entry Range: 1.481 - 1.520 (Current Market Price)
Leverage: Cross 5x - 10x
Take-Profit Targets:
Target 1: 1.435
Target 2: 1.380
Target 3: 1.320+
Stop Loss: 1.575
Trade Type: SHORT
Entry Range: 1.481 - 1.520 (Current Market Price)
Leverage: Cross 5x - 10x
Take-Profit Targets:
Target 1: 1.435
Target 2: 1.380
Target 3: 1.320+
Stop Loss: 1.575
22
·
--
Bullish
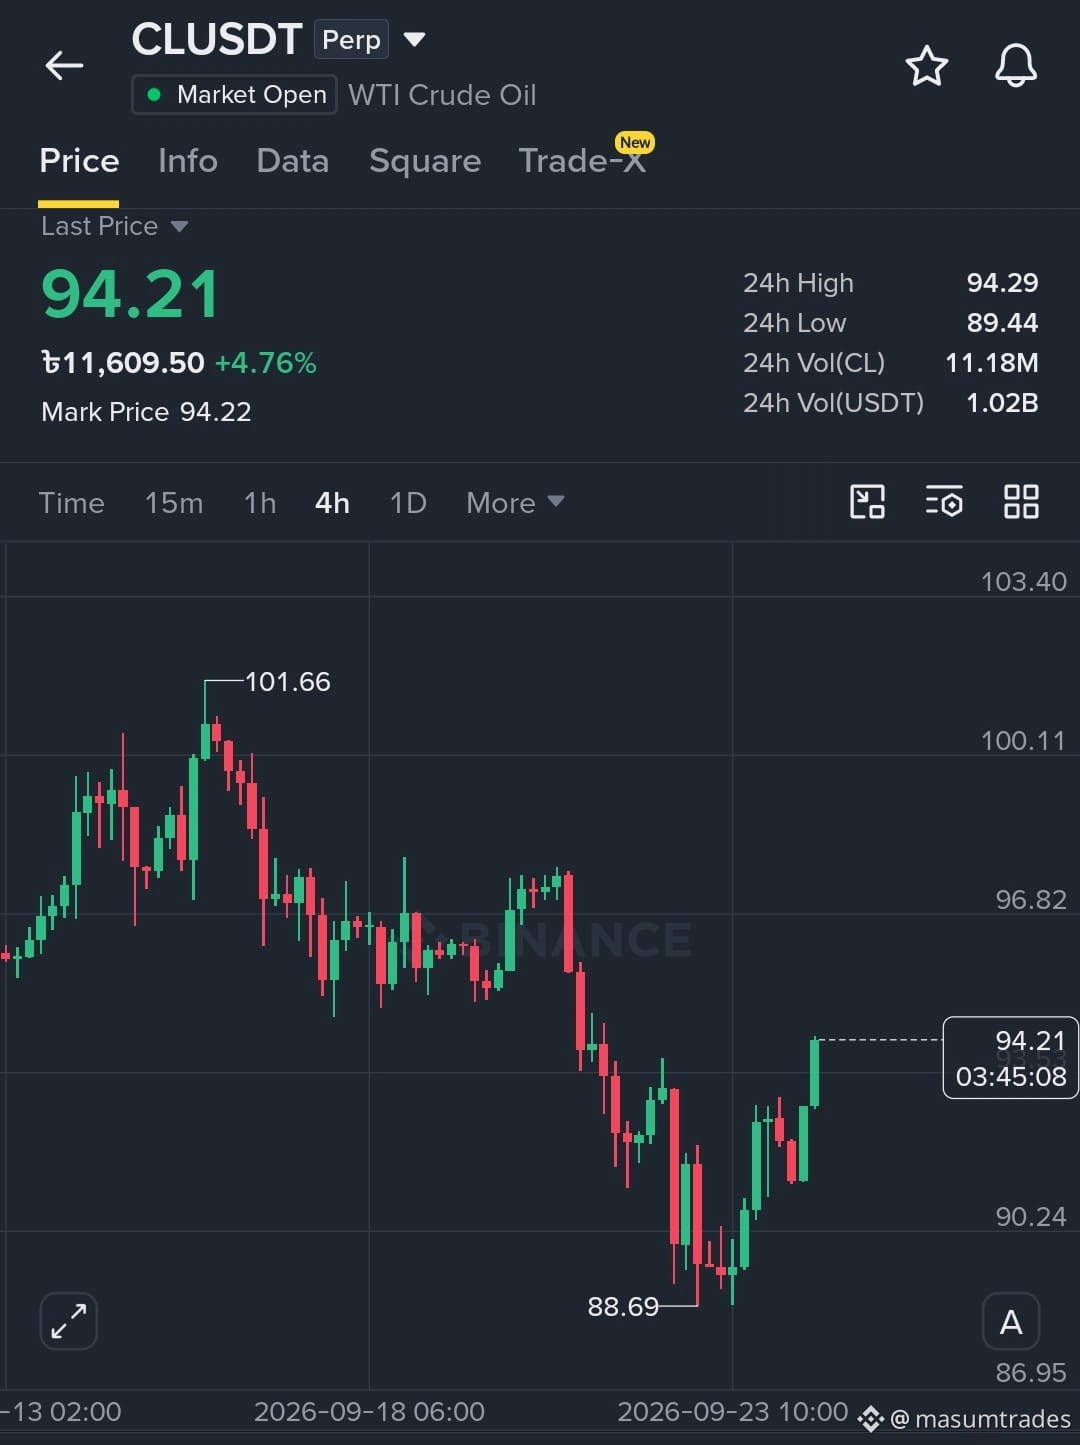
$CL swept sell-side liquidity near the 88.69 support zone and launched a strong expansion leg toward upper resistance.
Trade Type: LONG
{future}(CLUSDT)
Entry Range: 93.50 - 94.20 (Current Market Price)
Leverage: Cross 5x - 10x
Take-Profit Targets:
Target 1: 96.80
Target 2: 99.50
Target 3: 101.50+
Stop Loss: 91.20
$CL swept sell-side liquidity near the 88.69 support zone and launched a strong expansion leg toward upper resistance.
Trade Type: LONG
Entry Range: 93.50 - 94.20 (Current Market Price)
Leverage: Cross 5x - 10x
Take-Profit Targets:
Target 1: 96.80
Target 2: 99.50
Target 3: 101.50+
Stop Loss: 91.20
Trade Type: LONG
Entry Range: 93.50 - 94.20 (Current Market Price)
Leverage: Cross 5x - 10x
Take-Profit Targets:
Target 1: 96.80
Target 2: 99.50
Target 3: 101.50+
Stop Loss: 91.20
195
·
--
Bearish
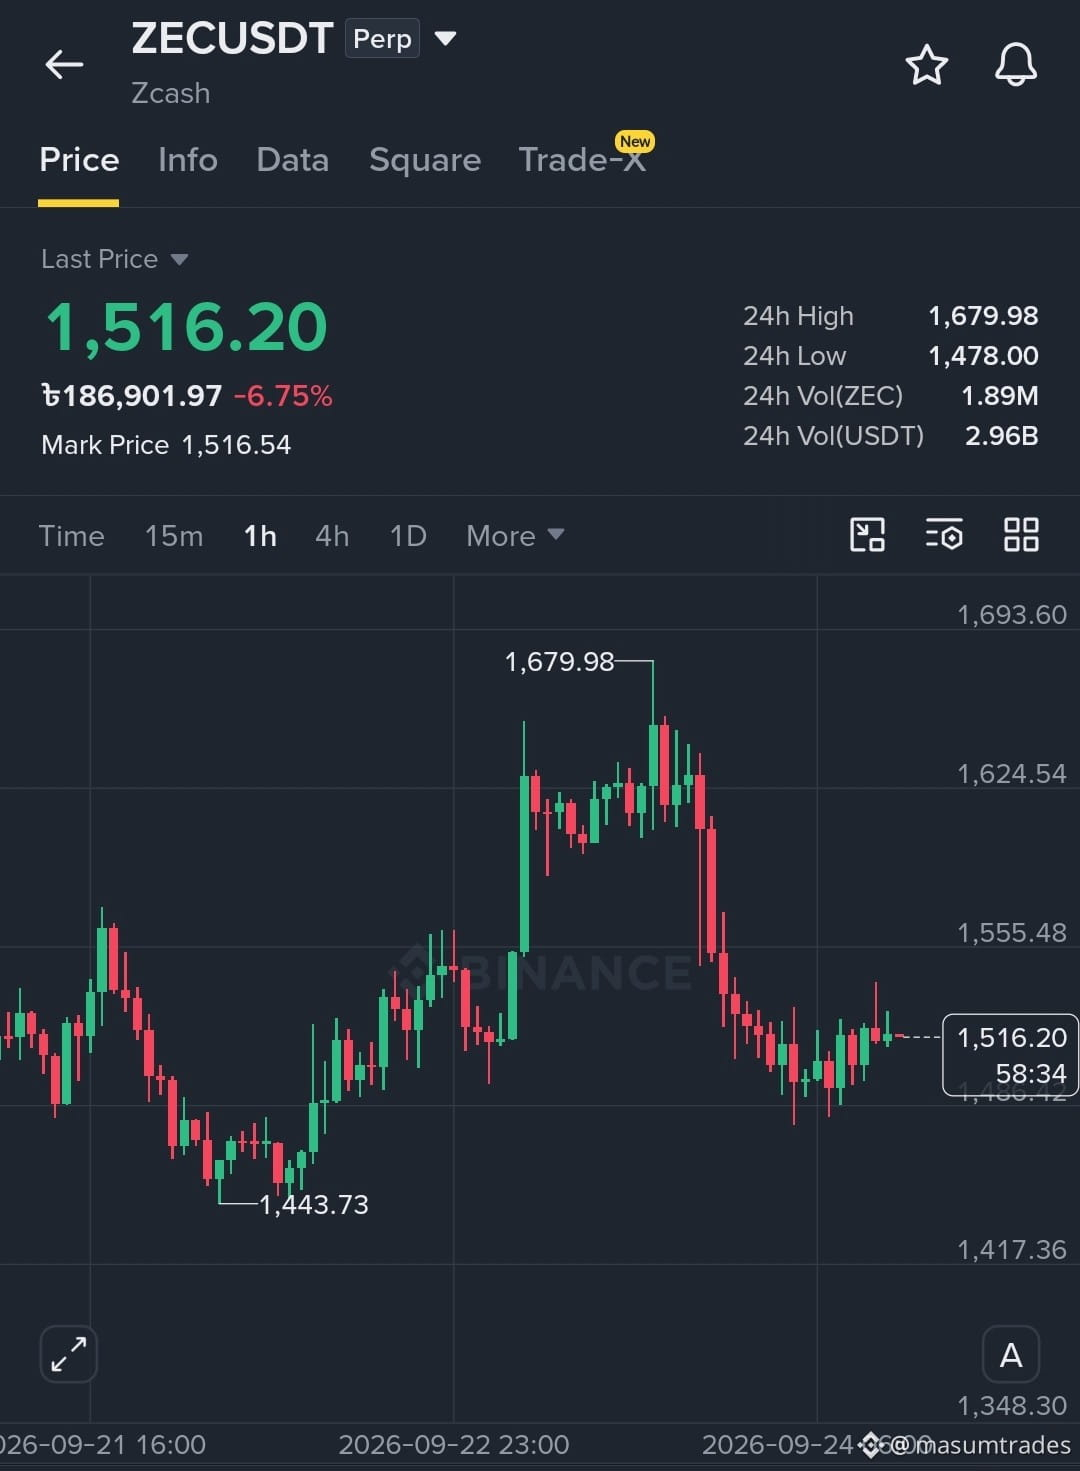
$ZEC rejected sharply near the 1,680 supply zone and is currently consolidating within a local low-volume distribution range. Bearish market structure suggests a potential breakdown toward underlying discount demand targets.
{future}(ZECUSDT)
Trade Type: SHORT
Entry Range: 1,516 - 1,550 (Current Market Price)
Leverage: Cross 5x - 10x
Take-Profit Targets:
Target 1: 1,475
Target 2: 1,440
Target 3: 1,380+
Stop Loss: 1,610
$ZEC rejected sharply near the 1,680 supply zone and is currently consolidating within a local low-volume distribution range. Bearish market structure suggests a potential breakdown toward underlying discount demand targets.
Trade Type: SHORT
Entry Range: 1,516 - 1,550 (Current Market Price)
Leverage: Cross 5x - 10x
Take-Profit Targets:
Target 1: 1,475
Target 2: 1,440
Target 3: 1,380+
Stop Loss: 1,610
Trade Type: SHORT
Entry Range: 1,516 - 1,550 (Current Market Price)
Leverage: Cross 5x - 10x
Take-Profit Targets:
Target 1: 1,475
Target 2: 1,440
Target 3: 1,380+
Stop Loss: 1,610
47
·
--
Bullish
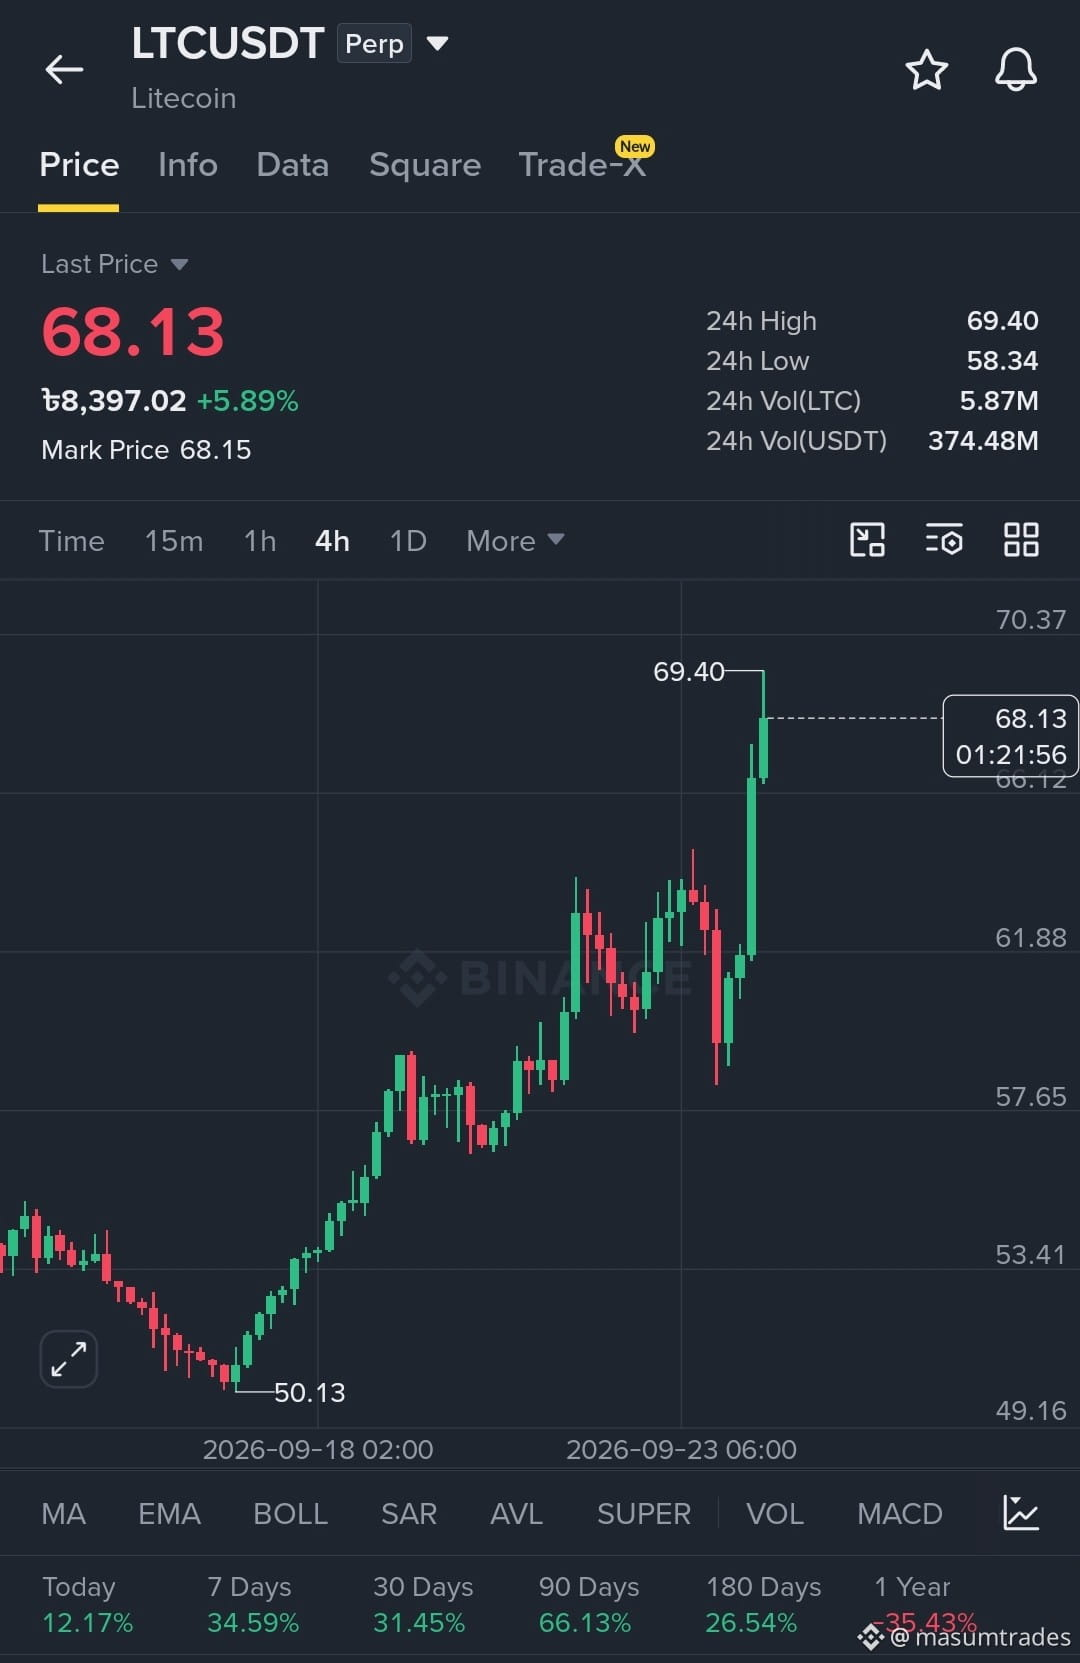
$LTC printed strong bullish displacement, breaking key higher-timeframe resistance levels with accelerating volume.
{future}(LTCUSDT)
Trade Type: LONG
Entry Range: 67.20 - 68.30 (Current Market Price)
Leverage: Cross 5x - 10x
Take-Profit Targets:
Target 1: 71.50
Target 2: 75.00
Target 3: 80.00+
Stop Loss: 64.10
$LTC printed strong bullish displacement, breaking key higher-timeframe resistance levels with accelerating volume.
Trade Type: LONG
Entry Range: 67.20 - 68.30 (Current Market Price)
Leverage: Cross 5x - 10x
Take-Profit Targets:
Target 1: 71.50
Target 2: 75.00
Target 3: 80.00+
Stop Loss: 64.10
Trade Type: LONG
Entry Range: 67.20 - 68.30 (Current Market Price)
Leverage: Cross 5x - 10x
Take-Profit Targets:
Target 1: 71.50
Target 2: 75.00
Target 3: 80.00+
Stop Loss: 64.10
33
Log in to explore more content
Join global crypto users on Binance Square
⚡️ Get latest and useful information about crypto.
💬 Trusted by the world’s largest crypto exchange.
👍 Discover real insights from verified creators.
Email / Phone number
Trending Topics
US10YearYieldNears5.3%
2,576 views
98 Discussing
#US10YearYieldNears5.3%
📊 BOND YIELDS AT MULTI-YEAR HIGHS!
The US 10-year Treasury yield approaching 5.3% is creating a major talking point across global financial markets. Rising yields reflect changing expectations around inflation, economic growth, and government borrowing.
🌍 What makes this situation particularly interesting is the impact on crypto sentiment. Higher bond yields may reduce demand for riskier assets, while persistent institutional interest could provide some support to crypto markets.
₿ The real question is: Can Bitcoin maintain its strength while traditional financial markets face rising borrowing costs?
💡 Sometimes, the biggest market signals come from outside the crypto market.
#Bitcoin #CryptoMarket #US10YearYield #TreasuryYields #BTC $BTC
PALASH5
·0 Likes
·2k views
BitcoinETFsTake$6.34BillionInQ3
234 views
14 Discussing
KoreaProposesTokenizingStocksAndBonds
24,454 views
361 Discussing