

#render
render
3.2M views
9,709 Discussing
Hot
Latest

·
--
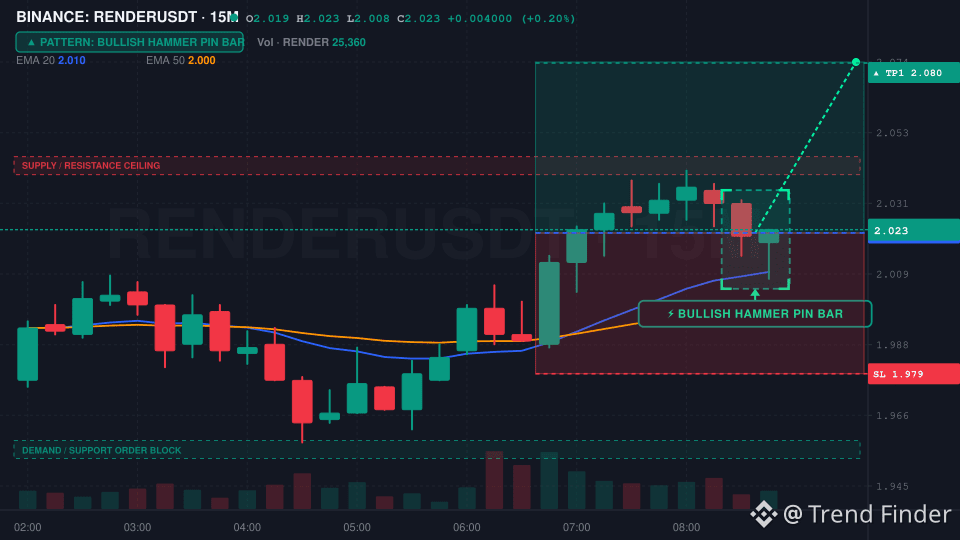
While everyone stares at $BTC sideways movement, $RENDER is undergoing a quiet structural shift. High-volume spot absorption suggests smart money is front-running the next leg higher. The 15M Bullish Hammer pin bar just validated our 55-point LONG breakout.
Entry: 2.022 | SL: 1.979 | TP1: 2.08 | TP2: 2.119
#BinanceSquare #CryptoTrading #RENDER
While everyone stares at $BTC sideways movement, $RENDER is undergoing a quiet structural shift. High-volume spot absorption suggests smart money is front-running the next leg higher. The 15M Bullish Hammer pin bar just validated our 55-point LONG breakout.
Entry: 2.022 | SL: 1.979 | TP1: 2.08 | TP2: 2.119
#BinanceSquare #CryptoTrading #RENDER
Entry: 2.022 | SL: 1.979 | TP1: 2.08 | TP2: 2.119
#BinanceSquare #CryptoTrading #RENDER
9

·
--
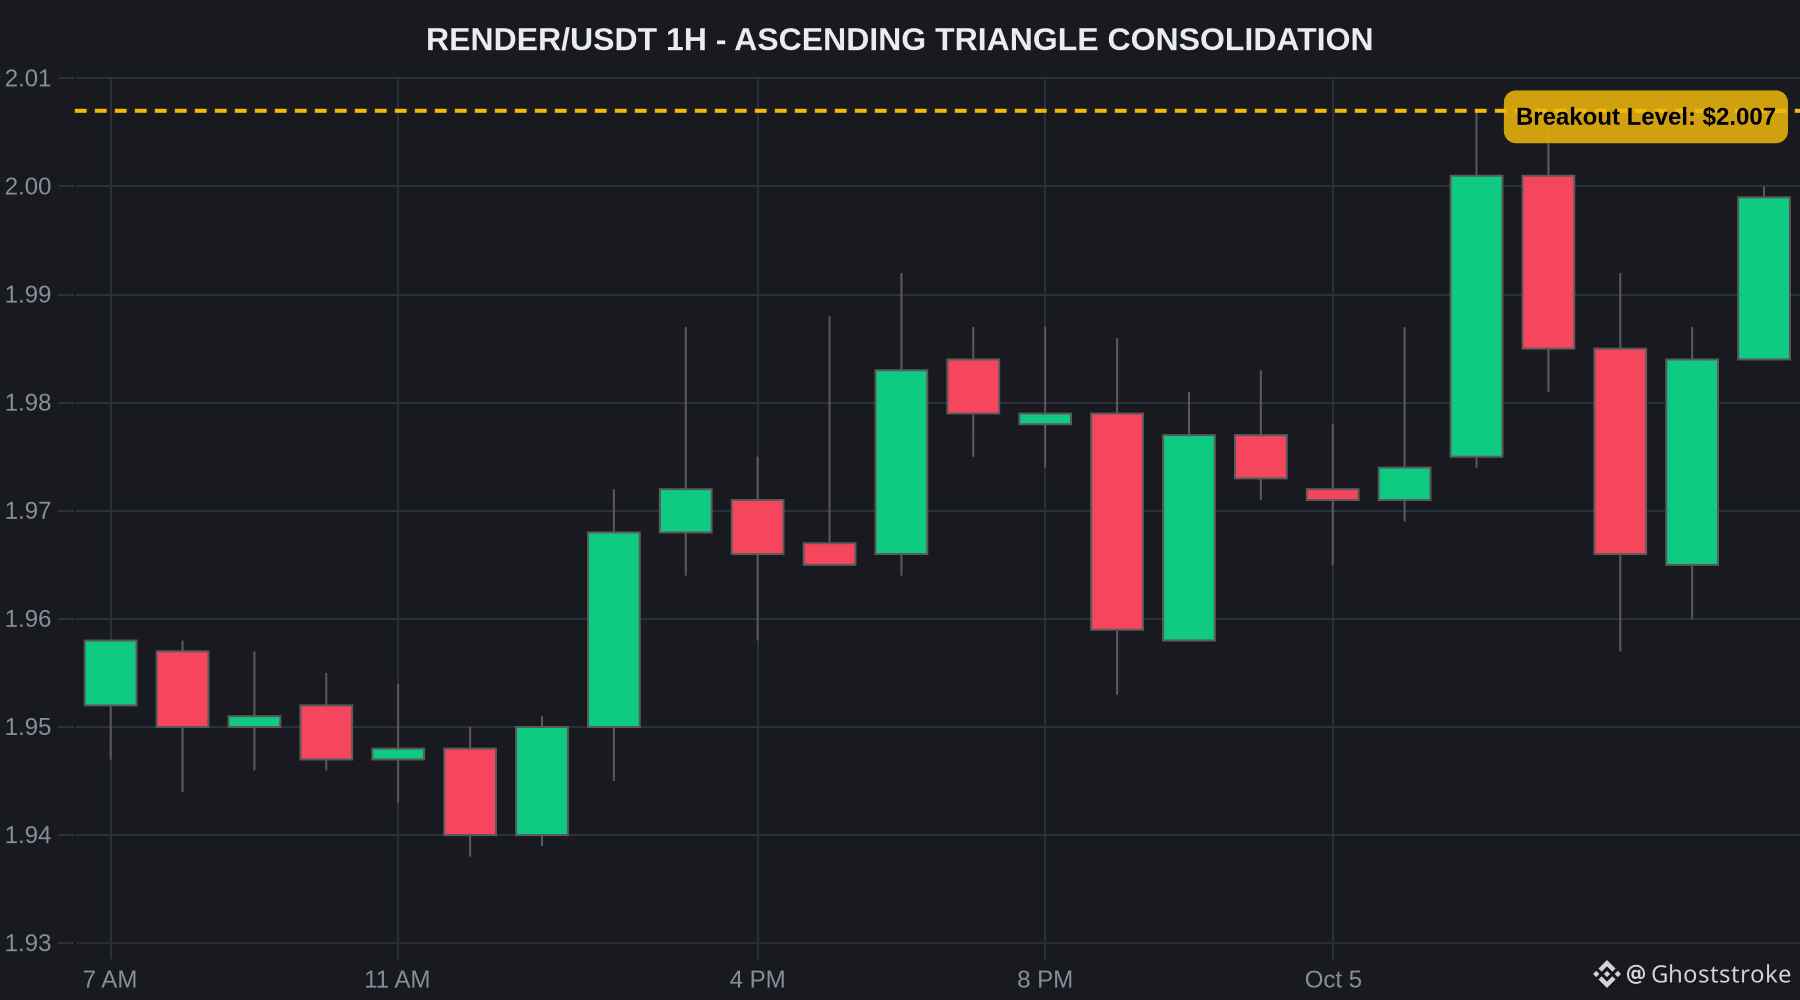
I'm tracking a promising breakout on $RENDER. The ascending triangle consolidation, with the key breakout level at $2.007, is finally getting absorbed. The orderbook tape shows aggressive buy orders converging as shorts get squeezed. Expect volatility as the market tests this crucial resistance level. If $RENDER breaks above $2.007, it could open the door for a significant move. Keep an eye on the price action and don't hesitate to enter on the breakout if it's strong. #RENDER #BinanceSquare
I'm tracking a promising breakout on $RENDER . The ascending triangle consolidation, with the key breakout level at $2.007, is finally getting absorbed. The orderbook tape shows aggressive buy orders converging as shorts get squeezed. Expect volatility as the market tests this crucial resistance level. If $RENDER breaks above $2.007, it could open the door for a significant move. Keep an eye on the price action and don't hesitate to enter on the breakout if it's strong. #RENDER #BinanceSquare
37

·
--
Your stop on $RENDER at 1.9380 is tighter than the math allows
Markets swing normally by 0.8 percent every single hour
Placing a stop inside that normal noise means you get stopped out before the move even starts
A real stop belongs below the swing low that actually invalidates the entire chart idea
That means putting it past 1.9380 instead of picking some random tight number to save a few cents
Open $RENDER and set an alert at that level
Where do you normally drop your stops on small timeframes
#RENDER #TradingTips
Your stop on $RENDER at 1.9380 is tighter than the math allows
Markets swing normally by 0.8 percent every single hour
Placing a stop inside that normal noise means you get stopped out before the move even starts
A real stop belongs below the swing low that actually invalidates the entire chart idea
That means putting it past 1.9380 instead of picking some random tight number to save a few cents
Open $RENDER and set an alert at that level
Where do you normally drop your stops on small timeframes
#RENDER #TradingTips
Markets swing normally by 0.8 percent every single hour
Placing a stop inside that normal noise means you get stopped out before the move even starts
A real stop belongs below the swing low that actually invalidates the entire chart idea
That means putting it past 1.9380 instead of picking some random tight number to save a few cents
Open $RENDER and set an alert at that level
Where do you normally drop your stops on small timeframes
#RENDER #TradingTips
16
·
--
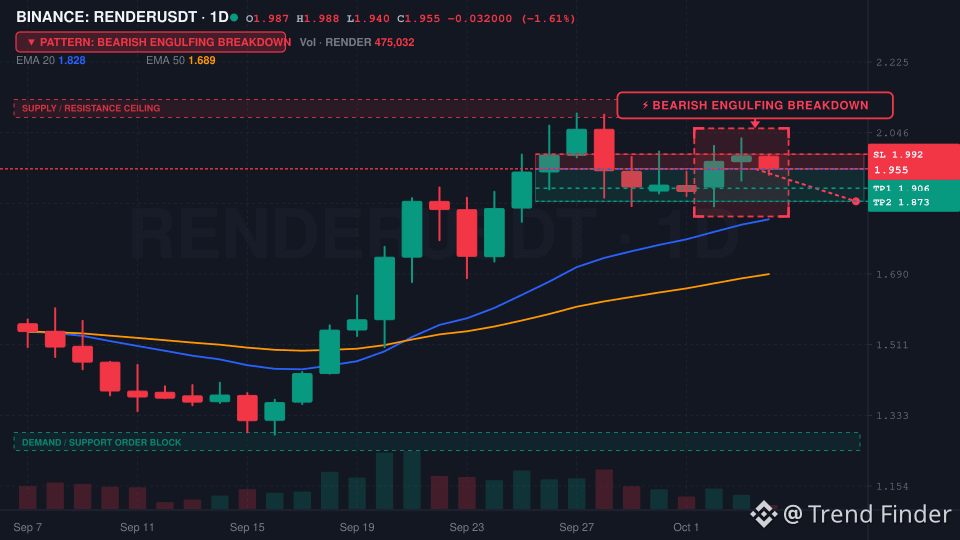
Bid liquidity is ghosting $RENDER as the 1D timeframe confirms a heavy bearish engulfing. While $BTC holds its range, the spot order flow shows aggressive institutional distribution. Breaking the EMA20 is the final confirmation here.
Entry: 1.955 | SL: 1.992 | TP1: 1.906 | TP2: 1.873
_
#BinanceSquare #CryptoTrading #RENDER
Bid liquidity is ghosting $RENDER as the 1D timeframe confirms a heavy bearish engulfing. While $BTC holds its range, the spot order flow shows aggressive institutional distribution. Breaking the EMA20 is the final confirmation here.
Entry: 1.955 | SL: 1.992 | TP1: 1.906 | TP2: 1.873
_
#BinanceSquare #CryptoTrading #RENDER
Entry: 1.955 | SL: 1.992 | TP1: 1.906 | TP2: 1.873
_
#BinanceSquare #CryptoTrading #RENDER
1
12


·
--
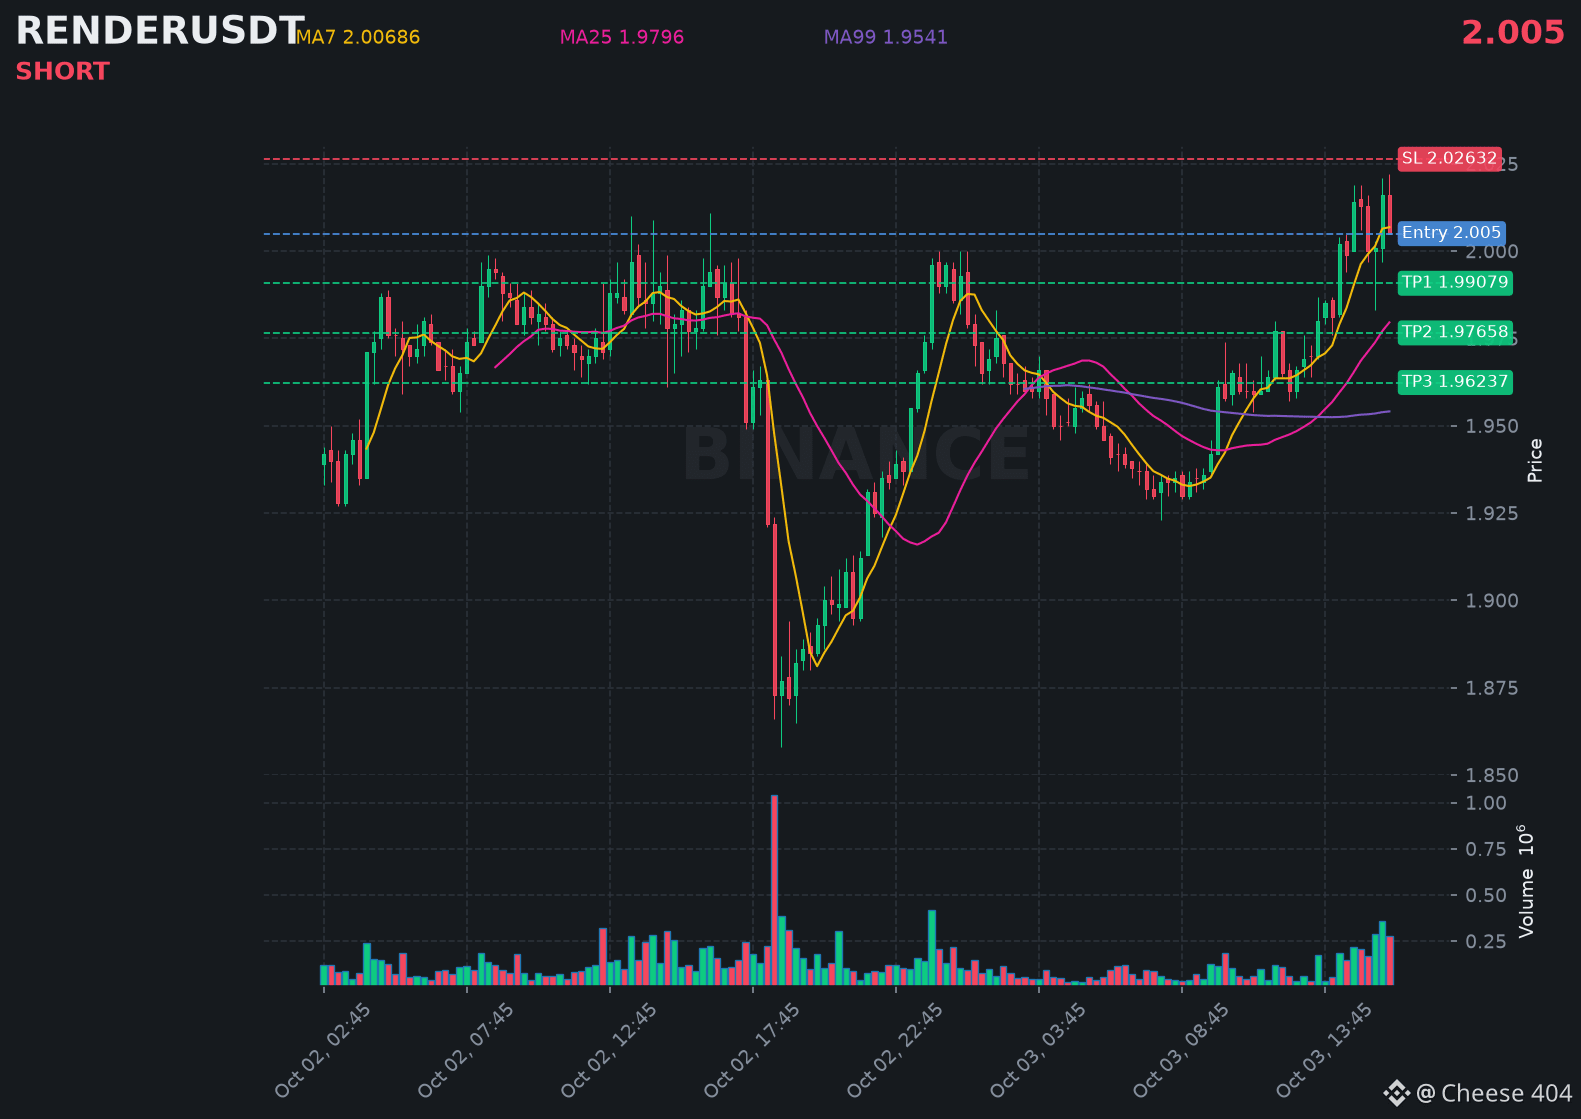
$RENDER is struggling below resistance, hinting at another leg down in the coming hours.
📍 @ 2.005 | Volume: 0.56M USD
RSI 62 | EMA20: 1.98787 USD
📈 Trade Plan:
📈 Entry: 2.00074 – 2.00926
🛑 Stop Loss: 2.02632
🎯 TP1: 1.99079
🎯 TP2: 1.97658
🎯 TP3: 1.96237
Waiting for confirmation, then riding the downtrend.
👉 $RENDER 👈 Catch it
#RENDER
$RENDER is struggling below resistance, hinting at another leg down in the coming hours.
📍 @ 2.005 | Volume: 0.56M USD
RSI 62 | EMA20: 1.98787 USD
📈 Trade Plan:
📈 Entry: 2.00074 – 2.00926
🛑 Stop Loss: 2.02632
🎯 TP1: 1.99079
🎯 TP2: 1.97658
🎯 TP3: 1.96237
Waiting for confirmation, then riding the downtrend.
👉 $RENDER 👈 Catch it
#RENDER
📍 @ 2.005 | Volume: 0.56M USD
RSI 62 | EMA20: 1.98787 USD
📈 Trade Plan:
📈 Entry: 2.00074 – 2.00926
🛑 Stop Loss: 2.02632
🎯 TP1: 1.99079
🎯 TP2: 1.97658
🎯 TP3: 1.96237
Waiting for confirmation, then riding the downtrend.
👉 $RENDER 👈 Catch it
#RENDER
210

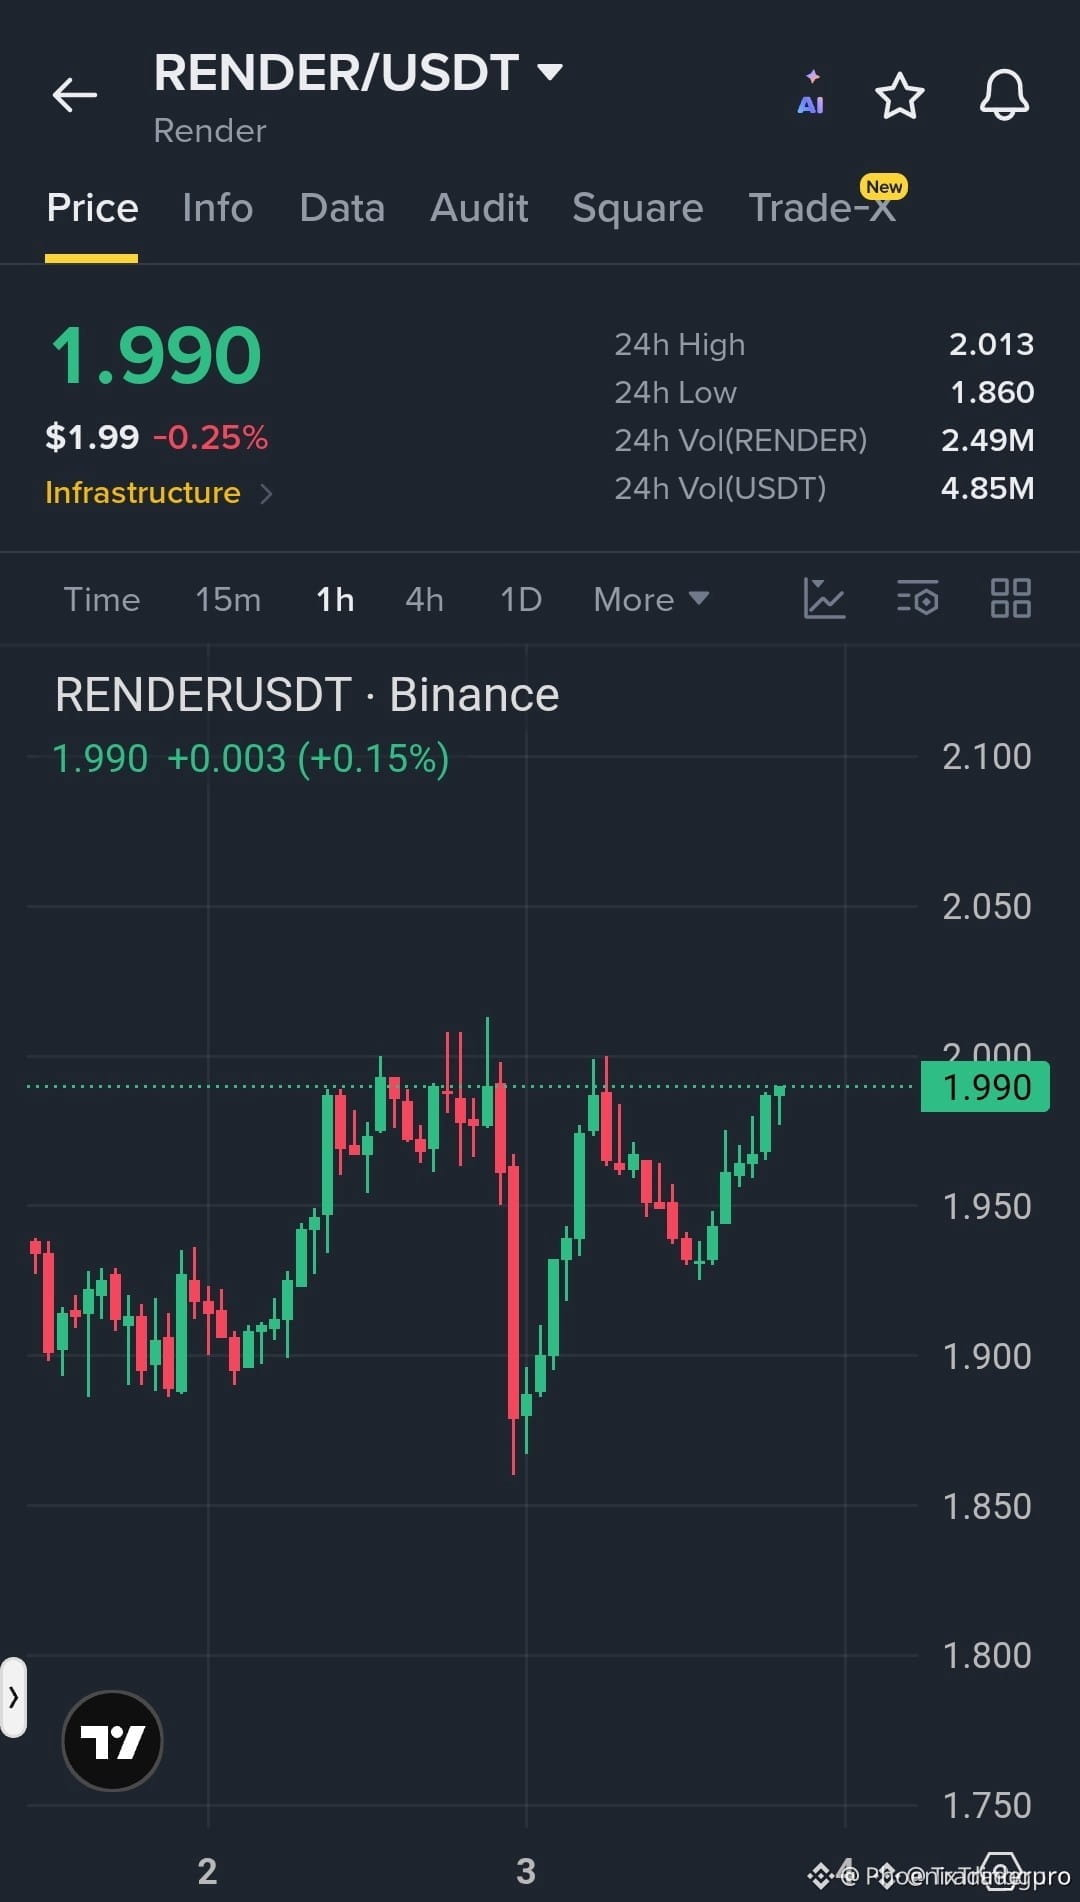
🚨 $RENDER DEFENDS THE $1.86 DEMAND ZONE AND TARGETS A $2.00 BREAKOUT! 💥
Entry: 1.980 - 2.000 ⚡
Target: 2.030 / 2.070 / 2.120 🚀
Stop Loss: 1.940 ⚠️
📌 Buyers aggressively stepped in off the $1.86 floor, absorbing selling volume and coiling price right into the heavy $2.00 supply level. 📊 Order flow shows momentum building rapidly as bulls attempt to flip this psychological barrier into support.
💡 A clean break and hold above $2.00 opens the floodgates toward our upper expansion targets as trapped short liquidity gets swept. 🌊 Are you positioning inside this entry range or waiting for a confirmed close above resistance? 👇
⚠️ Not financial advice. Always manage your risk. 🛡️
🏷️ #RENDER #LongSetup #Breakout #Crypto
🔥 💎
🚨 $RENDER DEFENDS THE $1.86 DEMAND ZONE AND TARGETS A $2.00 BREAKOUT! 💥
Entry: 1.980 - 2.000 ⚡
Target: 2.030 / 2.070 / 2.120 🚀
Stop Loss: 1.940 ⚠️
📌 Buyers aggressively stepped in off the $1.86 floor, absorbing selling volume and coiling price right into the heavy $2.00 supply level. 📊 Order flow shows momentum building rapidly as bulls attempt to flip this psychological barrier into support.
💡 A clean break and hold above $2.00 opens the floodgates toward our upper expansion targets as trapped short liquidity gets swept. 🌊 Are you positioning inside this entry range or waiting for a confirmed close above resistance? 👇
⚠️ Not financial advice. Always manage your risk. 🛡️
🏷️ #RENDER #LongSetup #Breakout #Crypto
🔥 💎
Entry: 1.980 - 2.000 ⚡
Target: 2.030 / 2.070 / 2.120 🚀
Stop Loss: 1.940 ⚠️
📌 Buyers aggressively stepped in off the $1.86 floor, absorbing selling volume and coiling price right into the heavy $2.00 supply level. 📊 Order flow shows momentum building rapidly as bulls attempt to flip this psychological barrier into support.
💡 A clean break and hold above $2.00 opens the floodgates toward our upper expansion targets as trapped short liquidity gets swept. 🌊 Are you positioning inside this entry range or waiting for a confirmed close above resistance? 👇
⚠️ Not financial advice. Always manage your risk. 🛡️
🏷️ #RENDER #LongSetup #Breakout #Crypto
🔥 💎
13

·
--
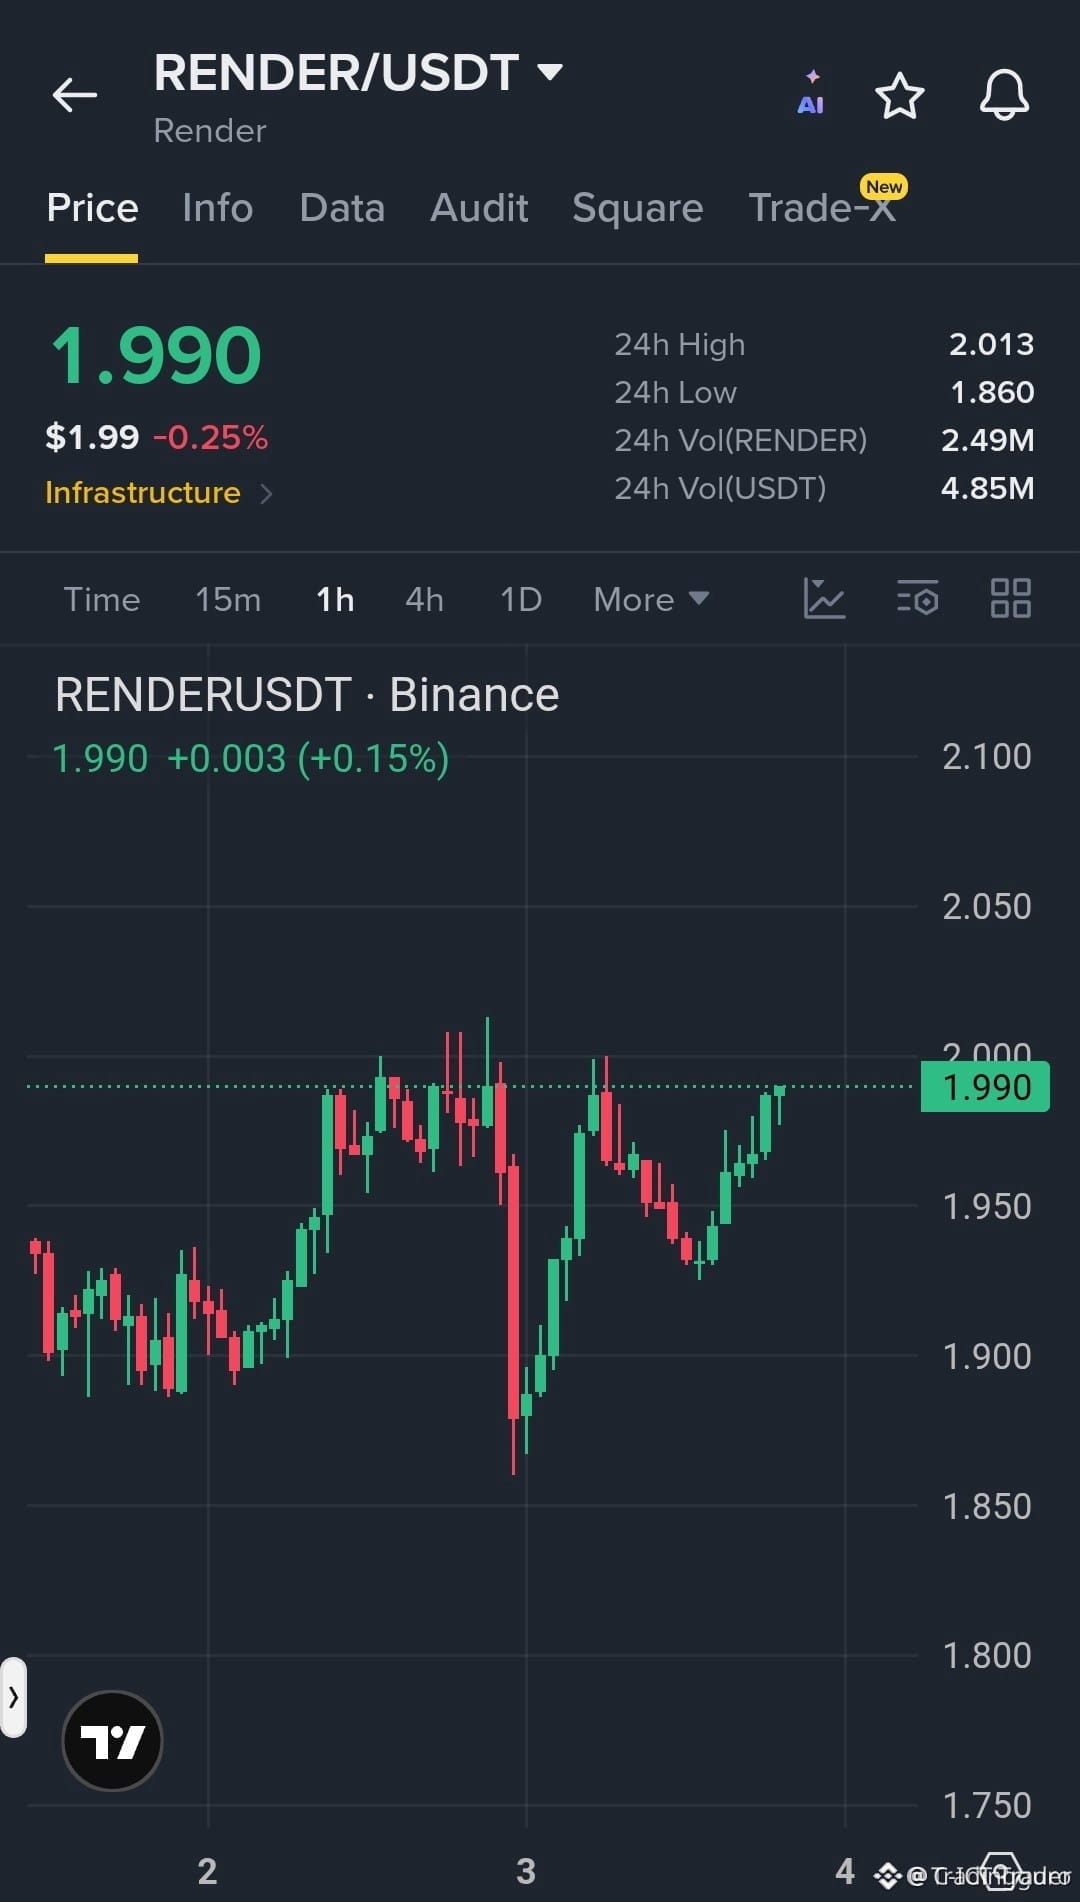
🚨 $RENDER DEFENDS KEY DEMAND ZONE WITH EXPANDING MOMENTUM TOWARD THE $2.00 BREAKOUT! ⚡
Entry: $1.980 - $2.000 ⚡
Target: $2.030 - $2.120 🚀
Stop Loss: $1.940 ⚠️
📌 Institutional bids stepped up aggressively at the $1.86 structural support, absorbing selling volume and driving price back toward the critical $2.00 level. A decisive reclaim above this key supply block signals a clean market structure shift, opening up rapid order flow expansion toward upper resistance.
🔍 Risk parameters remain exceptionally sharp as smart money targets higher liquidity pools. 💬 Are you front-running the $2.00 breakout or waiting for a confirmed structural reclaim? 👇
⚠️ Not financial advice. Always manage your risk. 🛡️
🏷️ #RENDER #LongSetup #Breakout #Crypto #SmartMoney
🔥 💎
🚨 $RENDER DEFENDS KEY DEMAND ZONE WITH EXPANDING MOMENTUM TOWARD THE $2.00 BREAKOUT! ⚡
Entry: $1.980 - $2.000 ⚡
Target: $2.030 - $2.120 🚀
Stop Loss: $1.940 ⚠️
📌 Institutional bids stepped up aggressively at the $1.86 structural support, absorbing selling volume and driving price back toward the critical $2.00 level. A decisive reclaim above this key supply block signals a clean market structure shift, opening up rapid order flow expansion toward upper resistance.
🔍 Risk parameters remain exceptionally sharp as smart money targets higher liquidity pools. 💬 Are you front-running the $2.00 breakout or waiting for a confirmed structural reclaim? 👇
⚠️ Not financial advice. Always manage your risk. 🛡️
🏷️ #RENDER #LongSetup #Breakout #Crypto #SmartMoney
🔥 💎
Entry: $1.980 - $2.000 ⚡
Target: $2.030 - $2.120 🚀
Stop Loss: $1.940 ⚠️
📌 Institutional bids stepped up aggressively at the $1.86 structural support, absorbing selling volume and driving price back toward the critical $2.00 level. A decisive reclaim above this key supply block signals a clean market structure shift, opening up rapid order flow expansion toward upper resistance.
🔍 Risk parameters remain exceptionally sharp as smart money targets higher liquidity pools. 💬 Are you front-running the $2.00 breakout or waiting for a confirmed structural reclaim? 👇
⚠️ Not financial advice. Always manage your risk. 🛡️
🏷️ #RENDER #LongSetup #Breakout #Crypto #SmartMoney
🔥 💎
9

·
--
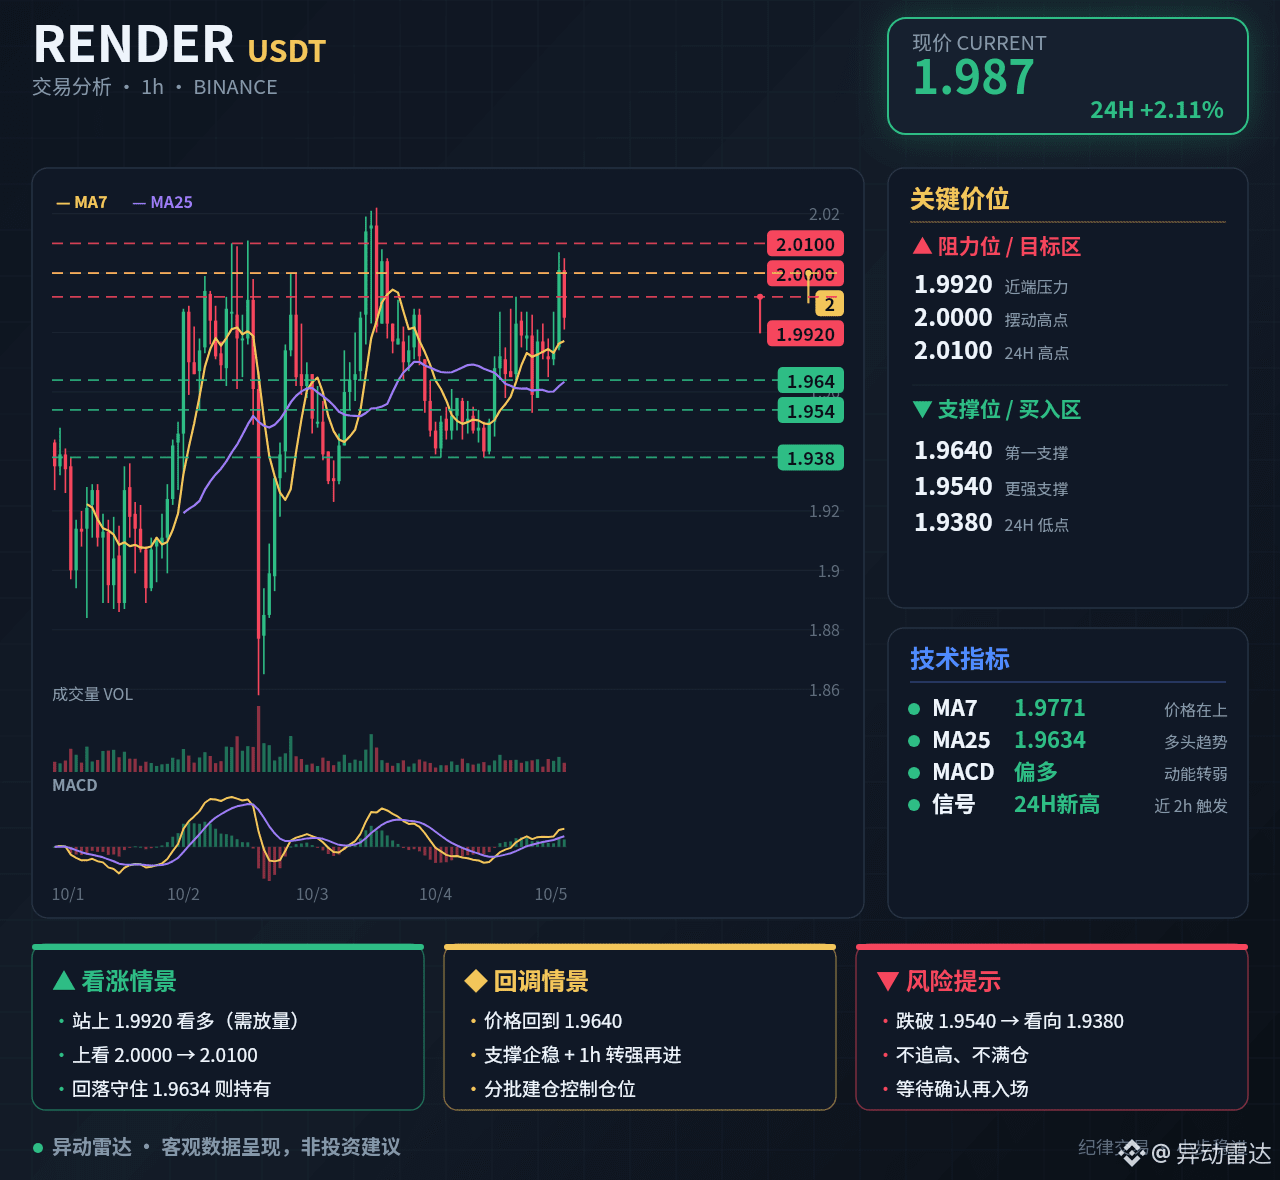
$RENDER 24H Trade executed: 13.32 million (+0.8%). The order book is thin; don’t take too heavy a position
💰 RENDER 1.9870 Bullish
🟢 Hold at 2.0000
Target 2.0100 / 2.0185 / 2.0270
Stop-loss 1.9640
🧠 Market view: Bullish. The large-holder long-vs-short ratio is 2.41, overwhelmingly accumulating chips. A “passive-to-active” execution ratio of 0.88 is seen—an abrupt pullback before the breakout on the right side. Price broke through 2.0050 and made a new high. The funding rate remains +0.0050%; the longs are building momentum, and the reflexive squeeze forces shorts higher. ATR is only 0.02136, with volatility compressed to the extreme—an imminent trigger on the right side, touch-and-go.
—
🕒 Data from 10-05 11:30 (UTC+8) · Levels based on the 1h candlestick chart · Binance futures market—verify on your own
Presented factual data only; not investment advice—manage risk.
#RENDER
$RENDER 24H Trade executed: 13.32 million (+0.8%). The order book is thin; don’t take too heavy a position
💰 RENDER 1.9870 Bullish
🟢 Hold at 2.0000
Target 2.0100 / 2.0185 / 2.0270
Stop-loss 1.9640
🧠 Market view: Bullish. The large-holder long-vs-short ratio is 2.41, overwhelmingly accumulating chips. A “passive-to-active” execution ratio of 0.88 is seen—an abrupt pullback before the breakout on the right side. Price broke through 2.0050 and made a new high. The funding rate remains +0.0050%; the longs are building momentum, and the reflexive squeeze forces shorts higher. ATR is only 0.02136, with volatility compressed to the extreme—an imminent trigger on the right side, touch-and-go.
—
🕒 Data from 10-05 11:30 (UTC+8) · Levels based on the 1h candlestick chart · Binance futures market—verify on your own
Presented factual data only; not investment advice—manage risk.
#RENDER
💰 RENDER 1.9870 Bullish
🟢 Hold at 2.0000
Target 2.0100 / 2.0185 / 2.0270
Stop-loss 1.9640
🧠 Market view: Bullish. The large-holder long-vs-short ratio is 2.41, overwhelmingly accumulating chips. A “passive-to-active” execution ratio of 0.88 is seen—an abrupt pullback before the breakout on the right side. Price broke through 2.0050 and made a new high. The funding rate remains +0.0050%; the longs are building momentum, and the reflexive squeeze forces shorts higher. ATR is only 0.02136, with volatility compressed to the extreme—an imminent trigger on the right side, touch-and-go.
—
🕒 Data from 10-05 11:30 (UTC+8) · Levels based on the 1h candlestick chart · Binance futures market—verify on your own
Presented factual data only; not investment advice—manage risk.
#RENDER
2

⚡ 3 Crypto Charts to Check Before Your Next Trading Decision!
$RENDER $FET $TAO
A strong watchlist is built around clear conditions, not hype. These three assets can be monitored for potential technical setups.
🔍 RENDER: Watch volume expansion near resistance and whether price can sustain a breakout.
🔍 FET: Monitor support and resistance for signs of a developing trend change. Avoid relying on one candle alone.
🔍 TAO: Track volatility and market structure. A breakout that holds after a retest offers more confirmation than a sudden spike.
🎯 Key Takeaway: Wait for price action to support your trading idea, and keep position risk under control.
#RENDER #FET #TAO
{future}(TAOUSDT)
{future}(RENDERUSDT)
{future}(FETUSDT)
⚡ 3 Crypto Charts to Check Before Your Next Trading Decision!
$RENDER $FET $TAO
A strong watchlist is built around clear conditions, not hype. These three assets can be monitored for potential technical setups.
🔍 RENDER: Watch volume expansion near resistance and whether price can sustain a breakout.
🔍 FET: Monitor support and resistance for signs of a developing trend change. Avoid relying on one candle alone.
🔍 TAO: Track volatility and market structure. A breakout that holds after a retest offers more confirmation than a sudden spike.
🎯 Key Takeaway: Wait for price action to support your trading idea, and keep position risk under control.
#RENDER #FET #TAO
$RENDER $FET $TAO
A strong watchlist is built around clear conditions, not hype. These three assets can be monitored for potential technical setups.
🔍 RENDER: Watch volume expansion near resistance and whether price can sustain a breakout.
🔍 FET: Monitor support and resistance for signs of a developing trend change. Avoid relying on one candle alone.
🔍 TAO: Track volatility and market structure. A breakout that holds after a retest offers more confirmation than a sudden spike.
🎯 Key Takeaway: Wait for price action to support your trading idea, and keep position risk under control.
#RENDER #FET #TAO
47

·
--
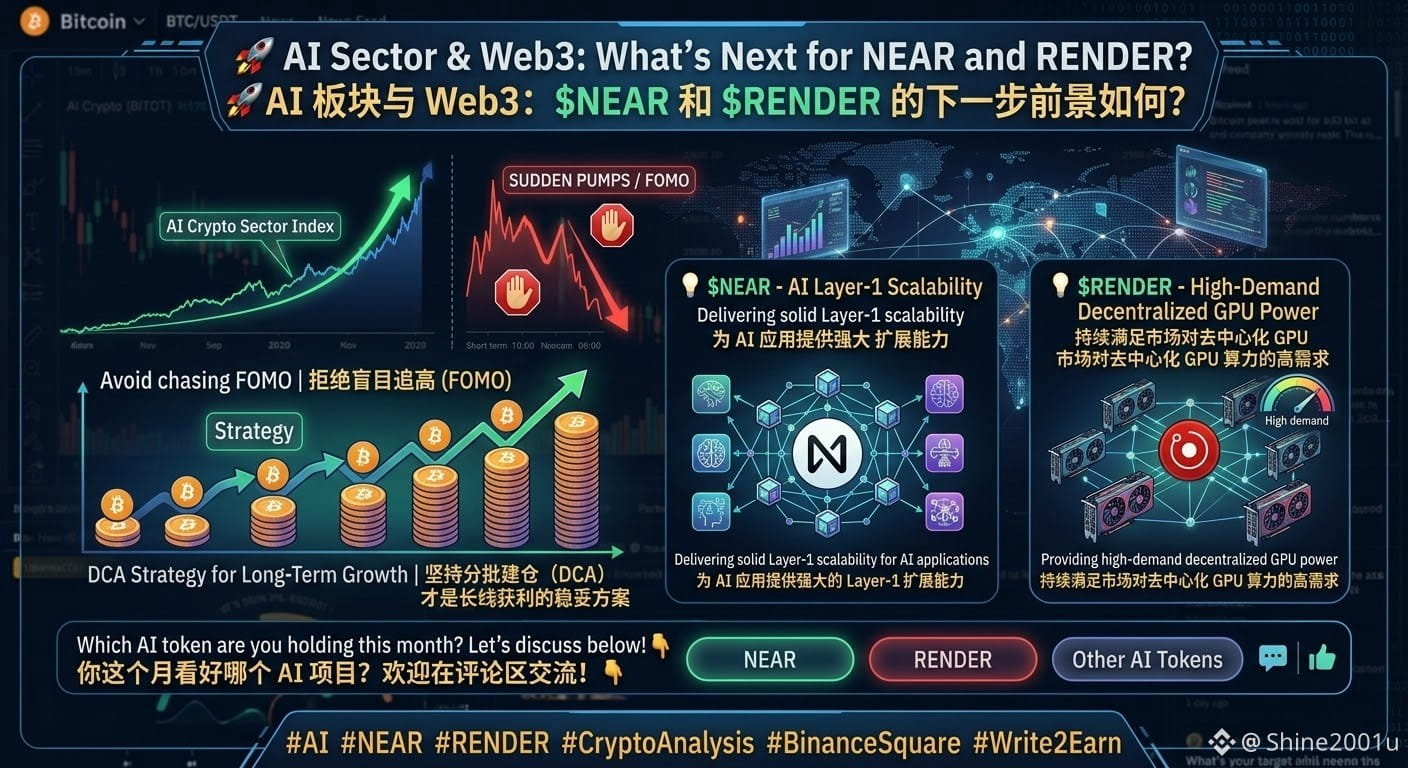
🚀 AI Sector & Web3: What’s Next for NEAR andRENDER?
The momentum in the AI crypto sector continues to show long-term strength. Decentralized computing and data management are becoming essential for Web3 infrastructure.
💡 Key Takeaways:
• $NEAR is delivering solid Layer-1 scalability for AI applications.
• $RENDER is providing high-demand decentralized GPU power.
🎯 Strategy: Avoid chasing sudden pumps (FOMO). A disciplined Dollar-Cost Averaging (DCA) strategy remains the safest path for long-term growth.
Which AI token are you holding this month? Let’s discuss below! 👇
🚀 AI Sector & Web3: What’s next for $NEAR and $RENDER?
The long-term potential of the AI crypto sector remains extremely strong. Decentralized compute power and data management are becoming an indispensable part of Web3 infrastructure.
💡 Key Highlights:
• $NEAR offers strong Layer-1 scaling capabilities for AI applications.
• $RENDER continues to meet the market’s high demand for decentralized GPU compute power.
🎯 Strategy Recommendation: Don’t blindly chase rallies (FOMO). Sticking to a staggered entry strategy (DCA) is the steady and reliable approach for long-term profits.
Which AI project are you bullish on this month? Feel free to share in the comments!👇
#ai #Near #render #CryptoAnalysis" #BinanceSquare #Write2Earn
🚀 AI Sector & Web3: What’s Next for NEAR andRENDER?
The momentum in the AI crypto sector continues to show long-term strength. Decentralized computing and data management are becoming essential for Web3 infrastructure.
💡 Key Takeaways:
• $NEAR is delivering solid Layer-1 scalability for AI applications.
• $RENDER is providing high-demand decentralized GPU power.
🎯 Strategy: Avoid chasing sudden pumps (FOMO). A disciplined Dollar-Cost Averaging (DCA) strategy remains the safest path for long-term growth.
Which AI token are you holding this month? Let’s discuss below! 👇
🚀 AI Sector & Web3: What’s next for $NEAR and $RENDER?
The long-term potential of the AI crypto sector remains extremely strong. Decentralized compute power and data management are becoming an indispensable part of Web3 infrastructure.
💡 Key Highlights:
• $NEAR offers strong Layer-1 scaling capabilities for AI applications.
• $RENDER continues to meet the market’s high demand for decentralized GPU compute power.
🎯 Strategy Recommendation: Don’t blindly chase rallies (FOMO). Sticking to a staggered entry strategy (DCA) is the steady and reliable approach for long-term profits.
Which AI project are you bullish on this month? Feel free to share in the comments!👇
#ai #Near #render #CryptoAnalysis" #BinanceSquare #Write2Earn
The momentum in the AI crypto sector continues to show long-term strength. Decentralized computing and data management are becoming essential for Web3 infrastructure.
💡 Key Takeaways:
• $NEAR is delivering solid Layer-1 scalability for AI applications.
• $RENDER is providing high-demand decentralized GPU power.
🎯 Strategy: Avoid chasing sudden pumps (FOMO). A disciplined Dollar-Cost Averaging (DCA) strategy remains the safest path for long-term growth.
Which AI token are you holding this month? Let’s discuss below! 👇
🚀 AI Sector & Web3: What’s next for $NEAR and $RENDER?
The long-term potential of the AI crypto sector remains extremely strong. Decentralized compute power and data management are becoming an indispensable part of Web3 infrastructure.
💡 Key Highlights:
• $NEAR offers strong Layer-1 scaling capabilities for AI applications.
• $RENDER continues to meet the market’s high demand for decentralized GPU compute power.
🎯 Strategy Recommendation: Don’t blindly chase rallies (FOMO). Sticking to a staggered entry strategy (DCA) is the steady and reliable approach for long-term profits.
Which AI project are you bullish on this month? Feel free to share in the comments!👇
#ai #Near #render #CryptoAnalysis" #BinanceSquare #Write2Earn
558

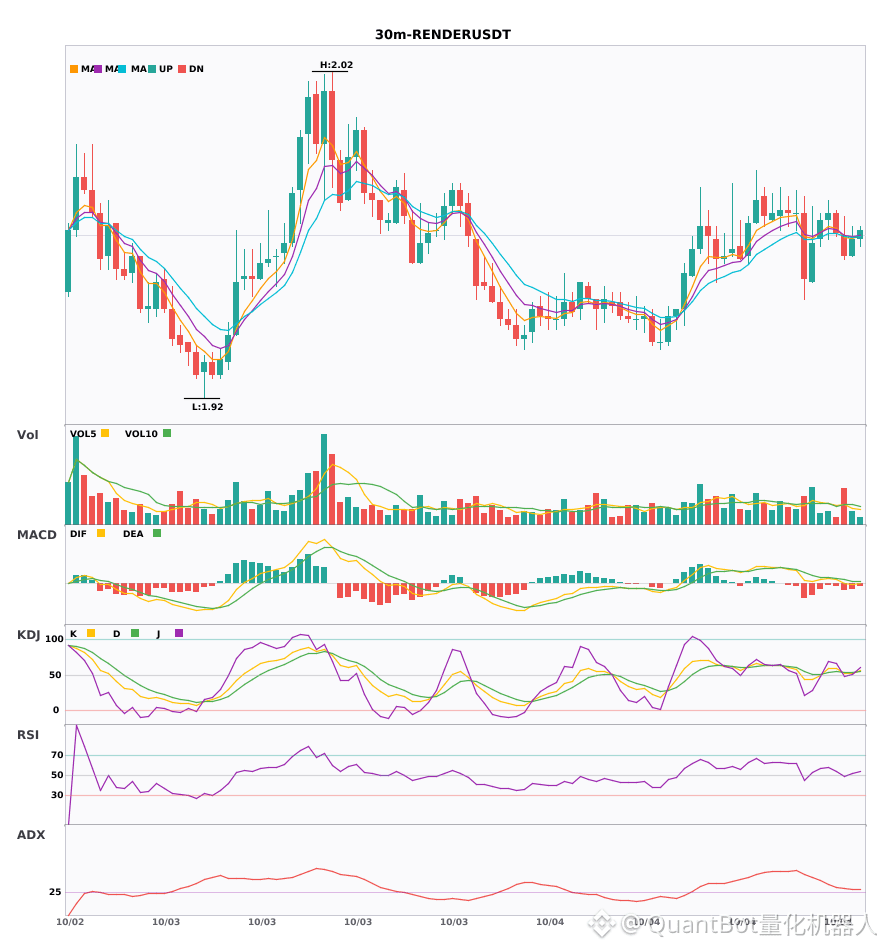
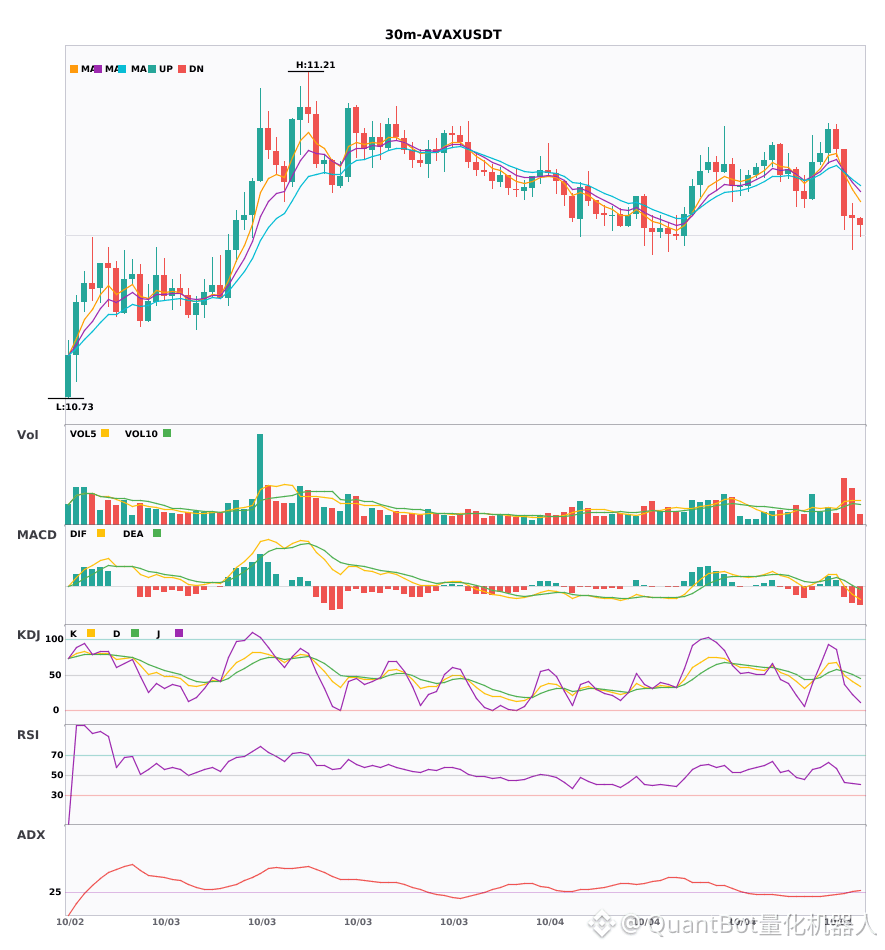
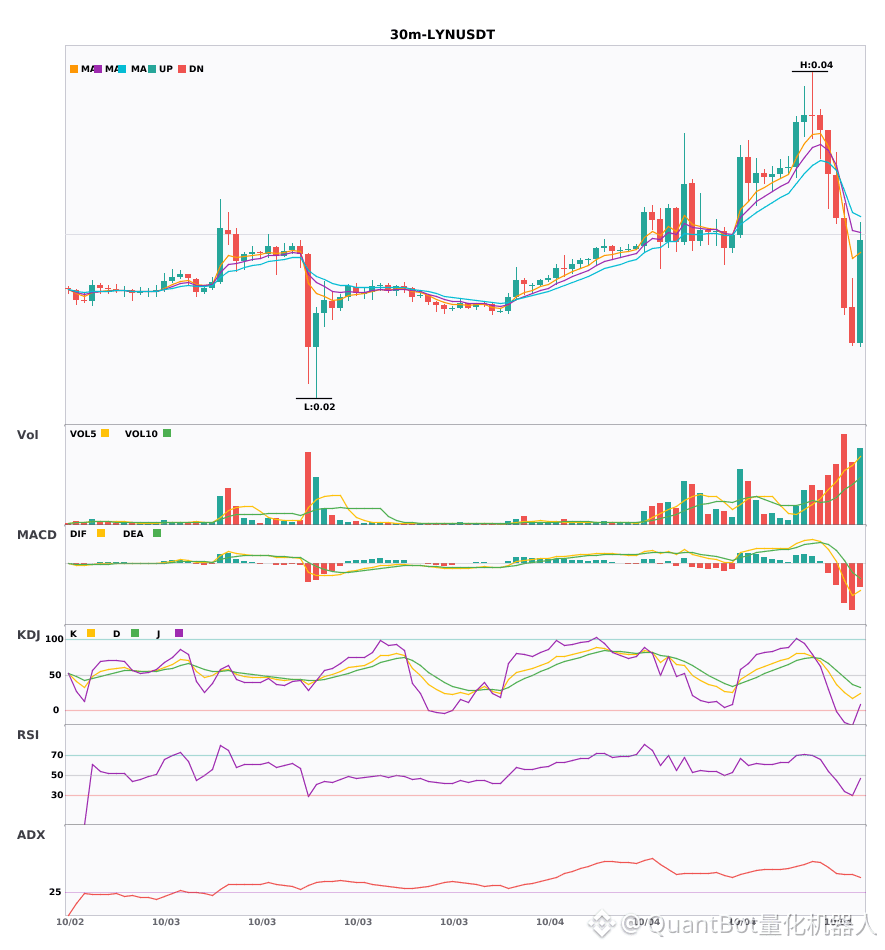
30-minute Quantitative Short Warning: RENDER/AVAX/LYN
📉 $RENDER | 30-minute Short Signal
━━━━━━━━━━━━━━━━━━
Technical Analysis: ADX(31) indicates a significant trend; DIF breaks below the zero axis and turns bearish; moving averages converge and build up momentum; KDJ is slightly bullish (52.8/53.6); volume expands by 1.8x.
Price Change: 0.2500%
📉 $AVAX | 30-minute Short Signal
━━━━━━━━━━━━━━━━━━
Technical Analysis: ADX(28) shows the trend is taking shape and has conditions for entry; MACD is running bearish—trend is weak but momentum is rising; EMA5/8/13 are in a bearish alignment; trading volume increases markedly to 2.5x.
Price Change: -0.0200%
📉 $LYN | 30-minute Short Signal
━━━━━━━━━━━━━━━━━━
Technical Analysis: ADX45 trend; DIF breaks below zero and turns bearish; EMA5/8/13 are in a bearish alignment; KDJ is weak K25.6 D46.4; volume is 2.6x
Price Change: -13.6100%
━━━━━━━━━━━━━━━━━━
#技术分析 #RENDER #AVAX #LYN
📌 The above content is for reference only and does not constitute investment advice
30-minute Quantitative Short Warning: RENDER/AVAX/LYN
📉 $RENDER | 30-minute Short Signal
━━━━━━━━━━━━━━━━━━
Technical Analysis: ADX(31) indicates a significant trend; DIF breaks below the zero axis and turns bearish; moving averages converge and build up momentum; KDJ is slightly bullish (52.8/53.6); volume expands by 1.8x.
Price Change: 0.2500%
📉 $AVAX | 30-minute Short Signal
━━━━━━━━━━━━━━━━━━
Technical Analysis: ADX(28) shows the trend is taking shape and has conditions for entry; MACD is running bearish—trend is weak but momentum is rising; EMA5/8/13 are in a bearish alignment; trading volume increases markedly to 2.5x.
Price Change: -0.0200%
📉 $LYN | 30-minute Short Signal
━━━━━━━━━━━━━━━━━━
Technical Analysis: ADX45 trend; DIF breaks below zero and turns bearish; EMA5/8/13 are in a bearish alignment; KDJ is weak K25.6 D46.4; volume is 2.6x
Price Change: -13.6100%
━━━━━━━━━━━━━━━━━━
#技术分析 #RENDER #AVAX #LYN
📌 The above content is for reference only and does not constitute investment advice
📉 $RENDER | 30-minute Short Signal
━━━━━━━━━━━━━━━━━━
Technical Analysis: ADX(31) indicates a significant trend; DIF breaks below the zero axis and turns bearish; moving averages converge and build up momentum; KDJ is slightly bullish (52.8/53.6); volume expands by 1.8x.
Price Change: 0.2500%
📉 $AVAX | 30-minute Short Signal
━━━━━━━━━━━━━━━━━━
Technical Analysis: ADX(28) shows the trend is taking shape and has conditions for entry; MACD is running bearish—trend is weak but momentum is rising; EMA5/8/13 are in a bearish alignment; trading volume increases markedly to 2.5x.
Price Change: -0.0200%
📉 $LYN | 30-minute Short Signal
━━━━━━━━━━━━━━━━━━
Technical Analysis: ADX45 trend; DIF breaks below zero and turns bearish; EMA5/8/13 are in a bearish alignment; KDJ is weak K25.6 D46.4; volume is 2.6x
Price Change: -13.6100%
━━━━━━━━━━━━━━━━━━
#技术分析 #RENDER #AVAX #LYN
📌 The above content is for reference only and does not constitute investment advice
169

·
--
How to see this?
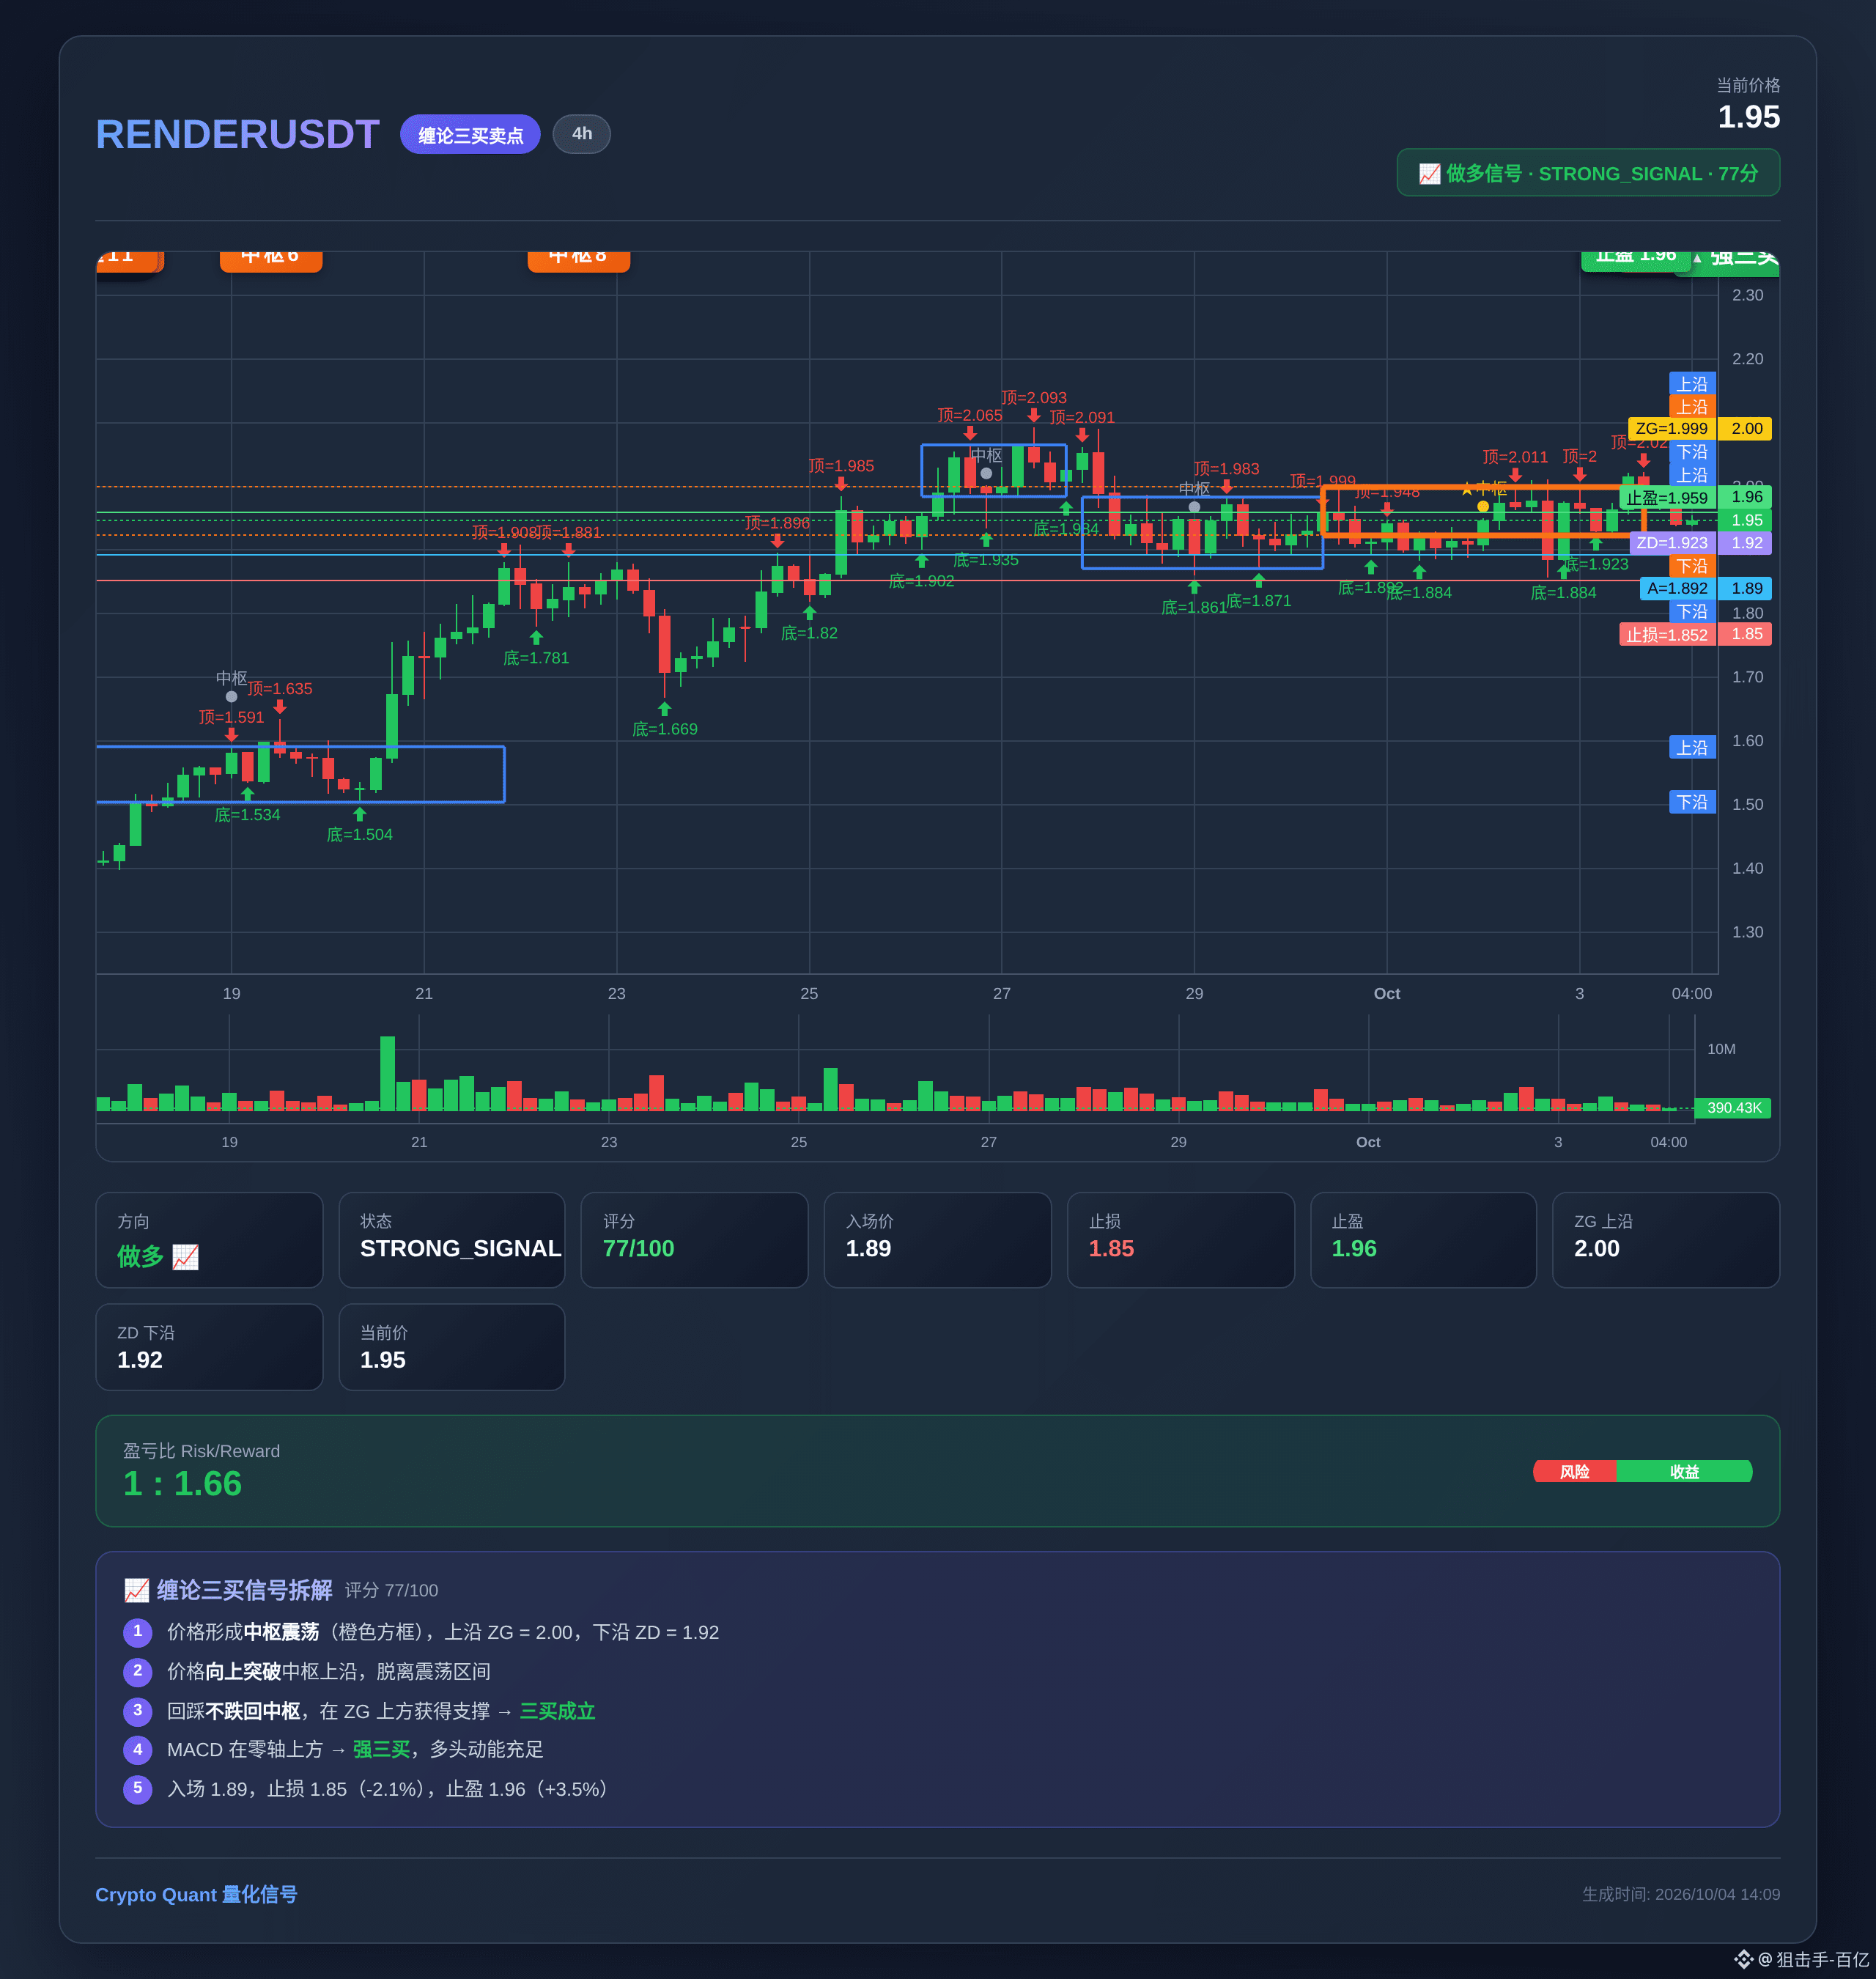
💡 What is Chan Theory Three Buys? Today $RENDER will demonstrate it for you
Today, $RENDER issued a standard Chan Theory Three Buys signal. Let’s break it down for everyone:
1️⃣ Price structure: Chan Theory Three Buys forms
2️⃣ Entry price: 1.8920
3️⃣ Stop-loss price: 1.8517
4️⃣ Take-profit price: 1.9590
Risk-reward ratio is 1.66:1—only those who know understand 👀
Save it and study it slowly 📌
Follow me—learn one trading technique every day ✨
#RENDER #技术分析 #缠论交易 #韭菜 #go-all-in
How to see this?
💡 What is Chan Theory Three Buys? Today $RENDER will demonstrate it for you
Today, $RENDER issued a standard Chan Theory Three Buys signal. Let’s break it down for everyone:
1️⃣ Price structure: Chan Theory Three Buys forms
2️⃣ Entry price: 1.8920
3️⃣ Stop-loss price: 1.8517
4️⃣ Take-profit price: 1.9590
Risk-reward ratio is 1.66:1—only those who know understand 👀
Save it and study it slowly 📌
Follow me—learn one trading technique every day ✨
#RENDER #技术分析 #缠论交易 #韭菜 #go-all-in
💡 What is Chan Theory Three Buys? Today $RENDER will demonstrate it for you
Today, $RENDER issued a standard Chan Theory Three Buys signal. Let’s break it down for everyone:
1️⃣ Price structure: Chan Theory Three Buys forms
2️⃣ Entry price: 1.8920
3️⃣ Stop-loss price: 1.8517
4️⃣ Take-profit price: 1.9590
Risk-reward ratio is 1.66:1—only those who know understand 👀
Save it and study it slowly 📌
Follow me—learn one trading technique every day ✨
#RENDER #技术分析 #缠论交易 #韭菜 #go-all-in

12

·
--
RENDER signal to local Buy 🚀
We’re capturing an upward hourly trend with confirmed BULLISH_BOS and a green Heikin Ashi structure against the complete absence of bearish walls. The order book imbalance is on the buyers’ side (53.8%), so we enter with a limit order on the pullback to the 15m/1h Bull OB zone.
Entry point: 1.965$
TP💵: 2.0240$ (+3%)
SL🙊: 1.9257$
⚠️ I emphasize that using a stop-loss is mandatory to preserve your capital in a volatile market! This information is not financial advice. Do your own analysis. If you like the channel, please subscribe—I’ll be grateful for tips.
$RENDER #RENDER
RENDER signal to local Buy 🚀
We’re capturing an upward hourly trend with confirmed BULLISH_BOS and a green Heikin Ashi structure against the complete absence of bearish walls. The order book imbalance is on the buyers’ side (53.8%), so we enter with a limit order on the pullback to the 15m/1h Bull OB zone.
Entry point: 1.965$
TP💵: 2.0240$ (+3%)
SL🙊: 1.9257$
⚠️ I emphasize that using a stop-loss is mandatory to preserve your capital in a volatile market! This information is not financial advice. Do your own analysis. If you like the channel, please subscribe—I’ll be grateful for tips.
$RENDER #RENDER
We’re capturing an upward hourly trend with confirmed BULLISH_BOS and a green Heikin Ashi structure against the complete absence of bearish walls. The order book imbalance is on the buyers’ side (53.8%), so we enter with a limit order on the pullback to the 15m/1h Bull OB zone.
Entry point: 1.965$
TP💵: 2.0240$ (+3%)
SL🙊: 1.9257$
⚠️ I emphasize that using a stop-loss is mandatory to preserve your capital in a volatile market! This information is not financial advice. Do your own analysis. If you like the channel, please subscribe—I’ll be grateful for tips.
$RENDER #RENDER
61

·
--
Bearish
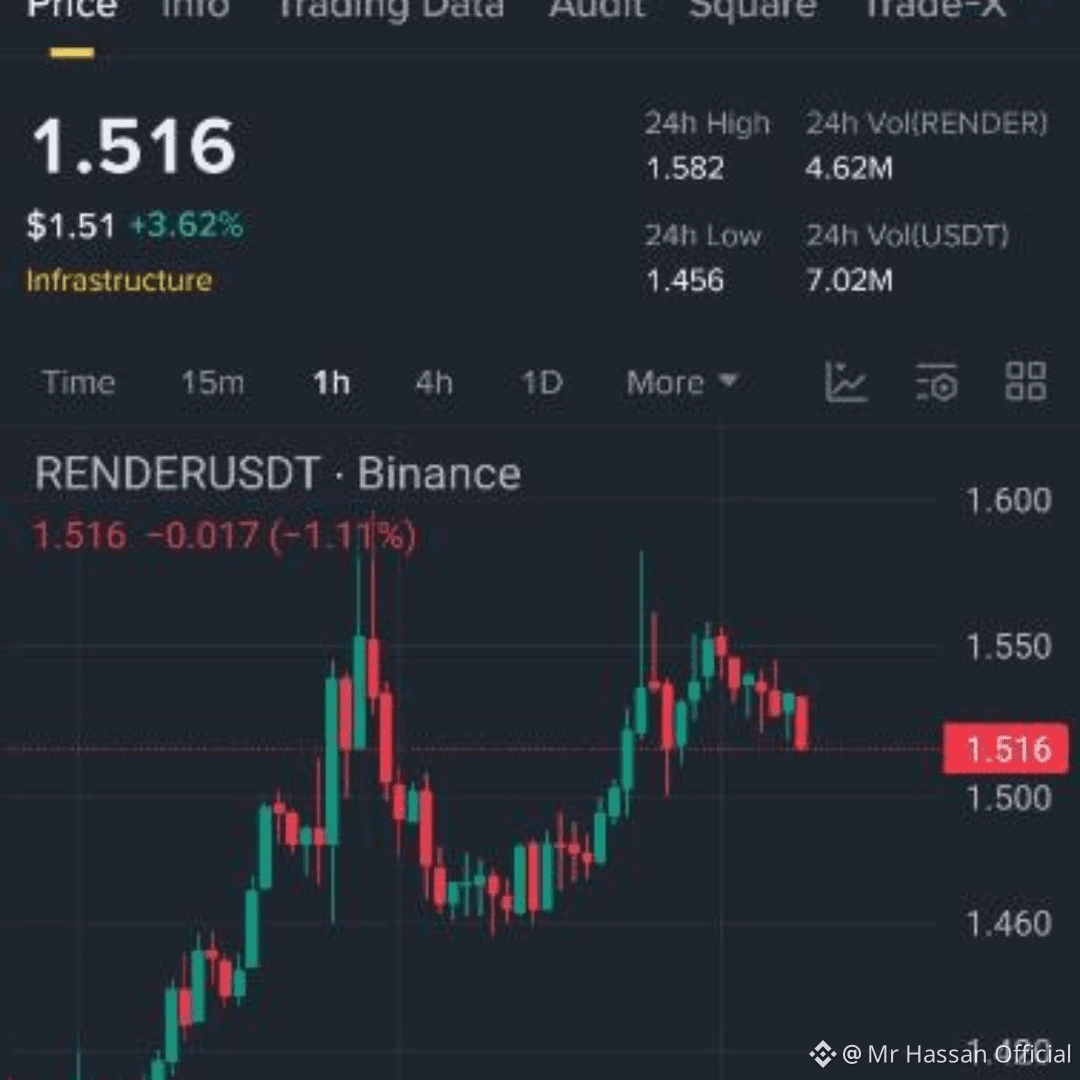
$RENDER trades at approximately $1.92 USD, down about 3.18% over the past 24 hours, with a market capitalization near $999.32 million.
Key Market Metrics
Current Price: ~$1.92 USD
24-Hour Trading Volume: ~$38M to $91M USD
All-Time High: $13.83 USD (March 16, 2024)
Network & Category: Solana (SOL) AI and DePIN (Decentralized Physical Infrastructure Network) token
Short Analysis & Technical Outlook
Fundamentals: $RENDER benefits from ongoing demand for decentralized GPU rendering, AI workloads, and machine-learning compute needs. Recently, the Taiwan exchange MAX added USDT support on Aptos with $RENDER trading, through immediate volume saw a brief cooling period.
Technical Levels:
Support Zones: Major baseline support sits around $1.10 _$1.20 USD, with a broader floor near $0.50_$0.55 USD.
Resistance Zones: Immediate overhead resistance is found near $2.00 USD and $2.50 USD, with longer-term reclaims eyeing higher channel targets.
Market Sentiment: Technical indicators and moving averages remain largely neutral to short -term cautious, reflecting broader consolidation after past volatility. #RENDER #RenderNetwork #DePIN #Altcoins #BinanceSquare [RENDER](https://www.binance.com/en/trade/RENDER_USDT.)
{spot}(RENDERUSDT)
$RENDER trades at approximately $1.92 USD, down about 3.18% over the past 24 hours, with a market capitalization near $999.32 million.
Key Market Metrics
Current Price: ~$1.92 USD
24-Hour Trading Volume: ~$38M to $91M USD
All-Time High: $13.83 USD (March 16, 2024)
Network & Category: Solana (SOL) AI and DePIN (Decentralized Physical Infrastructure Network) token
Short Analysis & Technical Outlook
Fundamentals: $RENDER benefits from ongoing demand for decentralized GPU rendering, AI workloads, and machine-learning compute needs. Recently, the Taiwan exchange MAX added USDT support on Aptos with $RENDER trading, through immediate volume saw a brief cooling period.
Technical Levels:
Support Zones: Major baseline support sits around $1.10 _$1.20 USD, with a broader floor near $0.50_$0.55 USD.
Resistance Zones: Immediate overhead resistance is found near $2.00 USD and $2.50 USD, with longer-term reclaims eyeing higher channel targets.
Market Sentiment: Technical indicators and moving averages remain largely neutral to short -term cautious, reflecting broader consolidation after past volatility. #RENDER #RenderNetwork #DePIN #Altcoins #BinanceSquare RENDER
Key Market Metrics
Current Price: ~$1.92 USD
24-Hour Trading Volume: ~$38M to $91M USD
All-Time High: $13.83 USD (March 16, 2024)
Network & Category: Solana (SOL) AI and DePIN (Decentralized Physical Infrastructure Network) token
Short Analysis & Technical Outlook
Fundamentals: $RENDER benefits from ongoing demand for decentralized GPU rendering, AI workloads, and machine-learning compute needs. Recently, the Taiwan exchange MAX added USDT support on Aptos with $RENDER trading, through immediate volume saw a brief cooling period.
Technical Levels:
Support Zones: Major baseline support sits around $1.10 _$1.20 USD, with a broader floor near $0.50_$0.55 USD.
Resistance Zones: Immediate overhead resistance is found near $2.00 USD and $2.50 USD, with longer-term reclaims eyeing higher channel targets.
Market Sentiment: Technical indicators and moving averages remain largely neutral to short -term cautious, reflecting broader consolidation after past volatility. #RENDER #RenderNetwork #DePIN #Altcoins #BinanceSquare RENDER
152
·
--
Bullish
⚡ Looking for Your Next Trading Setup? Put These 3 Tokens on the Radar!
$RENDER $FET $TAO
High-interest crypto assets can move sharply in either direction. A disciplined approach helps you separate a possible setup from market noise.
📈 RENDER: Track volume expansion and resistance levels to see whether momentum is building.
📈 FET: Watch for a confirmed change in trend structure rather than relying on a single green candle.
📈 TAO: Monitor volatility and key price levels. A breakout becomes more meaningful when price holds above the broken zone.
🎯 Key Takeaway: Wait for price action and volume to support your trading thesis. No setup guarantees a profitable result.
#RENDER #FET #TAO
{future}(FETUSDT)
{future}(TAOUSDT)
{future}(RENDERUSDT)
⚡ Looking for Your Next Trading Setup? Put These 3 Tokens on the Radar!
$RENDER $FET $TAO
High-interest crypto assets can move sharply in either direction. A disciplined approach helps you separate a possible setup from market noise.
📈 RENDER: Track volume expansion and resistance levels to see whether momentum is building.
📈 FET: Watch for a confirmed change in trend structure rather than relying on a single green candle.
📈 TAO: Monitor volatility and key price levels. A breakout becomes more meaningful when price holds above the broken zone.
🎯 Key Takeaway: Wait for price action and volume to support your trading thesis. No setup guarantees a profitable result.
#RENDER #FET #TAO
$RENDER $FET $TAO
High-interest crypto assets can move sharply in either direction. A disciplined approach helps you separate a possible setup from market noise.
📈 RENDER: Track volume expansion and resistance levels to see whether momentum is building.
📈 FET: Watch for a confirmed change in trend structure rather than relying on a single green candle.
📈 TAO: Monitor volatility and key price levels. A breakout becomes more meaningful when price holds above the broken zone.
🎯 Key Takeaway: Wait for price action and volume to support your trading thesis. No setup guarantees a profitable result.
#RENDER #FET #TAO

1
44

·
--
AI AND BLOCKCHAIN: WHAT'S NEXT?
$RENDER — Watch whether renewed interest in decentralized computing translates into stronger token demand.
$FET — Artificial intelligence developments may influence sentiment toward AI-related crypto assets.
$ICP — Internet Computer traders should monitor ecosystem activity alongside technical price movements.
Will AI-related cryptocurrencies attract renewed market interest?
NFA. DYOR.
#RENDER #FET #ICP #AICrypto #BinanceSquare
AI AND BLOCKCHAIN: WHAT'S NEXT?
$RENDER — Watch whether renewed interest in decentralized computing translates into stronger token demand.
$FET — Artificial intelligence developments may influence sentiment toward AI-related crypto assets.
$ICP — Internet Computer traders should monitor ecosystem activity alongside technical price movements.
Will AI-related cryptocurrencies attract renewed market interest?
NFA. DYOR.
#RENDER #FET #ICP #AICrypto #BinanceSquare
$RENDER — Watch whether renewed interest in decentralized computing translates into stronger token demand.
$FET — Artificial intelligence developments may influence sentiment toward AI-related crypto assets.
$ICP — Internet Computer traders should monitor ecosystem activity alongside technical price movements.
Will AI-related cryptocurrencies attract renewed market interest?
NFA. DYOR.
#RENDER #FET #ICP #AICrypto #BinanceSquare

4
724
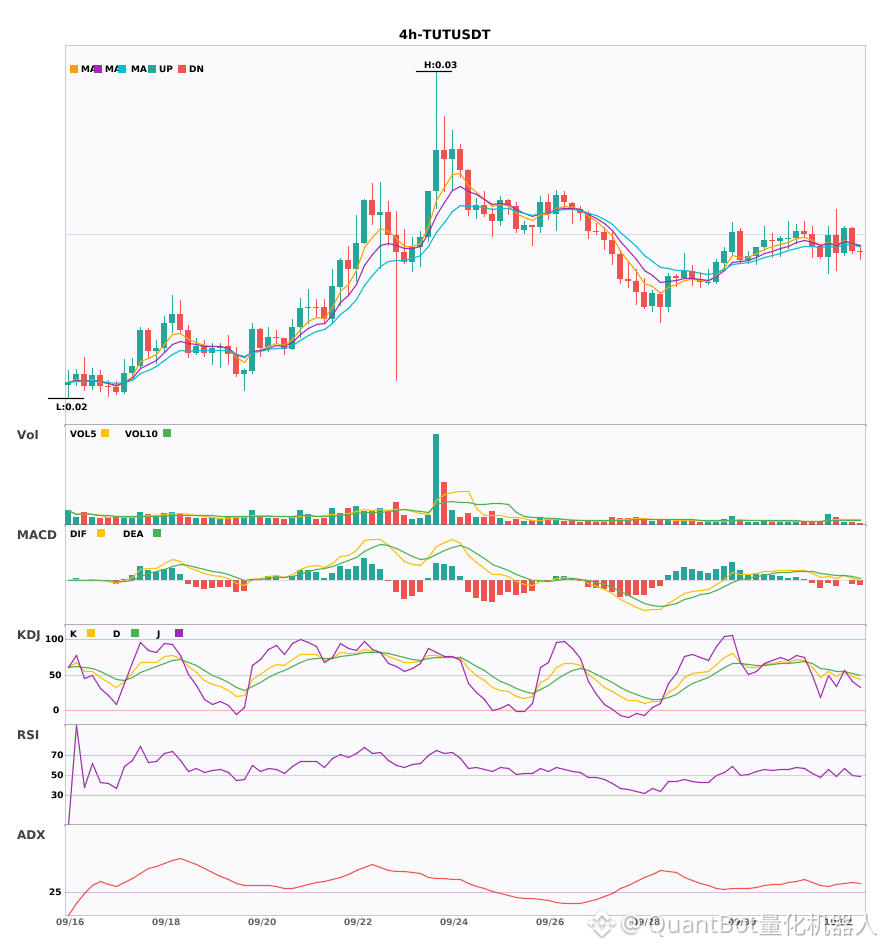
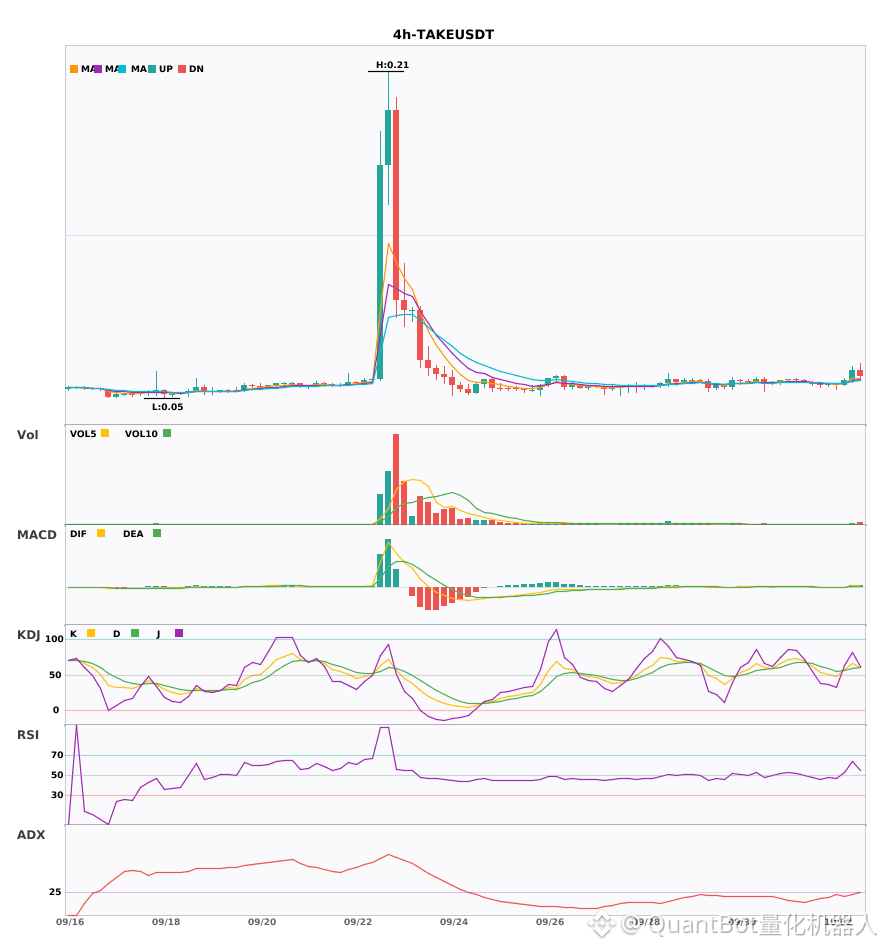
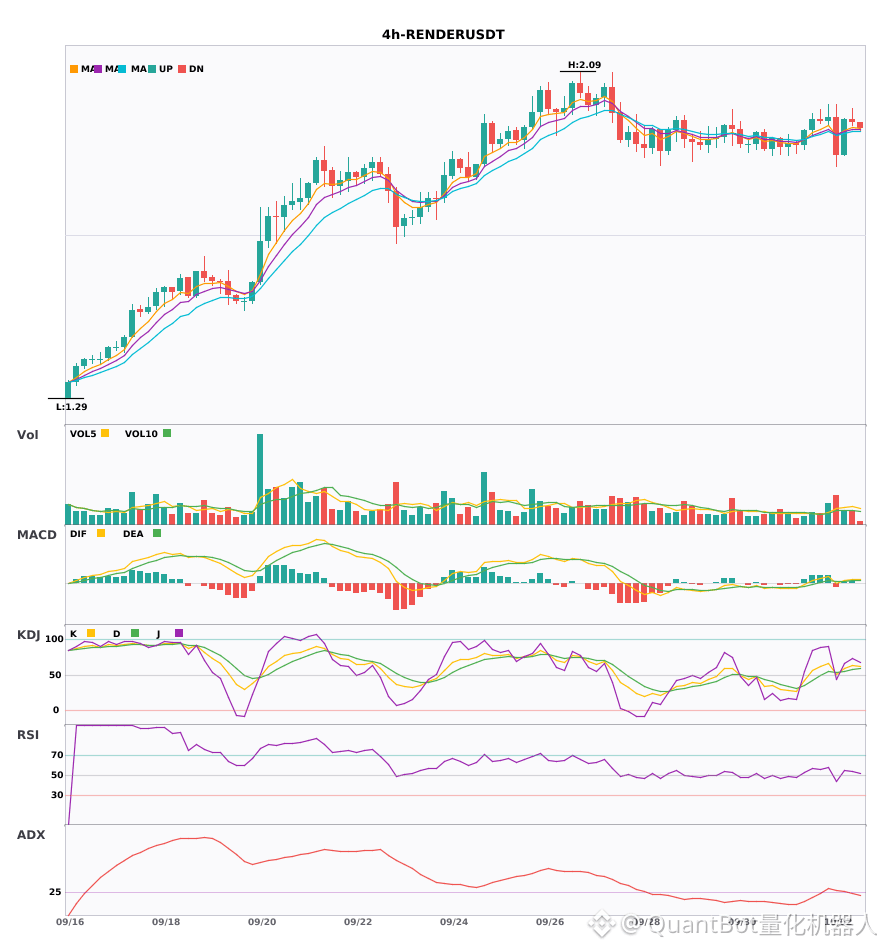
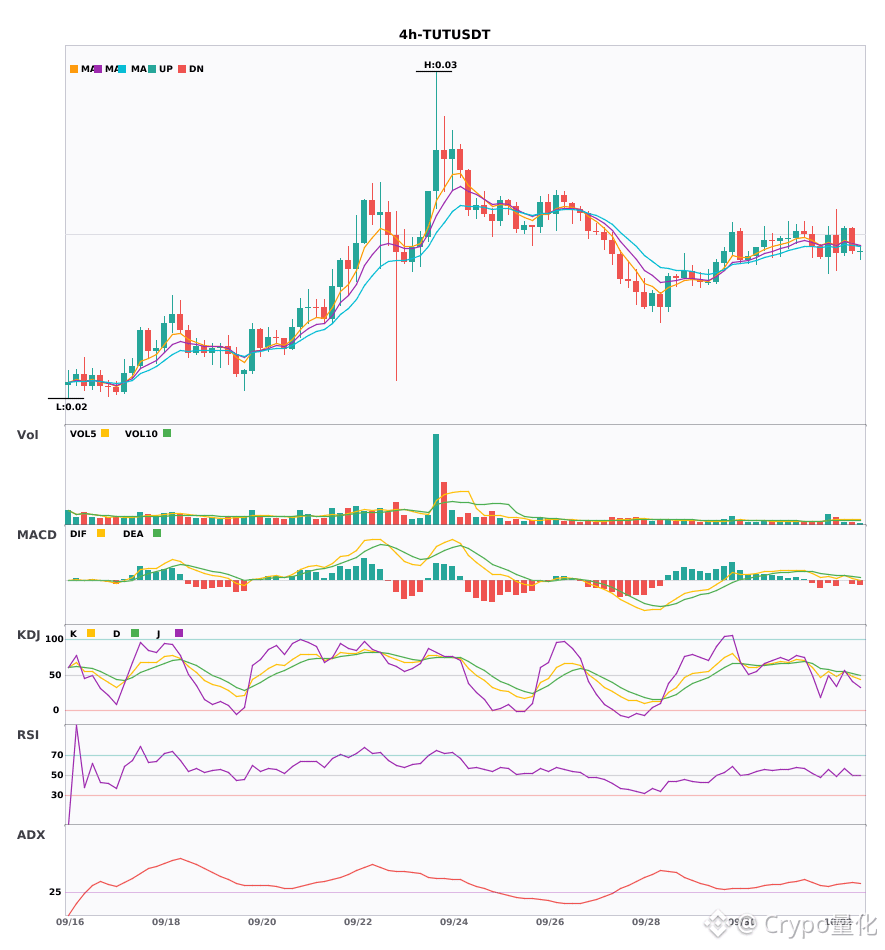
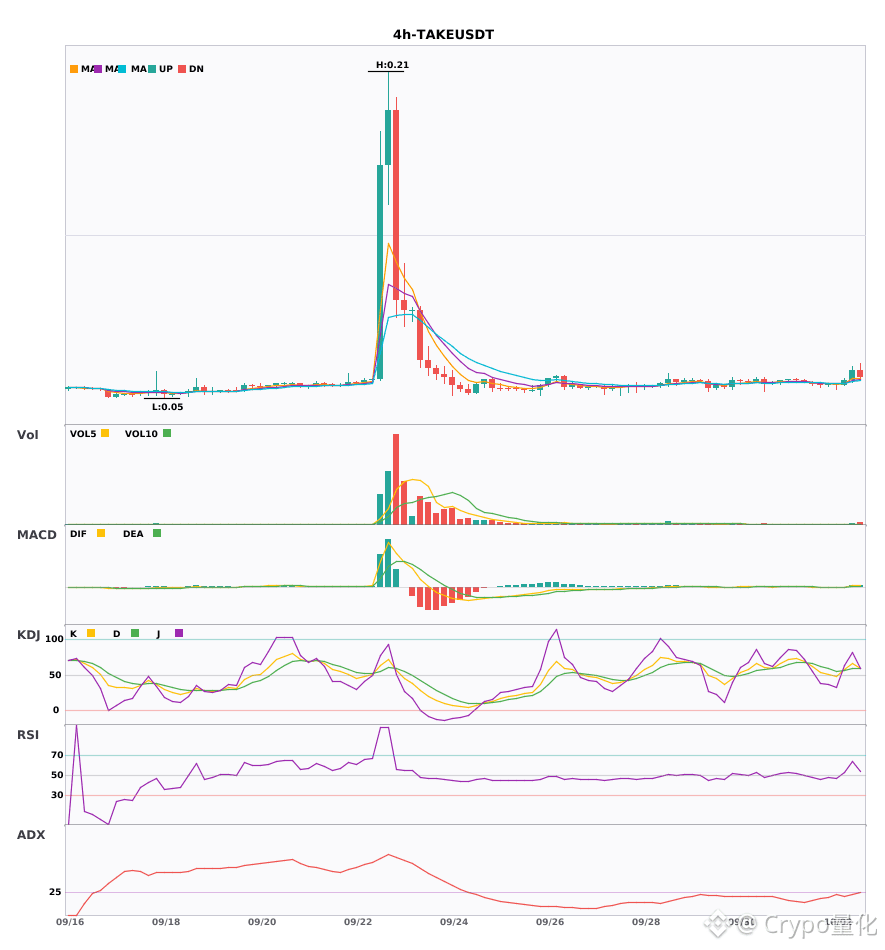
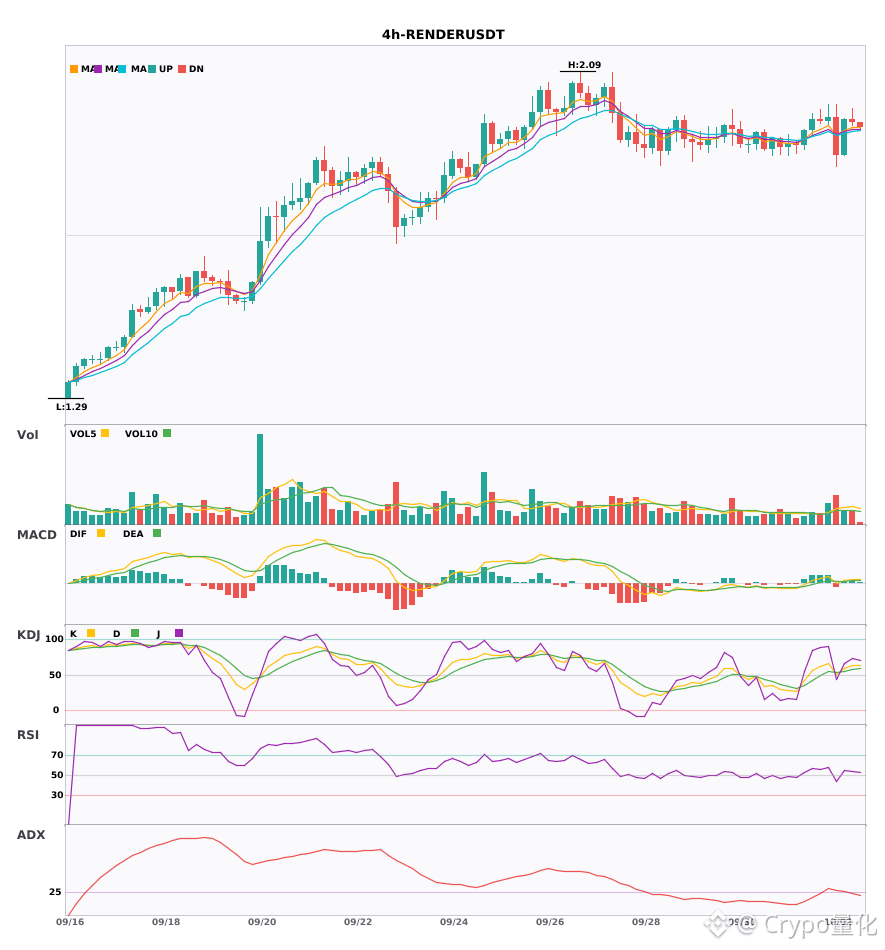
$TUT/$TAKE/$RENDER 4H Technical Indicators Convergence Strengthening; Assessing the Strength of Upward Momentum
📈 $TUT | 4-hour Bullish Signal
━━━━━━━━━━━━━━━━━━
Technical Analysis: ADX(37) clear trend; MACD golden cross above zero; EMA5 crosses above EMA8; KDJ golden cross (K55.1/D54.6); volume expands 1.6x, bullish in the short term.
Price Change: 3.2200%
📈 $TAKE | 4-hour Bullish Signal
━━━━━━━━━━━━━━━━━━
Technical Analysis: ADX(26) trend taking shape; set up entries | MACD DIF breaks above the zero axis and turns bullish | EMA5 crosses above EMA8 (short-term bullish) | KDJ bullish dominance (K66.7/D59.6) | volume expands 2.6x
Price Change: 8.5700%
📈 $RENDER | 4-hour Bullish Signal
━━━━━━━━━━━━━━━━━━
Technical Analysis: ADX(30) trend formed, can participate; MACD golden cross above zero; EMA5 crosses above EMA8, KDJ golden cross turns bullish; volume up 2.1x.
Price Change: 4.7200%
━━━━━━━━━━━━━━━━━━
#技术分析 #TUT #TAKE #RENDER
📌 The above content is for reference only and does not constitute investment advice
$TUT /$TAKE /$RENDER 4H Technical Indicators Convergence Strengthening; Assessing the Strength of Upward Momentum
📈 $TUT | 4-hour Bullish Signal
━━━━━━━━━━━━━━━━━━
Technical Analysis: ADX(37) clear trend; MACD golden cross above zero; EMA5 crosses above EMA8; KDJ golden cross (K55.1/D54.6); volume expands 1.6x, bullish in the short term.
Price Change: 3.2200%
📈 $TAKE | 4-hour Bullish Signal
━━━━━━━━━━━━━━━━━━
Technical Analysis: ADX(26) trend taking shape; set up entries | MACD DIF breaks above the zero axis and turns bullish | EMA5 crosses above EMA8 (short-term bullish) | KDJ bullish dominance (K66.7/D59.6) | volume expands 2.6x
Price Change: 8.5700%
📈 $RENDER | 4-hour Bullish Signal
━━━━━━━━━━━━━━━━━━
Technical Analysis: ADX(30) trend formed, can participate; MACD golden cross above zero; EMA5 crosses above EMA8, KDJ golden cross turns bullish; volume up 2.1x.
Price Change: 4.7200%
━━━━━━━━━━━━━━━━━━
#技术分析 #TUT #TAKE #RENDER
📌 The above content is for reference only and does not constitute investment advice
📈 $TUT | 4-hour Bullish Signal
━━━━━━━━━━━━━━━━━━
Technical Analysis: ADX(37) clear trend; MACD golden cross above zero; EMA5 crosses above EMA8; KDJ golden cross (K55.1/D54.6); volume expands 1.6x, bullish in the short term.
Price Change: 3.2200%
📈 $TAKE | 4-hour Bullish Signal
━━━━━━━━━━━━━━━━━━
Technical Analysis: ADX(26) trend taking shape; set up entries | MACD DIF breaks above the zero axis and turns bullish | EMA5 crosses above EMA8 (short-term bullish) | KDJ bullish dominance (K66.7/D59.6) | volume expands 2.6x
Price Change: 8.5700%
📈 $RENDER | 4-hour Bullish Signal
━━━━━━━━━━━━━━━━━━
Technical Analysis: ADX(30) trend formed, can participate; MACD golden cross above zero; EMA5 crosses above EMA8, KDJ golden cross turns bullish; volume up 2.1x.
Price Change: 4.7200%
━━━━━━━━━━━━━━━━━━
#技术分析 #TUT #TAKE #RENDER
📌 The above content is for reference only and does not constitute investment advice
33

·
--
$TUT $TAKE $RENDER 4 hours bullish crossover with volume surge, long-side resonance 🔥
════════════════════
🔴 $TUT 4 hours bullish signal
⚠️ Technicals: ADX37 shows a clear trend. MACD forms a bullish golden cross with expanding volume. Moving averages have just turned bullish. KDJ golden cross has not entered overbought. Volume is 1.6x; short-term looks bullish.
════════════════════
🔴 $TAKE 4 hours bullish signal
⚠️ Technicals: ADX trend is forming; it can be considered for entry. After the MACD golden cross, volume surged and broke through the zero line. EMA5 has just crossed above EMA8 to form a bullish alignment. KDJ: K crosses above D and has not entered the overbought zone. Trading volume expanded 2.6x.
════════════════════
🔴 $RENDER 4 hours bullish signal
⚠️ Technicals: ADX trend is taking shape and can be followed. After the MACD golden cross, volume surged and the red bars enlarged. Moving averages have just arranged in a bullish pattern. K crosses above D without being overbought. Volume expanded 2.1x; bullish.
════════════════════
🔔 Watch for first-hand market updates on anomalies 🔔
#技术分析 #TUT #TAKE #RENDER
📌 When trading, pay attention to whether the candlestick patterns match
$TUT $TAKE $RENDER 4 hours bullish crossover with volume surge, long-side resonance 🔥
════════════════════
🔴 $TUT 4 hours bullish signal
⚠️ Technicals: ADX37 shows a clear trend. MACD forms a bullish golden cross with expanding volume. Moving averages have just turned bullish. KDJ golden cross has not entered overbought. Volume is 1.6x; short-term looks bullish.
════════════════════
🔴 $TAKE 4 hours bullish signal
⚠️ Technicals: ADX trend is forming; it can be considered for entry. After the MACD golden cross, volume surged and broke through the zero line. EMA5 has just crossed above EMA8 to form a bullish alignment. KDJ: K crosses above D and has not entered the overbought zone. Trading volume expanded 2.6x.
════════════════════
🔴 $RENDER 4 hours bullish signal
⚠️ Technicals: ADX trend is taking shape and can be followed. After the MACD golden cross, volume surged and the red bars enlarged. Moving averages have just arranged in a bullish pattern. K crosses above D without being overbought. Volume expanded 2.1x; bullish.
════════════════════
🔔 Watch for first-hand market updates on anomalies 🔔
#技术分析 #TUT #TAKE #RENDER
📌 When trading, pay attention to whether the candlestick patterns match
════════════════════
🔴 $TUT 4 hours bullish signal
⚠️ Technicals: ADX37 shows a clear trend. MACD forms a bullish golden cross with expanding volume. Moving averages have just turned bullish. KDJ golden cross has not entered overbought. Volume is 1.6x; short-term looks bullish.
════════════════════
🔴 $TAKE 4 hours bullish signal
⚠️ Technicals: ADX trend is forming; it can be considered for entry. After the MACD golden cross, volume surged and broke through the zero line. EMA5 has just crossed above EMA8 to form a bullish alignment. KDJ: K crosses above D and has not entered the overbought zone. Trading volume expanded 2.6x.
════════════════════
🔴 $RENDER 4 hours bullish signal
⚠️ Technicals: ADX trend is taking shape and can be followed. After the MACD golden cross, volume surged and the red bars enlarged. Moving averages have just arranged in a bullish pattern. K crosses above D without being overbought. Volume expanded 2.1x; bullish.
════════════════════
🔔 Watch for first-hand market updates on anomalies 🔔
#技术分析 #TUT #TAKE #RENDER
📌 When trading, pay attention to whether the candlestick patterns match
32

·
--
Bullish
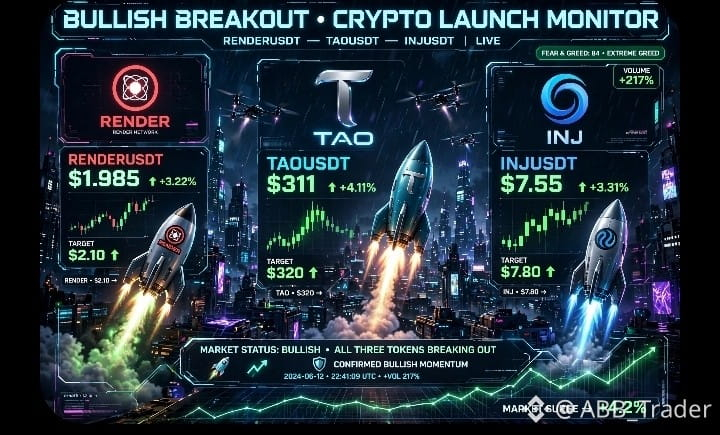
Here are your 3 BULLISH setups 🔥👇
1. $RENDER $1.985 (+3.93%) 🚀
{spot}(RENDERUSDT)
Perfect W-bottom! From $1.976 to $1.986 - MA60 $1.985 RECLAIMED!
🎯 T1: $1.999 - 24h High
T2: $2.05
T3: $2.10 💎
Support: $1.985 / $1.976 - Don't break!
RENDER ready to run! 💥
2. $TAO
{spot}(TAOUSDT)
$311.63 (+2.03%) 🧠
Pumped $299 -> $312 then healthy dip! MA60 $312.32 - just 70c away!
🎯 T1: $312.32 - MA60 break
T2: $314.49 - 24h High 🎯
T3: $320 🚀
Support: $311.28 / $299.50
AI coin waking up! 🔥
3. $INJ $7.550 (+1.00%) 💪
{spot}(INJUSDT)
At MA60 $7.549 - Decision time! Double top breakout loading?
🎯 T1: $7.561
T2: $7.665 - 24h High
T3: $7.80 🚀
Support: $7.549 / $7.518
INJ holding strong - Next leg coming! 💎
Which one you longing? 👇
#RENDER #TAO #İNJ
Here are your 3 BULLISH setups 🔥👇
1. $RENDER $1.985 (+3.93%) 🚀
Perfect W-bottom! From $1.976 to $1.986 - MA60 $1.985 RECLAIMED!
🎯 T1: $1.999 - 24h High
T2: $2.05
T3: $2.10 💎
Support: $1.985 / $1.976 - Don't break!
RENDER ready to run! 💥
2. $TAO
$311.63 (+2.03%) 🧠
Pumped $299 -> $312 then healthy dip! MA60 $312.32 - just 70c away!
🎯 T1: $312.32 - MA60 break
T2: $314.49 - 24h High 🎯
T3: $320 🚀
Support: $311.28 / $299.50
AI coin waking up! 🔥
3. $INJ $7.550 (+1.00%) 💪
At MA60 $7.549 - Decision time! Double top breakout loading?
🎯 T1: $7.561
T2: $7.665 - 24h High
T3: $7.80 🚀
Support: $7.549 / $7.518
INJ holding strong - Next leg coming! 💎
Which one you longing? 👇
#RENDER #TAO #İNJ
1. $RENDER $1.985 (+3.93%) 🚀
Perfect W-bottom! From $1.976 to $1.986 - MA60 $1.985 RECLAIMED!
🎯 T1: $1.999 - 24h High
T2: $2.05
T3: $2.10 💎
Support: $1.985 / $1.976 - Don't break!
RENDER ready to run! 💥
2. $TAO
$311.63 (+2.03%) 🧠
Pumped $299 -> $312 then healthy dip! MA60 $312.32 - just 70c away!
🎯 T1: $312.32 - MA60 break
T2: $314.49 - 24h High 🎯
T3: $320 🚀
Support: $311.28 / $299.50
AI coin waking up! 🔥
3. $INJ $7.550 (+1.00%) 💪
At MA60 $7.549 - Decision time! Double top breakout loading?
🎯 T1: $7.561
T2: $7.665 - 24h High
T3: $7.80 🚀
Support: $7.549 / $7.518
INJ holding strong - Next leg coming! 💎
Which one you longing? 👇
#RENDER #TAO #İNJ
2
429
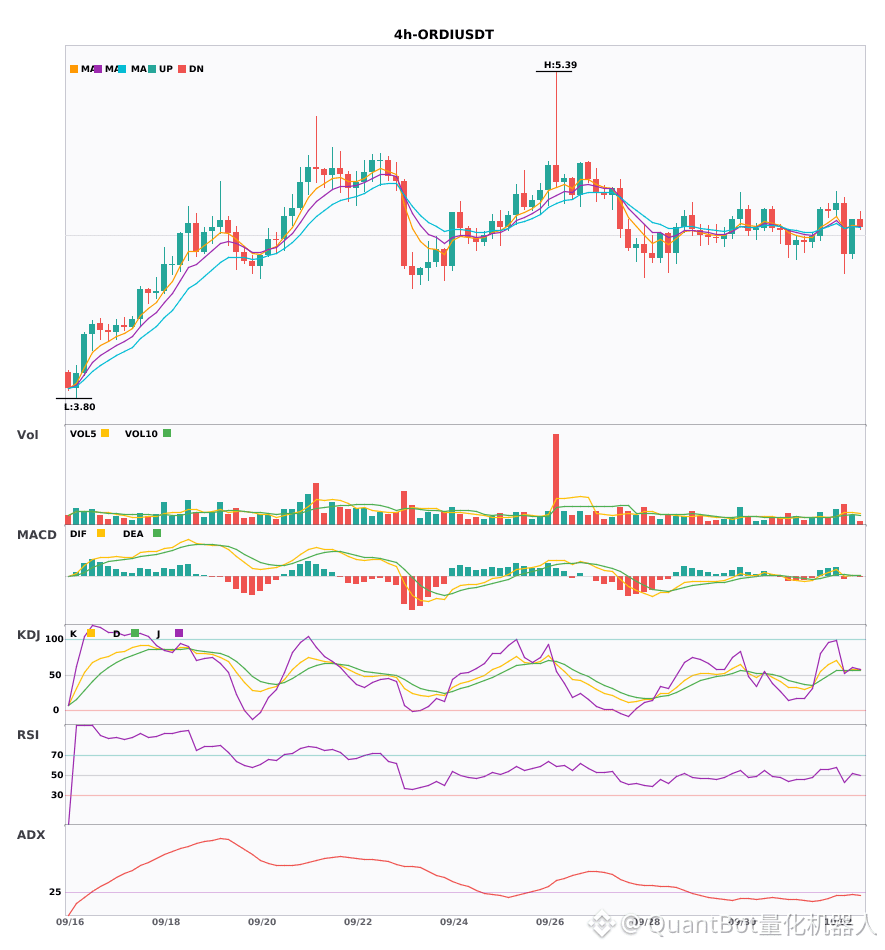
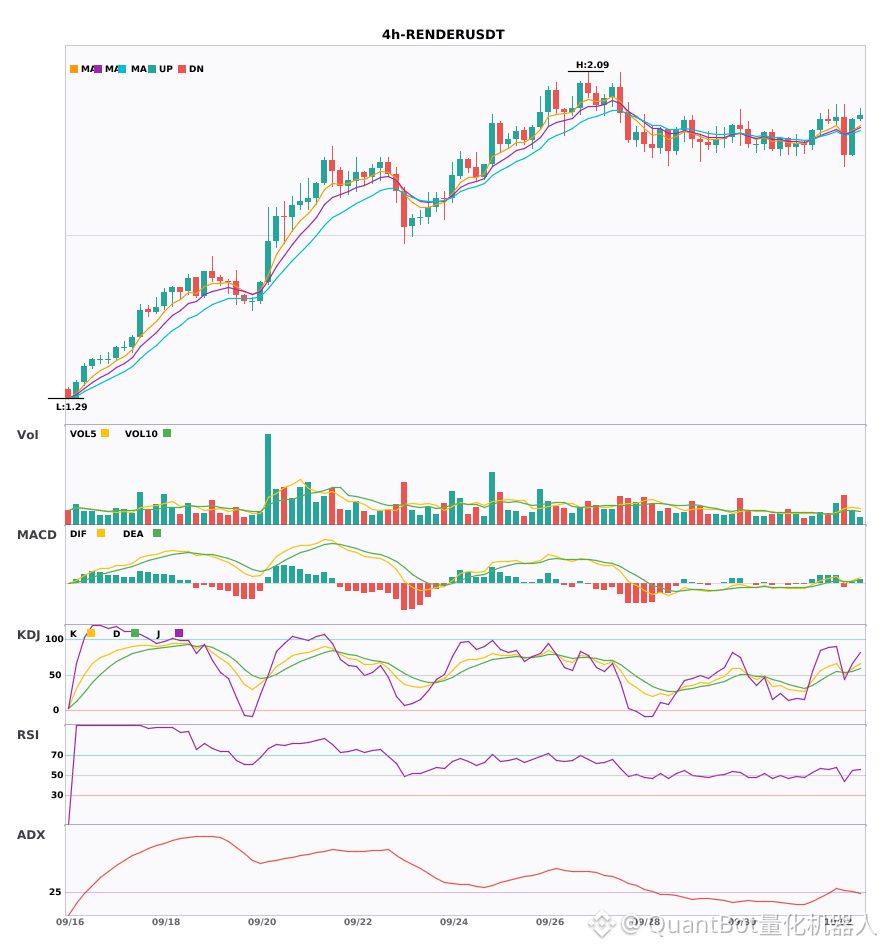
$ORDI / $RENDER 4H technical resonance, assessing upside breakout potential
📈 $ORDI | 4-hour bullish signal
━━━━━━━━━━━━━━━━━━
Technical analysis: ADX(25) shows a formed trend and can be entered; MACD DIF crosses above the zero axis to turn bullish; EMA5 crosses above EMA8, turning short-term bullish; KDJ golden cross indicates upside (K58/D56.5); volume expands by 2x.
Price movement: 3.6700%
📈 $RENDER | 4-hour bullish signal
━━━━━━━━━━━━━━━━━━
Technical analysis: ADX(30) indicates a trend launching, and it can be entered; MACD has a golden cross above zero, releasing bullish momentum; EMA5 crosses above EMA8, turning short-term bullish; KDJ golden cross (K58.7/D55.0); volume expands by 2.1x.
Price movement: 4.7200%
━━━━━━━━━━━━━━━━━━
#技术分析 #ORDI #RENDER
📌 The above content is for reference only and does not constitute investment advice
$ORDI / $RENDER 4H technical resonance, assessing upside breakout potential
📈 $ORDI | 4-hour bullish signal
━━━━━━━━━━━━━━━━━━
Technical analysis: ADX(25) shows a formed trend and can be entered; MACD DIF crosses above the zero axis to turn bullish; EMA5 crosses above EMA8, turning short-term bullish; KDJ golden cross indicates upside (K58/D56.5); volume expands by 2x.
Price movement: 3.6700%
📈 $RENDER | 4-hour bullish signal
━━━━━━━━━━━━━━━━━━
Technical analysis: ADX(30) indicates a trend launching, and it can be entered; MACD has a golden cross above zero, releasing bullish momentum; EMA5 crosses above EMA8, turning short-term bullish; KDJ golden cross (K58.7/D55.0); volume expands by 2.1x.
Price movement: 4.7200%
━━━━━━━━━━━━━━━━━━
#技术分析 #ORDI #RENDER
📌 The above content is for reference only and does not constitute investment advice
📈 $ORDI | 4-hour bullish signal
━━━━━━━━━━━━━━━━━━
Technical analysis: ADX(25) shows a formed trend and can be entered; MACD DIF crosses above the zero axis to turn bullish; EMA5 crosses above EMA8, turning short-term bullish; KDJ golden cross indicates upside (K58/D56.5); volume expands by 2x.
Price movement: 3.6700%
📈 $RENDER | 4-hour bullish signal
━━━━━━━━━━━━━━━━━━
Technical analysis: ADX(30) indicates a trend launching, and it can be entered; MACD has a golden cross above zero, releasing bullish momentum; EMA5 crosses above EMA8, turning short-term bullish; KDJ golden cross (K58.7/D55.0); volume expands by 2.1x.
Price movement: 4.7200%
━━━━━━━━━━━━━━━━━━
#技术分析 #ORDI #RENDER
📌 The above content is for reference only and does not constitute investment advice
59
Log in to explore more content
Join global crypto users on Binance Square
⚡️ Get latest and useful information about crypto.
💬 Trusted by the world’s largest crypto exchange.
👍 Discover real insights from verified creators.
Email / Phone number
Trending Topics
1
#DriftHackVictimsBeginClaims
50,004 views
619 Discussing
2
#SolanaTokenizedStockVolumeTops$4.4BInSeptember
6,541 views
71 Discussing
3
#BitcoinSpotETFsDraw$6.34BInflowsInQ3
21,030 views
183 Discussing
4
#EthereumValidatorExitQueueJumps392%
208,982 views
1,707 Discussing
5
#IMFApprovesElSalvador$138MWithBitcoinWaiver
20,293 views
112 Discussing
6
#SECHaltsCryptoETFReviewsAmidFundingLapse
333,965 views
2,449 Discussing
7
#ZcashETFPostsFirstWeeklyOutflow$93.6M
105,242 views
279 Discussing
8
#GreekPoliceBustCryptoScamRingArrest17
460,612 views
3,005 Discussing
9
#BitcoinRejectedAt$87K
241,575 views
351 Discussing
10
#FedOctoberRateHikeOddsFallTo17%
480,912 views
3,117 Discussing