
ZIV OREN
12.1k Posts

ZIV OREN
 Square Verified+
Report
Block User
Energy can't be faked | Sharp mind, Calm Soul
Open Trade
High-Frequency Trader
1.2 Years
276 Following
34.3K+ Followers
29.7K+ Liked
Posts
Portfolio
All
Quotes
Live
·
--
Bullish
$XRP Looking Ready for a Rebound 📈
📊 Analysis:
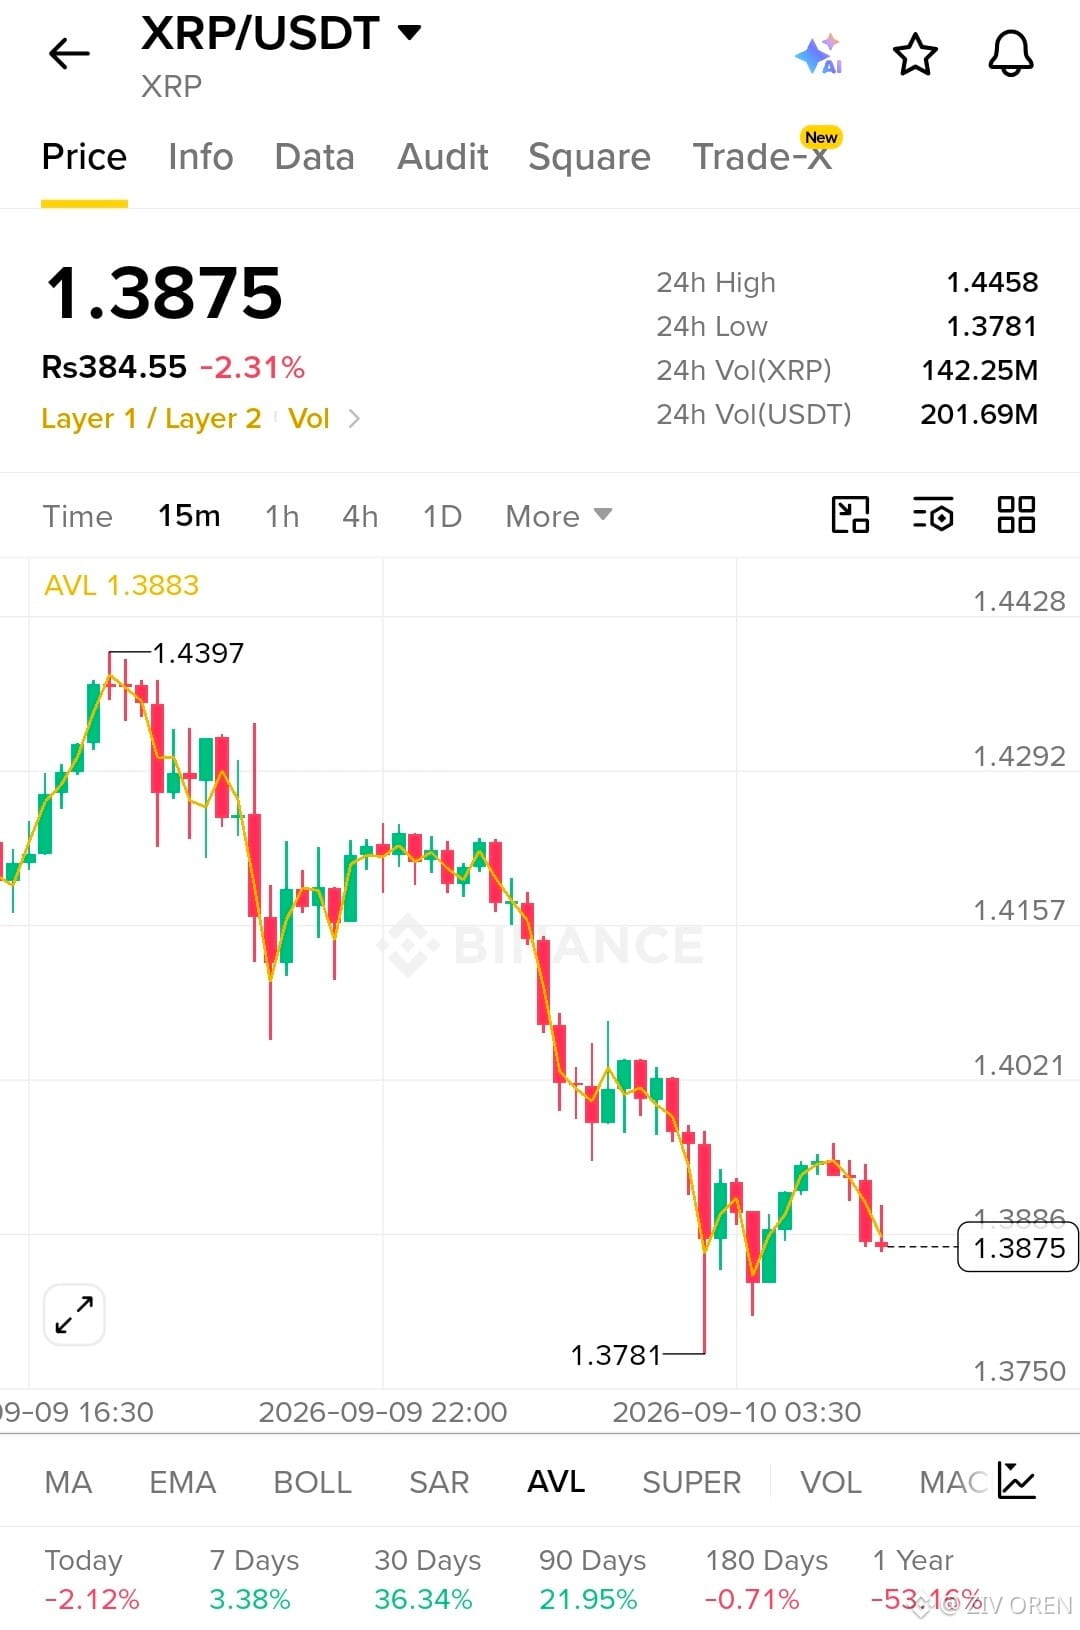
$XRP is trading around $1.3875 after a sharp drop from $1.4397. Price recently bounced from the $1.3781 low and is attempting to stabilize, but short-term momentum remains cautious.
🎯 Resistance: $1.4021 → $1.4157 → $1.4292
🛡️ Support: $1.3781 → $1.3750
A reclaim above $1.4021 could strengthen the recovery toward $1.4157. Holding $1.3781 is important; a clean breakdown could lead to further weakness.
Trade smart & manage risk.
Let's trade $XRP
$XRP Looking Ready for a Rebound 📈
📊 Analysis:
$XRP is trading around $1.3875 after a sharp drop from $1.4397. Price recently bounced from the $1.3781 low and is attempting to stabilize, but short-term momentum remains cautious.
🎯 Resistance: $1.4021 → $1.4157 → $1.4292
🛡️ Support: $1.3781 → $1.3750
A reclaim above $1.4021 could strengthen the recovery toward $1.4157. Holding $1.3781 is important; a clean breakdown could lead to further weakness.
Trade smart & manage risk.
Let's trade $XRP
📊 Analysis:
$XRP is trading around $1.3875 after a sharp drop from $1.4397. Price recently bounced from the $1.3781 low and is attempting to stabilize, but short-term momentum remains cautious.
🎯 Resistance: $1.4021 → $1.4157 → $1.4292
🛡️ Support: $1.3781 → $1.3750
A reclaim above $1.4021 could strengthen the recovery toward $1.4157. Holding $1.3781 is important; a clean breakdown could lead to further weakness.
Trade smart & manage risk.
Let's trade $XRP
43
·
--
Bullish
$ETH Looking Ready for a Recovery 📈
📊 Analysis:
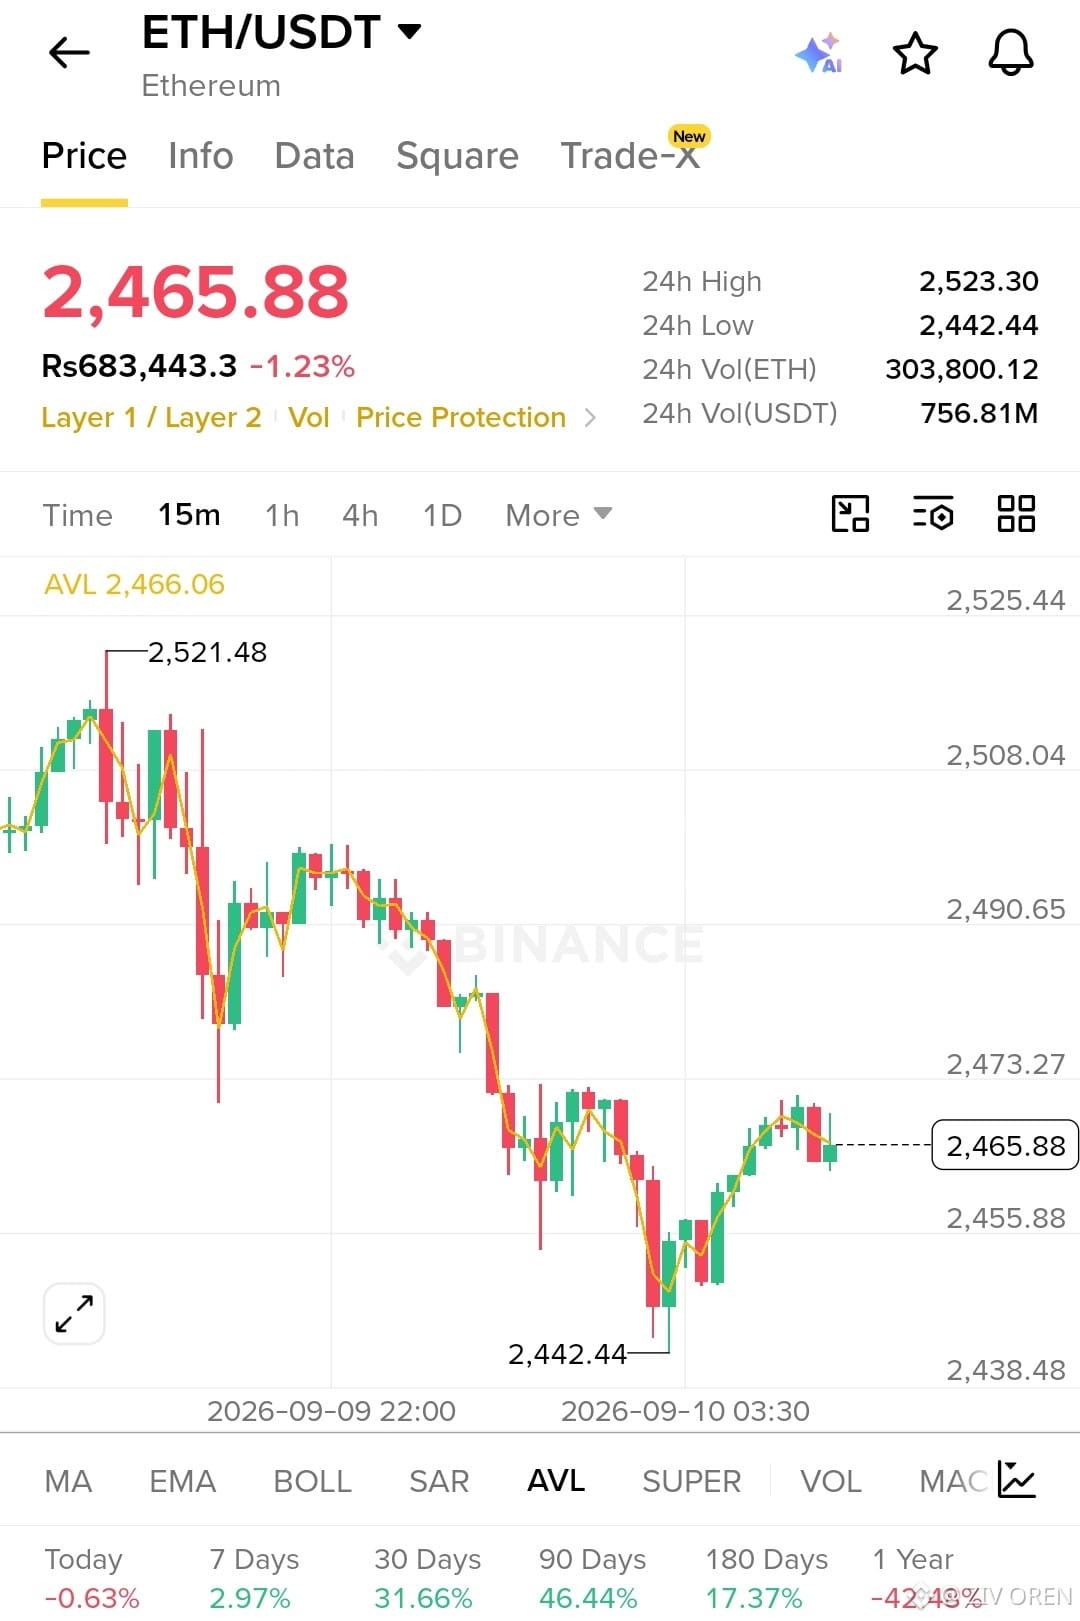
$ETH is trading around $2,465.88 after bouncing from the $2,442.44 low. The short-term chart shows a recovery attempt, but price is facing resistance around $2,473.
🎯 Resistance: $2,473 → $2,490 → $2,508
🛡️ Support: $2,455 → $2,442
A clean break above $2,473 could strengthen the rebound toward $2,490 and $2,508. Holding $2,442 remains important for the bullish setup.
Trade smart & manage risk.
Let's trade $ETH
$ETH Looking Ready for a Recovery 📈
📊 Analysis:
$ETH is trading around $2,465.88 after bouncing from the $2,442.44 low. The short-term chart shows a recovery attempt, but price is facing resistance around $2,473.
🎯 Resistance: $2,473 → $2,490 → $2,508
🛡️ Support: $2,455 → $2,442
A clean break above $2,473 could strengthen the rebound toward $2,490 and $2,508. Holding $2,442 remains important for the bullish setup.
Trade smart & manage risk.
Let's trade $ETH
📊 Analysis:
$ETH is trading around $2,465.88 after bouncing from the $2,442.44 low. The short-term chart shows a recovery attempt, but price is facing resistance around $2,473.
🎯 Resistance: $2,473 → $2,490 → $2,508
🛡️ Support: $2,455 → $2,442
A clean break above $2,473 could strengthen the rebound toward $2,490 and $2,508. Holding $2,442 remains important for the bullish setup.
Trade smart & manage risk.
Let's trade $ETH
38
·
--
Bullish
$BTC Looking Ready for a Recovery 📈
📊 Analysis:
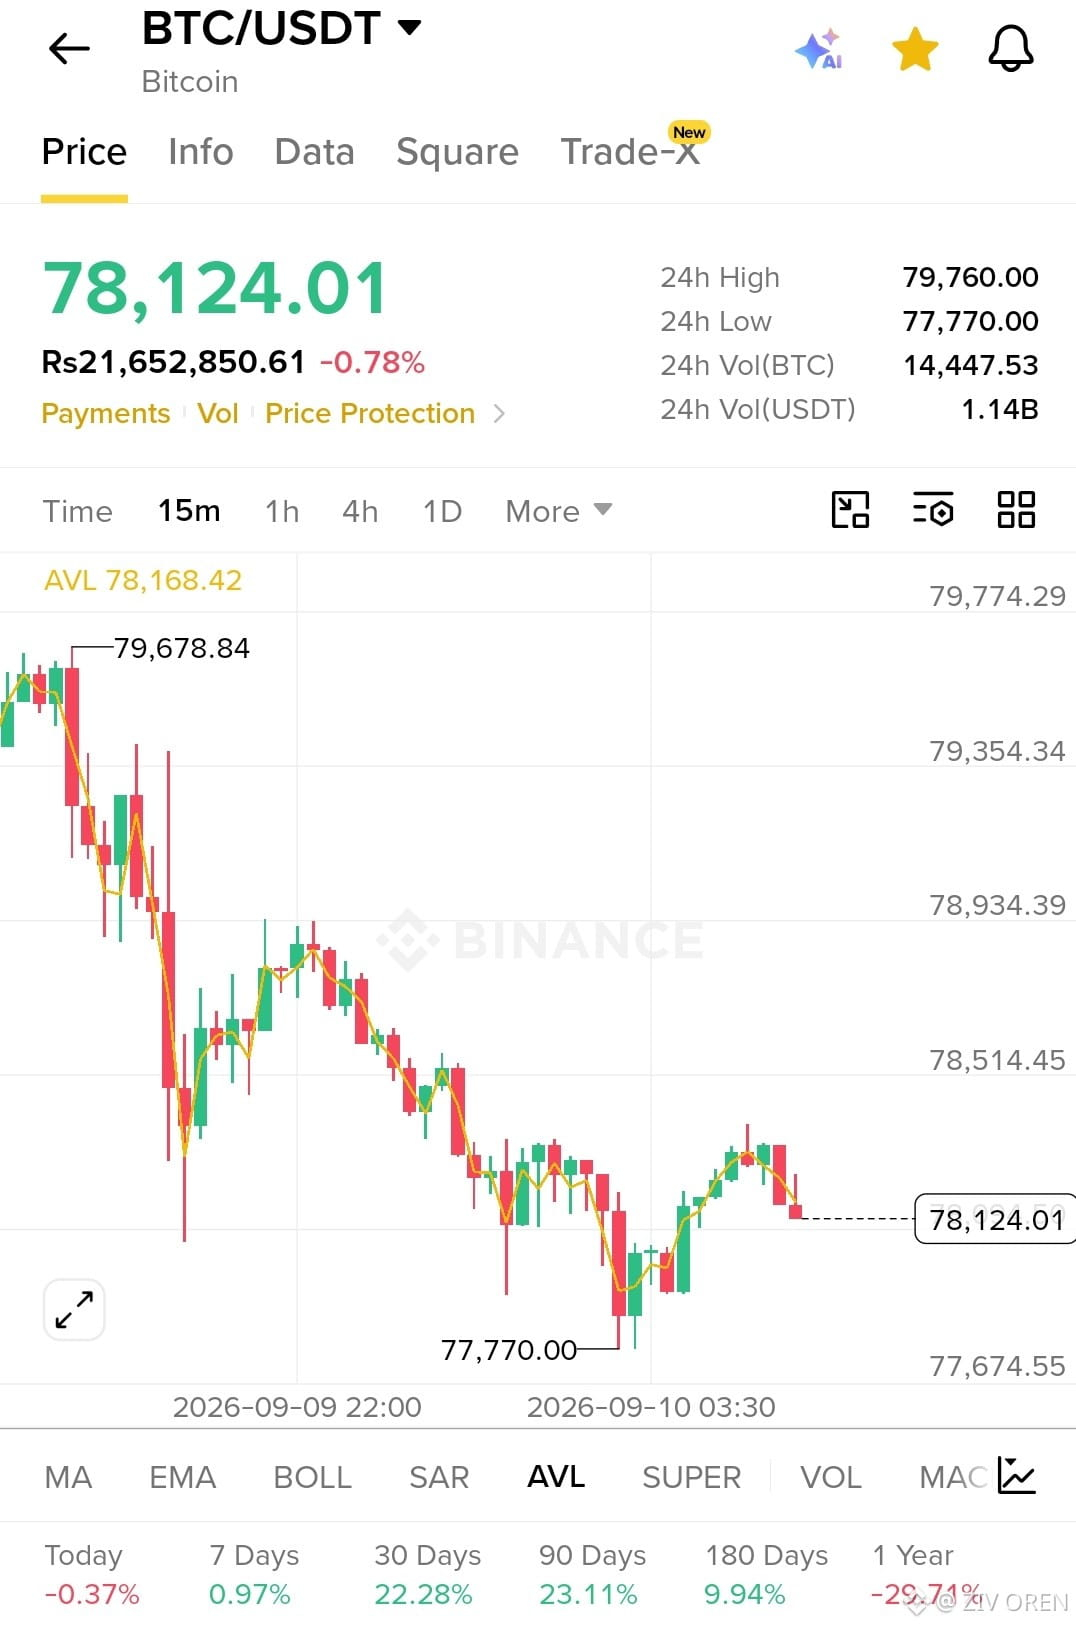
$BTC is trading near $78,124 after a pullback from $79,678.84. Price bounced from the $77,770 support and recovered toward $78.3K, but is currently seeing some rejection.
🎯 Resistance: $78,514 → $78,934 → $79,678
🛡️ Support: $77,770 → $77,674
A clean break above $78,514 could strengthen the recovery toward $78,934 and potentially $79,678. Holding $77,770 remains important for the bullish setup.
Trade smart & manage risk.
Let's trade $BTC
$BTC Looking Ready for a Recovery 📈
📊 Analysis:
$BTC is trading near $78,124 after a pullback from $79,678.84. Price bounced from the $77,770 support and recovered toward $78.3K, but is currently seeing some rejection.
🎯 Resistance: $78,514 → $78,934 → $79,678
🛡️ Support: $77,770 → $77,674
A clean break above $78,514 could strengthen the recovery toward $78,934 and potentially $79,678. Holding $77,770 remains important for the bullish setup.
Trade smart & manage risk.
Let's trade $BTC
📊 Analysis:
$BTC is trading near $78,124 after a pullback from $79,678.84. Price bounced from the $77,770 support and recovered toward $78.3K, but is currently seeing some rejection.
🎯 Resistance: $78,514 → $78,934 → $79,678
🛡️ Support: $77,770 → $77,674
A clean break above $78,514 could strengthen the recovery toward $78,934 and potentially $79,678. Holding $77,770 remains important for the bullish setup.
Trade smart & manage risk.
Let's trade $BTC
46
·
--
Bullish
$BNB Looking Ready for a Bounce 📈
📊 Analysis:
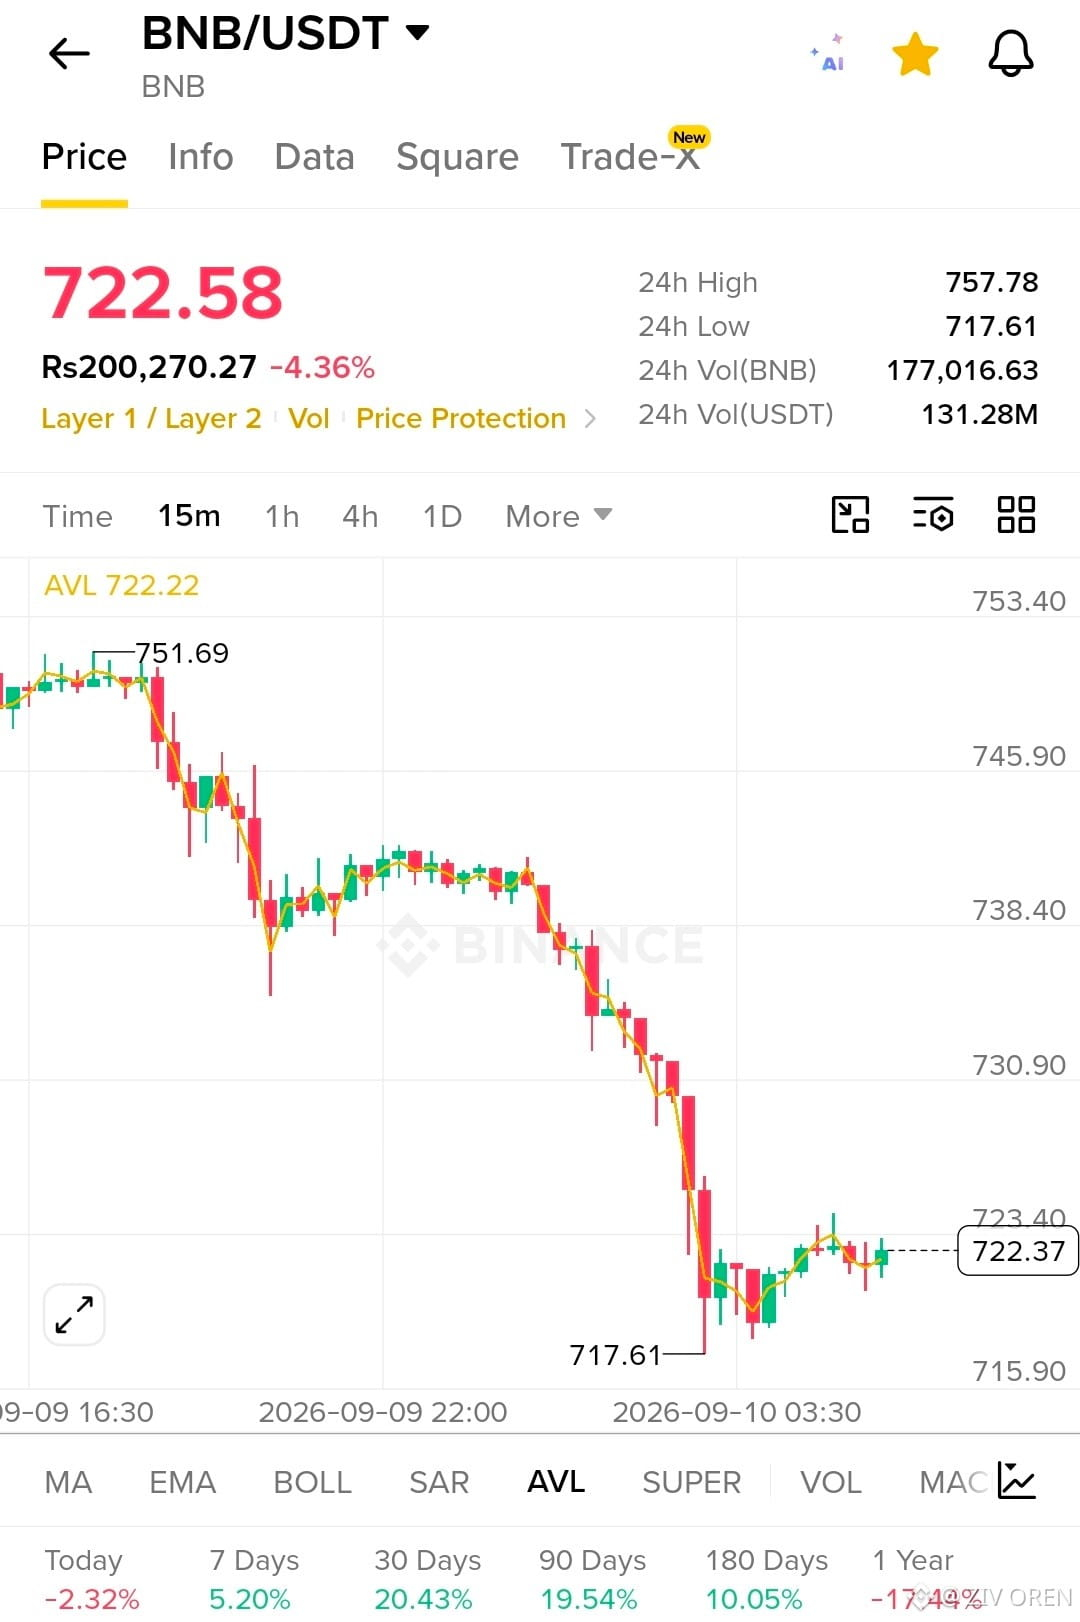
$BNB is trading near $722.58 after a sharp decline from $751.69, with the recent low at $717.61. Price is now stabilizing around $722, suggesting a possible short-term recovery if buyers defend support.
🎯 Resistance: $723.40 → $730.90 → $738.40
🛡️ Support: $717.61 → $715.90
A break above $730.90 could improve bullish momentum toward $738.40. Holding $717.61 is important for the recovery setup; a breakdown could bring renewed selling pressure.
Trade smart & manage risk.
Let's trade $BNB
$BNB Looking Ready for a Bounce 📈
📊 Analysis:
$BNB is trading near $722.58 after a sharp decline from $751.69, with the recent low at $717.61. Price is now stabilizing around $722, suggesting a possible short-term recovery if buyers defend support.
🎯 Resistance: $723.40 → $730.90 → $738.40
🛡️ Support: $717.61 → $715.90
A break above $730.90 could improve bullish momentum toward $738.40. Holding $717.61 is important for the recovery setup; a breakdown could bring renewed selling pressure.
Trade smart & manage risk.
Let's trade $BNB
📊 Analysis:
$BNB is trading near $722.58 after a sharp decline from $751.69, with the recent low at $717.61. Price is now stabilizing around $722, suggesting a possible short-term recovery if buyers defend support.
🎯 Resistance: $723.40 → $730.90 → $738.40
🛡️ Support: $717.61 → $715.90
A break above $730.90 could improve bullish momentum toward $738.40. Holding $717.61 is important for the recovery setup; a breakdown could bring renewed selling pressure.
Trade smart & manage risk.
Let's trade $BNB
66
·
--
Bullish
$FORM Looking for a Bullish Reversal 📈
📊 Analysis:
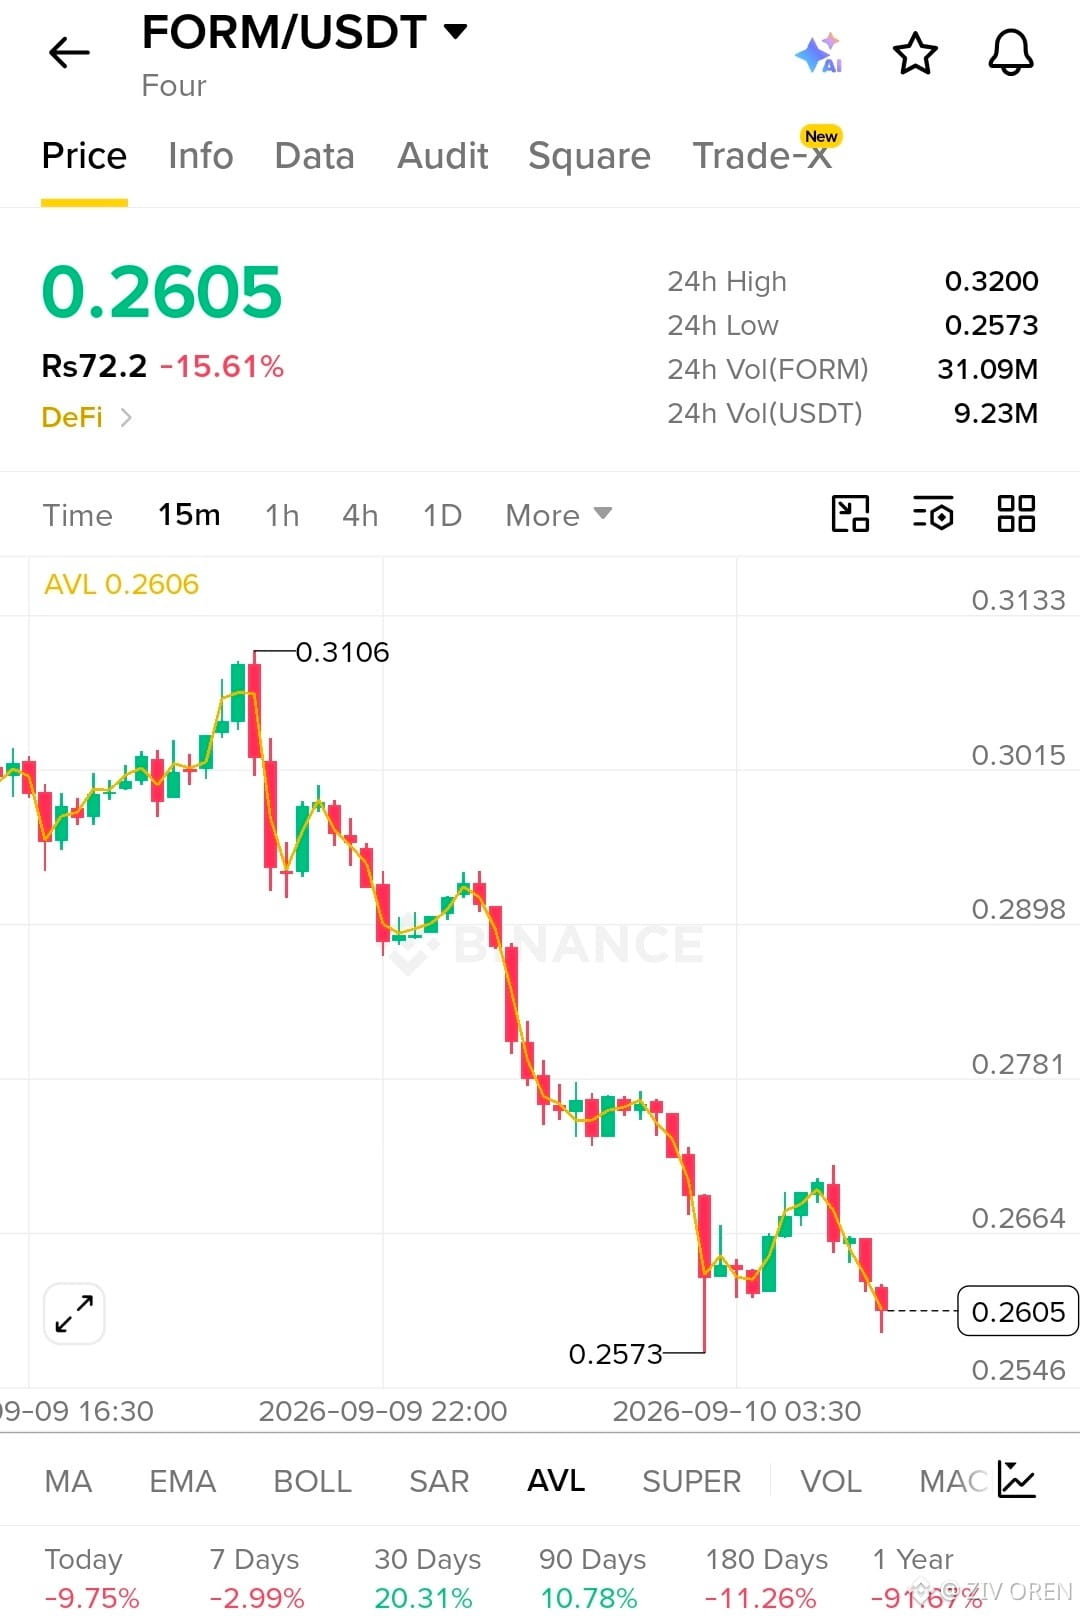
$FORM is under short-term pressure, trading around $0.2605 after falling from the $0.3106 area. Price is testing the $0.2573 low, making this a key support zone to watch.
🎯 Resistance: $0.2664 → $0.2781
🛡️ Support: $0.2573 → $0.2546
A reclaim of $0.2664 could signal a relief bounce toward $0.2781. If $0.2573 breaks decisively, further downside remains possible.
Trade smart & manage risk.
Let's trade $FORM
$FORM Looking for a Bullish Reversal 📈
📊 Analysis:
$FORM is under short-term pressure, trading around $0.2605 after falling from the $0.3106 area. Price is testing the $0.2573 low, making this a key support zone to watch.
🎯 Resistance: $0.2664 → $0.2781
🛡️ Support: $0.2573 → $0.2546
A reclaim of $0.2664 could signal a relief bounce toward $0.2781. If $0.2573 breaks decisively, further downside remains possible.
Trade smart & manage risk.
Let's trade $FORM
📊 Analysis:
$FORM is under short-term pressure, trading around $0.2605 after falling from the $0.3106 area. Price is testing the $0.2573 low, making this a key support zone to watch.
🎯 Resistance: $0.2664 → $0.2781
🛡️ Support: $0.2573 → $0.2546
A reclaim of $0.2664 could signal a relief bounce toward $0.2781. If $0.2573 breaks decisively, further downside remains possible.
Trade smart & manage risk.
Let's trade $FORM
215
·
--
Bullish
$SC Looking Bullish 📈
📊 Analysis:
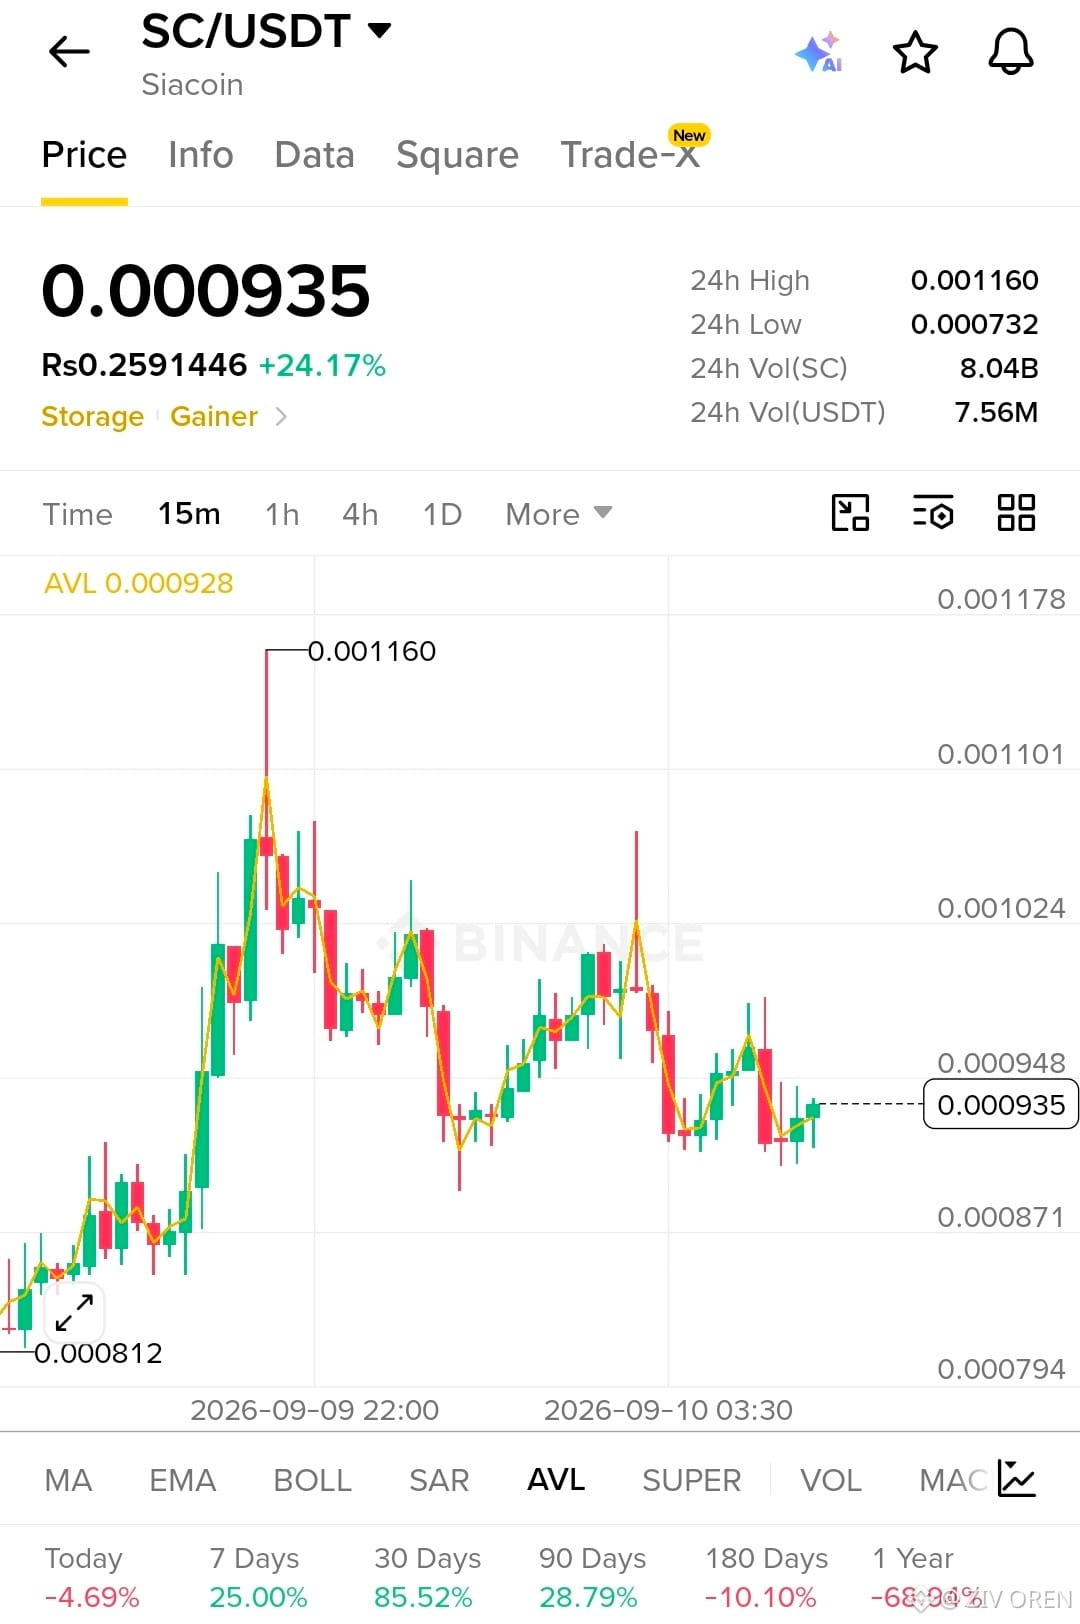
$SC is holding around $0.000935 after a strong 24H move of +24.17%. Price is consolidating above the $0.00090 area, while the recent $0.001160 high remains the major breakout zone.
🎯 Resistance: $0.000948 → $0.001024 → $0.001160
🛡️ Support: $0.000900 → $0.000871
A clean break above $0.001024 could bring the $0.001160 high back into focus. Holding $0.000900 keeps the short-term setup constructive.
Trade smart & manage risk.
Let's trade $SC
$SC Looking Bullish 📈
📊 Analysis:
$SC is holding around $0.000935 after a strong 24H move of +24.17%. Price is consolidating above the $0.00090 area, while the recent $0.001160 high remains the major breakout zone.
🎯 Resistance: $0.000948 → $0.001024 → $0.001160
🛡️ Support: $0.000900 → $0.000871
A clean break above $0.001024 could bring the $0.001160 high back into focus. Holding $0.000900 keeps the short-term setup constructive.
Trade smart & manage risk.
Let's trade $SC
📊 Analysis:
$SC is holding around $0.000935 after a strong 24H move of +24.17%. Price is consolidating above the $0.00090 area, while the recent $0.001160 high remains the major breakout zone.
🎯 Resistance: $0.000948 → $0.001024 → $0.001160
🛡️ Support: $0.000900 → $0.000871
A clean break above $0.001024 could bring the $0.001160 high back into focus. Holding $0.000900 keeps the short-term setup constructive.
Trade smart & manage risk.
Let's trade $SC
64
·
--
Bullish
$VTHO Looking Bullish After a Powerful Breakout 🚀
📊 Analysis:
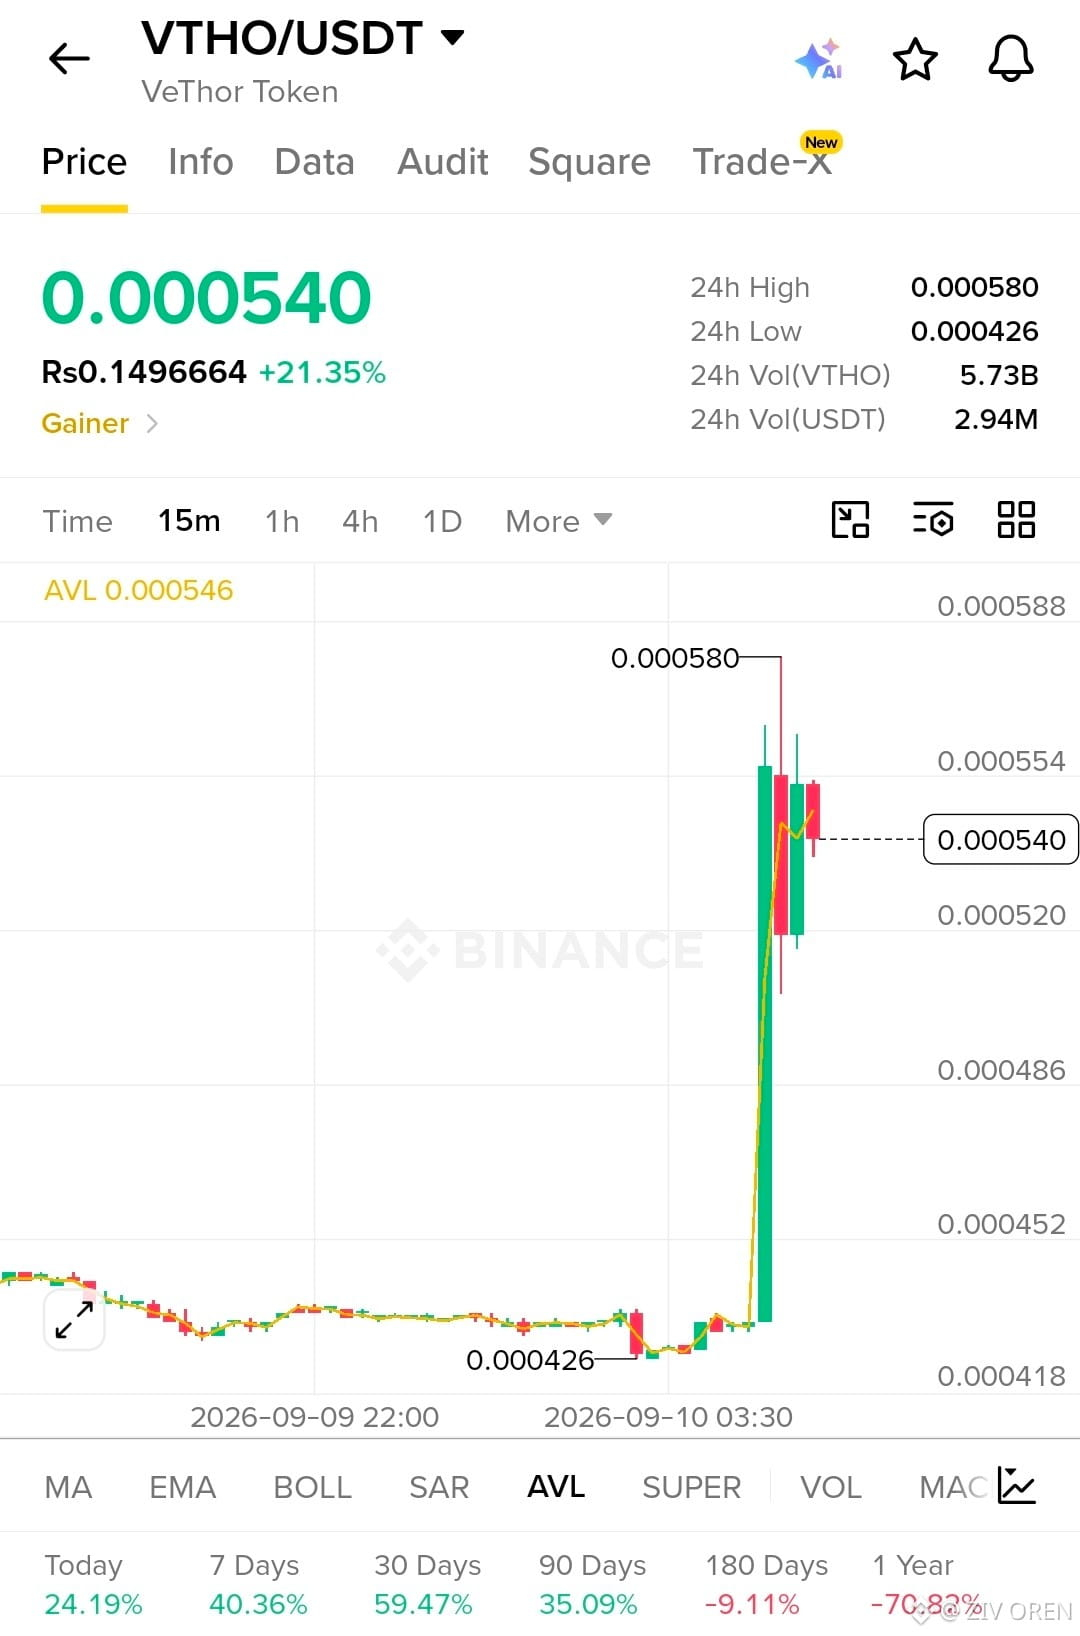
$VTHO surged strongly from the $0.000426 area to a 24H high near $0.000580. Price is now consolidating around $0.000540 after the sharp move, showing strong short-term momentum.
🎯 Resistance: $0.000554 → $0.000580
🛡️ Support: $0.000520 → $0.000486
A clean breakout above $0.000580 could attract further buying pressure. Holding $0.000520 would keep the bullish structure interesting, while losing it could trigger a deeper pullback.
Trade smart & manage risk.
Let's trade $VTHO
$VTHO Looking Bullish After a Powerful Breakout 🚀
📊 Analysis:
$VTHO surged strongly from the $0.000426 area to a 24H high near $0.000580. Price is now consolidating around $0.000540 after the sharp move, showing strong short-term momentum.
🎯 Resistance: $0.000554 → $0.000580
🛡️ Support: $0.000520 → $0.000486
A clean breakout above $0.000580 could attract further buying pressure. Holding $0.000520 would keep the bullish structure interesting, while losing it could trigger a deeper pullback.
Trade smart & manage risk.
Let's trade $VTHO
📊 Analysis:
$VTHO surged strongly from the $0.000426 area to a 24H high near $0.000580. Price is now consolidating around $0.000540 after the sharp move, showing strong short-term momentum.
🎯 Resistance: $0.000554 → $0.000580
🛡️ Support: $0.000520 → $0.000486
A clean breakout above $0.000580 could attract further buying pressure. Holding $0.000520 would keep the bullish structure interesting, while losing it could trigger a deeper pullback.
Trade smart & manage risk.
Let's trade $VTHO
1
196
·
--
Bullish
$IOST Looking Bullish After a Strong Move 🚀
📊 Analysis:
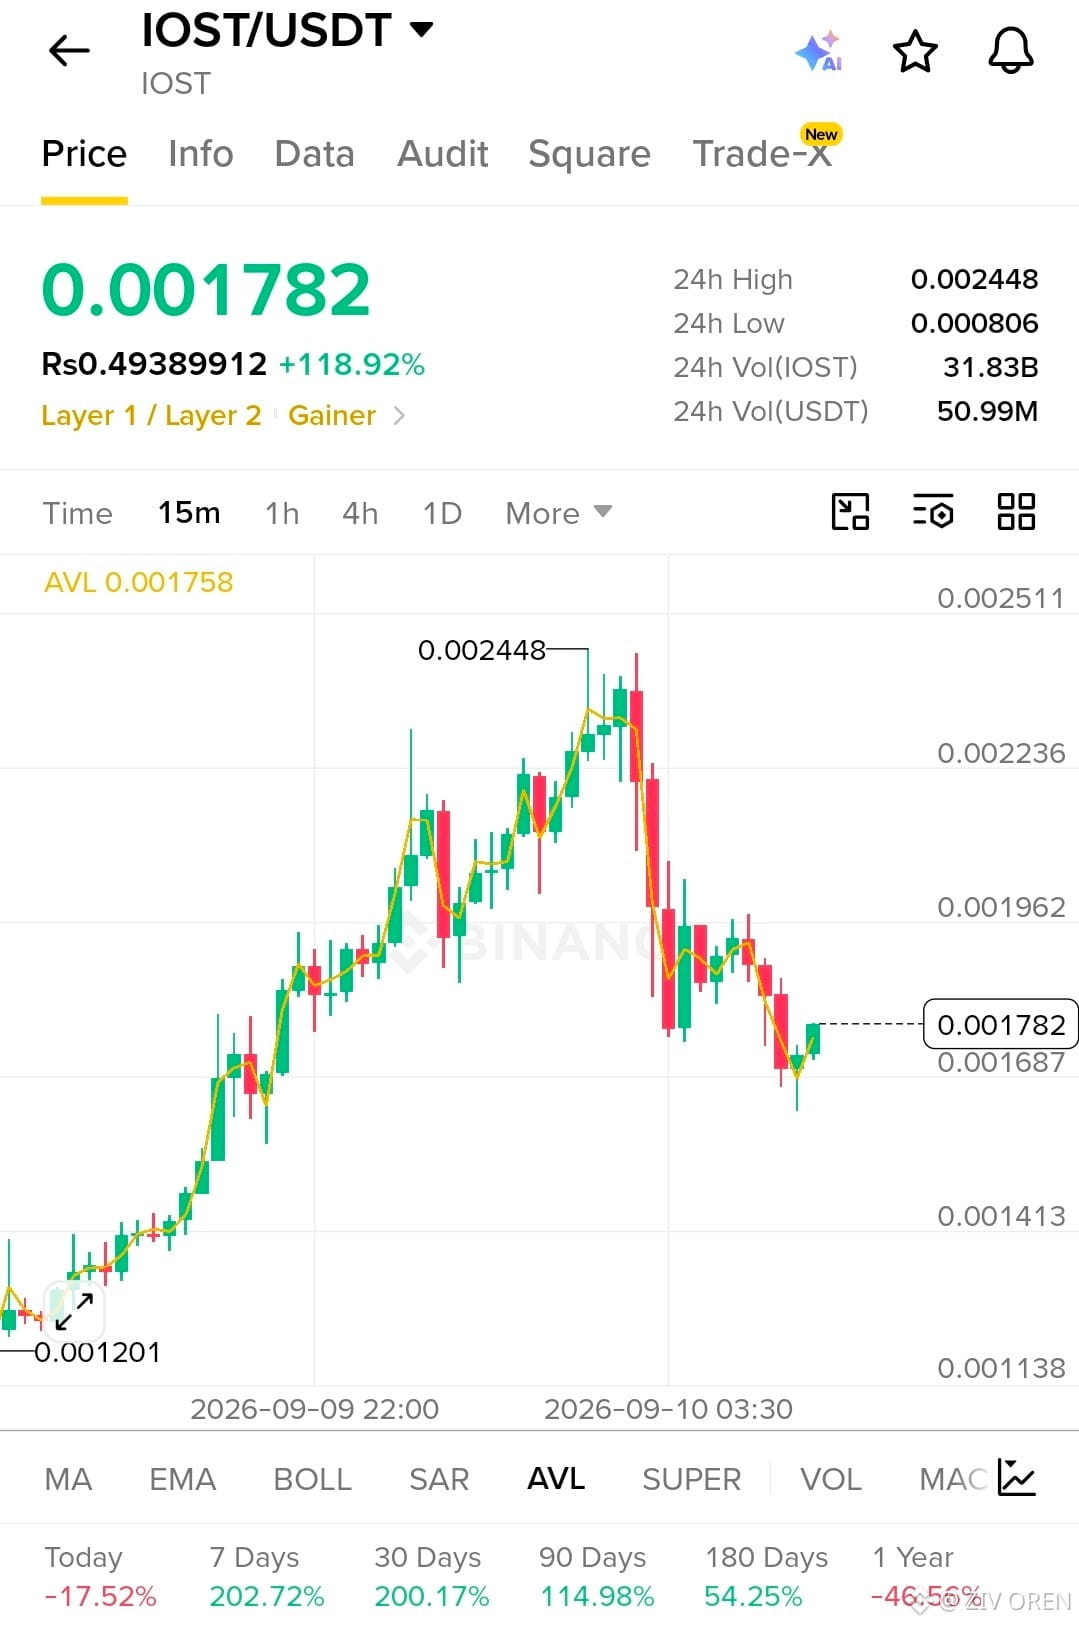
$IOST has shown powerful momentum, gaining over 118% in 24H and reaching $0.002448. After the sharp pullback, price is attempting a recovery around $0.001782.
🎯 Resistance: $0.001962 → $0.002236 → $0.002448
🛡️ Support: $0.001687 → $0.001413
A break above $0.001962 could strengthen the recovery and bring the previous high into focus. Losing $0.001687 could signal further consolidation.
Trade smart and manage risk.
Let's trade $IOST
$IOST Looking Bullish After a Strong Move 🚀
📊 Analysis:
$IOST has shown powerful momentum, gaining over 118% in 24H and reaching $0.002448. After the sharp pullback, price is attempting a recovery around $0.001782.
🎯 Resistance: $0.001962 → $0.002236 → $0.002448
🛡️ Support: $0.001687 → $0.001413
A break above $0.001962 could strengthen the recovery and bring the previous high into focus. Losing $0.001687 could signal further consolidation.
Trade smart and manage risk.
Let's trade $IOST
📊 Analysis:
$IOST has shown powerful momentum, gaining over 118% in 24H and reaching $0.002448. After the sharp pullback, price is attempting a recovery around $0.001782.
🎯 Resistance: $0.001962 → $0.002236 → $0.002448
🛡️ Support: $0.001687 → $0.001413
A break above $0.001962 could strengthen the recovery and bring the previous high into focus. Losing $0.001687 could signal further consolidation.
Trade smart and manage risk.
Let's trade $IOST
208
·
--
Bullish
$4Stock Looking for a Recovery Setup 📈
📊 Analysis:
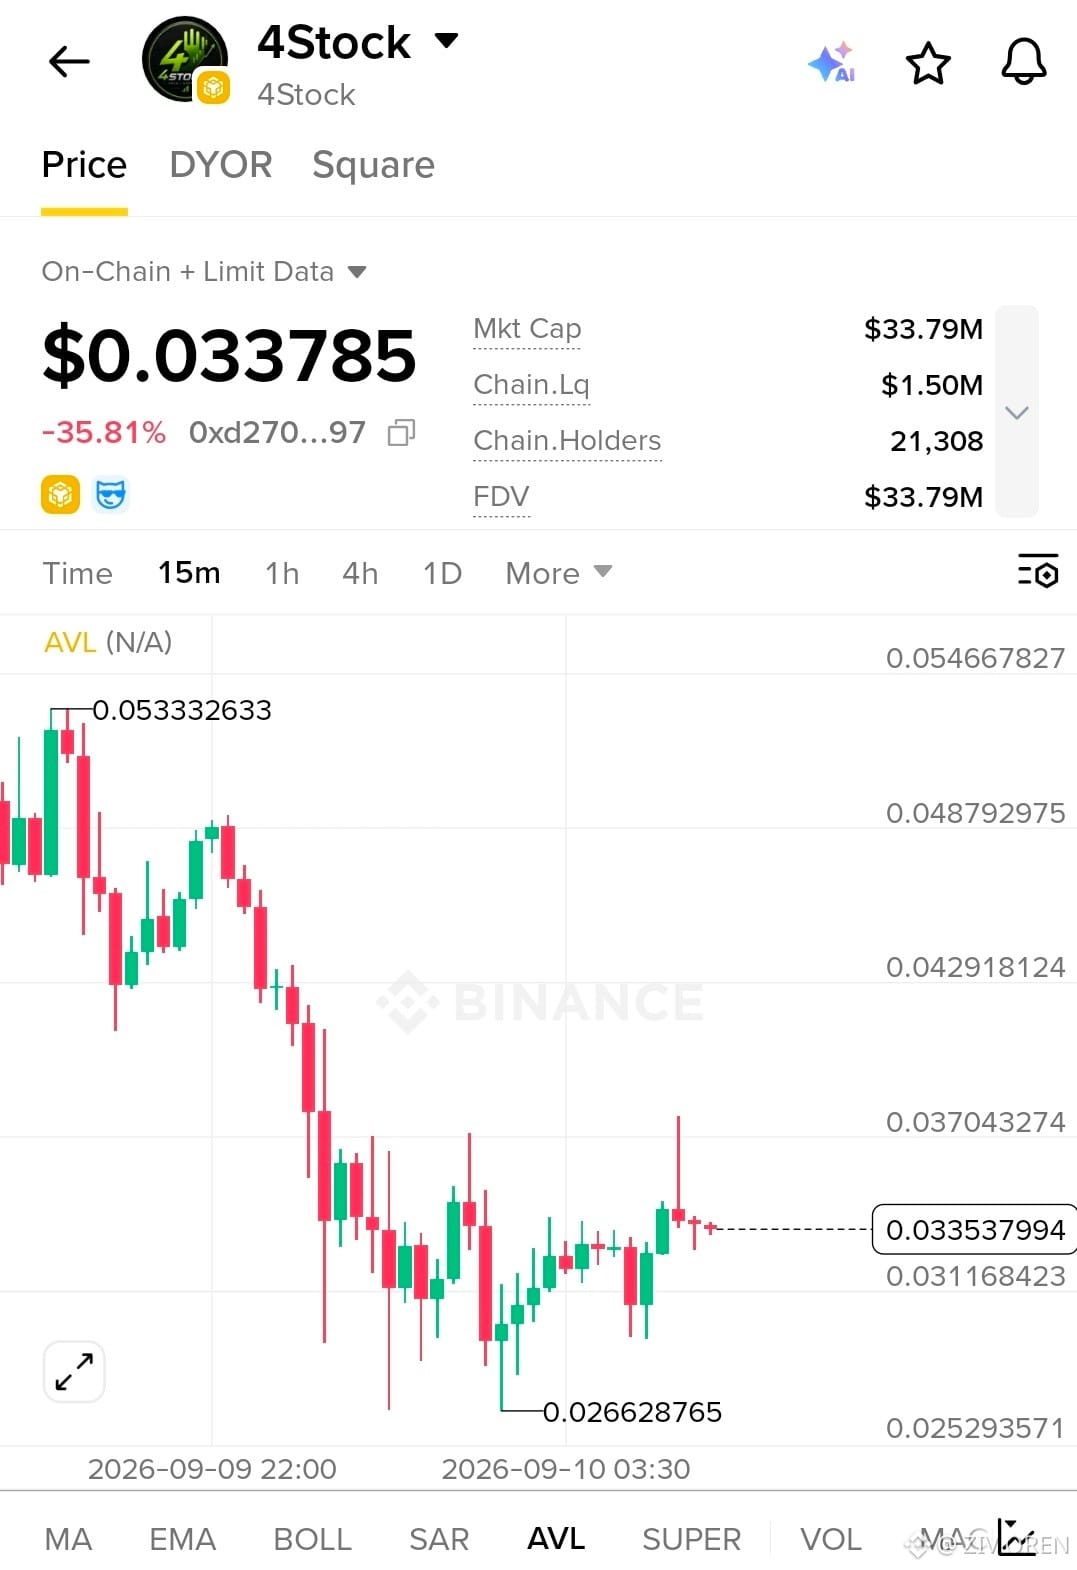
$4STOCK is trading around $0.0338 after a sharp sell-off. Price has started consolidating above the $0.0312 area, while the recent low near $0.0266 is acting as key support.
🎯 Resistance: $0.0370 → $0.0429
🛡️ Support: $0.0312 → $0.0266
A strong break above $0.0370 could signal improving momentum toward $0.0429. If support fails, downside risk remains.
Trade with disciplined risk management.
Let's trade $4Stock
$4Stock Looking for a Recovery Setup 📈
📊 Analysis:
$4STOCK is trading around $0.0338 after a sharp sell-off. Price has started consolidating above the $0.0312 area, while the recent low near $0.0266 is acting as key support.
🎯 Resistance: $0.0370 → $0.0429
🛡️ Support: $0.0312 → $0.0266
A strong break above $0.0370 could signal improving momentum toward $0.0429. If support fails, downside risk remains.
Trade with disciplined risk management.
Let's trade $4Stock
📊 Analysis:
$4STOCK is trading around $0.0338 after a sharp sell-off. Price has started consolidating above the $0.0312 area, while the recent low near $0.0266 is acting as key support.
🎯 Resistance: $0.0370 → $0.0429
🛡️ Support: $0.0312 → $0.0266
A strong break above $0.0370 could signal improving momentum toward $0.0429. If support fails, downside risk remains.
Trade with disciplined risk management.
Let's trade $4Stock
1
650
·
--
Bullish
$CNPY Looking Bullish After Strong Momentum 🚀
📊 Analysis:
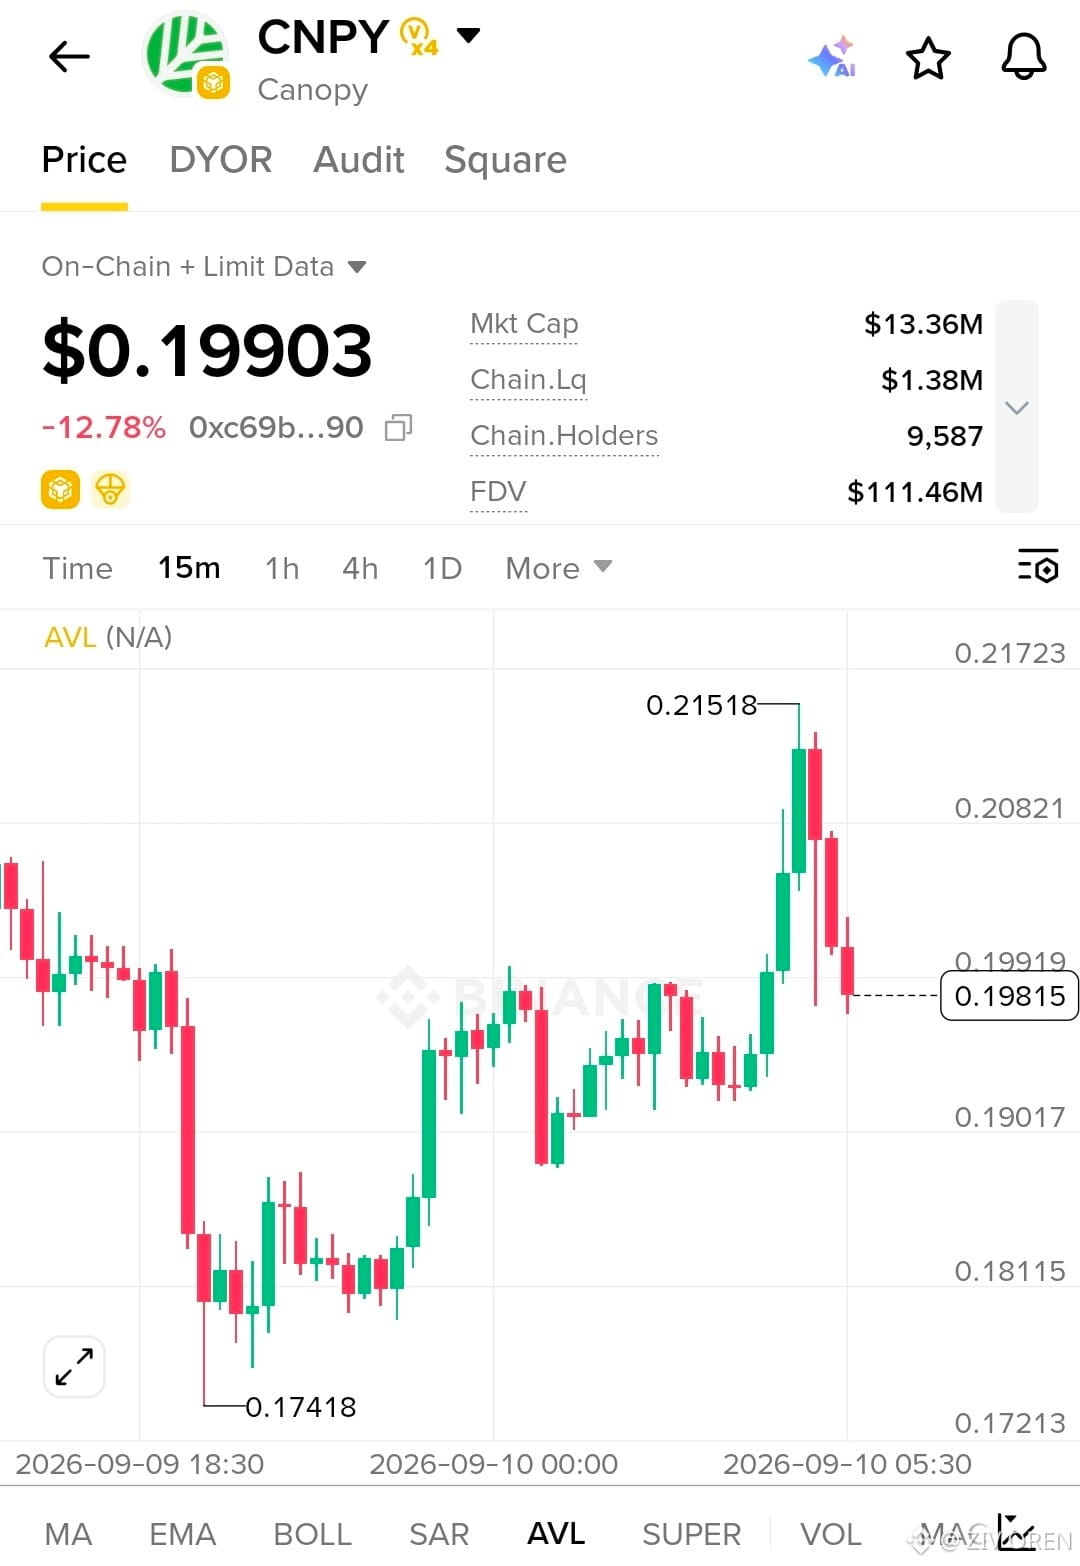
$CNPY pushed from the $0.19 area to a recent high near $0.21518, showing strong buying momentum. The current pullback around $0.19815 could be a healthy retest if $0.19017 holds as support.
🎯 Resistance: $0.20821 → $0.21518
🛡️ Support: $0.19017 → $0.18115
A clean break above $0.21518 could open room for further upside, while losing $0.19017 may weaken the setup.
Trade with proper risk management.
Let's trade $CNPY
$CNPY Looking Bullish After Strong Momentum 🚀
📊 Analysis:
$CNPY pushed from the $0.19 area to a recent high near $0.21518, showing strong buying momentum. The current pullback around $0.19815 could be a healthy retest if $0.19017 holds as support.
🎯 Resistance: $0.20821 → $0.21518
🛡️ Support: $0.19017 → $0.18115
A clean break above $0.21518 could open room for further upside, while losing $0.19017 may weaken the setup.
Trade with proper risk management.
Let's trade $CNPY
📊 Analysis:
$CNPY pushed from the $0.19 area to a recent high near $0.21518, showing strong buying momentum. The current pullback around $0.19815 could be a healthy retest if $0.19017 holds as support.
🎯 Resistance: $0.20821 → $0.21518
🛡️ Support: $0.19017 → $0.18115
A clean break above $0.21518 could open room for further upside, while losing $0.19017 may weaken the setup.
Trade with proper risk management.
Let's trade $CNPY
1
348
·
--
Bullish
$BTC — SHORT SETUP
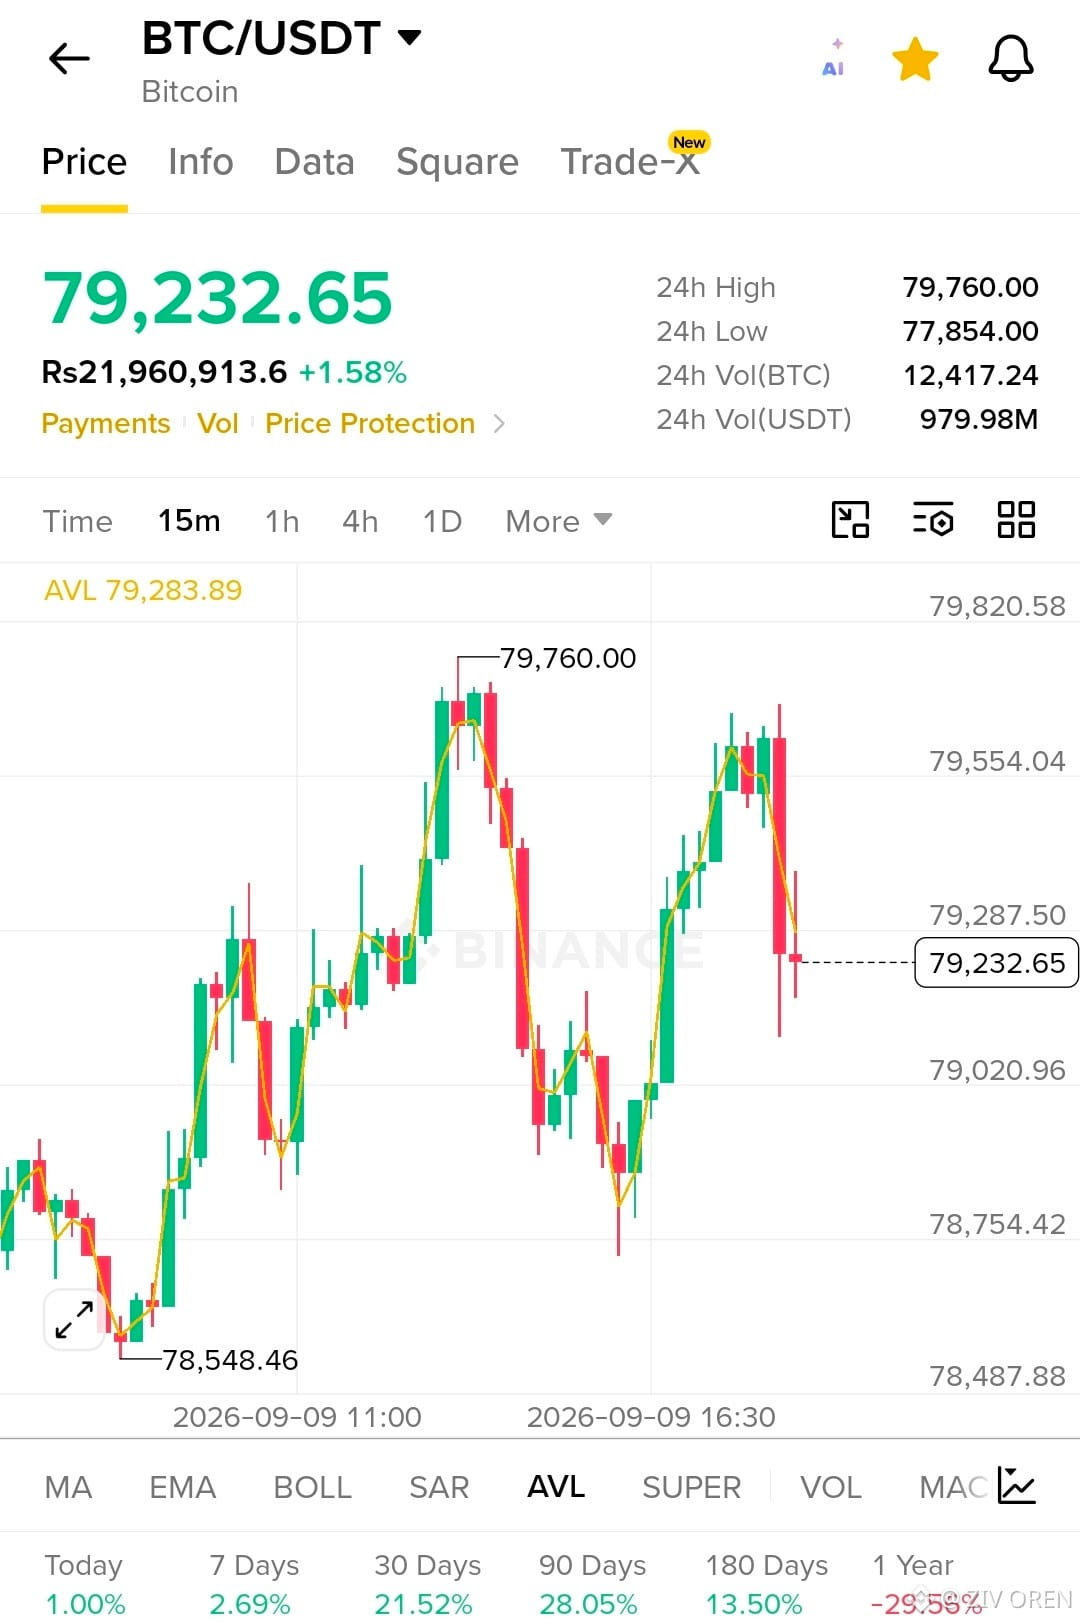
BTC is showing a rejection from the 79,550–79,760 resistance area. On the 15M chart, price has pulled back sharply and is now testing the 79,200 region.
Entry Zone: 79,200 – 79,350
TP1: 79,020
TP2: 78,750
TP3: 78,550
Stop Loss: 79,620
Analysis:
The recent rejection near 79,550 followed by a strong bearish candle suggests short-term momentum is cooling. A failed reclaim of 79,287 could keep pressure on the downside.
Key Confirmation:
A clean break below 79,020 can strengthen the bearish continuation setup.
Invalidation:
If BTC reclaims 79,550 and holds above it, avoid the short setup.
Risk Management:
Do not chase the breakdown. Wait for confirmation or a retest, and manage position size carefully.
$BTC — Stay disciplined and trade the levels$BTC
$BTC — SHORT SETUP
BTC is showing a rejection from the 79,550–79,760 resistance area. On the 15M chart, price has pulled back sharply and is now testing the 79,200 region.
Entry Zone: 79,200 – 79,350
TP1: 79,020
TP2: 78,750
TP3: 78,550
Stop Loss: 79,620
Analysis:
The recent rejection near 79,550 followed by a strong bearish candle suggests short-term momentum is cooling. A failed reclaim of 79,287 could keep pressure on the downside.
Key Confirmation:
A clean break below 79,020 can strengthen the bearish continuation setup.
Invalidation:
If BTC reclaims 79,550 and holds above it, avoid the short setup.
Risk Management:
Do not chase the breakdown. Wait for confirmation or a retest, and manage position size carefully.
$BTC — Stay disciplined and trade the levels$BTC
BTC is showing a rejection from the 79,550–79,760 resistance area. On the 15M chart, price has pulled back sharply and is now testing the 79,200 region.
Entry Zone: 79,200 – 79,350
TP1: 79,020
TP2: 78,750
TP3: 78,550
Stop Loss: 79,620
Analysis:
The recent rejection near 79,550 followed by a strong bearish candle suggests short-term momentum is cooling. A failed reclaim of 79,287 could keep pressure on the downside.
Key Confirmation:
A clean break below 79,020 can strengthen the bearish continuation setup.
Invalidation:
If BTC reclaims 79,550 and holds above it, avoid the short setup.
Risk Management:
Do not chase the breakdown. Wait for confirmation or a retest, and manage position size carefully.
$BTC — Stay disciplined and trade the levels$BTC
89
·
--
Bullish
$USELESS — LOOKING BULLISH
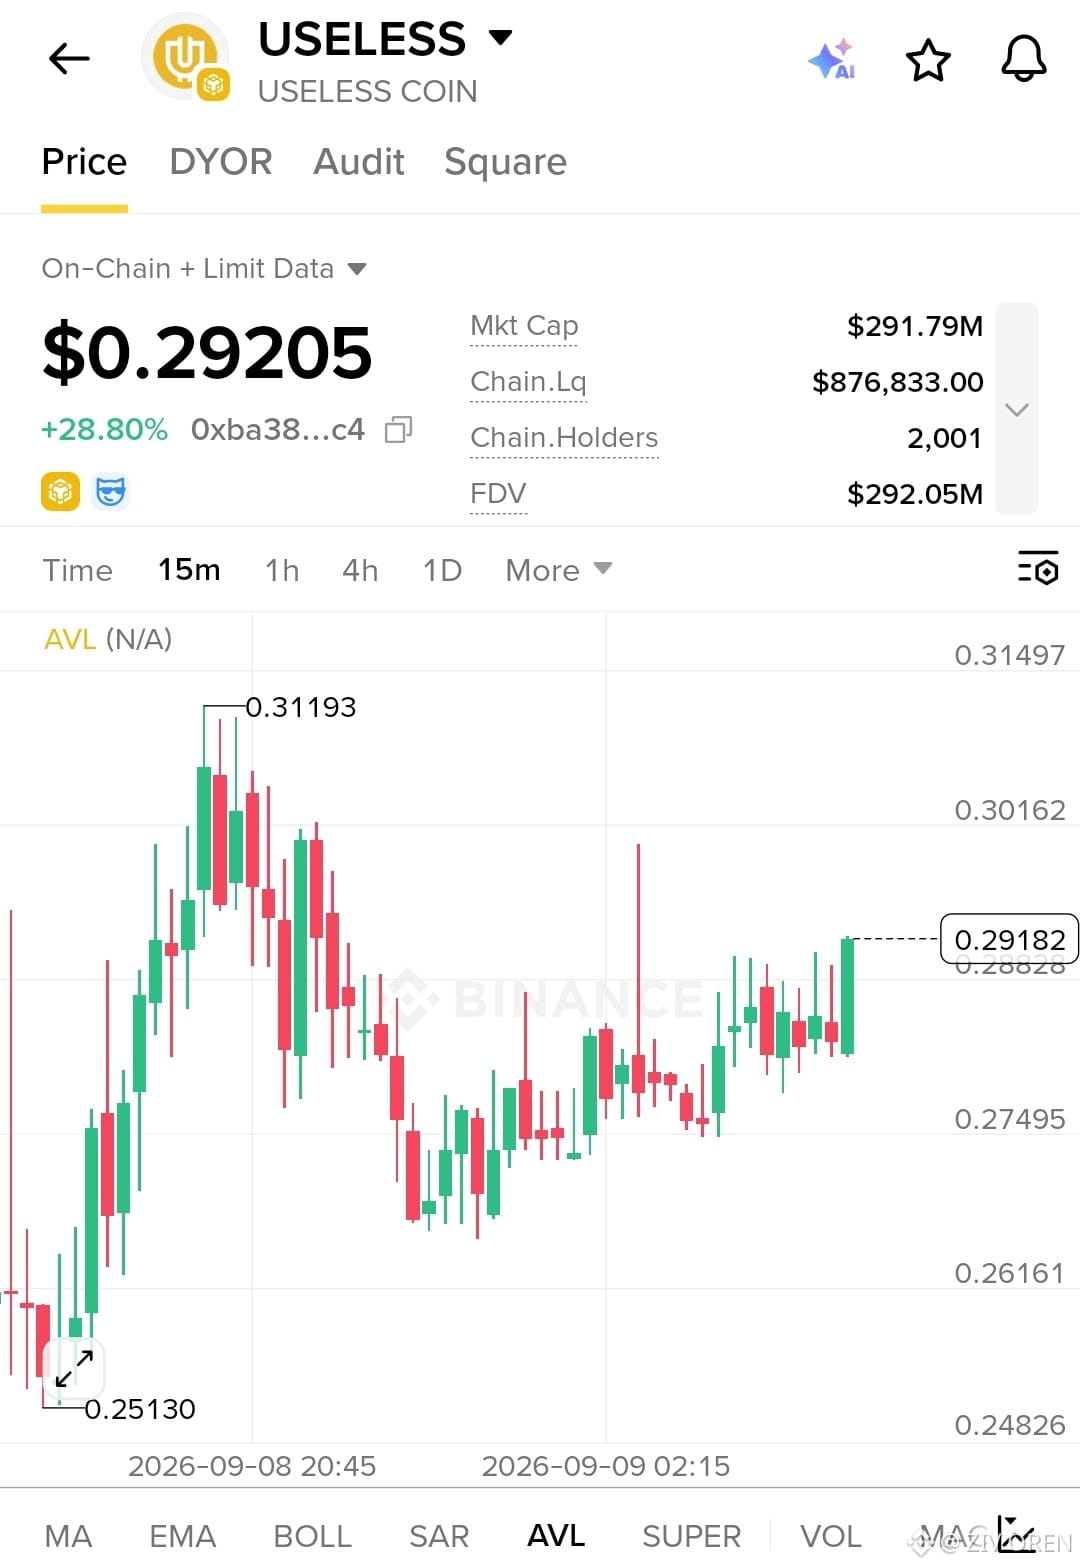
USELESS is showing a strong recovery on the 15M chart, climbing from the 0.2513 area and forming higher lows. Price is now pushing near 0.2920 after breaking out of the recent consolidation range.
Entry Zone: 0.2840 – 0.2900
TP1: 0.3016
TP2: 0.3119
TP3: 0.3250
Stop Loss: 0.2740
Analysis:
The 0.2880–0.2920 region is the immediate breakout area. A clean hold above 0.2920 could give bulls room to retest the previous high near 0.3119.
The structure remains constructive while price holds above 0.2750. A decisive breakdown below 0.2740 would weaken the bullish setup and invalidate the trade idea.
Avoid chasing a sharp candle. Wait for a controlled retest and confirmation before entering. Manage position size carefully due to high volatility.
Let's trade $USELESS
$USELESS — LOOKING BULLISH
USELESS is showing a strong recovery on the 15M chart, climbing from the 0.2513 area and forming higher lows. Price is now pushing near 0.2920 after breaking out of the recent consolidation range.
Entry Zone: 0.2840 – 0.2900
TP1: 0.3016
TP2: 0.3119
TP3: 0.3250
Stop Loss: 0.2740
Analysis:
The 0.2880–0.2920 region is the immediate breakout area. A clean hold above 0.2920 could give bulls room to retest the previous high near 0.3119.
The structure remains constructive while price holds above 0.2750. A decisive breakdown below 0.2740 would weaken the bullish setup and invalidate the trade idea.
Avoid chasing a sharp candle. Wait for a controlled retest and confirmation before entering. Manage position size carefully due to high volatility.
Let's trade $USELESS
USELESS is showing a strong recovery on the 15M chart, climbing from the 0.2513 area and forming higher lows. Price is now pushing near 0.2920 after breaking out of the recent consolidation range.
Entry Zone: 0.2840 – 0.2900
TP1: 0.3016
TP2: 0.3119
TP3: 0.3250
Stop Loss: 0.2740
Analysis:
The 0.2880–0.2920 region is the immediate breakout area. A clean hold above 0.2920 could give bulls room to retest the previous high near 0.3119.
The structure remains constructive while price holds above 0.2750. A decisive breakdown below 0.2740 would weaken the bullish setup and invalidate the trade idea.
Avoid chasing a sharp candle. Wait for a controlled retest and confirmation before entering. Manage position size carefully due to high volatility.
Let's trade $USELESS
137
·
--
Bullish
$SOPH — BULLISH REVERSAL SETUP
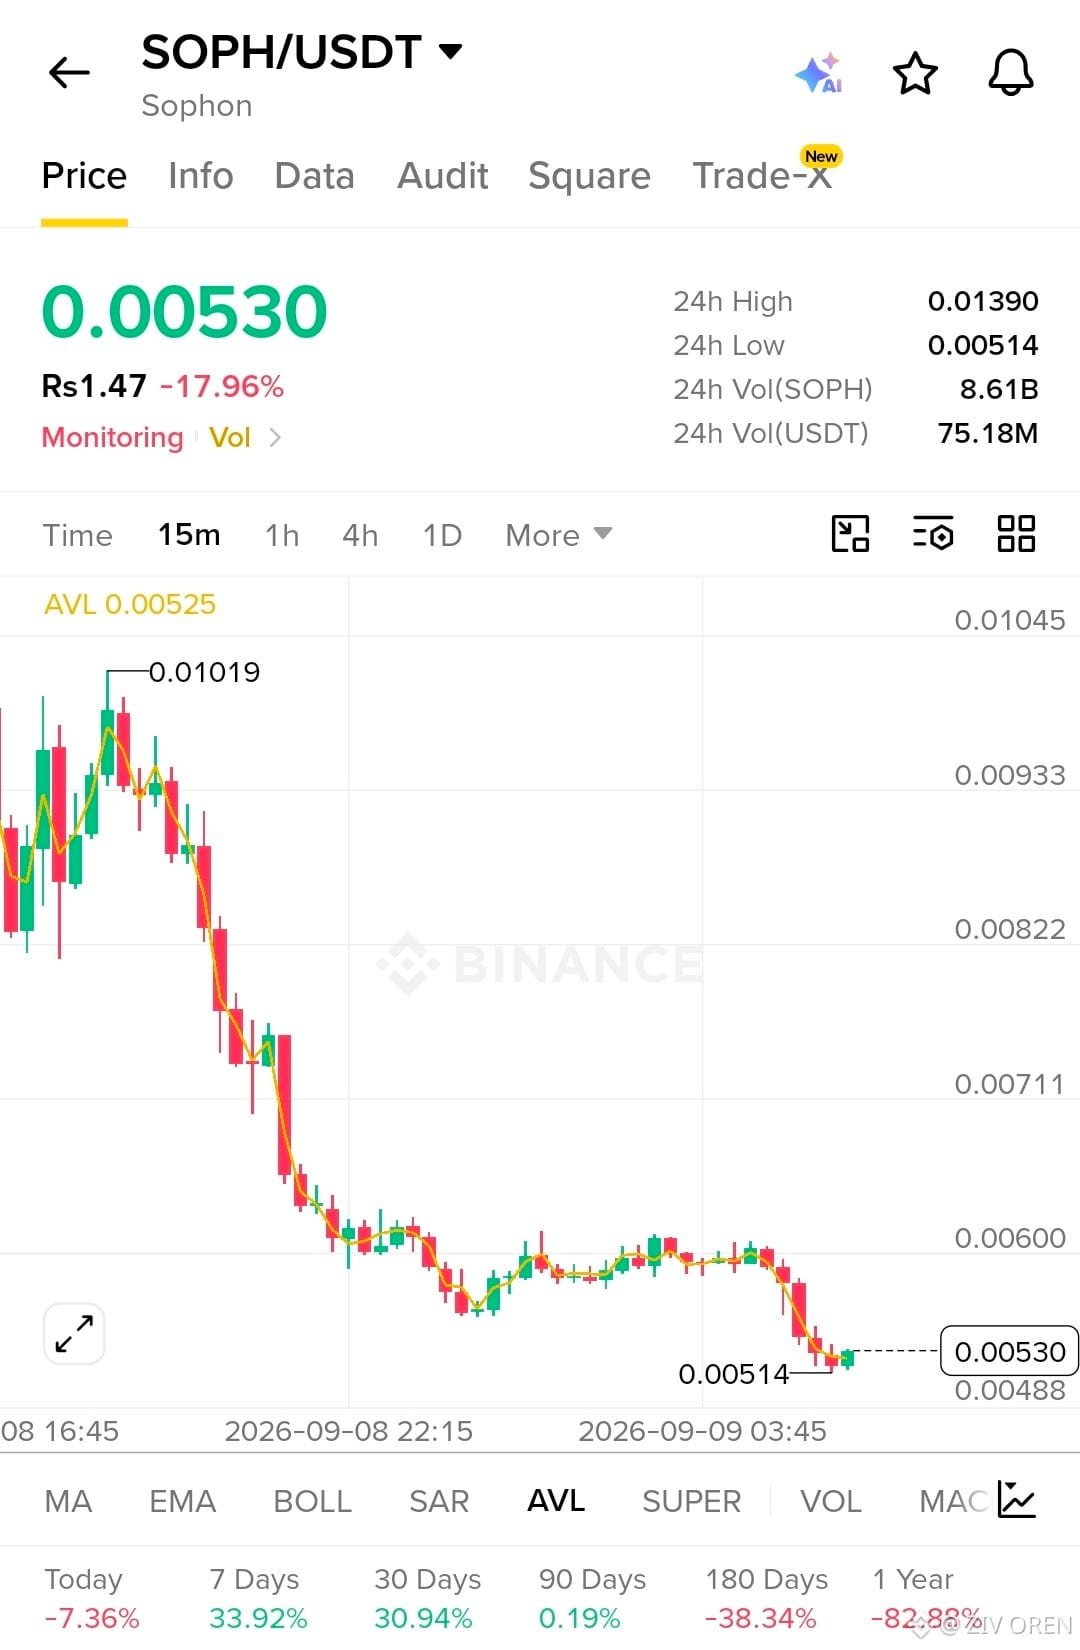
SOPH is attempting to stabilize after a prolonged 15M downtrend. Price has reached the 0.00514 low and is showing early signs of a bounce from this support area.
Entry Zone: 0.00520 – 0.00535
TP1: 0.00560
TP2: 0.00600
TP3: 0.00650
Stop Loss: 0.00500
Analysis:
The immediate support is around 0.00514. A successful hold above this area followed by a reclaim of 0.00560 could signal a short-term recovery toward 0.00600 and beyond.
The setup needs confirmation because the broader 15M structure is still bearish. A decisive break below 0.00514 would weaken the reversal idea and invalidate the setup.
Avoid FOMO. Wait for support confirmation and controlled price action before entering. Manage position size and risk carefully.
High-volatility setup — levels are chart-based and not guaranteed.
Let's trade $SOPH
$SOPH — BULLISH REVERSAL SETUP
SOPH is attempting to stabilize after a prolonged 15M downtrend. Price has reached the 0.00514 low and is showing early signs of a bounce from this support area.
Entry Zone: 0.00520 – 0.00535
TP1: 0.00560
TP2: 0.00600
TP3: 0.00650
Stop Loss: 0.00500
Analysis:
The immediate support is around 0.00514. A successful hold above this area followed by a reclaim of 0.00560 could signal a short-term recovery toward 0.00600 and beyond.
The setup needs confirmation because the broader 15M structure is still bearish. A decisive break below 0.00514 would weaken the reversal idea and invalidate the setup.
Avoid FOMO. Wait for support confirmation and controlled price action before entering. Manage position size and risk carefully.
High-volatility setup — levels are chart-based and not guaranteed.
Let's trade $SOPH
SOPH is attempting to stabilize after a prolonged 15M downtrend. Price has reached the 0.00514 low and is showing early signs of a bounce from this support area.
Entry Zone: 0.00520 – 0.00535
TP1: 0.00560
TP2: 0.00600
TP3: 0.00650
Stop Loss: 0.00500
Analysis:
The immediate support is around 0.00514. A successful hold above this area followed by a reclaim of 0.00560 could signal a short-term recovery toward 0.00600 and beyond.
The setup needs confirmation because the broader 15M structure is still bearish. A decisive break below 0.00514 would weaken the reversal idea and invalidate the setup.
Avoid FOMO. Wait for support confirmation and controlled price action before entering. Manage position size and risk carefully.
High-volatility setup — levels are chart-based and not guaranteed.
Let's trade $SOPH
315
·
--
Bullish
$MARSCOIN — BULLISH REVERSAL SETUP
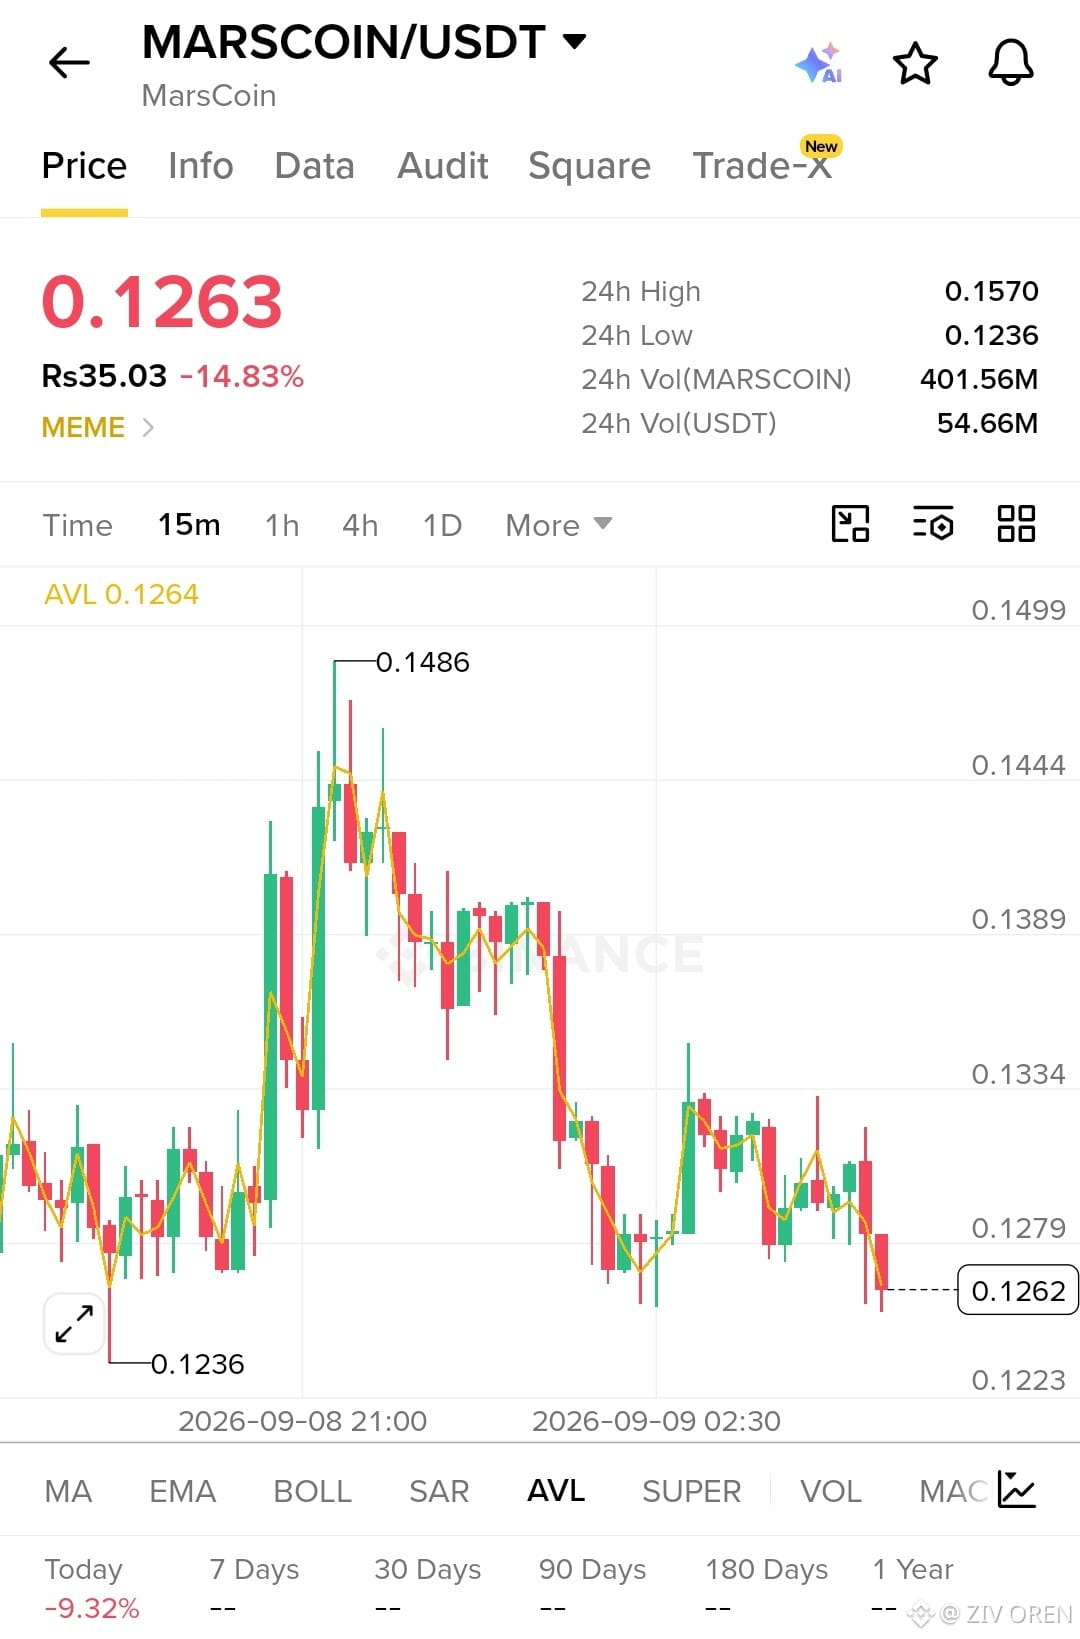
MARSCOIN is currently testing the 0.1260 area after a sharp rejection from 0.1334. The chart is weak in the short term, but the 0.1236–0.1260 region is an important support zone where a rebound could develop.
Entry Zone: 0.1250 – 0.1270
TP1: 0.1300
TP2: 0.1334
TP3: 0.1380
Stop Loss: 0.1220
Analysis:
The key confirmation is a reclaim of 0.1279. If price stabilizes above this level and breaks 0.1300 with strength, momentum could shift back toward 0.1334 and higher.
A clean break below 0.1236 would weaken the setup and invalidate the bullish idea. Avoid chasing candles and wait for support confirmation before entering.
High-volatility setup — manage position size and risk carefully. Levels are chart-based and not guaranteed.
Let's trade $MARSCOIN
$MARSCOIN — BULLISH REVERSAL SETUP
MARSCOIN is currently testing the 0.1260 area after a sharp rejection from 0.1334. The chart is weak in the short term, but the 0.1236–0.1260 region is an important support zone where a rebound could develop.
Entry Zone: 0.1250 – 0.1270
TP1: 0.1300
TP2: 0.1334
TP3: 0.1380
Stop Loss: 0.1220
Analysis:
The key confirmation is a reclaim of 0.1279. If price stabilizes above this level and breaks 0.1300 with strength, momentum could shift back toward 0.1334 and higher.
A clean break below 0.1236 would weaken the setup and invalidate the bullish idea. Avoid chasing candles and wait for support confirmation before entering.
High-volatility setup — manage position size and risk carefully. Levels are chart-based and not guaranteed.
Let's trade $MARSCOIN
MARSCOIN is currently testing the 0.1260 area after a sharp rejection from 0.1334. The chart is weak in the short term, but the 0.1236–0.1260 region is an important support zone where a rebound could develop.
Entry Zone: 0.1250 – 0.1270
TP1: 0.1300
TP2: 0.1334
TP3: 0.1380
Stop Loss: 0.1220
Analysis:
The key confirmation is a reclaim of 0.1279. If price stabilizes above this level and breaks 0.1300 with strength, momentum could shift back toward 0.1334 and higher.
A clean break below 0.1236 would weaken the setup and invalidate the bullish idea. Avoid chasing candles and wait for support confirmation before entering.
High-volatility setup — manage position size and risk carefully. Levels are chart-based and not guaranteed.
Let's trade $MARSCOIN
1
1
407
·
--
Bullish
$DOT — LOOKING BULLISH
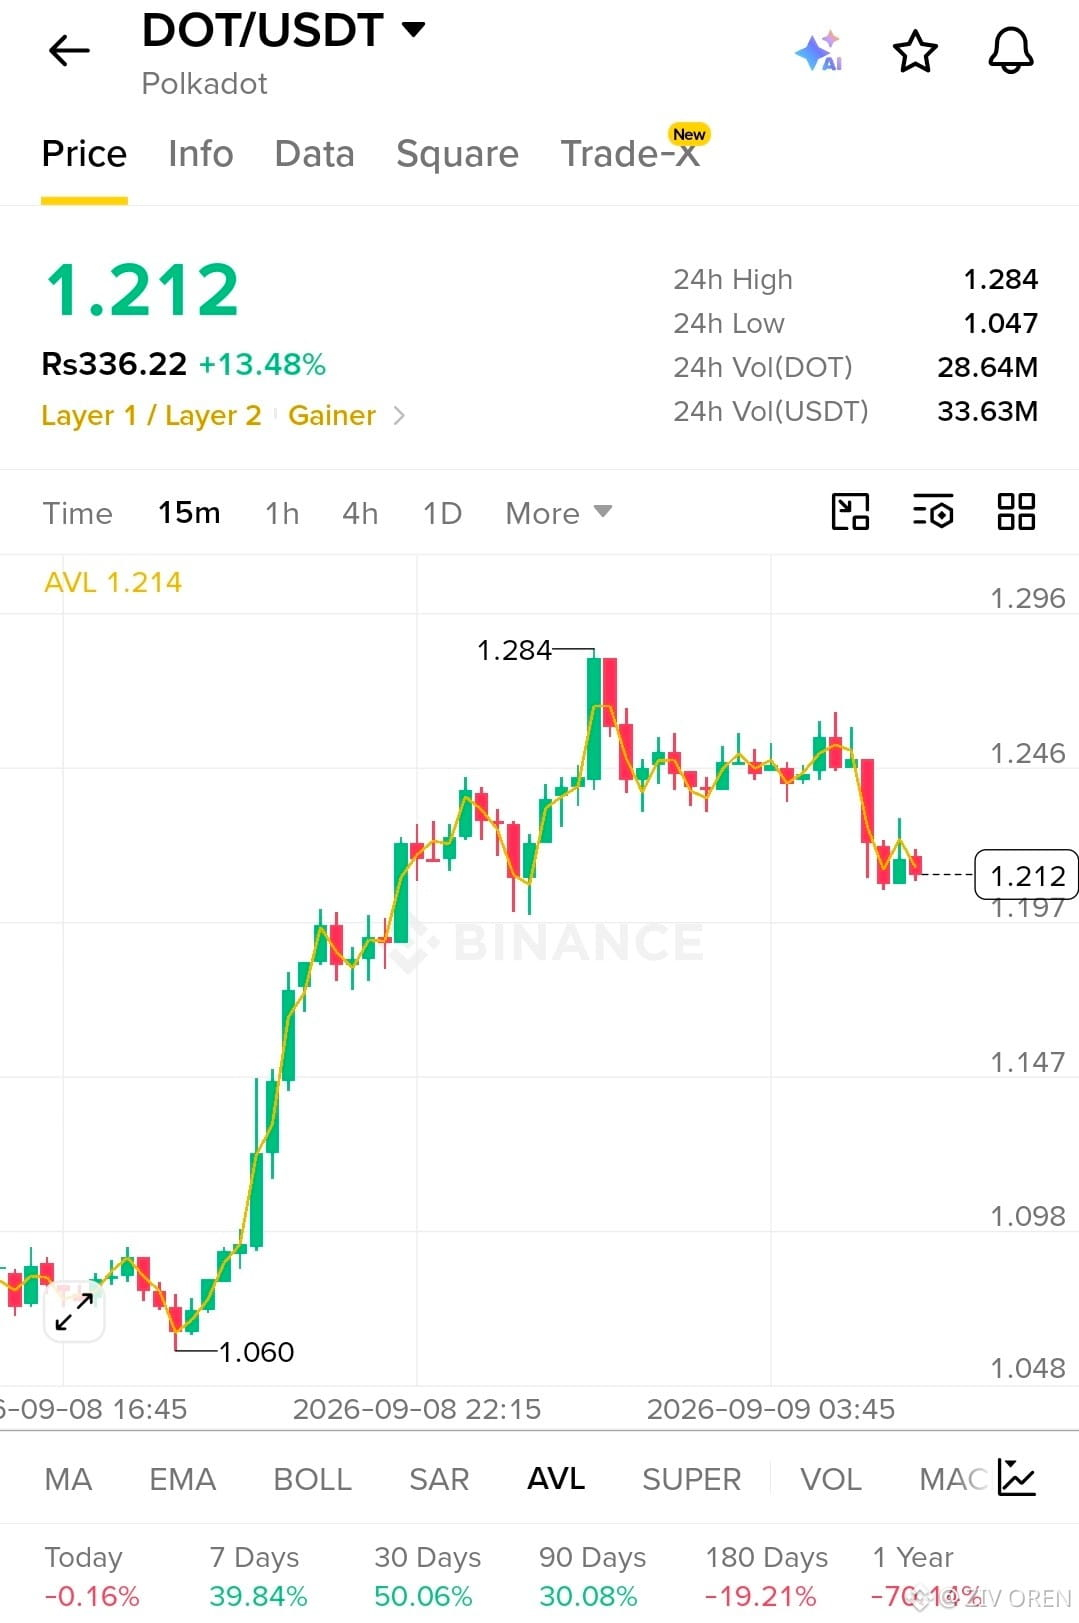
DOT has made a strong upside move from the 1.06 area and reached 1.284 before entering a short consolidation. Price is now testing the 1.197–1.21 support zone.
Entry Zone: 1.205 – 1.220
TP1: 1.246
TP2: 1.284
TP3: 1.320
Stop Loss: 1.185
Analysis:
The 15M structure remains constructive after the strong breakout, but momentum has cooled near resistance. A reclaim and hold above 1.246 would strengthen the bullish setup and could bring the 1.284 high back into focus.
If 1.197 holds, the current pullback can develop into another continuation move. A decisive break below 1.185 would invalidate the setup.
Avoid FOMO after a sharp move. Wait for support confirmation and manage position size carefully.
Let's trade $DOT
$DOT — LOOKING BULLISH
DOT has made a strong upside move from the 1.06 area and reached 1.284 before entering a short consolidation. Price is now testing the 1.197–1.21 support zone.
Entry Zone: 1.205 – 1.220
TP1: 1.246
TP2: 1.284
TP3: 1.320
Stop Loss: 1.185
Analysis:
The 15M structure remains constructive after the strong breakout, but momentum has cooled near resistance. A reclaim and hold above 1.246 would strengthen the bullish setup and could bring the 1.284 high back into focus.
If 1.197 holds, the current pullback can develop into another continuation move. A decisive break below 1.185 would invalidate the setup.
Avoid FOMO after a sharp move. Wait for support confirmation and manage position size carefully.
Let's trade $DOT
DOT has made a strong upside move from the 1.06 area and reached 1.284 before entering a short consolidation. Price is now testing the 1.197–1.21 support zone.
Entry Zone: 1.205 – 1.220
TP1: 1.246
TP2: 1.284
TP3: 1.320
Stop Loss: 1.185
Analysis:
The 15M structure remains constructive after the strong breakout, but momentum has cooled near resistance. A reclaim and hold above 1.246 would strengthen the bullish setup and could bring the 1.284 high back into focus.
If 1.197 holds, the current pullback can develop into another continuation move. A decisive break below 1.185 would invalidate the setup.
Avoid FOMO after a sharp move. Wait for support confirmation and manage position size carefully.
Let's trade $DOT
1
162
·
--
Bullish
$MIRA — LOOKING BULLISH
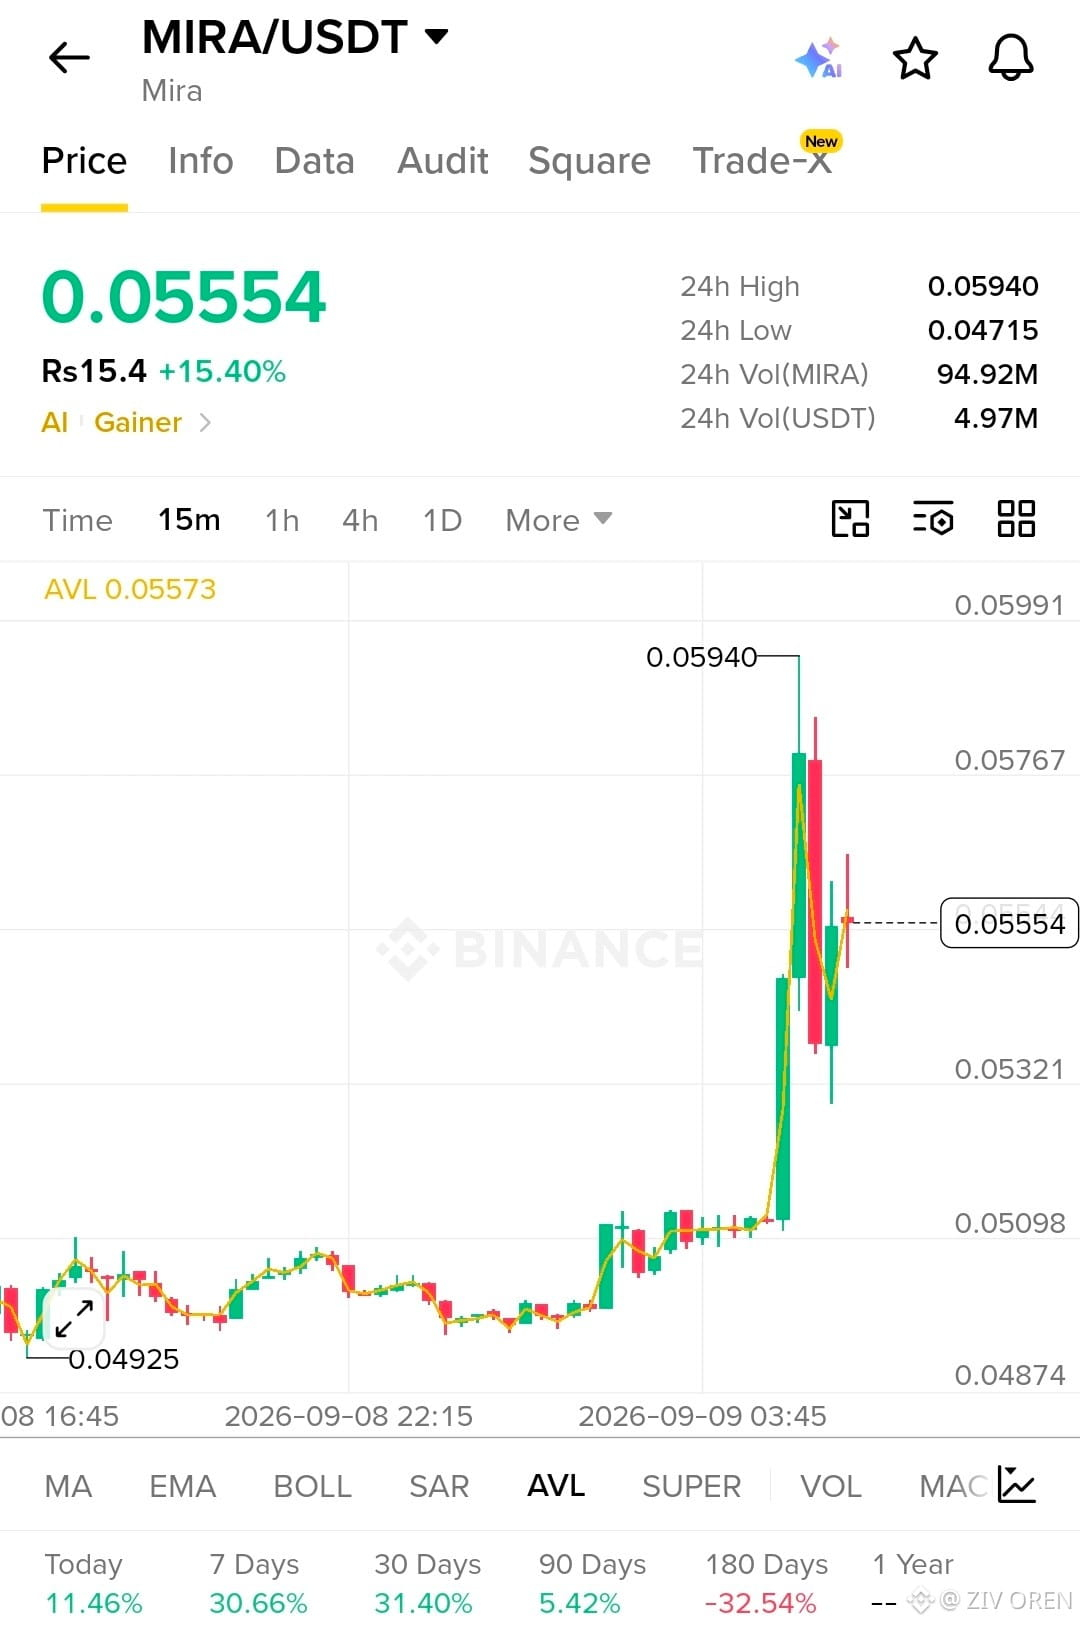
MIRA is showing strong 15M momentum after a sharp breakout from the 0.0510 area. Price is holding above the recent breakout zone, while 0.0532 is acting as an important short-term support.
Entry Zone: 0.05420 – 0.05520
TP1: 0.05770
TP2: 0.05940
TP3: 0.06150
Stop Loss: 0.05280
Analysis:
The structure remains bullish as long as MIRA holds above the 0.0532 support area. A clean break and hold above 0.0577 could open the way toward the recent high around 0.0594 and potentially higher levels.
Avoid chasing a vertical candle. A pullback into the entry zone with support confirmation would offer a cleaner setup. If 0.0528 breaks decisively, the bullish setup becomes invalid.
Trade with controlled position size and manage risk carefully. Levels are chart-based and not guaranteed.
Let's trade $MIRA
$MIRA — LOOKING BULLISH
MIRA is showing strong 15M momentum after a sharp breakout from the 0.0510 area. Price is holding above the recent breakout zone, while 0.0532 is acting as an important short-term support.
Entry Zone: 0.05420 – 0.05520
TP1: 0.05770
TP2: 0.05940
TP3: 0.06150
Stop Loss: 0.05280
Analysis:
The structure remains bullish as long as MIRA holds above the 0.0532 support area. A clean break and hold above 0.0577 could open the way toward the recent high around 0.0594 and potentially higher levels.
Avoid chasing a vertical candle. A pullback into the entry zone with support confirmation would offer a cleaner setup. If 0.0528 breaks decisively, the bullish setup becomes invalid.
Trade with controlled position size and manage risk carefully. Levels are chart-based and not guaranteed.
Let's trade $MIRA
MIRA is showing strong 15M momentum after a sharp breakout from the 0.0510 area. Price is holding above the recent breakout zone, while 0.0532 is acting as an important short-term support.
Entry Zone: 0.05420 – 0.05520
TP1: 0.05770
TP2: 0.05940
TP3: 0.06150
Stop Loss: 0.05280
Analysis:
The structure remains bullish as long as MIRA holds above the 0.0532 support area. A clean break and hold above 0.0577 could open the way toward the recent high around 0.0594 and potentially higher levels.
Avoid chasing a vertical candle. A pullback into the entry zone with support confirmation would offer a cleaner setup. If 0.0528 breaks decisively, the bullish setup becomes invalid.
Trade with controlled position size and manage risk carefully. Levels are chart-based and not guaranteed.
Let's trade $MIRA
3
497
·
--
Bullish
$SOPH — BULLISH MOMENTUM SETUP
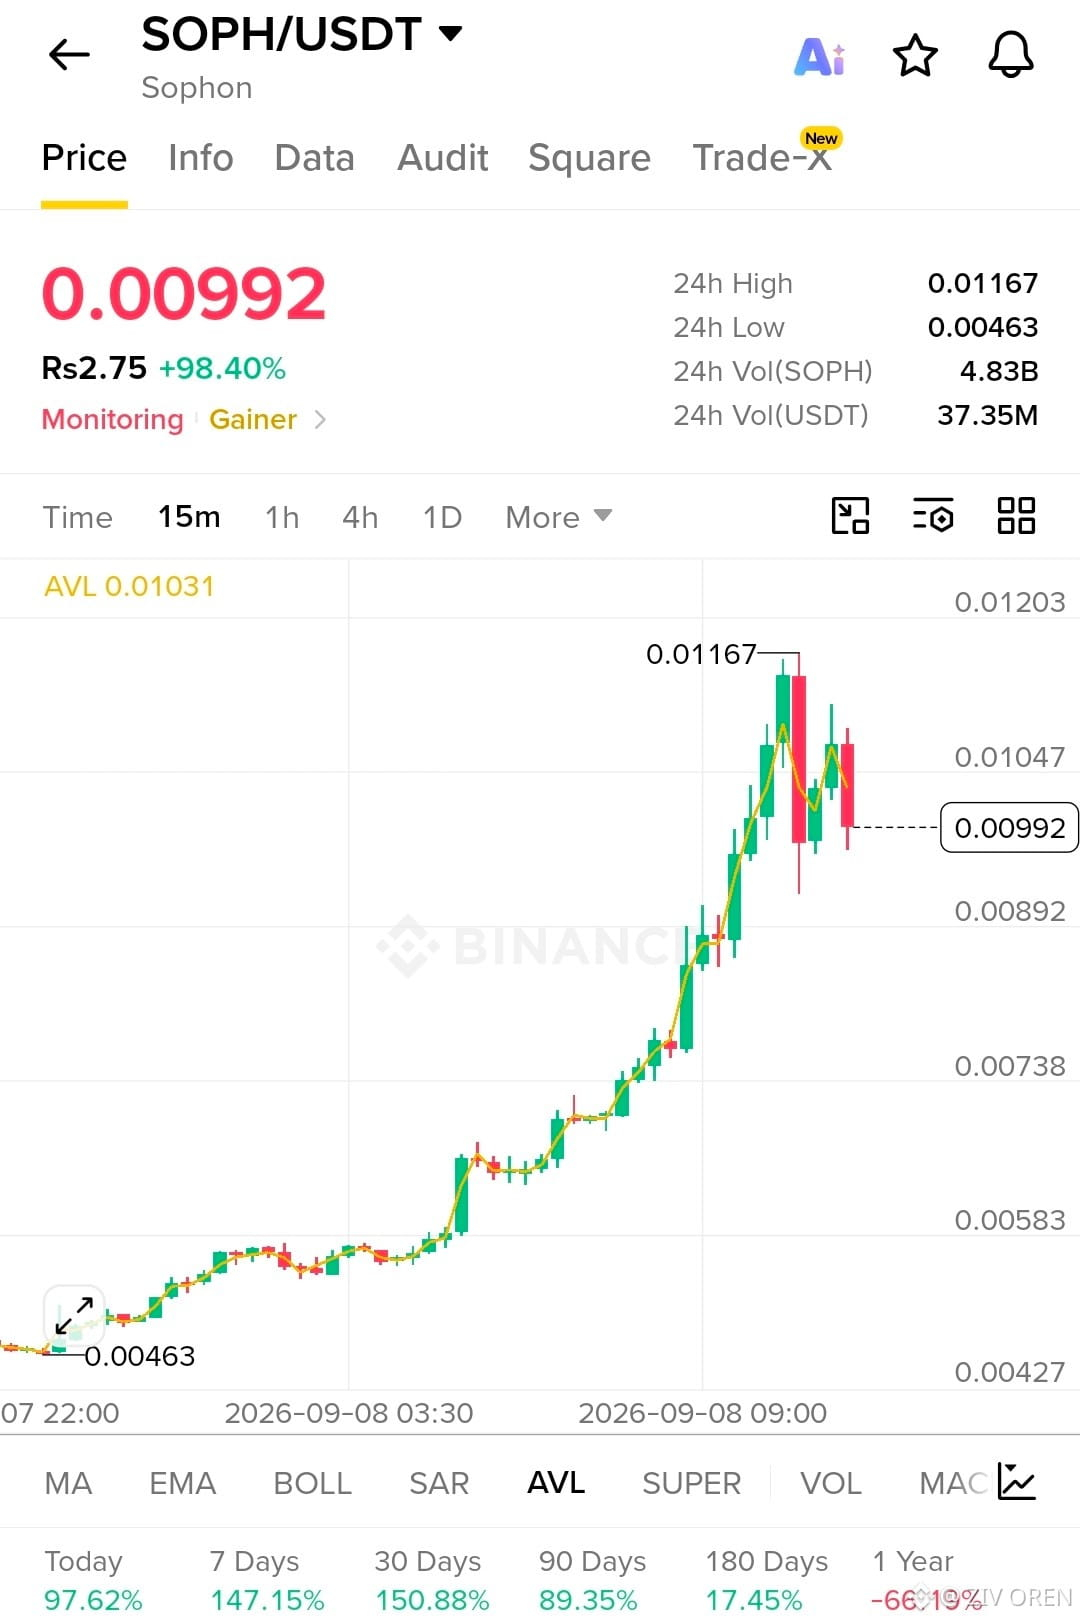
SOPH is showing exceptional momentum on the 15M chart, climbing from 0.00463 to a fresh high of 0.01167. After this sharp rally, price is consolidating near 0.00992, so a controlled retest could offer a better entry than chasing the move.
Current Price: 0.00992
Entry Zone: 0.00955 – 0.00990
TP1: 0.01047
TP2: 0.01100
TP3: 0.01167
TP4: 0.01220
Stop Loss: 0.00890
Analysis:
The overall structure remains strongly bullish with consecutive higher highs and higher lows. The 0.01047 area is the immediate resistance, while 0.00890–0.00920 acts as an important support zone.
Key confirmation: A clean reclaim and hold above 0.01047 could open the way toward 0.01167 and potentially higher.
Because SOPH has already moved sharply, avoid FOMO. A pullback into the entry zone with support confirmation would provide a more disciplined setup.
High-volatility setup — manage position size and risk carefully. Levels are chart-based and not guaranteed.
Let's trade $SOPH
$SOPH — BULLISH MOMENTUM SETUP
SOPH is showing exceptional momentum on the 15M chart, climbing from 0.00463 to a fresh high of 0.01167. After this sharp rally, price is consolidating near 0.00992, so a controlled retest could offer a better entry than chasing the move.
Current Price: 0.00992
Entry Zone: 0.00955 – 0.00990
TP1: 0.01047
TP2: 0.01100
TP3: 0.01167
TP4: 0.01220
Stop Loss: 0.00890
Analysis:
The overall structure remains strongly bullish with consecutive higher highs and higher lows. The 0.01047 area is the immediate resistance, while 0.00890–0.00920 acts as an important support zone.
Key confirmation: A clean reclaim and hold above 0.01047 could open the way toward 0.01167 and potentially higher.
Because SOPH has already moved sharply, avoid FOMO. A pullback into the entry zone with support confirmation would provide a more disciplined setup.
High-volatility setup — manage position size and risk carefully. Levels are chart-based and not guaranteed.
Let's trade $SOPH
SOPH is showing exceptional momentum on the 15M chart, climbing from 0.00463 to a fresh high of 0.01167. After this sharp rally, price is consolidating near 0.00992, so a controlled retest could offer a better entry than chasing the move.
Current Price: 0.00992
Entry Zone: 0.00955 – 0.00990
TP1: 0.01047
TP2: 0.01100
TP3: 0.01167
TP4: 0.01220
Stop Loss: 0.00890
Analysis:
The overall structure remains strongly bullish with consecutive higher highs and higher lows. The 0.01047 area is the immediate resistance, while 0.00890–0.00920 acts as an important support zone.
Key confirmation: A clean reclaim and hold above 0.01047 could open the way toward 0.01167 and potentially higher.
Because SOPH has already moved sharply, avoid FOMO. A pullback into the entry zone with support confirmation would provide a more disciplined setup.
High-volatility setup — manage position size and risk carefully. Levels are chart-based and not guaranteed.
Let's trade $SOPH
336
·
--
Bullish
$SOL — SHORT-TERM BEARISH SETUP
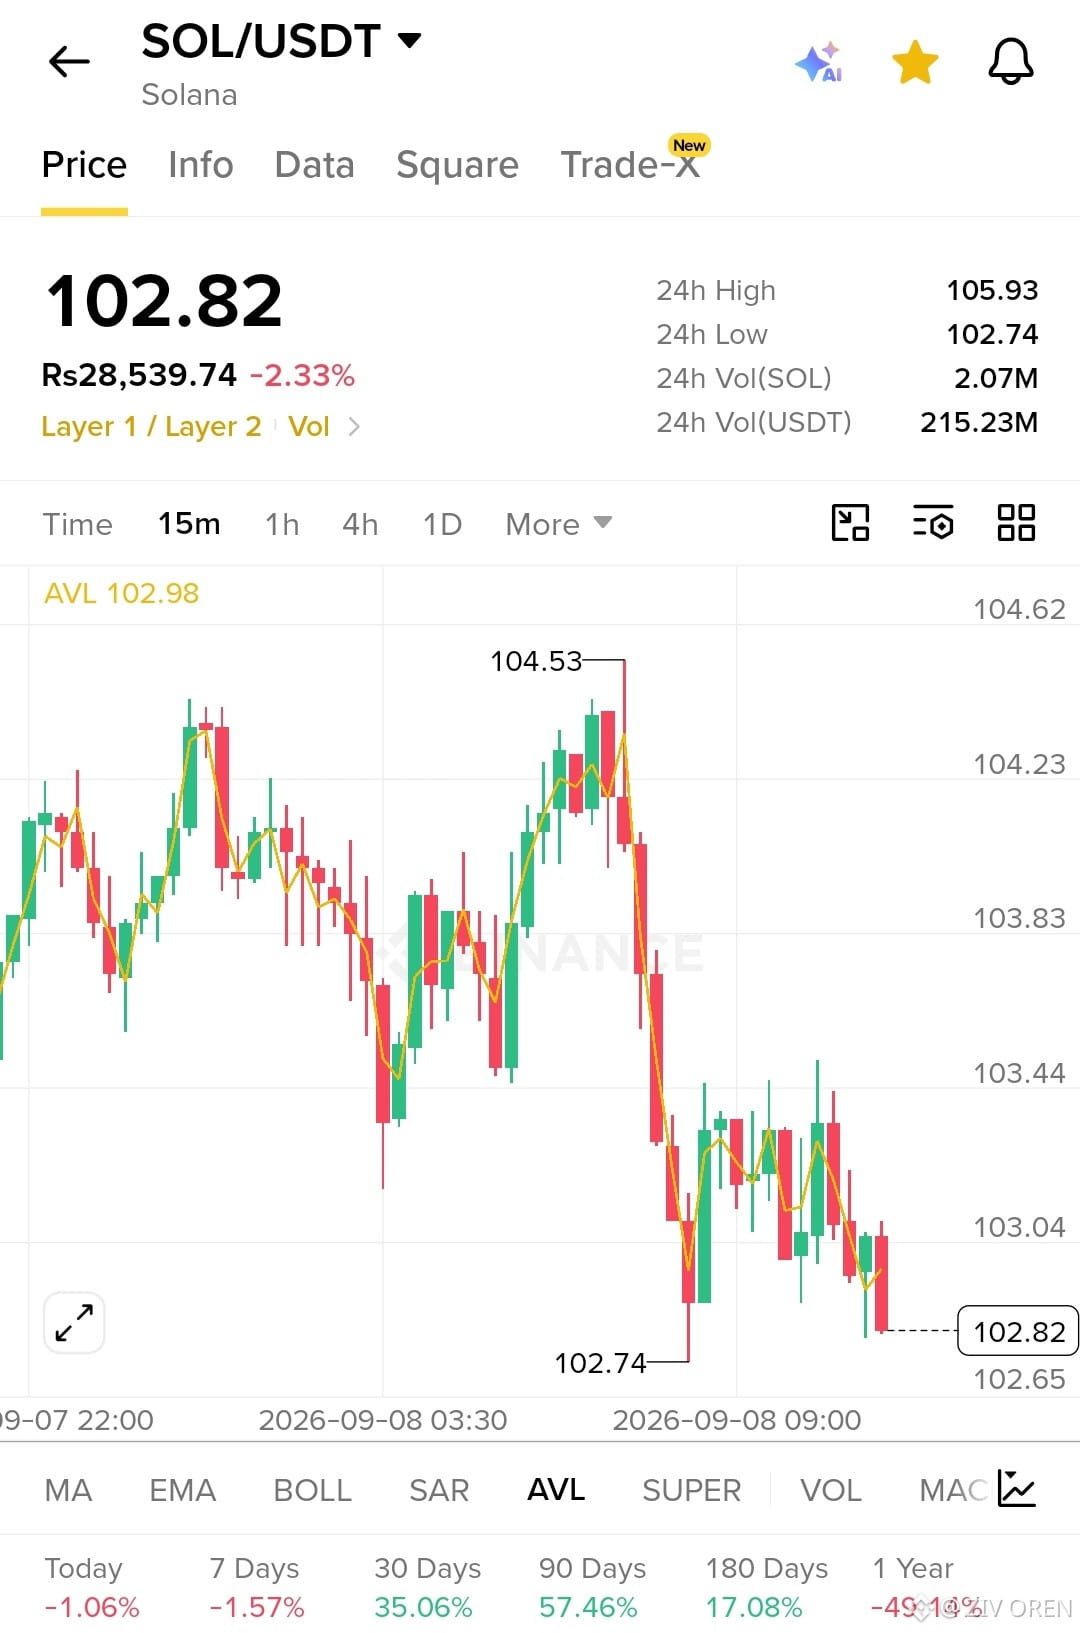
SOL is showing clear selling pressure on the 15M chart after rejection from 104.53. Price has broken lower and is now testing the 102.74–102.65 support area.
Current Price: 102.82
Entry Zone: 102.90 – 103.15
TP1: 102.74
TP2: 102.40
TP3: 102.00
Stop Loss: 103.50
Analysis:
The short-term structure remains bearish, with lower highs and lower lows forming after the rejection near 104.53. The 103.04–103.44 region is now an important resistance zone.
Key confirmation: A clean break and hold below 102.74 could strengthen the bearish continuation toward the next support levels.
If SOL reclaims 103.50 with strong momentum, the short setup becomes invalid. Avoid chasing the breakdown; wait for confirmation or a retest.
High-volatility setup — manage position size and risk carefully. Levels are chart-based and not guaranteed.
Let's trade $SOL
$SOL — SHORT-TERM BEARISH SETUP
SOL is showing clear selling pressure on the 15M chart after rejection from 104.53. Price has broken lower and is now testing the 102.74–102.65 support area.
Current Price: 102.82
Entry Zone: 102.90 – 103.15
TP1: 102.74
TP2: 102.40
TP3: 102.00
Stop Loss: 103.50
Analysis:
The short-term structure remains bearish, with lower highs and lower lows forming after the rejection near 104.53. The 103.04–103.44 region is now an important resistance zone.
Key confirmation: A clean break and hold below 102.74 could strengthen the bearish continuation toward the next support levels.
If SOL reclaims 103.50 with strong momentum, the short setup becomes invalid. Avoid chasing the breakdown; wait for confirmation or a retest.
High-volatility setup — manage position size and risk carefully. Levels are chart-based and not guaranteed.
Let's trade $SOL
SOL is showing clear selling pressure on the 15M chart after rejection from 104.53. Price has broken lower and is now testing the 102.74–102.65 support area.
Current Price: 102.82
Entry Zone: 102.90 – 103.15
TP1: 102.74
TP2: 102.40
TP3: 102.00
Stop Loss: 103.50
Analysis:
The short-term structure remains bearish, with lower highs and lower lows forming after the rejection near 104.53. The 103.04–103.44 region is now an important resistance zone.
Key confirmation: A clean break and hold below 102.74 could strengthen the bearish continuation toward the next support levels.
If SOL reclaims 103.50 with strong momentum, the short setup becomes invalid. Avoid chasing the breakdown; wait for confirmation or a retest.
High-volatility setup — manage position size and risk carefully. Levels are chart-based and not guaranteed.
Let's trade $SOL
166
Log in to explore more content
Join global crypto users on Binance Square
⚡️ Get latest and useful information about crypto.
💬 Trusted by the world’s largest crypto exchange.
👍 Discover real insights from verified creators.
Email / Phone number
Trending Topics
USAugustPPIRisesLessThanExpected
32,603 views
647 Discussing
🚨 US AUG PPI: Rises LESS Than Expected! Bullish for Crypto? 🚀
PPI +0.4% MoM as expected, but CORE PPI only +0.2% vs +0.3% expected - cooling!
What it means:
• Wholesale inflation softer than feared
• Fed rate hike chance now 62% - but dovish signals coming
• Core PCE revisions expected downward - bullish
• BTC usually pumps on softer PPI
Fed meeting Sep 15-16 - Market now expects pause, not hike?
Is this the green light for Q4 rally?
#Bitcoin #PPI #Fed #CryptoNews #BTC#usaugustppiriseslessthanexpected
True News
·1 Likes
·1.3k views
SECApprovesNasdaqTexasCommodityTrustRule
20,892 views
487 Discussing
ECBRaisesRatesSecondTimeTo2.5%
17,972 views
361 Discussing