
Timeoutson
37 Posts

Timeoutson
Report
Block User
Nothing special
Frequent Trader
4.9 Years
21 Following
48 Followers
43 Liked
Posts
All
Quotes
·
--

Article
$JASMY Spot Accumulation Plan: Zero-Stress Systematic Execution (2.63 R:R)$JASMY Spot Accumulation Strategy: Complete Institutional Execution Plan
Most retail traders lose capital not because their directional bias is wrong, but because they enter with poor risk management, chase market pumps out of FOMO, and get shaken out by routine wicks.
If you cannot sit in front of charts 24/7, market orders are your worst enemy. A systematic trader relies on pre-planned limit orders, multi-tiered Dollar-Cost Averaging (DCA), and strict position sizing. Below is a structured CEX Spot Accumulation Plan for $JASMY.
(Note: Figures are modeled on a standard $100 base allocation to make the risk math clear and scalable for any portfolio size.)
1. Market Structure & On-Chain Audit
On the daily chart, $JASMY has formed a solid local double-bottom base around $0.0355 and is now consolidating. On-chain Net Money Flow analysis reveals an interesting divergence: while small/medium retail accounts have been selling into recent pullbacks, large institutional-sized inflow orders (+9.71M) have actively absorbed sell liquidity.
Rather than buying market tops, our strategy places limit orders across key structural demand zones and volume nodes to capture high-probability pullbacks.
2. Multi-Level Spot Limit Buy Plan ($100 Base Example)
Never deploy 100% of your capital at once. We split our allocation across three defined support levels:
Entry Order 1 (Aggressive / Momentum — $30 Allocation):
Limit Price: $0.00392Rationale: First key local liquidity and retest zone.
Entry Order 2 (Conservative / Structure Retest — $40 Allocation):
Limit Price: $0.00378Rationale: 4H Market Structure retest level.
Entry Order 3 (Deep Macro Support — $30 Allocation):
Limit Price: $0.00362Rationale: Major Volume Profile Point of Control (POC).
Weighted Average Entry Price (If ALL Orders Fill): $0.003774
3. Profit Targets & Execution Strategy
Gains are locked in systematically as price reaches major supply zones:
Take-Profit 1 (TP1): $0.00426 (Sell 30% Position) — Retest of 1H local swing high.Take-Profit 2 (TP2): $0.00465 (Sell 50% Position) — 4H/1D Volume Profile Resistance.Take-Profit 3 (TP3): $0.00515 (Sell 20% Position) — Major Daily Macro Supply Zone.
4. Risk Management & Invalidation Rules
A trade plan without strict risk boundaries is just gambling.
Invalidation / Stop-Loss (SL): $0.00346 (Daily / 4H Close Below).
Rationale: Placed safely below the $0.00355 macro double-bottom low to prevent premature wick stop-hunts.
Maximum Risk Exposure: -$8.50 (Assumes full $100 position filled; capped at 8.50% max risk).
Overall Risk-to-Reward Ratio (R:R): 1 : 2.63
5. Active Trade Management
Break-Even Protocol: The moment price hits TP1 ($0.00426), move your Stop-Loss to your Average Entry Price ($0.003774). This guarantees the remaining trade is 100% risk-free.Invalidation Protocol: If a 4H candle closes below $0.00346, cancel any unfilled limit orders below and exit the trade manually.
Final Discipline Note: Professional trading is about executing a plan with precision, not predicting every minor candle move. Set your spot limit orders, set your alerts, and let the market come to you.
Disclaimer: This analysis is for educational and informational purposes only. It demonstrates a quantitative technical and spot capital management model. Always conduct your own research (DYOR) and manage your risk according to your personal financial goals.
#jasmy #SpotTrading #TradingSignals #tradingStrategy #SpotAccumulation
$JASMY Spot Accumulation Plan: Zero-Stress Systematic Execution (2.63 R:R)
$JASMY Spot Accumulation Strategy: Complete Institutional Execution Plan
Most retail traders lose capital not because their directional bias is wrong, but because they enter with poor risk management, chase market pumps out of FOMO, and get shaken out by routine wicks.
If you cannot sit in front of charts 24/7, market orders are your worst enemy. A systematic trader relies on pre-planned limit orders, multi-tiered Dollar-Cost Averaging (DCA), and strict position sizing. Below is a structured CEX Spot Accumulation Plan for $JASMY .
(Note: Figures are modeled on a standard $100 base allocation to make the risk math clear and scalable for any portfolio size.)
1. Market Structure & On-Chain Audit
On the daily chart, $JASMY has formed a solid local double-bottom base around $0.0355 and is now consolidating. On-chain Net Money Flow analysis reveals an interesting divergence: while small/medium retail accounts have been selling into recent pullbacks, large institutional-sized inflow orders (+9.71M) have actively absorbed sell liquidity.
Rather than buying market tops, our strategy places limit orders across key structural demand zones and volume nodes to capture high-probability pullbacks.
2. Multi-Level Spot Limit Buy Plan ($100 Base Example)
Never deploy 100% of your capital at once. We split our allocation across three defined support levels:
Entry Order 1 (Aggressive / Momentum — $30 Allocation):
Limit Price: $0.00392Rationale: First key local liquidity and retest zone.
Entry Order 2 (Conservative / Structure Retest — $40 Allocation):
Limit Price: $0.00378Rationale: 4H Market Structure retest level.
Entry Order 3 (Deep Macro Support — $30 Allocation):
Limit Price: $0.00362Rationale: Major Volume Profile Point of Control (POC).
Weighted Average Entry Price (If ALL Orders Fill): $0.003774
3. Profit Targets & Execution Strategy
Gains are locked in systematically as price reaches major supply zones:
Take-Profit 1 (TP1): $0.00426 (Sell 30% Position) — Retest of 1H local swing high.Take-Profit 2 (TP2): $0.00465 (Sell 50% Position) — 4H/1D Volume Profile Resistance.Take-Profit 3 (TP3): $0.00515 (Sell 20% Position) — Major Daily Macro Supply Zone.
4. Risk Management & Invalidation Rules
A trade plan without strict risk boundaries is just gambling.
Invalidation / Stop-Loss (SL): $0.00346 (Daily / 4H Close Below).
Rationale: Placed safely below the $0.00355 macro double-bottom low to prevent premature wick stop-hunts.
Maximum Risk Exposure: -$8.50 (Assumes full $100 position filled; capped at 8.50% max risk).
Overall Risk-to-Reward Ratio (R:R): 1 : 2.63
5. Active Trade Management
Break-Even Protocol: The moment price hits TP1 ($0.00426), move your Stop-Loss to your Average Entry Price ($0.003774). This guarantees the remaining trade is 100% risk-free.Invalidation Protocol: If a 4H candle closes below $0.00346, cancel any unfilled limit orders below and exit the trade manually.
Final Discipline Note: Professional trading is about executing a plan with precision, not predicting every minor candle move. Set your spot limit orders, set your alerts, and let the market come to you.
Disclaimer: This analysis is for educational and informational purposes only. It demonstrates a quantitative technical and spot capital management model. Always conduct your own research (DYOR) and manage your risk according to your personal financial goals.
#jasmy #SpotTrading #TradingSignals #tradingStrategy #SpotAccumulation
Most retail traders lose capital not because their directional bias is wrong, but because they enter with poor risk management, chase market pumps out of FOMO, and get shaken out by routine wicks.
If you cannot sit in front of charts 24/7, market orders are your worst enemy. A systematic trader relies on pre-planned limit orders, multi-tiered Dollar-Cost Averaging (DCA), and strict position sizing. Below is a structured CEX Spot Accumulation Plan for $JASMY .
(Note: Figures are modeled on a standard $100 base allocation to make the risk math clear and scalable for any portfolio size.)
1. Market Structure & On-Chain Audit
On the daily chart, $JASMY has formed a solid local double-bottom base around $0.0355 and is now consolidating. On-chain Net Money Flow analysis reveals an interesting divergence: while small/medium retail accounts have been selling into recent pullbacks, large institutional-sized inflow orders (+9.71M) have actively absorbed sell liquidity.
Rather than buying market tops, our strategy places limit orders across key structural demand zones and volume nodes to capture high-probability pullbacks.
2. Multi-Level Spot Limit Buy Plan ($100 Base Example)
Never deploy 100% of your capital at once. We split our allocation across three defined support levels:
Entry Order 1 (Aggressive / Momentum — $30 Allocation):
Limit Price: $0.00392Rationale: First key local liquidity and retest zone.
Entry Order 2 (Conservative / Structure Retest — $40 Allocation):
Limit Price: $0.00378Rationale: 4H Market Structure retest level.
Entry Order 3 (Deep Macro Support — $30 Allocation):
Limit Price: $0.00362Rationale: Major Volume Profile Point of Control (POC).
Weighted Average Entry Price (If ALL Orders Fill): $0.003774
3. Profit Targets & Execution Strategy
Gains are locked in systematically as price reaches major supply zones:
Take-Profit 1 (TP1): $0.00426 (Sell 30% Position) — Retest of 1H local swing high.Take-Profit 2 (TP2): $0.00465 (Sell 50% Position) — 4H/1D Volume Profile Resistance.Take-Profit 3 (TP3): $0.00515 (Sell 20% Position) — Major Daily Macro Supply Zone.
4. Risk Management & Invalidation Rules
A trade plan without strict risk boundaries is just gambling.
Invalidation / Stop-Loss (SL): $0.00346 (Daily / 4H Close Below).
Rationale: Placed safely below the $0.00355 macro double-bottom low to prevent premature wick stop-hunts.
Maximum Risk Exposure: -$8.50 (Assumes full $100 position filled; capped at 8.50% max risk).
Overall Risk-to-Reward Ratio (R:R): 1 : 2.63
5. Active Trade Management
Break-Even Protocol: The moment price hits TP1 ($0.00426), move your Stop-Loss to your Average Entry Price ($0.003774). This guarantees the remaining trade is 100% risk-free.Invalidation Protocol: If a 4H candle closes below $0.00346, cancel any unfilled limit orders below and exit the trade manually.
Final Discipline Note: Professional trading is about executing a plan with precision, not predicting every minor candle move. Set your spot limit orders, set your alerts, and let the market come to you.
Disclaimer: This analysis is for educational and informational purposes only. It demonstrates a quantitative technical and spot capital management model. Always conduct your own research (DYOR) and manage your risk according to your personal financial goals.
#jasmy #SpotTrading #TradingSignals #tradingStrategy #SpotAccumulation
138
·
--

Article
$SAND Systematic Spot Accumulation Plan: Zero Stress, Pure Math (3.04 R:R)$SAND Spot Accumulation Strategy: Complete Institutional Trade Blueprint.
Most retail traders fail because they buy market pumps out of FOMO and panic-sell during routine pullbacks. If you cannot watch charts 24/7, market orders will exhaust your portfolio.
Systematic trading relies on mathematical execution, structured Dollar-Cost Averaging (DCA), and strict risk control. Below is a multi-tiered CEX Spot Accumulation Plan designed for $SAND.
(Note: Calculations are modeled on a standard $100 base allocation for clear risk math. Scale figures proportionally to fit your portfolio.)
1. Market Structure & Strategy Rationale
While lower timeframes show short-term momentum, high-timeframe structures indicate that price action is testing resistance levels ($0.0410–$0.0415) with overbought RSI readings. Rather than chasing market price, this plan positions limit buy orders across key support zones and Volume Profile nodes to capitalize on temporary pullbacks.
2. Multi-Level Spot Buy Execution ($100 Base Example)
Do not deploy 100% of your position at once. Split capital across three structural support levels:
Entry 1 (Aggressive / Momentum - 30% Capital / $30):
Limit Price: $0.0390 Rationale: Immediate local retest level.
Entry 2 (Conservative / Structure Retest - 40% Capital / $40):
Limit Price: $0.0372Rationale: Key Liquidity & 1H Volume POC zone.
Entry 3 (Deep Support - 30% Capital / $30):
Limit Price: $0.0358Rationale: Major 4H Structural Support.
Weighted Average Entry Price (If All Limit Orders Fill): $0.03732
3. Profit Targets & Distribution Plan
Lock in gains systematically as price reaches major supply zones:
Take-Profit 1 (TP1): $0.0415 (Sell 30% of Position) — Retest of local swing high.Take-Profit 2 (TP2): $0.0470 (Sell 50% of Position) — High-density supply cluster.Take-Profit 3 (TP3): $0.0530 (Sell 20% Position) — Macro swing resistance.
4. Risk Management & Invalidation Rules
A trade plan is incomplete without strict capital preservation rules.
Stop-Loss Level (SL): $0.0342 (Daily / 4H Close Below)
Why this level? Placed safely below market structure and liquidity pools to avoid premature stop-hunts while capping overall drawdown.
Max Loss on $100 Capital (All Entries Filled): -$8.44 (8.44% maximum risk exposure).Overall Risk-to-Reward Ratio (R:R): 1 : 3.04
5. Active Trade Rules
Break-Even Adjustment: Once price hits TP1 ($0.0415), move your Stop-Loss to your Average Entry Price ($0.03732). This removes risk completely for the remaining position.Invalidation: If a 4H candle closes below $0.0342, cancel any unfilled lower limit orders and exit the position manually.
Final Execution Note: Consistent trading relies on discipline over guesswork. Set your limit orders on CEX Spot, set your alerts, and let the market execute the plan.
Disclaimer: This breakdown is for educational purposes and demonstrates a structured technical model. Always manage your own risk and position size accordingly.
#TradingSignals #SpotTrading #Sand #TradingCommunity
$SAND Systematic Spot Accumulation Plan: Zero Stress, Pure Math (3.04 R:R)
$SAND Spot Accumulation Strategy: Complete Institutional Trade Blueprint.
Most retail traders fail because they buy market pumps out of FOMO and panic-sell during routine pullbacks. If you cannot watch charts 24/7, market orders will exhaust your portfolio.
Systematic trading relies on mathematical execution, structured Dollar-Cost Averaging (DCA), and strict risk control. Below is a multi-tiered CEX Spot Accumulation Plan designed for $SAND .
(Note: Calculations are modeled on a standard $100 base allocation for clear risk math. Scale figures proportionally to fit your portfolio.)
1. Market Structure & Strategy Rationale
While lower timeframes show short-term momentum, high-timeframe structures indicate that price action is testing resistance levels ($0.0410–$0.0415) with overbought RSI readings. Rather than chasing market price, this plan positions limit buy orders across key support zones and Volume Profile nodes to capitalize on temporary pullbacks.
2. Multi-Level Spot Buy Execution ($100 Base Example)
Do not deploy 100% of your position at once. Split capital across three structural support levels:
Entry 1 (Aggressive / Momentum - 30% Capital / $30):
Limit Price: $0.0390 Rationale: Immediate local retest level.
Entry 2 (Conservative / Structure Retest - 40% Capital / $40):
Limit Price: $0.0372Rationale: Key Liquidity & 1H Volume POC zone.
Entry 3 (Deep Support - 30% Capital / $30):
Limit Price: $0.0358Rationale: Major 4H Structural Support.
Weighted Average Entry Price (If All Limit Orders Fill): $0.03732
3. Profit Targets & Distribution Plan
Lock in gains systematically as price reaches major supply zones:
Take-Profit 1 (TP1): $0.0415 (Sell 30% of Position) — Retest of local swing high.Take-Profit 2 (TP2): $0.0470 (Sell 50% of Position) — High-density supply cluster.Take-Profit 3 (TP3): $0.0530 (Sell 20% Position) — Macro swing resistance.
4. Risk Management & Invalidation Rules
A trade plan is incomplete without strict capital preservation rules.
Stop-Loss Level (SL): $0.0342 (Daily / 4H Close Below)
Why this level? Placed safely below market structure and liquidity pools to avoid premature stop-hunts while capping overall drawdown.
Max Loss on $100 Capital (All Entries Filled): -$8.44 (8.44% maximum risk exposure).Overall Risk-to-Reward Ratio (R:R): 1 : 3.04
5. Active Trade Rules
Break-Even Adjustment: Once price hits TP1 ($0.0415), move your Stop-Loss to your Average Entry Price ($0.03732). This removes risk completely for the remaining position.Invalidation: If a 4H candle closes below $0.0342, cancel any unfilled lower limit orders and exit the position manually.
Final Execution Note: Consistent trading relies on discipline over guesswork. Set your limit orders on CEX Spot, set your alerts, and let the market execute the plan.
Disclaimer: This breakdown is for educational purposes and demonstrates a structured technical model. Always manage your own risk and position size accordingly.
#TradingSignals #SpotTrading #Sand #TradingCommunity
Most retail traders fail because they buy market pumps out of FOMO and panic-sell during routine pullbacks. If you cannot watch charts 24/7, market orders will exhaust your portfolio.
Systematic trading relies on mathematical execution, structured Dollar-Cost Averaging (DCA), and strict risk control. Below is a multi-tiered CEX Spot Accumulation Plan designed for $SAND .
(Note: Calculations are modeled on a standard $100 base allocation for clear risk math. Scale figures proportionally to fit your portfolio.)
1. Market Structure & Strategy Rationale
While lower timeframes show short-term momentum, high-timeframe structures indicate that price action is testing resistance levels ($0.0410–$0.0415) with overbought RSI readings. Rather than chasing market price, this plan positions limit buy orders across key support zones and Volume Profile nodes to capitalize on temporary pullbacks.
2. Multi-Level Spot Buy Execution ($100 Base Example)
Do not deploy 100% of your position at once. Split capital across three structural support levels:
Entry 1 (Aggressive / Momentum - 30% Capital / $30):
Limit Price: $0.0390 Rationale: Immediate local retest level.
Entry 2 (Conservative / Structure Retest - 40% Capital / $40):
Limit Price: $0.0372Rationale: Key Liquidity & 1H Volume POC zone.
Entry 3 (Deep Support - 30% Capital / $30):
Limit Price: $0.0358Rationale: Major 4H Structural Support.
Weighted Average Entry Price (If All Limit Orders Fill): $0.03732
3. Profit Targets & Distribution Plan
Lock in gains systematically as price reaches major supply zones:
Take-Profit 1 (TP1): $0.0415 (Sell 30% of Position) — Retest of local swing high.Take-Profit 2 (TP2): $0.0470 (Sell 50% of Position) — High-density supply cluster.Take-Profit 3 (TP3): $0.0530 (Sell 20% Position) — Macro swing resistance.
4. Risk Management & Invalidation Rules
A trade plan is incomplete without strict capital preservation rules.
Stop-Loss Level (SL): $0.0342 (Daily / 4H Close Below)
Why this level? Placed safely below market structure and liquidity pools to avoid premature stop-hunts while capping overall drawdown.
Max Loss on $100 Capital (All Entries Filled): -$8.44 (8.44% maximum risk exposure).Overall Risk-to-Reward Ratio (R:R): 1 : 3.04
5. Active Trade Rules
Break-Even Adjustment: Once price hits TP1 ($0.0415), move your Stop-Loss to your Average Entry Price ($0.03732). This removes risk completely for the remaining position.Invalidation: If a 4H candle closes below $0.0342, cancel any unfilled lower limit orders and exit the position manually.
Final Execution Note: Consistent trading relies on discipline over guesswork. Set your limit orders on CEX Spot, set your alerts, and let the market execute the plan.
Disclaimer: This breakdown is for educational purposes and demonstrates a structured technical model. Always manage your own risk and position size accordingly.
#TradingSignals #SpotTrading #Sand #TradingCommunity
323
·
--
got it, i am in
got it, i am in

Token Talks
·
--
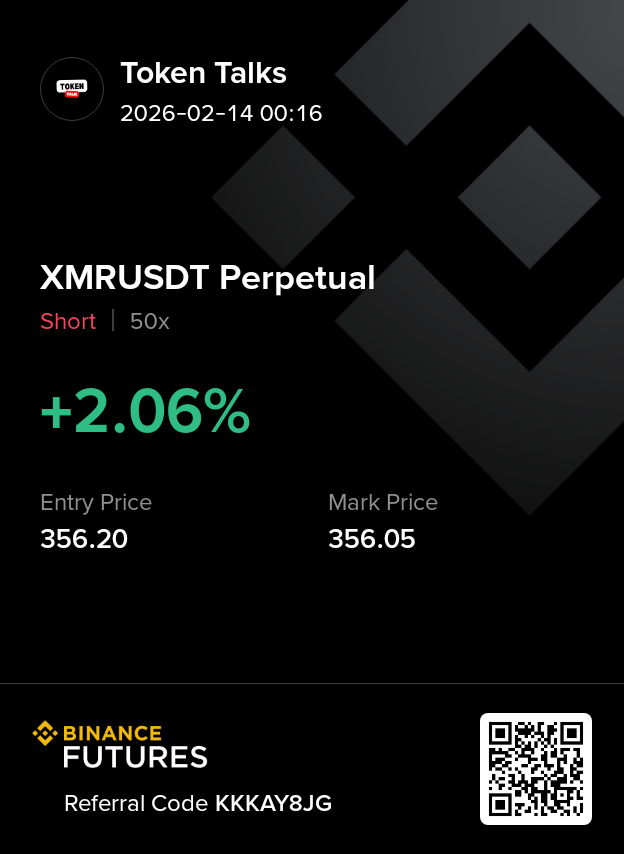
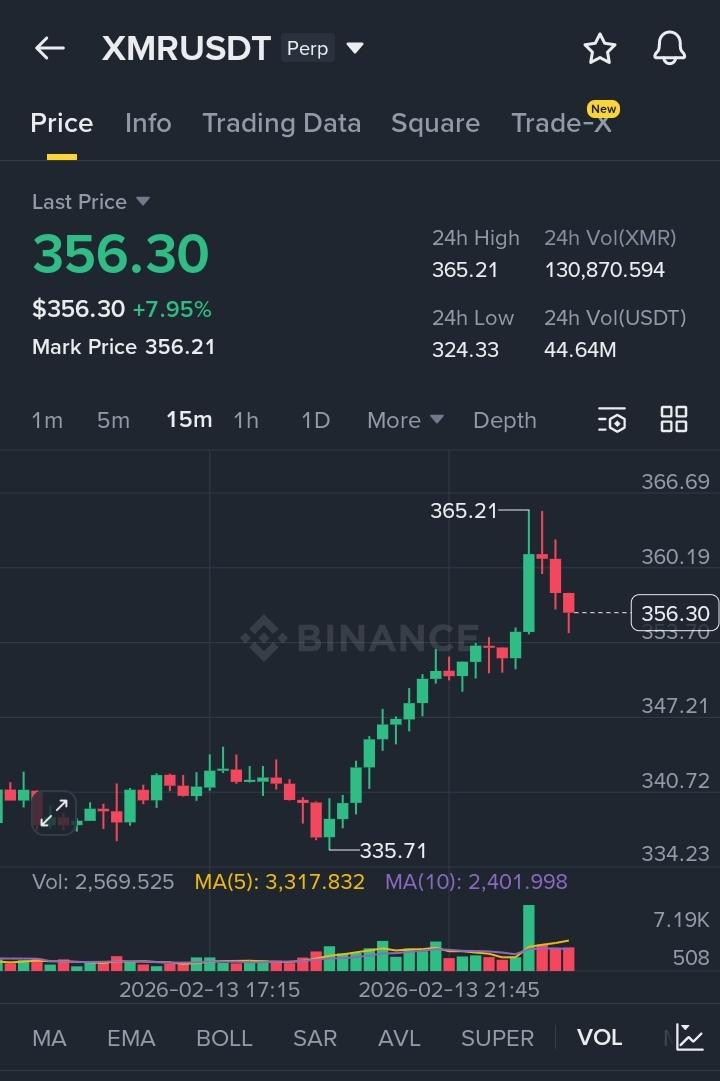
BearishOn the 15m chart, $XMR just made a strong push into 365 and immediately printed rejection wicks followed by consecutive red candles. That’s classic local exhaustion after a vertical move. If momentum fails to reclaim 360–362 quickly, a deeper pullback becomes more probable.
Short XMR
Entry Zone: 355 – 362
Stop Loss: 368
TP1: 345
TP2: 338
Or from 100% to 500%
This is a scalp trade. Use 20x to 50x leverage with a margin of 1% to 5%. Book partial profit at TP1 and move stop-loss to entry.
Trade #XMR Here 👇👇👇
Short XMR
Entry Zone: 355 – 362
Stop Loss: 368
TP1: 345
TP2: 338
Or from 100% to 500%
This is a scalp trade. Use 20x to 50x leverage with a margin of 1% to 5%. Book partial profit at TP1 and move stop-loss to entry.
Trade #XMR Here 👇👇👇
4
·
--

Article
The Untold Truth: How I Turned Losses into Wins and Mastered Crypto TradingEvery trade, win or lose, is a step toward mastery.
Let me take you back to the beginning of my trading journey. I was like most new traders — excited, hungry, and impatient. I’d see a green candle and jump in. A red one? I’d panic and close. I was chasing pumps, cutting winners too early, and holding onto losers with hope. Sound familiar?
My turning point came not from a big win, but from a big loss.
That loss hit hard. But it forced me to pause, reflect, and evolve. I realized trading isn’t about guessing the next move — it’s about planning, managing risk, and controlling emotions.
Here’s what I changed that made all the difference:
I Stopped Trading Emotionally
No more revenge trades. No more chasing green candles. I learned to sit on my hands when the market was uncertain and only act when my plan said “go.”
I Built a Real Strategy
Indicators don’t make you profitable — discipline does. I began journaling my trades, reviewing my setups, and only entering when everything aligned across multiple timeframes. I stopped focusing on “being right” and started focusing on executing correctly.
I Treated Losses as Data
Losses are not failures. They’re feedback. I studied every stop-loss hit to find out what I could improve. Was my entry rushed? Was I trading against the trend? Did I ignore volume?
I Focused on Risk Management
Even the best setup can fail. That’s why I never risk more than 1–2% of my capital per trade. I started using proper stop-loss levels — not random numbers — and planned exits before I entered.
I Learned to Be Patient
The best trades often come when you’re not forcing them. Now I wait for the market to come to me. Like my recent SOLUSDT trade — I didn’t chase. I let the price dip into my entry zone and sniped it for a clean +$14 gain.
Final Thoughts:
Your trading journey won’t be perfect. You’ll lose. You’ll doubt. But every trade is a step forward — if you take the time to learn.
So stop trying to win every trade. Start trying to master the process.
Because the real profit? It's not in dollars — it's in discipline.
#CryptoTrading. #CryptoJourney #LearntoEarn #Cryptomindset
The Untold Truth: How I Turned Losses into Wins and Mastered Crypto Trading
Every trade, win or lose, is a step toward mastery.
Let me take you back to the beginning of my trading journey. I was like most new traders — excited, hungry, and impatient. I’d see a green candle and jump in. A red one? I’d panic and close. I was chasing pumps, cutting winners too early, and holding onto losers with hope. Sound familiar?
My turning point came not from a big win, but from a big loss.
That loss hit hard. But it forced me to pause, reflect, and evolve. I realized trading isn’t about guessing the next move — it’s about planning, managing risk, and controlling emotions.
Here’s what I changed that made all the difference:
I Stopped Trading Emotionally
No more revenge trades. No more chasing green candles. I learned to sit on my hands when the market was uncertain and only act when my plan said “go.”
I Built a Real Strategy
Indicators don’t make you profitable — discipline does. I began journaling my trades, reviewing my setups, and only entering when everything aligned across multiple timeframes. I stopped focusing on “being right” and started focusing on executing correctly.
I Treated Losses as Data
Losses are not failures. They’re feedback. I studied every stop-loss hit to find out what I could improve. Was my entry rushed? Was I trading against the trend? Did I ignore volume?
I Focused on Risk Management
Even the best setup can fail. That’s why I never risk more than 1–2% of my capital per trade. I started using proper stop-loss levels — not random numbers — and planned exits before I entered.
I Learned to Be Patient
The best trades often come when you’re not forcing them. Now I wait for the market to come to me. Like my recent SOLUSDT trade — I didn’t chase. I let the price dip into my entry zone and sniped it for a clean +$14 gain.
Final Thoughts:
Your trading journey won’t be perfect. You’ll lose. You’ll doubt. But every trade is a step forward — if you take the time to learn.
So stop trying to win every trade. Start trying to master the process.
Because the real profit? It's not in dollars — it's in discipline.
#CryptoTrading. #CryptoJourney #LearntoEarn #Cryptomindset
Let me take you back to the beginning of my trading journey. I was like most new traders — excited, hungry, and impatient. I’d see a green candle and jump in. A red one? I’d panic and close. I was chasing pumps, cutting winners too early, and holding onto losers with hope. Sound familiar?
My turning point came not from a big win, but from a big loss.
That loss hit hard. But it forced me to pause, reflect, and evolve. I realized trading isn’t about guessing the next move — it’s about planning, managing risk, and controlling emotions.
Here’s what I changed that made all the difference:
I Stopped Trading Emotionally
No more revenge trades. No more chasing green candles. I learned to sit on my hands when the market was uncertain and only act when my plan said “go.”
I Built a Real Strategy
Indicators don’t make you profitable — discipline does. I began journaling my trades, reviewing my setups, and only entering when everything aligned across multiple timeframes. I stopped focusing on “being right” and started focusing on executing correctly.
I Treated Losses as Data
Losses are not failures. They’re feedback. I studied every stop-loss hit to find out what I could improve. Was my entry rushed? Was I trading against the trend? Did I ignore volume?
I Focused on Risk Management
Even the best setup can fail. That’s why I never risk more than 1–2% of my capital per trade. I started using proper stop-loss levels — not random numbers — and planned exits before I entered.
I Learned to Be Patient
The best trades often come when you’re not forcing them. Now I wait for the market to come to me. Like my recent SOLUSDT trade — I didn’t chase. I let the price dip into my entry zone and sniped it for a clean +$14 gain.
Final Thoughts:
Your trading journey won’t be perfect. You’ll lose. You’ll doubt. But every trade is a step forward — if you take the time to learn.
So stop trying to win every trade. Start trying to master the process.
Because the real profit? It's not in dollars — it's in discipline.
#CryptoTrading. #CryptoJourney #LearntoEarn #Cryptomindset
275
Log in to explore more content
Join global crypto users on Binance Square
⚡️ Get latest and useful information about crypto.
💬 Trusted by the world’s largest crypto exchange.
👍 Discover real insights from verified creators.
Email / Phone number
Trending Topics
SaylorHintsStrategyBitcoinBuy
2.3M views
12,565 Discussing
#SaylorHintsStrategyBitcoinBuy
#SaylorHintsStrategyBitcoinBuy 👀
Michael Saylor’s latest comments have once again put Strategy and Bitcoin accumulation in the spotlight. The market is watching closely for any potential move from the company, especially as institutional interest in Bitcoin continues to attract attention. 📈
If Strategy adds more BTC, it could reinforce the narrative of long-term corporate Bitcoin adoption and potentially create fresh momentum across the crypto market. However, traders should remember that headlines can drive short-term volatility in both directions.
Will Strategy make another Bitcoin purchase soon? The crypto community is watching every move. 🚀₿
maqsoodahmed1
·1 Likes
·433 views
BOJRaisesRatesTo31YearHigh
268,131 views
3,352 Discussing
BuffettStepsDownAsBerkshireChairman
131,702 views
1,818 Discussing