

CryptoPandaヅ
8.6k Posts

CryptoPandaヅ
 Square Verified+
Report
Block User
Support My Analysis, I thank You All. Hoping for your profitable journey!
Open Trade
High-Frequency Trader
4.4 Years
12 Following
38.7K+ Followers
26.4K+ Liked
Posts
Portfolio
All
Quotes
Live
·
--
Bearish
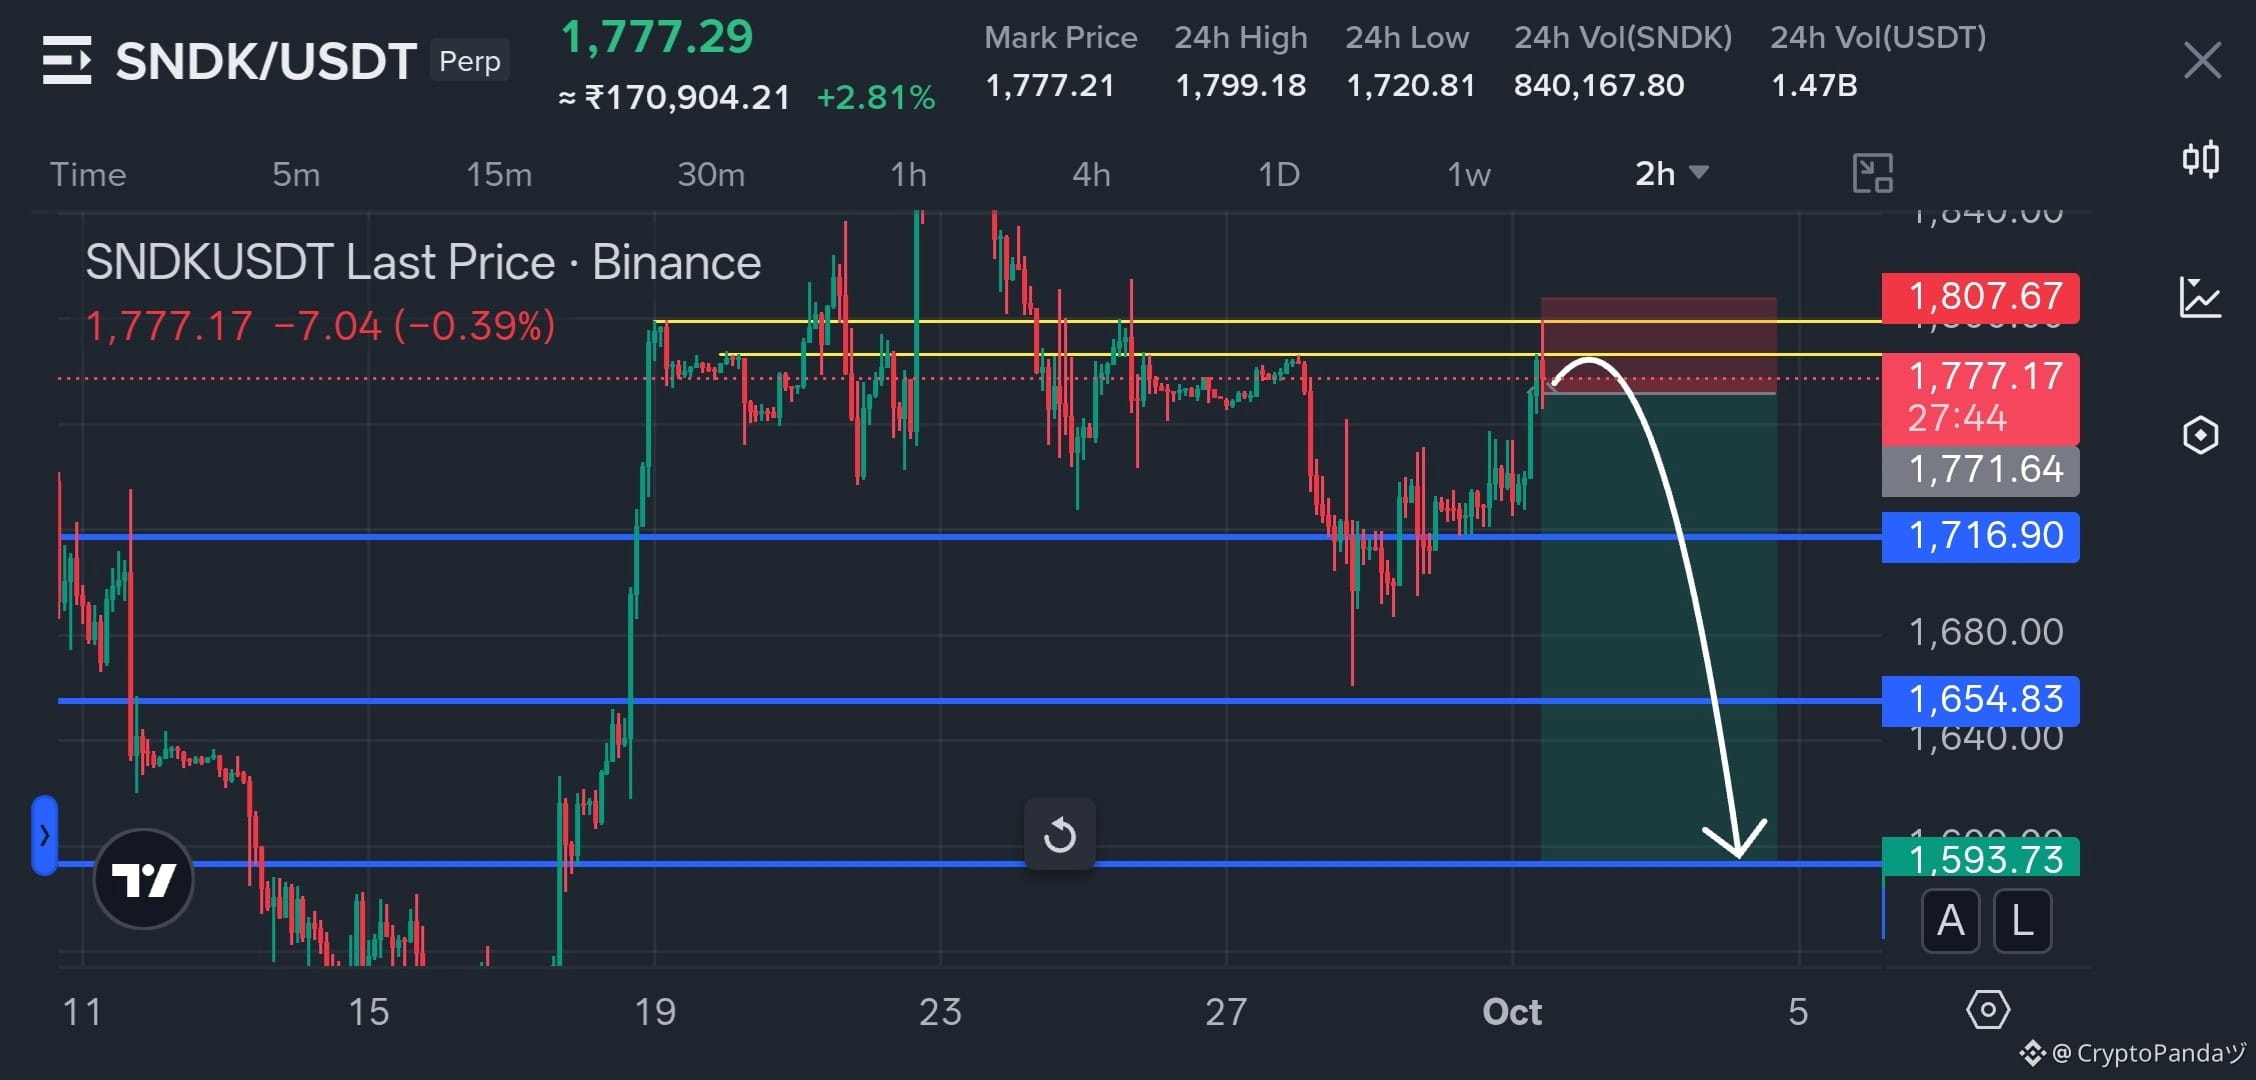
$SNDK — Rejection Beneath 1,799 High, 1,777 Supply Capping Price, Flush Soon 📉
Trade Plan: Short $SNDK
Entry: 1,770 - 1,780
SL: 1807.67
TP: 1,716.90 | 1,654.83 | 1,593.73
Why this Setup?
SNDK has pushed back into the 1,750 - 1,780 supply area after failing to reclaim the 1,799 high, with the 1,777 zone acting as the immediate rejection point. A loss of 1,716.90 could accelerate the move toward 1,654.83 and eventually the 1,593.73 support zone. As long as 1,807.67 holds, the bearish setup remains valid.
Trade $SNDK here 👇
{future}(SNDKUSDT)
$SNDK — Rejection Beneath 1,799 High, 1,777 Supply Capping Price, Flush Soon 📉
Trade Plan: Short $SNDK
Entry: 1,770 - 1,780
SL: 1807.67
TP: 1,716.90 | 1,654.83 | 1,593.73
Why this Setup?
SNDK has pushed back into the 1,750 - 1,780 supply area after failing to reclaim the 1,799 high, with the 1,777 zone acting as the immediate rejection point. A loss of 1,716.90 could accelerate the move toward 1,654.83 and eventually the 1,593.73 support zone. As long as 1,807.67 holds, the bearish setup remains valid.
Trade $SNDK here 👇
Trade Plan: Short $SNDK
Entry: 1,770 - 1,780
SL: 1807.67
TP: 1,716.90 | 1,654.83 | 1,593.73
Why this Setup?
SNDK has pushed back into the 1,750 - 1,780 supply area after failing to reclaim the 1,799 high, with the 1,777 zone acting as the immediate rejection point. A loss of 1,716.90 could accelerate the move toward 1,654.83 and eventually the 1,593.73 support zone. As long as 1,807.67 holds, the bearish setup remains valid.
Trade $SNDK here 👇
2
119
·
--
Bullish
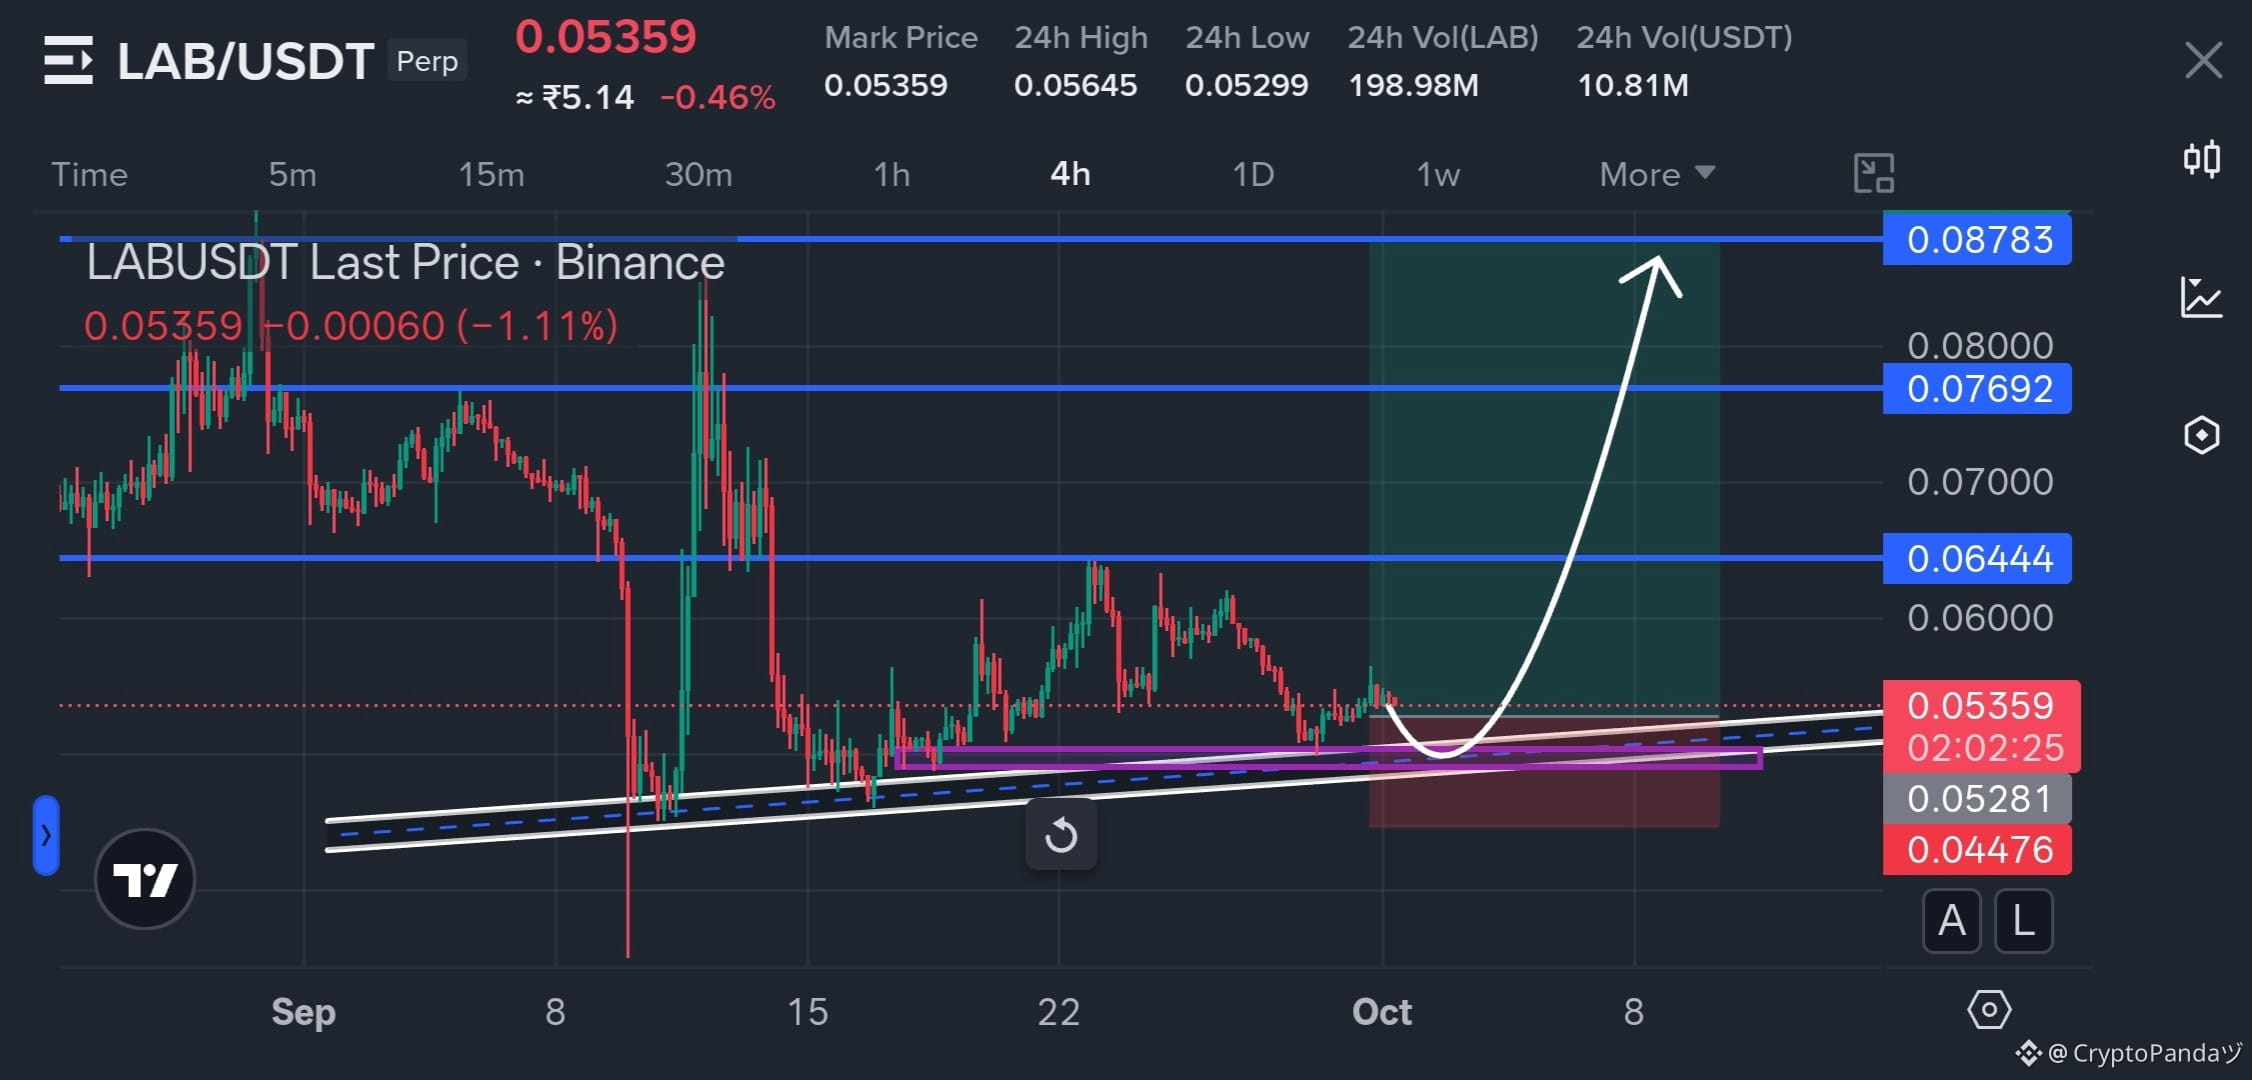
$LAB — Ascending Trendline Holding Near 0.05281 Base, About To Wake Up 📈
Trade Plan: Long $LAB
Entry: 0.050 - 0.055
SL: 0.04476
TP: 0.06444 | 0.07692 | 0.08783
Why this Setup?
LAB is compressing above the rising trendline and the 0.05281 base, with the 4H structure showing buyers repeatedly defending this ascending support. A hold above this zone followed by a breakout could open the path toward 0.06444, 0.07692 and 0.08783. As long as 0.04476 holds, the bullish setup remains valid.
Trade $LAB here 👇
{future}(LABUSDT)
$LAB — Ascending Trendline Holding Near 0.05281 Base, About To Wake Up 📈
Trade Plan: Long $LAB
Entry: 0.050 - 0.055
SL: 0.04476
TP: 0.06444 | 0.07692 | 0.08783
Why this Setup?
LAB is compressing above the rising trendline and the 0.05281 base, with the 4H structure showing buyers repeatedly defending this ascending support. A hold above this zone followed by a breakout could open the path toward 0.06444, 0.07692 and 0.08783. As long as 0.04476 holds, the bullish setup remains valid.
Trade $LAB here 👇
Trade Plan: Long $LAB
Entry: 0.050 - 0.055
SL: 0.04476
TP: 0.06444 | 0.07692 | 0.08783
Why this Setup?
LAB is compressing above the rising trendline and the 0.05281 base, with the 4H structure showing buyers repeatedly defending this ascending support. A hold above this zone followed by a breakout could open the path toward 0.06444, 0.07692 and 0.08783. As long as 0.04476 holds, the bullish setup remains valid.
Trade $LAB here 👇
2
103
·
--
Bullish
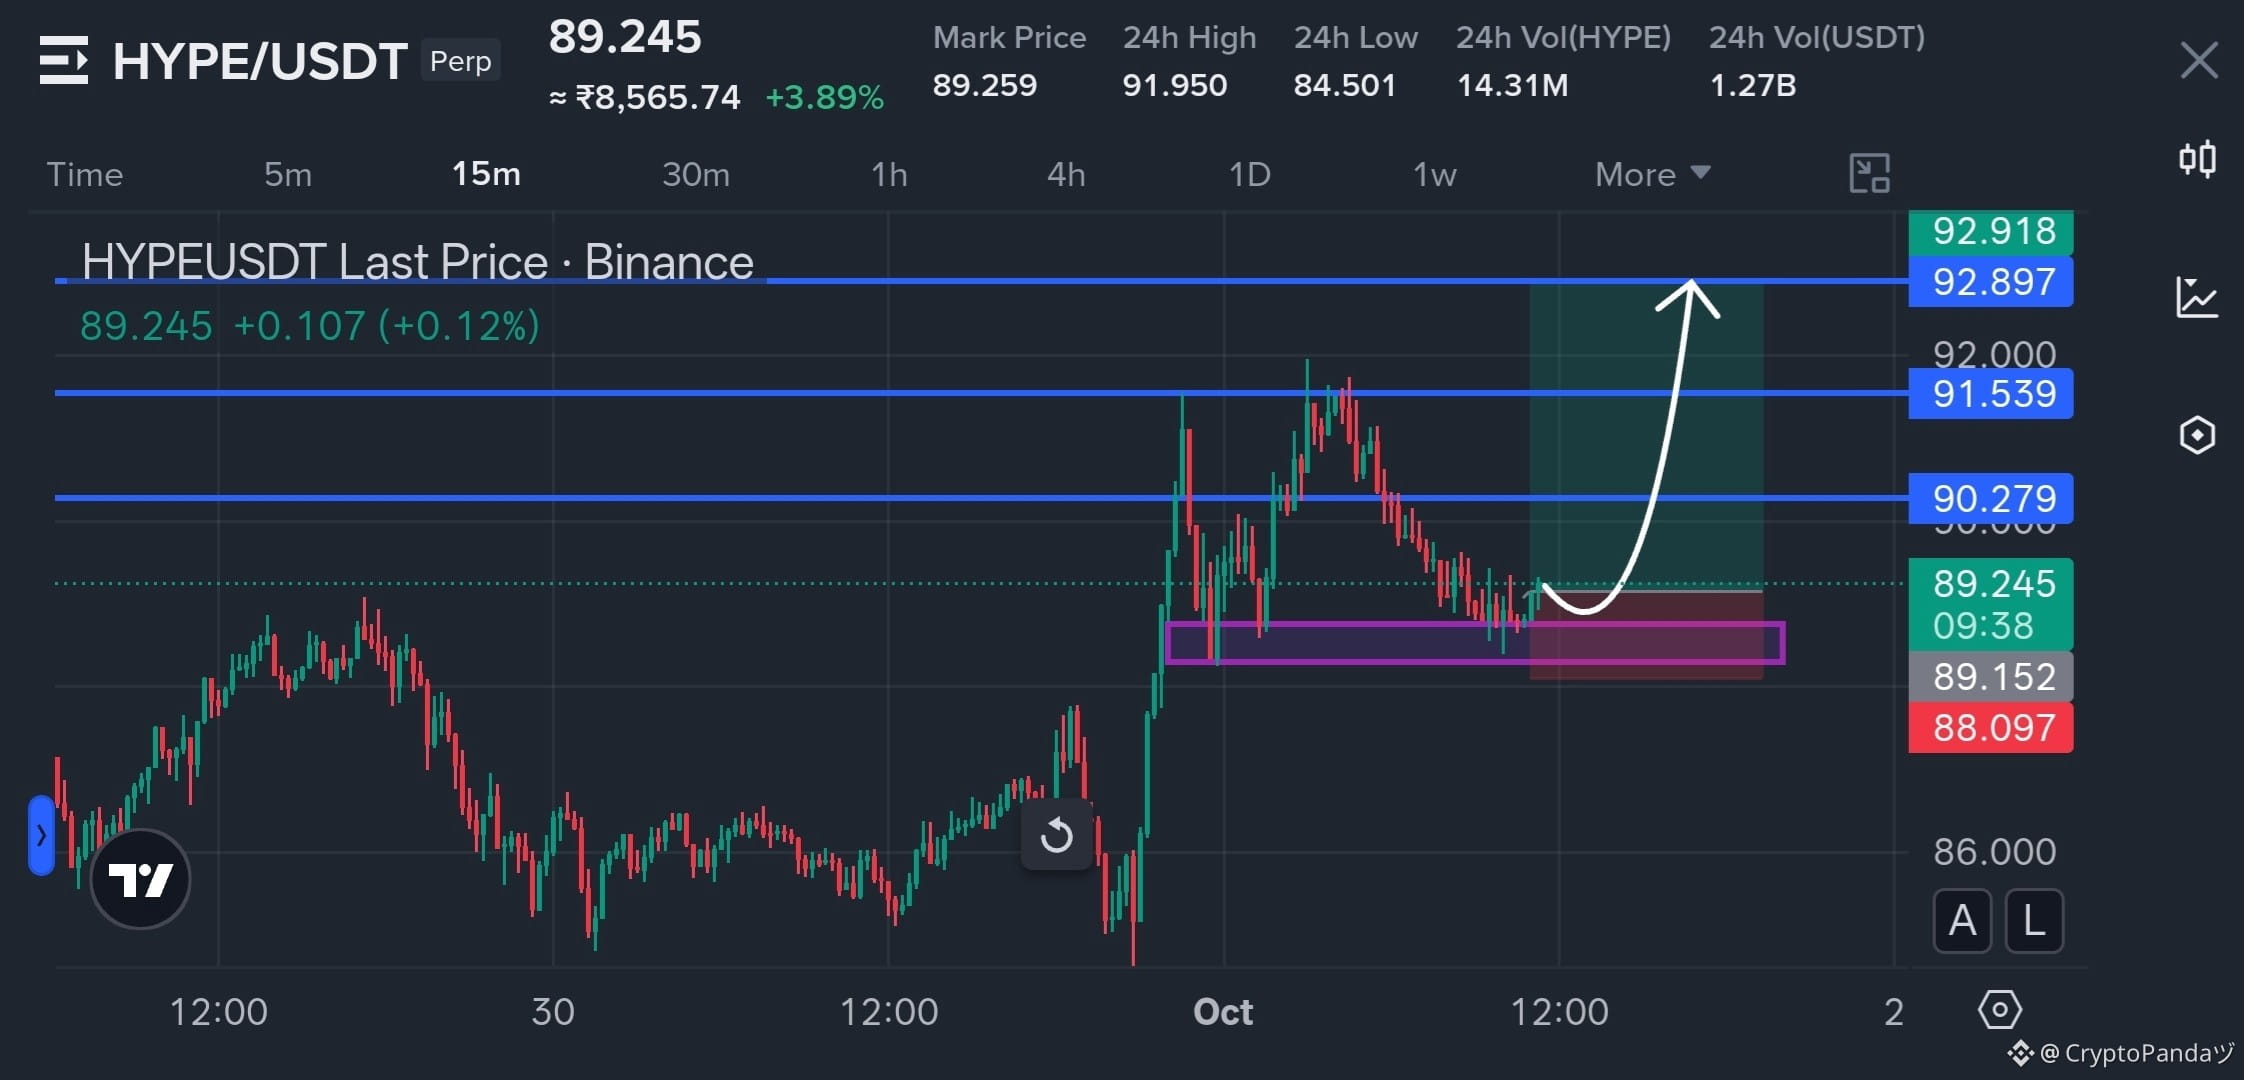
$HYPE — 15M Demand Reclaim at 89.15, Upside Expansion Soon 📈
Trade Plan: Long $HYPE
Entry: 89.00 - 89.20
SL: 88.097
TP: 90.279 | 91.539 | 92.897
Why this Setup?
HYPE is compressing directly above the 89.15 demand base after the sharp impulse higher, while price is repeatedly holding the same reclaim zone. The setup is built around a clean stair-step expansion: reclaim 90.279 first, then open the path toward 91.539 and the 92.897 resistance. As long as 88.097 holds, the bullish setup remains valid.
Trade $HYPE here 👇
{future}(HYPEUSDT)
$HYPE — 15M Demand Reclaim at 89.15, Upside Expansion Soon 📈
Trade Plan: Long $HYPE
Entry: 89.00 - 89.20
SL: 88.097
TP: 90.279 | 91.539 | 92.897
Why this Setup?
HYPE is compressing directly above the 89.15 demand base after the sharp impulse higher, while price is repeatedly holding the same reclaim zone. The setup is built around a clean stair-step expansion: reclaim 90.279 first, then open the path toward 91.539 and the 92.897 resistance. As long as 88.097 holds, the bullish setup remains valid.
Trade $HYPE here 👇
Trade Plan: Long $HYPE
Entry: 89.00 - 89.20
SL: 88.097
TP: 90.279 | 91.539 | 92.897
Why this Setup?
HYPE is compressing directly above the 89.15 demand base after the sharp impulse higher, while price is repeatedly holding the same reclaim zone. The setup is built around a clean stair-step expansion: reclaim 90.279 first, then open the path toward 91.539 and the 92.897 resistance. As long as 88.097 holds, the bullish setup remains valid.
Trade $HYPE here 👇
2
104
·
--
Bullish
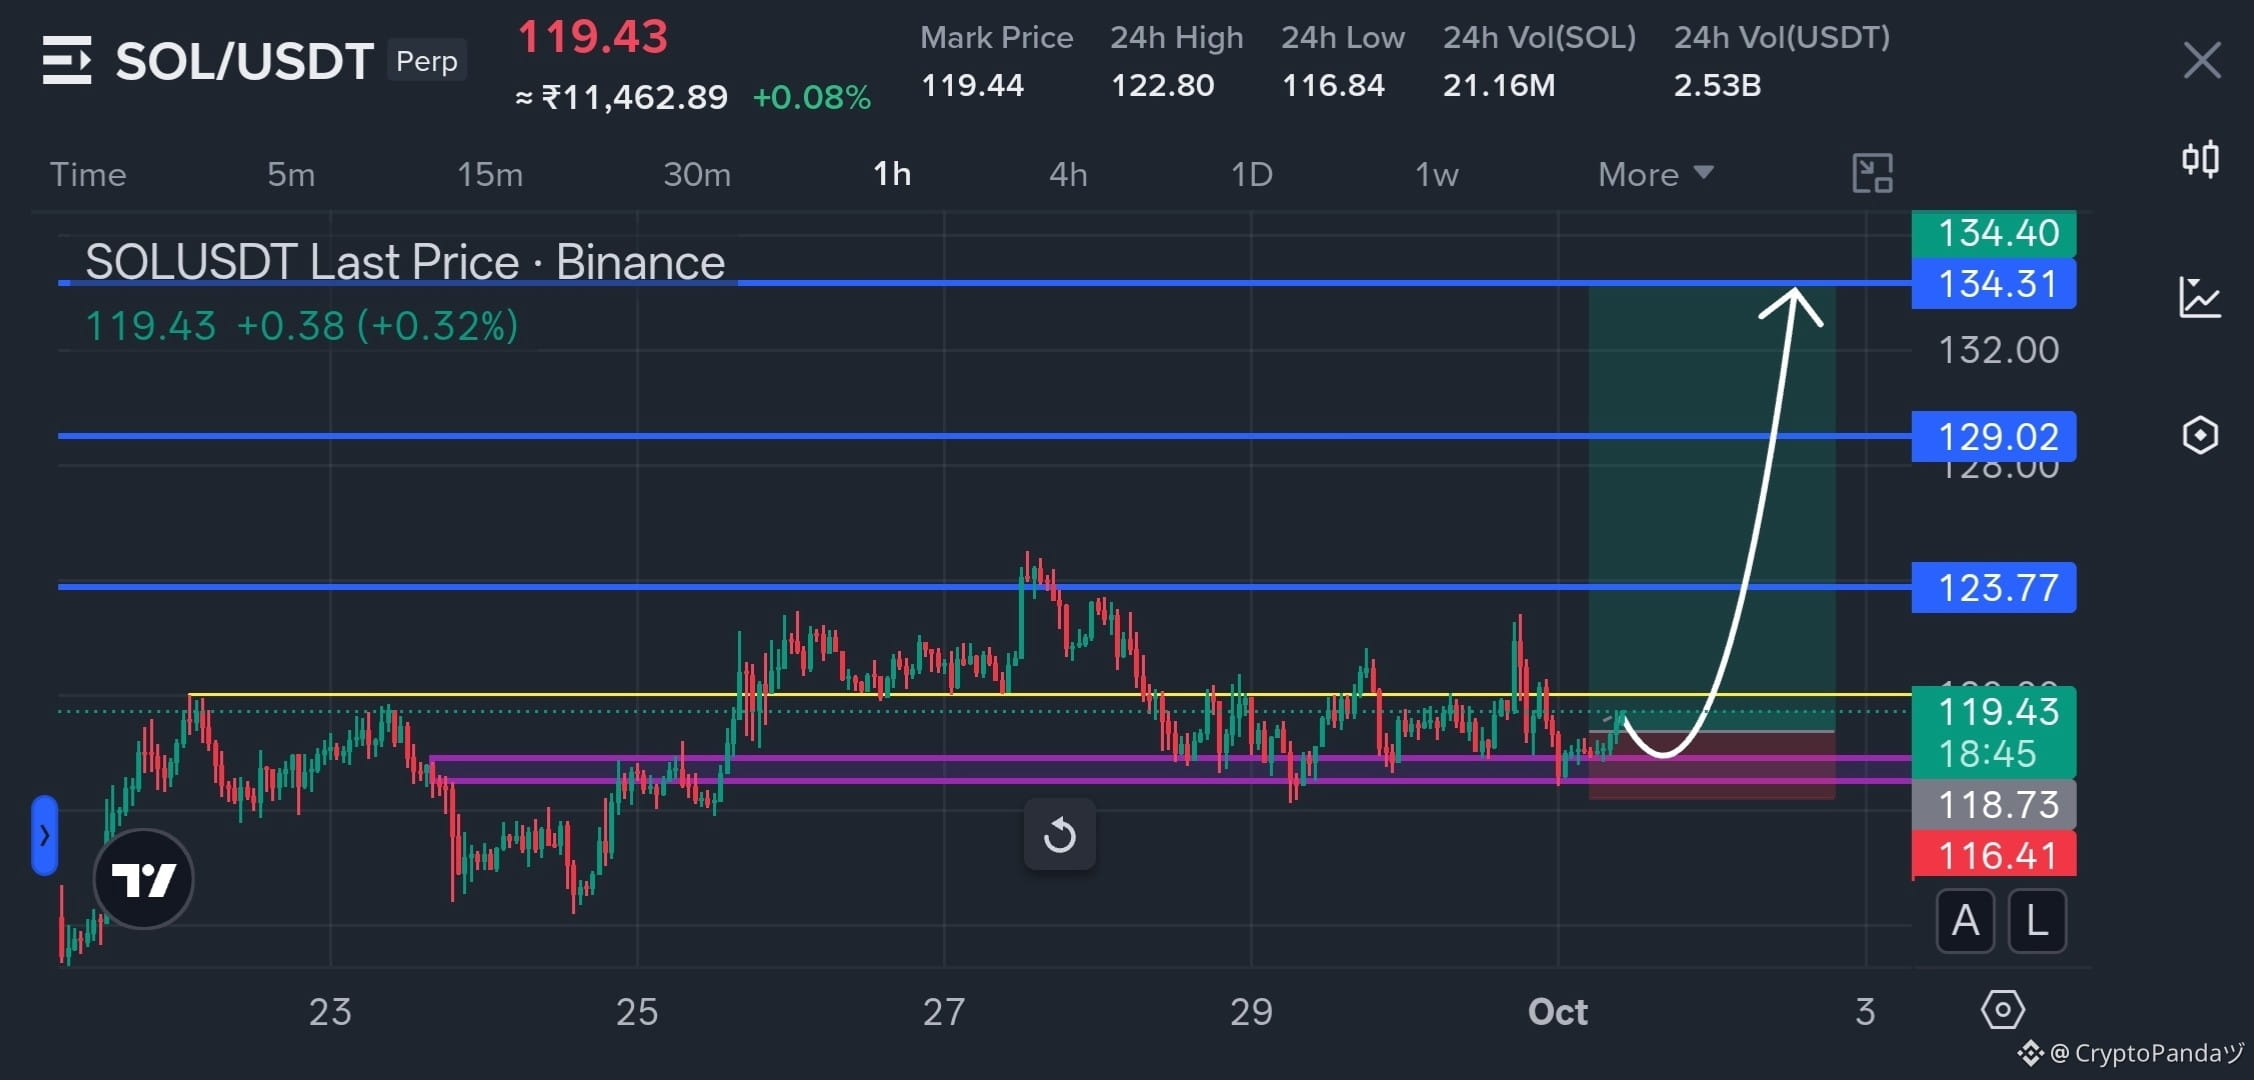
$SOL — 118.73 Demand Holding Firm, Whales Ready For The Next Leg Up 📈
Trade Plan: Long $SOL
Entry: 118 - 120
SL: 116.41
TP: 123.77 | 129.02 | 134.31
Why this Setup?
SOL is holding the 118 - 120 demand area after repeated reactions from the lower support zone. The chart shows a clear upside path toward 123.77, with further expansion levels at 129.02 and 134.31 if buyers reclaim the range high. As long as 116.41 holds, the bullish setup remains valid.
Trade $SOL here 👇
{future}(SOLUSDT)
$SOL — 118.73 Demand Holding Firm, Whales Ready For The Next Leg Up 📈
Trade Plan: Long $SOL
Entry: 118 - 120
SL: 116.41
TP: 123.77 | 129.02 | 134.31
Why this Setup?
SOL is holding the 118 - 120 demand area after repeated reactions from the lower support zone. The chart shows a clear upside path toward 123.77, with further expansion levels at 129.02 and 134.31 if buyers reclaim the range high. As long as 116.41 holds, the bullish setup remains valid.
Trade $SOL here 👇
Trade Plan: Long $SOL
Entry: 118 - 120
SL: 116.41
TP: 123.77 | 129.02 | 134.31
Why this Setup?
SOL is holding the 118 - 120 demand area after repeated reactions from the lower support zone. The chart shows a clear upside path toward 123.77, with further expansion levels at 129.02 and 134.31 if buyers reclaim the range high. As long as 116.41 holds, the bullish setup remains valid.
Trade $SOL here 👇
2
146
·
--
Bullish
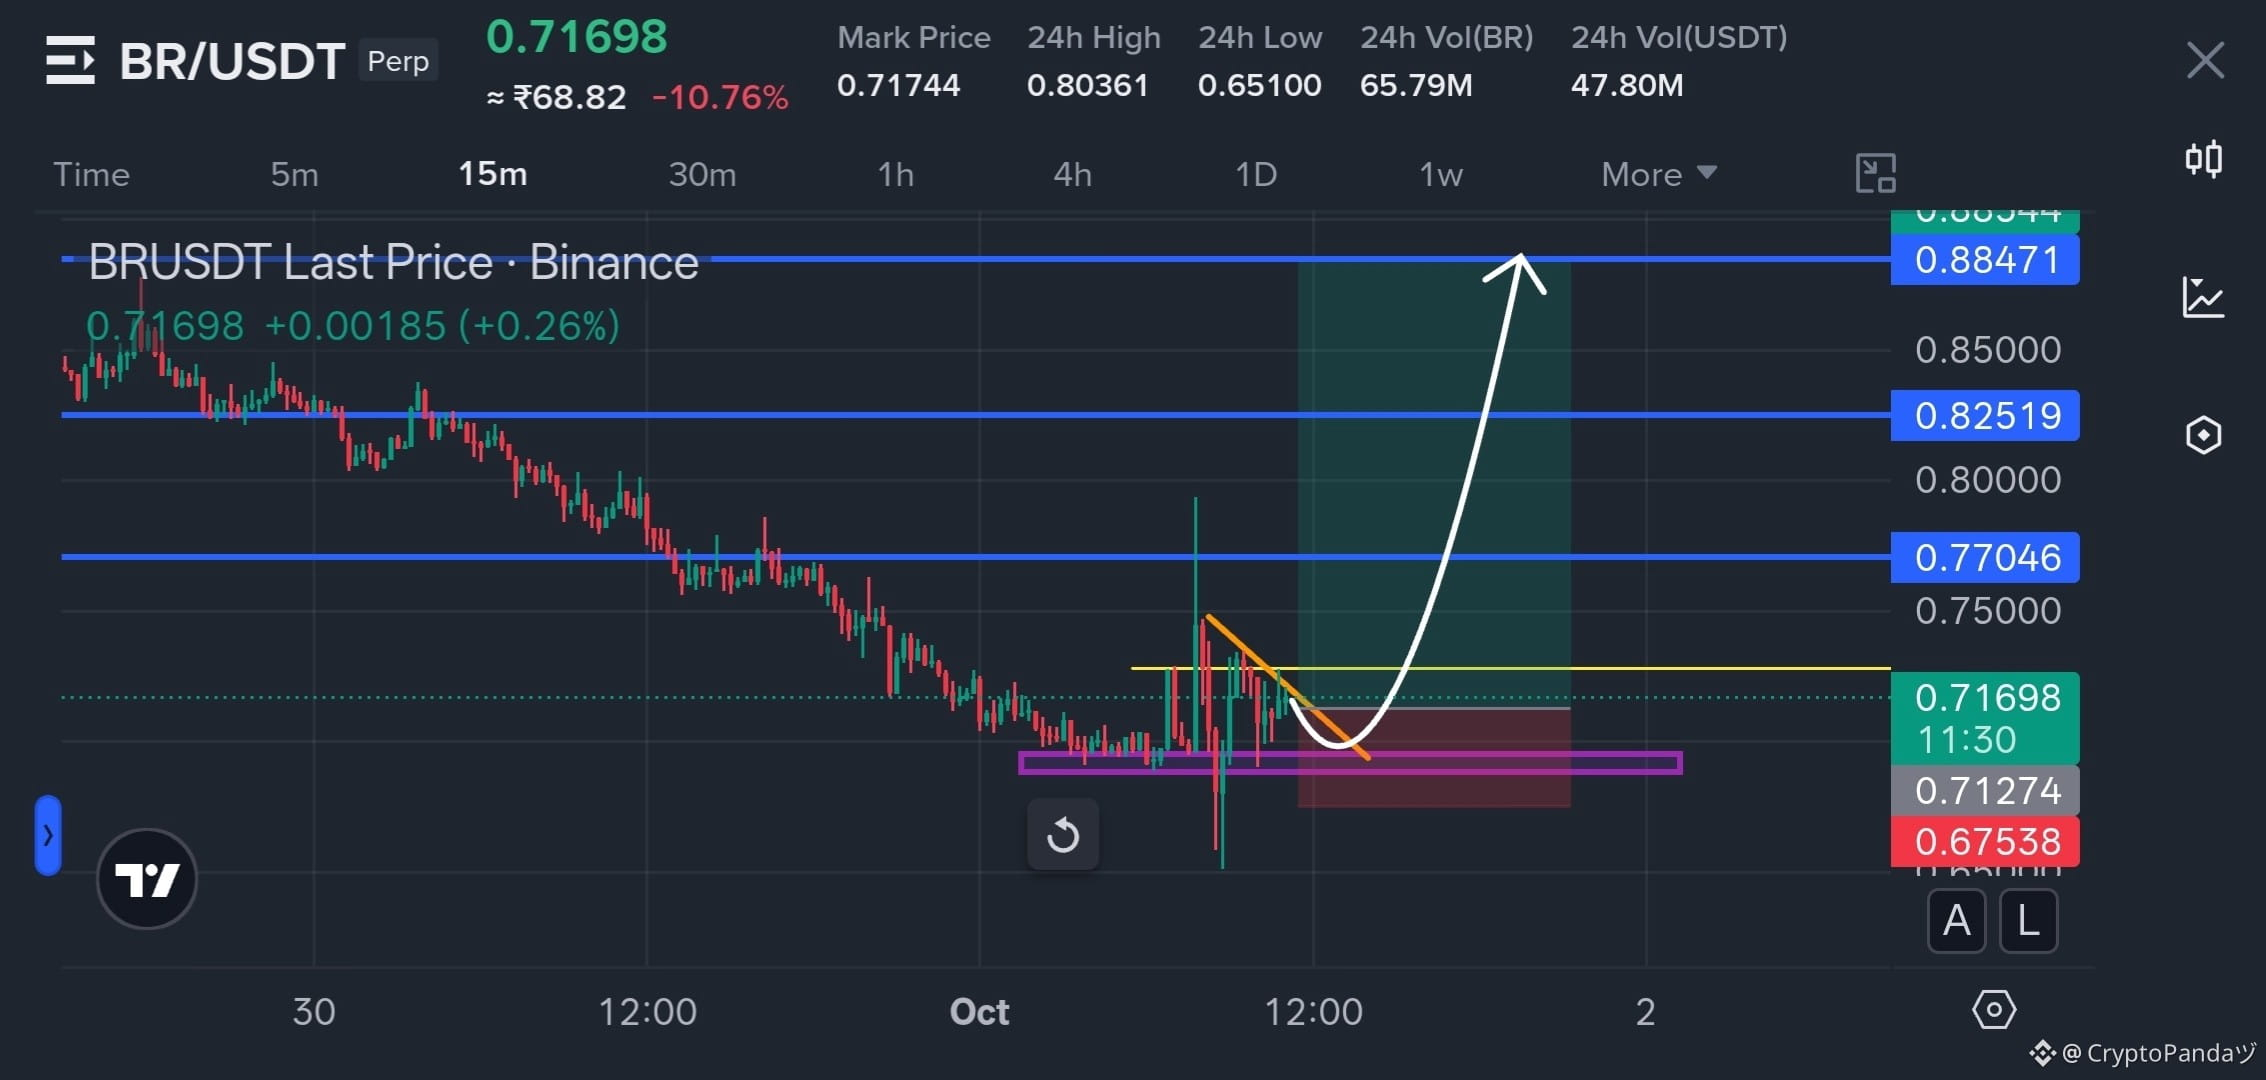
$BR — Trendline Pressing Into 0.71274 Demand, Reversal Breakout Loading 📈
Trade Plan: Long $BR
Entry: 0.68 - 0.72
SL: 0.67538
TP: 0.77046 | 0.82519 | 0.88471
Why this Setup?
BR is compressing beneath a descending trendline while holding the 0.71274 demand zone, creating a tight squeeze between sellers overhead and buyers defending the base. A reclaim and breakout through the falling trendline could open the path toward 0.77046, 0.82519 and 0.88471. As long as 0.67538 holds, the bullish setup remains valid.
Trade $BR here 👇
{future}(BRUSDT)
$BR — Trendline Pressing Into 0.71274 Demand, Reversal Breakout Loading 📈
Trade Plan: Long $BR
Entry: 0.68 - 0.72
SL: 0.67538
TP: 0.77046 | 0.82519 | 0.88471
Why this Setup?
BR is compressing beneath a descending trendline while holding the 0.71274 demand zone, creating a tight squeeze between sellers overhead and buyers defending the base. A reclaim and breakout through the falling trendline could open the path toward 0.77046, 0.82519 and 0.88471. As long as 0.67538 holds, the bullish setup remains valid.
Trade $BR here 👇
Trade Plan: Long $BR
Entry: 0.68 - 0.72
SL: 0.67538
TP: 0.77046 | 0.82519 | 0.88471
Why this Setup?
BR is compressing beneath a descending trendline while holding the 0.71274 demand zone, creating a tight squeeze between sellers overhead and buyers defending the base. A reclaim and breakout through the falling trendline could open the path toward 0.77046, 0.82519 and 0.88471. As long as 0.67538 holds, the bullish setup remains valid.
Trade $BR here 👇
2
103
·
--
Bullish
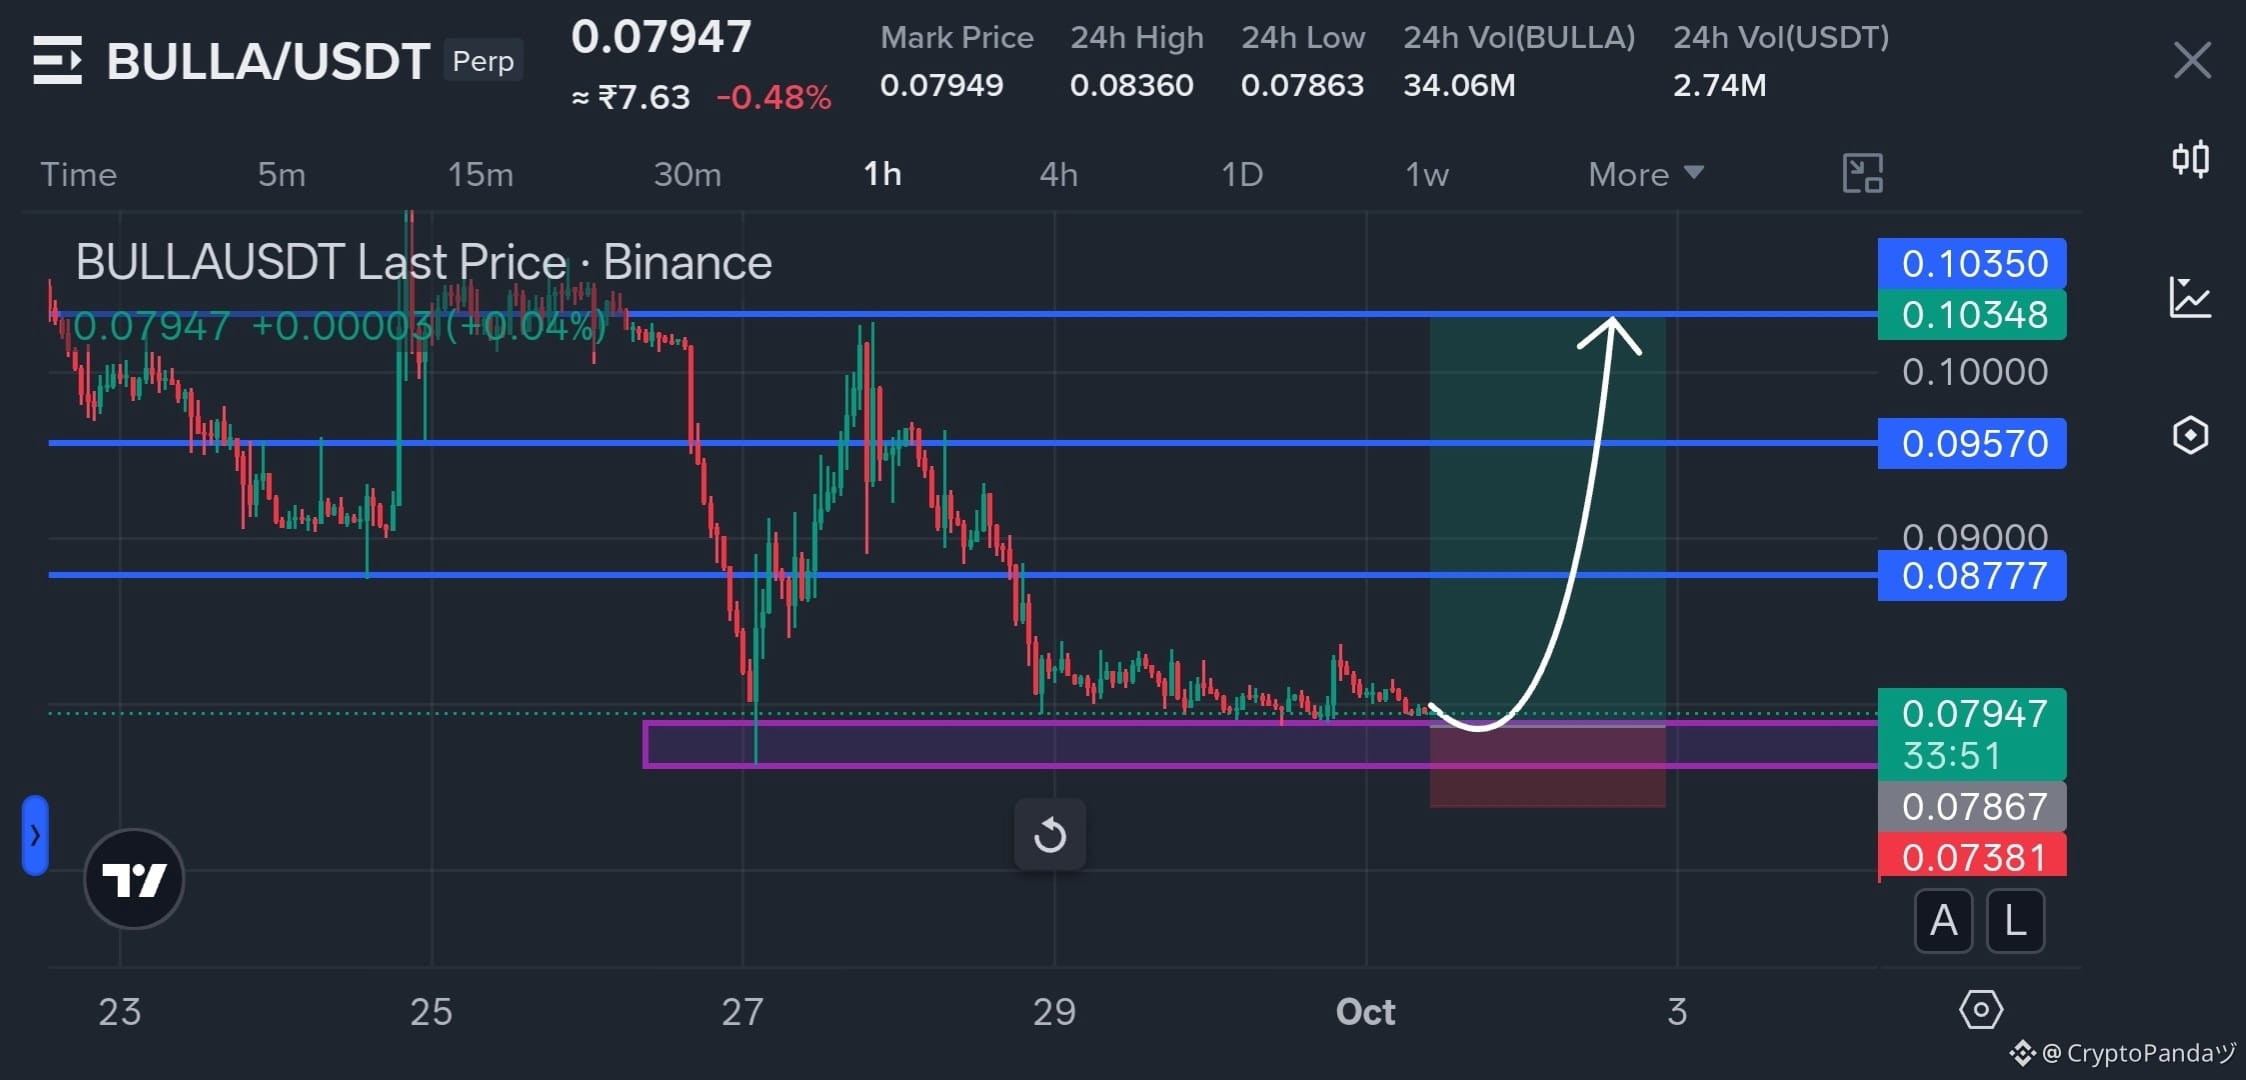
$BULLA — Strong Support at 0.078 Demand, Next Stop 0.1035 Sky Zone 📈
Trade Plan: Long $BULLA
Entry: 0.078 - 0.080
SL: 0.07381
TP: 0.08777 | 0.09570 | 0.10350
Why this Setup?
BULLA is compressing directly above the 0.078 demand zone after a prolonged slide, while the chart leaves a clear ladder of resistance at 0.08777 and 0.09570 before the major 0.10350 zone. A demand hold followed by a reclaim of 0.08777 could turn this into a violent upside expansion, with the final target sitting far above the current range. As long as 0.07381 holds, the bullish setup remains valid.
Trade $BULLA here 👇
{future}(BULLAUSDT)
$BULLA — Strong Support at 0.078 Demand, Next Stop 0.1035 Sky Zone 📈
Trade Plan: Long $BULLA
Entry: 0.078 - 0.080
SL: 0.07381
TP: 0.08777 | 0.09570 | 0.10350
Why this Setup?
BULLA is compressing directly above the 0.078 demand zone after a prolonged slide, while the chart leaves a clear ladder of resistance at 0.08777 and 0.09570 before the major 0.10350 zone. A demand hold followed by a reclaim of 0.08777 could turn this into a violent upside expansion, with the final target sitting far above the current range. As long as 0.07381 holds, the bullish setup remains valid.
Trade $BULLA here 👇
Trade Plan: Long $BULLA
Entry: 0.078 - 0.080
SL: 0.07381
TP: 0.08777 | 0.09570 | 0.10350
Why this Setup?
BULLA is compressing directly above the 0.078 demand zone after a prolonged slide, while the chart leaves a clear ladder of resistance at 0.08777 and 0.09570 before the major 0.10350 zone. A demand hold followed by a reclaim of 0.08777 could turn this into a violent upside expansion, with the final target sitting far above the current range. As long as 0.07381 holds, the bullish setup remains valid.
Trade $BULLA here 👇
2
220
·
--
Bullish
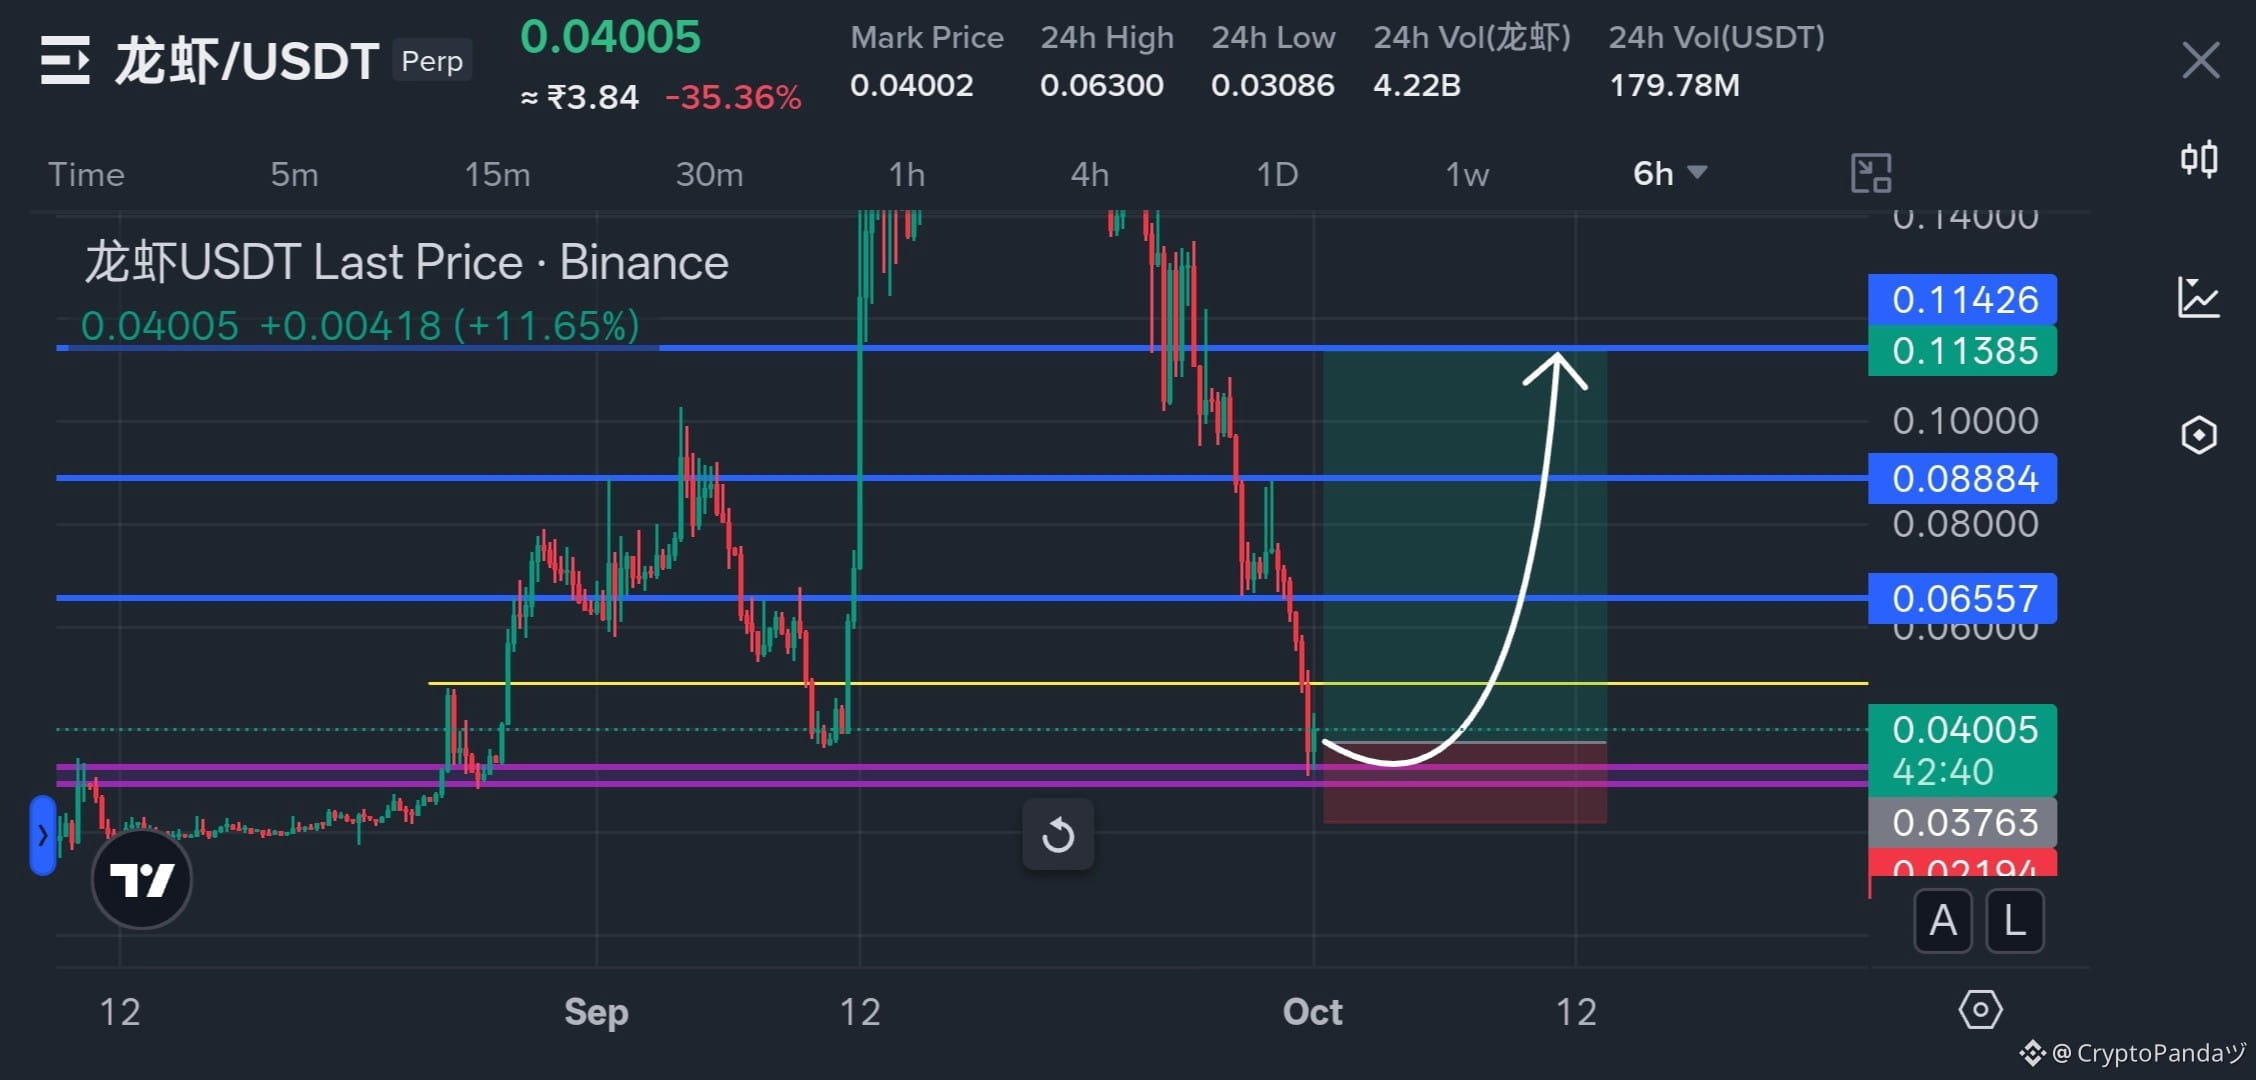
$龙虾 — 6H Flush Into 0.03763 Demand, Reversal Path Loading 📈
Trade Plan: Long $龙虾
Entry: 0.038 - 0.042
SL: 0.031974
TP: 0.06557 | 0.08884 | 0.11385
Why this Setup?
龙虾 is now pressing into the 0.03763 demand base after 6 hours of straight flushing, where buyers previously stepped in. The chart shows a clear recovery path above this zone, with 0.06557 as the first major reclaim followed by 0.08884 and 0.11385. Holding the demand area could turn this deep pullback into a strong reversal setup. As long as 0.031974 holds, the bullish setup remains valid.
Trade $龙虾 here 👇
{future}(龙虾USDT)
$龙虾 — 6H Flush Into 0.03763 Demand, Reversal Path Loading 📈
Trade Plan: Long $龙虾
Entry: 0.038 - 0.042
SL: 0.031974
TP: 0.06557 | 0.08884 | 0.11385
Why this Setup?
龙虾 is now pressing into the 0.03763 demand base after 6 hours of straight flushing, where buyers previously stepped in. The chart shows a clear recovery path above this zone, with 0.06557 as the first major reclaim followed by 0.08884 and 0.11385. Holding the demand area could turn this deep pullback into a strong reversal setup. As long as 0.031974 holds, the bullish setup remains valid.
Trade $龙虾 here 👇
Trade Plan: Long $龙虾
Entry: 0.038 - 0.042
SL: 0.031974
TP: 0.06557 | 0.08884 | 0.11385
Why this Setup?
龙虾 is now pressing into the 0.03763 demand base after 6 hours of straight flushing, where buyers previously stepped in. The chart shows a clear recovery path above this zone, with 0.06557 as the first major reclaim followed by 0.08884 and 0.11385. Holding the demand area could turn this deep pullback into a strong reversal setup. As long as 0.031974 holds, the bullish setup remains valid.
Trade $龙虾 here 👇
3
401
·
--
Bearish
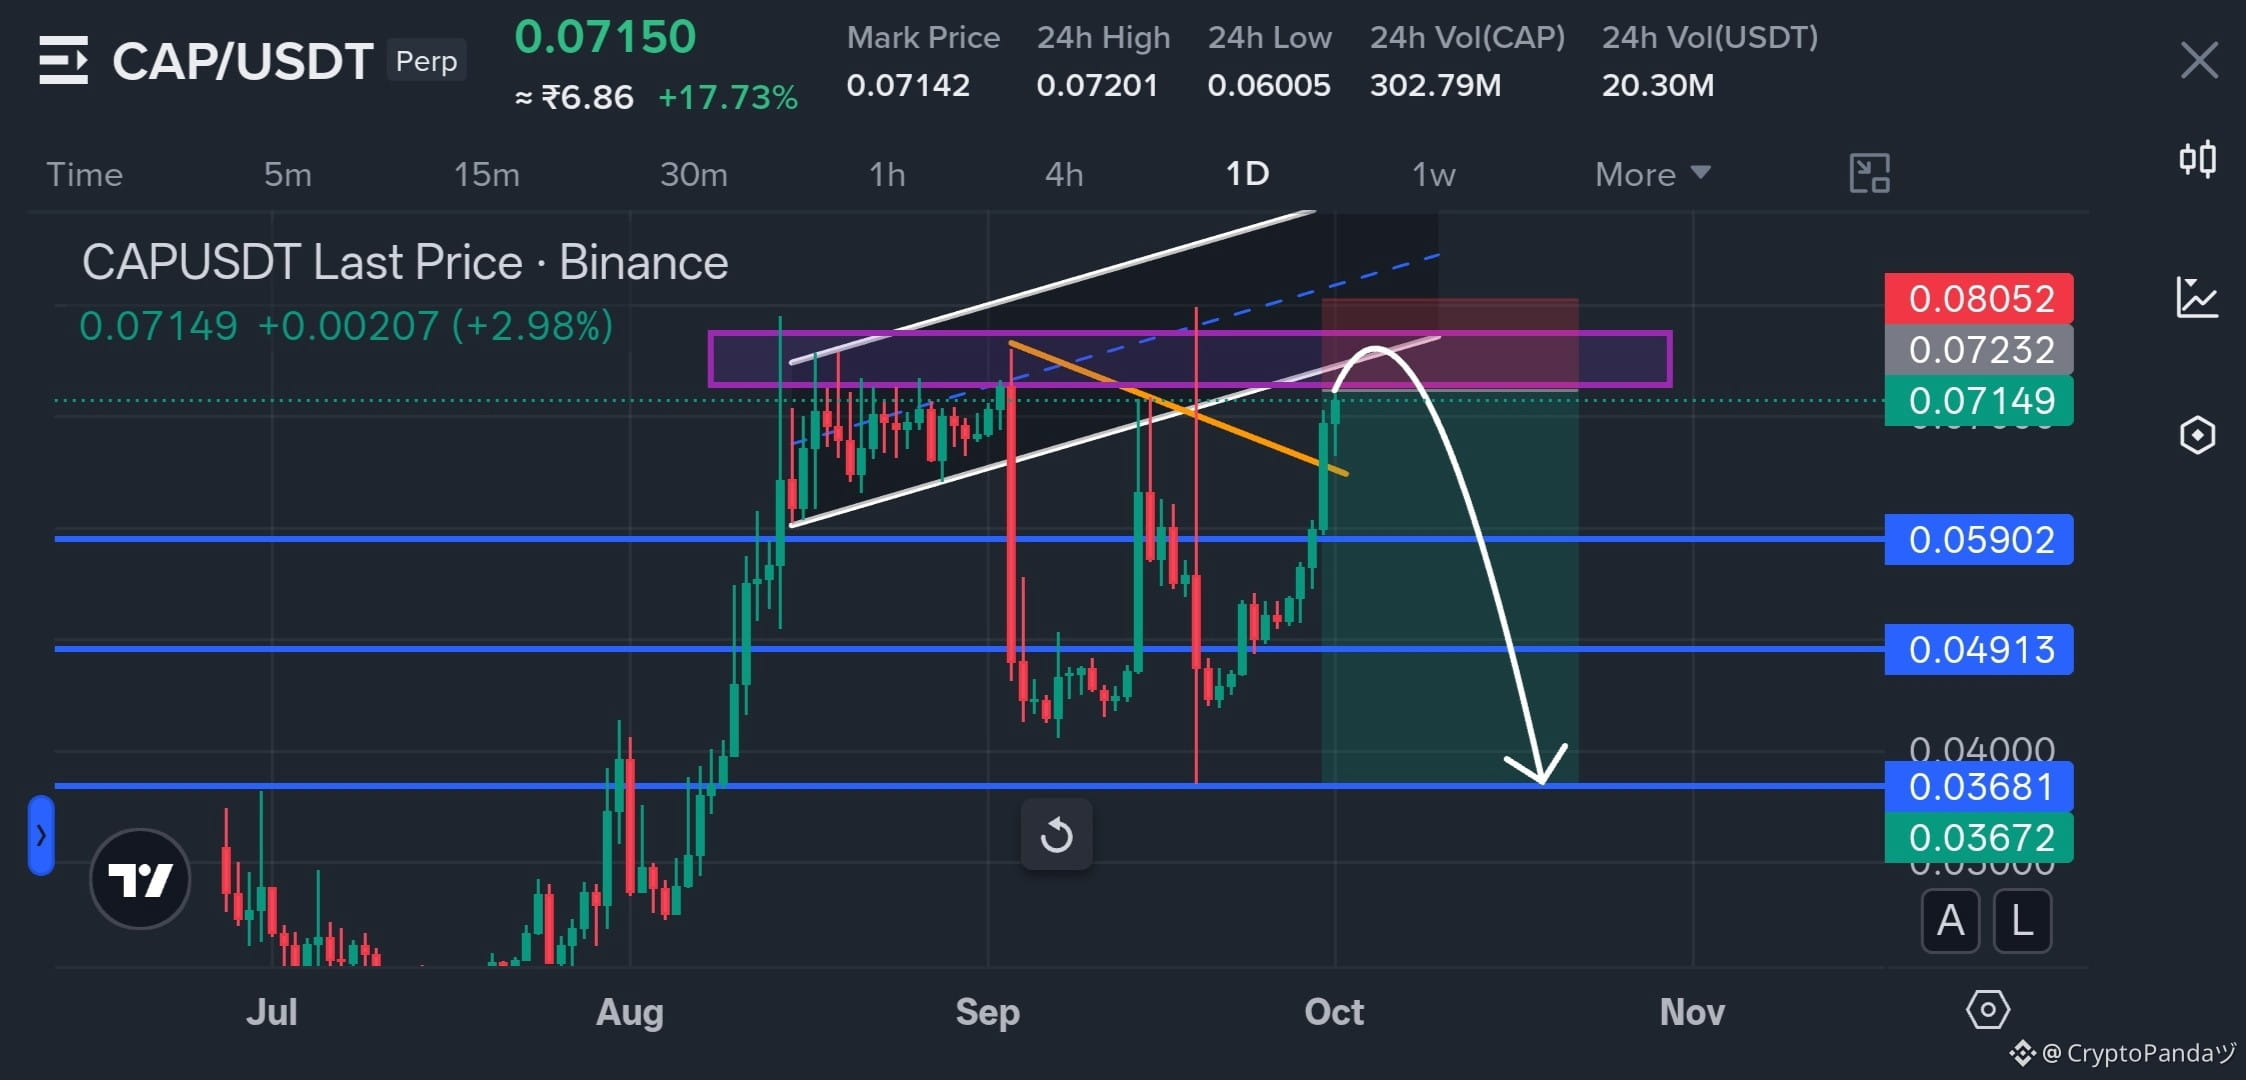
$CAP — The Rocket Hit the Ceiling at 0.07232 Supply, Trapdoor Opening 📉
Trade Plan: Short $CAP
Entry: 0.071 - 0.073
SL: 0.08052
TP: 0.05902 | 0.04913 | 0.03681
Why this Setup?
CAP is pressing directly into the 0.07232 - 0.08052 supply ceiling after a sharp recovery, with the rising structure showing signs of exhaustion. A rejection from this zone could turn the breakout attempt into a full liquidity unwind, first targeting 0.05902, then 0.04913, with 0.03681 as the deeper flush zone. As long as 0.08052 holds, the bearish setup remains valid.
Trade $CAP here 👇
{future}(CAPUSDT)
$CAP — The Rocket Hit the Ceiling at 0.07232 Supply, Trapdoor Opening 📉
Trade Plan: Short $CAP
Entry: 0.071 - 0.073
SL: 0.08052
TP: 0.05902 | 0.04913 | 0.03681
Why this Setup?
CAP is pressing directly into the 0.07232 - 0.08052 supply ceiling after a sharp recovery, with the rising structure showing signs of exhaustion. A rejection from this zone could turn the breakout attempt into a full liquidity unwind, first targeting 0.05902, then 0.04913, with 0.03681 as the deeper flush zone. As long as 0.08052 holds, the bearish setup remains valid.
Trade $CAP here 👇
Trade Plan: Short $CAP
Entry: 0.071 - 0.073
SL: 0.08052
TP: 0.05902 | 0.04913 | 0.03681
Why this Setup?
CAP is pressing directly into the 0.07232 - 0.08052 supply ceiling after a sharp recovery, with the rising structure showing signs of exhaustion. A rejection from this zone could turn the breakout attempt into a full liquidity unwind, first targeting 0.05902, then 0.04913, with 0.03681 as the deeper flush zone. As long as 0.08052 holds, the bearish setup remains valid.
Trade $CAP here 👇
2
186
·
--
Bearish
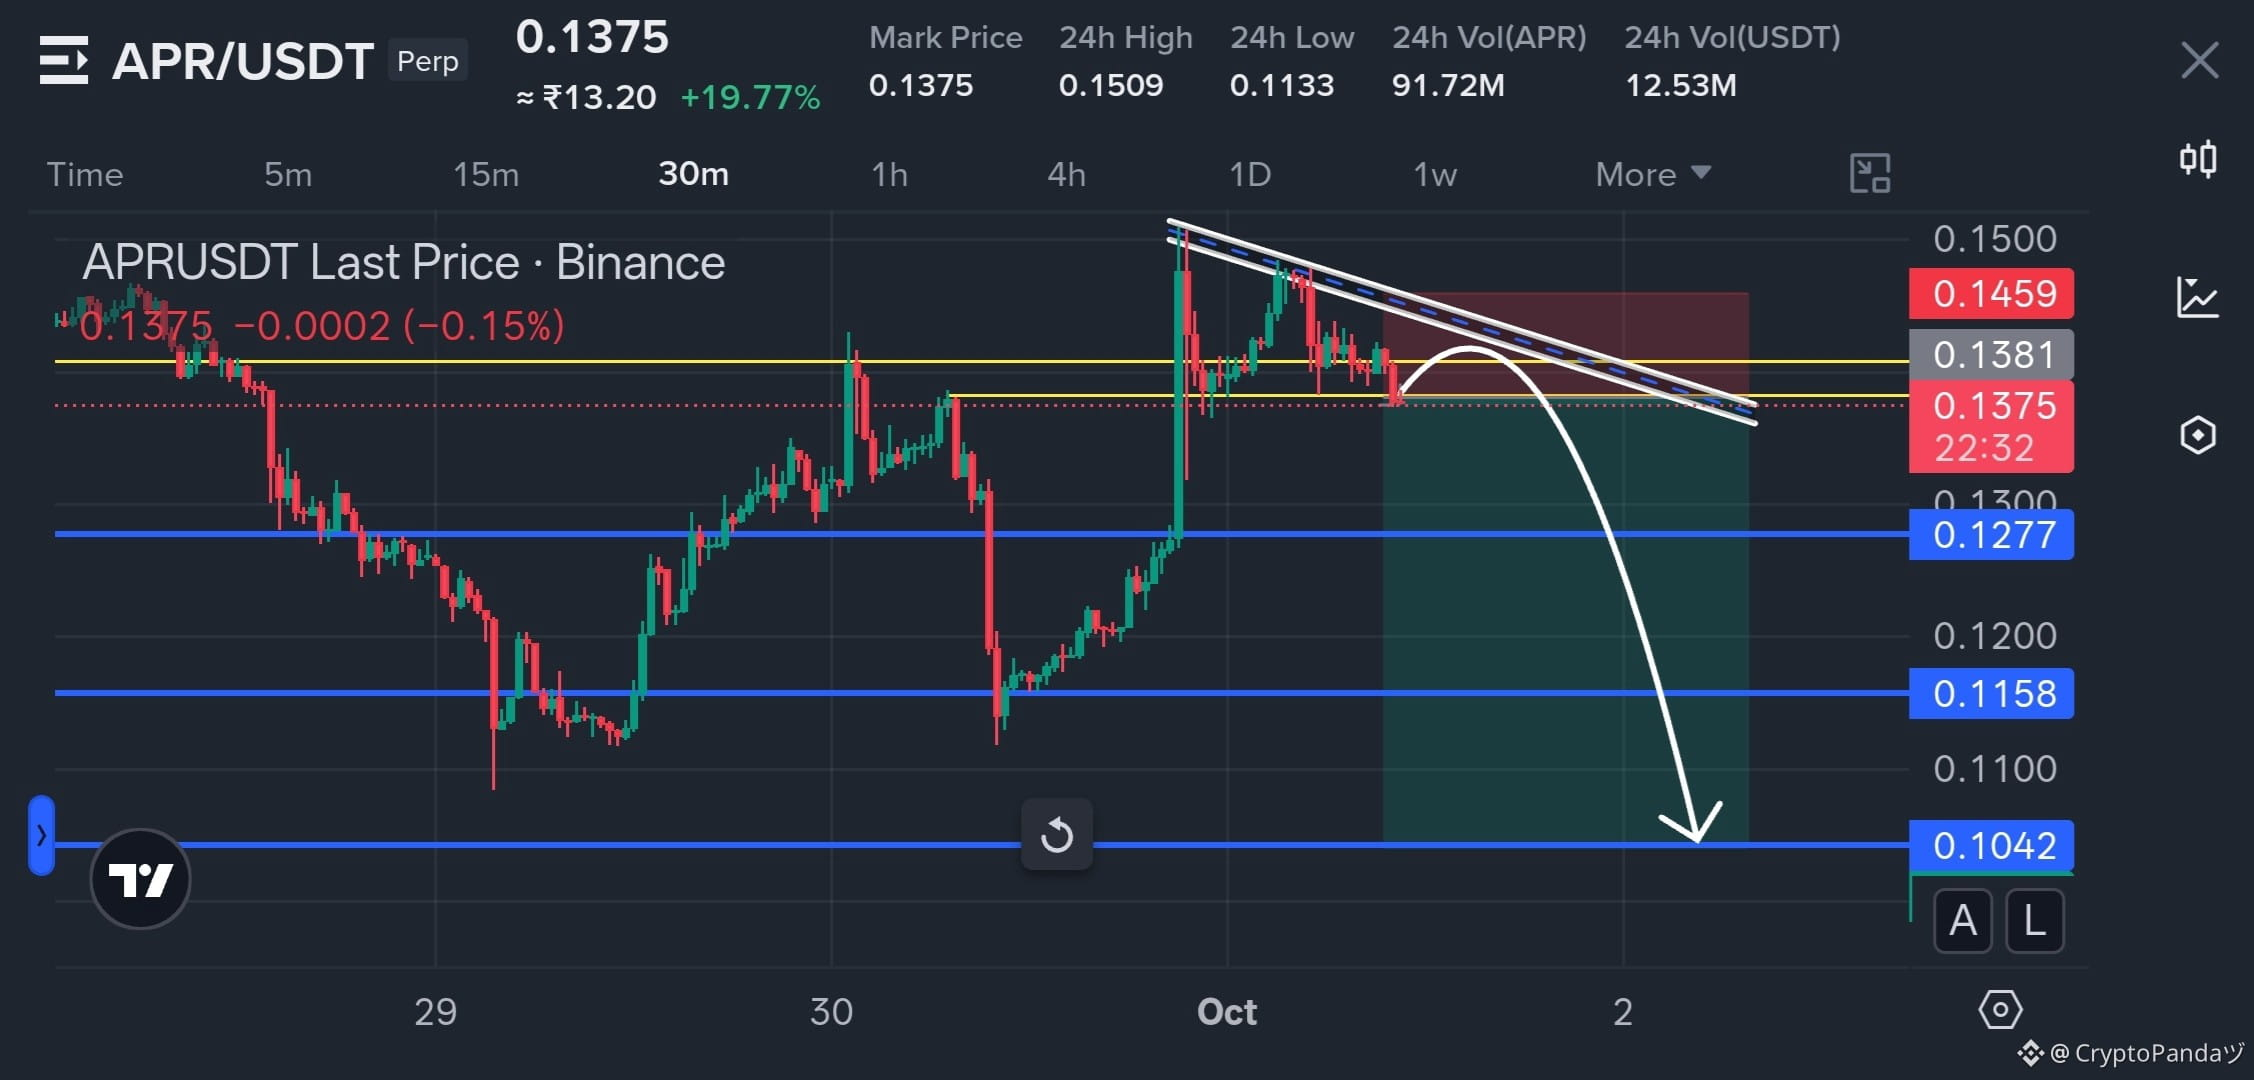
$APR — Double Trendline Rejection Under 0.1381, Breakdown Incoming 📉
Trade Plan: Short $APR
Entry: 0.137 - 0.140
SL: 0.1459
TP: 0.1277 | 0.1158 | 0.1042
Why this Setup?
APR is compressing beneath a descending trendline while repeatedly failing around the 0.1381 resistance. The structure is forming a clear lower-high sequence after the spike, with 0.1277 acting as the first major downside magnet; a clean break there could expose 0.1158 and 0.1042 next. As long as 0.1459 holds, the bearish setup remains valid.
Trade $APR here 👇
{future}(APRUSDT)
$APR — Double Trendline Rejection Under 0.1381, Breakdown Incoming 📉
Trade Plan: Short $APR
Entry: 0.137 - 0.140
SL: 0.1459
TP: 0.1277 | 0.1158 | 0.1042
Why this Setup?
APR is compressing beneath a descending trendline while repeatedly failing around the 0.1381 resistance. The structure is forming a clear lower-high sequence after the spike, with 0.1277 acting as the first major downside magnet; a clean break there could expose 0.1158 and 0.1042 next. As long as 0.1459 holds, the bearish setup remains valid.
Trade $APR here 👇
Trade Plan: Short $APR
Entry: 0.137 - 0.140
SL: 0.1459
TP: 0.1277 | 0.1158 | 0.1042
Why this Setup?
APR is compressing beneath a descending trendline while repeatedly failing around the 0.1381 resistance. The structure is forming a clear lower-high sequence after the spike, with 0.1277 acting as the first major downside magnet; a clean break there could expose 0.1158 and 0.1042 next. As long as 0.1459 holds, the bearish setup remains valid.
Trade $APR here 👇
2
151
·
--
Bearish
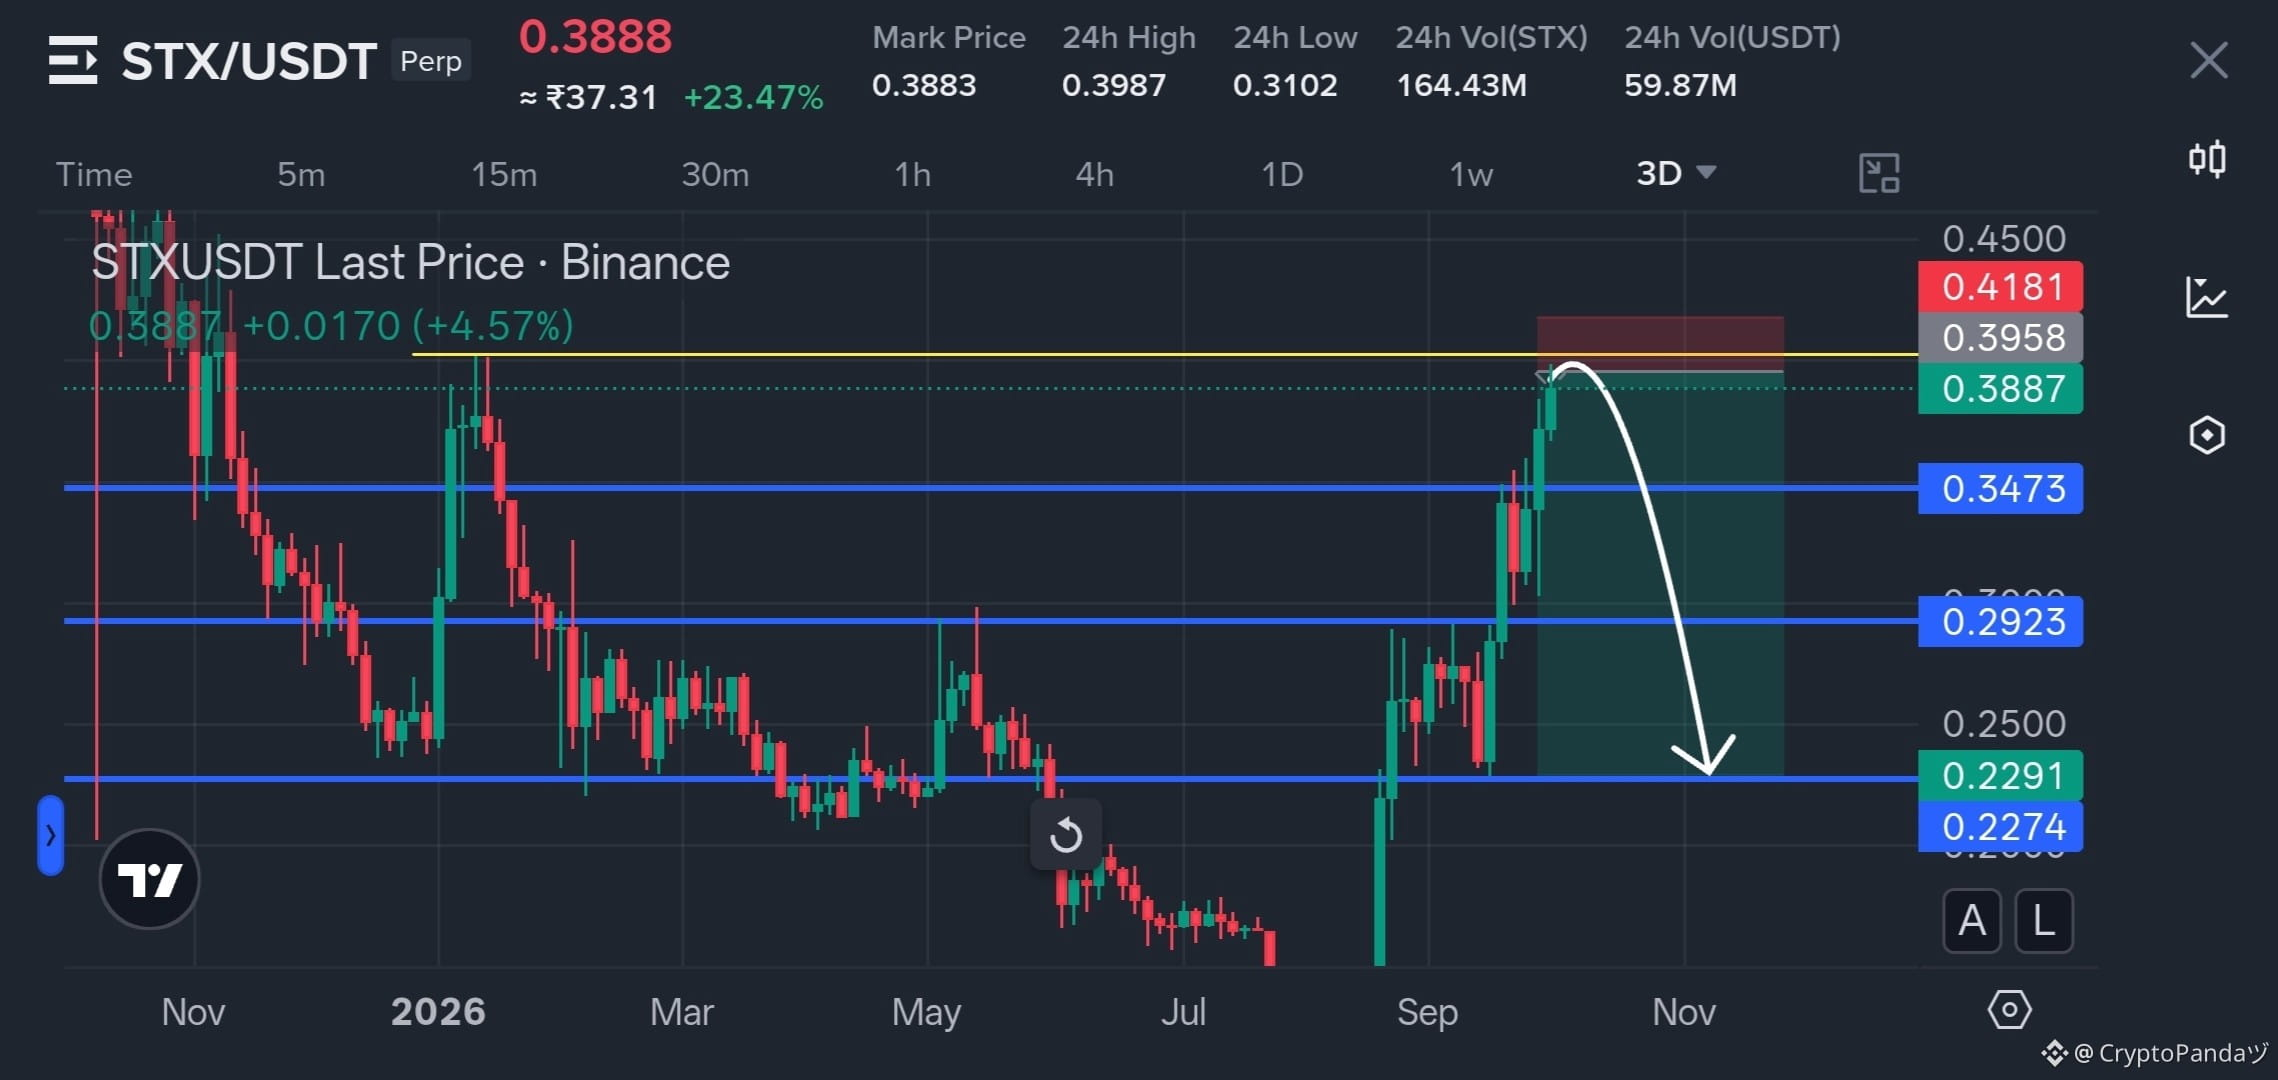
$STX — Vertical Pump Meets 0.3958 Ceiling, Mean-Reversion Flush Loading 📉
Trade Plan: Short $STX
Entry: 0.38 - 0.40
SL: 0.4181
TP: 0.3473 | 0.2923 | 0.2291
Why this Setup?
STX has made a sharp vertical expansion into the 0.3958 resistance area after reclaiming the 0.3473 zone, creating a stretched structure near the upper supply band. A rejection from this ceiling could unwind the recent impulse and send price through 0.3473, with deeper downside targets at 0.2923 and 0.2291. As long as 0.4181 holds, the bearish setup remains valid.
Trade $STX here 👇
{future}(STXUSDT)
$STX — Vertical Pump Meets 0.3958 Ceiling, Mean-Reversion Flush Loading 📉
Trade Plan: Short $STX
Entry: 0.38 - 0.40
SL: 0.4181
TP: 0.3473 | 0.2923 | 0.2291
Why this Setup?
STX has made a sharp vertical expansion into the 0.3958 resistance area after reclaiming the 0.3473 zone, creating a stretched structure near the upper supply band. A rejection from this ceiling could unwind the recent impulse and send price through 0.3473, with deeper downside targets at 0.2923 and 0.2291. As long as 0.4181 holds, the bearish setup remains valid.
Trade $STX here 👇
Trade Plan: Short $STX
Entry: 0.38 - 0.40
SL: 0.4181
TP: 0.3473 | 0.2923 | 0.2291
Why this Setup?
STX has made a sharp vertical expansion into the 0.3958 resistance area after reclaiming the 0.3473 zone, creating a stretched structure near the upper supply band. A rejection from this ceiling could unwind the recent impulse and send price through 0.3473, with deeper downside targets at 0.2923 and 0.2291. As long as 0.4181 holds, the bearish setup remains valid.
Trade $STX here 👇
2
225
·
--
Bearish
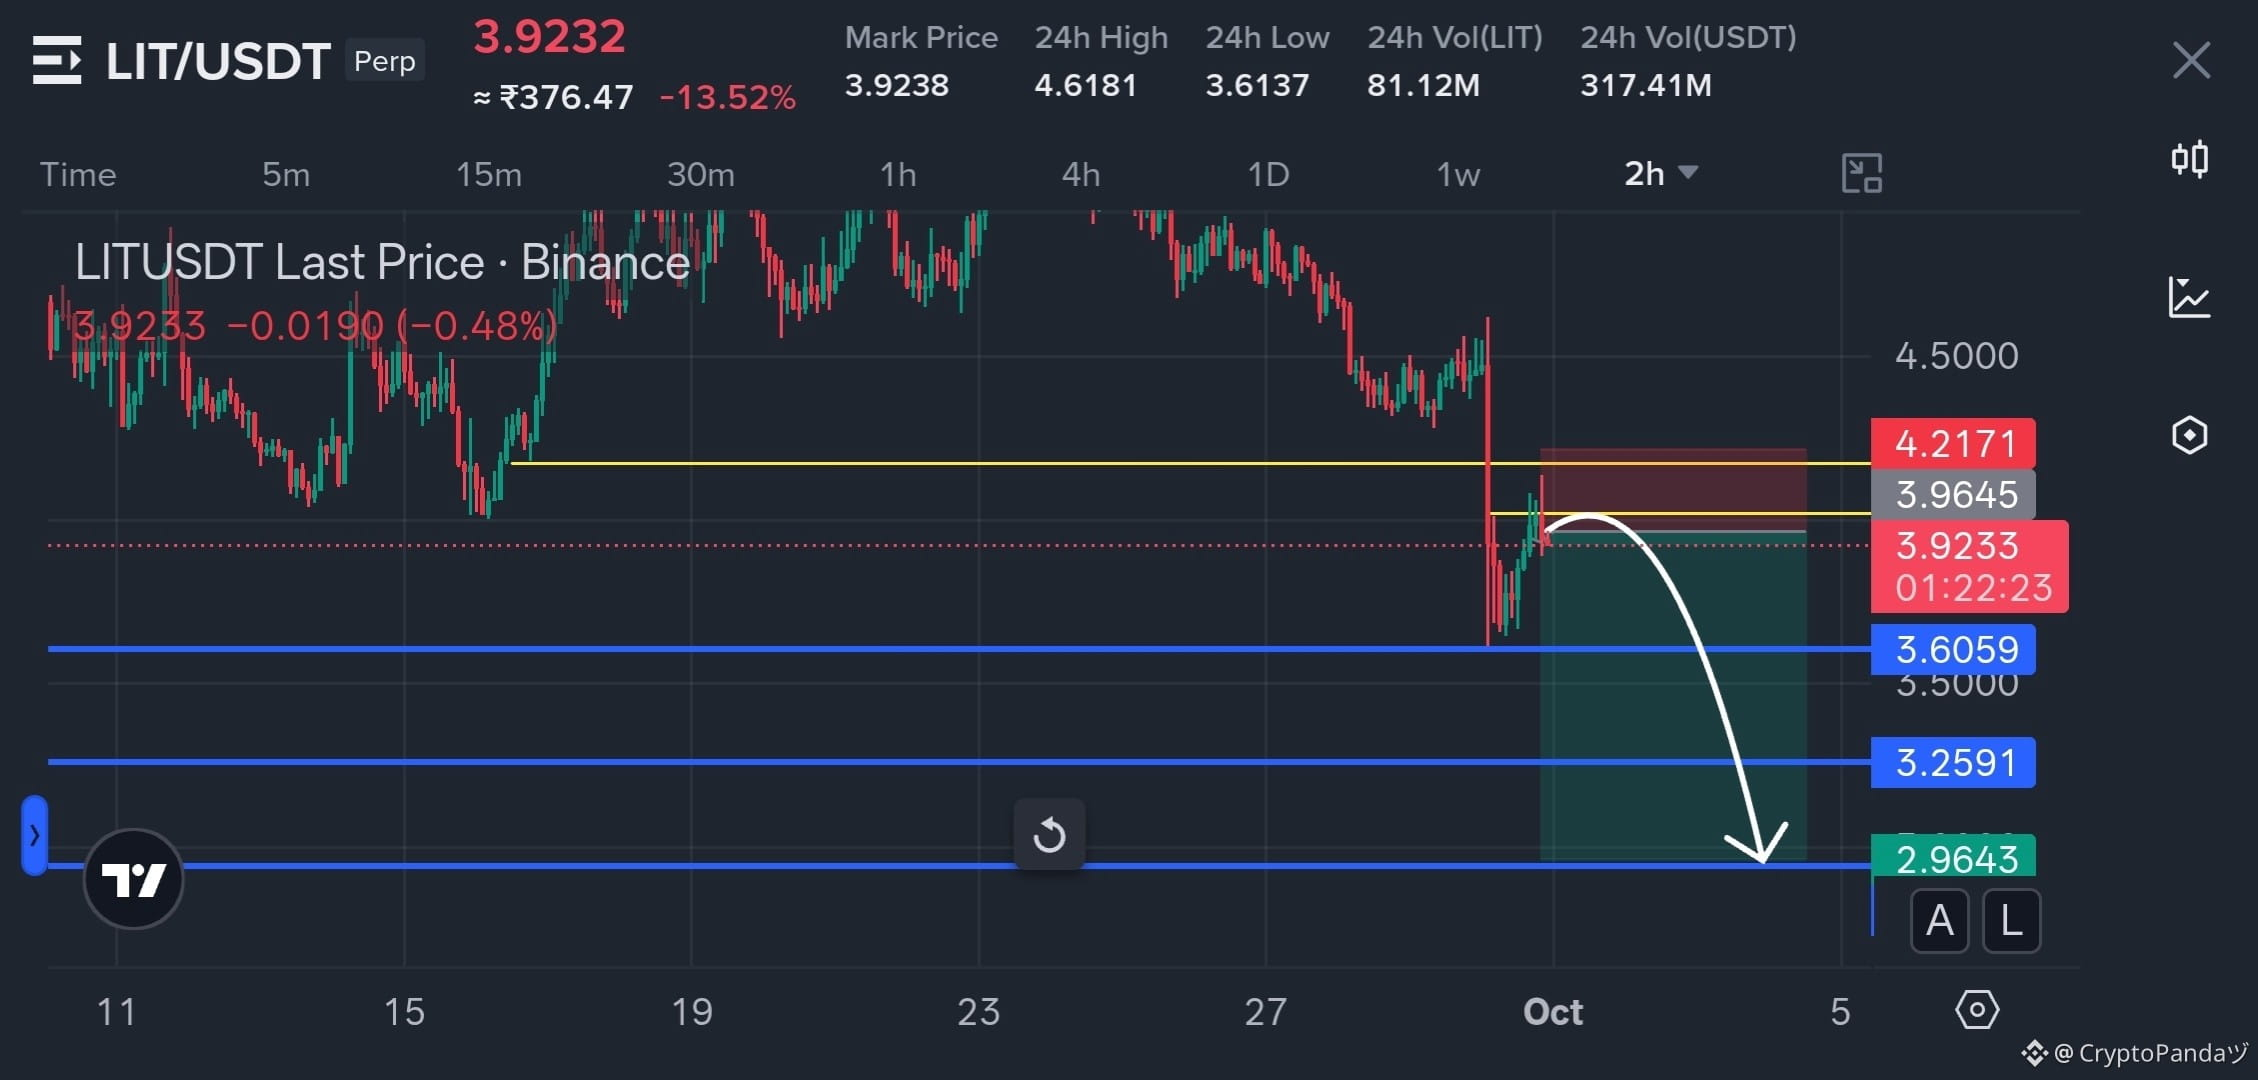
$LIT — Dead Cat Bounce Fading Beneath 3.9645 Resistance, Flush Incoming 📉
Trade Plan: Short $LIT
Entry: 3.90 - 3.95
SL: 4.2171
TP: 3.6059 | 3.2591 | 2.9643
Why this Setup On LIT?
The sharp rebound from the 3.6059 support is showing signs of a dead cat bounce, with price now stalling beneath the 3.9645 resistance zone. If this recovery fails to reclaim the supply area, another downside leg could open toward 3.6059, 3.2591 and 2.9643. As long as 4.2171 holds, the bearish setup remains valid.
Trade $LIT here 👇
{future}(LITUSDT)
$LIT — Dead Cat Bounce Fading Beneath 3.9645 Resistance, Flush Incoming 📉
Trade Plan: Short $LIT
Entry: 3.90 - 3.95
SL: 4.2171
TP: 3.6059 | 3.2591 | 2.9643
Why this Setup On LIT?
The sharp rebound from the 3.6059 support is showing signs of a dead cat bounce, with price now stalling beneath the 3.9645 resistance zone. If this recovery fails to reclaim the supply area, another downside leg could open toward 3.6059, 3.2591 and 2.9643. As long as 4.2171 holds, the bearish setup remains valid.
Trade $LIT here 👇
Trade Plan: Short $LIT
Entry: 3.90 - 3.95
SL: 4.2171
TP: 3.6059 | 3.2591 | 2.9643
Why this Setup On LIT?
The sharp rebound from the 3.6059 support is showing signs of a dead cat bounce, with price now stalling beneath the 3.9645 resistance zone. If this recovery fails to reclaim the supply area, another downside leg could open toward 3.6059, 3.2591 and 2.9643. As long as 4.2171 holds, the bearish setup remains valid.
Trade $LIT here 👇
2
221
·
--
Bearish
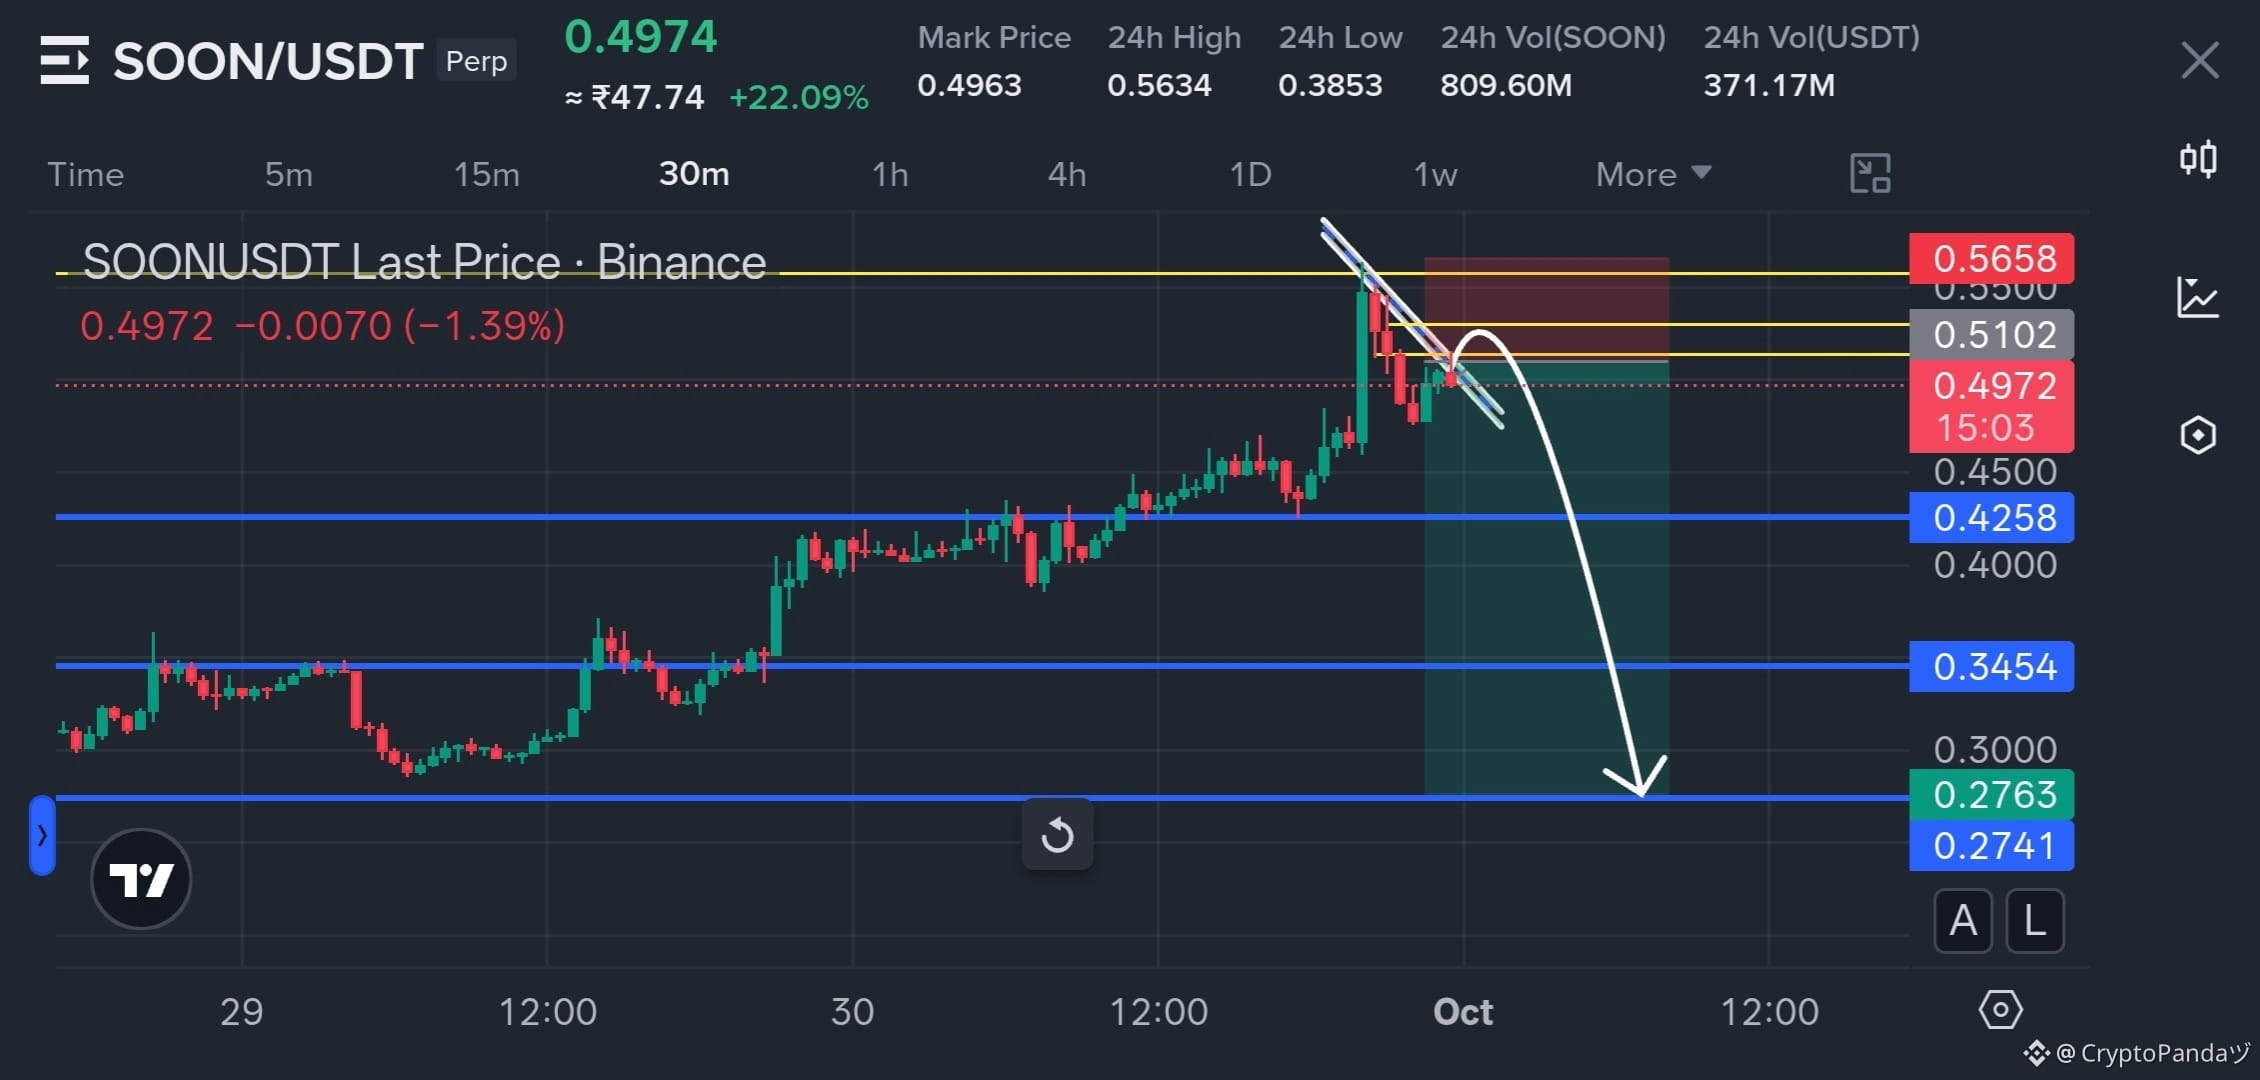
$SOON — Parabolic Run Losing Steam Beneath 0.5102. Reversal Loading 📉
Trade Plan: Short $SOON
Entry: 0.49 - 0.51
SL: 0.5658
TP: 0.4258 | 0.3454 | 0.2763
Why this Setup?
SOON is stalling beneath the 0.5102 resistance after the vertical run, while the descending trendline is pressing lower. A rejection from this supply pocket could unwind the recent impulse toward 0.4258, with deeper downside opening toward 0.3454 and 0.2763. As long as 0.5658 holds, the bearish setup remains valid.
Trade $SOON here 👇
{future}(SOONUSDT)
$SOON — Parabolic Run Losing Steam Beneath 0.5102. Reversal Loading 📉
Trade Plan: Short $SOON
Entry: 0.49 - 0.51
SL: 0.5658
TP: 0.4258 | 0.3454 | 0.2763
Why this Setup?
SOON is stalling beneath the 0.5102 resistance after the vertical run, while the descending trendline is pressing lower. A rejection from this supply pocket could unwind the recent impulse toward 0.4258, with deeper downside opening toward 0.3454 and 0.2763. As long as 0.5658 holds, the bearish setup remains valid.
Trade $SOON here 👇
Trade Plan: Short $SOON
Entry: 0.49 - 0.51
SL: 0.5658
TP: 0.4258 | 0.3454 | 0.2763
Why this Setup?
SOON is stalling beneath the 0.5102 resistance after the vertical run, while the descending trendline is pressing lower. A rejection from this supply pocket could unwind the recent impulse toward 0.4258, with deeper downside opening toward 0.3454 and 0.2763. As long as 0.5658 holds, the bearish setup remains valid.
Trade $SOON here 👇
2
273
·
--
Bearish
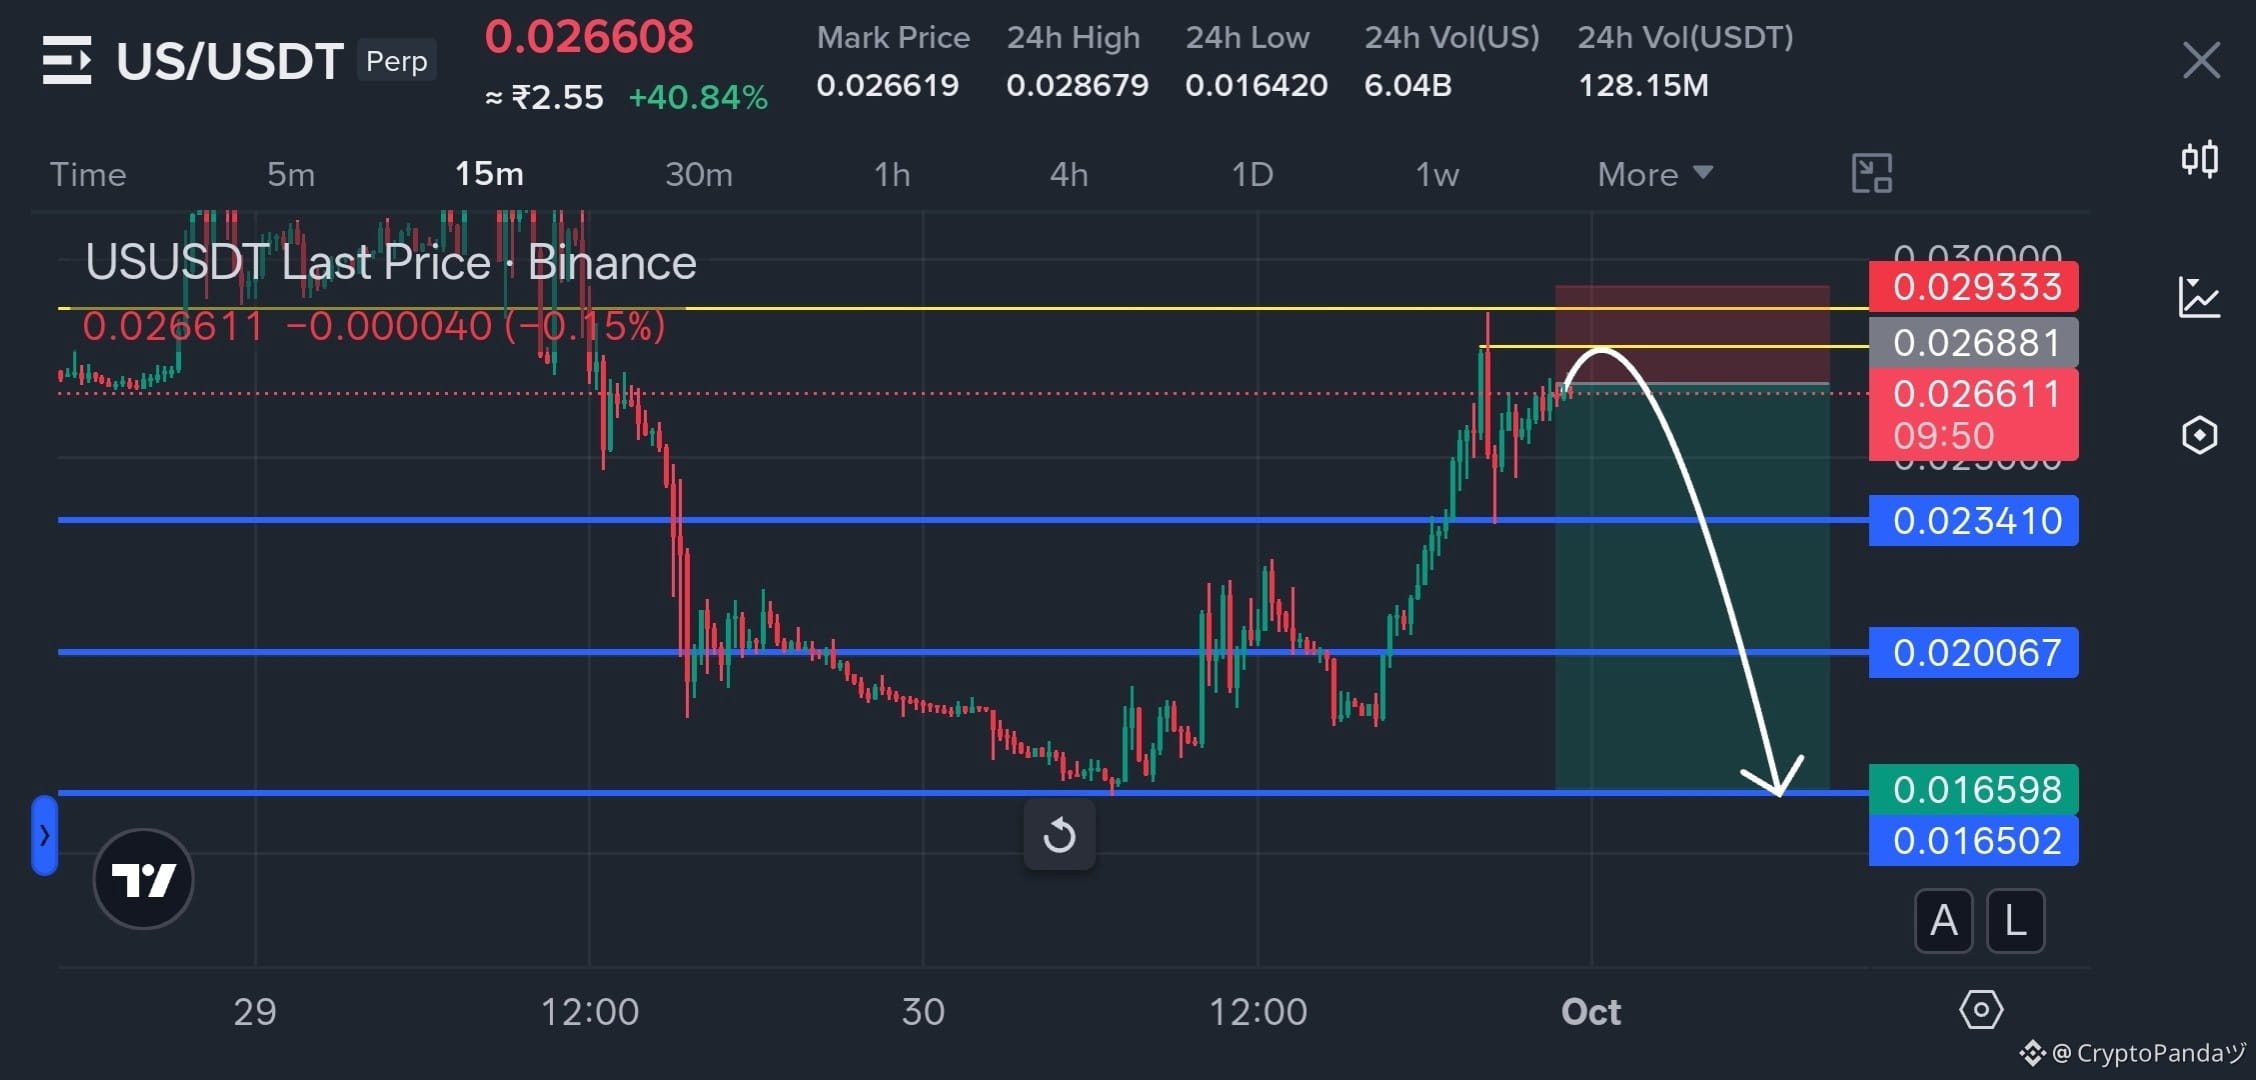
$US — Rejection Brewing Beneath 0.02688 Supply, Major Crash Incoming 📉
Trade Plan: Short $US
Entry: 0.0265 - 0.0270
SL: 0.029333
TP: 0.023410 | 0.020067 | 0.016598
Why this Setup?
Price is stalling beneath the 0.02688 supply zone after a sharp upside expansion, creating a potential exhaustion setup. A rejection from this area could send US back through the 0.023410 and 0.020067 supports, with deeper downside opening toward 0.016598. As long as 0.029333 holds, the bearish setup remains valid.
Trade $US here 👇
{future}(USUSDT)
$US — Rejection Brewing Beneath 0.02688 Supply, Major Crash Incoming 📉
Trade Plan: Short $US
Entry: 0.0265 - 0.0270
SL: 0.029333
TP: 0.023410 | 0.020067 | 0.016598
Why this Setup?
Price is stalling beneath the 0.02688 supply zone after a sharp upside expansion, creating a potential exhaustion setup. A rejection from this area could send US back through the 0.023410 and 0.020067 supports, with deeper downside opening toward 0.016598. As long as 0.029333 holds, the bearish setup remains valid.
Trade $US here 👇
Trade Plan: Short $US
Entry: 0.0265 - 0.0270
SL: 0.029333
TP: 0.023410 | 0.020067 | 0.016598
Why this Setup?
Price is stalling beneath the 0.02688 supply zone after a sharp upside expansion, creating a potential exhaustion setup. A rejection from this area could send US back through the 0.023410 and 0.020067 supports, with deeper downside opening toward 0.016598. As long as 0.029333 holds, the bearish setup remains valid.
Trade $US here 👇
2
205
·
--
Bearish
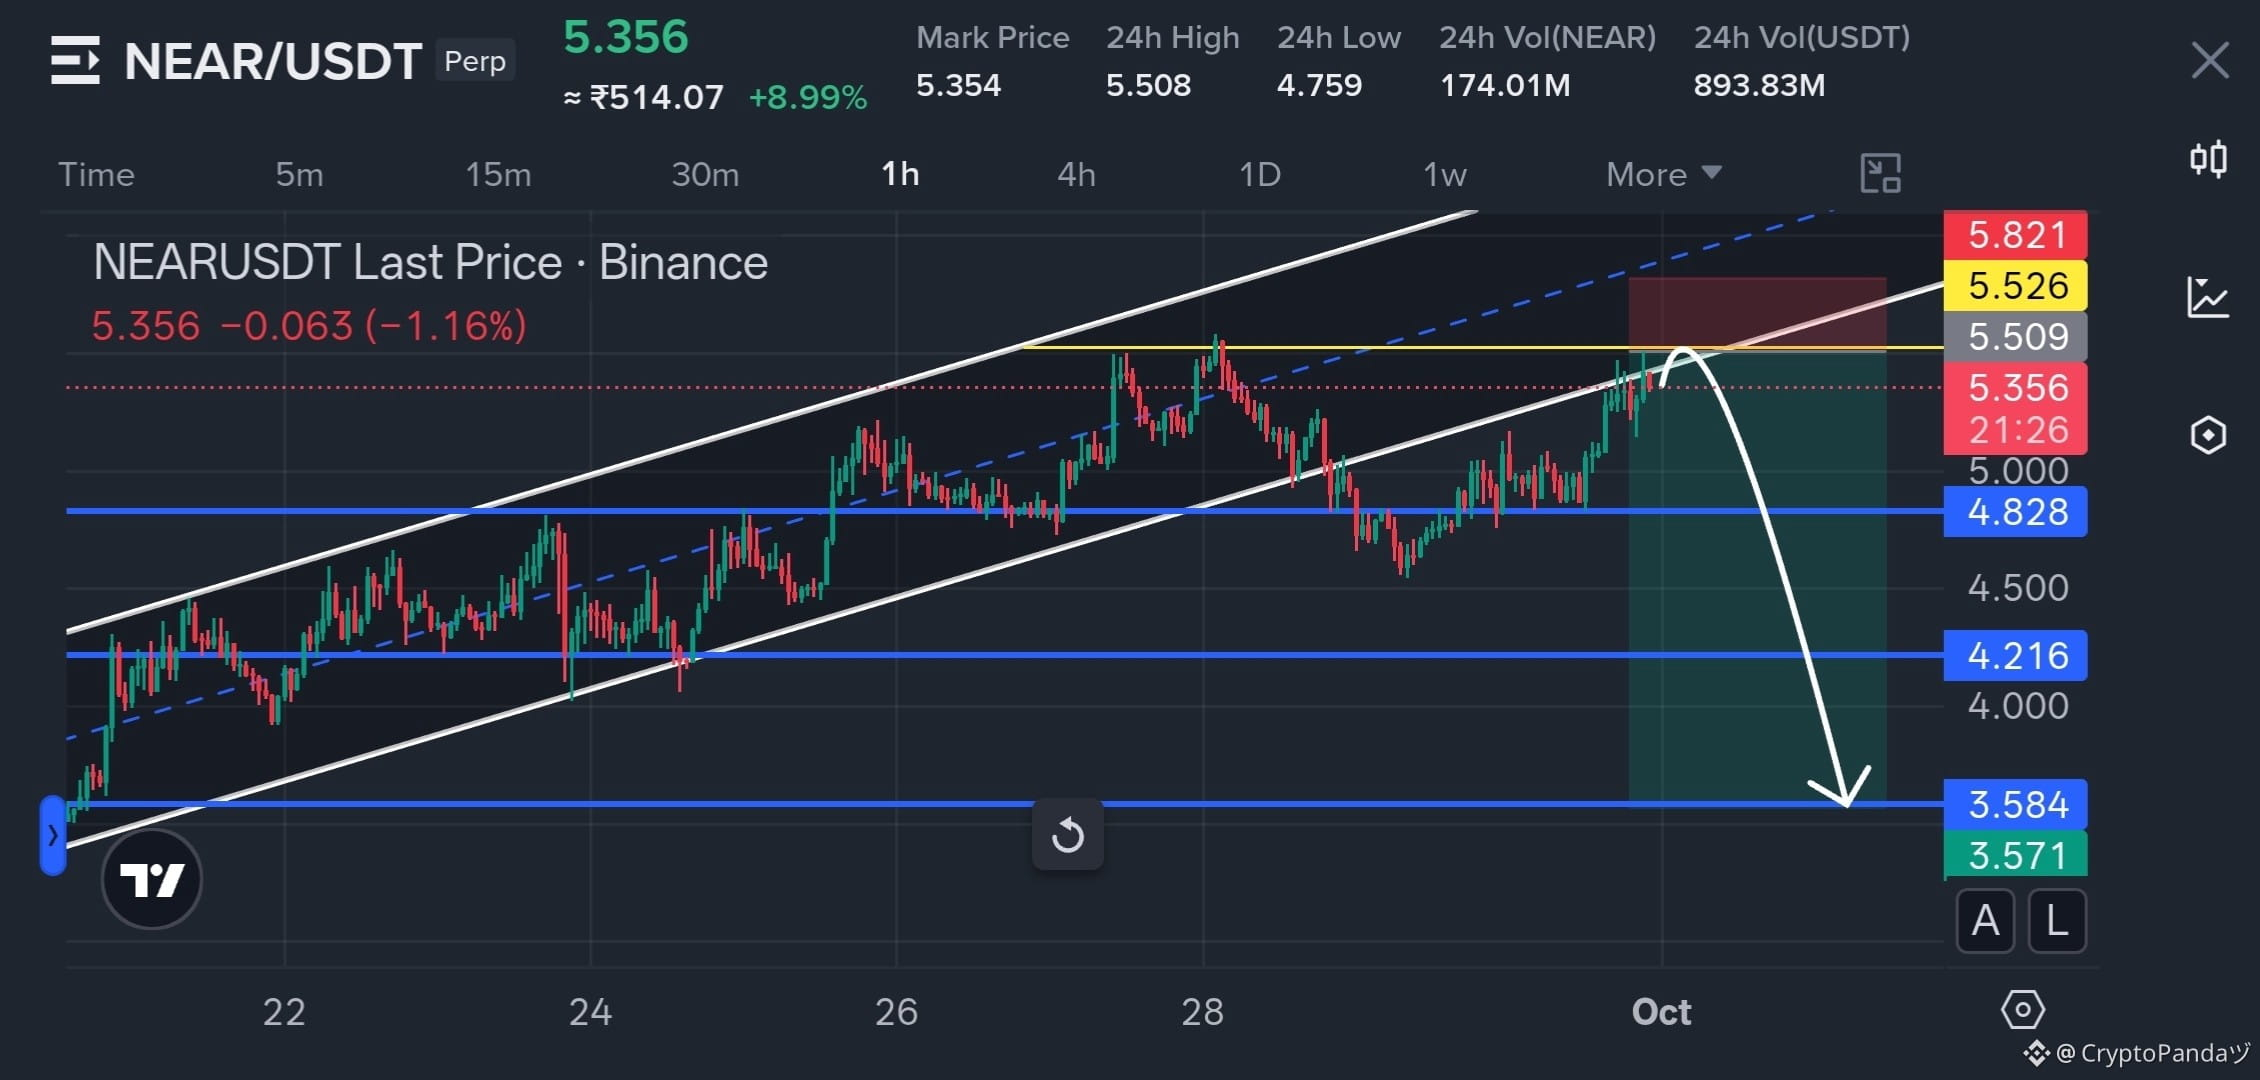
$NEAR — Rising Channel Meets 5.526 Supply, Dump Trigger Sits Below 📉
Trade Plan: Short $NEAR
Entry: 5.30 - 5.50
SL: 5.821
TP: 4.828 | 4.216 | 3.584
Why this Setup?
Price of NEAR is pressing into the upper boundary of the rising channel around the 5.526 supply zone, creating a potential exhaustion area after the recent upside push. A rejection here could send NEAR back through the 4.828 and 4.216 supports, with deeper downside opening toward 3.584. As long as 5.821 holds, the bearish setup remains valid.
Trade $NEAR here 👇
{future}(NEARUSDT)
$NEAR — Rising Channel Meets 5.526 Supply, Dump Trigger Sits Below 📉
Trade Plan: Short $NEAR
Entry: 5.30 - 5.50
SL: 5.821
TP: 4.828 | 4.216 | 3.584
Why this Setup?
Price of NEAR is pressing into the upper boundary of the rising channel around the 5.526 supply zone, creating a potential exhaustion area after the recent upside push. A rejection here could send NEAR back through the 4.828 and 4.216 supports, with deeper downside opening toward 3.584. As long as 5.821 holds, the bearish setup remains valid.
Trade $NEAR here 👇
Trade Plan: Short $NEAR
Entry: 5.30 - 5.50
SL: 5.821
TP: 4.828 | 4.216 | 3.584
Why this Setup?
Price of NEAR is pressing into the upper boundary of the rising channel around the 5.526 supply zone, creating a potential exhaustion area after the recent upside push. A rejection here could send NEAR back through the 4.828 and 4.216 supports, with deeper downside opening toward 3.584. As long as 5.821 holds, the bearish setup remains valid.
Trade $NEAR here 👇
2
175
·
--
Bearish
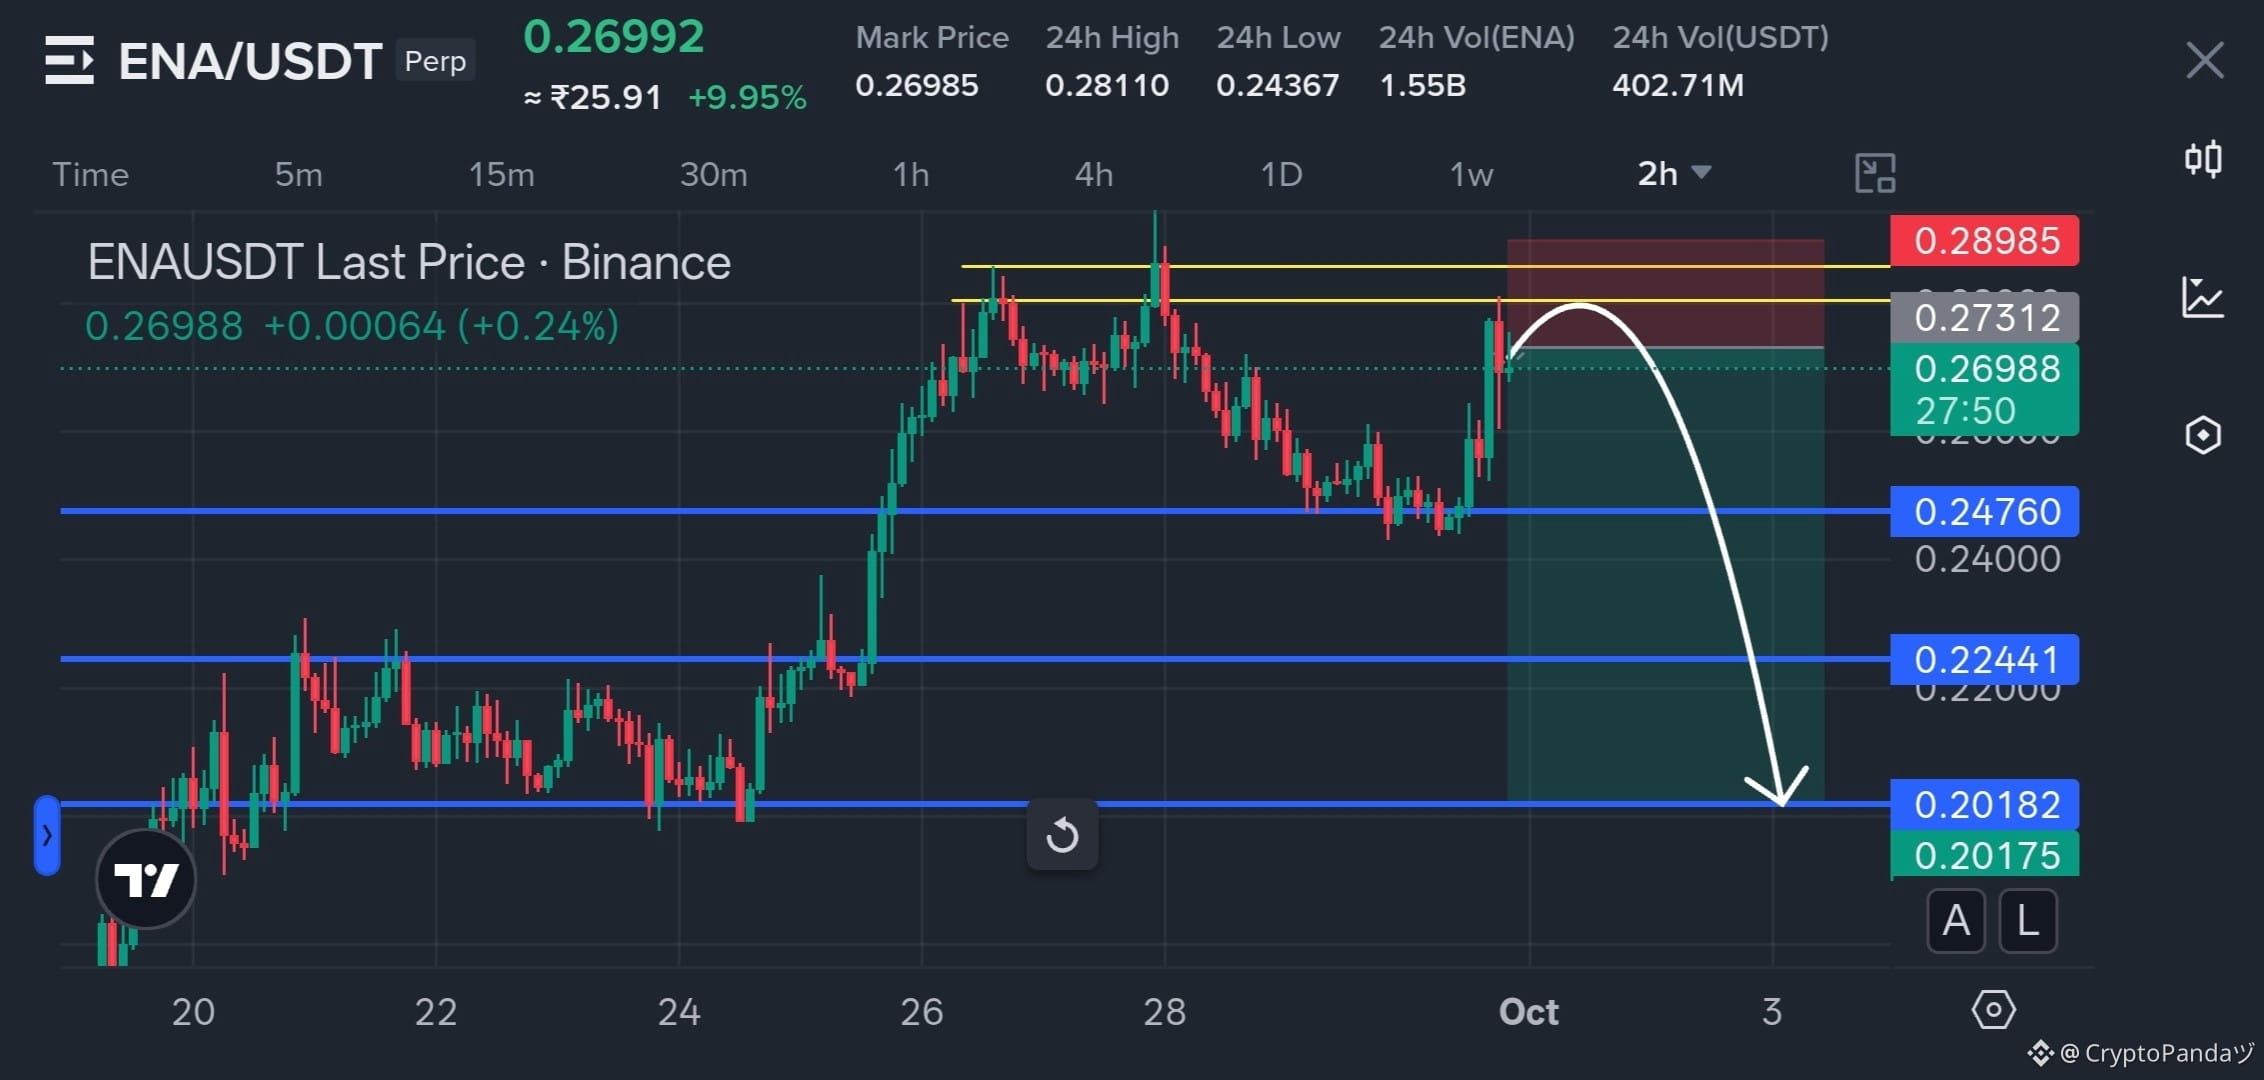
$ENA — Supply Reloading Near 0.27312, Downside Liquidity Hunt Begins 📉
Trade Plan: Short $ENA
Entry: 0.27 - 0.28
SL: 0.28985
TP: 0.24760 | 0.22441 | 0.20182
Why this Setup?
ENA has surged back into the 0.27312 supply area after reclaiming the lower range, creating a potential liquidity trap for late buyers. A rejection from this zone could unwind the move and drag price through 0.24760, 0.22441 and toward the 0.20182 demand floor. As long as 0.28985 holds, the bearish setup remains valid.
Trade $ENA here 👇
{future}(ENAUSDT)
$ENA — Supply Reloading Near 0.27312, Downside Liquidity Hunt Begins 📉
Trade Plan: Short $ENA
Entry: 0.27 - 0.28
SL: 0.28985
TP: 0.24760 | 0.22441 | 0.20182
Why this Setup?
ENA has surged back into the 0.27312 supply area after reclaiming the lower range, creating a potential liquidity trap for late buyers. A rejection from this zone could unwind the move and drag price through 0.24760, 0.22441 and toward the 0.20182 demand floor. As long as 0.28985 holds, the bearish setup remains valid.
Trade $ENA here 👇
Trade Plan: Short $ENA
Entry: 0.27 - 0.28
SL: 0.28985
TP: 0.24760 | 0.22441 | 0.20182
Why this Setup?
ENA has surged back into the 0.27312 supply area after reclaiming the lower range, creating a potential liquidity trap for late buyers. A rejection from this zone could unwind the move and drag price through 0.24760, 0.22441 and toward the 0.20182 demand floor. As long as 0.28985 holds, the bearish setup remains valid.
Trade $ENA here 👇
2
157
·
--
Bullish
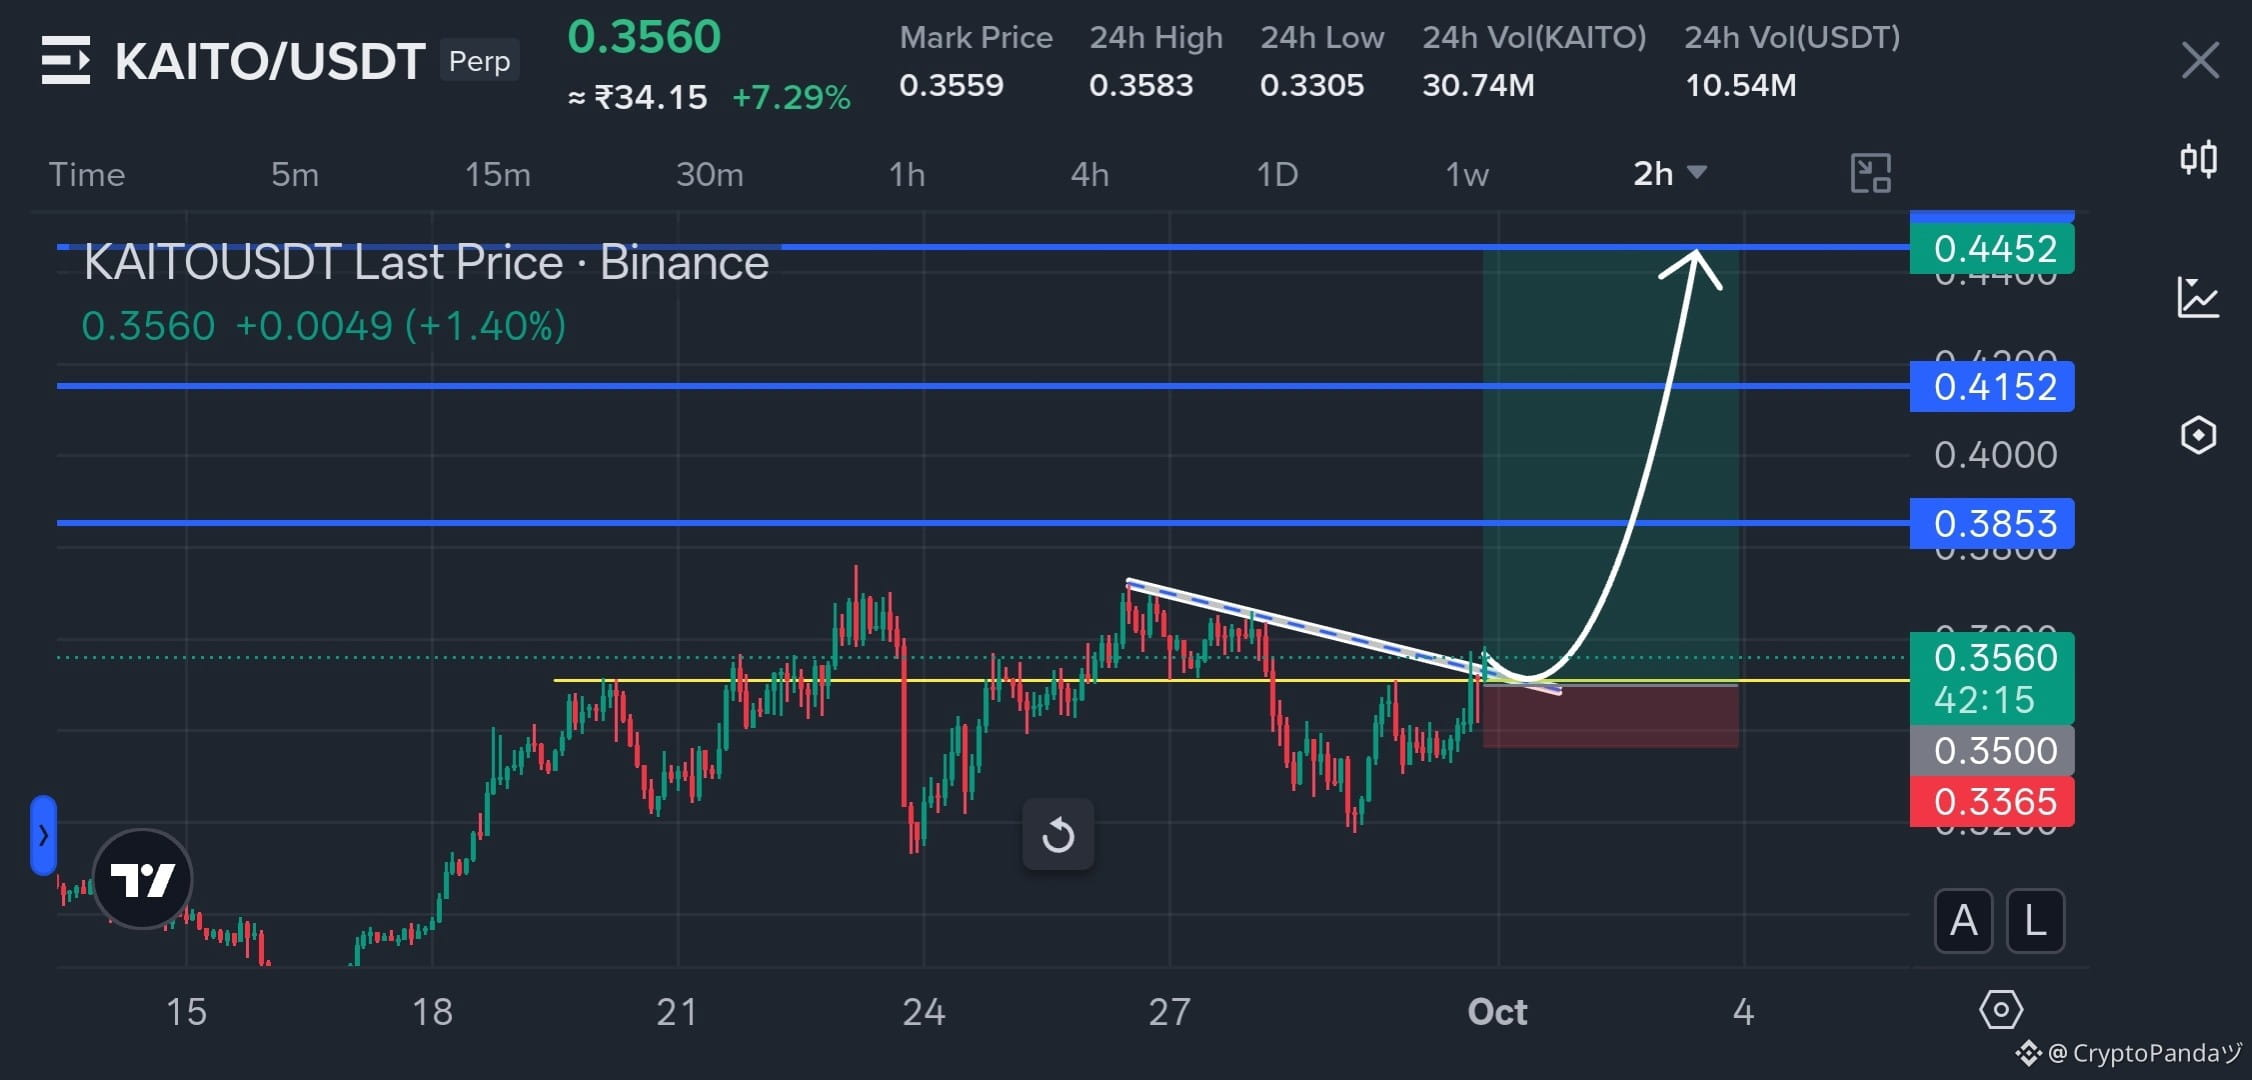
$KAITO — 0.3505 Resistance Turned Support, Upside Lift Incoming 📈
Trade Plan: Long $KAITO
Entry: 0.35 - 0.36
SL: 0.3365
TP: 0.3853 | 0.4152 | 0.4452
Why this Setup?
KAITO is breaking above the descending trendline that has been capping price since the 0.37 area. The 0.35 horizontal zone is now acting as the key breakout/retest area, with price holding above it around 0.356. If this breakout sustains, the chart structure points toward 0.3853, then 0.4152 and finally 0.4452. As long as 0.3365 holds, the bullish setup remains valid.
Trade $KAITO here 👇
{future}(KAITOUSDT)
$KAITO — 0.3505 Resistance Turned Support, Upside Lift Incoming 📈
Trade Plan: Long $KAITO
Entry: 0.35 - 0.36
SL: 0.3365
TP: 0.3853 | 0.4152 | 0.4452
Why this Setup?
KAITO is breaking above the descending trendline that has been capping price since the 0.37 area. The 0.35 horizontal zone is now acting as the key breakout/retest area, with price holding above it around 0.356. If this breakout sustains, the chart structure points toward 0.3853, then 0.4152 and finally 0.4452. As long as 0.3365 holds, the bullish setup remains valid.
Trade $KAITO here 👇
Trade Plan: Long $KAITO
Entry: 0.35 - 0.36
SL: 0.3365
TP: 0.3853 | 0.4152 | 0.4452
Why this Setup?
KAITO is breaking above the descending trendline that has been capping price since the 0.37 area. The 0.35 horizontal zone is now acting as the key breakout/retest area, with price holding above it around 0.356. If this breakout sustains, the chart structure points toward 0.3853, then 0.4152 and finally 0.4452. As long as 0.3365 holds, the bullish setup remains valid.
Trade $KAITO here 👇
2
171
·
--
Bullish
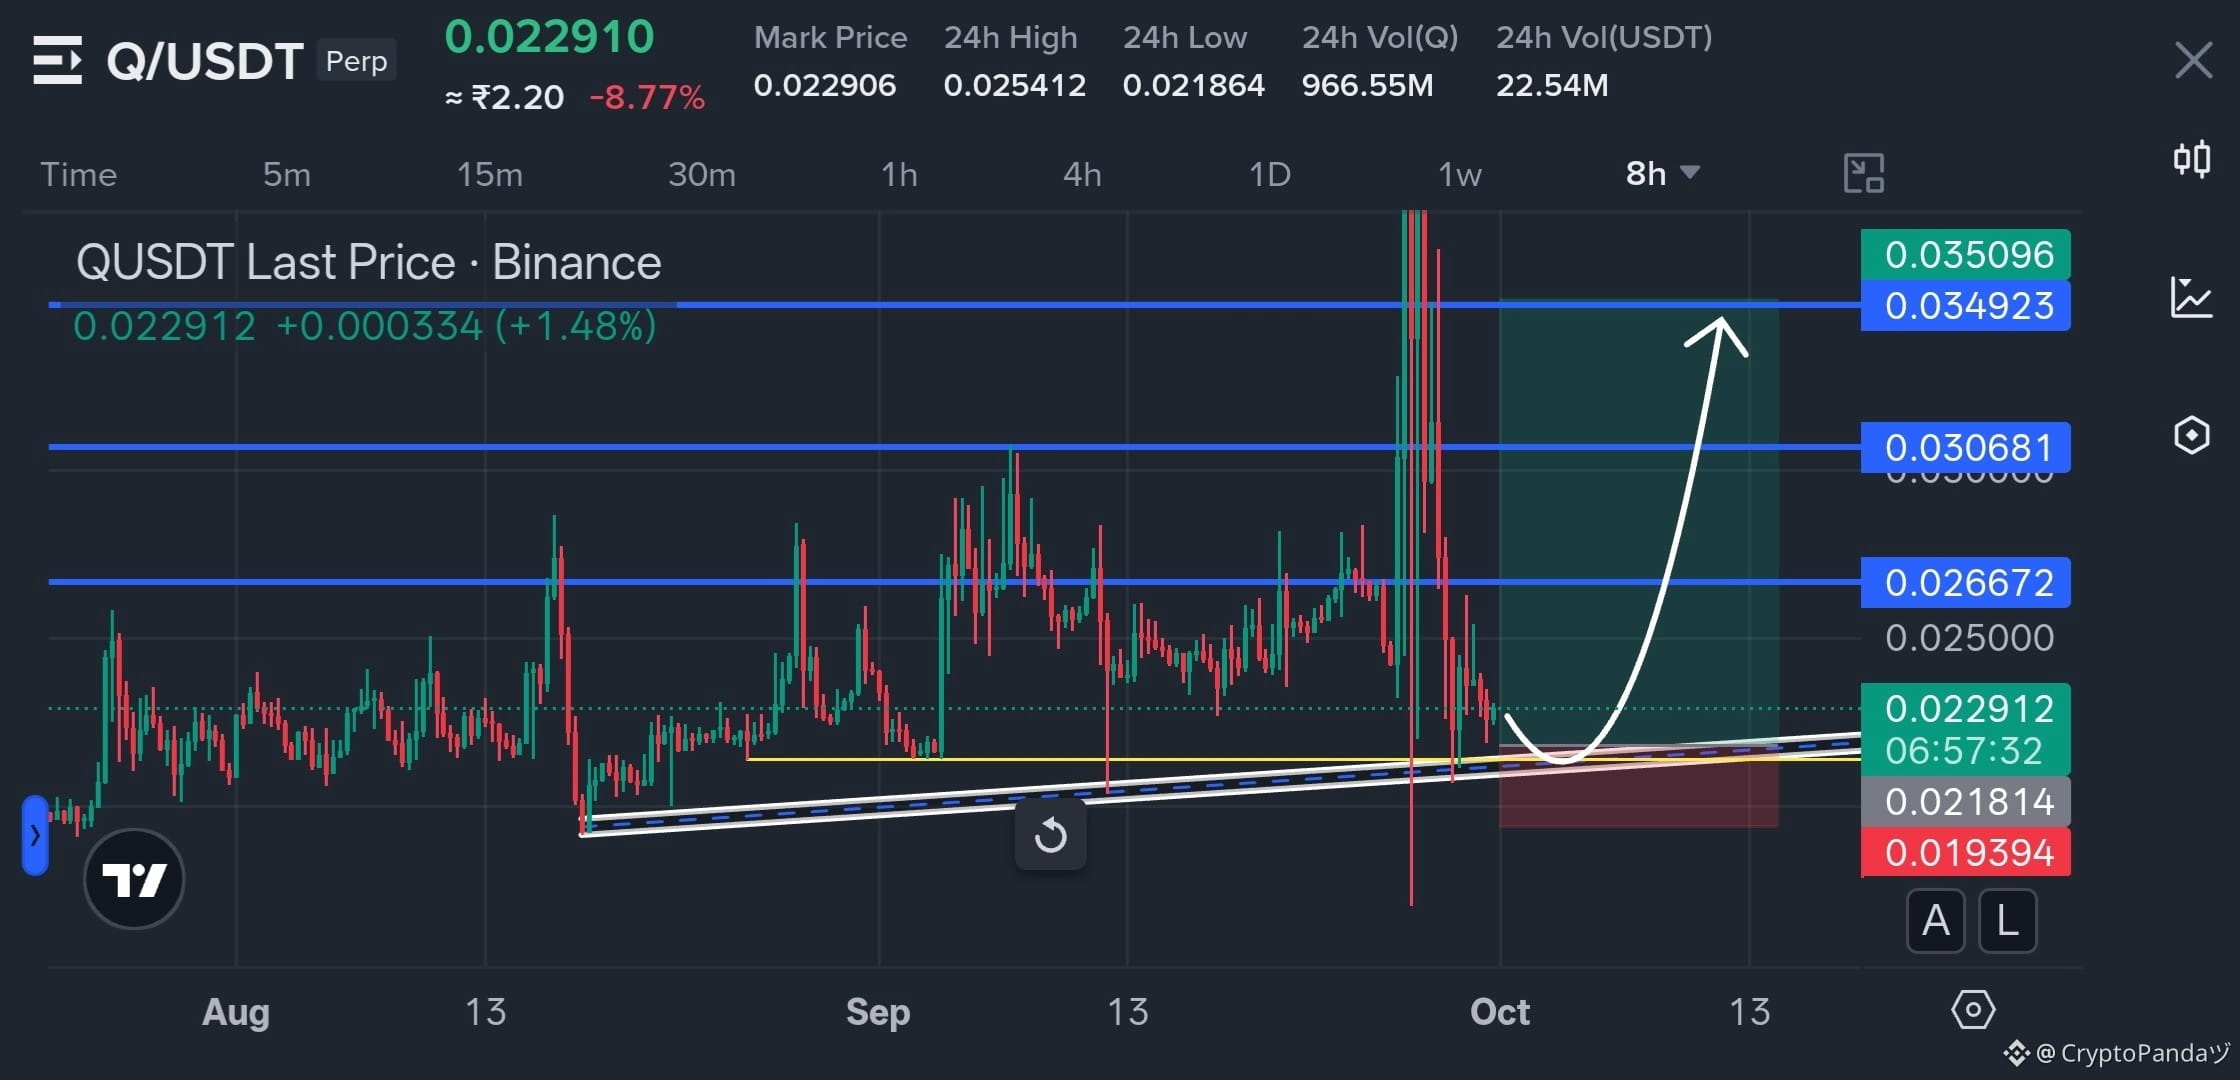
$Q — Coiling Tight Above 0.0218 Demand. Bulls Ready For The Next Upside Leg 📈
Trade Plan: Long $Q
Entry: 0.022 - 0.023
SL: 0.019394
TP: 0.026672 | 0.030681 | 0.034923
Why this Setup?
Price is holding above the rising trendline around the 0.022 zone after repeated tests, while the structure continues to form higher support. A bounce from this area could push price toward 0.026672 first, followed by 0.030681 and 0.034923 if momentum expands. As long as 0.019394 holds, the bullish setup remains valid.
Trade $Q here 👇
{future}(QUSDT)
$Q — Coiling Tight Above 0.0218 Demand. Bulls Ready For The Next Upside Leg 📈
Trade Plan: Long $Q
Entry: 0.022 - 0.023
SL: 0.019394
TP: 0.026672 | 0.030681 | 0.034923
Why this Setup?
Price is holding above the rising trendline around the 0.022 zone after repeated tests, while the structure continues to form higher support. A bounce from this area could push price toward 0.026672 first, followed by 0.030681 and 0.034923 if momentum expands. As long as 0.019394 holds, the bullish setup remains valid.
Trade $Q here 👇
Trade Plan: Long $Q
Entry: 0.022 - 0.023
SL: 0.019394
TP: 0.026672 | 0.030681 | 0.034923
Why this Setup?
Price is holding above the rising trendline around the 0.022 zone after repeated tests, while the structure continues to form higher support. A bounce from this area could push price toward 0.026672 first, followed by 0.030681 and 0.034923 if momentum expands. As long as 0.019394 holds, the bullish setup remains valid.
Trade $Q here 👇
4
200
·
--
Bullish
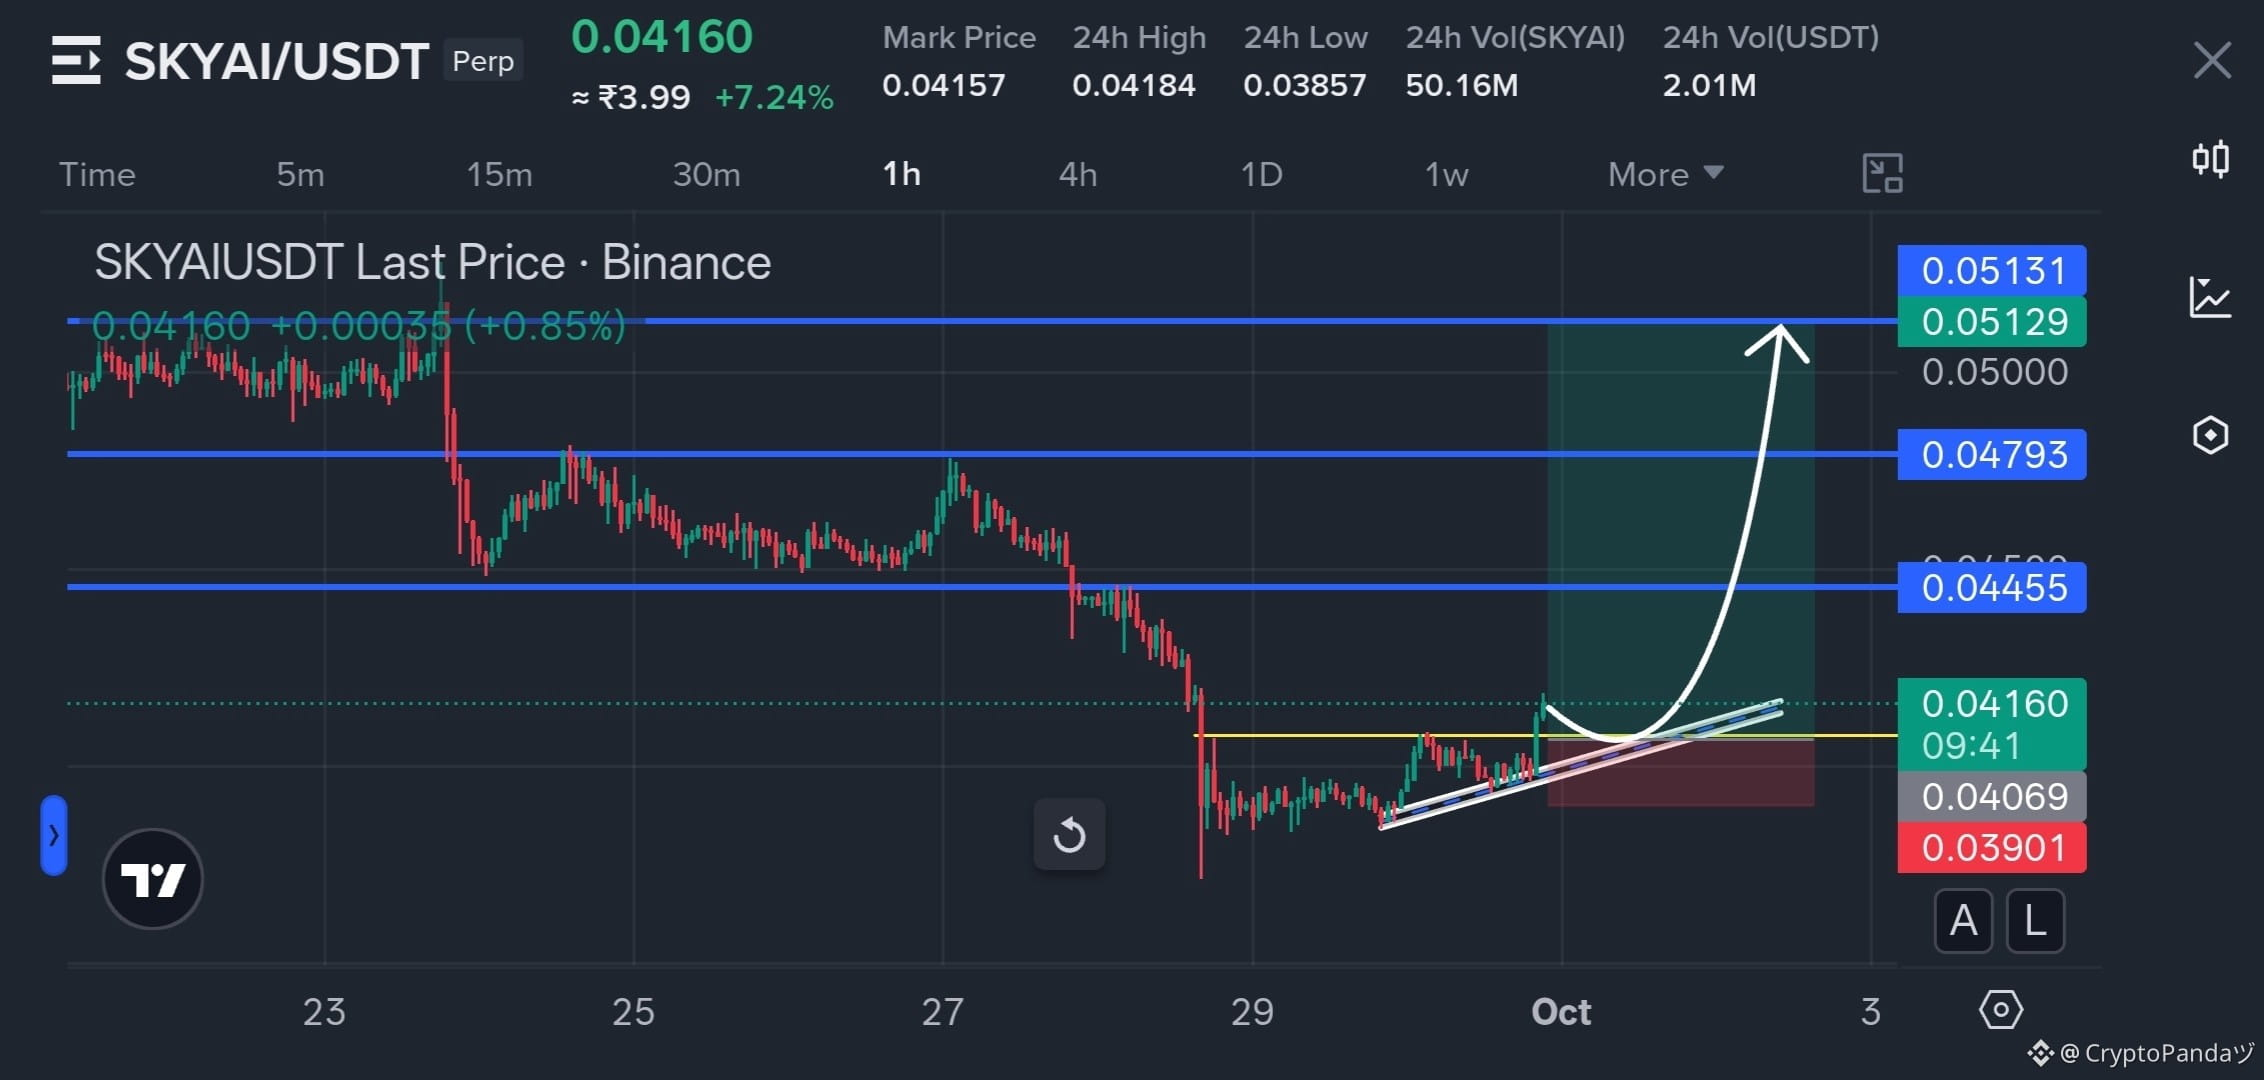
$SKYAI — Ascending Base Support At 0.0405, Upside Void Opening 📈
Trade Plan: Long $SKYAI
Entry: 0.0405 - 0.0415
SL: 0.03901
TP: 0.04455 | 0.04793 | 0.05131
Why this Setup?
SKYAI is building a tight ascending base above the 0.0405 area, with higher lows forming along the rising trendline. A sustained reclaim from this structure could open the path toward 0.04455, followed by 0.04793 and 0.05131 as momentum expands. As long as 0.03901 holds, the bullish setup remains valid.
Trade $SKYAI here 👇
{future}(SKYAIUSDT)
$SKYAI — Ascending Base Support At 0.0405, Upside Void Opening 📈
Trade Plan: Long $SKYAI
Entry: 0.0405 - 0.0415
SL: 0.03901
TP: 0.04455 | 0.04793 | 0.05131
Why this Setup?
SKYAI is building a tight ascending base above the 0.0405 area, with higher lows forming along the rising trendline. A sustained reclaim from this structure could open the path toward 0.04455, followed by 0.04793 and 0.05131 as momentum expands. As long as 0.03901 holds, the bullish setup remains valid.
Trade $SKYAI here 👇
Trade Plan: Long $SKYAI
Entry: 0.0405 - 0.0415
SL: 0.03901
TP: 0.04455 | 0.04793 | 0.05131
Why this Setup?
SKYAI is building a tight ascending base above the 0.0405 area, with higher lows forming along the rising trendline. A sustained reclaim from this structure could open the path toward 0.04455, followed by 0.04793 and 0.05131 as momentum expands. As long as 0.03901 holds, the bullish setup remains valid.
Trade $SKYAI here 👇
4
2.3k
·
--
Bullish
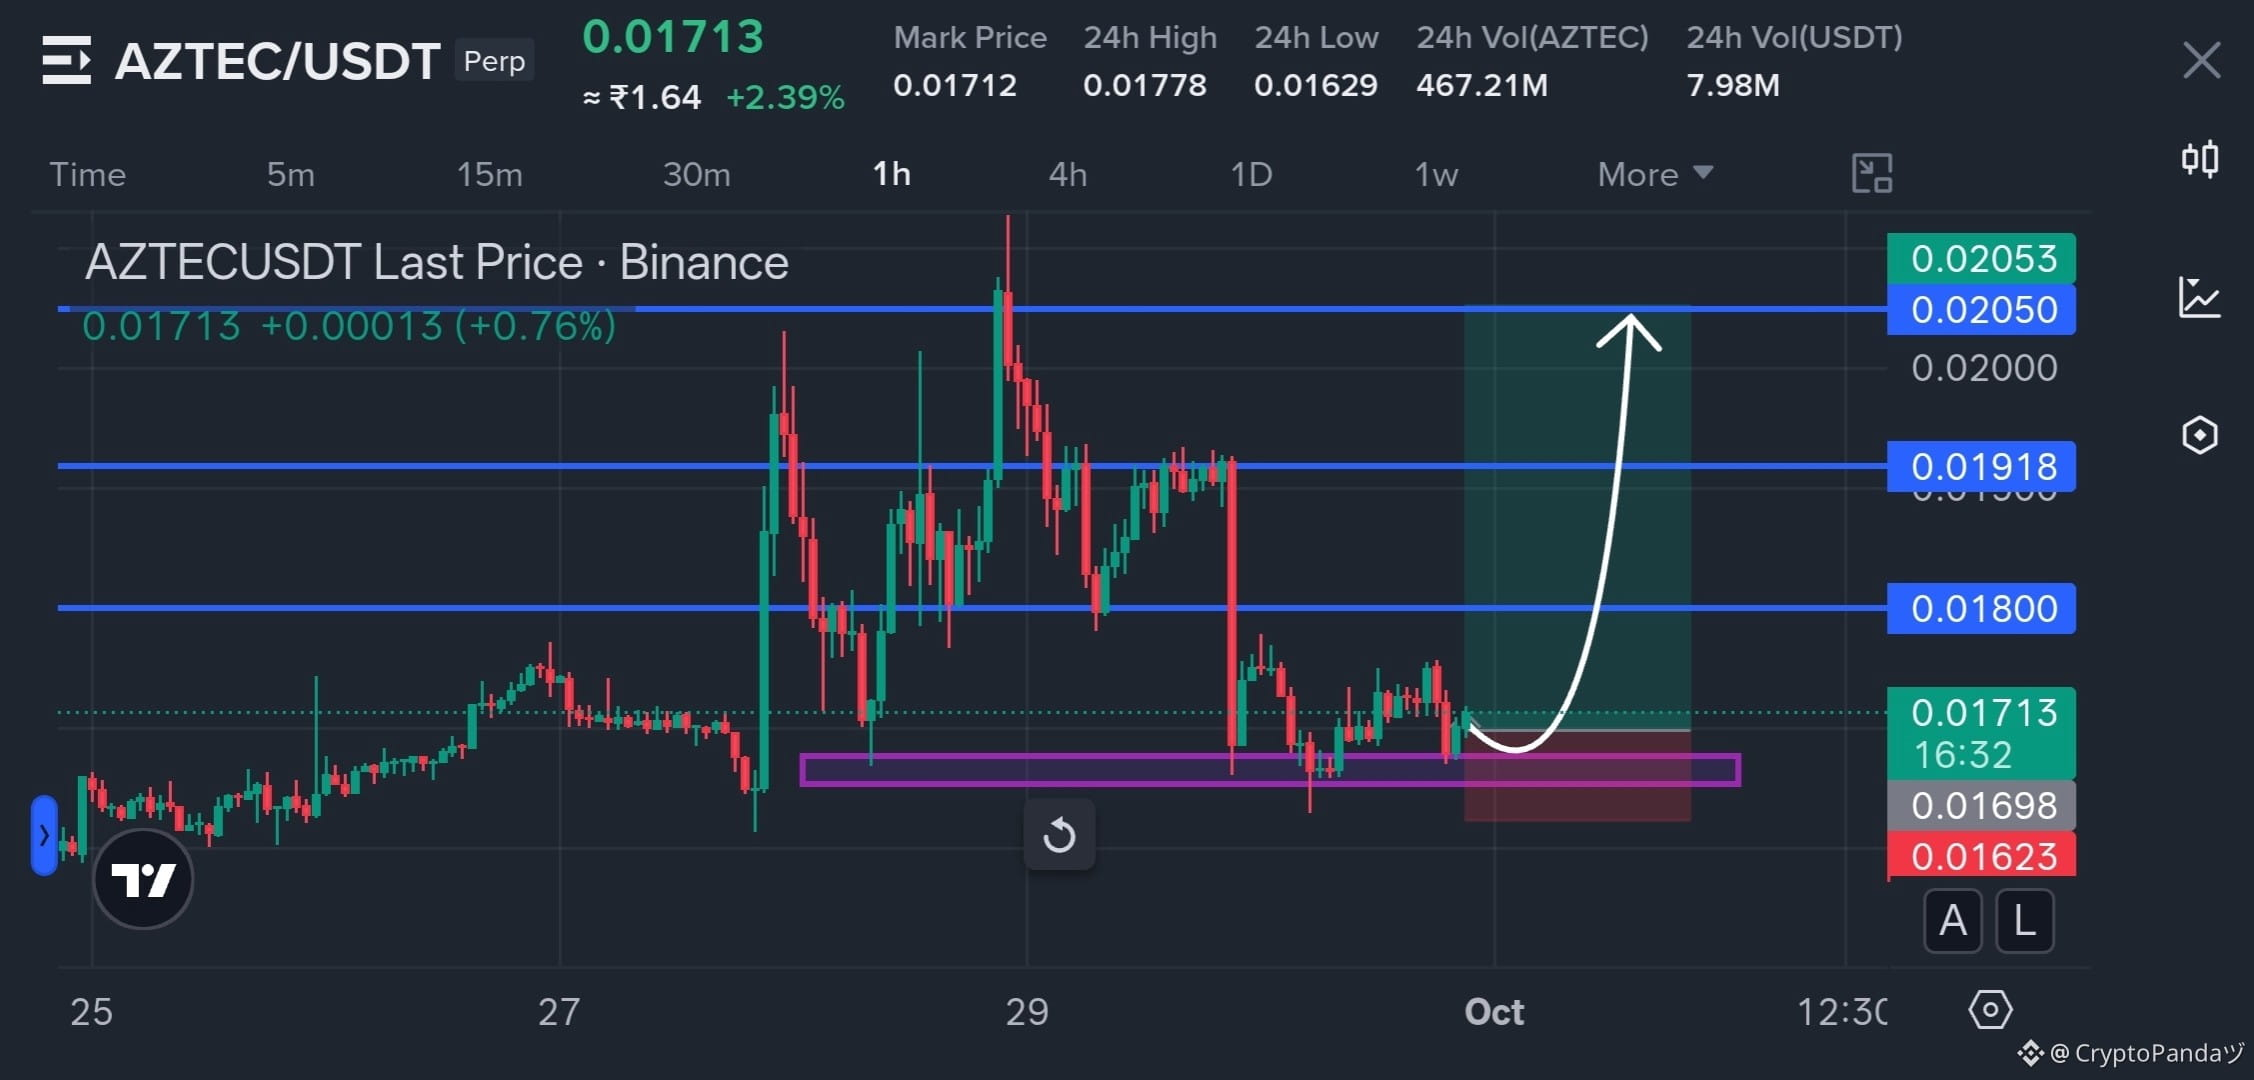
$AZTEC — Order Block Reclaim Near 0.01700, Upside Continuation Loading 📈
Trade Plan: Long $AZTEC
Entry: 0.0170 - 0.0172
SL: 0.01623
TP: 0.01800 | 0.01918 | 0.02050
Why this Setup?
Price is holding the 0.01698 - 0.01700 demand zone after repeated tests, while the chart shows a tight base forming beneath the 0.01800 resistance. A clean reclaim of 0.01800 could open the path toward 0.01918 and then 0.02050 as upside momentum expands. As long as 0.01623 holds, the bullish setup remains valid.
Trade $AZTEC here 👇
{future}(AZTECUSDT)
$AZTEC — Order Block Reclaim Near 0.01700, Upside Continuation Loading 📈
Trade Plan: Long $AZTEC
Entry: 0.0170 - 0.0172
SL: 0.01623
TP: 0.01800 | 0.01918 | 0.02050
Why this Setup?
Price is holding the 0.01698 - 0.01700 demand zone after repeated tests, while the chart shows a tight base forming beneath the 0.01800 resistance. A clean reclaim of 0.01800 could open the path toward 0.01918 and then 0.02050 as upside momentum expands. As long as 0.01623 holds, the bullish setup remains valid.
Trade $AZTEC here 👇
Trade Plan: Long $AZTEC
Entry: 0.0170 - 0.0172
SL: 0.01623
TP: 0.01800 | 0.01918 | 0.02050
Why this Setup?
Price is holding the 0.01698 - 0.01700 demand zone after repeated tests, while the chart shows a tight base forming beneath the 0.01800 resistance. A clean reclaim of 0.01800 could open the path toward 0.01918 and then 0.02050 as upside momentum expands. As long as 0.01623 holds, the bullish setup remains valid.
Trade $AZTEC here 👇
1
4
121
·
--
Bearish
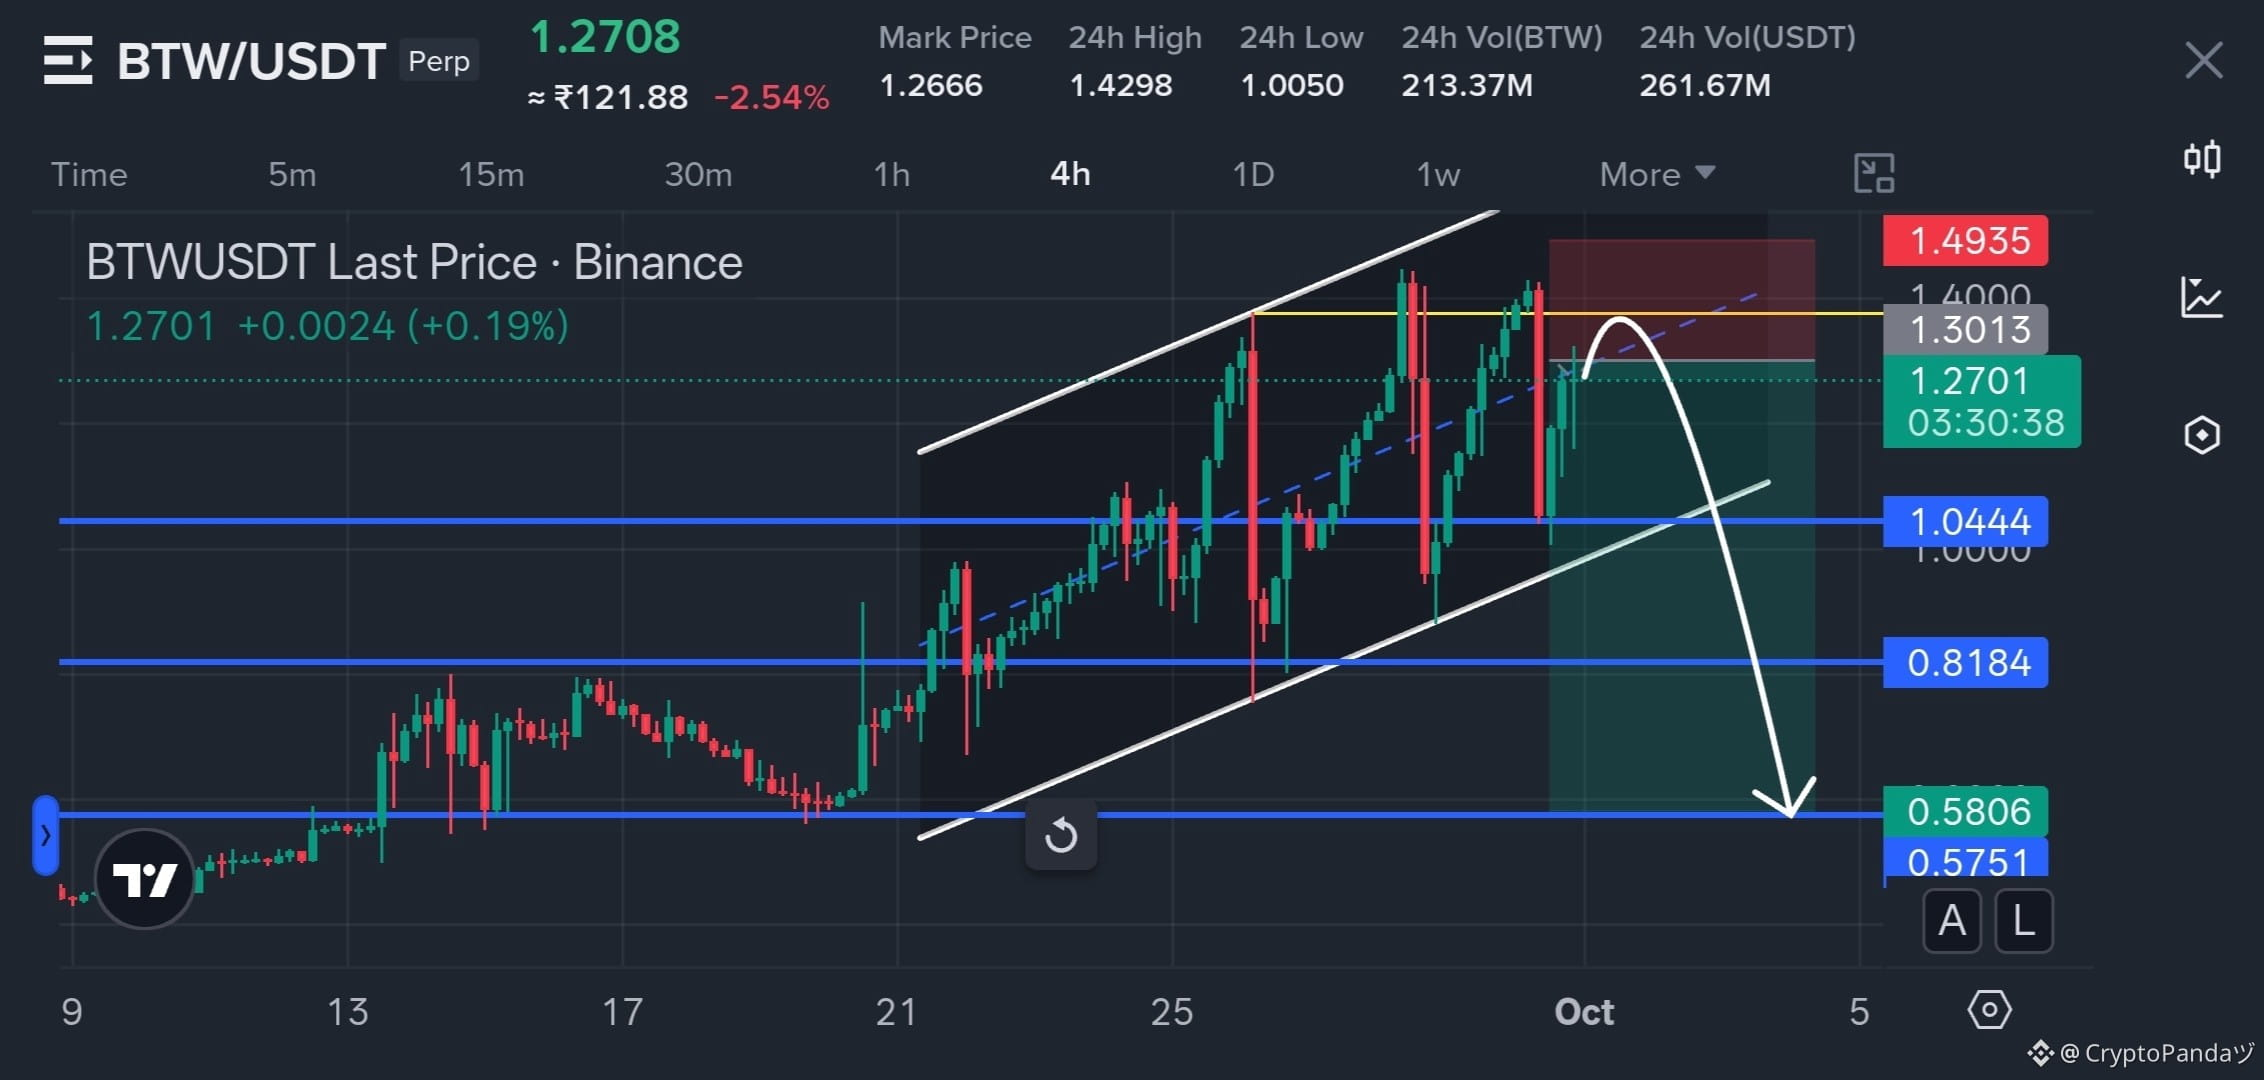
$BTW — Rising Channel Rejection Near 1.40 Supply, About To Empty Out 📉
Trade Plan: Short $BTW
Entry: 1.25 - 1.35
SL: 1.4935
TP: 1.0444 | 0.8184 | 0.5806
Why this Setup?
Price is pressing into the upper boundary of a rising channel near the 1.40 supply zone, while the chart shows repeated rejection from this area. A breakdown from the channel could open a deeper downside move toward 1.0444, 0.8184 and 0.5806. As long as 1.4935 holds, the bearish setup remains valid.
Trade $BTW here 👇
{future}(BTWUSDT)
$BTW — Rising Channel Rejection Near 1.40 Supply, About To Empty Out 📉
Trade Plan: Short $BTW
Entry: 1.25 - 1.35
SL: 1.4935
TP: 1.0444 | 0.8184 | 0.5806
Why this Setup?
Price is pressing into the upper boundary of a rising channel near the 1.40 supply zone, while the chart shows repeated rejection from this area. A breakdown from the channel could open a deeper downside move toward 1.0444, 0.8184 and 0.5806. As long as 1.4935 holds, the bearish setup remains valid.
Trade $BTW here 👇
Trade Plan: Short $BTW
Entry: 1.25 - 1.35
SL: 1.4935
TP: 1.0444 | 0.8184 | 0.5806
Why this Setup?
Price is pressing into the upper boundary of a rising channel near the 1.40 supply zone, while the chart shows repeated rejection from this area. A breakdown from the channel could open a deeper downside move toward 1.0444, 0.8184 and 0.5806. As long as 1.4935 holds, the bearish setup remains valid.
Trade $BTW here 👇
3
413
Log in to explore more content
Join global crypto users on Binance Square
⚡️ Get latest and useful information about crypto.
💬 Trusted by the world’s largest crypto exchange.
👍 Discover real insights from verified creators.
Email / Phone number
Trending Topics
MetaMaskExitsLidoValidatorsAfterSecurityIncident
34,911 views
645 Discussing
🚨 METAMASK JUST STARTED EXITING ETH VALIDATORS AFTER A SECURITY INCIDENT.
MetaMask says an ongoing security incident hit part of its infrastructure, forcing it to proactively exit affected validators from its non-custodial staking operations. The company says it has found no immediate threat to MetaMask wallets so far.
The key detail?
These validators are tied to Lido staking, and the exit process may temporarily remove ETH from staking while the investigation continues. Lido-related reports say the full exit, withdrawal and re-entry cycle could take up to roughly 45 days.
That means the market should separate two things:
Wallet users are not currently being told they’re at immediate risk.
But validator infrastructure clearly was serious enough to trigger an emergency exit.
And when one of Ethereum’s biggest wallet brands starts pulling validators as a precaution, traders pay attention.
Security incidents don’t need stolen funds to become market-moving.
Sometimes the reaction itself is the signal. 👀
$ETH $LDO
#metamaskexitslidovalidatorsaftersecurityincident
KimHotbae
·1 Likes
·2.6k views
MicronBeatsEarningsLiftsGuidance
23,208 views
536 Discussing
CFTCSubmitsTwoEventContractRulesToWhiteHouse
18,321 views
474 Discussing