
AlphaAnalyst
19.9k Posts

AlphaAnalyst
 Square Verified
Report
Block User
Alpha Hunter | Trading the chaos | Signals, Setups, & Strategy | X/Twitter: @AlphaAnalyst_01
40 Following
83.6K+ Followers
95.8K+ Liked
Posts
All
Quotes
·
--
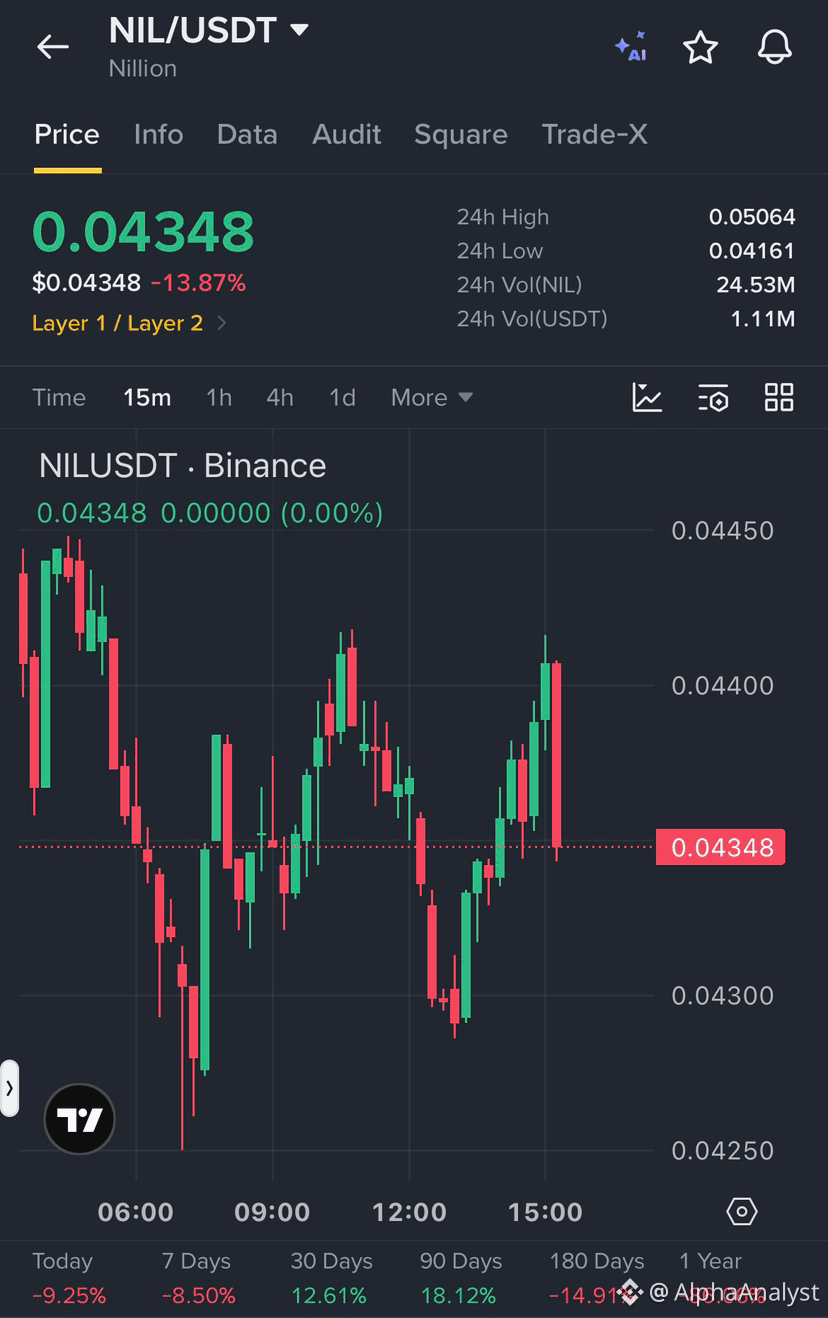
🔥 $NIL /USDT — SHORT Setup
📉 Bearish rejection from 0.0440 resistance
🎯 Entry: 0.0435–0.0440
💰 TP1: 0.0430 | TP2: 0.0426
🛑 SL: 0.0443
⚡ Risk only 1–2% • Secure profit at TP1
🧠 Trade the setup, not the emotion. 💎#TSMCAugustRevenueUp53.3%YoY #IranSaysReadyToEscalateWarWithUS #US10YTreasuryYieldHitsHighestSinceNov2023 #BrentCrudeTops$100
🔥 $NIL /USDT — SHORT Setup
📉 Bearish rejection from 0.0440 resistance
🎯 Entry: 0.0435–0.0440
💰 TP1: 0.0430 | TP2: 0.0426
🛑 SL: 0.0443
⚡ Risk only 1–2% • Secure profit at TP1
🧠 Trade the setup, not the emotion. 💎#TSMCAugustRevenueUp53.3%YoY #IranSaysReadyToEscalateWarWithUS #US10YTreasuryYieldHitsHighestSinceNov2023 #BrentCrudeTops$100
📉 Bearish rejection from 0.0440 resistance
🎯 Entry: 0.0435–0.0440
💰 TP1: 0.0430 | TP2: 0.0426
🛑 SL: 0.0443
⚡ Risk only 1–2% • Secure profit at TP1
🧠 Trade the setup, not the emotion. 💎#TSMCAugustRevenueUp53.3%YoY #IranSaysReadyToEscalateWarWithUS #US10YTreasuryYieldHitsHighestSinceNov2023 #BrentCrudeTops$100
7
·
--
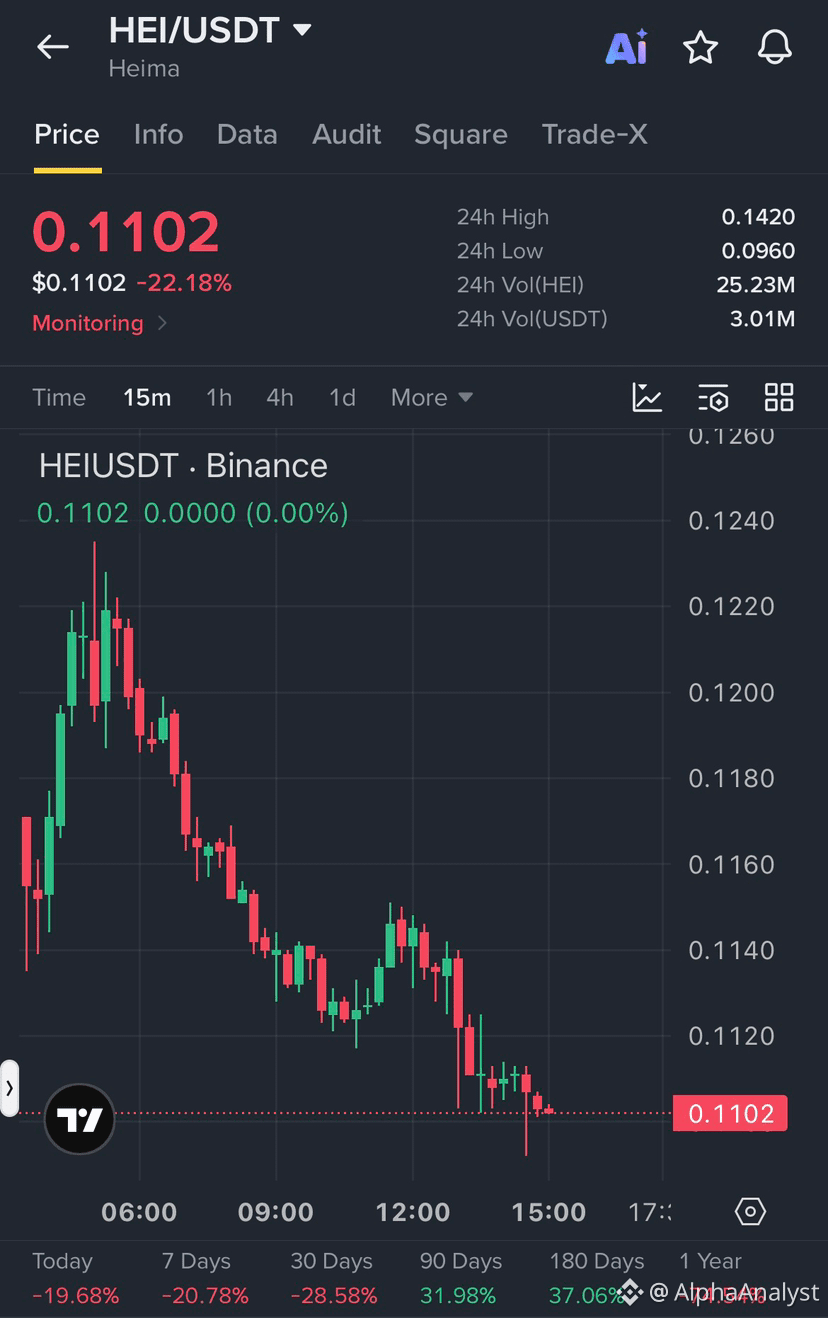
$HEI /USDT — Bearish Momentum Setup
📉 Strong downtrend + continuous Lower Highs & Lower Lows
🎯 SHORT: 0.1110–0.1130
💰 TP1: 0.1080 | TP2: 0.1040
🛑 SL: 0.1150
⚡ Risk only 1–2% & secure partial profit at TP1.
🧠 No FOMO — Wait for confirmation & trade the structure.
💎 Protect Capital • Let Profits Run#TSMCAugustRevenueUp53.3%YoY #EUExtendsCentralContactPointToCASPs #BitcoinSurpasses$79K #USADPWeeklyEmploymentRises12000 #BankOfAmericaGroupPilotsUSBDCStablecoin
$HEI /USDT — Bearish Momentum Setup
📉 Strong downtrend + continuous Lower Highs & Lower Lows
🎯 SHORT: 0.1110–0.1130
💰 TP1: 0.1080 | TP2: 0.1040
🛑 SL: 0.1150
⚡ Risk only 1–2% & secure partial profit at TP1.
🧠 No FOMO — Wait for confirmation & trade the structure.
💎 Protect Capital • Let Profits Run#TSMCAugustRevenueUp53.3%YoY #EUExtendsCentralContactPointToCASPs #BitcoinSurpasses$79K #USADPWeeklyEmploymentRises12000 #BankOfAmericaGroupPilotsUSBDCStablecoin
📉 Strong downtrend + continuous Lower Highs & Lower Lows
🎯 SHORT: 0.1110–0.1130
💰 TP1: 0.1080 | TP2: 0.1040
🛑 SL: 0.1150
⚡ Risk only 1–2% & secure partial profit at TP1.
🧠 No FOMO — Wait for confirmation & trade the structure.
💎 Protect Capital • Let Profits Run#TSMCAugustRevenueUp53.3%YoY #EUExtendsCentralContactPointToCASPs #BitcoinSurpasses$79K #USADPWeeklyEmploymentRises12000 #BankOfAmericaGroupPilotsUSBDCStablecoin
36
·
--
Let’s Hunt the Next Move 🔥
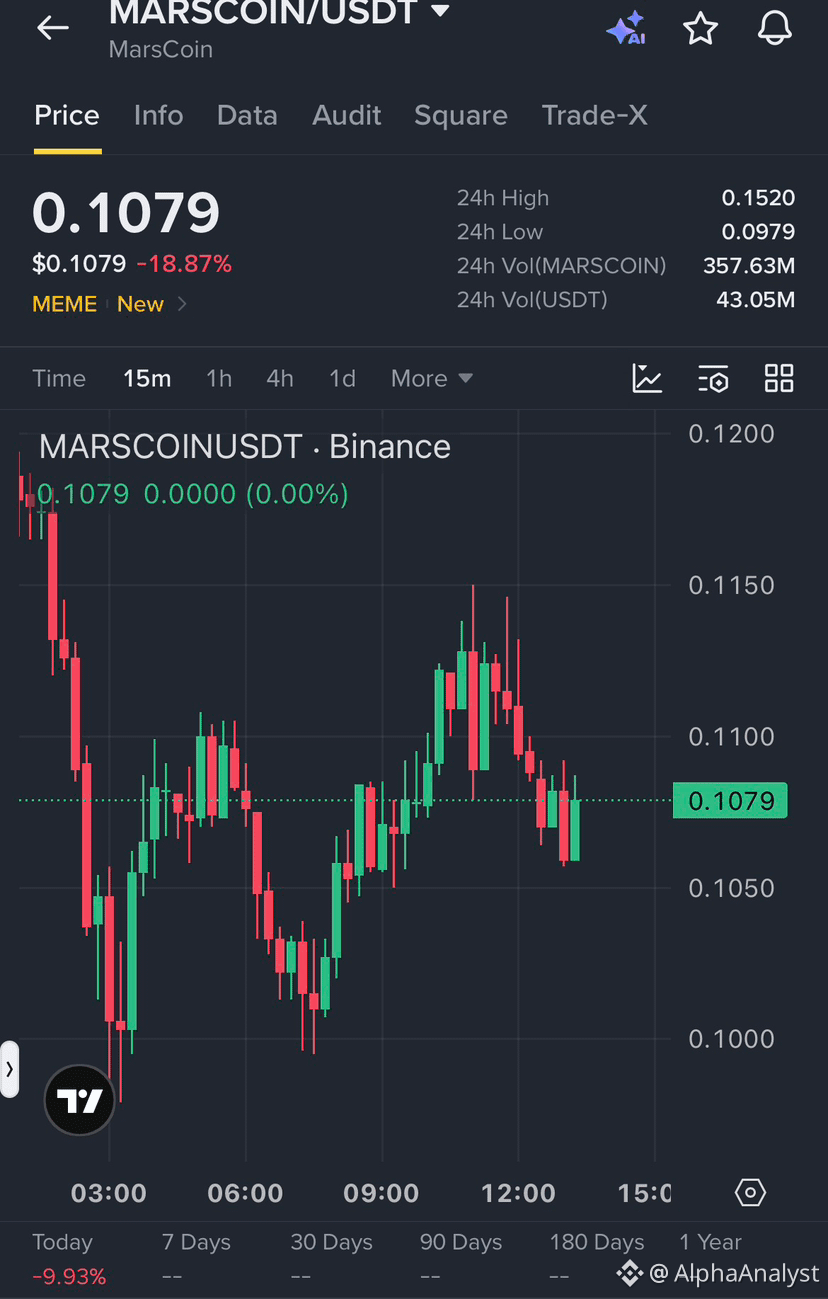
🚨 $MARSCOIN /USDT — SHORT SETUP
📉 Rejection + weak structure → bearish pressure
🎯 Entry: 0.1090–0.1110
💰 TP1: 0.1050 | TP2: 0.1020
🛑 SL: 0.1140
⚡ Risk only 1–2% & secure partials at TP1.
💎 Trade Smart • Stay Disciplined • Protect Capital#TSMCAugustRevenueUp53.3%YoY #EUExtendsCentralContactPointToCASPs #BrentCrudeTops$100 #BankOfAmericaGroupPilotsUSBDCStablecoin #USTreasuryToBuyBackUpTo$6BLongDatedDebt
Let’s Hunt the Next Move 🔥
🚨 $MARSCOIN /USDT — SHORT SETUP
📉 Rejection + weak structure → bearish pressure
🎯 Entry: 0.1090–0.1110
💰 TP1: 0.1050 | TP2: 0.1020
🛑 SL: 0.1140
⚡ Risk only 1–2% & secure partials at TP1.
💎 Trade Smart • Stay Disciplined • Protect Capital#TSMCAugustRevenueUp53.3%YoY #EUExtendsCentralContactPointToCASPs #BrentCrudeTops$100 #BankOfAmericaGroupPilotsUSBDCStablecoin #USTreasuryToBuyBackUpTo$6BLongDatedDebt
🚨 $MARSCOIN /USDT — SHORT SETUP
📉 Rejection + weak structure → bearish pressure
🎯 Entry: 0.1090–0.1110
💰 TP1: 0.1050 | TP2: 0.1020
🛑 SL: 0.1140
⚡ Risk only 1–2% & secure partials at TP1.
💎 Trade Smart • Stay Disciplined • Protect Capital#TSMCAugustRevenueUp53.3%YoY #EUExtendsCentralContactPointToCASPs #BrentCrudeTops$100 #BankOfAmericaGroupPilotsUSBDCStablecoin #USTreasuryToBuyBackUpTo$6BLongDatedDebt
210
·
--
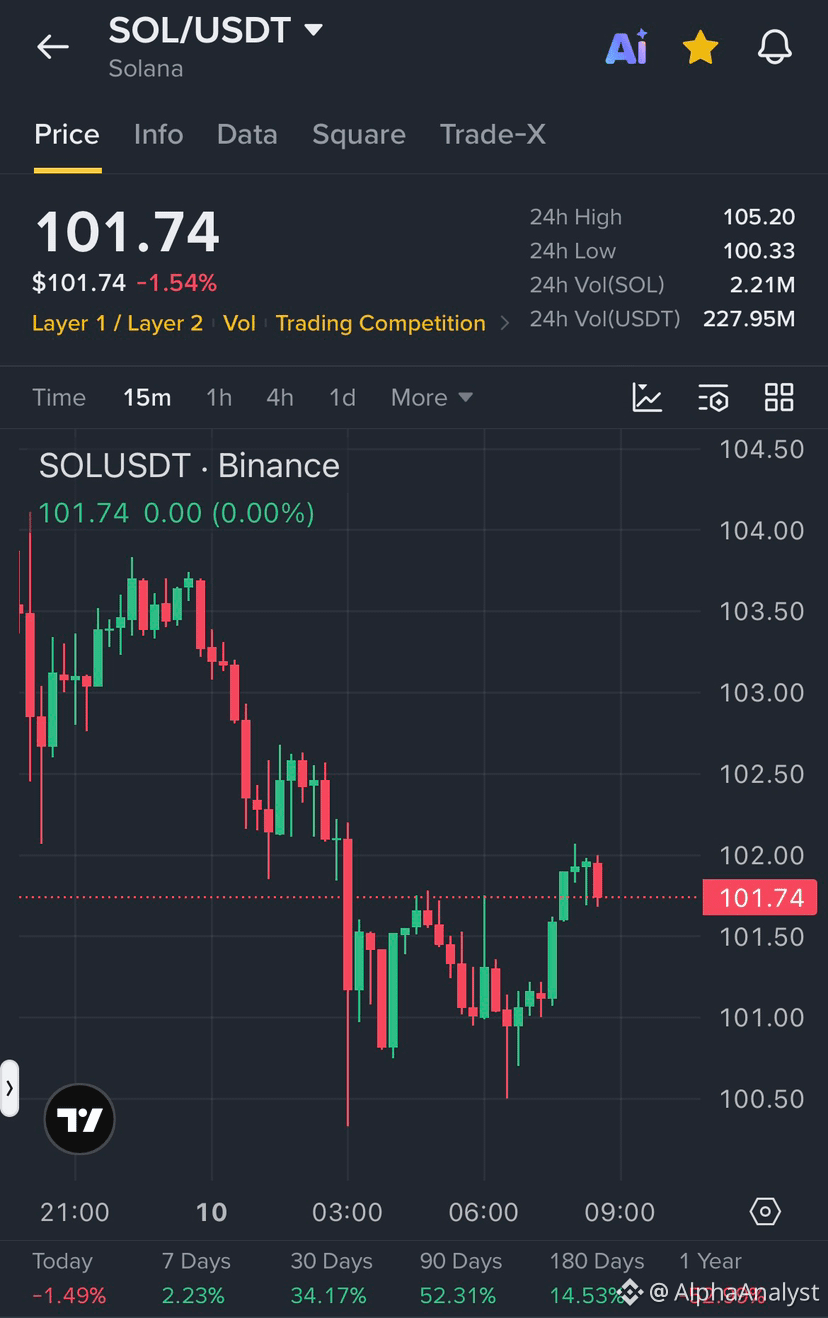
📊 $SOL /USDT — Bounce Watch
⚡ Buyers defending $101.00 after a sharp sell-off.
🎯 Entry: $101.50–102.00
🚀 TP1: $102.50 | TP2: $103.20
🛑 SL: $100.80
💎 Risk only 1–2% & secure partials at TP1.
Trade Smart • Trade Safe 🚀#USTreasuryToBuyBackUpTo$6BLongDatedDebt #BrentCrudeTops$100 #RippleLobbiesToAdvanceCLARITYActVote #LAPTOPFoundationXAccountSuspended
📊 $SOL /USDT — Bounce Watch
⚡ Buyers defending $101.00 after a sharp sell-off.
🎯 Entry: $101.50–102.00
🚀 TP1: $102.50 | TP2: $103.20
🛑 SL: $100.80
💎 Risk only 1–2% & secure partials at TP1.
Trade Smart • Trade Safe 🚀#USTreasuryToBuyBackUpTo$6BLongDatedDebt #BrentCrudeTops$100 #RippleLobbiesToAdvanceCLARITYActVote #LAPTOPFoundationXAccountSuspended
⚡ Buyers defending $101.00 after a sharp sell-off.
🎯 Entry: $101.50–102.00
🚀 TP1: $102.50 | TP2: $103.20
🛑 SL: $100.80
💎 Risk only 1–2% & secure partials at TP1.
Trade Smart • Trade Safe 🚀#USTreasuryToBuyBackUpTo$6BLongDatedDebt #BrentCrudeTops$100 #RippleLobbiesToAdvanceCLARITYActVote #LAPTOPFoundationXAccountSuspended
119
·
--
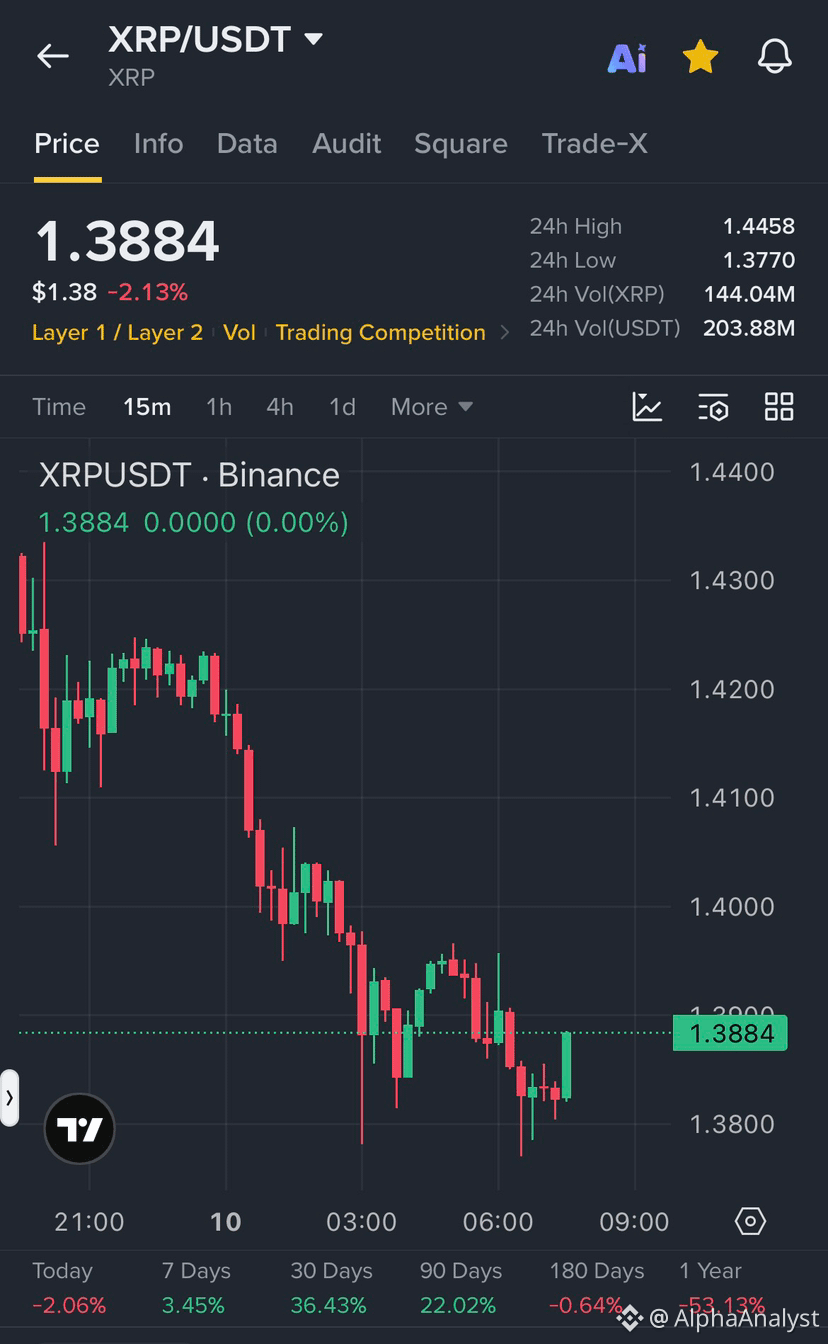
📊 $XRP /USDT — Bounce Setup
⚡ Buyers are defending $1.38 support after the sharp drop.
🎯 Entry: $1.385–$1.395
🚀 TP1: $1.405 | TP2: $1.420
🛑 SL: $1.375
💎 Risk only 1–2% & secure partials at TP1.
Trade Smart • Trade Safe 🚀#USTreasuryToBuyBackUpTo$6BLongDatedDebt #BrentCrudeTops$100 #RippleLobbiesToAdvanceCLARITYActVote #ChinaAugustCPIRises0.8%YoY
📊 $XRP /USDT — Bounce Setup
⚡ Buyers are defending $1.38 support after the sharp drop.
🎯 Entry: $1.385–$1.395
🚀 TP1: $1.405 | TP2: $1.420
🛑 SL: $1.375
💎 Risk only 1–2% & secure partials at TP1.
Trade Smart • Trade Safe 🚀#USTreasuryToBuyBackUpTo$6BLongDatedDebt #BrentCrudeTops$100 #RippleLobbiesToAdvanceCLARITYActVote #ChinaAugustCPIRises0.8%YoY
⚡ Buyers are defending $1.38 support after the sharp drop.
🎯 Entry: $1.385–$1.395
🚀 TP1: $1.405 | TP2: $1.420
🛑 SL: $1.375
💎 Risk only 1–2% & secure partials at TP1.
Trade Smart • Trade Safe 🚀#USTreasuryToBuyBackUpTo$6BLongDatedDebt #BrentCrudeTops$100 #RippleLobbiesToAdvanceCLARITYActVote #ChinaAugustCPIRises0.8%YoY
153
·
--
Listen Fam⚜️🌅
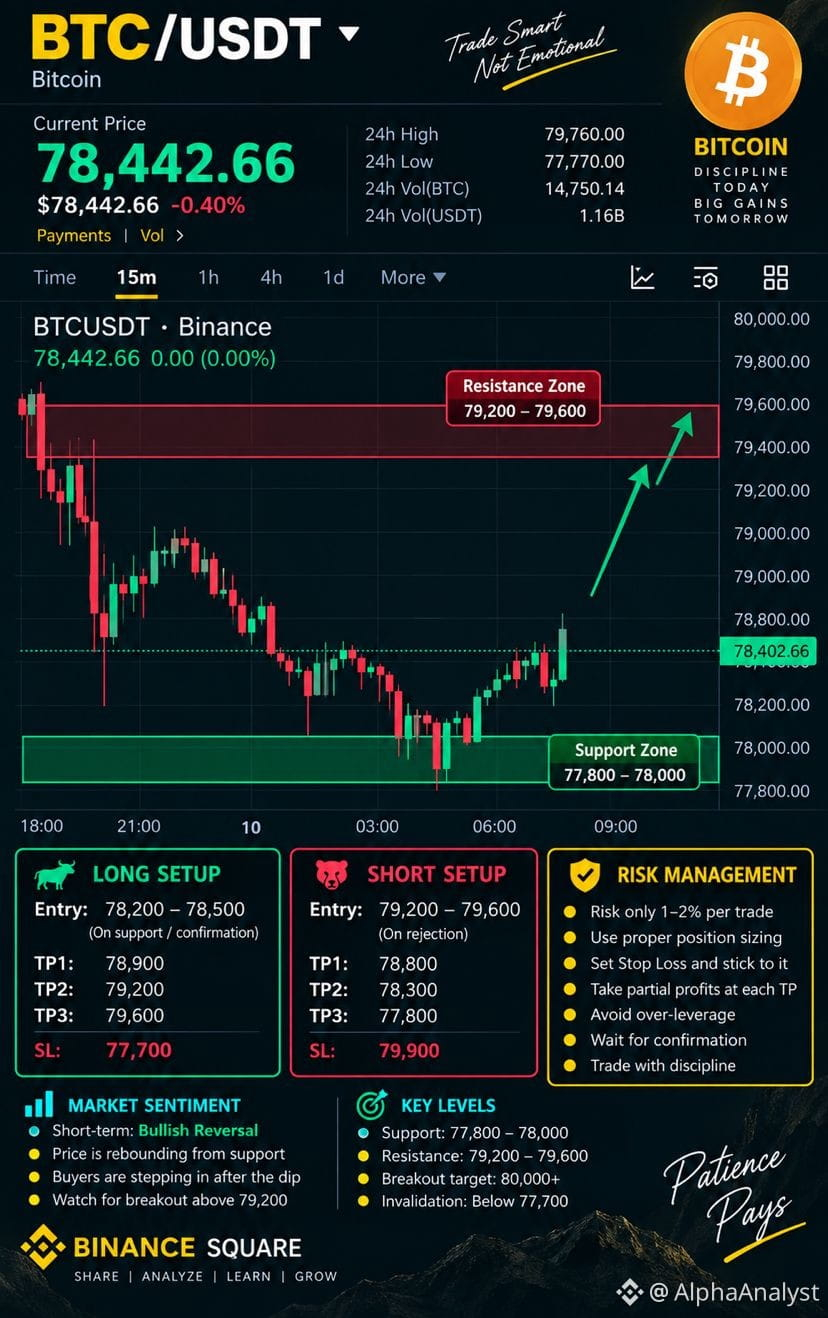
$BTC /USDT — Recovery Setup
📈 Buyers defending $78K support after the sell-off.
🎯 Long Entry: $78,200–$78,450
💰 TP1: $78,800 | TP2: $79,200
🛑 SL: $77,750
⚡ Risk only 1–2% — secure partials at TP1.
Trade smart. Trade safe. 🚀#BitcoinSurpasses$79K #RippleLobbiesToAdvanceCLARITYActVote #USStrikesTargetsNearHormuzAndJask #OilRisesToHighestSinceJuly
Listen Fam⚜️🌅
$BTC /USDT — Recovery Setup
📈 Buyers defending $78K support after the sell-off.
🎯 Long Entry: $78,200–$78,450
💰 TP1: $78,800 | TP2: $79,200
🛑 SL: $77,750
⚡ Risk only 1–2% — secure partials at TP1.
Trade smart. Trade safe. 🚀#BitcoinSurpasses$79K #RippleLobbiesToAdvanceCLARITYActVote #USStrikesTargetsNearHormuzAndJask #OilRisesToHighestSinceJuly
$BTC /USDT — Recovery Setup
📈 Buyers defending $78K support after the sell-off.
🎯 Long Entry: $78,200–$78,450
💰 TP1: $78,800 | TP2: $79,200
🛑 SL: $77,750
⚡ Risk only 1–2% — secure partials at TP1.
Trade smart. Trade safe. 🚀#BitcoinSurpasses$79K #RippleLobbiesToAdvanceCLARITYActVote #USStrikesTargetsNearHormuzAndJask #OilRisesToHighestSinceJuly
116
·
--
Good Morning Fam 🌅📈
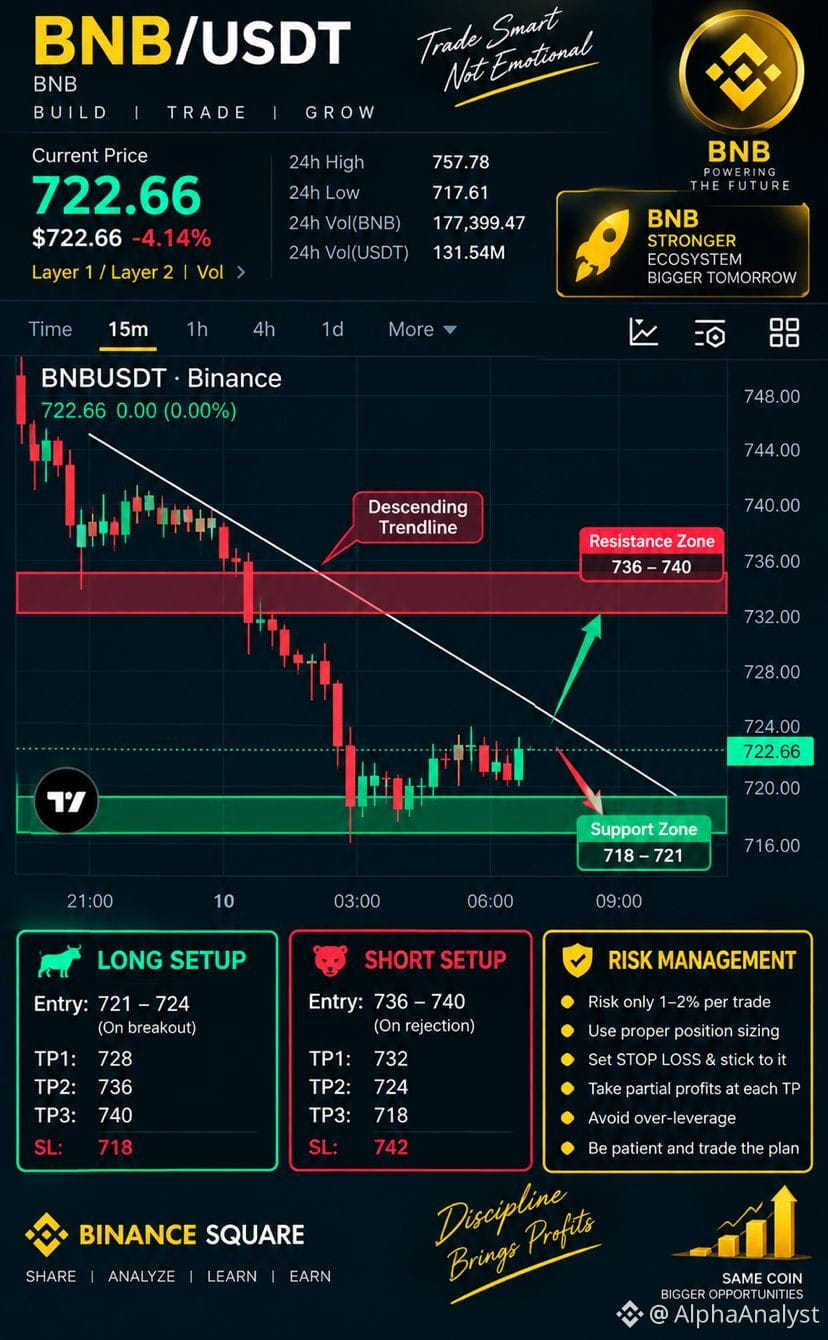
$BNB /USDT showing weakness after a strong sell-off.
📉 Bias: Bearish | Lower highs + lower lows
🎯 Short Entry: 723–725
🛑 SL: 728
💰 TP1: 720 | TP2: 717
⚡ Risk only 1–2% & secure partials at TP1.
Trade smart, stay disciplined! 🔥#BitcoinSurpasses$79K #BankOfAmericaGroupPilotsUSBDCStablecoin #ChinaAugustCPIRises0.8%YoY #OilRisesToHighestSinceJuly
Good Morning Fam 🌅📈
$BNB /USDT showing weakness after a strong sell-off.
📉 Bias: Bearish | Lower highs + lower lows
🎯 Short Entry: 723–725
🛑 SL: 728
💰 TP1: 720 | TP2: 717
⚡ Risk only 1–2% & secure partials at TP1.
Trade smart, stay disciplined! 🔥#BitcoinSurpasses$79K #BankOfAmericaGroupPilotsUSBDCStablecoin #ChinaAugustCPIRises0.8%YoY #OilRisesToHighestSinceJuly
$BNB /USDT showing weakness after a strong sell-off.
📉 Bias: Bearish | Lower highs + lower lows
🎯 Short Entry: 723–725
🛑 SL: 728
💰 TP1: 720 | TP2: 717
⚡ Risk only 1–2% & secure partials at TP1.
Trade smart, stay disciplined! 🔥#BitcoinSurpasses$79K #BankOfAmericaGroupPilotsUSBDCStablecoin #ChinaAugustCPIRises0.8%YoY #OilRisesToHighestSinceJuly
119
·
--
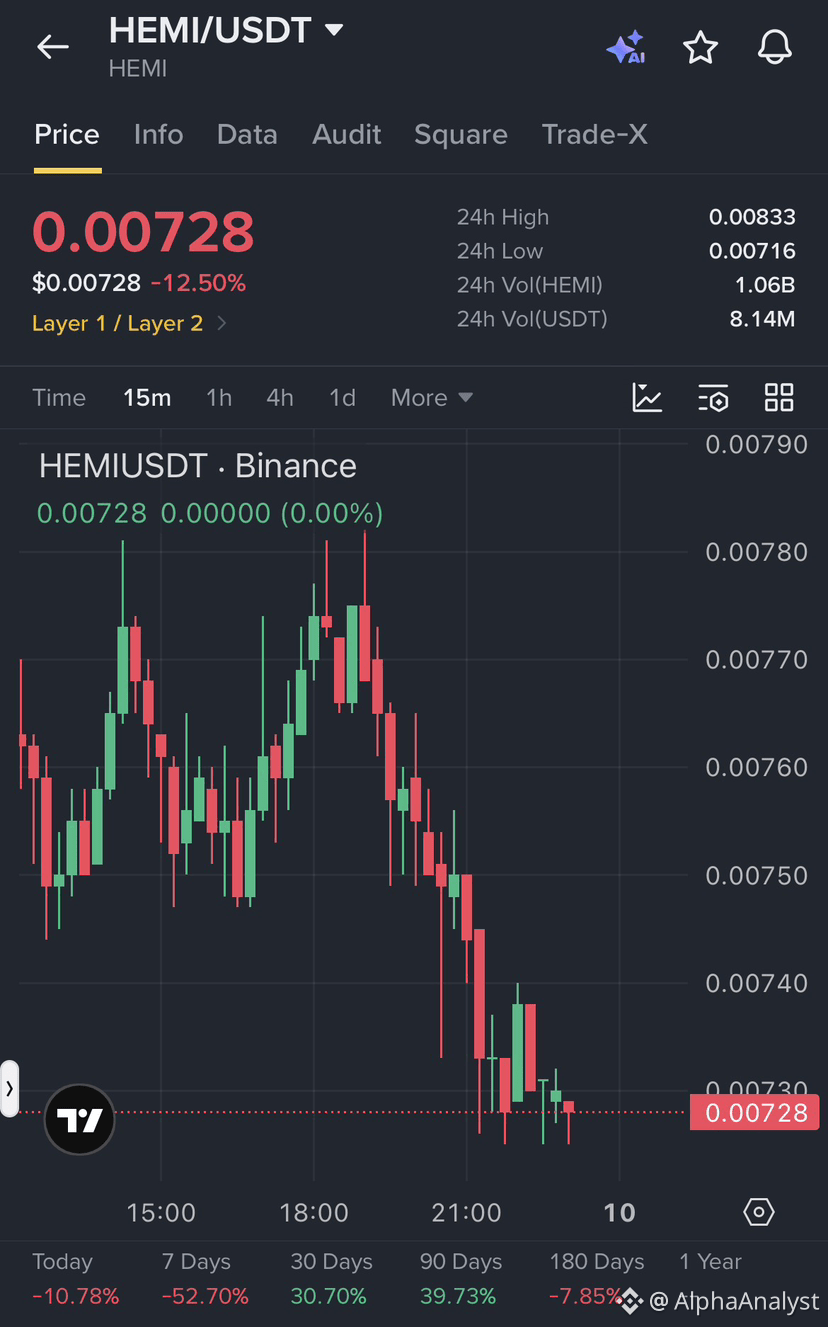
🔥$HEMI /USDT — Bearish Momentum
📉 Strong downtrend with clear Lower Highs + Lower Lows.
🎯 SHORT: 0.00730–0.00740 (on pullback)
TP1: 0.00715 | TP2: 0.00705 | TP3: 0.00690
🛑 SL: 0.00755
⚡ Below 0.00715 → downside can accelerate.
💰 Risk only 1–2% with proper position sizing.
#HEMI #Crypto #BinanceSquare#BitcoinSurpasses$79K #BankOfAmericaGroupPilotsUSBDCStablecoin #ChinaAugustCPIRises0.8%YoY #OilRisesToHighestSinceJuly
🔥$HEMI /USDT — Bearish Momentum
📉 Strong downtrend with clear Lower Highs + Lower Lows.
🎯 SHORT: 0.00730–0.00740 (on pullback)
TP1: 0.00715 | TP2: 0.00705 | TP3: 0.00690
🛑 SL: 0.00755
⚡ Below 0.00715 → downside can accelerate.
💰 Risk only 1–2% with proper position sizing.
#HEMI #Crypto #BinanceSquare#BitcoinSurpasses$79K #BankOfAmericaGroupPilotsUSBDCStablecoin #ChinaAugustCPIRises0.8%YoY #OilRisesToHighestSinceJuly
📉 Strong downtrend with clear Lower Highs + Lower Lows.
🎯 SHORT: 0.00730–0.00740 (on pullback)
TP1: 0.00715 | TP2: 0.00705 | TP3: 0.00690
🛑 SL: 0.00755
⚡ Below 0.00715 → downside can accelerate.
💰 Risk only 1–2% with proper position sizing.
#HEMI #Crypto #BinanceSquare#BitcoinSurpasses$79K #BankOfAmericaGroupPilotsUSBDCStablecoin #ChinaAugustCPIRises0.8%YoY #OilRisesToHighestSinceJuly
2
257
·
--
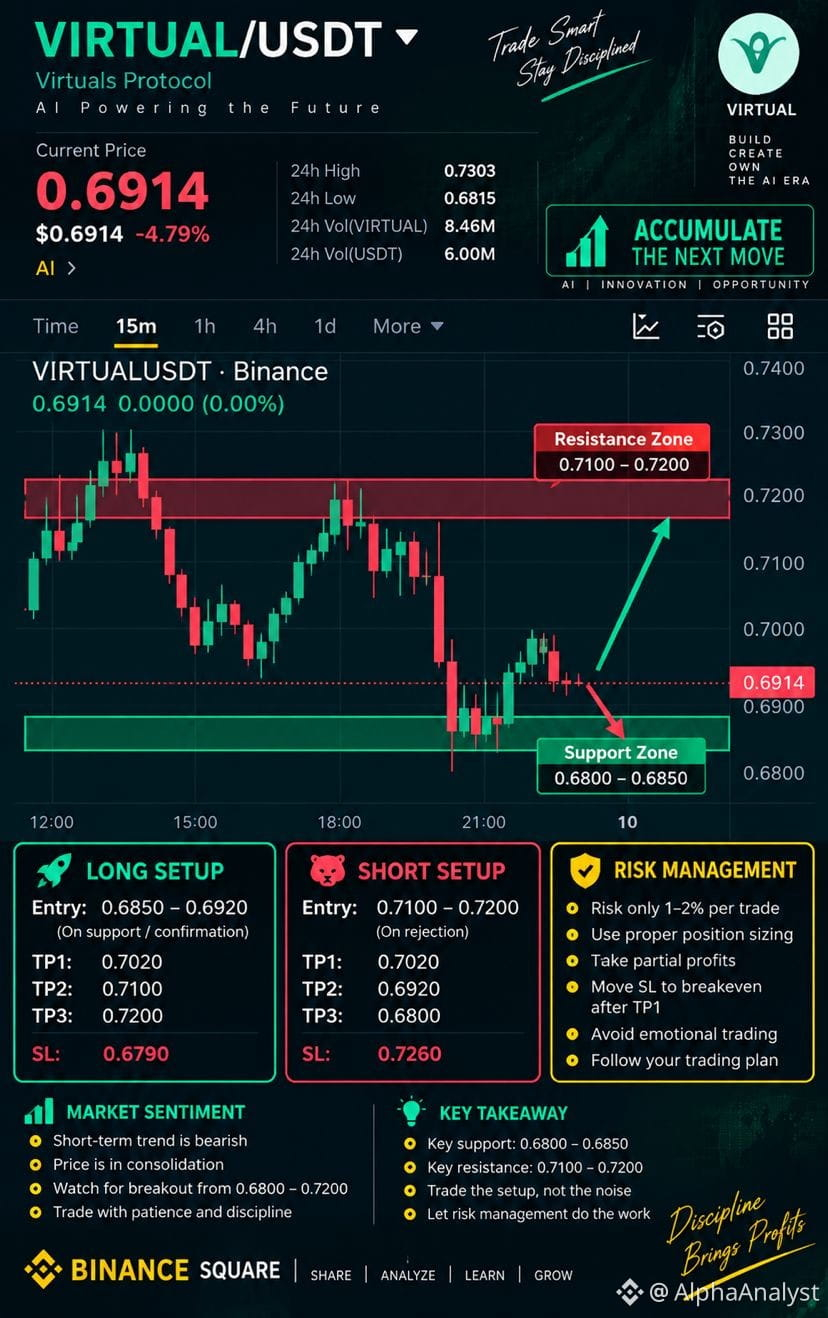
🔥 $VIRTUAL /USDT — Bearish Setup
📉 Structure: Lower highs + strong sell-off = sellers in control.
🎯 Short Entry: 0.6920–0.6970
TP1: 0.6850 | TP2: 0.6750 | TP3: 0.6650
🛑 SL: 0.7030
⚡ Below 0.6900 → bearish continuation likely.
💰 Risk only 1–2% & use proper position sizing.
#VIRTUAL #Crypto #BinanceSquare#USTreasuryToBuyBackUpTo$6BLongDatedDebt #RippleLobbiesToAdvanceCLARITYActVote #USStrikesTargetsNearHormuzAndJask #OilRisesToHighestSinceJuly
🔥 $VIRTUAL /USDT — Bearish Setup
📉 Structure: Lower highs + strong sell-off = sellers in control.
🎯 Short Entry: 0.6920–0.6970
TP1: 0.6850 | TP2: 0.6750 | TP3: 0.6650
🛑 SL: 0.7030
⚡ Below 0.6900 → bearish continuation likely.
💰 Risk only 1–2% & use proper position sizing.
#VIRTUAL #Crypto #BinanceSquare#USTreasuryToBuyBackUpTo$6BLongDatedDebt #RippleLobbiesToAdvanceCLARITYActVote #USStrikesTargetsNearHormuzAndJask #OilRisesToHighestSinceJuly
📉 Structure: Lower highs + strong sell-off = sellers in control.
🎯 Short Entry: 0.6920–0.6970
TP1: 0.6850 | TP2: 0.6750 | TP3: 0.6650
🛑 SL: 0.7030
⚡ Below 0.6900 → bearish continuation likely.
💰 Risk only 1–2% & use proper position sizing.
#VIRTUAL #Crypto #BinanceSquare#USTreasuryToBuyBackUpTo$6BLongDatedDebt #RippleLobbiesToAdvanceCLARITYActVote #USStrikesTargetsNearHormuzAndJask #OilRisesToHighestSinceJuly
1
107
·
--
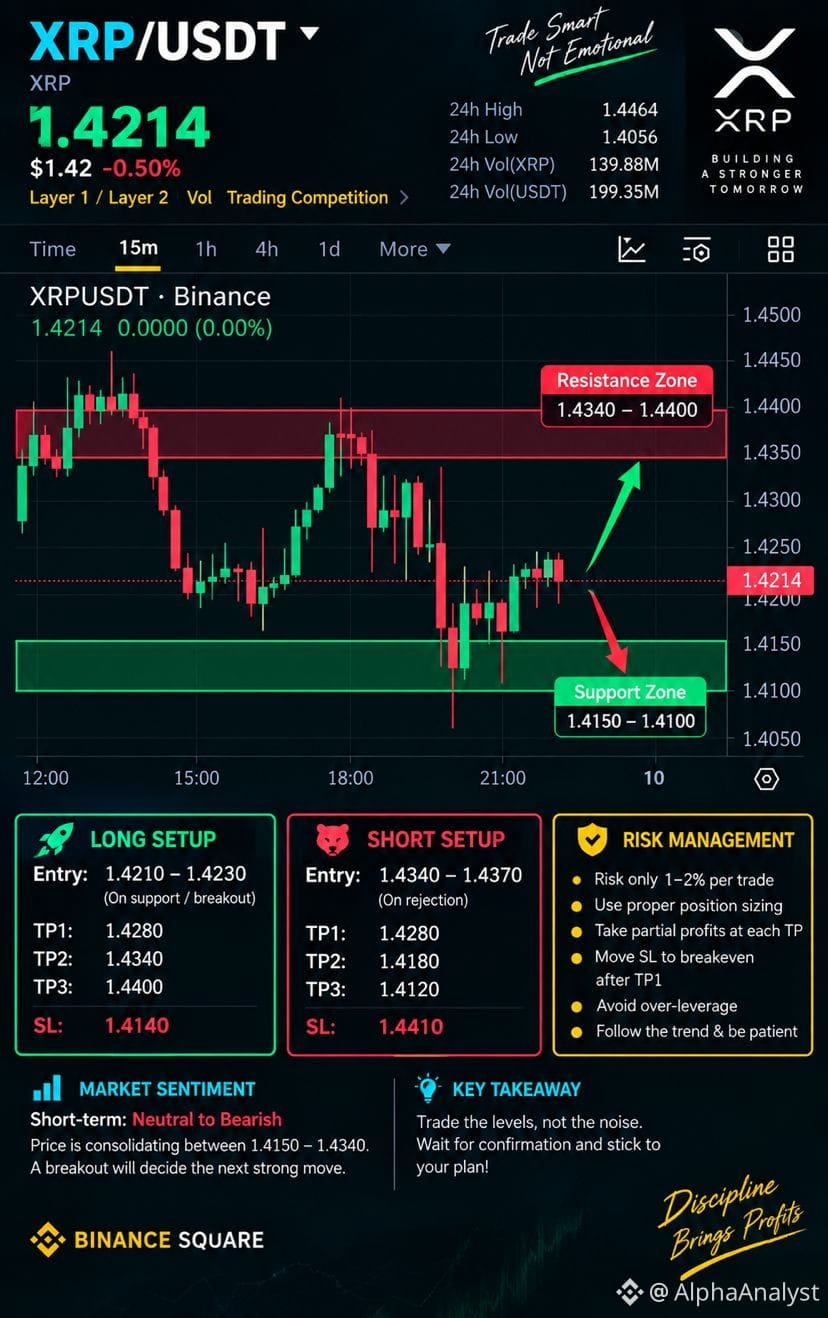
🔥$XRP /USDT — Quick Long Setup
📈 Structure: Recovery after rejection, buyers defending 1.415–1.420.
🟢 Entry: 1.418–1.423
🎯 TP: 1.430 → 1.440 → 1.445
🛑 SL: 1.408
⚡ Break & hold 1.425 = stronger upside potential.
💰 Risk only 1–2% per trade.
#XRP #BinanceSquare #CryptoTradingInsights #BankOfAmericaGroupPilotsUSBDCStablecoin #USTreasuryToBuyBackUpTo$6BLongDatedDebt #USStrikesTargetsNearHormuzAndJask
🔥$XRP /USDT — Quick Long Setup
📈 Structure: Recovery after rejection, buyers defending 1.415–1.420.
🟢 Entry: 1.418–1.423
🎯 TP: 1.430 → 1.440 → 1.445
🛑 SL: 1.408
⚡ Break & hold 1.425 = stronger upside potential.
💰 Risk only 1–2% per trade.
#XRP #BinanceSquare #CryptoTradingInsights #BankOfAmericaGroupPilotsUSBDCStablecoin #USTreasuryToBuyBackUpTo$6BLongDatedDebt #USStrikesTargetsNearHormuzAndJask
📈 Structure: Recovery after rejection, buyers defending 1.415–1.420.
🟢 Entry: 1.418–1.423
🎯 TP: 1.430 → 1.440 → 1.445
🛑 SL: 1.408
⚡ Break & hold 1.425 = stronger upside potential.
💰 Risk only 1–2% per trade.
#XRP #BinanceSquare #CryptoTradingInsights #BankOfAmericaGroupPilotsUSBDCStablecoin #USTreasuryToBuyBackUpTo$6BLongDatedDebt #USStrikesTargetsNearHormuzAndJask
111
·
--
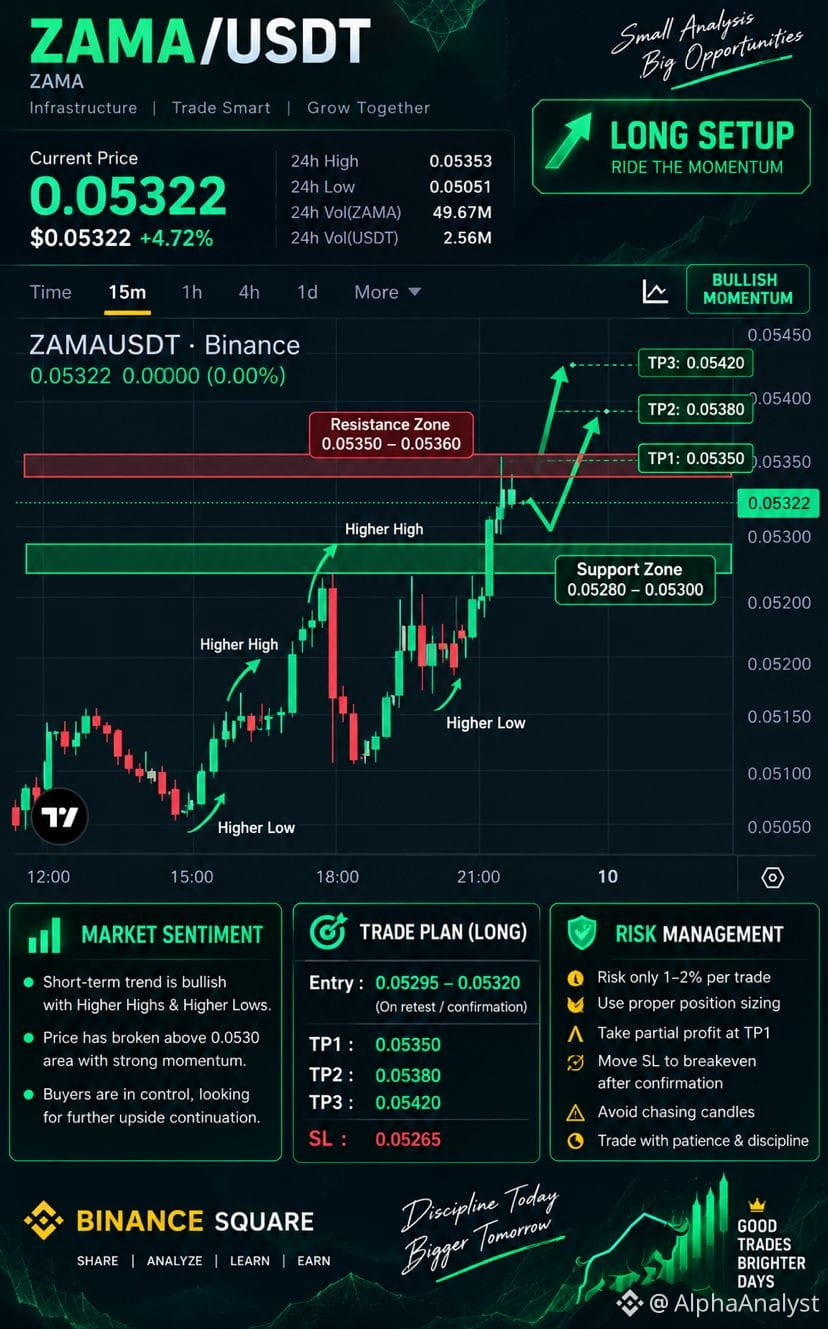
🔥$ZAMA /USDT — Bullish Breakout Alert
📈 Strong breakout with rising momentum & higher highs.
⚡ LONG: 0.0529–0.0532 | TP: 0.0540 → 0.0550
🎯 Break above 0.0535 = continuation likely.
🛑 SL: 0.0524 | Wait for pullback/confirmation.
💰 Risk only 1–2% & don’t chase the pump.
🚀 Momentum is heating up!
#ZAMA #USDT #Binance #CryptoTrading. #GrayscaleZcashETFTops$500M #OilRisesToHighestSinceJuly #USTreasuryToBuyBackUpTo$6BLongDatedDebt
🔥$ZAMA /USDT — Bullish Breakout Alert
📈 Strong breakout with rising momentum & higher highs.
⚡ LONG: 0.0529–0.0532 | TP: 0.0540 → 0.0550
🎯 Break above 0.0535 = continuation likely.
🛑 SL: 0.0524 | Wait for pullback/confirmation.
💰 Risk only 1–2% & don’t chase the pump.
🚀 Momentum is heating up!
#ZAMA #USDT #Binance #CryptoTrading. #GrayscaleZcashETFTops$500M #OilRisesToHighestSinceJuly #USTreasuryToBuyBackUpTo$6BLongDatedDebt
📈 Strong breakout with rising momentum & higher highs.
⚡ LONG: 0.0529–0.0532 | TP: 0.0540 → 0.0550
🎯 Break above 0.0535 = continuation likely.
🛑 SL: 0.0524 | Wait for pullback/confirmation.
💰 Risk only 1–2% & don’t chase the pump.
🚀 Momentum is heating up!
#ZAMA #USDT #Binance #CryptoTrading. #GrayscaleZcashETFTops$500M #OilRisesToHighestSinceJuly #USTreasuryToBuyBackUpTo$6BLongDatedDebt
71
·
--
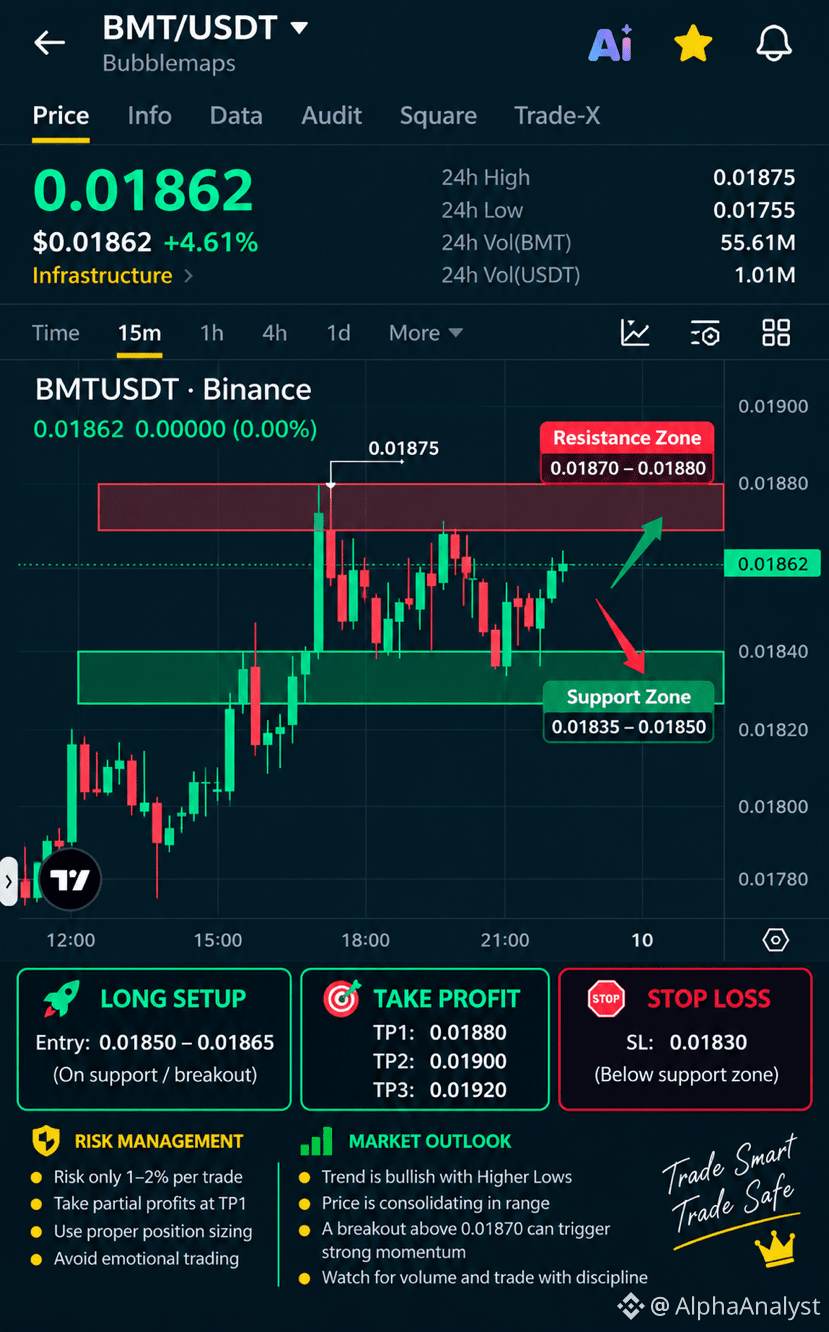
🔥$BMT /USDT — Breakout Watch
📈 Bullish structure with higher lows; price consolidating near resistance.
⚡ LONG: 0.01850–0.01865 | TP: 0.01890 → 0.01920
🎯 Break above 0.01870 = strong continuation signal.
🛑 SL: 0.01835 | Enter only after confirmation.
💰 Risk only 1–2% & avoid chasing the breakout.
🚀 Momentum building — watch the breakout!
#BMT #USDT #Binance #cryptotradingpro #GrayscaleZcashETFTops$500M #OilRisesToHighestSinceJuly #USTreasuryToBuyBackUpTo$6BLongDatedDebt
🔥$BMT /USDT — Breakout Watch
📈 Bullish structure with higher lows; price consolidating near resistance.
⚡ LONG: 0.01850–0.01865 | TP: 0.01890 → 0.01920
🎯 Break above 0.01870 = strong continuation signal.
🛑 SL: 0.01835 | Enter only after confirmation.
💰 Risk only 1–2% & avoid chasing the breakout.
🚀 Momentum building — watch the breakout!
#BMT #USDT #Binance #cryptotradingpro #GrayscaleZcashETFTops$500M #OilRisesToHighestSinceJuly #USTreasuryToBuyBackUpTo$6BLongDatedDebt
📈 Bullish structure with higher lows; price consolidating near resistance.
⚡ LONG: 0.01850–0.01865 | TP: 0.01890 → 0.01920
🎯 Break above 0.01870 = strong continuation signal.
🛑 SL: 0.01835 | Enter only after confirmation.
💰 Risk only 1–2% & avoid chasing the breakout.
🚀 Momentum building — watch the breakout!
#BMT #USDT #Binance #cryptotradingpro #GrayscaleZcashETFTops$500M #OilRisesToHighestSinceJuly #USTreasuryToBuyBackUpTo$6BLongDatedDebt
113
·
--
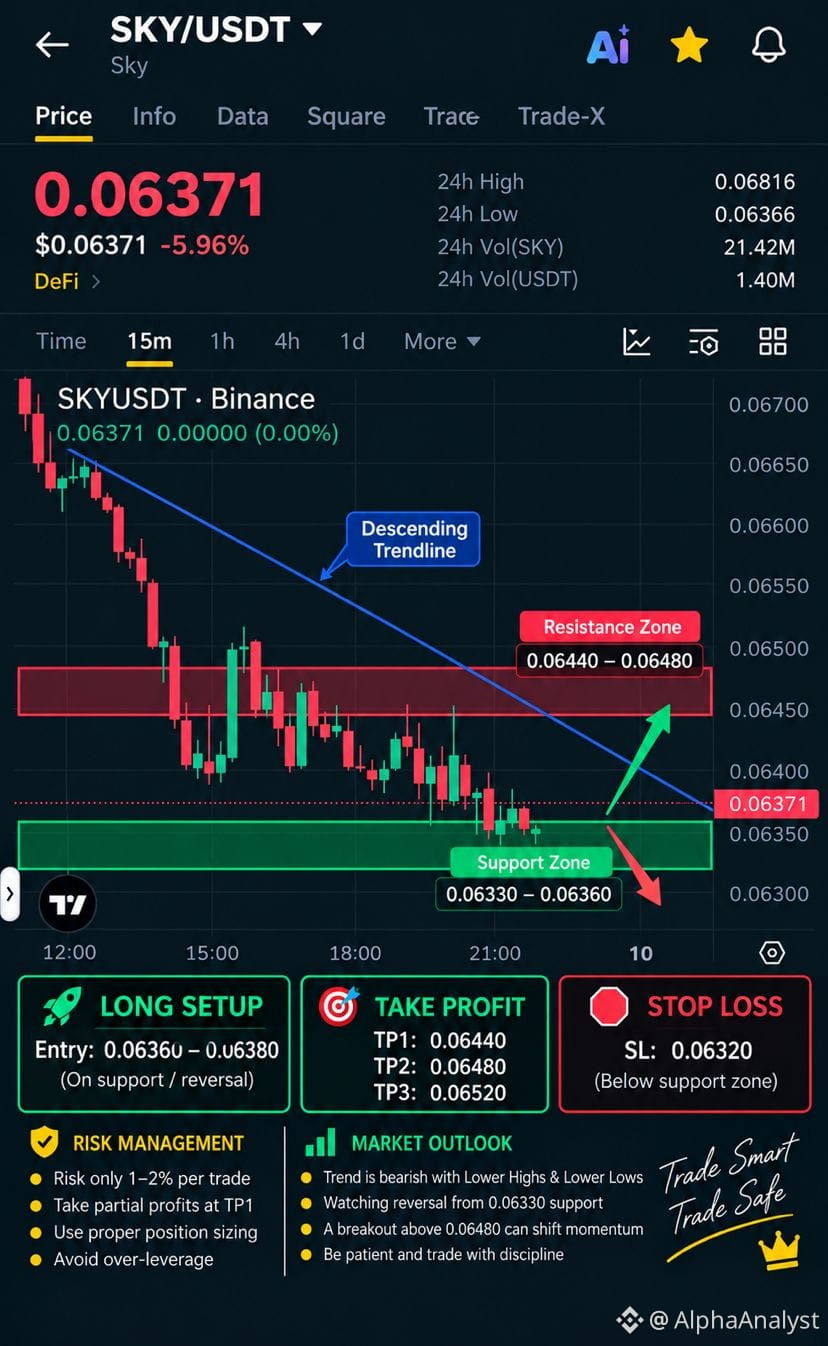
🔥$SKY /USDT — Bearish Momentum
📉 Strong downtrend with continuous Lower Highs & Lower Lows.
⚡ SHORT: 0.0637–0.0642 | TP: 0.0630 → 0.0620
🛑 SL: 0.0647 | Enter only after rejection confirmation.
💰 Risk only 1–2% per trade.
🚨 Break below 0.0635 = further downside likely!
#SKY #USDT #Binance #CryptoTrading. #RippleLobbiesToAdvanceCLARITYActVote #USStrikesTargetsNearHormuzAndJask #OilRisesToHighestSinceJuly
🔥$SKY /USDT — Bearish Momentum
📉 Strong downtrend with continuous Lower Highs & Lower Lows.
⚡ SHORT: 0.0637–0.0642 | TP: 0.0630 → 0.0620
🛑 SL: 0.0647 | Enter only after rejection confirmation.
💰 Risk only 1–2% per trade.
🚨 Break below 0.0635 = further downside likely!
#SKY #USDT #Binance #CryptoTrading. #RippleLobbiesToAdvanceCLARITYActVote #USStrikesTargetsNearHormuzAndJask #OilRisesToHighestSinceJuly
📉 Strong downtrend with continuous Lower Highs & Lower Lows.
⚡ SHORT: 0.0637–0.0642 | TP: 0.0630 → 0.0620
🛑 SL: 0.0647 | Enter only after rejection confirmation.
💰 Risk only 1–2% per trade.
🚨 Break below 0.0635 = further downside likely!
#SKY #USDT #Binance #CryptoTrading. #RippleLobbiesToAdvanceCLARITYActVote #USStrikesTargetsNearHormuzAndJask #OilRisesToHighestSinceJuly
118
·
--
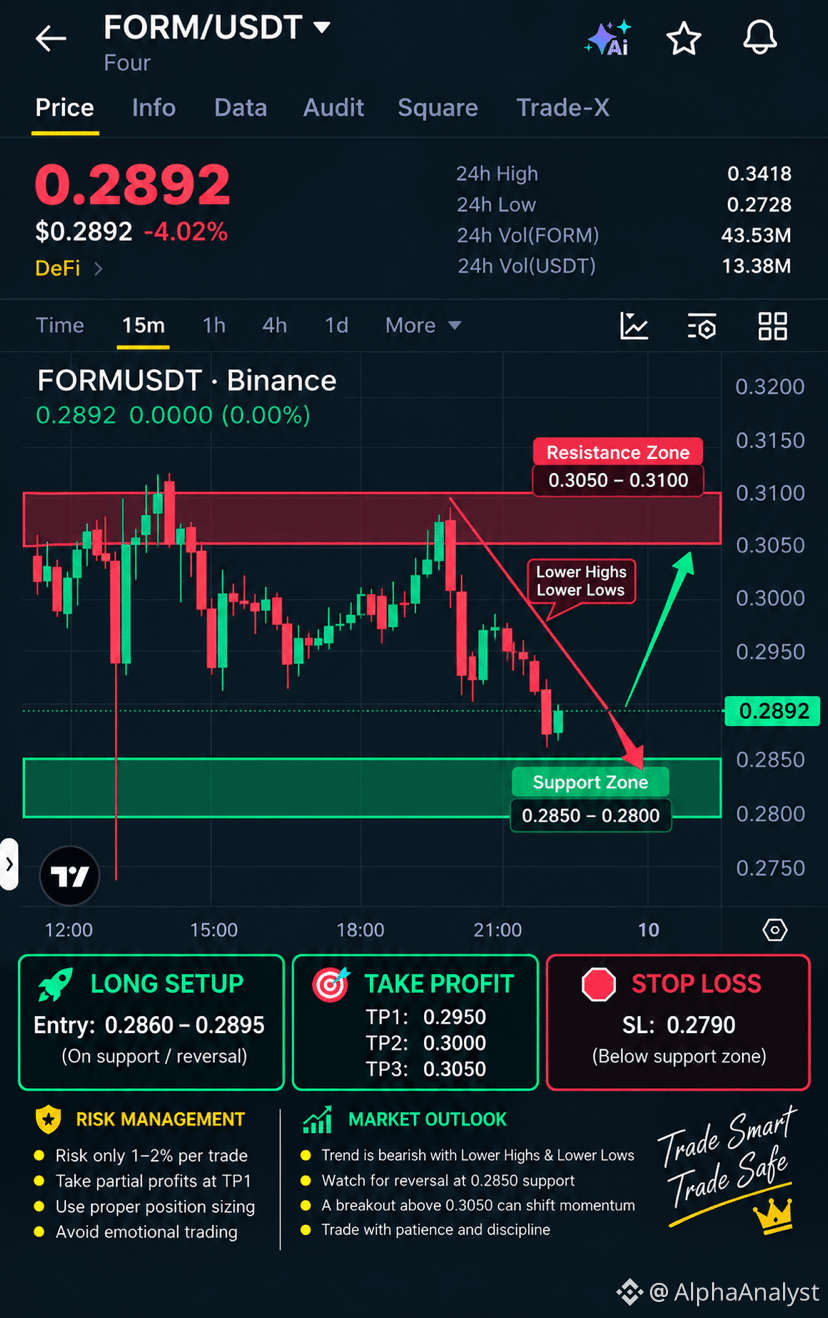
🔥$FORM /USDT — Bearish Momentum
📉 Sellers in control — clear Lower Highs & Lower Lows.
⚡ SHORT: 0.2900–0.2940 | TP: 0.2850 → 0.2780
🛑 SL: 0.2980 | Enter only on rejection/confirmation.
💰 Risk only 1–2% & avoid overleveraging.
🚨 Break below 0.2850 = possible further downside!
#FORM #USDT #Binance #CryptoTradingInsights #RippleLobbiesToAdvanceCLARITYActVote #USStrikesTargetsNearHormuzAndJask #OilRisesToHighestSinceJuly
🔥$FORM /USDT — Bearish Momentum
📉 Sellers in control — clear Lower Highs & Lower Lows.
⚡ SHORT: 0.2900–0.2940 | TP: 0.2850 → 0.2780
🛑 SL: 0.2980 | Enter only on rejection/confirmation.
💰 Risk only 1–2% & avoid overleveraging.
🚨 Break below 0.2850 = possible further downside!
#FORM #USDT #Binance #CryptoTradingInsights #RippleLobbiesToAdvanceCLARITYActVote #USStrikesTargetsNearHormuzAndJask #OilRisesToHighestSinceJuly
📉 Sellers in control — clear Lower Highs & Lower Lows.
⚡ SHORT: 0.2900–0.2940 | TP: 0.2850 → 0.2780
🛑 SL: 0.2980 | Enter only on rejection/confirmation.
💰 Risk only 1–2% & avoid overleveraging.
🚨 Break below 0.2850 = possible further downside!
#FORM #USDT #Binance #CryptoTradingInsights #RippleLobbiesToAdvanceCLARITYActVote #USStrikesTargetsNearHormuzAndJask #OilRisesToHighestSinceJuly
163
·
--
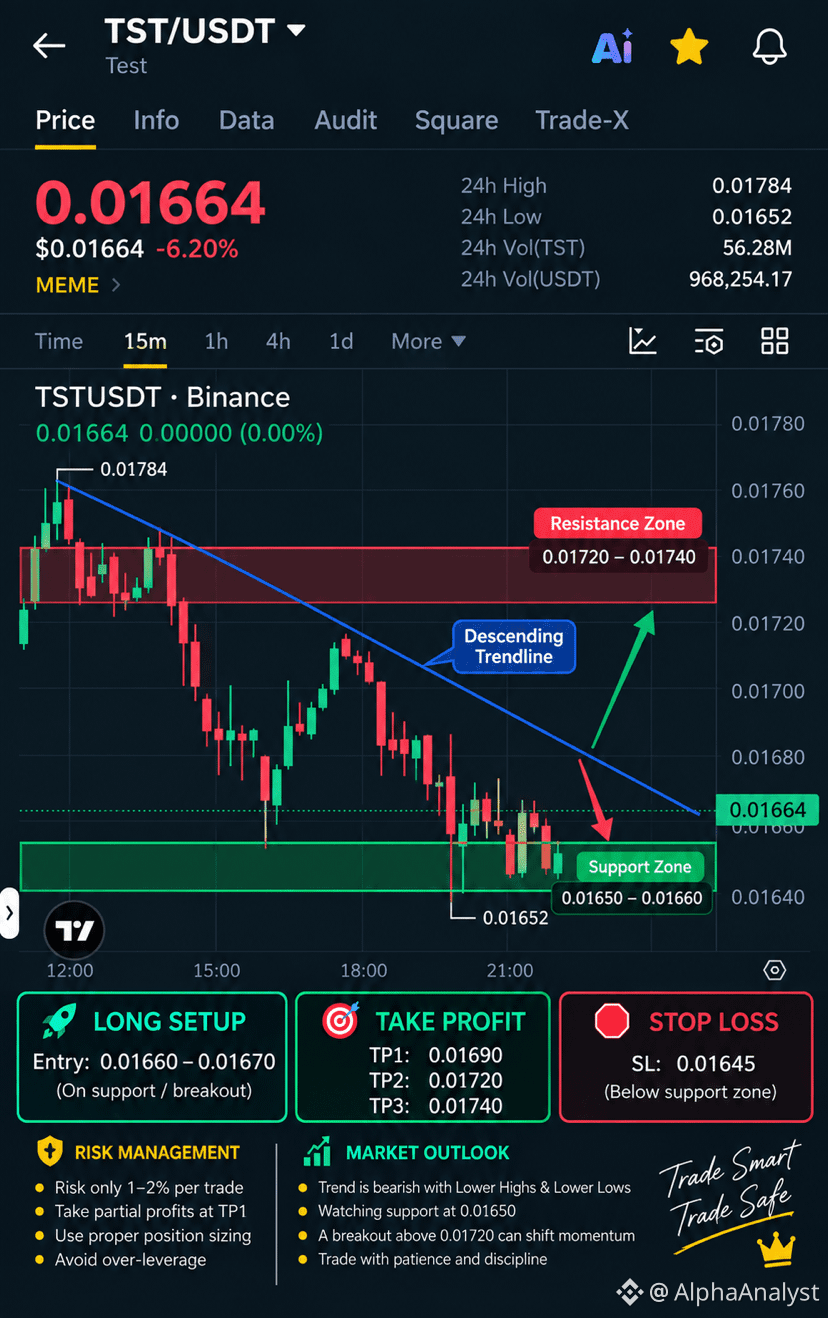
🔥$TST /USDT — Bearish Setup
📉 Strong downtrend with clear Lower Highs & Lower Lows.
⚡ SHORT: 0.0167–0.0169 | TP: 0.0162 → 0.0158
🛑 SL: 0.0171 | Enter only after rejection confirmation.
💰 Risk max 1–2% — avoid overleveraging.
🚨 Break below 0.0165 could accelerate the drop!
#TST #USDT #Binance #CryptoTradingInsights #RippleLobbiesToAdvanceCLARITYActVote #USStrikesTargetsNearHormuzAndJask #USTreasuryToBuyBackUpTo$6BLongDatedDebt
🔥$TST /USDT — Bearish Setup
📉 Strong downtrend with clear Lower Highs & Lower Lows.
⚡ SHORT: 0.0167–0.0169 | TP: 0.0162 → 0.0158
🛑 SL: 0.0171 | Enter only after rejection confirmation.
💰 Risk max 1–2% — avoid overleveraging.
🚨 Break below 0.0165 could accelerate the drop!
#TST #USDT #Binance #CryptoTradingInsights #RippleLobbiesToAdvanceCLARITYActVote #USStrikesTargetsNearHormuzAndJask #USTreasuryToBuyBackUpTo$6BLongDatedDebt
📉 Strong downtrend with clear Lower Highs & Lower Lows.
⚡ SHORT: 0.0167–0.0169 | TP: 0.0162 → 0.0158
🛑 SL: 0.0171 | Enter only after rejection confirmation.
💰 Risk max 1–2% — avoid overleveraging.
🚨 Break below 0.0165 could accelerate the drop!
#TST #USDT #Binance #CryptoTradingInsights #RippleLobbiesToAdvanceCLARITYActVote #USStrikesTargetsNearHormuzAndJask #USTreasuryToBuyBackUpTo$6BLongDatedDebt
323
·
--
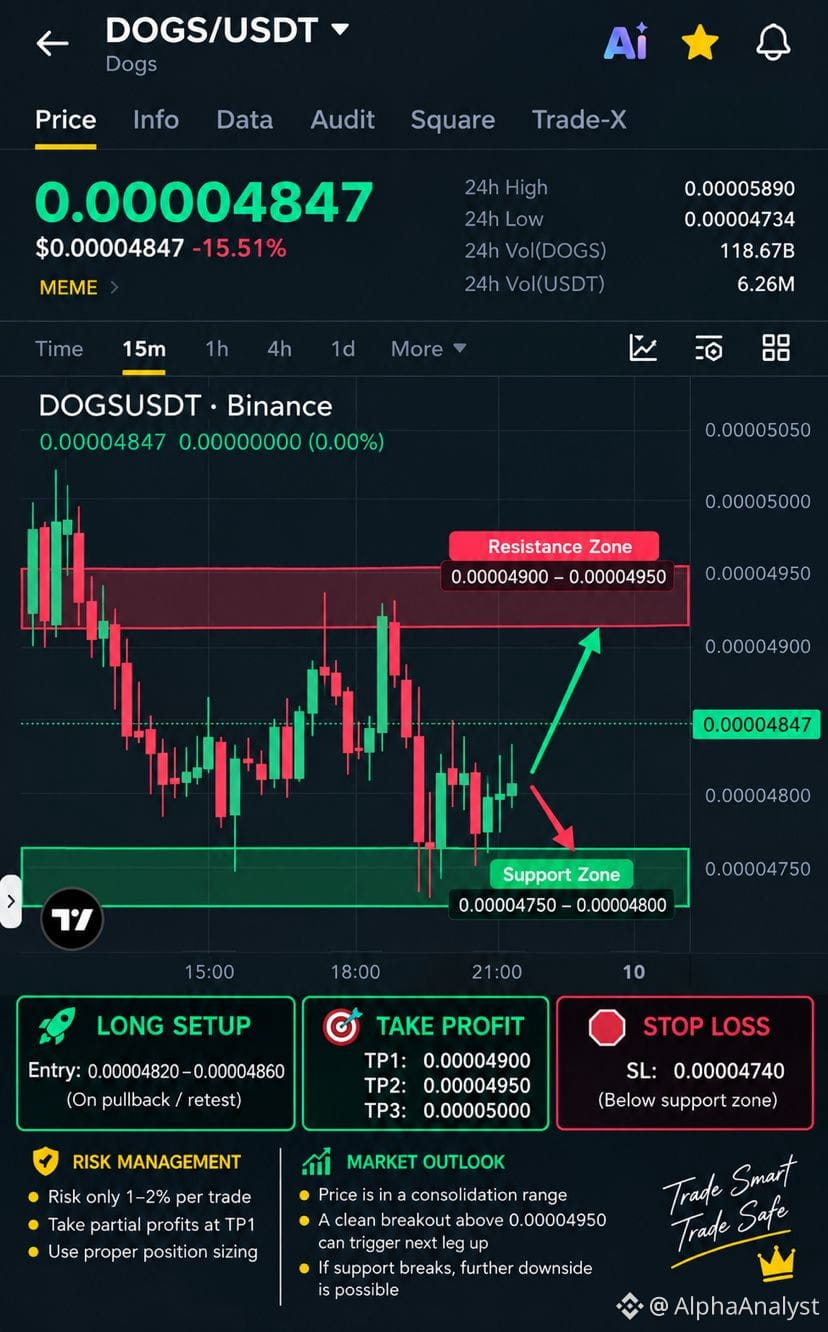
$DOGS /USDT — Rebound Watch 🐶
📉 Heavy sell-off, but price is stabilizing around 0.0000480 support.
⚡ LONG: 0.0000480–0.0000486 | TP: 0.0000495 → 0.0000500
🛑 SL: 0.0000473 | Enter only after bullish confirmation.
💰 Risk max 1–2% — no revenge trades.
🚀 Break 0.0000495 = stronger recovery setup!
#DOGS #USDT #Binance #CryptoTrading#USADPWeeklyEmploymentRises12000 #ChinaAugustCPIRises0.8%YoY #USStrikesTargetsNearHormuzAndJask #OilRisesToHighestSinceJuly
$DOGS /USDT — Rebound Watch 🐶
📉 Heavy sell-off, but price is stabilizing around 0.0000480 support.
⚡ LONG: 0.0000480–0.0000486 | TP: 0.0000495 → 0.0000500
🛑 SL: 0.0000473 | Enter only after bullish confirmation.
💰 Risk max 1–2% — no revenge trades.
🚀 Break 0.0000495 = stronger recovery setup!
#DOGS #USDT #Binance #CryptoTrading#USADPWeeklyEmploymentRises12000 #ChinaAugustCPIRises0.8%YoY #USStrikesTargetsNearHormuzAndJask #OilRisesToHighestSinceJuly
📉 Heavy sell-off, but price is stabilizing around 0.0000480 support.
⚡ LONG: 0.0000480–0.0000486 | TP: 0.0000495 → 0.0000500
🛑 SL: 0.0000473 | Enter only after bullish confirmation.
💰 Risk max 1–2% — no revenge trades.
🚀 Break 0.0000495 = stronger recovery setup!
#DOGS #USDT #Binance #CryptoTrading#USADPWeeklyEmploymentRises12000 #ChinaAugustCPIRises0.8%YoY #USStrikesTargetsNearHormuzAndJask #OilRisesToHighestSinceJuly
2
112
·
--
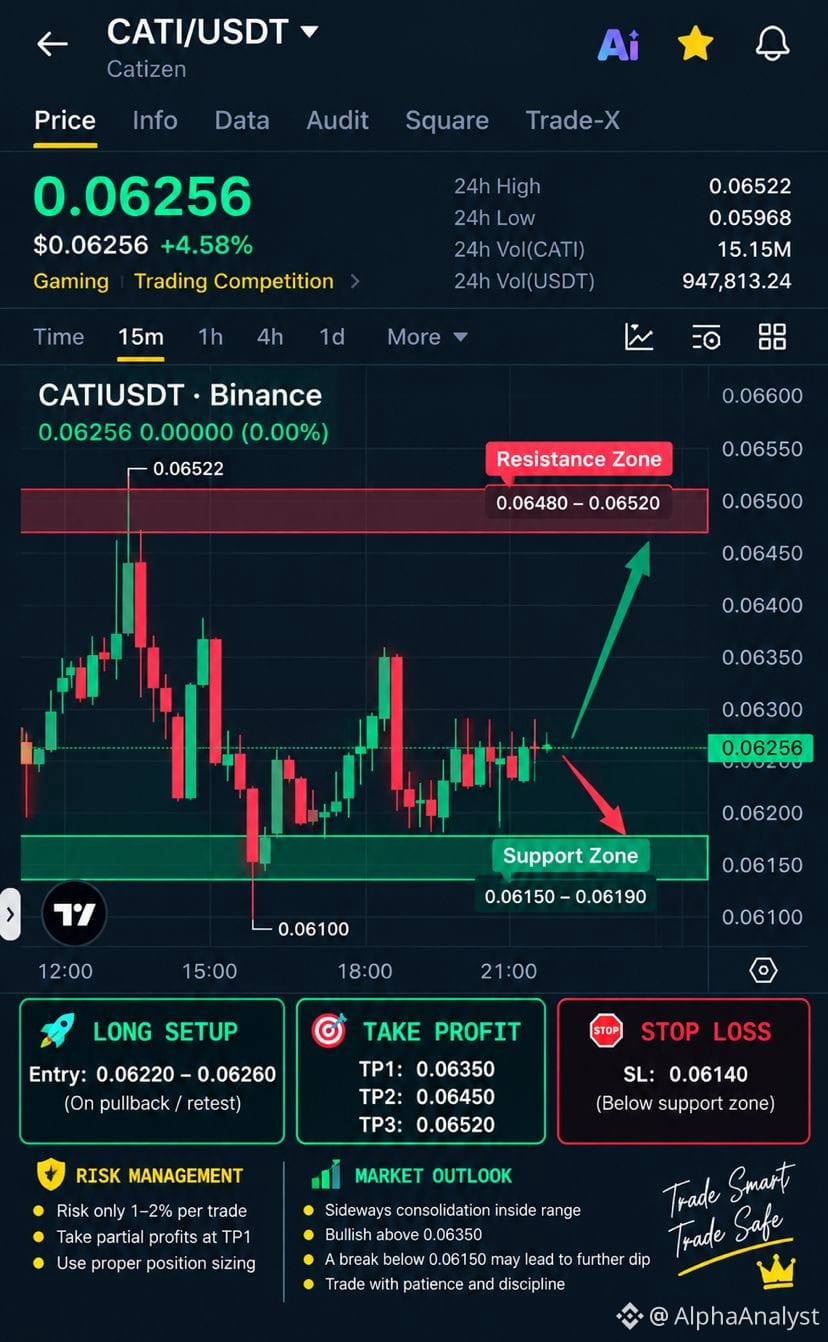
🔥$CATI /USDT — Bullish Setup 🚀
📊 Price consolidating above 0.0620, showing accumulation strength.
⚡ LONG: 0.0622–0.0626 | TP: 0.0635 → 0.0645 → 0.0652
🛑 SL: 0.0614 | Enter on pullback/retest confirmation.
💰 Risk only 1–2% & avoid chasing.
🚀 Break 0.0635 = momentum toward resistance!
#CATI #USDT #Binance #CryptoTradingInsights #RippleLobbiesToAdvanceCLARITYActVote #ChinaAugustCPIRises0.8%YoY #OilRisesToHighestSinceJuly
🔥$CATI /USDT — Bullish Setup 🚀
📊 Price consolidating above 0.0620, showing accumulation strength.
⚡ LONG: 0.0622–0.0626 | TP: 0.0635 → 0.0645 → 0.0652
🛑 SL: 0.0614 | Enter on pullback/retest confirmation.
💰 Risk only 1–2% & avoid chasing.
🚀 Break 0.0635 = momentum toward resistance!
#CATI #USDT #Binance #CryptoTradingInsights #RippleLobbiesToAdvanceCLARITYActVote #ChinaAugustCPIRises0.8%YoY #OilRisesToHighestSinceJuly
📊 Price consolidating above 0.0620, showing accumulation strength.
⚡ LONG: 0.0622–0.0626 | TP: 0.0635 → 0.0645 → 0.0652
🛑 SL: 0.0614 | Enter on pullback/retest confirmation.
💰 Risk only 1–2% & avoid chasing.
🚀 Break 0.0635 = momentum toward resistance!
#CATI #USDT #Binance #CryptoTradingInsights #RippleLobbiesToAdvanceCLARITYActVote #ChinaAugustCPIRises0.8%YoY #OilRisesToHighestSinceJuly
1
137
·
--
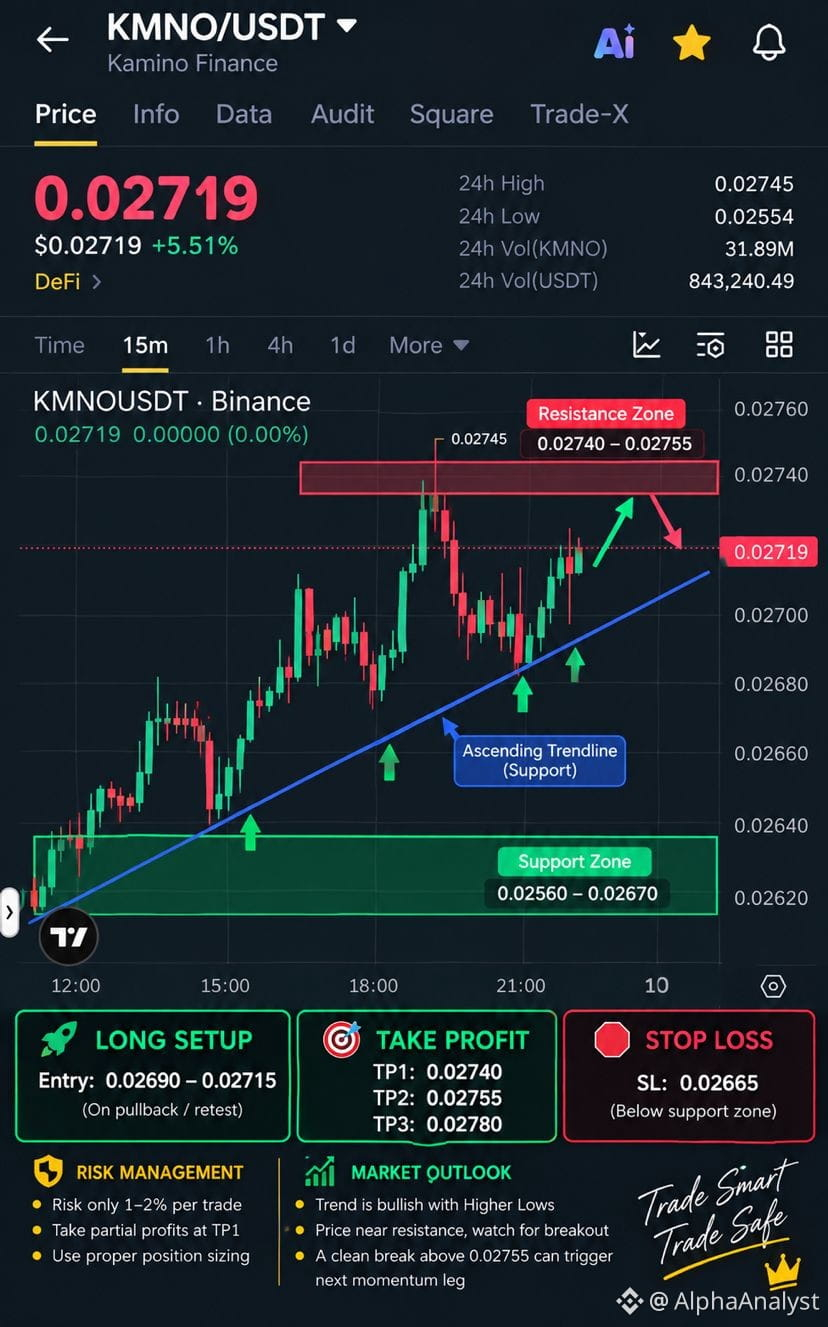
$KMNO /USDT — Bullish Momentum 🚀
📈 Strong breakout with higher highs + higher lows; momentum remains bullish.
⚡ LONG: 0.0270–0.0272 | TP: 0.0276 → 0.0280
🛑 SL: 0.0268 | Enter only on a confirmed retest.
💰 Risk 1–2% max & avoid chasing the move.
🚀 Break above 0.02745 = potential next leg up!
#KMNO #USDT #Binance #CryptoTrading #BankOfAmericaGroupPilotsUSBDCStablecoin #ChinaAugustCPIRises0.8%YoY #OilRisesToHighestSinceJuly
$KMNO /USDT — Bullish Momentum 🚀
📈 Strong breakout with higher highs + higher lows; momentum remains bullish.
⚡ LONG: 0.0270–0.0272 | TP: 0.0276 → 0.0280
🛑 SL: 0.0268 | Enter only on a confirmed retest.
💰 Risk 1–2% max & avoid chasing the move.
🚀 Break above 0.02745 = potential next leg up!
#KMNO #USDT #Binance #CryptoTrading #BankOfAmericaGroupPilotsUSBDCStablecoin #ChinaAugustCPIRises0.8%YoY #OilRisesToHighestSinceJuly
📈 Strong breakout with higher highs + higher lows; momentum remains bullish.
⚡ LONG: 0.0270–0.0272 | TP: 0.0276 → 0.0280
🛑 SL: 0.0268 | Enter only on a confirmed retest.
💰 Risk 1–2% max & avoid chasing the move.
🚀 Break above 0.02745 = potential next leg up!
#KMNO #USDT #Binance #CryptoTrading #BankOfAmericaGroupPilotsUSBDCStablecoin #ChinaAugustCPIRises0.8%YoY #OilRisesToHighestSinceJuly
22
·
--
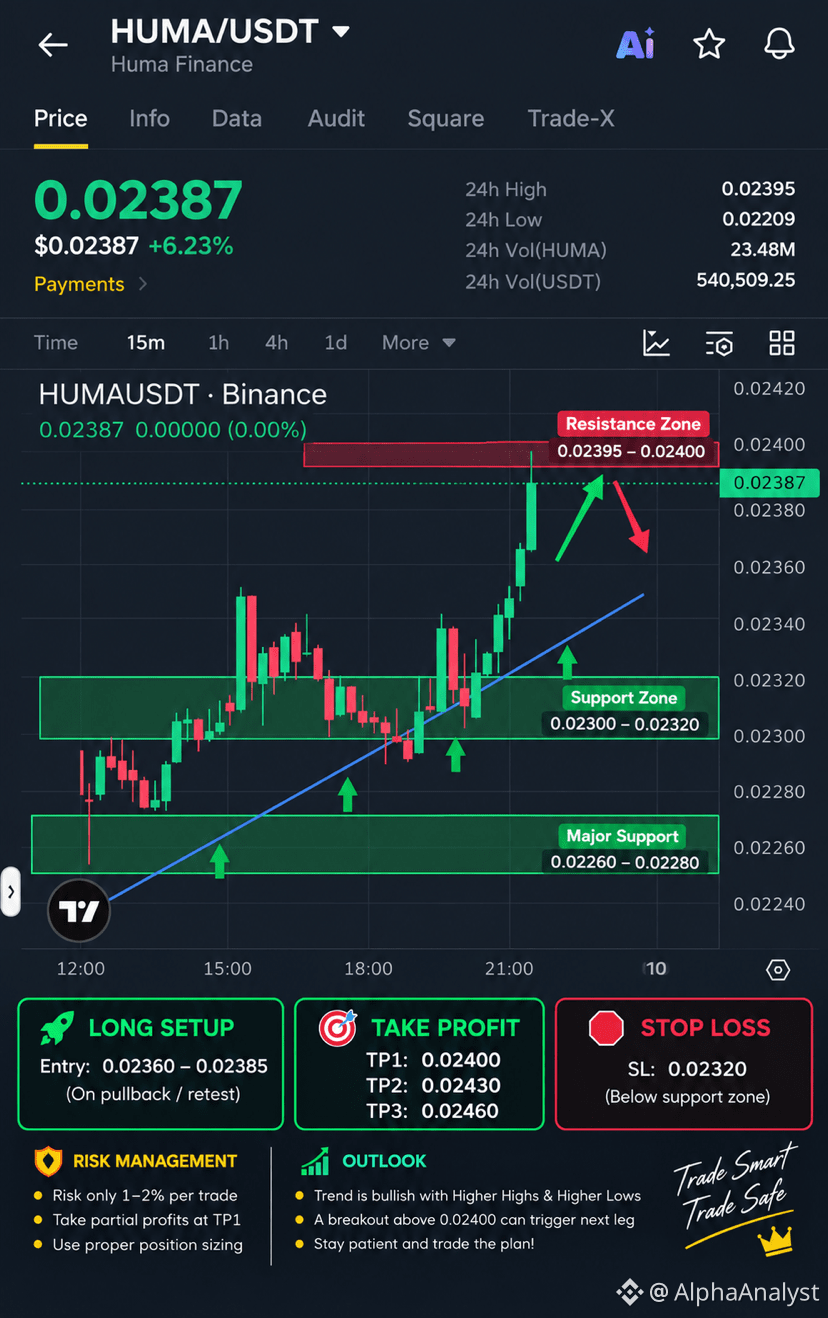
🔥 $HUMA /USDT — Bullish Breakout 🚀
📈 Strong bullish momentum with higher highs + higher lows.
⚡ LONG: 0.0235–0.0238 | TP: 0.0242 → 0.0248
🛑 SL: 0.0232 | Enter on retest/confirmation.
💰 Risk only 1–2% & don’t chase the pump.
🚀 Hold above 0.0240 = potential breakout continuation!
#HUMA #USDT #Binance #CryptoTrading#BitcoinSurpasses$79K #GrayscaleZcashETFTops$500M #OilRisesToHighestSinceJuly #USTreasuryToBuyBackUpTo$6BLongDatedDebt
🔥 $HUMA /USDT — Bullish Breakout 🚀
📈 Strong bullish momentum with higher highs + higher lows.
⚡ LONG: 0.0235–0.0238 | TP: 0.0242 → 0.0248
🛑 SL: 0.0232 | Enter on retest/confirmation.
💰 Risk only 1–2% & don’t chase the pump.
🚀 Hold above 0.0240 = potential breakout continuation!
#HUMA #USDT #Binance #CryptoTrading#BitcoinSurpasses$79K #GrayscaleZcashETFTops$500M #OilRisesToHighestSinceJuly #USTreasuryToBuyBackUpTo$6BLongDatedDebt
📈 Strong bullish momentum with higher highs + higher lows.
⚡ LONG: 0.0235–0.0238 | TP: 0.0242 → 0.0248
🛑 SL: 0.0232 | Enter on retest/confirmation.
💰 Risk only 1–2% & don’t chase the pump.
🚀 Hold above 0.0240 = potential breakout continuation!
#HUMA #USDT #Binance #CryptoTrading#BitcoinSurpasses$79K #GrayscaleZcashETFTops$500M #OilRisesToHighestSinceJuly #USTreasuryToBuyBackUpTo$6BLongDatedDebt
114
·
--
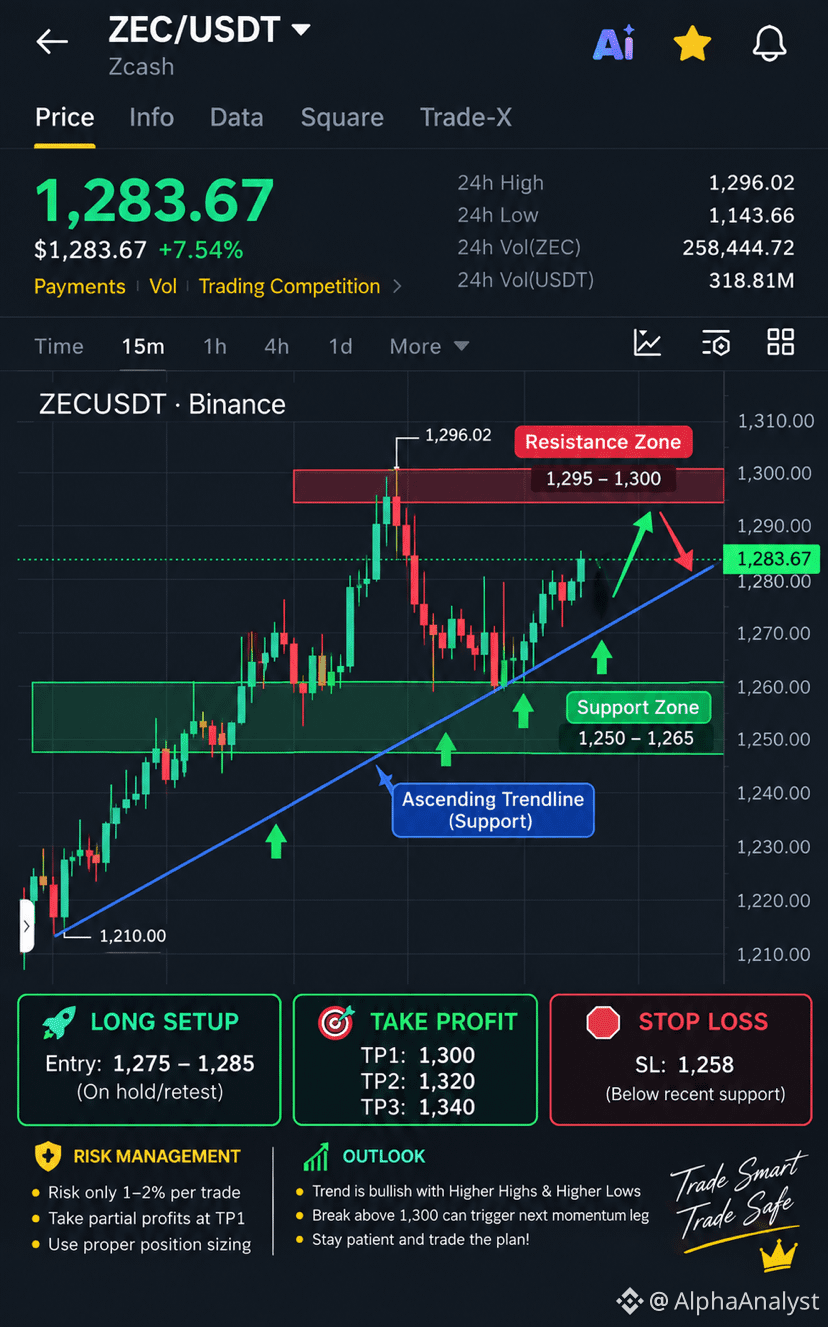
🔥$ZEC /USDT — Bullish Momentum 🚀
📈 Strong uptrend with higher highs & higher lows; buyers remain in control.
⚡ LONG: 1,275–1,283 | TP: 1,295 → 1,315
🛑 SL: 1,265 | Enter only on a confirmed hold/retest.
💰 Risk 1–2% max & avoid chasing the pump.
🚀 Break & hold 1,295 = potential next leg up!
#ZEC #USDT #Binance #cryptotradingpro #GrayscaleZcashETFTops$500M #OilRisesToHighestSinceJuly #BrentCrudeTops$100
🔥$ZEC /USDT — Bullish Momentum 🚀
📈 Strong uptrend with higher highs & higher lows; buyers remain in control.
⚡ LONG: 1,275–1,283 | TP: 1,295 → 1,315
🛑 SL: 1,265 | Enter only on a confirmed hold/retest.
💰 Risk 1–2% max & avoid chasing the pump.
🚀 Break & hold 1,295 = potential next leg up!
#ZEC #USDT #Binance #cryptotradingpro #GrayscaleZcashETFTops$500M #OilRisesToHighestSinceJuly #BrentCrudeTops$100
📈 Strong uptrend with higher highs & higher lows; buyers remain in control.
⚡ LONG: 1,275–1,283 | TP: 1,295 → 1,315
🛑 SL: 1,265 | Enter only on a confirmed hold/retest.
💰 Risk 1–2% max & avoid chasing the pump.
🚀 Break & hold 1,295 = potential next leg up!
#ZEC #USDT #Binance #cryptotradingpro #GrayscaleZcashETFTops$500M #OilRisesToHighestSinceJuly #BrentCrudeTops$100
194
Log in to explore more content
Join global crypto users on Binance Square
⚡️ Get latest and useful information about crypto.
💬 Trusted by the world’s largest crypto exchange.
👍 Discover real insights from verified creators.
Email / Phone number
Trending Topics
AppleDebutsFoldablePhone
37,043 views
777 Discussing
Apple just dropped the foldable iPhone — and the market is paying attention. This isn't just another product cycle; it's a new product category, a new CEO on stage, and a $1,999 price tag that pushes $AAPL further into ultra-premium territory. Foldables are the narrative, and Apple is now the headline.
#appledebutsfoldablephone #EUExtendsCentralContactPointToCASPs #US10YTreasuryYieldHitsHighestSinceNov2023 #BrentCrudeTops$100 #USTreasuryToBuyBackUpTo$6BLongDatedDebt
KimHotbae
·2 Likes
·2.9k views
TSMCAugustRevenueUp53.3%YoY
6,235 views
224 Discussing
IranSaysReadyToEscalateWarWithUS
9,727 views
239 Discussing