

FeryX Trades
21.6k Posts

FeryX Trades
 Square Verified+
Report
Block User
فريال | متداولة شرسة لا تعرف التراجع 📊
أحلل بذكاء، أقتنص الفرص، وأبني نجاحي بثقة.
هدفي الحرية المالية وصناعة اسمي بقوة في عالم التداول.
4.3K+ Following
38.1K+ Followers
36.6K+ Liked
Posts
All
Quotes
Live
·
--
Bullish
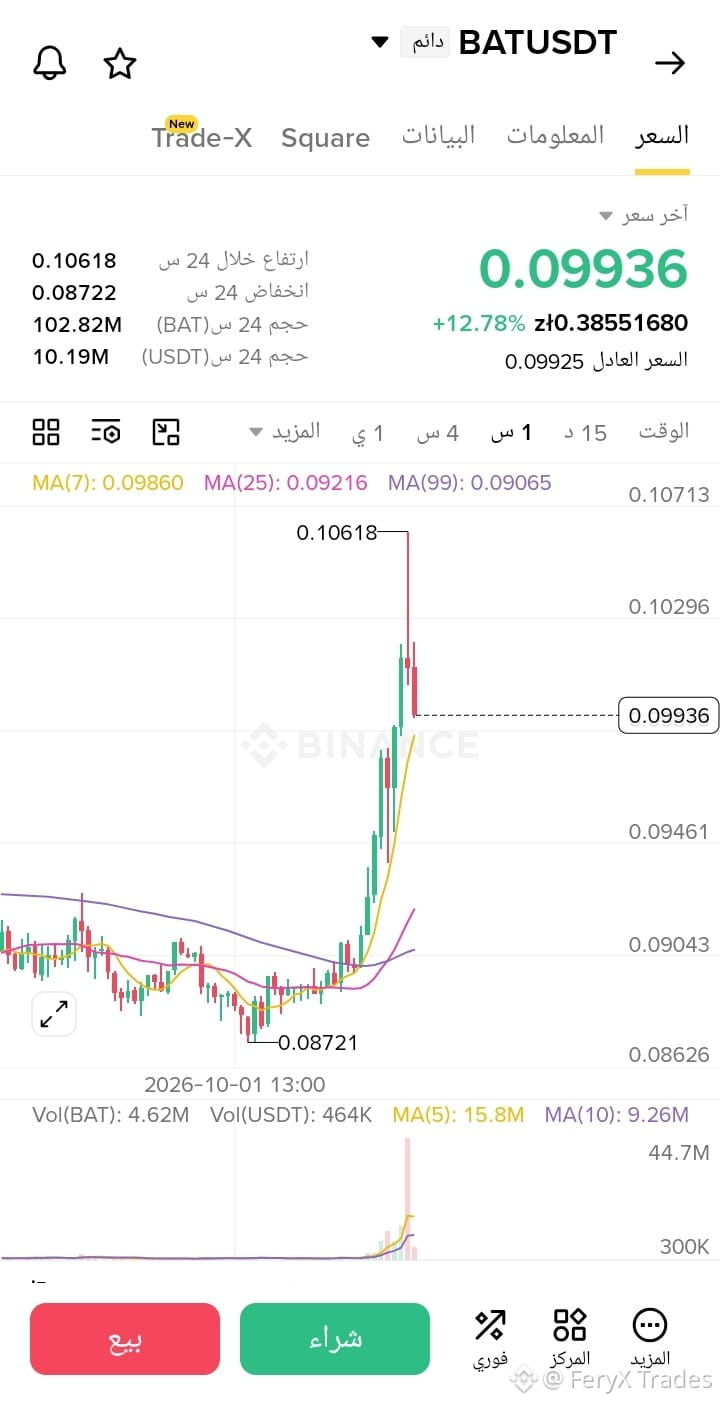
The bulls (buyers) have awakened, and momentum surges sharply for coin $BAT ! 🚀🔥
The upward move is fast, and buying pressure dominates the chart. However, with this sudden and sharp spike, a smart trading strategy requires strict adherence to risk management and tightening the “Stop-Loss” range to secure profits safely during the rally! 🎯⚡
We are now entering a quick Buy (Long) trade as this strong move accelerates: 🟢
← **Entry range:** 0.1015$ – 0.1035$ 📍
← **Targets:** 0.1061$ | 0.1089$ | 0.1120$ 🎯
← **Stop-Loss (SL):** 0.0970$ 🛑
This is a fleeting opportunity and the price is accelerating strongly; so secure your positions now, stick to the appropriate position size, and enter the market immediately! 💥🚀
The bulls (buyers) have awakened, and momentum surges sharply for coin $BAT ! 🚀🔥
The upward move is fast, and buying pressure dominates the chart. However, with this sudden and sharp spike, a smart trading strategy requires strict adherence to risk management and tightening the “Stop-Loss” range to secure profits safely during the rally! 🎯⚡
We are now entering a quick Buy (Long) trade as this strong move accelerates: 🟢
← **Entry range:** 0.1015$ – 0.1035$ 📍
← **Targets:** 0.1061$ | 0.1089$ | 0.1120$ 🎯
← **Stop-Loss (SL):** 0.0970$ 🛑
This is a fleeting opportunity and the price is accelerating strongly; so secure your positions now, stick to the appropriate position size, and enter the market immediately! 💥🚀
The upward move is fast, and buying pressure dominates the chart. However, with this sudden and sharp spike, a smart trading strategy requires strict adherence to risk management and tightening the “Stop-Loss” range to secure profits safely during the rally! 🎯⚡
We are now entering a quick Buy (Long) trade as this strong move accelerates: 🟢
← **Entry range:** 0.1015$ – 0.1035$ 📍
← **Targets:** 0.1061$ | 0.1089$ | 0.1120$ 🎯
← **Stop-Loss (SL):** 0.0970$ 🛑
This is a fleeting opportunity and the price is accelerating strongly; so secure your positions now, stick to the appropriate position size, and enter the market immediately! 💥🚀
2
106
·
--
Bearish
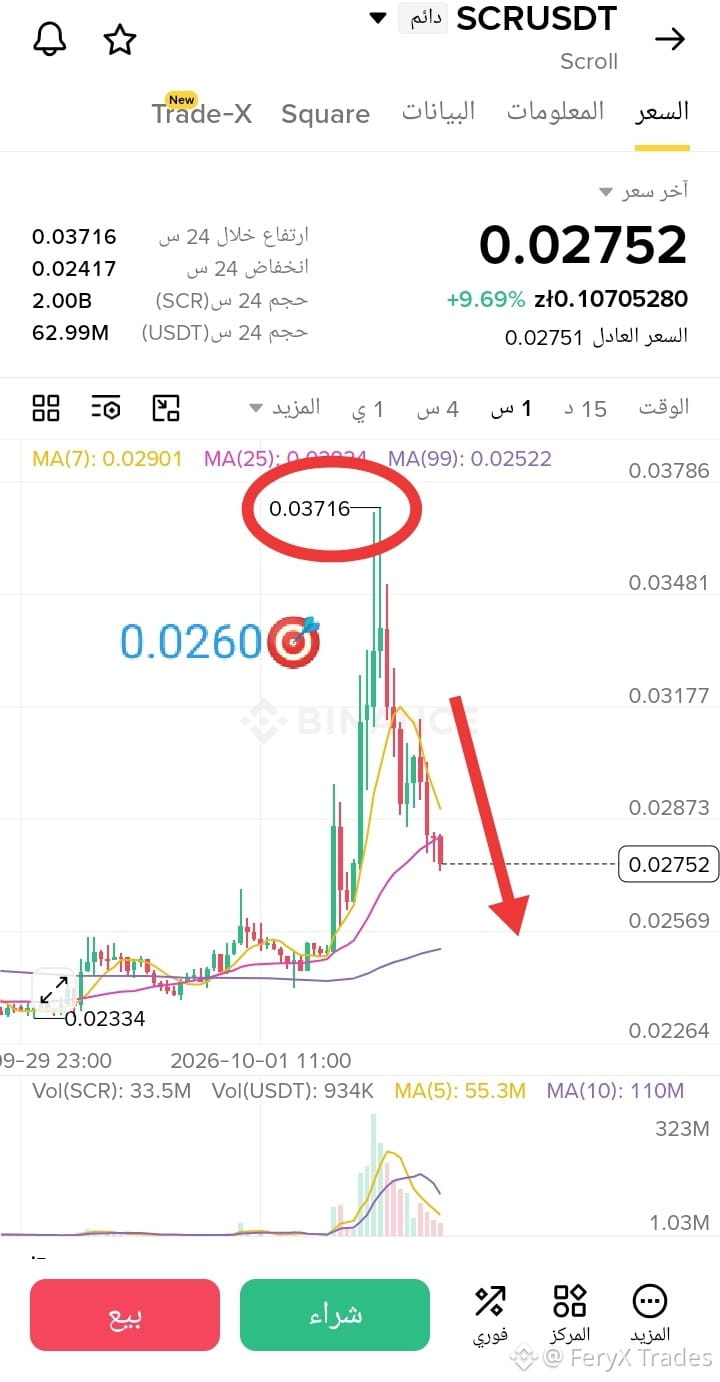
A sharp free-fall from the top to $SCR .. The next downward wave will be faster than you expect! 🚨🩸
The price completely loses its upward momentum after failing to hold above, and smart liquidity is setting you up to break the current support levels and target the remaining lows. We’re at the start of a new downwave that will crush the pushed-in buy positions! ⚡📉
We enter sell (Short) trades with high conviction to catch the coming drop: 🔴
← **Entry Range:** 0.0281 – 0.0285 $ 📍
← **Targets:** 0.0274 | 0.0260 | 0.0250 $ 🎯
← **Stop Loss (SL):** 0.0301 $ 🛑
Position yourselves intelligently in the sell zone now, and capture the price drop before the move accelerates and entering becomes high-risk! The snipers are in position.. and keep my words! 💥🎯
A sharp free-fall from the top to $SCR .. The next downward wave will be faster than you expect! 🚨🩸
The price completely loses its upward momentum after failing to hold above, and smart liquidity is setting you up to break the current support levels and target the remaining lows. We’re at the start of a new downwave that will crush the pushed-in buy positions! ⚡📉
We enter sell (Short) trades with high conviction to catch the coming drop: 🔴
← **Entry Range:** 0.0281 – 0.0285 $ 📍
← **Targets:** 0.0274 | 0.0260 | 0.0250 $ 🎯
← **Stop Loss (SL):** 0.0301 $ 🛑
Position yourselves intelligently in the sell zone now, and capture the price drop before the move accelerates and entering becomes high-risk! The snipers are in position.. and keep my words! 💥🎯
The price completely loses its upward momentum after failing to hold above, and smart liquidity is setting you up to break the current support levels and target the remaining lows. We’re at the start of a new downwave that will crush the pushed-in buy positions! ⚡📉
We enter sell (Short) trades with high conviction to catch the coming drop: 🔴
← **Entry Range:** 0.0281 – 0.0285 $ 📍
← **Targets:** 0.0274 | 0.0260 | 0.0250 $ 🎯
← **Stop Loss (SL):** 0.0301 $ 🛑
Position yourselves intelligently in the sell zone now, and capture the price drop before the move accelerates and entering becomes high-risk! The snipers are in position.. and keep my words! 💥🎯
1
72
·
--
Bullish
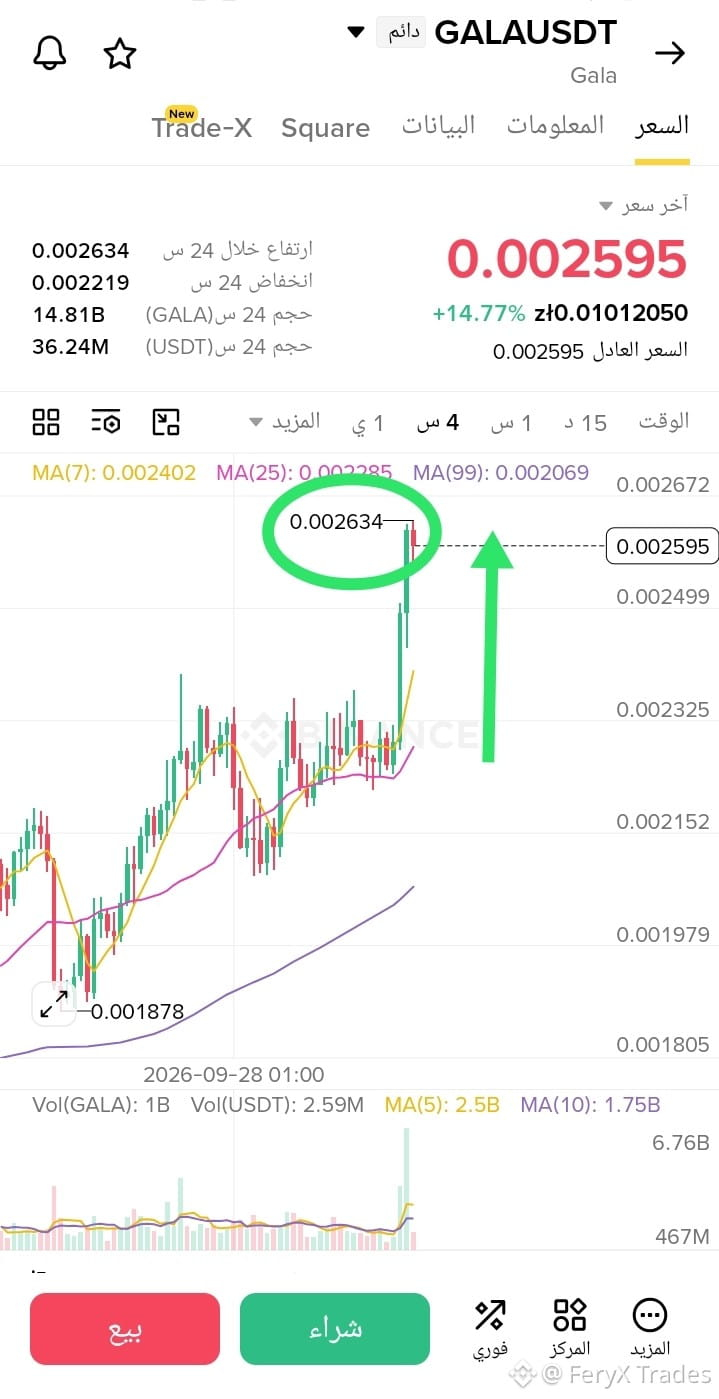
A roaring breakout explosion of $GALA , and the bulls successfully break the tight consolidation range! 🚀🔥
Green candles announce the start of a structural shift in favor of buying, but don’t chase the rise and don’t rush recklessly into the peak! ⚠️ Smart liquidity is waiting for a well-organized corrective pullback to retest the demand zones for positioning at the best possible price with the lowest risk percentage. 🎯
We enter buy trades (Long) with a sniper’s logic at the immediate cooldown: ⚡
← Entry range: 0.00249 – 0.00253 $ 📍
← Targets: 0.00265 | 0.00275 | 0.00285 $ 🎯
← Stop loss (SL): 0.00238 $ 🛑
Wait for the calculated correction, secure your seats immediately within the entry range, and don’t miss the upcoming fierce upswing toward the targets! Position intelligently and stick to my words! 💥🎯
A roaring breakout explosion of $GALA , and the bulls successfully break the tight consolidation range! 🚀🔥
Green candles announce the start of a structural shift in favor of buying, but don’t chase the rise and don’t rush recklessly into the peak! ⚠️ Smart liquidity is waiting for a well-organized corrective pullback to retest the demand zones for positioning at the best possible price with the lowest risk percentage. 🎯
We enter buy trades (Long) with a sniper’s logic at the immediate cooldown: ⚡
← Entry range: 0.00249 – 0.00253 $ 📍
← Targets: 0.00265 | 0.00275 | 0.00285 $ 🎯
← Stop loss (SL): 0.00238 $ 🛑
Wait for the calculated correction, secure your seats immediately within the entry range, and don’t miss the upcoming fierce upswing toward the targets! Position intelligently and stick to my words! 💥🎯
Green candles announce the start of a structural shift in favor of buying, but don’t chase the rise and don’t rush recklessly into the peak! ⚠️ Smart liquidity is waiting for a well-organized corrective pullback to retest the demand zones for positioning at the best possible price with the lowest risk percentage. 🎯
We enter buy trades (Long) with a sniper’s logic at the immediate cooldown: ⚡
← Entry range: 0.00249 – 0.00253 $ 📍
← Targets: 0.00265 | 0.00275 | 0.00285 $ 🎯
← Stop loss (SL): 0.00238 $ 🛑
Wait for the calculated correction, secure your seats immediately within the entry range, and don’t miss the upcoming fierce upswing toward the targets! Position intelligently and stick to my words! 💥🎯
1
179
·
--
Bullish
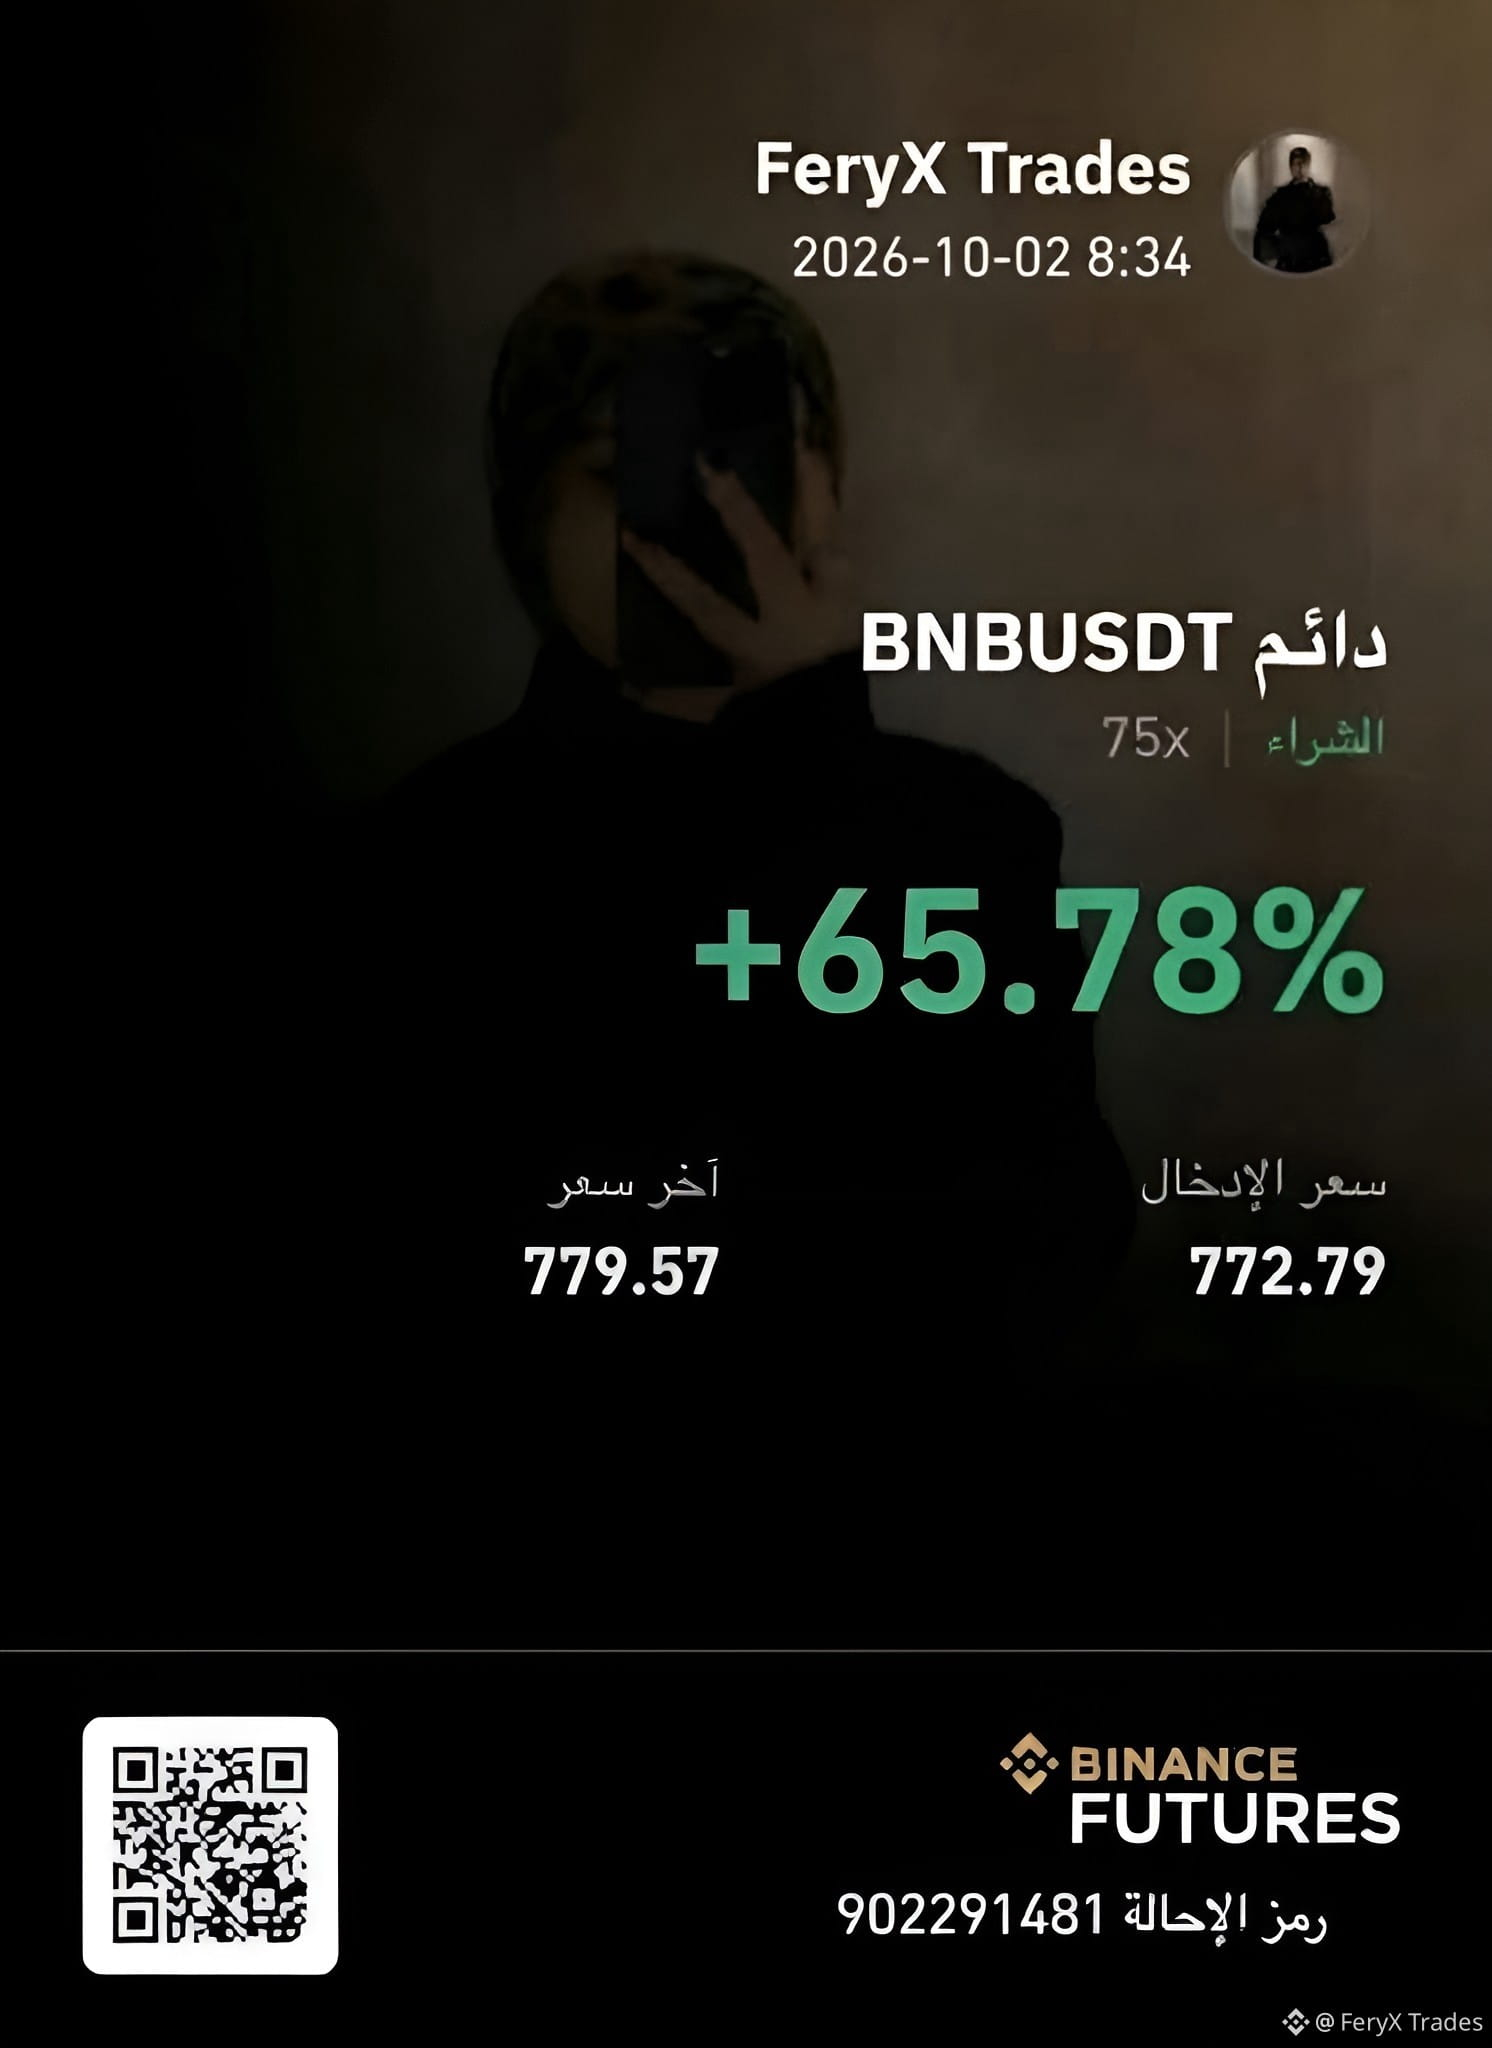
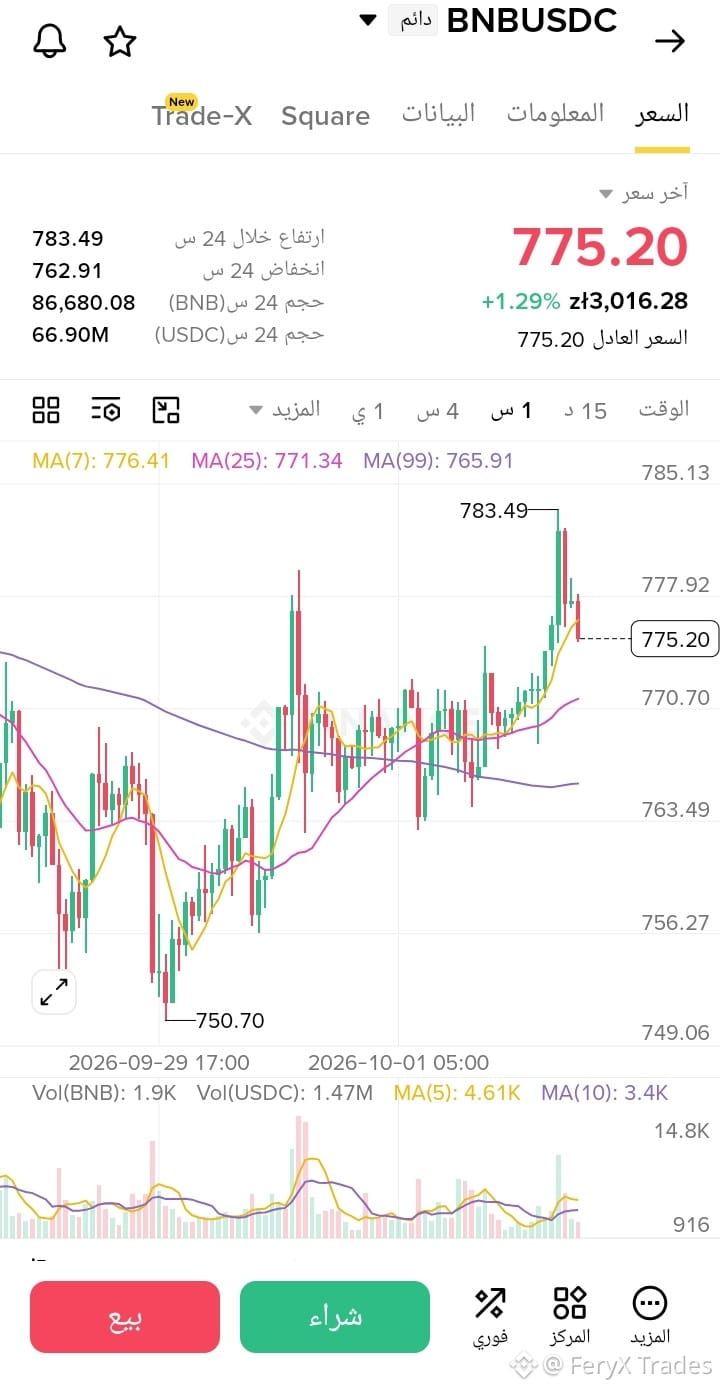
A fiery explosion on a coin $BNB that hits the target with mill precision! 😎🔥 A killer long from the absolute bottom with zero pullback.. Printing money as usual with FeryX Trades 🤑💥
{future}(BNBUSDT)
A fiery explosion on a coin $BNB that hits the target with mill precision! 😎🔥 A killer long from the absolute bottom with zero pullback.. Printing money as usual with FeryX Trades 🤑💥
1
257
·
--
Bullish
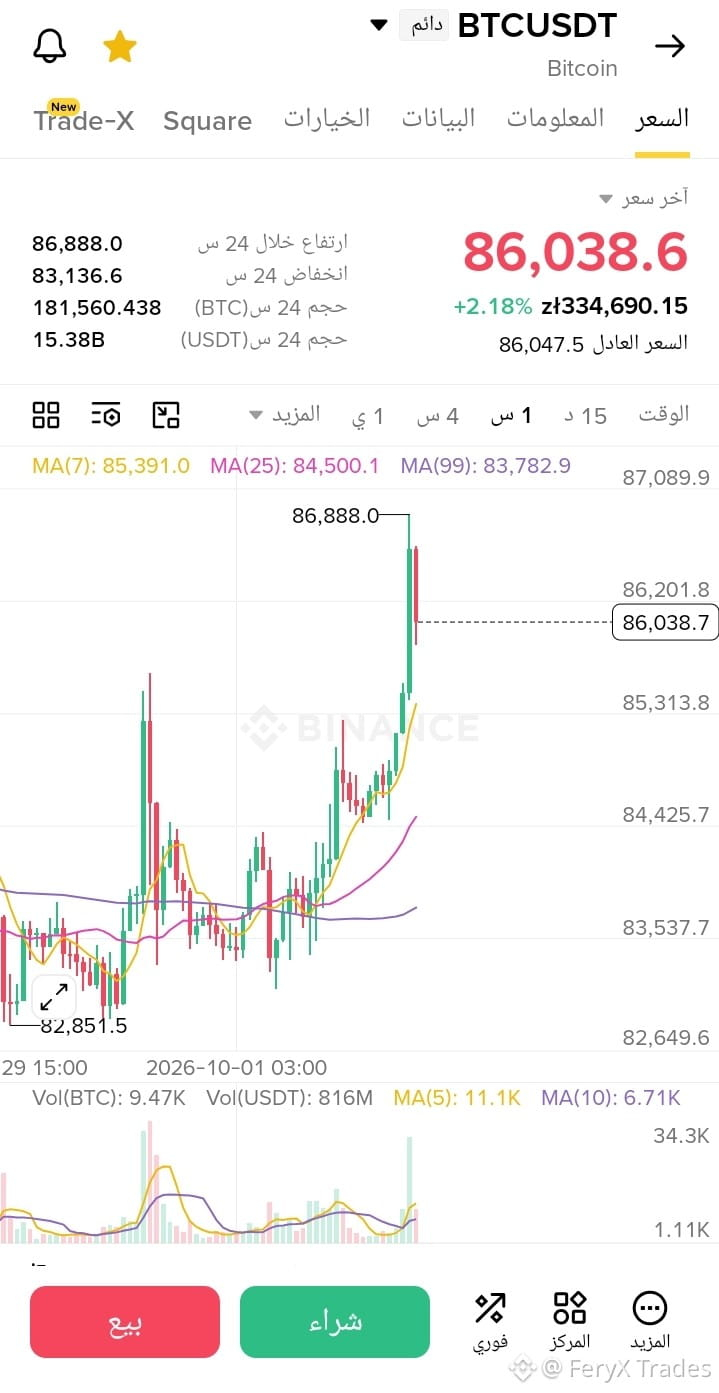
$BTC Hits targets with sniper precision! 😎🔥 FeryX Trades deals Crypto ownership always zero jheftela, zero reflection! 🤣💰
{future}(BTCUSDT)
$BTC Hits targets with sniper precision! 😎🔥 FeryX Trades deals Crypto ownership always zero jheftela, zero reflection! 🤣💰

1
204
·
--
Bullish
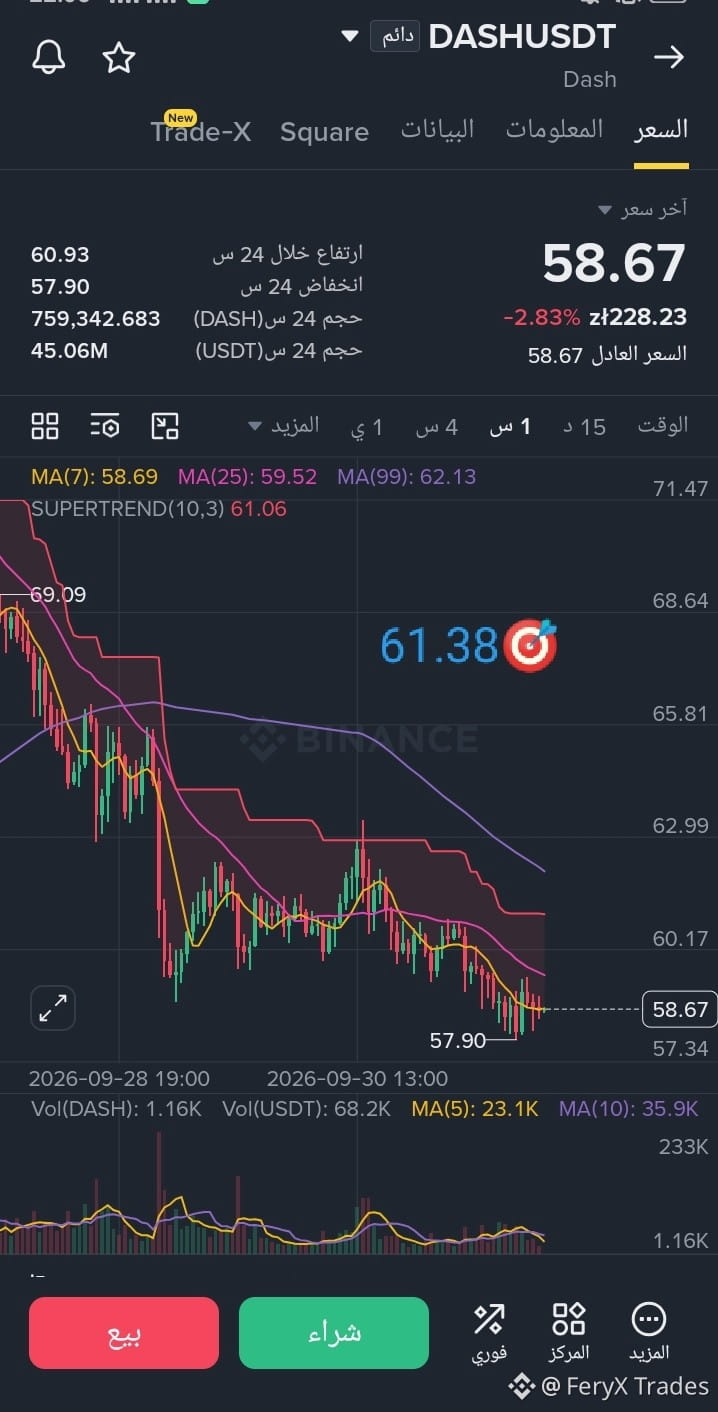
Enter a Buy (Long) trade on currency $DASH .
Entry range: 58.40 - 58.73
Take-profit (TP) range: 61.38 - 63.63
Stop-loss (SL): 56.65
DASH shows up before the decline below 57.90, where a strong and distinctive rebound occurred (forming a prominent lower wick), indicating buyers (bulls) entering the market!
Be cautious: the overall downtrend may resume on the 1-hour timeframe, which would invalidate the rebound scenario if the 57.50 stop-loss level is broken.
Never risk your entire capital; use a position size that matches your account size.
The setup looks ready. 👇👇👇
I’m closely monitoring the charts for currencies $GTC and $BTC C.
Enter a Buy (Long) trade on currency $DASH .
Entry range: 58.40 - 58.73
Take-profit (TP) range: 61.38 - 63.63
Stop-loss (SL): 56.65
DASH shows up before the decline below 57.90, where a strong and distinctive rebound occurred (forming a prominent lower wick), indicating buyers (bulls) entering the market!
Be cautious: the overall downtrend may resume on the 1-hour timeframe, which would invalidate the rebound scenario if the 57.50 stop-loss level is broken.
Never risk your entire capital; use a position size that matches your account size.
The setup looks ready. 👇👇👇
I’m closely monitoring the charts for currencies $GTC and $BTC C.
Entry range: 58.40 - 58.73
Take-profit (TP) range: 61.38 - 63.63
Stop-loss (SL): 56.65
DASH shows up before the decline below 57.90, where a strong and distinctive rebound occurred (forming a prominent lower wick), indicating buyers (bulls) entering the market!
Be cautious: the overall downtrend may resume on the 1-hour timeframe, which would invalidate the rebound scenario if the 57.50 stop-loss level is broken.
Never risk your entire capital; use a position size that matches your account size.
The setup looks ready. 👇👇👇
I’m closely monitoring the charts for currencies $GTC and $BTC C.
1
154
·
--
Bullish
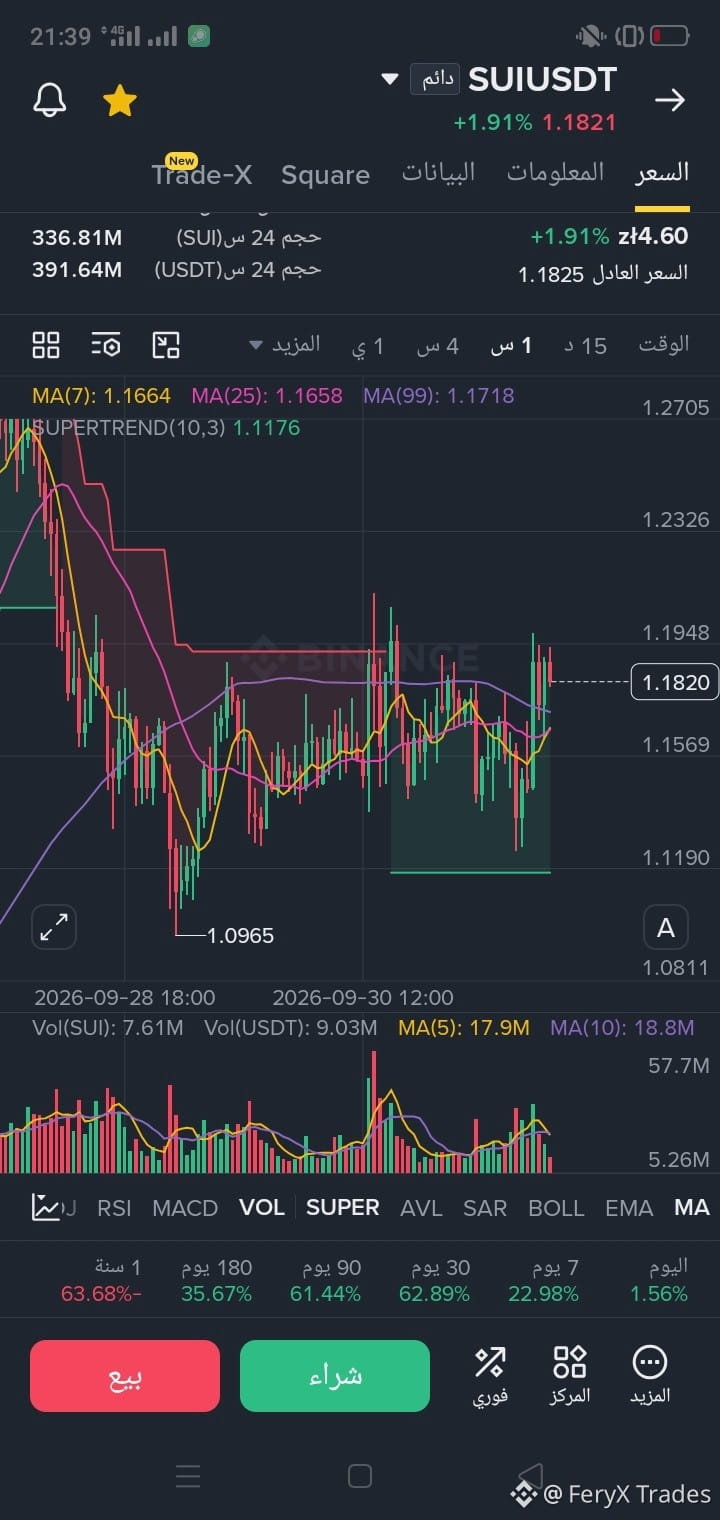
A new breakout for $SUI and a second rebound wave forming on the chart! ⚡📈
After our first trade hit all its targets completely with exceptional accuracy, the price is now showing a quick bullish reversal pattern, confirming that the mid-range timeframes are ready for a second round of upside. Technical consolidation above the support levels gives buyers the full advantage to renew momentum and continue along the main path, opening an ideal window to reposition before the candles surge toward higher levels.
We’re taking advantage of this price confirmation and opening a new buy trade (Long), with a calculated risk to follow the upcoming move:
← Entry range: 1.1890 – 1.1930 $
← Targets: 1.2000 $ 🎯 1.2050 $ 🎯 1.2100 $
❌ Stop Loss (SL): 1.1786 $
Secure your spots in the current accumulation zone, and ride the train before the momentum intensifies toward the first target! 📊🚀
{future}(SUIUSDT)
A new breakout for $SUI and a second rebound wave forming on the chart! ⚡📈
After our first trade hit all its targets completely with exceptional accuracy, the price is now showing a quick bullish reversal pattern, confirming that the mid-range timeframes are ready for a second round of upside. Technical consolidation above the support levels gives buyers the full advantage to renew momentum and continue along the main path, opening an ideal window to reposition before the candles surge toward higher levels.
We’re taking advantage of this price confirmation and opening a new buy trade (Long), with a calculated risk to follow the upcoming move:
← Entry range: 1.1890 – 1.1930 $
← Targets: 1.2000 $ 🎯 1.2050 $ 🎯 1.2100 $
❌ Stop Loss (SL): 1.1786 $
Secure your spots in the current accumulation zone, and ride the train before the momentum intensifies toward the first target! 📊🚀
After our first trade hit all its targets completely with exceptional accuracy, the price is now showing a quick bullish reversal pattern, confirming that the mid-range timeframes are ready for a second round of upside. Technical consolidation above the support levels gives buyers the full advantage to renew momentum and continue along the main path, opening an ideal window to reposition before the candles surge toward higher levels.
We’re taking advantage of this price confirmation and opening a new buy trade (Long), with a calculated risk to follow the upcoming move:
← Entry range: 1.1890 – 1.1930 $
← Targets: 1.2000 $ 🎯 1.2050 $ 🎯 1.2100 $
❌ Stop Loss (SL): 1.1786 $
Secure your spots in the current accumulation zone, and ride the train before the momentum intensifies toward the first target! 📊🚀
1
181
·
--
Bullish
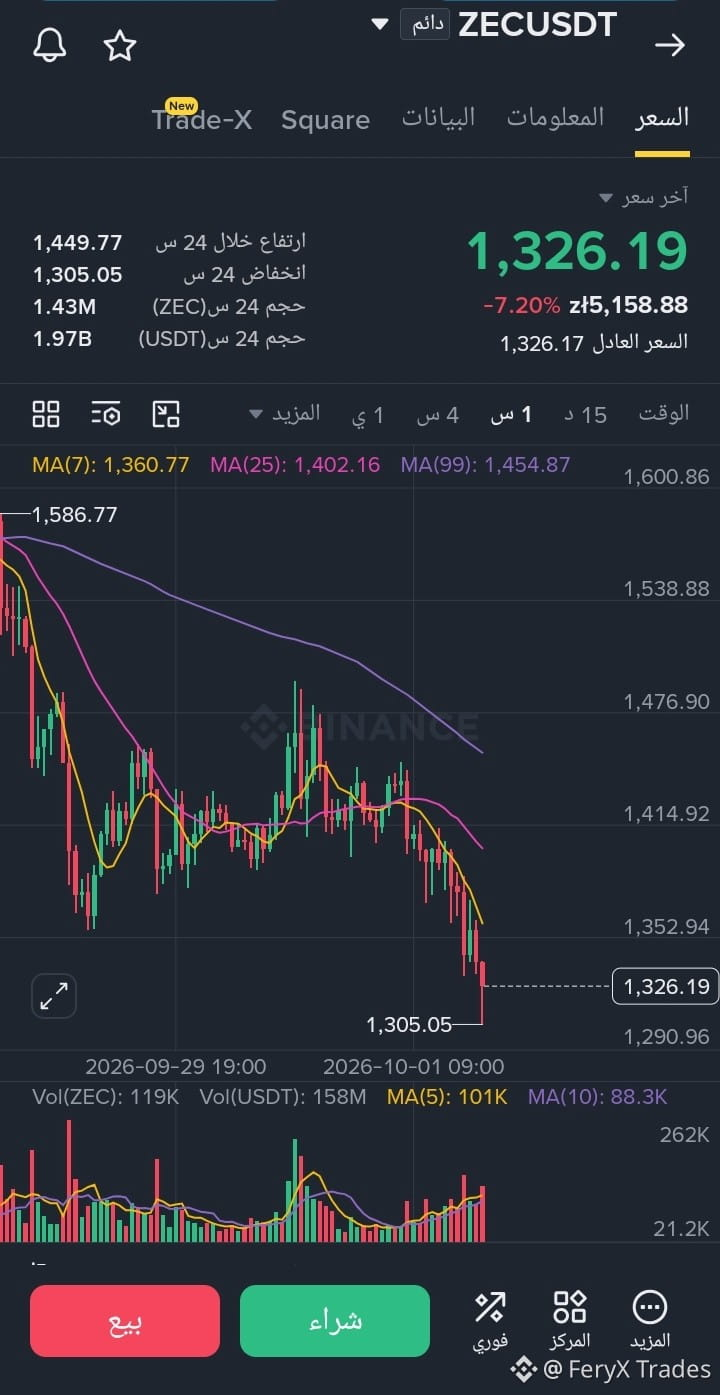
Cautious stability near key support zones; the intensity of the decline has started to ease gradually. An indication that a corrective rebound may be possible.
Buy trade on currency $ZEC .
Entry range: $1,330-$1,350
Targets: $1,390 / $1,430 / $1,480
Stop loss: $1,095
Note: The trend on the four-hour timeframe is still bearish; stay disciplined.
Don’t enter with your entire portfolio—allocate risk management wisely according to your account size.
I’m anticipating the rebound. 👇👇👇
Currencies $ZRO and $XRP
Within my watchlist.
Cautious stability near key support zones; the intensity of the decline has started to ease gradually. An indication that a corrective rebound may be possible.
Buy trade on currency $ZEC .
Entry range: $1,330-$1,350
Targets: $1,390 / $1,430 / $1,480
Stop loss: $1,095
Note: The trend on the four-hour timeframe is still bearish; stay disciplined.
Don’t enter with your entire portfolio—allocate risk management wisely according to your account size.
I’m anticipating the rebound. 👇👇👇
Currencies $ZRO and $XRP
Within my watchlist.
Buy trade on currency $ZEC .
Entry range: $1,330-$1,350
Targets: $1,390 / $1,430 / $1,480
Stop loss: $1,095
Note: The trend on the four-hour timeframe is still bearish; stay disciplined.
Don’t enter with your entire portfolio—allocate risk management wisely according to your account size.
I’m anticipating the rebound. 👇👇👇
Currencies $ZRO and $XRP
Within my watchlist.
1
298
·
--
Bullish
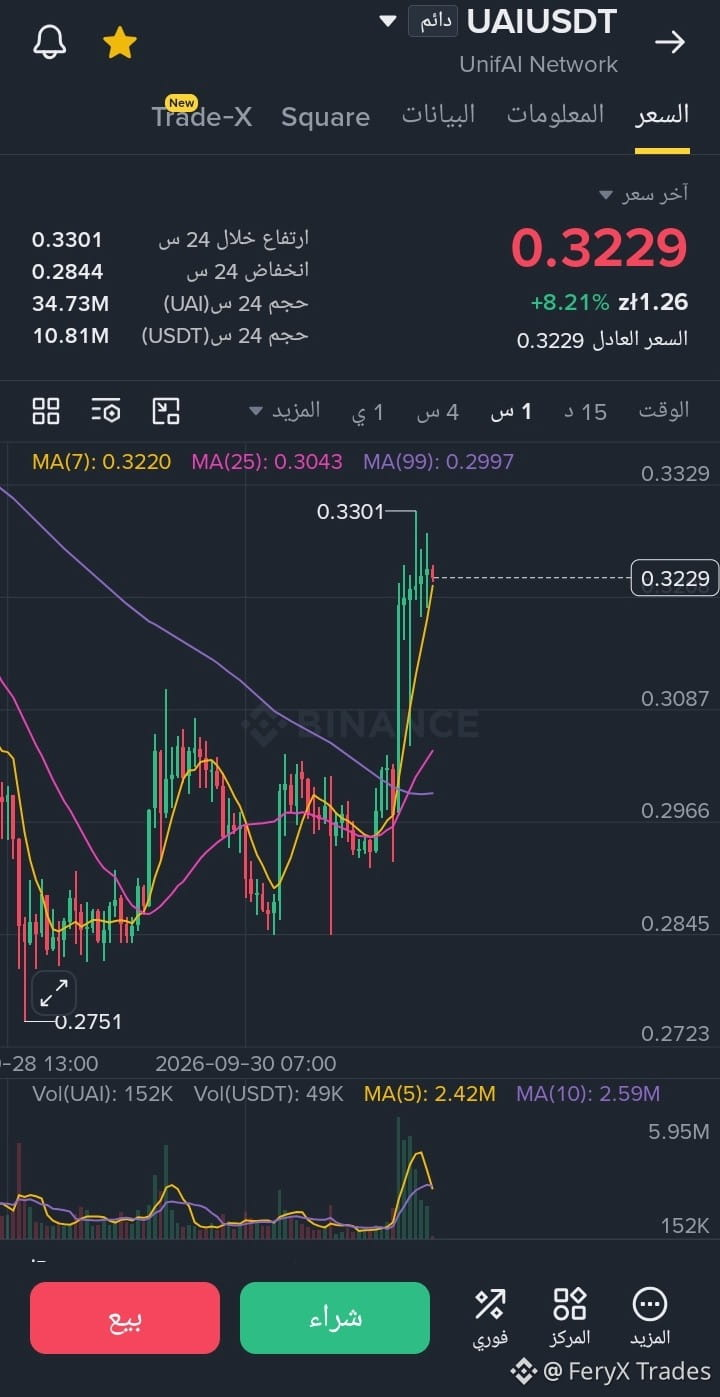
$UAI The price holds its base firmly and momentum starts building for an upward push. Let’s open a long between 0.318 - 0.328! Next targets: 0.334, then 0.343, and finally 0.350 (Stop loss: 0.295). Positivity continues as long as the price is above 0.315!
$UAI The price holds its base firmly and momentum starts building for an upward push. Let’s open a long between 0.318 - 0.328! Next targets: 0.334, then 0.343, and finally 0.350 (Stop loss: 0.295). Positivity continues as long as the price is above 0.315!
1
148
·
--
Come on, everyone, come!!
Come on, everyone, come!!
FeryX Trades
·
--
[Replay] 🎙️ The market is blazing! 🔥 | Fast scalping deals and instant profits 🤑
01 h 33 m 27 s · 145 listens
1
228
·
--
🎙️ The market is blazing! 🔥 | Fast scalping deals and instant profits 🤑
End
01 h 33 m 27 s
145
1
1
·
--
Bullish
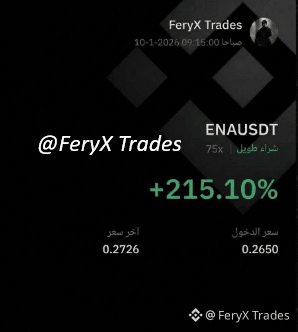
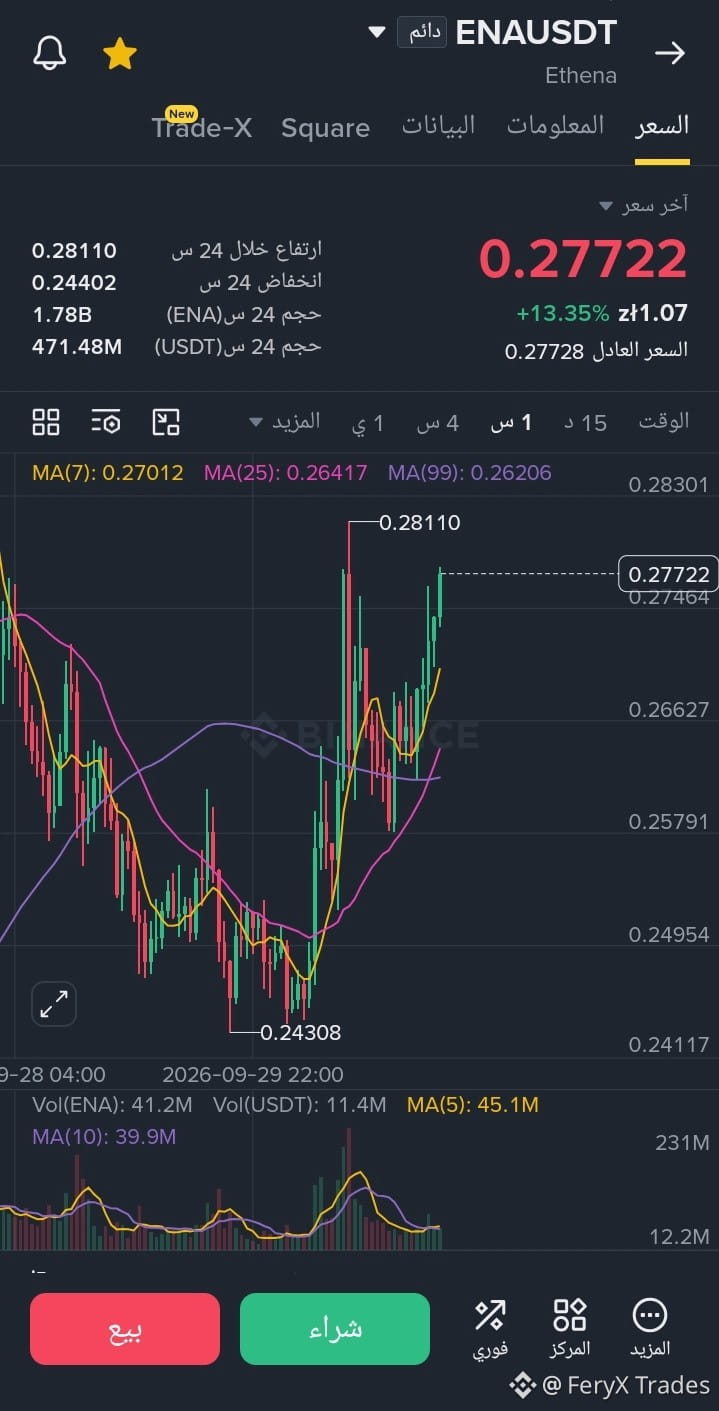
BOOOOM 😉🔥 The results speak
from the Long deal on $ENA
{future}(ENAUSDT)
BOOOOM 😉🔥 The results speak
from the Long deal on $ENA
from the Long deal on $ENA
1
146
·
--
Bullish
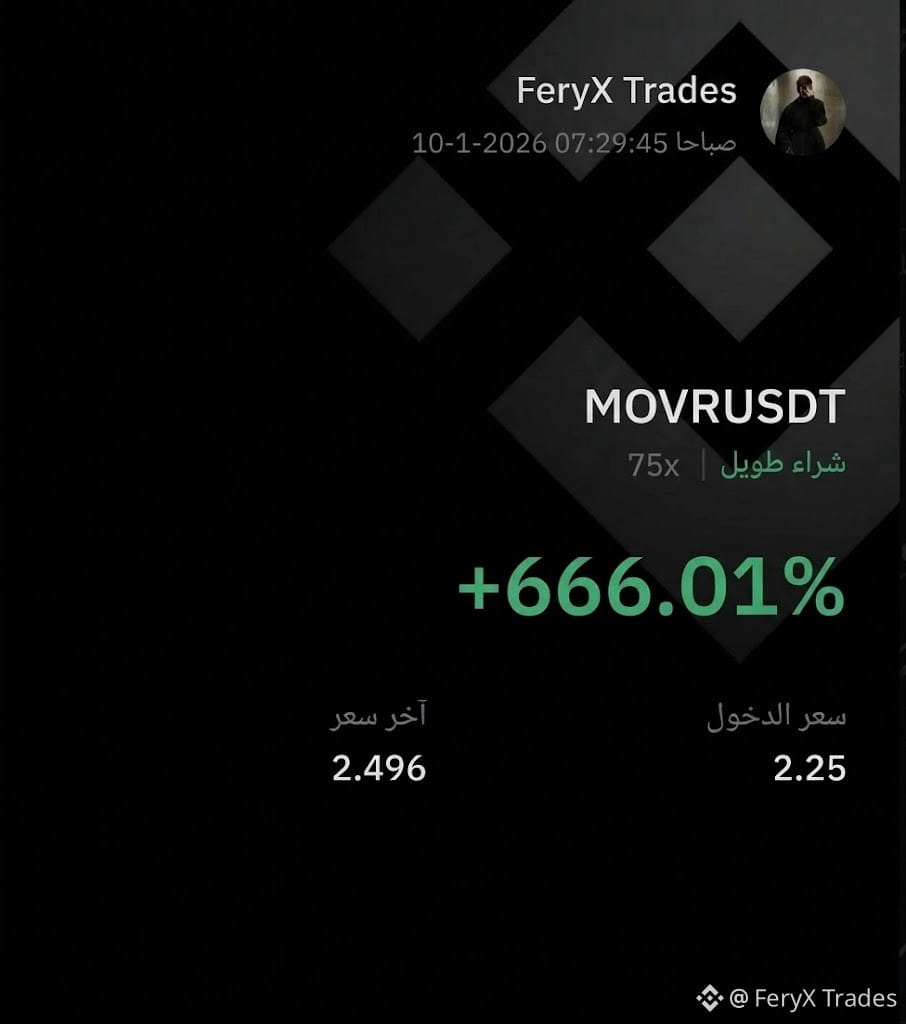
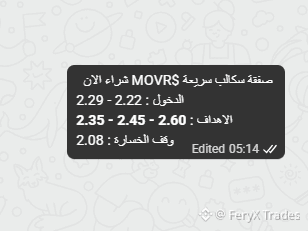
The third knockout blow and the third target of the coin operation to hit its head! 🤣🔥
Coin $MOVR was blown up, with the accuracy of a sniper from the entry point, and with zero “jajfla”! 🤩🔥
If you’re not following me, you’re missing rocket opportunities 😎👏
The third knockout blow and the third target of the coin operation to hit its head! 🤣🔥
Coin $MOVR was blown up, with the accuracy of a sniper from the entry point, and with zero “jajfla”! 🤩🔥
If you’re not following me, you’re missing rocket opportunities 😎👏
Coin $MOVR was blown up, with the accuracy of a sniper from the entry point, and with zero “jajfla”! 🤩🔥
If you’re not following me, you’re missing rocket opportunities 😎👏
1
4.4k
·
--
Bullish
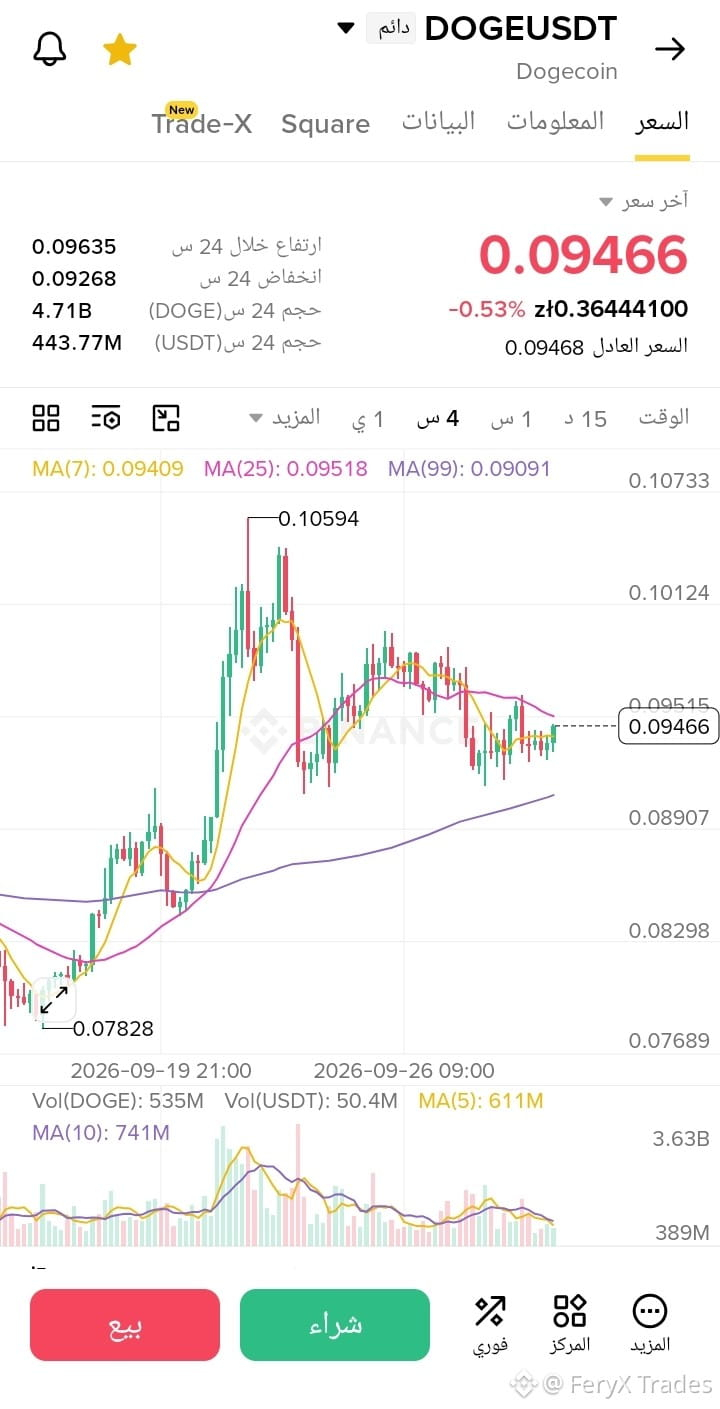
A huge accumulation opportunity is forming on the **$DOGE ** coin.
**Preparation Range:** 0.0880$– 0.0920$
**Profit-Gain Range:** 0.0950$ – 0.0980$– 0.1000$
**Stop-Loss:** 0.0850$
**Technical Analysis:** The price succeeded in re-testing a major pivot support area after the latest correction. The current consolidation paves the way for a bullish locomotive rebound and an anticipated structural breakout on the weekly timeframe.
**Warning:** A break of the main support and a close below 0.0850$ immediately invalidates the bullish outlook.
**Risk Management:** Support is excellent, but don’t put all your capital into one trade; stick to a safe position size.
Watch how the price responds at support. 👇👇👇
Follow the current ticker: **$DOGE**
A huge accumulation opportunity is forming on the **$DOGE ** coin.
**Preparation Range:** 0.0880$– 0.0920$
**Profit-Gain Range:** 0.0950$ – 0.0980$– 0.1000$
**Stop-Loss:** 0.0850$
**Technical Analysis:** The price succeeded in re-testing a major pivot support area after the latest correction. The current consolidation paves the way for a bullish locomotive rebound and an anticipated structural breakout on the weekly timeframe.
**Warning:** A break of the main support and a close below 0.0850$ immediately invalidates the bullish outlook.
**Risk Management:** Support is excellent, but don’t put all your capital into one trade; stick to a safe position size.
Watch how the price responds at support. 👇👇👇
Follow the current ticker: **$DOGE **
**Preparation Range:** 0.0880$– 0.0920$
**Profit-Gain Range:** 0.0950$ – 0.0980$– 0.1000$
**Stop-Loss:** 0.0850$
**Technical Analysis:** The price succeeded in re-testing a major pivot support area after the latest correction. The current consolidation paves the way for a bullish locomotive rebound and an anticipated structural breakout on the weekly timeframe.
**Warning:** A break of the main support and a close below 0.0850$ immediately invalidates the bullish outlook.
**Risk Management:** Support is excellent, but don’t put all your capital into one trade; stick to a safe position size.
Watch how the price responds at support. 👇👇👇
Follow the current ticker: **$DOGE **
3
2
204
·
--
Bearish
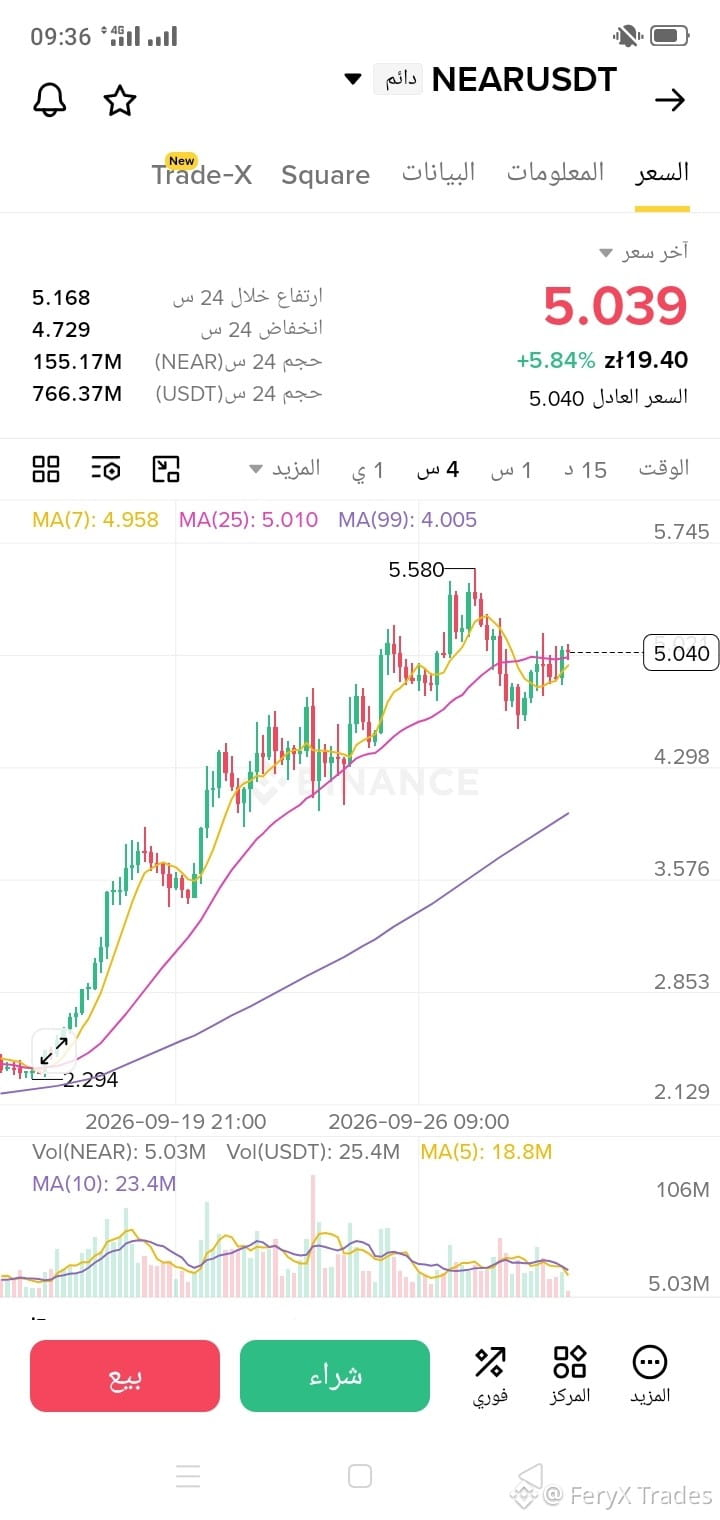
Excellent selling opportunity formed at **$NEAR ** after breaking the upward structure.
**Setup range:** $4.95–$5.08
**Profit-taking range:** $4.70 – $4.50 – $4.30
**Stop loss:** $5.20
**Technical analysis:** A clear structural break of the ascending channel on the 4-hour timeframe opens the door to a deep corrective wave, especially after the recent sharp rises and the depletion of buying momentum at the peaks.
**Warning:** If the price regains and holds above the 5.20$ level, the bearish outlook is invalidated and the downside idea is cancelled.
**Risk management:** Strong move corrections are fast and sharp—keep a balanced position size and do not over-leverage.
Watch the price drop by mentioning. 👇👇👇
Follow the current symbol: **$NEAR **
Excellent selling opportunity formed at **$NEAR ** after breaking the upward structure.
**Setup range:** $4.95–$5.08
**Profit-taking range:** $4.70 – $4.50 – $4.30
**Stop loss:** $5.20
**Technical analysis:** A clear structural break of the ascending channel on the 4-hour timeframe opens the door to a deep corrective wave, especially after the recent sharp rises and the depletion of buying momentum at the peaks.
**Warning:** If the price regains and holds above the 5.20$ level, the bearish outlook is invalidated and the downside idea is cancelled.
**Risk management:** Strong move corrections are fast and sharp—keep a balanced position size and do not over-leverage.
Watch the price drop by mentioning. 👇👇👇
Follow the current symbol: **$NEAR **
**Setup range:** $4.95–$5.08
**Profit-taking range:** $4.70 – $4.50 – $4.30
**Stop loss:** $5.20
**Technical analysis:** A clear structural break of the ascending channel on the 4-hour timeframe opens the door to a deep corrective wave, especially after the recent sharp rises and the depletion of buying momentum at the peaks.
**Warning:** If the price regains and holds above the 5.20$ level, the bearish outlook is invalidated and the downside idea is cancelled.
**Risk management:** Strong move corrections are fast and sharp—keep a balanced position size and do not over-leverage.
Watch the price drop by mentioning. 👇👇👇
Follow the current symbol: **$NEAR **
4
302
·
--
Bearish
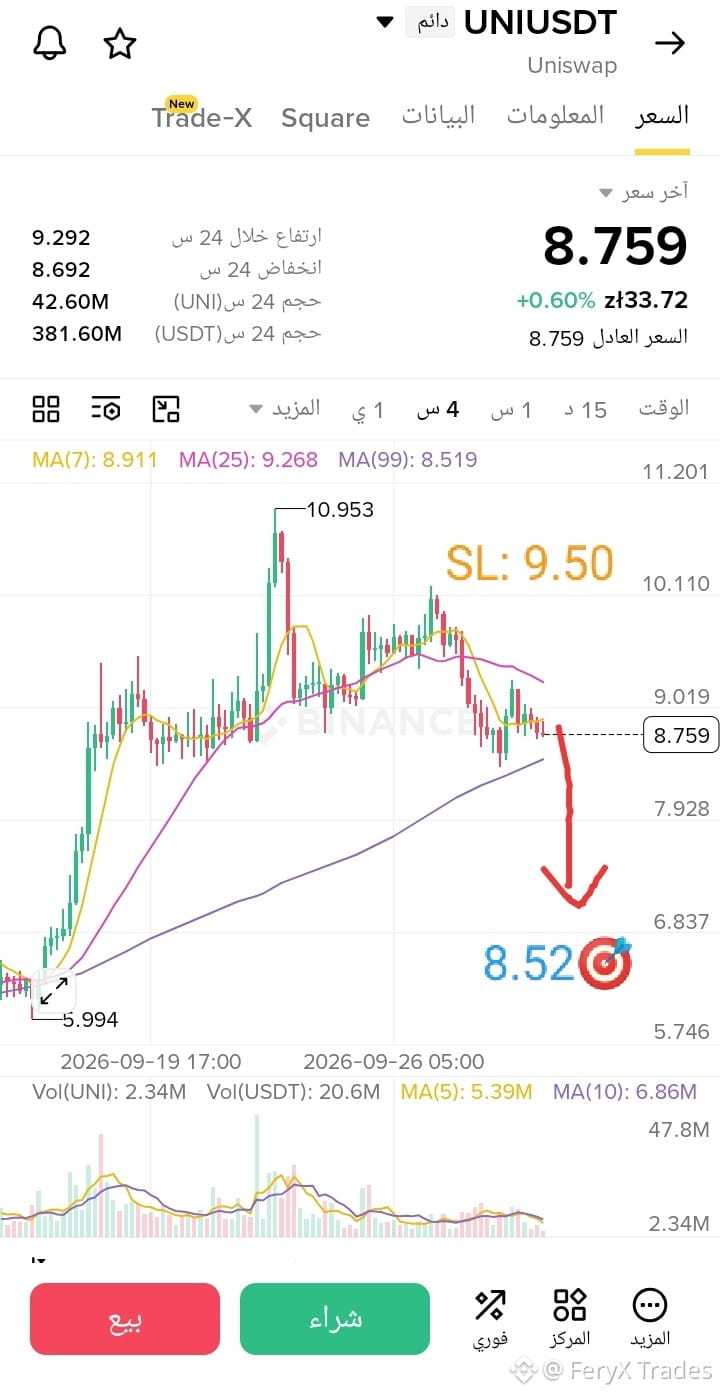
An upcoming selling opportunity for **$UNI **.
**Preparation range:** $8.65–$8.91
**Profit-taking range:** $8.52–$8.20–$7.90
**Stop-loss:** $9.50
**Technical analysis:** The price is experiencing severe difficulty in regaining key resistance zones, with momentum indicators turning negative. This price action reflects the depletion of buying power and increases the likelihood of a faster decline toward lower liquidity levels.
**Disclaimer:** A breakout and consolidation above $9.50 completely invalidates the technical analysis and ends the bearish idea.
**Risk management:** Keep a balanced position size that matches your capital and avoid high leverage.
Follow the live moves. 👇👇👇
Current symbol follow-up: $GRASS $NEAR
An upcoming selling opportunity for **$UNI **.
**Preparation range:** $8.65–$8.91
**Profit-taking range:** $8.52–$8.20–$7.90
**Stop-loss:** $9.50
**Technical analysis:** The price is experiencing severe difficulty in regaining key resistance zones, with momentum indicators turning negative. This price action reflects the depletion of buying power and increases the likelihood of a faster decline toward lower liquidity levels.
**Disclaimer:** A breakout and consolidation above $9.50 completely invalidates the technical analysis and ends the bearish idea.
**Risk management:** Keep a balanced position size that matches your capital and avoid high leverage.
Follow the live moves. 👇👇👇
Current symbol follow-up: $GRASS $NEAR
**Preparation range:** $8.65–$8.91
**Profit-taking range:** $8.52–$8.20–$7.90
**Stop-loss:** $9.50
**Technical analysis:** The price is experiencing severe difficulty in regaining key resistance zones, with momentum indicators turning negative. This price action reflects the depletion of buying power and increases the likelihood of a faster decline toward lower liquidity levels.
**Disclaimer:** A breakout and consolidation above $9.50 completely invalidates the technical analysis and ends the bearish idea.
**Risk management:** Keep a balanced position size that matches your capital and avoid high leverage.
Follow the live moves. 👇👇👇
Current symbol follow-up: $GRASS $NEAR
6
373
·
--
Bearish
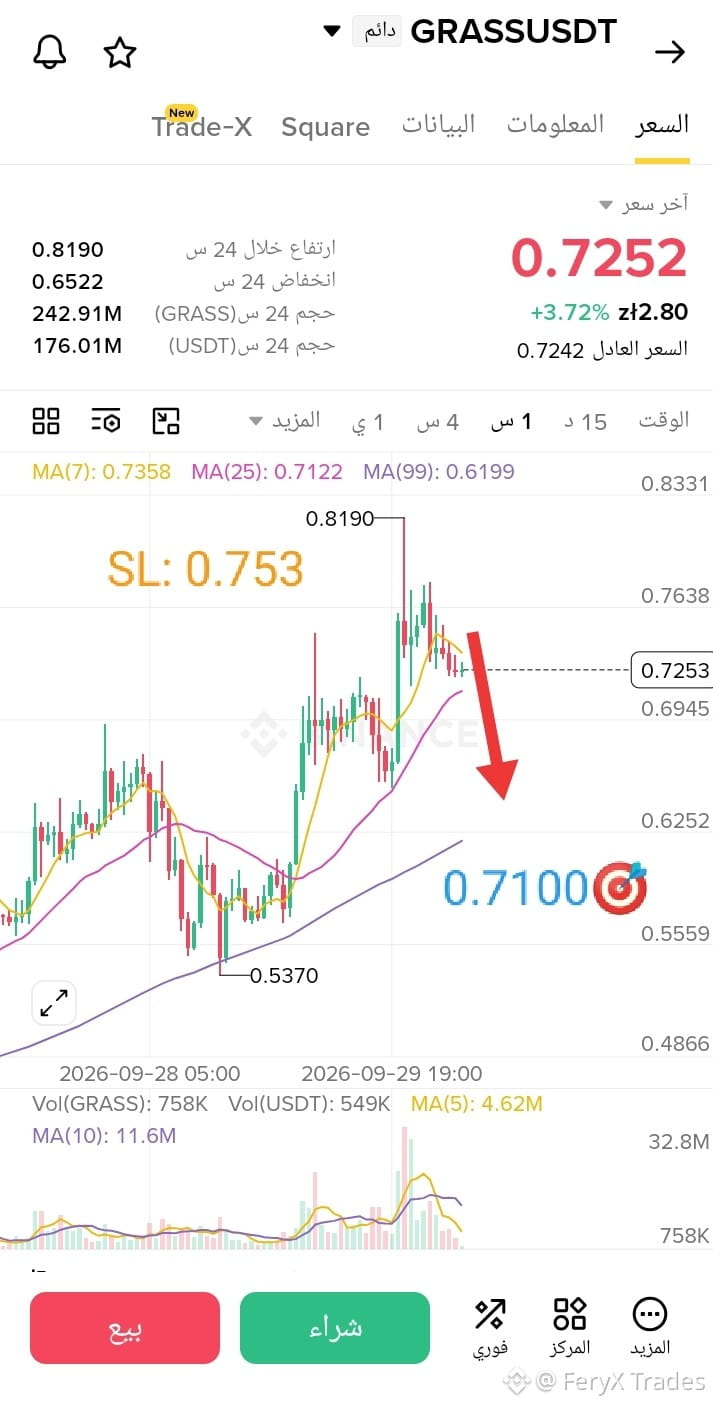
Enter a short at $GRASS immediately at 0.7225 - 0.7300; the downward move is coming strongly and will not be stopped, and the opportunity is golden!
Target 0.7100 then 0.6900 and finally 0.6700.
Set the stop loss at 0.753
Don’t hesitate—win now before everyone!
{future}(GRASSUSDT)
Enter a short at $GRASS immediately at 0.7225 - 0.7300; the downward move is coming strongly and will not be stopped, and the opportunity is golden!
Target 0.7100 then 0.6900 and finally 0.6700.
Set the stop loss at 0.753
Don’t hesitate—win now before everyone!
Target 0.7100 then 0.6900 and finally 0.6700.
Set the stop loss at 0.753
Don’t hesitate—win now before everyone!
3
209
·
--
Bullish
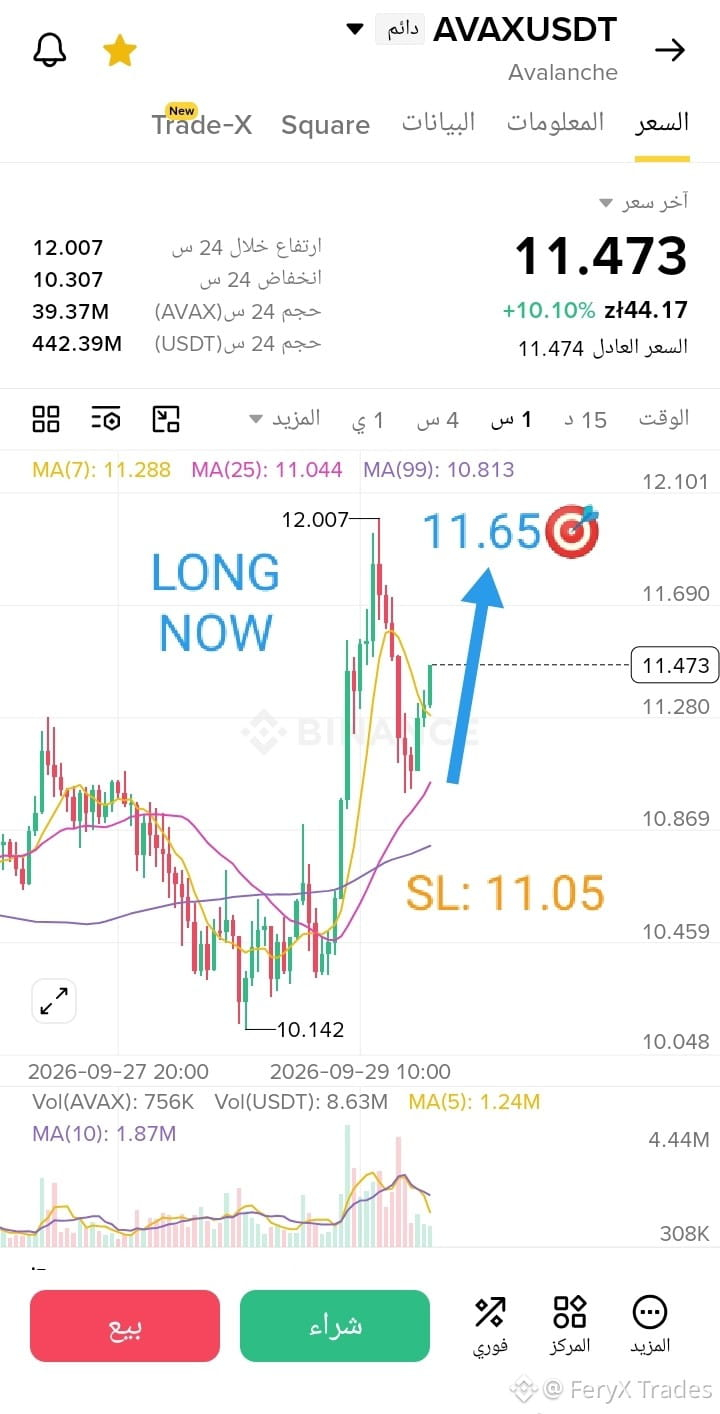
Enter a long on **$AVAX ** immediately at 11.39 - 11.45; the upward move is coming strong and unstoppable, and the opportunity is golden!
Target 11.65 then 11.82 and finally 12.02
Set stop loss at 11.05 only.
Don’t hesitate—win now before everyone else!
$AVAX
{future}(AVAXUSDT)
Enter a long on **$AVAX ** immediately at 11.39 - 11.45; the upward move is coming strong and unstoppable, and the opportunity is golden!
Target 11.65 then 11.82 and finally 12.02
Set stop loss at 11.05 only.
Don’t hesitate—win now before everyone else!
$AVAX
Target 11.65 then 11.82 and finally 12.02
Set stop loss at 11.05 only.
Don’t hesitate—win now before everyone else!
$AVAX
2
181
·
--
Bullish
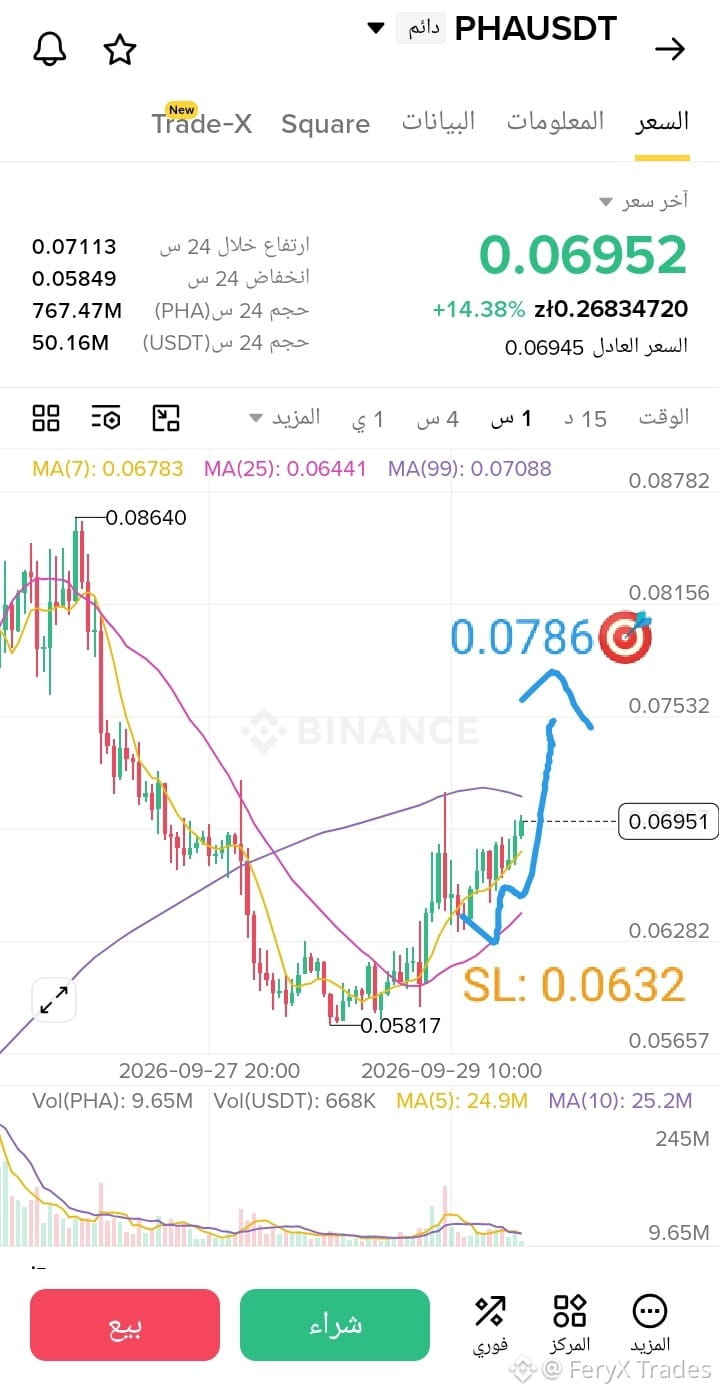
Positive momentum and strong consolidation for the $PHA coin above resistance levels.
Setup range: $0.0670 - $0.0694
Target: $0.0786
Stop loss: $0.0632
Technical analysis: The price’s successful breakout and trading above the 0.0686$ area indicates a stable recovery path, supporting the continuation of the upward wave and the testing of the next resistance targets.
Note: A drop below the support zone at 0.0633$ invalidates the bullish outlook and returns trading to the bearish range.
Risk management: Choose the appropriate lot size to avoid slippage, and maintain strict capital management.
Follow updates first-hand. 👇👇👇
Current symbol tracking: $ENA $BERA
{future}(BERAUSDT)
Positive momentum and strong consolidation for the $PHA coin above resistance levels.
Setup range: $0.0670 - $0.0694
Target: $0.0786
Stop loss: $0.0632
Technical analysis: The price’s successful breakout and trading above the 0.0686$ area indicates a stable recovery path, supporting the continuation of the upward wave and the testing of the next resistance targets.
Note: A drop below the support zone at 0.0633$ invalidates the bullish outlook and returns trading to the bearish range.
Risk management: Choose the appropriate lot size to avoid slippage, and maintain strict capital management.
Follow updates first-hand. 👇👇👇
Current symbol tracking: $ENA $BERA
Setup range: $0.0670 - $0.0694
Target: $0.0786
Stop loss: $0.0632
Technical analysis: The price’s successful breakout and trading above the 0.0686$ area indicates a stable recovery path, supporting the continuation of the upward wave and the testing of the next resistance targets.
Note: A drop below the support zone at 0.0633$ invalidates the bullish outlook and returns trading to the bearish range.
Risk management: Choose the appropriate lot size to avoid slippage, and maintain strict capital management.
Follow updates first-hand. 👇👇👇
Current symbol tracking: $ENA $BERA
2
195
·
--
Bearish
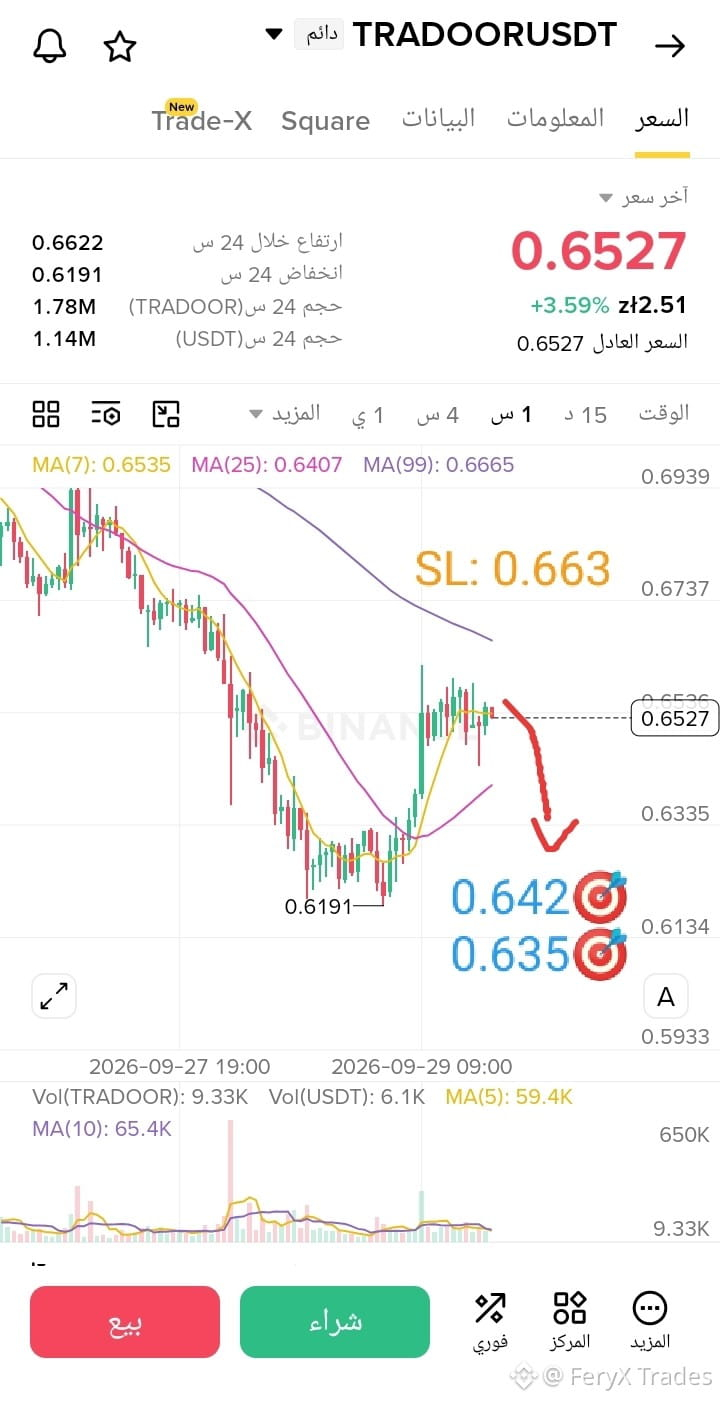
A possible bearish wave on **$TRADOOR **.
**Setup range:** 0.650$ - 0.655$
**Take-profit range:** 0.642$ - 0.635$ - 0.625$
**Stop-loss:** 0.663$
**Technical analysis:** A firm rejection at the local resistance peak confirms buyers have been depleted and the structure has shifted in favor of sellers, opening the way to target lower liquidity levels.
**Warning:** A breakout above the high level of 0.663$ absorbs the stop-loss and cancels the bearish scenario.
**Risk management:** Very tight risk (~1.2% - 1.6%) with an excellent reward-to-risk ratio reaching 1:3.7; stick to balanced entry proportions.
Track the price action. 👇👇👇
Your focus on $ZEC $NEAR
A possible bearish wave on **$TRADOOR **.
**Setup range:** 0.650$ - 0.655$
**Take-profit range:** 0.642$ - 0.635$ - 0.625$
**Stop-loss:** 0.663$
**Technical analysis:** A firm rejection at the local resistance peak confirms buyers have been depleted and the structure has shifted in favor of sellers, opening the way to target lower liquidity levels.
**Warning:** A breakout above the high level of 0.663$ absorbs the stop-loss and cancels the bearish scenario.
**Risk management:** Very tight risk (~1.2% - 1.6%) with an excellent reward-to-risk ratio reaching 1:3.7; stick to balanced entry proportions.
Track the price action. 👇👇👇
Your focus on $ZEC $NEAR
**Setup range:** 0.650$ - 0.655$
**Take-profit range:** 0.642$ - 0.635$ - 0.625$
**Stop-loss:** 0.663$
**Technical analysis:** A firm rejection at the local resistance peak confirms buyers have been depleted and the structure has shifted in favor of sellers, opening the way to target lower liquidity levels.
**Warning:** A breakout above the high level of 0.663$ absorbs the stop-loss and cancels the bearish scenario.
**Risk management:** Very tight risk (~1.2% - 1.6%) with an excellent reward-to-risk ratio reaching 1:3.7; stick to balanced entry proportions.
Track the price action. 👇👇👇
Your focus on $ZEC $NEAR
2
168
Log in to explore more content
Join global crypto users on Binance Square
⚡️ Get latest and useful information about crypto.
💬 Trusted by the world’s largest crypto exchange.
👍 Discover real insights from verified creators.
Email / Phone number