
Crypto Eagles
12k Posts

Crypto Eagles
 Square Verified+
Square Content Creator | X: @CryptoProject6

Creator Awards 2024

#BinanceTurns7

Top Voices
Frequent Trader
6 Years
131 Following
123.1K+ Followers
165.9K+ Liked
3 Badges
Posts
All
Quotes
Videos
Live
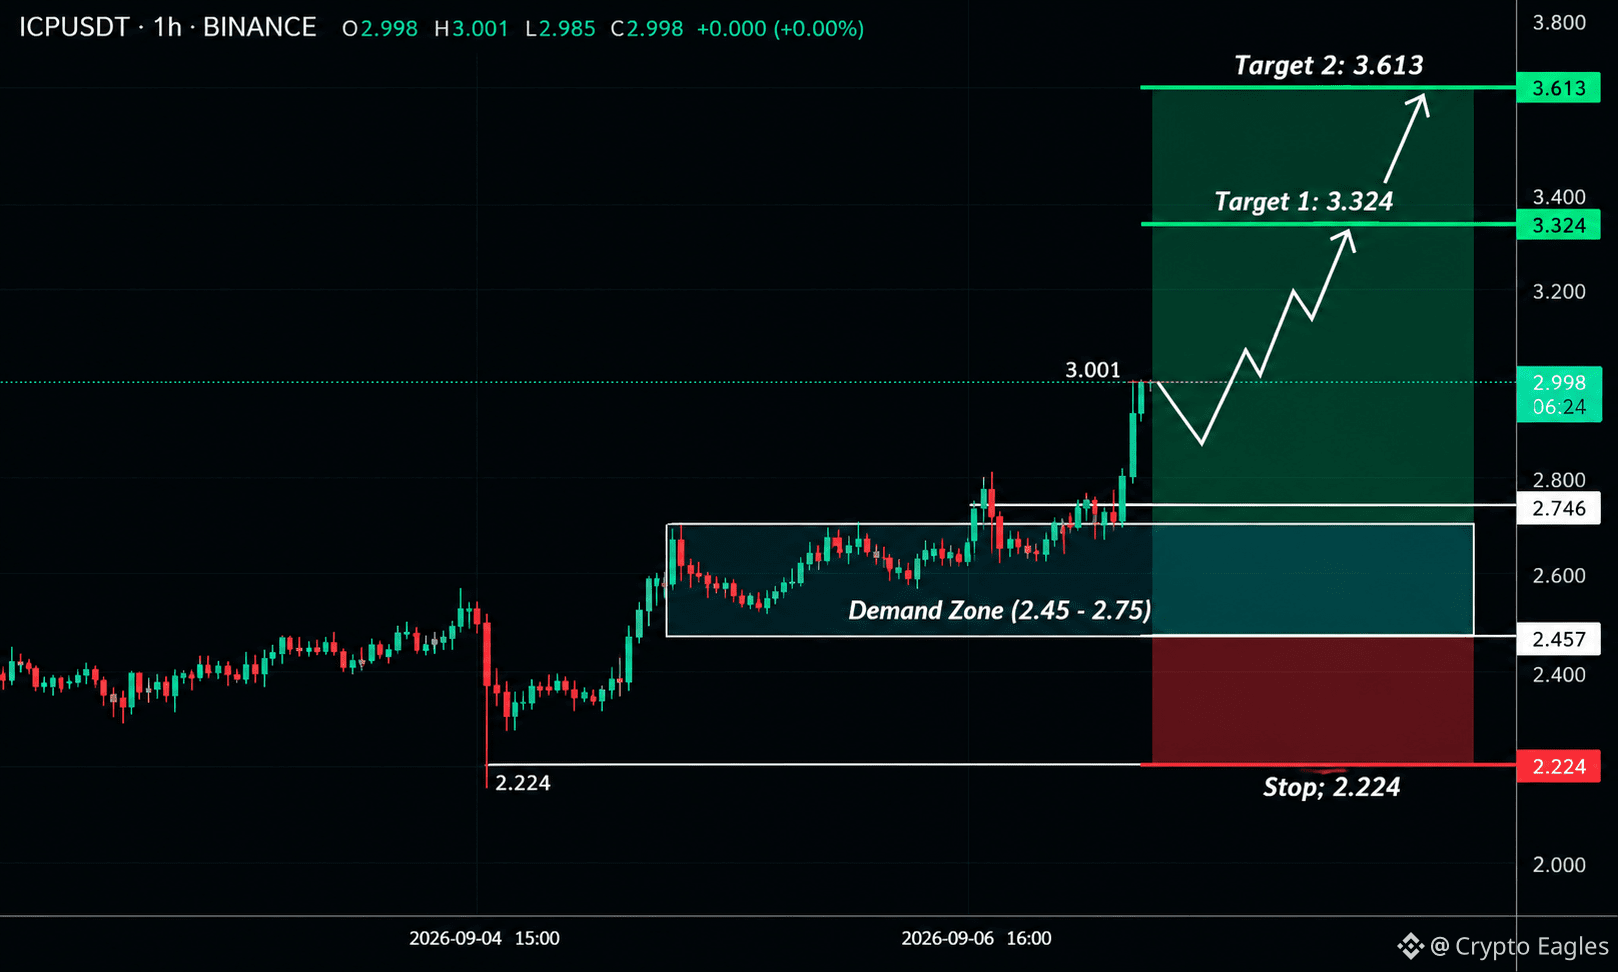
$ICP Long Setup
ICP has broken out strongly from the 2.45–2.75 demand zone and reclaimed the key 2.746 resistance with bullish momentum. A successful retest above this level could push price toward 3.324 and then 3.613.
Entry: 2.75–3.00
TP1: 3.324
TP2: 3.613
SL: 2.224
Holding above 2.746 keeps the bullish structure intact; losing the demand zone would invalidate the setup. Momentum remains bullish.
$DOOD
$XAN
ICP has broken out strongly from the 2.45–2.75 demand zone and reclaimed the key 2.746 resistance with bullish momentum. A successful retest above this level could push price toward 3.324 and then 3.613.
Entry: 2.75–3.00
TP1: 3.324
TP2: 3.613
SL: 2.224
Holding above 2.746 keeps the bullish structure intact; losing the demand zone would invalidate the setup. Momentum remains bullish.
$DOOD
$XAN
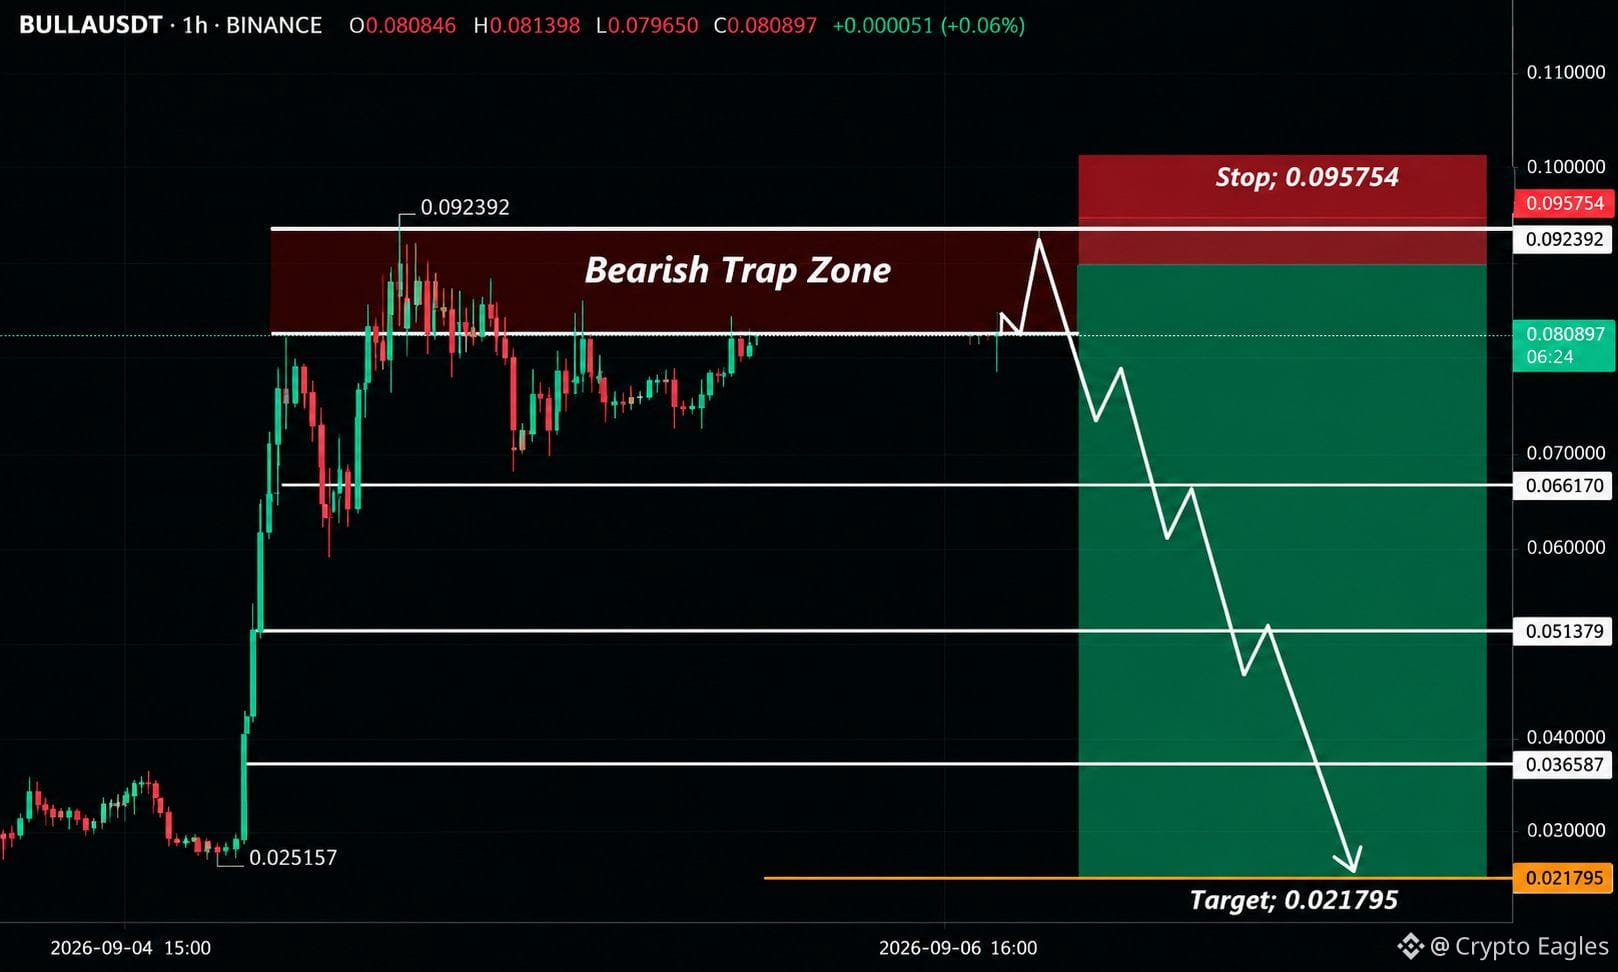
$BULLA Short Setup 🔻
Entry: 0.0809 – 0.0924
SL: 0.09575
TP1: 0.06617
TP2: 0.05138
TP3: 0.03659
Final Target: 0.02180
$BULL is trading inside a clear Bearish Trap Zone below the 0.09239 resistance. A rejection here can trigger a broader downside move, with 0.06617 as the first major support. A clean break below it opens 0.05138 → 0.03659.
$DOOD
$XAN
Entry: 0.0809 – 0.0924
SL: 0.09575
TP1: 0.06617
TP2: 0.05138
TP3: 0.03659
Final Target: 0.02180
$BULL is trading inside a clear Bearish Trap Zone below the 0.09239 resistance. A rejection here can trigger a broader downside move, with 0.06617 as the first major support. A clean break below it opens 0.05138 → 0.03659.
$DOOD
$XAN
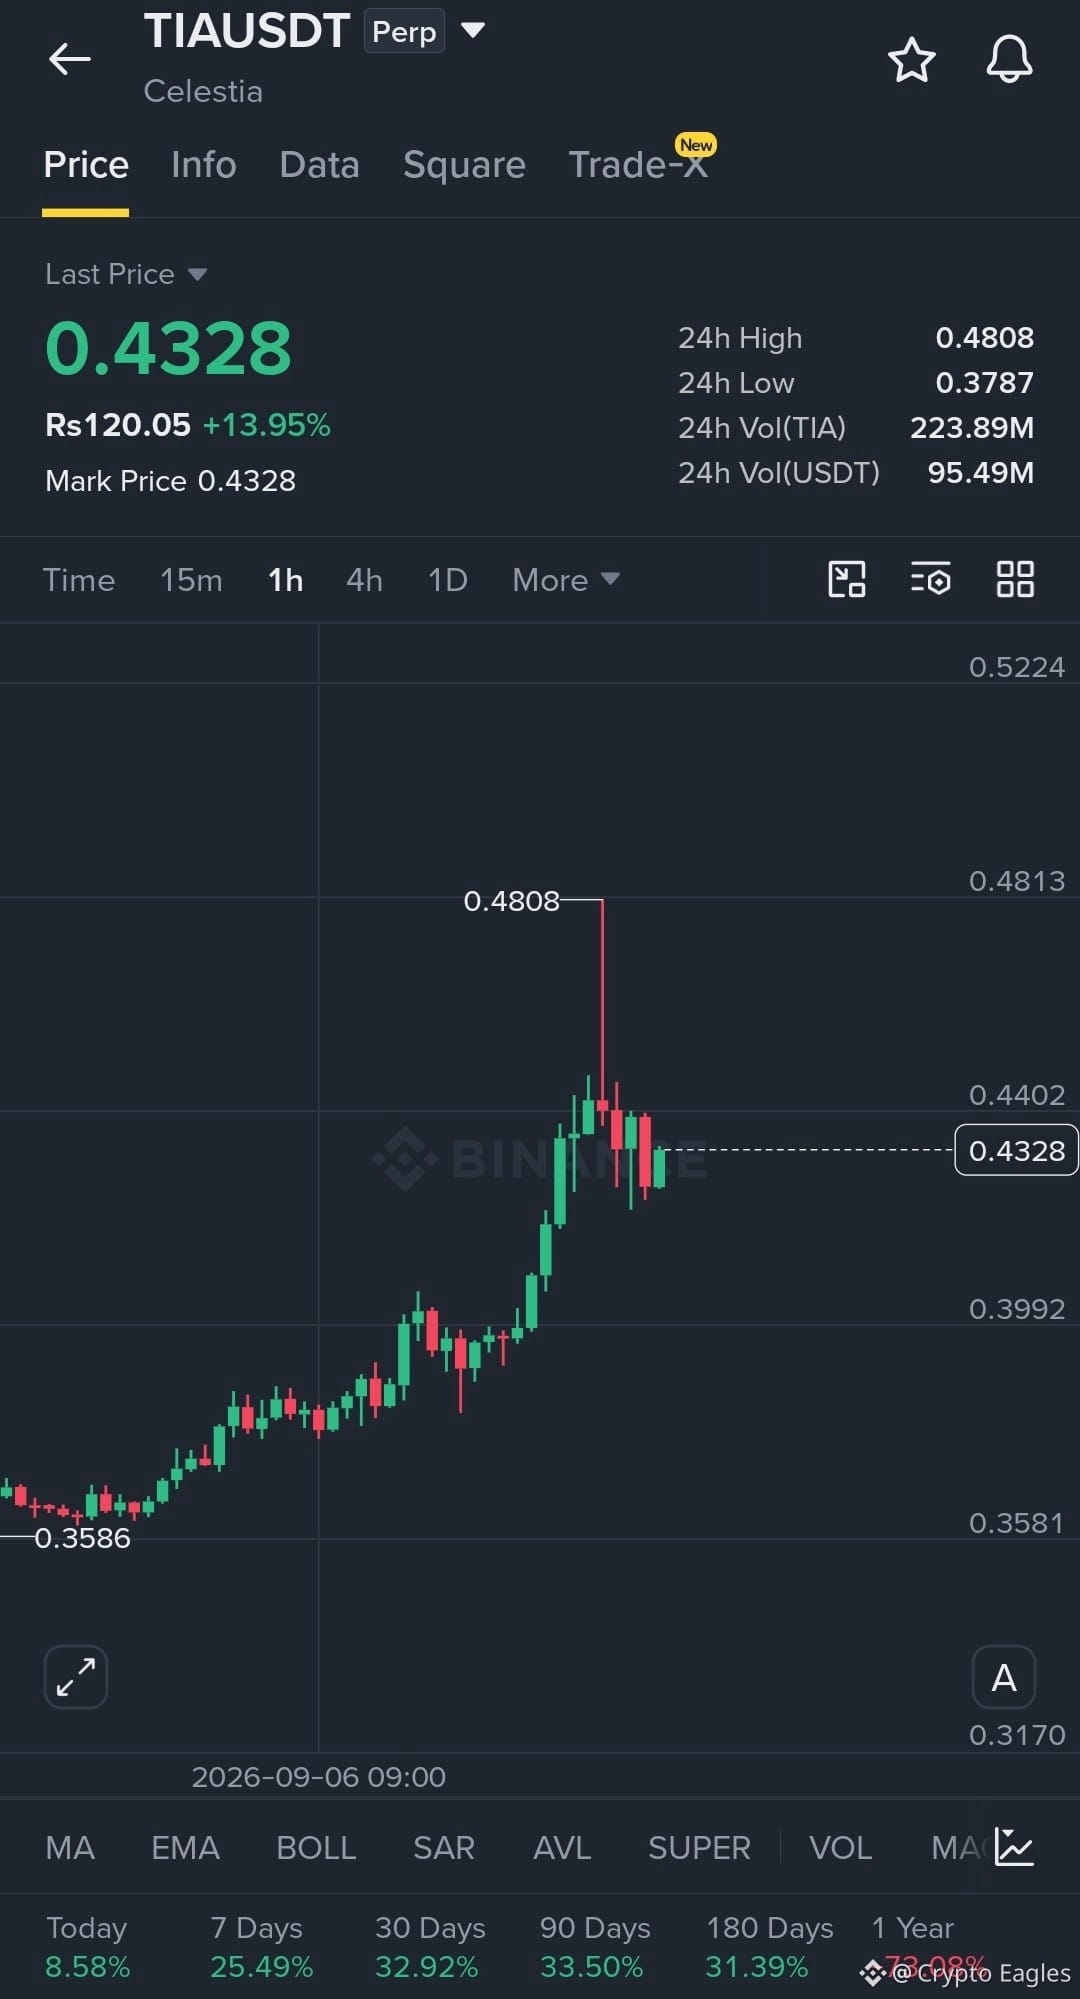
$TIA Long Setup
Entry: 0.425 – 0.435
SL: 0.398
TP1: 0.4808
TP2: 0.5224
TP3: 0.5600
TIA has made a strong bullish move from 0.3586 and is consolidating after the rejection at 0.4808. Holding above 0.3992 keeps the bullish structure intact. A breakout above 0.4808 can trigger the next leg higher.
$DOOD
$NAORIS
Entry: 0.425 – 0.435
SL: 0.398
TP1: 0.4808
TP2: 0.5224
TP3: 0.5600
TIA has made a strong bullish move from 0.3586 and is consolidating after the rejection at 0.4808. Holding above 0.3992 keeps the bullish structure intact. A breakout above 0.4808 can trigger the next leg higher.
$DOOD
$NAORIS
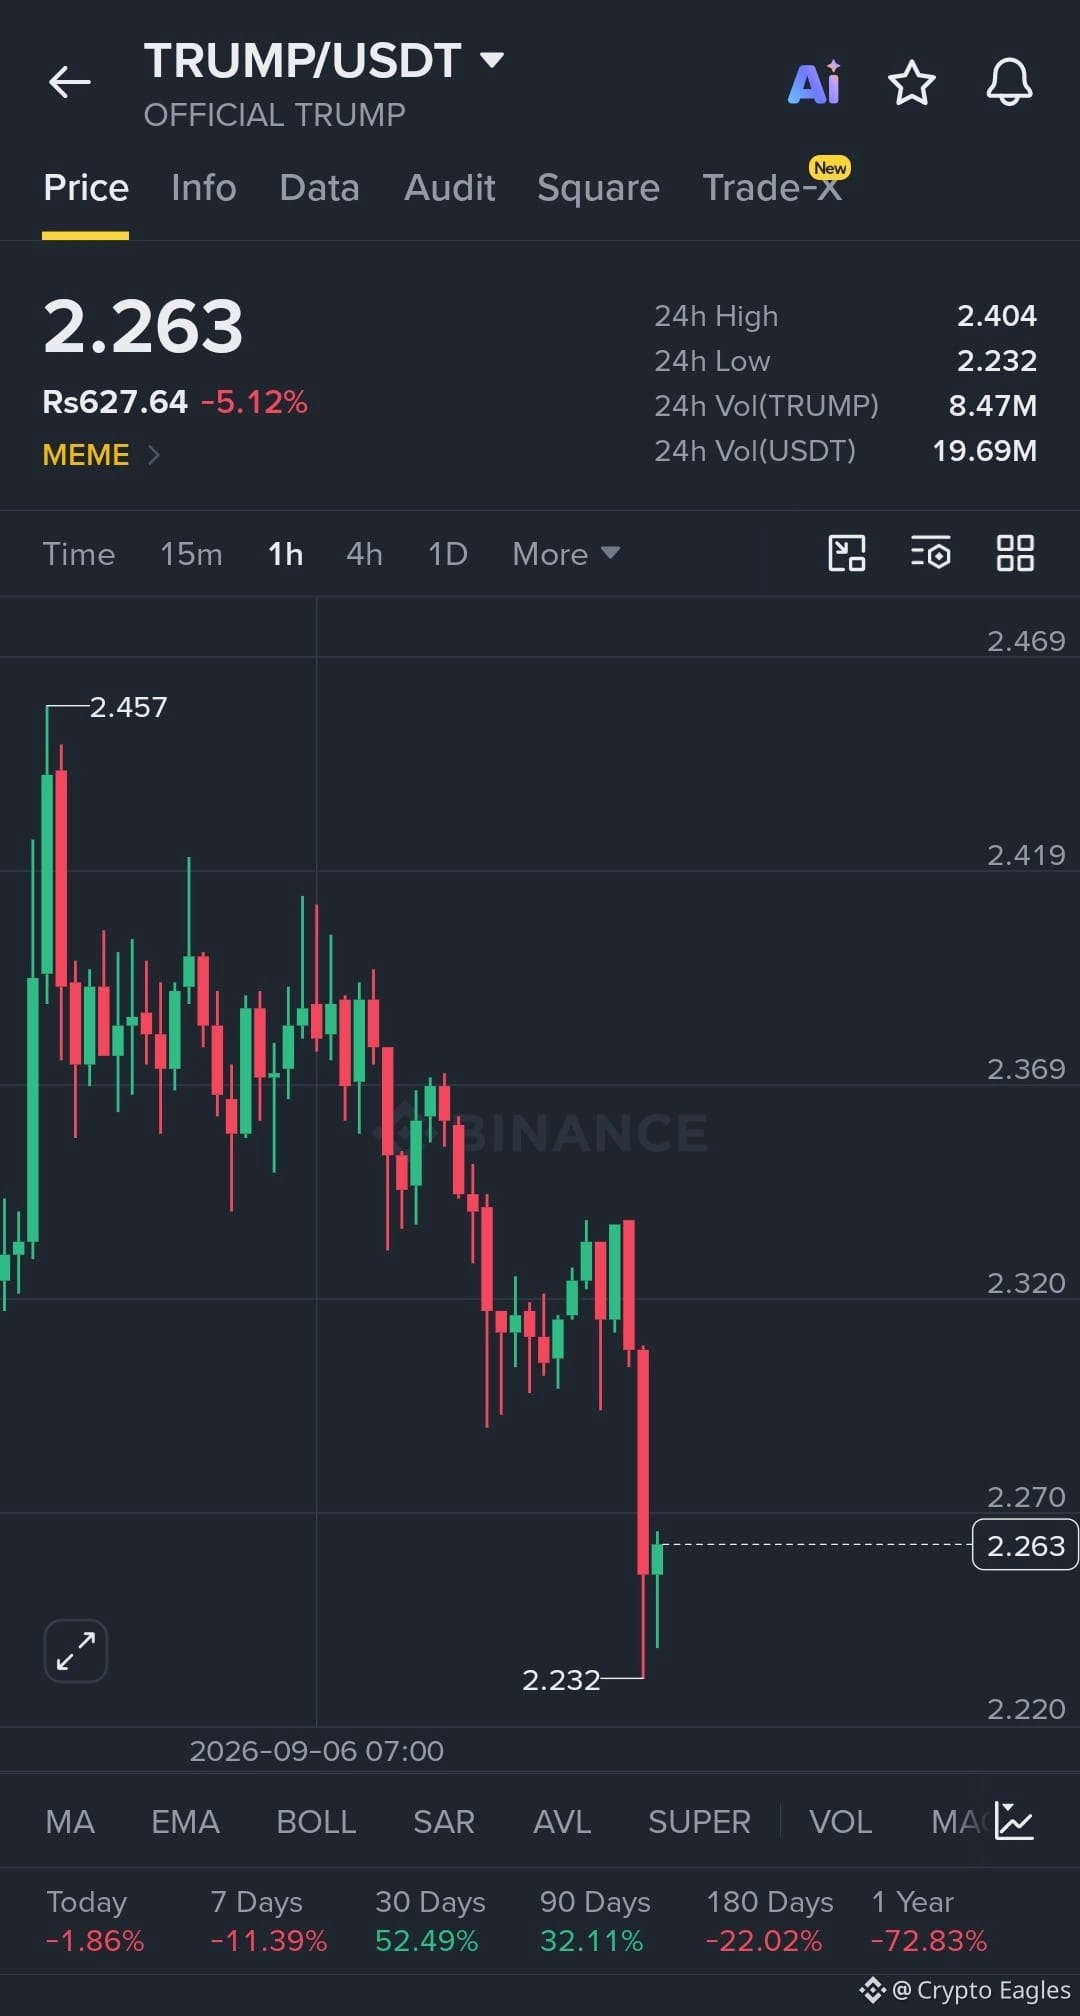
$TRUMP Long Setup
Entry: 2.25 – 2.27
SL: 2.22
TP1: 2.30
TP2: 2.35
TP3: 2.42
Price bounced from the 2.232 low, so a hold above 2.25 can trigger a recovery toward 2.30–2.35. A break below 2.22 invalidates the long setup.
$RAYSOL
$AVAX
Entry: 2.25 – 2.27
SL: 2.22
TP1: 2.30
TP2: 2.35
TP3: 2.42
Price bounced from the 2.232 low, so a hold above 2.25 can trigger a recovery toward 2.30–2.35. A break below 2.22 invalidates the long setup.
$RAYSOL
$AVAX
$TAO Long Setup
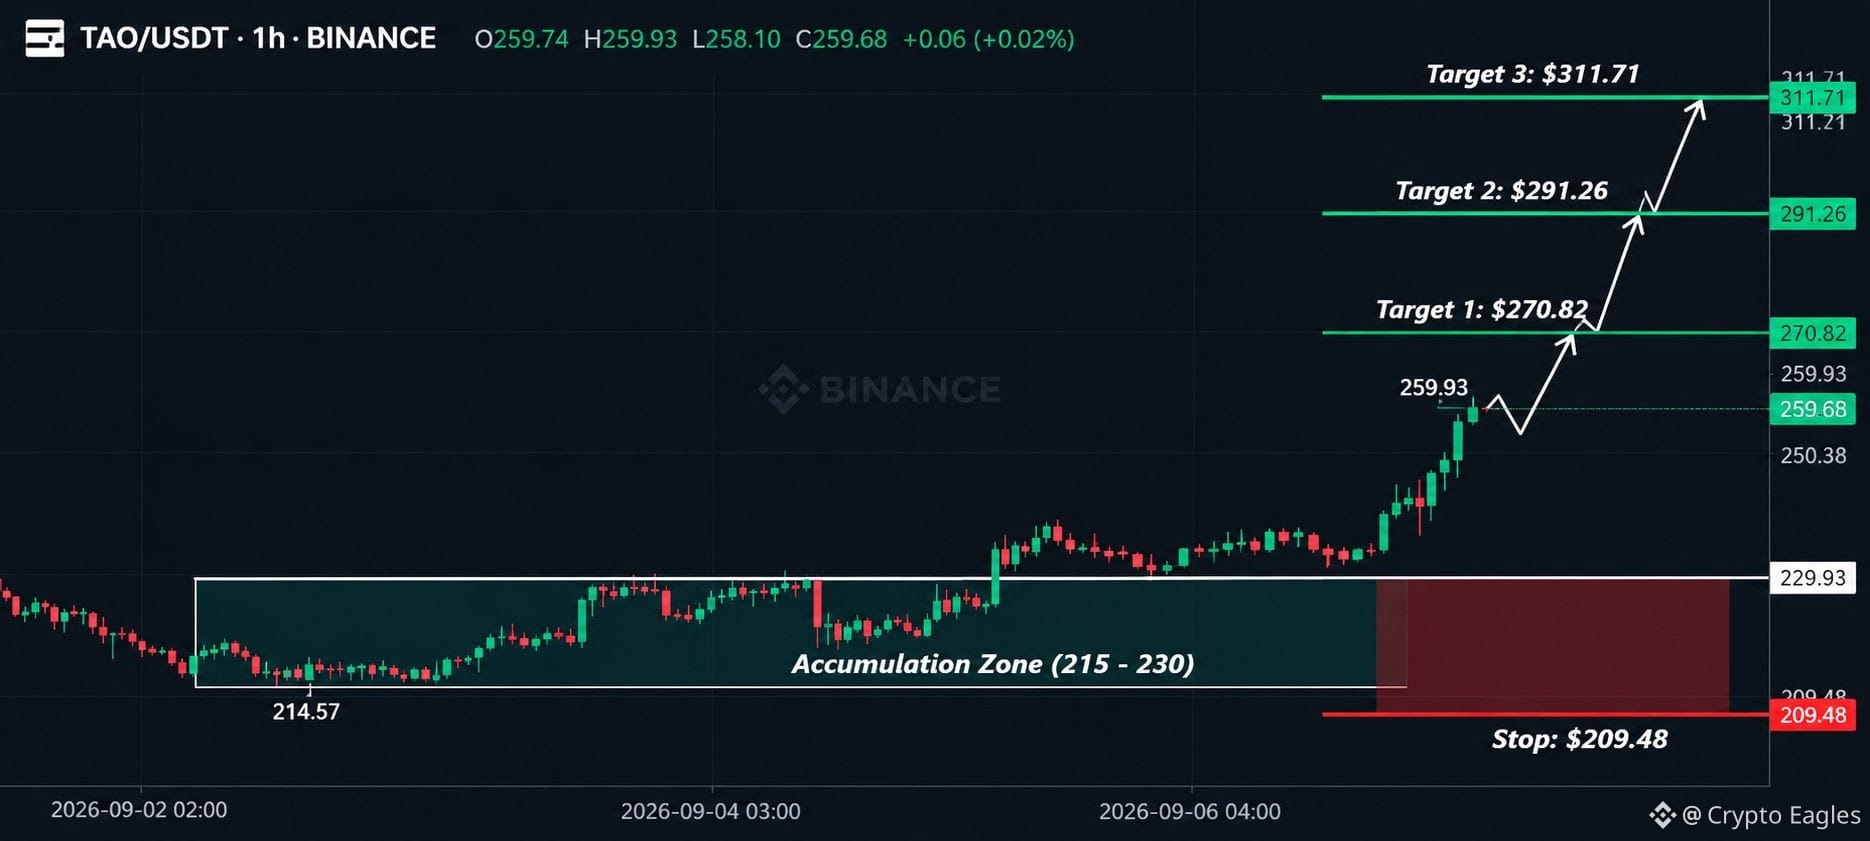
TAO has broken out strongly from the 215–230 accumulation zone and is now holding around 259.68 after reclaiming the 229.93 resistance.
TP1: $270.82
TP2: $291.26
TP3: $311.71
Stop: $209.48
As long as price holds above the breakout structure, momentum remains bullish. A sustained move above $270.82 could open the path toward $291.26 → $311.71.
$RAYSOL
$FLOCK
TAO has broken out strongly from the 215–230 accumulation zone and is now holding around 259.68 after reclaiming the 229.93 resistance.
TP1: $270.82
TP2: $291.26
TP3: $311.71
Stop: $209.48
As long as price holds above the breakout structure, momentum remains bullish. A sustained move above $270.82 could open the path toward $291.26 → $311.71.
$RAYSOL
$FLOCK
$JUP Long Setup
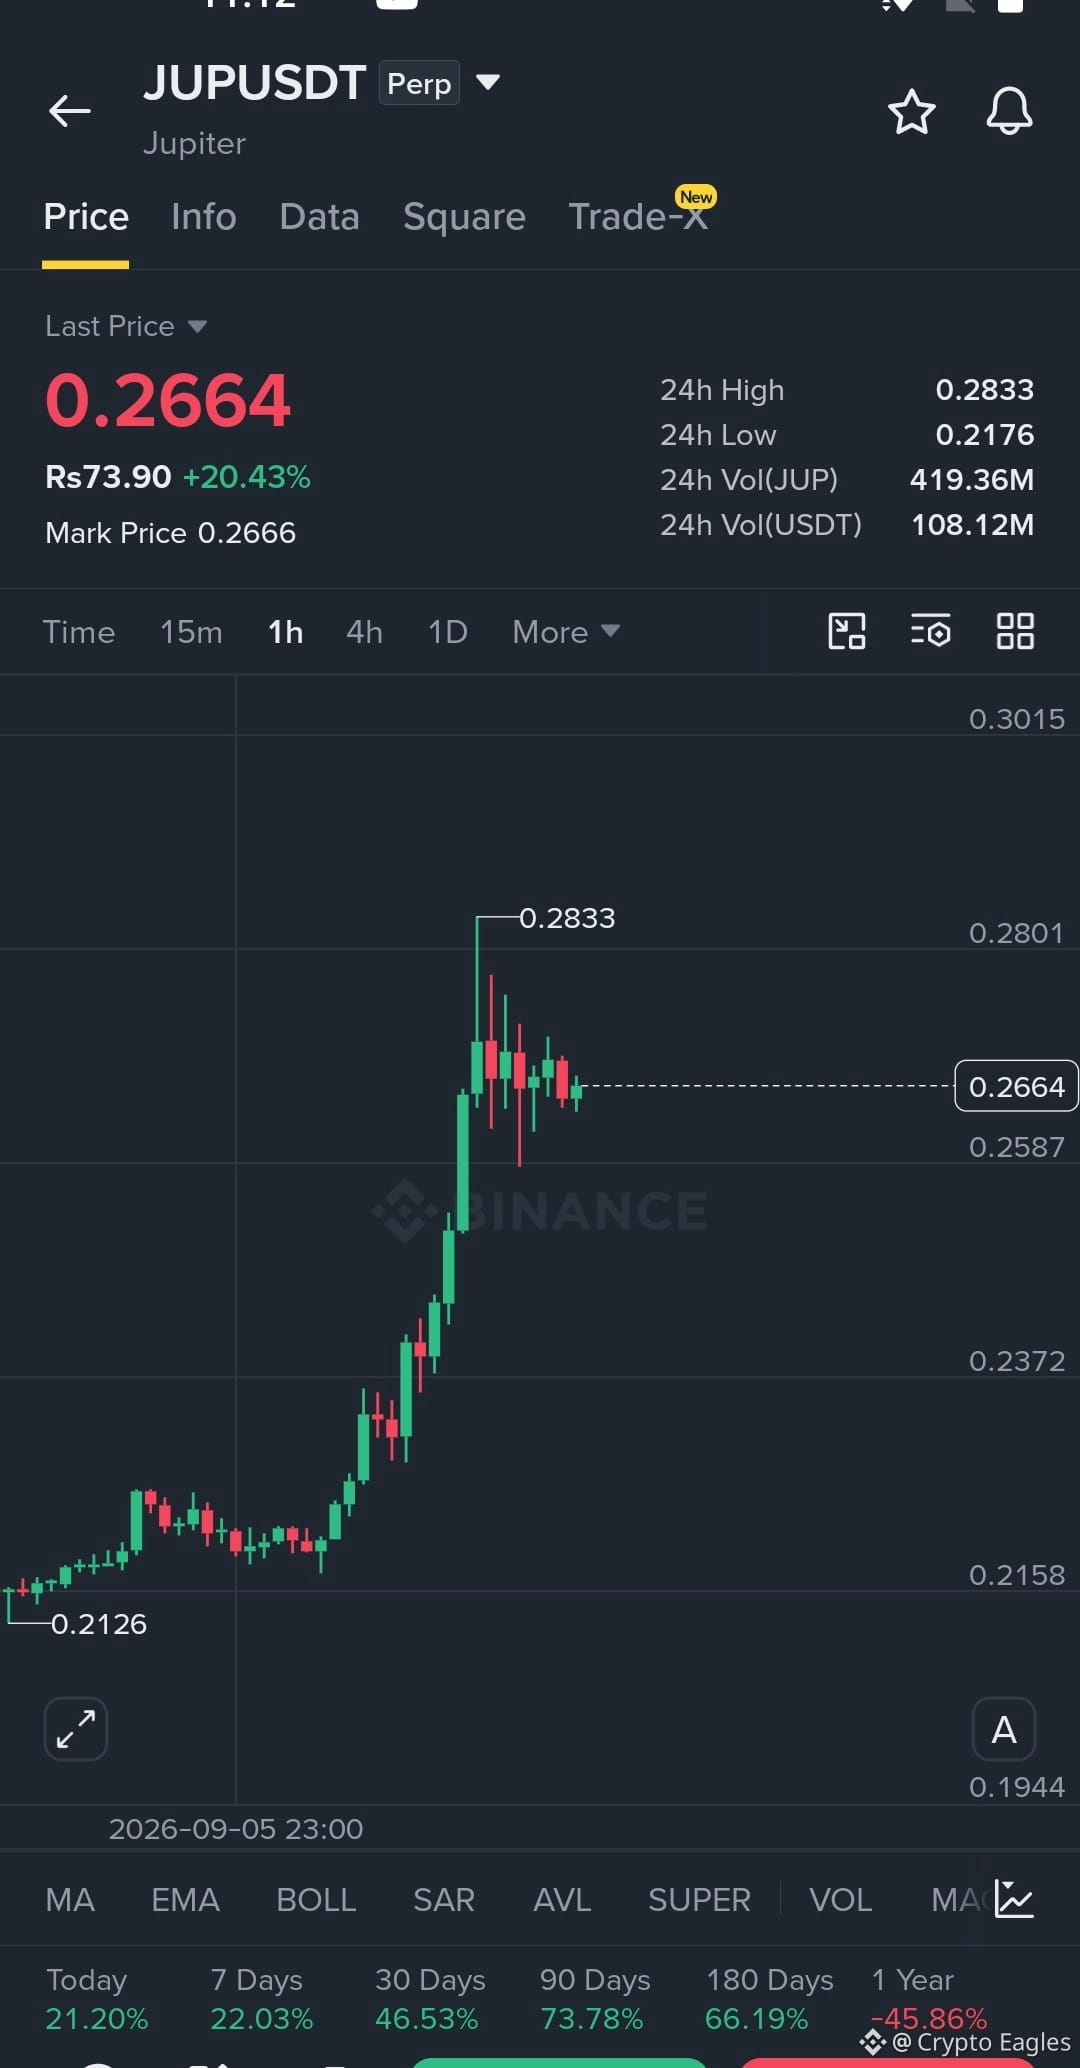
Entry: 0.260 – 0.267
SL: 0.255
TP1: 0.280
TP2: 0.2833
TP3: 0.3015
JUP has made a strong 1H breakout from the 0.237 area and is now consolidating near 0.266. Holding 0.2587 keeps the bullish structure intact; a clean break above 0.2833 can trigger the next leg higher.
$RAYSOL
$FLOCK
Entry: 0.260 – 0.267
SL: 0.255
TP1: 0.280
TP2: 0.2833
TP3: 0.3015
JUP has made a strong 1H breakout from the 0.237 area and is now consolidating near 0.266. Holding 0.2587 keeps the bullish structure intact; a clean break above 0.2833 can trigger the next leg higher.
$RAYSOL
$FLOCK
Polymarket Is Where Narratives Become Markets 👀
One reason I’m watching Polymarket closely is its ability to turn major global events into tradable probabilities.
Crypto, AI, politics, economics and sports all have their own markets, giving users a chance to trade areas where they actually have knowledge.
The brief highlights 250K to 500K monthly active traders, 17M+ monthly website visits and projected $18B trading volume for 2025.
With prediction-market projects like $GNO , and $THALES already building in this sector, @Polymarket growing attention makes the prediction-market narrative worth watching.
For me, this is bigger than betting on outcomes. It is about markets turning information into probabilities.
DYOR.
One reason I’m watching Polymarket closely is its ability to turn major global events into tradable probabilities.
Crypto, AI, politics, economics and sports all have their own markets, giving users a chance to trade areas where they actually have knowledge.
The brief highlights 250K to 500K monthly active traders, 17M+ monthly website visits and projected $18B trading volume for 2025.
With prediction-market projects like $GNO , and $THALES already building in this sector, @Polymarket growing attention makes the prediction-market narrative worth watching.
For me, this is bigger than betting on outcomes. It is about markets turning information into probabilities.
DYOR.

$ZEC Long Setup
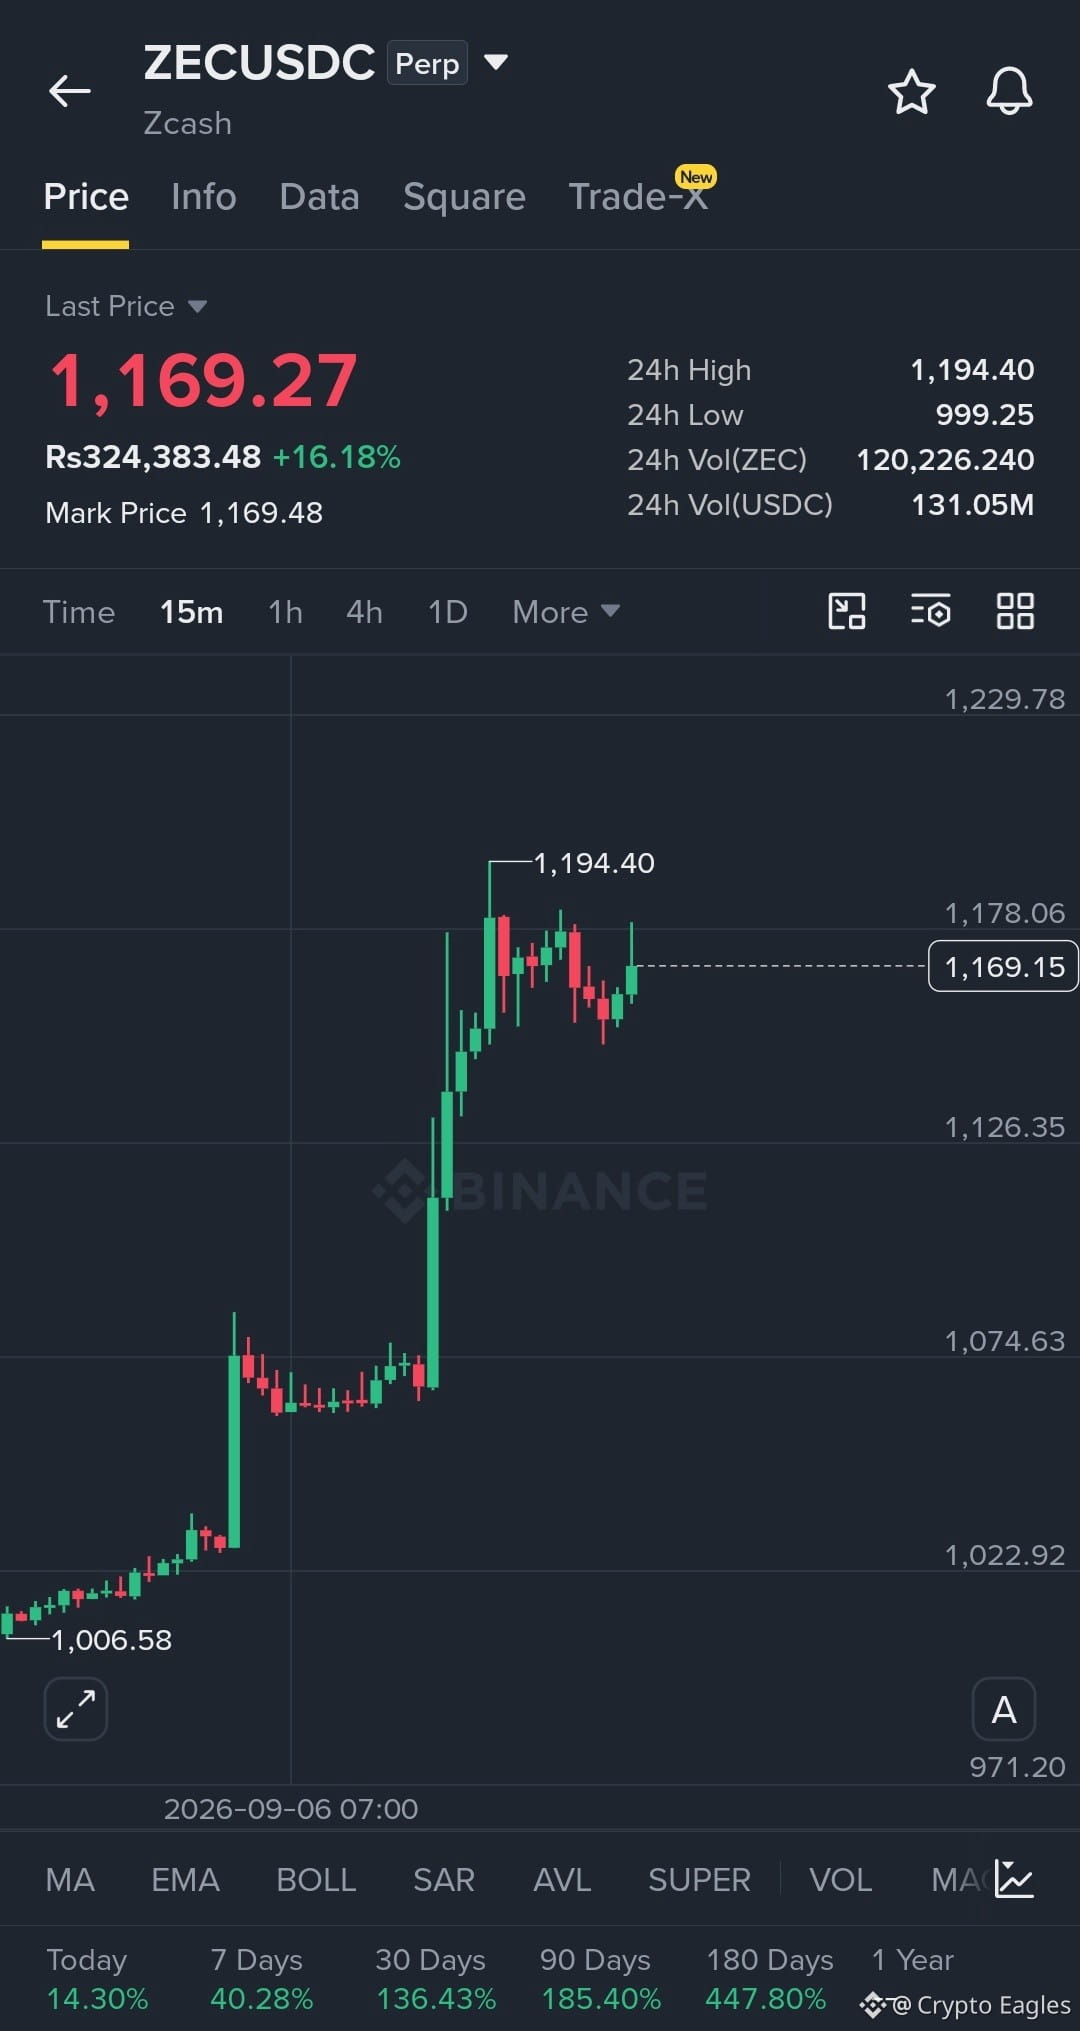
Entry: 1,155 – 1,175
SL: 1,125
TP1: 1,195
TP2: 1,230
TP3: 1,275
ZEC is holding a strong bullish structure after the sharp breakout. Price is consolidating just below 1,194 resistance; a clean breakout and hold above this level can trigger the next upside move. Losing 1,125 would weaken the setup.
$FLOCK
$ARB
Entry: 1,155 – 1,175
SL: 1,125
TP1: 1,195
TP2: 1,230
TP3: 1,275
ZEC is holding a strong bullish structure after the sharp breakout. Price is consolidating just below 1,194 resistance; a clean breakout and hold above this level can trigger the next upside move. Losing 1,125 would weaken the setup.
$FLOCK
$ARB
$IOST Long Setup
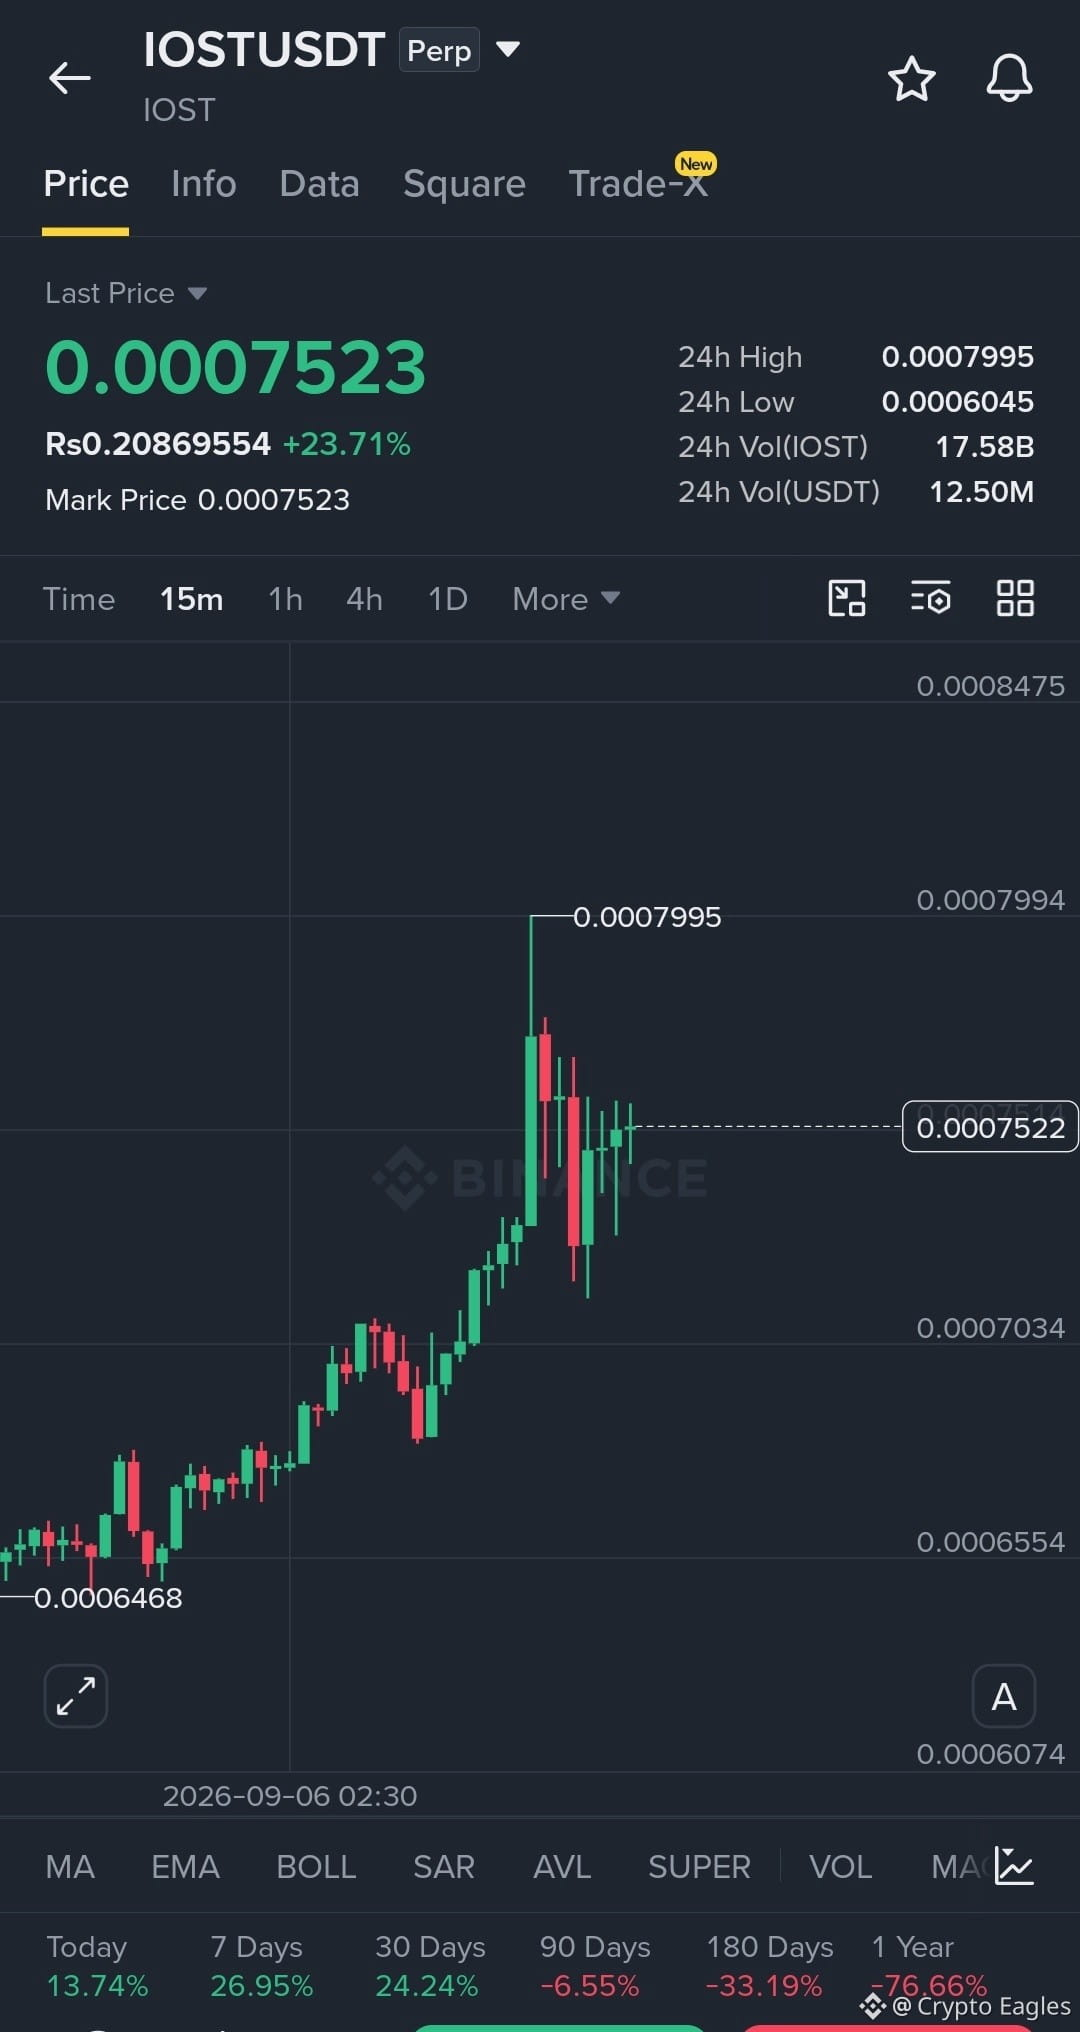
Entry: 0.000735 – 0.000755
SL: 0.000703
TP1: 0.000800
TP2: 0.000847
TP3: 0.000900
IOST is holding a strong bullish structure on the 15m chart after breaking higher from the 0.000703 area. A clean breakout above 0.000800 can trigger the next upside move. Losing 0.000703 invalidates the setup.
$ARB
$UAI
Entry: 0.000735 – 0.000755
SL: 0.000703
TP1: 0.000800
TP2: 0.000847
TP3: 0.000900
IOST is holding a strong bullish structure on the 15m chart after breaking higher from the 0.000703 area. A clean breakout above 0.000800 can trigger the next upside move. Losing 0.000703 invalidates the setup.
$ARB
$UAI
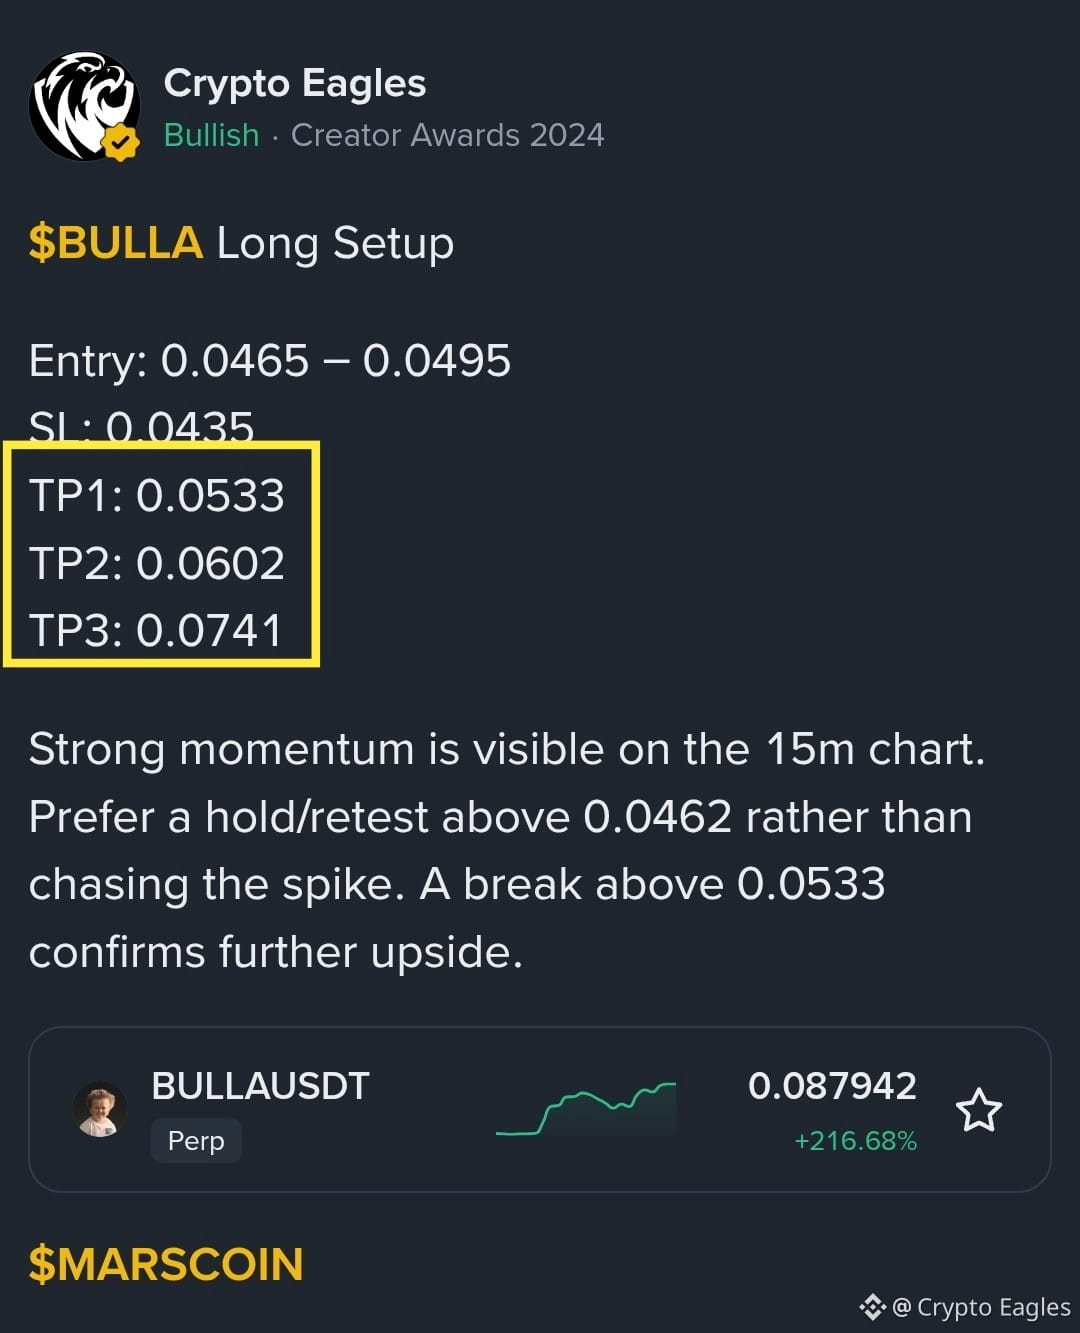
$BULLA ALL TARGETS ACHIEVED
$AKE
$4
$AKE
$4
Crypto Eagles
·
--
Bullish$BULLA Long Setup
Entry: 0.0465 – 0.0495
SL: 0.0435
TP1: 0.0533
TP2: 0.0602
TP3: 0.0741
Strong momentum is visible on the 15m chart. Prefer a hold/retest above 0.0462 rather than chasing the spike. A break above 0.0533 confirms further upside.
$MARSCOIN
$4
Entry: 0.0465 – 0.0495
SL: 0.0435
TP1: 0.0533
TP2: 0.0602
TP3: 0.0741
Strong momentum is visible on the 15m chart. Prefer a hold/retest above 0.0462 rather than chasing the spike. A break above 0.0533 confirms further upside.
$MARSCOIN
$4
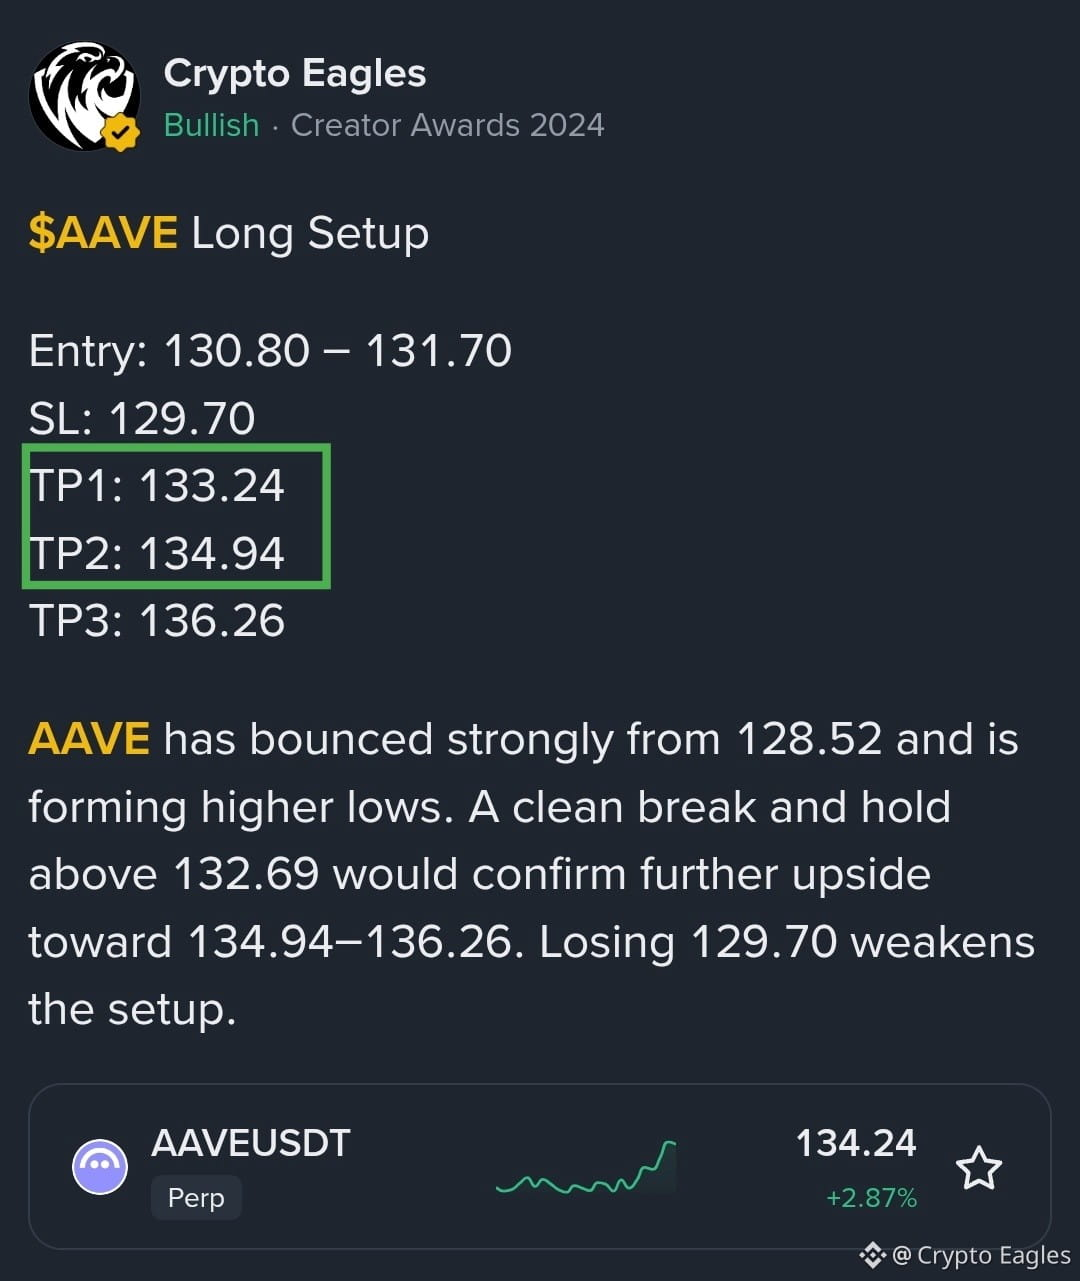
$AAVE TP1 TP2 TARGETS ACHIEVED
$BULLA
$4
$BULLA
$4
Crypto Eagles
·
--
Bullish$AAVE Long Setup
Entry: 130.80 – 131.70
SL: 129.70
TP1: 133.24
TP2: 134.94
TP3: 136.26
AAVE has bounced strongly from 128.52 and is forming higher lows. A clean break and hold above 132.69 would confirm further upside toward 134.94–136.26. Losing 129.70 weakens the setup.
$BULLA
$4
Entry: 130.80 – 131.70
SL: 129.70
TP1: 133.24
TP2: 134.94
TP3: 136.26
AAVE has bounced strongly from 128.52 and is forming higher lows. A clean break and hold above 132.69 would confirm further upside toward 134.94–136.26. Losing 129.70 weakens the setup.
$BULLA
$4
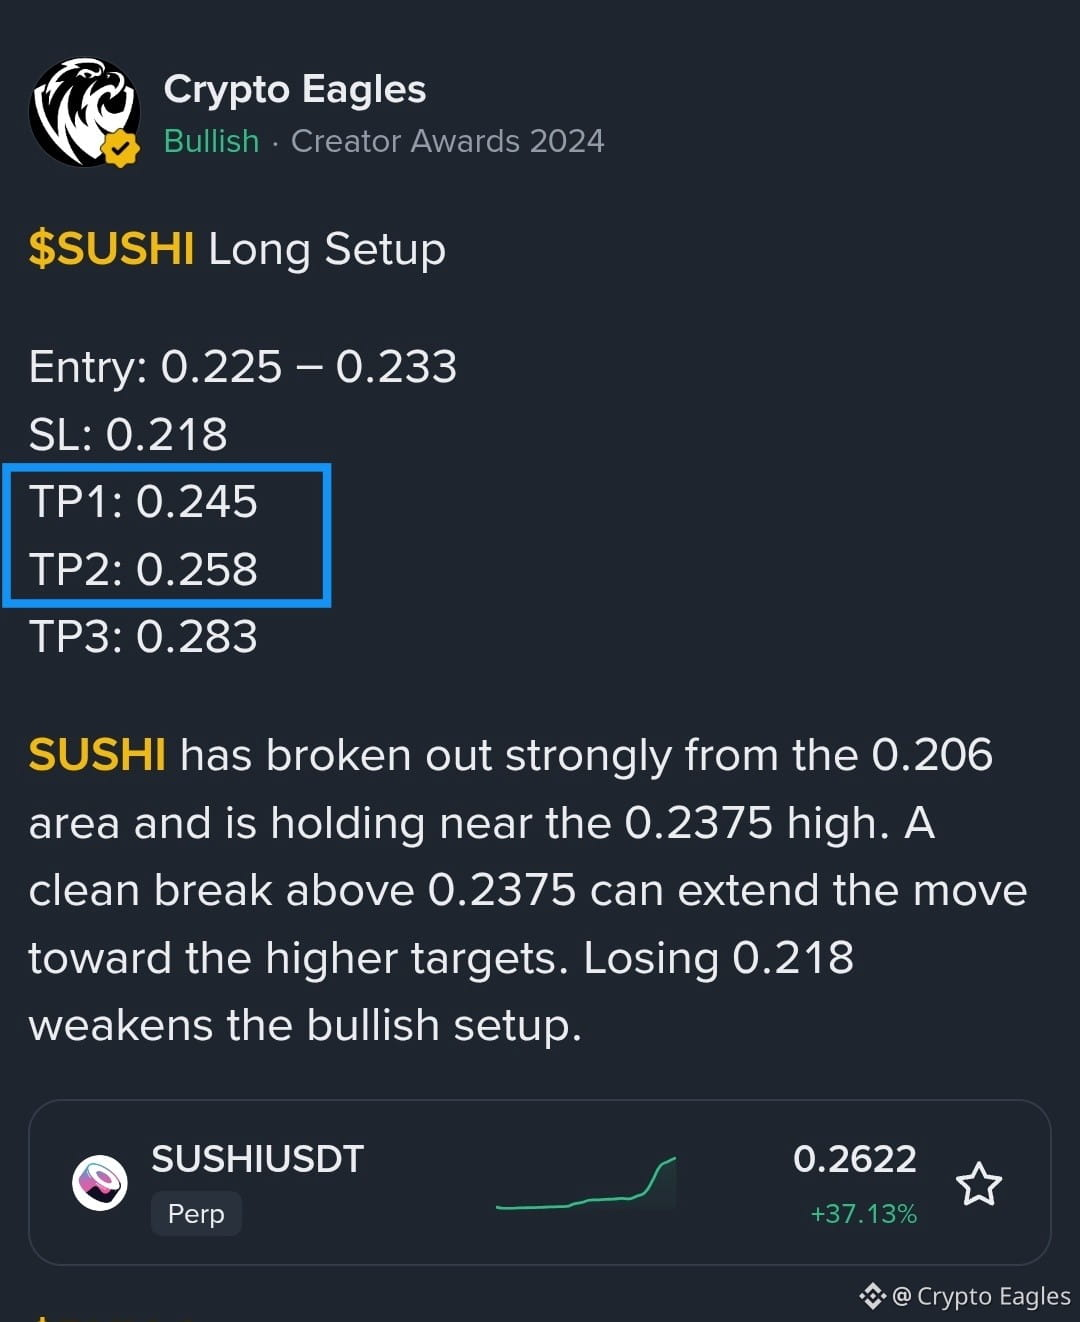
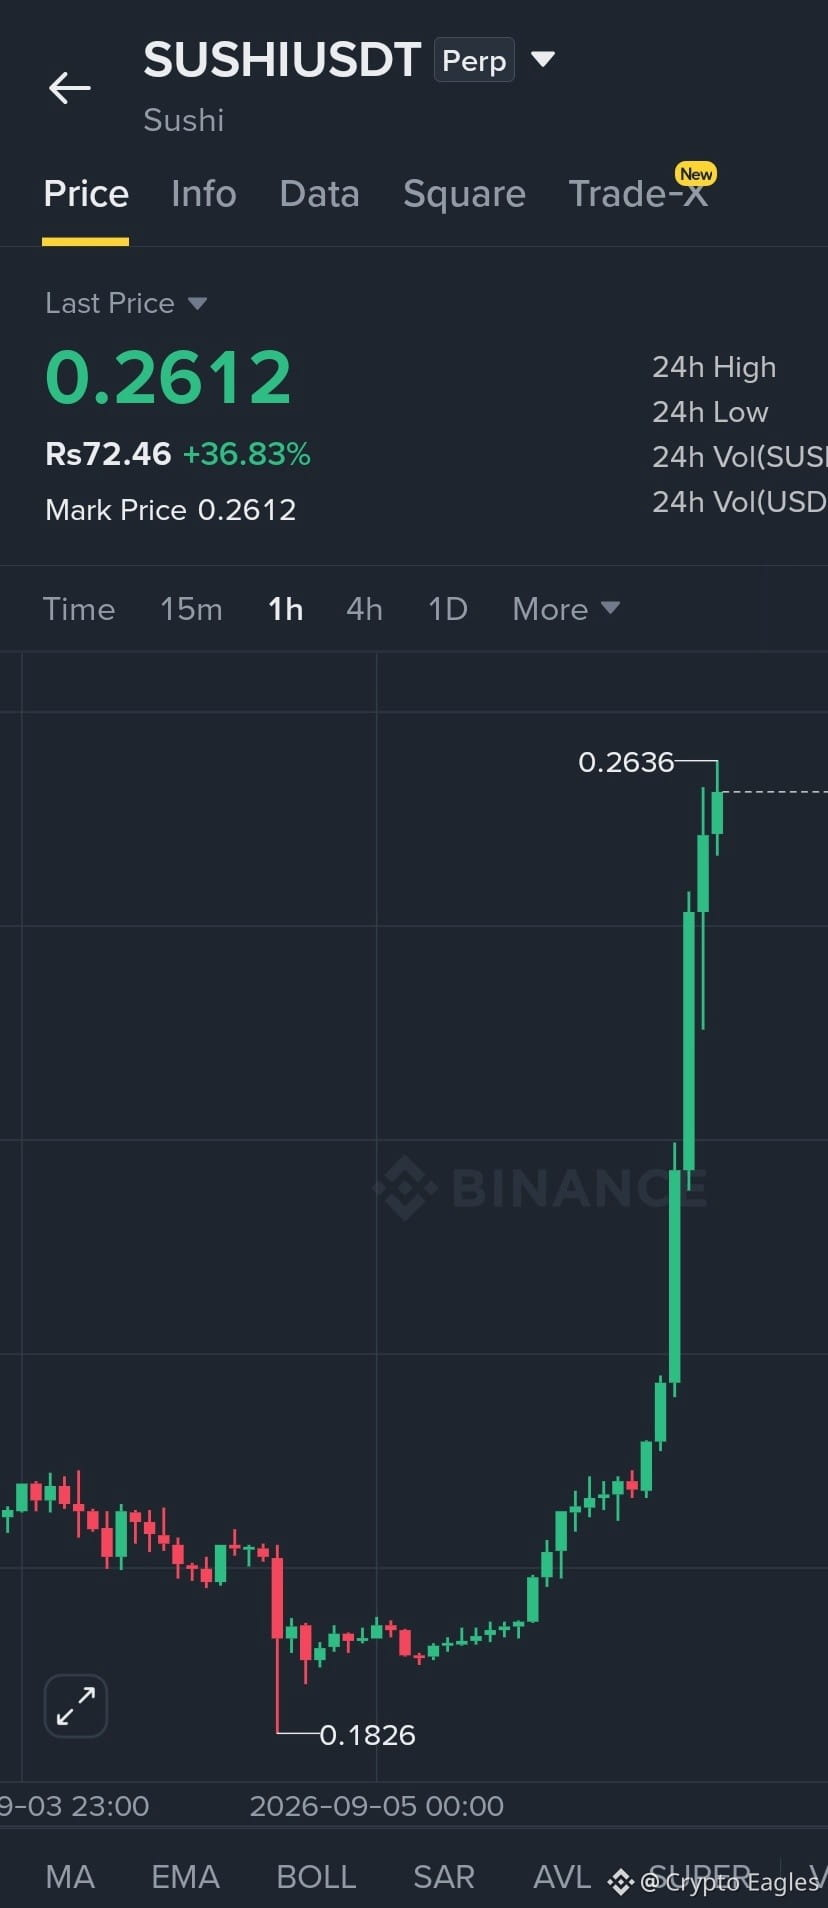
Big Congratulations to Everyone on TP1 TP2 $SUSHI TARGETS ACHIEVED
Crypto Eagles
·
--
Bullish$SUSHI Long Setup
Entry: 0.225 – 0.233
SL: 0.218
TP1: 0.245
TP2: 0.258
TP3: 0.283
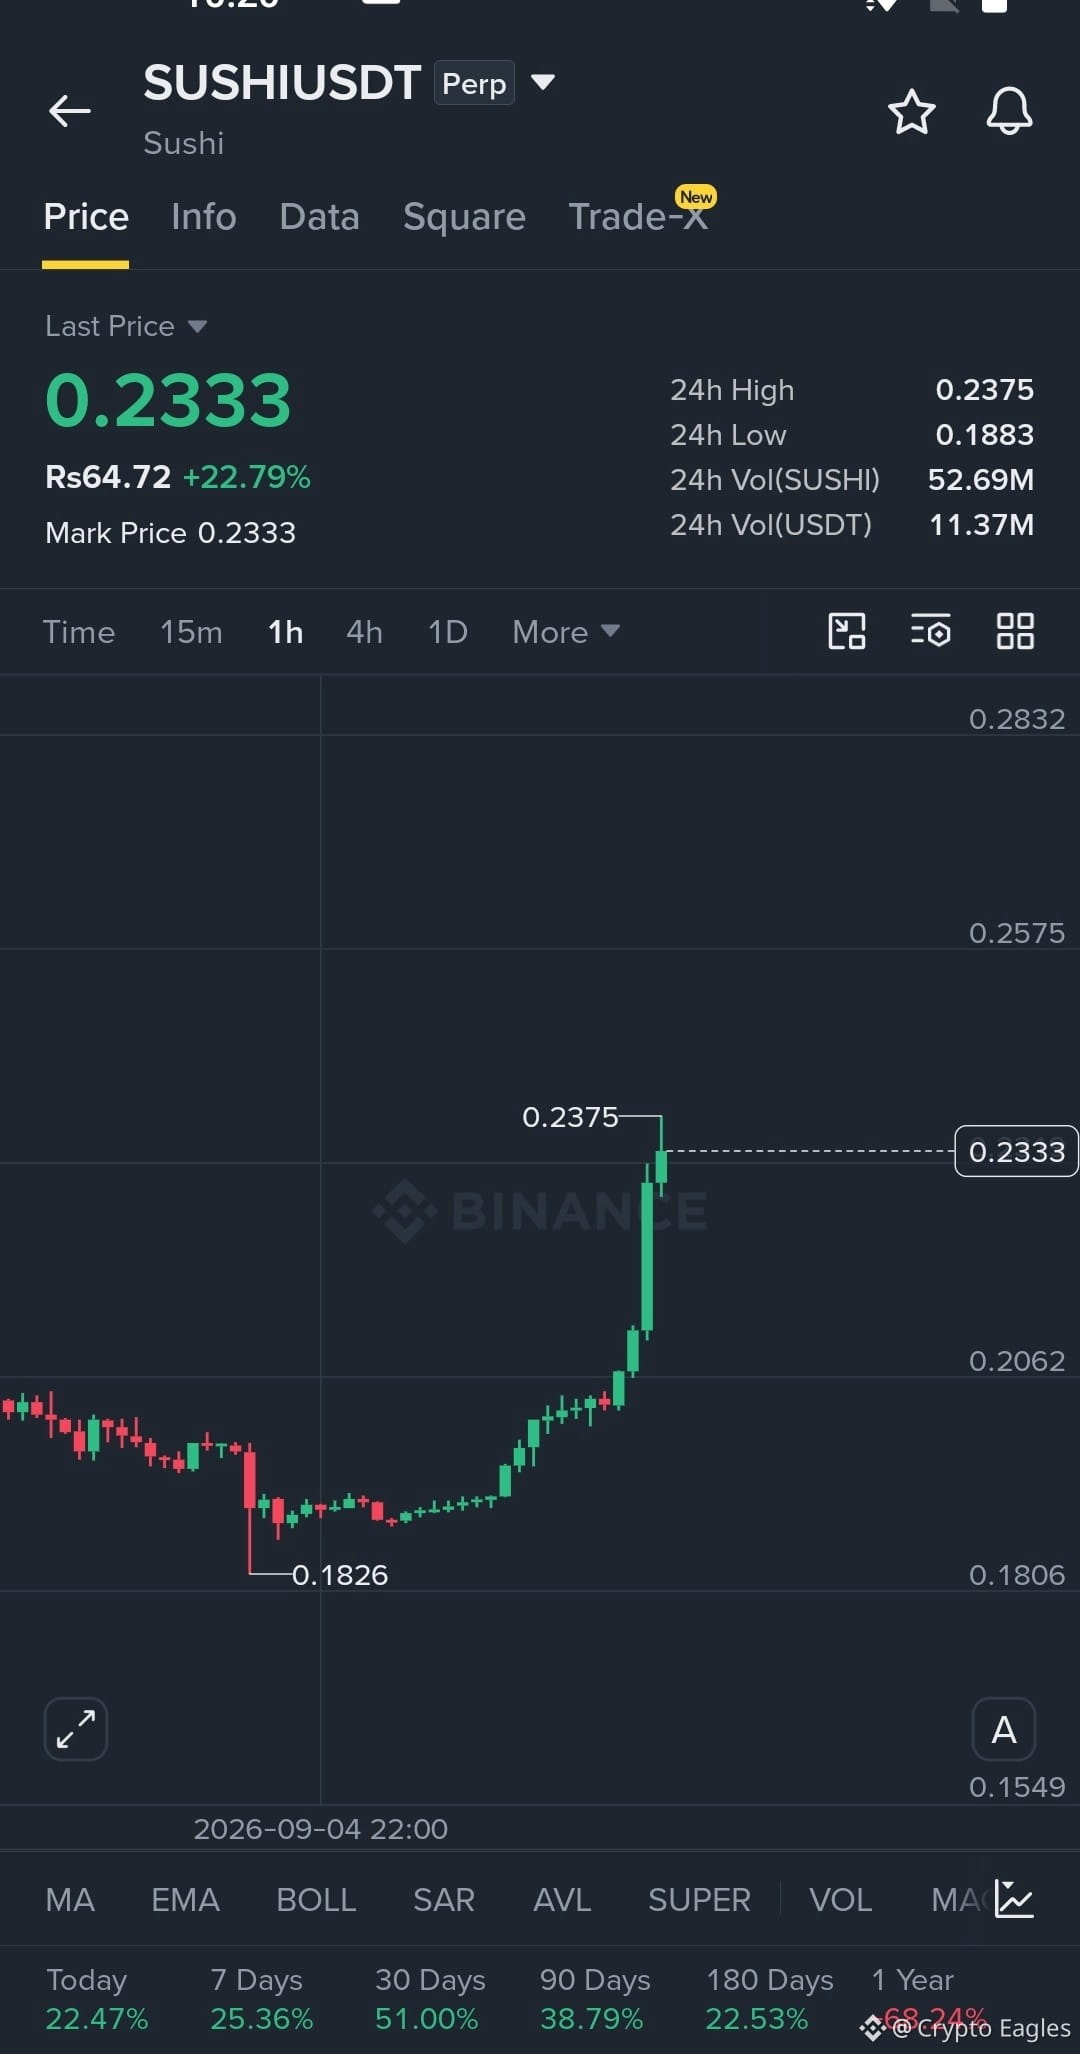
SUSHI has broken out strongly from the 0.206 area and is holding near the 0.2375 high. A clean break above 0.2375 can extend the move toward the higher targets. Losing 0.218 weakens the bullish setup.
$BULLA
$4
Entry: 0.225 – 0.233
SL: 0.218
TP1: 0.245
TP2: 0.258
TP3: 0.283
SUSHI has broken out strongly from the 0.206 area and is holding near the 0.2375 high. A clean break above 0.2375 can extend the move toward the higher targets. Losing 0.218 weakens the bullish setup.
$BULLA
$4
$SUSHI Long Setup
Entry: 0.225 – 0.233
SL: 0.218
TP1: 0.245
TP2: 0.258
TP3: 0.283
SUSHI has broken out strongly from the 0.206 area and is holding near the 0.2375 high. A clean break above 0.2375 can extend the move toward the higher targets. Losing 0.218 weakens the bullish setup.
$BULLA
$4
Entry: 0.225 – 0.233
SL: 0.218
TP1: 0.245
TP2: 0.258
TP3: 0.283
SUSHI has broken out strongly from the 0.206 area and is holding near the 0.2375 high. A clean break above 0.2375 can extend the move toward the higher targets. Losing 0.218 weakens the bullish setup.
$BULLA
$4
30D trade $BNB 424.6 USDT
$BNB Long Setup
Entry: 760 – 777
SL: 749
TP1: 784.45
TP2: 800
TP3: 814.95
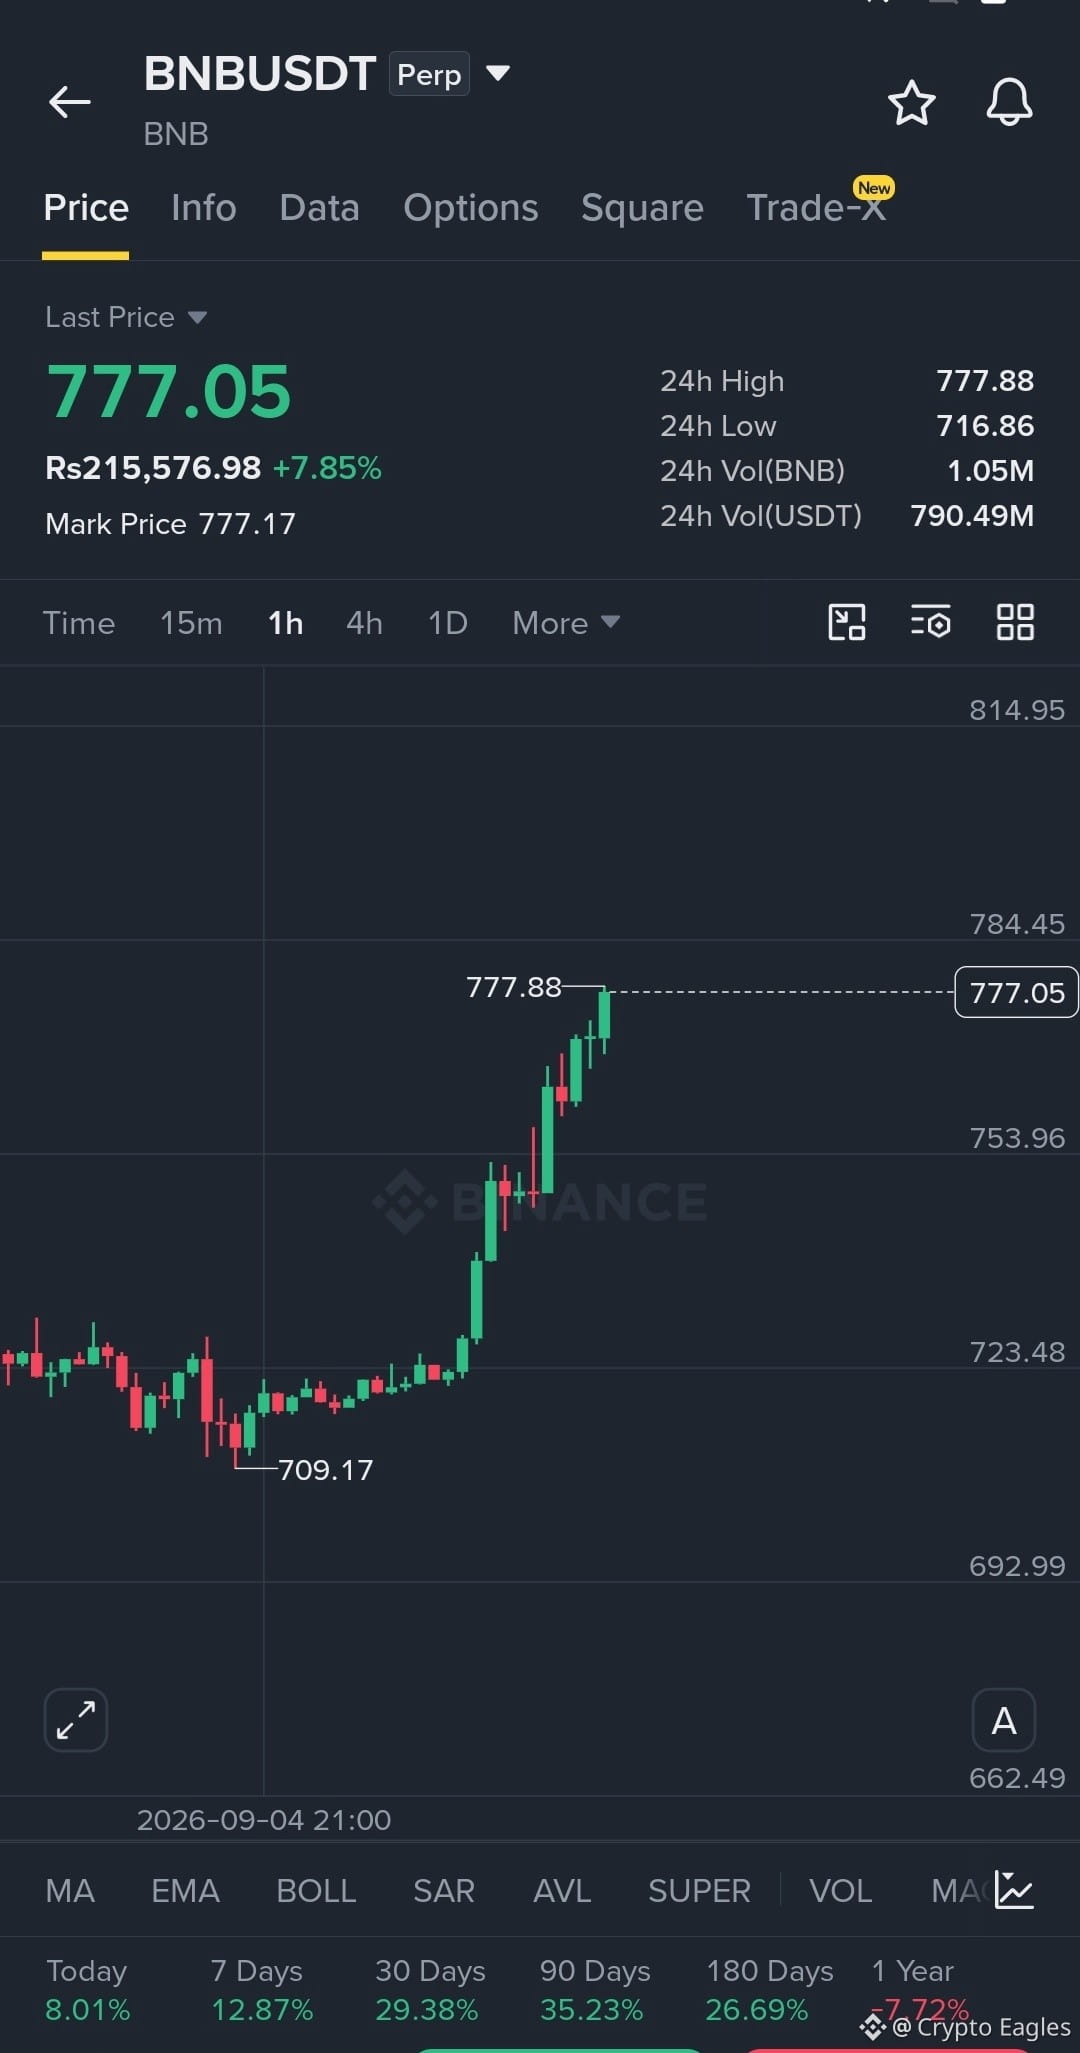
BNB is in a strong 1H bullish breakout, pushing from 723.48 toward the 777.88 high. A clean hold above 777.88 can extend the move toward 784.45 and 814.95. Losing 753.96 would weaken the bullish setup.
$BULLA
$4
Entry: 760 – 777
SL: 749
TP1: 784.45
TP2: 800
TP3: 814.95
BNB is in a strong 1H bullish breakout, pushing from 723.48 toward the 777.88 high. A clean hold above 777.88 can extend the move toward 784.45 and 814.95. Losing 753.96 would weaken the bullish setup.
$BULLA
$4
$AAVE Long Setup
Entry: 130.80 – 131.70
SL: 129.70
TP1: 133.24
TP2: 134.94
TP3: 136.26
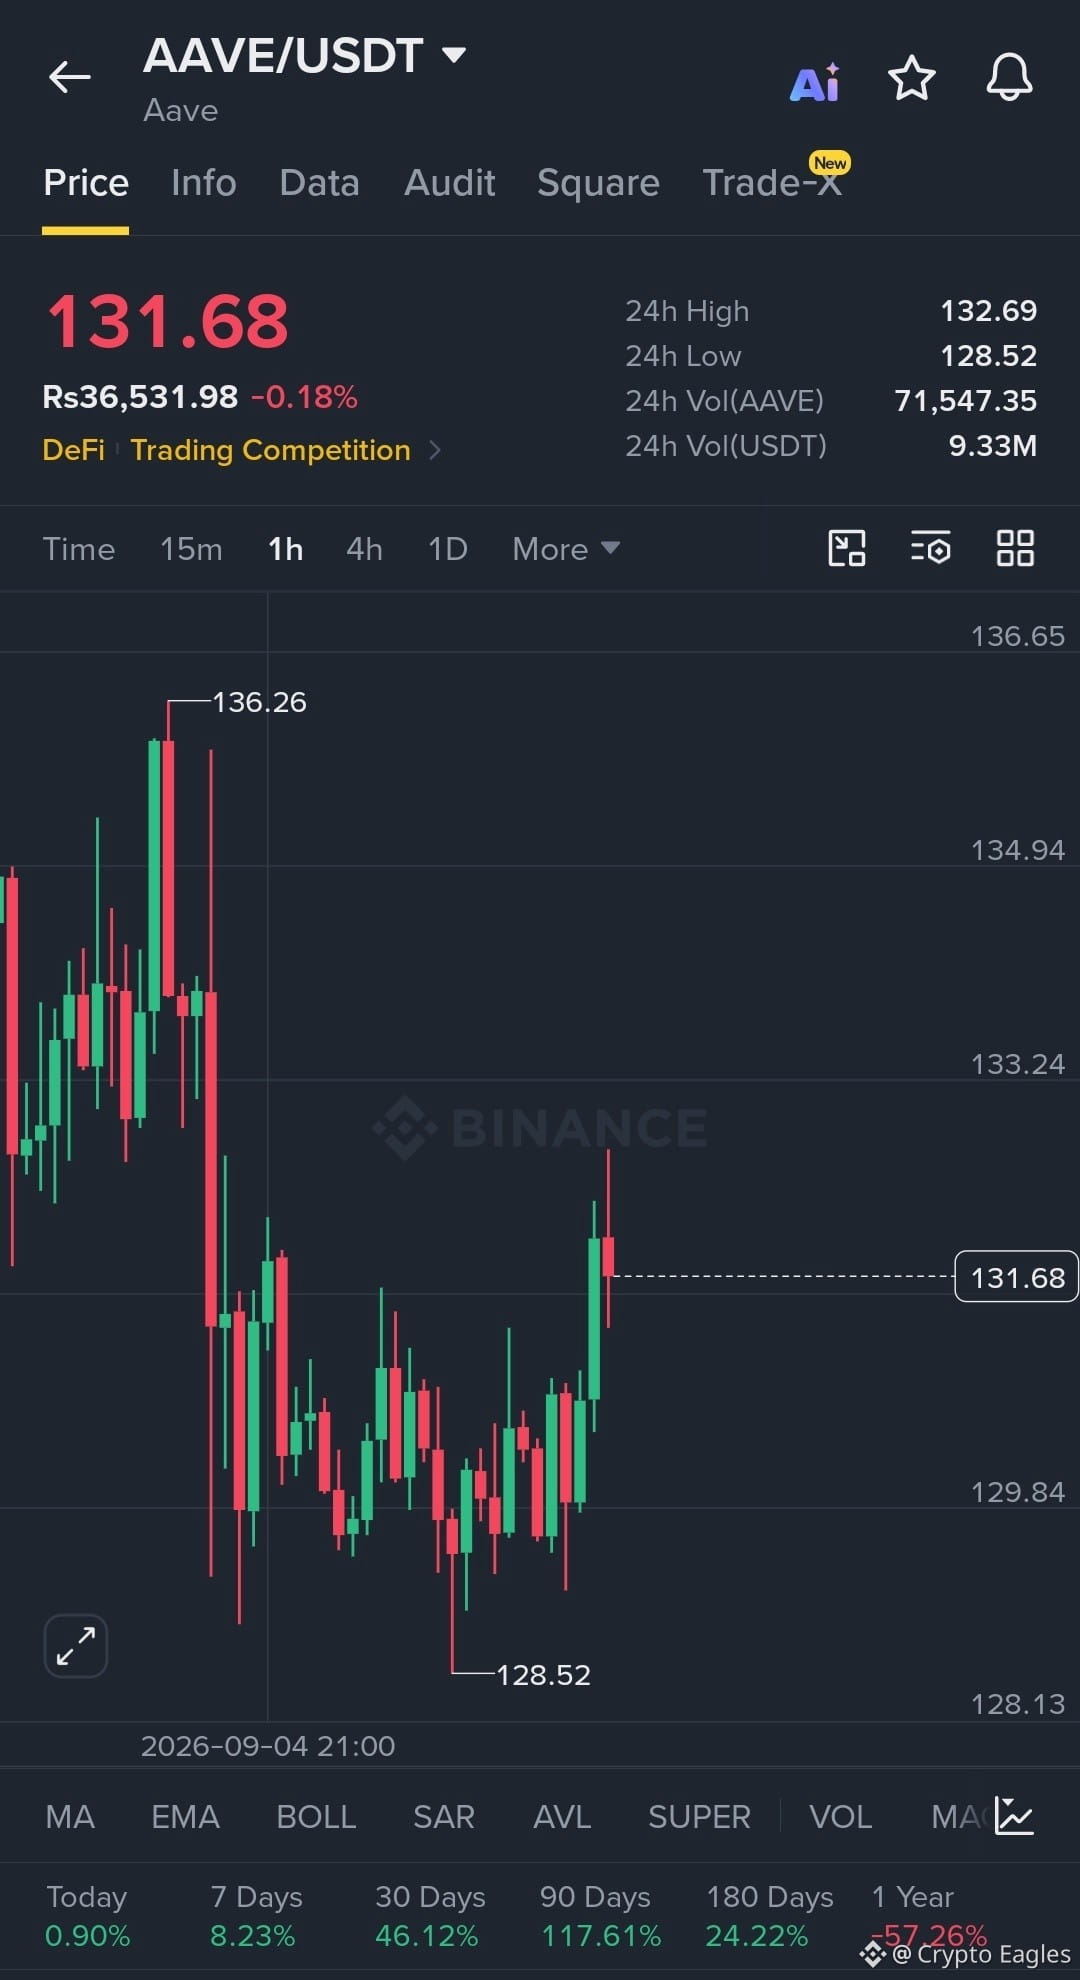
AAVE has bounced strongly from 128.52 and is forming higher lows. A clean break and hold above 132.69 would confirm further upside toward 134.94–136.26. Losing 129.70 weakens the setup.
$BULLA
$4
Entry: 130.80 – 131.70
SL: 129.70
TP1: 133.24
TP2: 134.94
TP3: 136.26
AAVE has bounced strongly from 128.52 and is forming higher lows. A clean break and hold above 132.69 would confirm further upside toward 134.94–136.26. Losing 129.70 weakens the setup.
$BULLA
$4
$NOM Long Setup
Entry: 0.00188 – 0.00191
SL: 0.00177
TP1: 0.00204
TP2: 0.00214
TP3: 0.00217
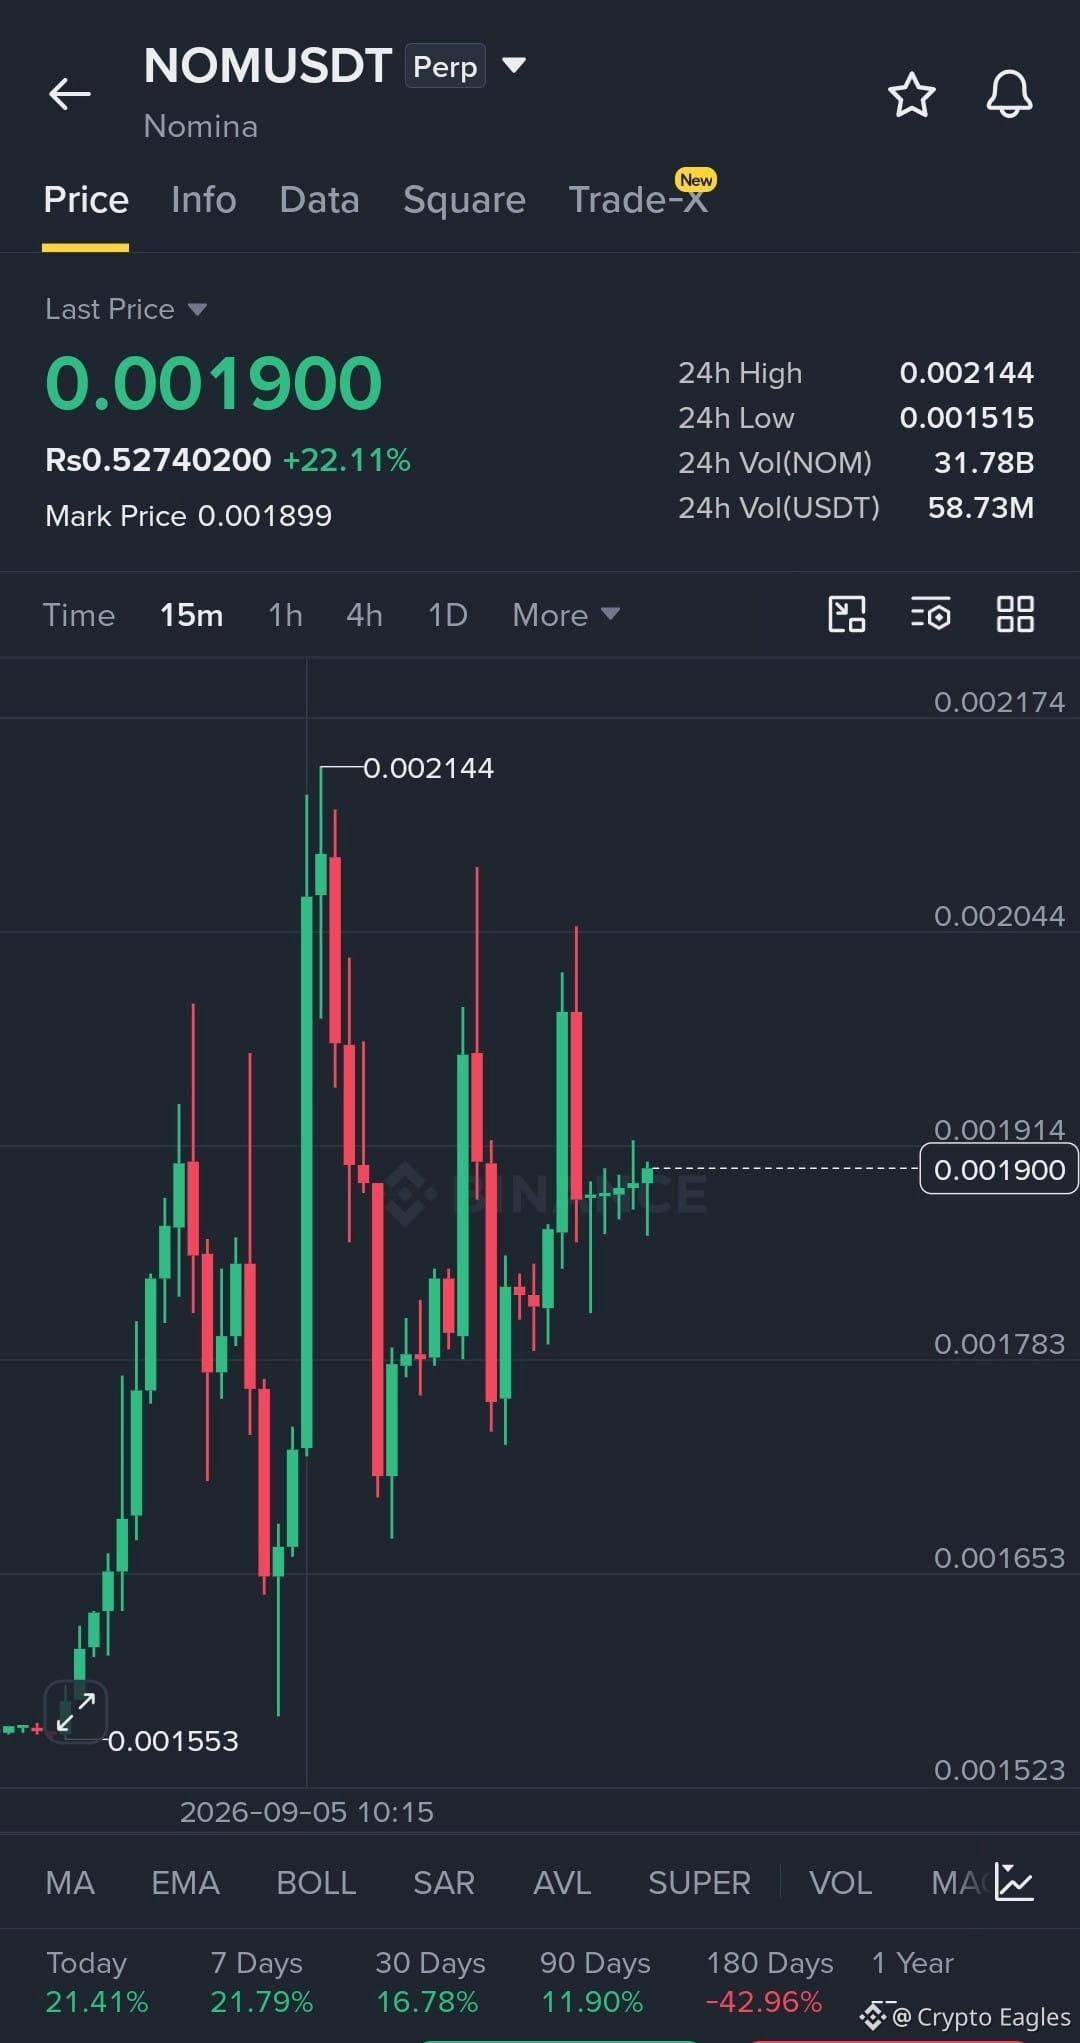
NOM is holding above 0.00178 and consolidating just below 0.00191 resistance. A clean breakout and hold above 0.00191 could trigger another move toward 0.00204–0.00214. Losing 0.00177 invalidates the setup.
$4
$BULLA
Entry: 0.00188 – 0.00191
SL: 0.00177
TP1: 0.00204
TP2: 0.00214
TP3: 0.00217
NOM is holding above 0.00178 and consolidating just below 0.00191 resistance. A clean breakout and hold above 0.00191 could trigger another move toward 0.00204–0.00214. Losing 0.00177 invalidates the setup.
$4
$BULLA
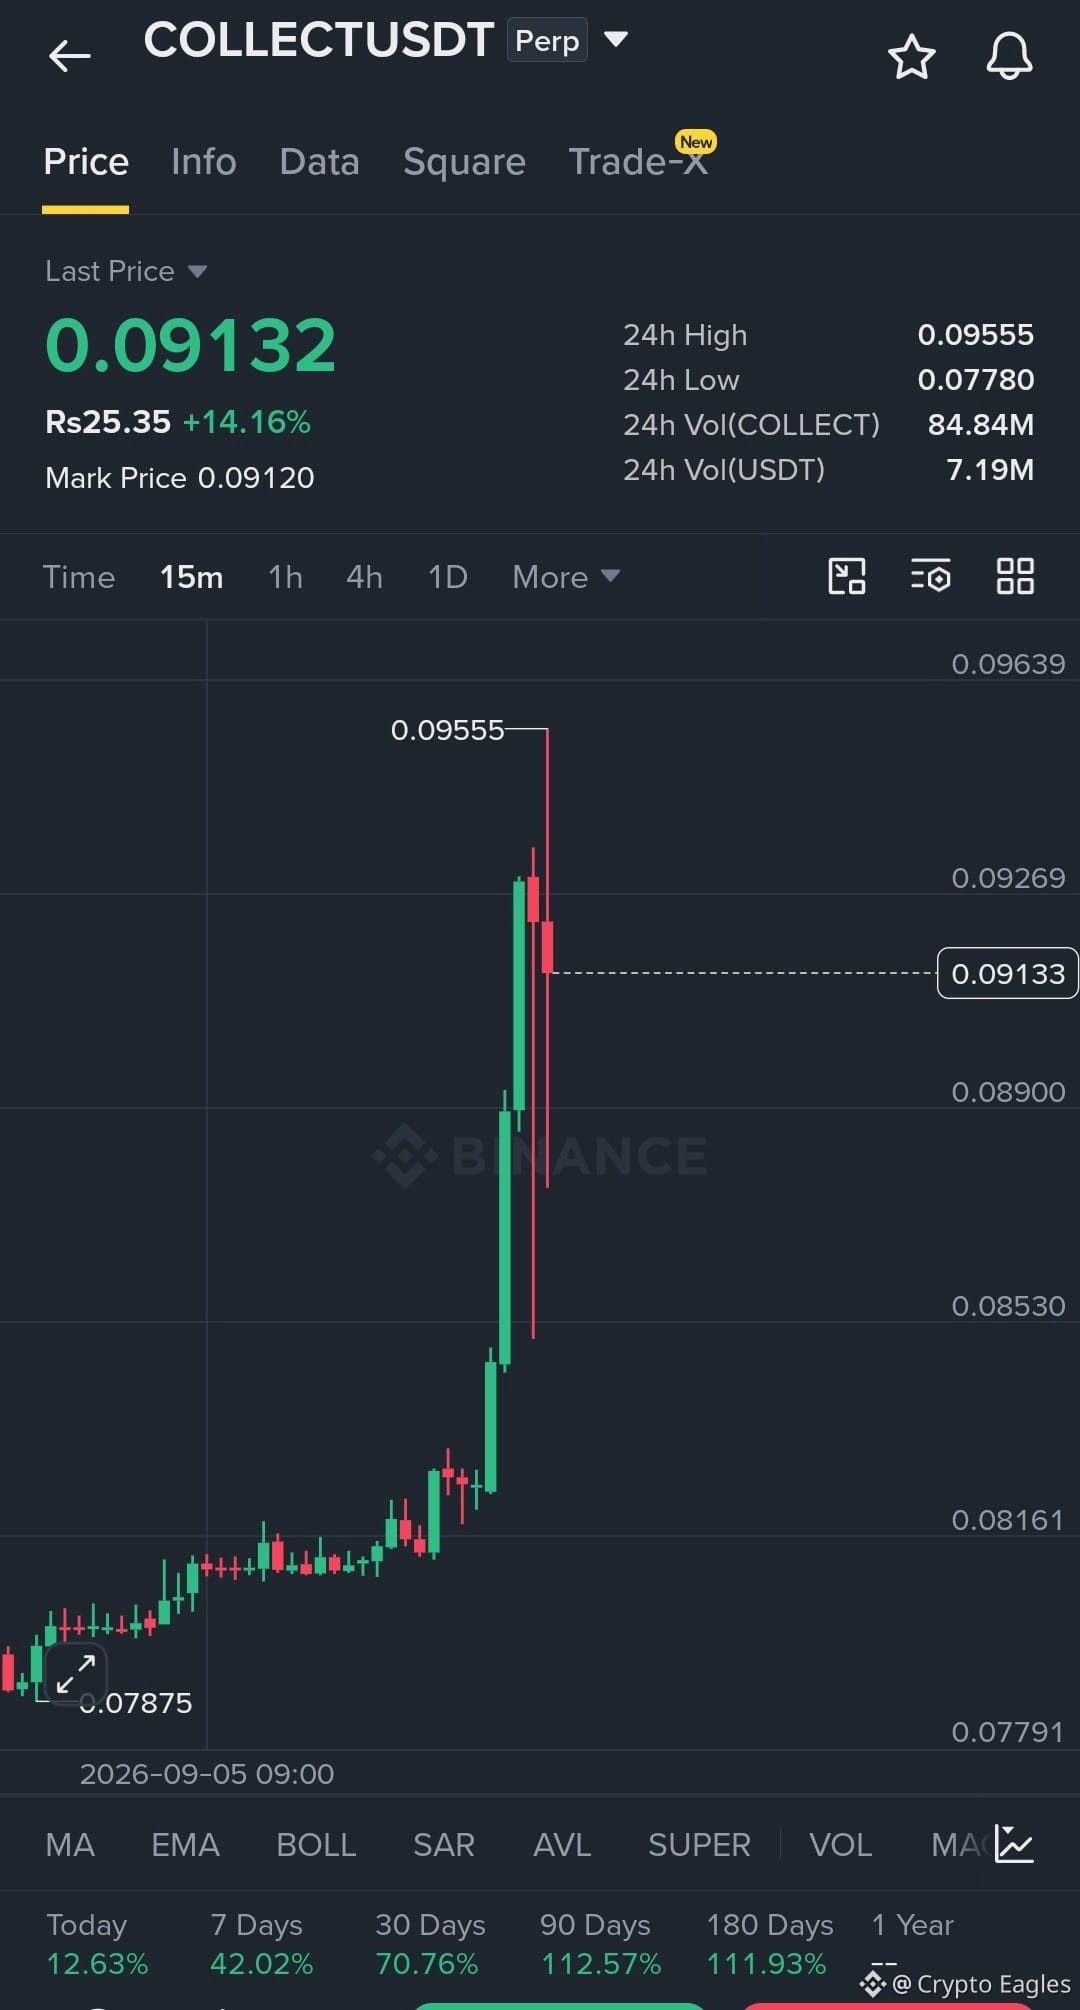
$COLLECT Long Setup
Entry: 0.0890 – 0.0915
SL: 0.0850
TP1: 0.0955
TP2: 0.1000
TP3: 0.1050
COLLECT is in a strong bullish expansion, but the 0.09555 high is immediate resistance. A hold above 0.0890 keeps the long setup valid; a clean breakout above 0.09555 can trigger the next upside leg.
$MARSCOIN
$BULLA
Entry: 0.0890 – 0.0915
SL: 0.0850
TP1: 0.0955
TP2: 0.1000
TP3: 0.1050
COLLECT is in a strong bullish expansion, but the 0.09555 high is immediate resistance. A hold above 0.0890 keeps the long setup valid; a clean breakout above 0.09555 can trigger the next upside leg.
$MARSCOIN
$BULLA
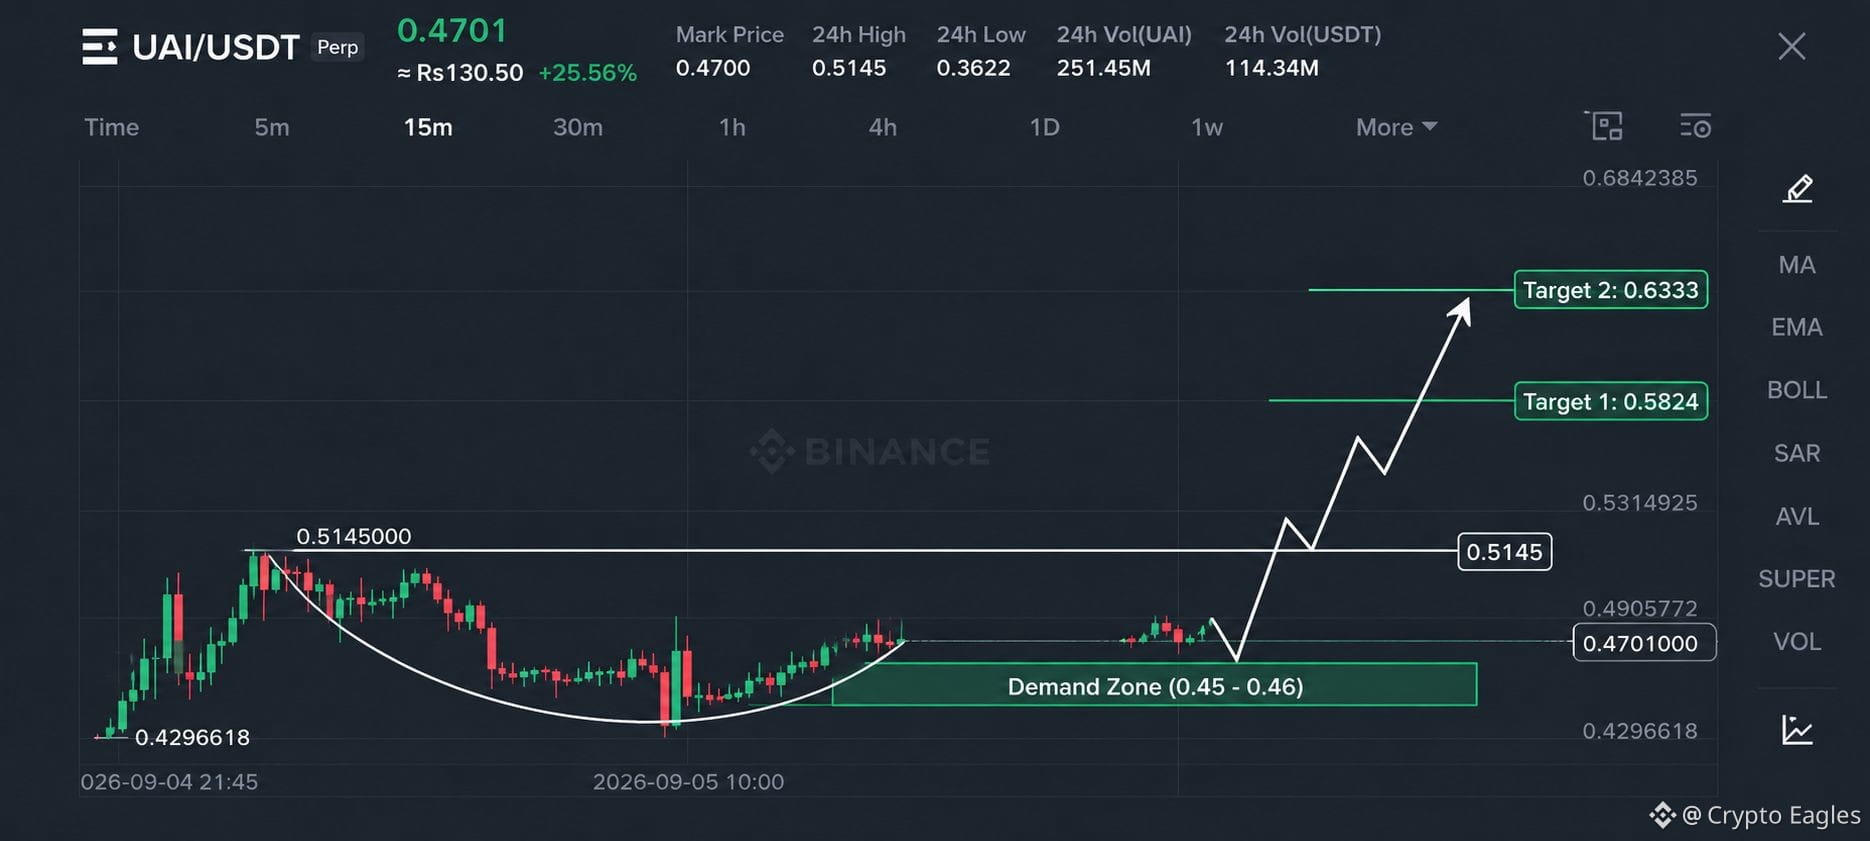
$UAI Long Setup
Entry: 0.45 – 0.46
SL: 0.429
TP1: 0.5145
TP2: 0.5824
TP3: 0.6333
UAI is forming a rounded recovery structure while holding the 0.45–0.46 demand zone. A strong bounce and reclaim of 0.5145 can confirm the bullish continuation and open the path toward 0.5824 → 0.6333. As long as the demand zone holds, the long setup remains valid. 🚀
$BULLA
$4
Entry: 0.45 – 0.46
SL: 0.429
TP1: 0.5145
TP2: 0.5824
TP3: 0.6333
UAI is forming a rounded recovery structure while holding the 0.45–0.46 demand zone. A strong bounce and reclaim of 0.5145 can confirm the bullish continuation and open the path toward 0.5824 → 0.6333. As long as the demand zone holds, the long setup remains valid. 🚀
$BULLA
$4
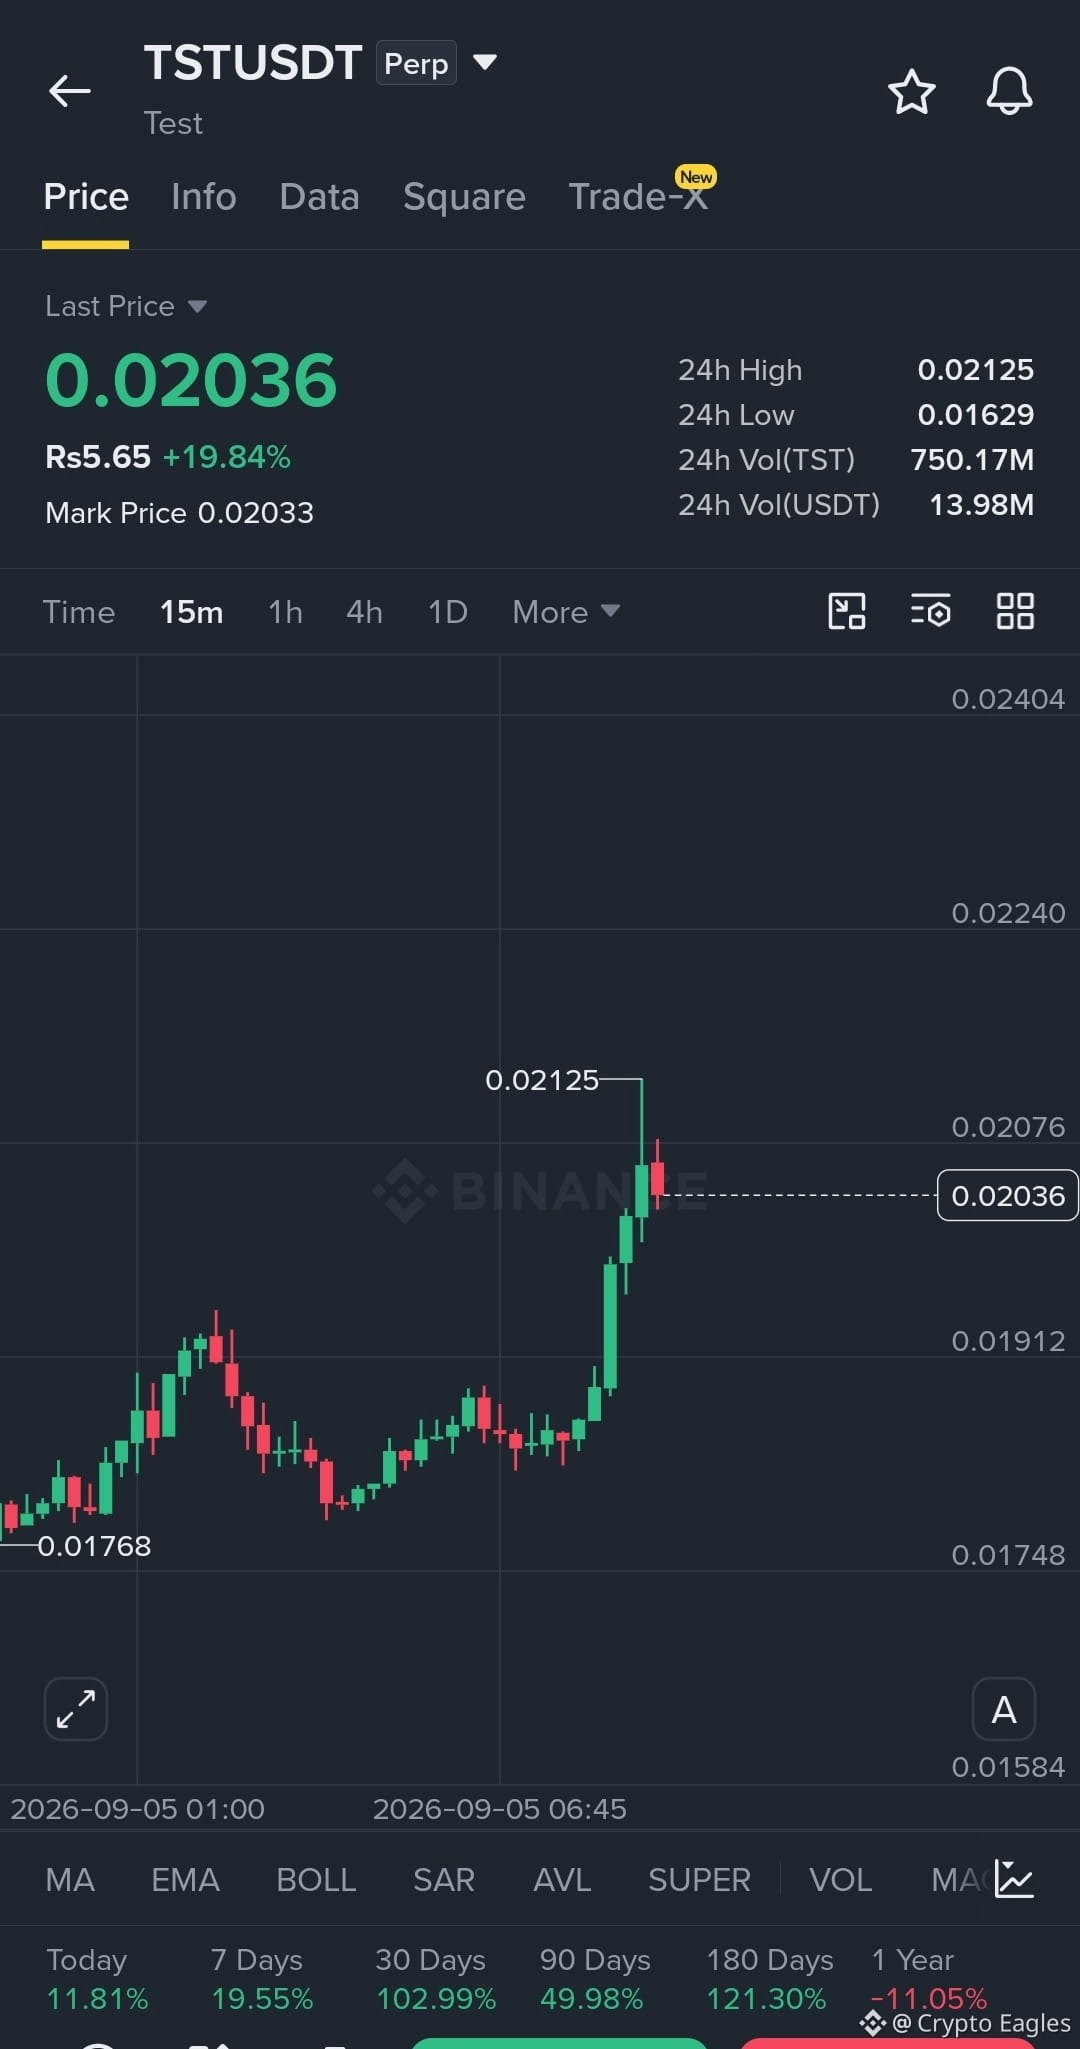
$TST Long Setup
Entry: 0.0200 – 0.0204
SL: 0.0191
TP1: 0.02125
TP2: 0.02240
TP3: 0.02404
TST is showing strong bullish momentum after breaking above the 0.01912 resistance area. A clean break and hold above 0.02125 could open the higher targets. Losing 0.0191 would weaken the setup.
$BULLA
$4
Entry: 0.0200 – 0.0204
SL: 0.0191
TP1: 0.02125
TP2: 0.02240
TP3: 0.02404
TST is showing strong bullish momentum after breaking above the 0.01912 resistance area. A clean break and hold above 0.02125 could open the higher targets. Losing 0.0191 would weaken the setup.
$BULLA
$4
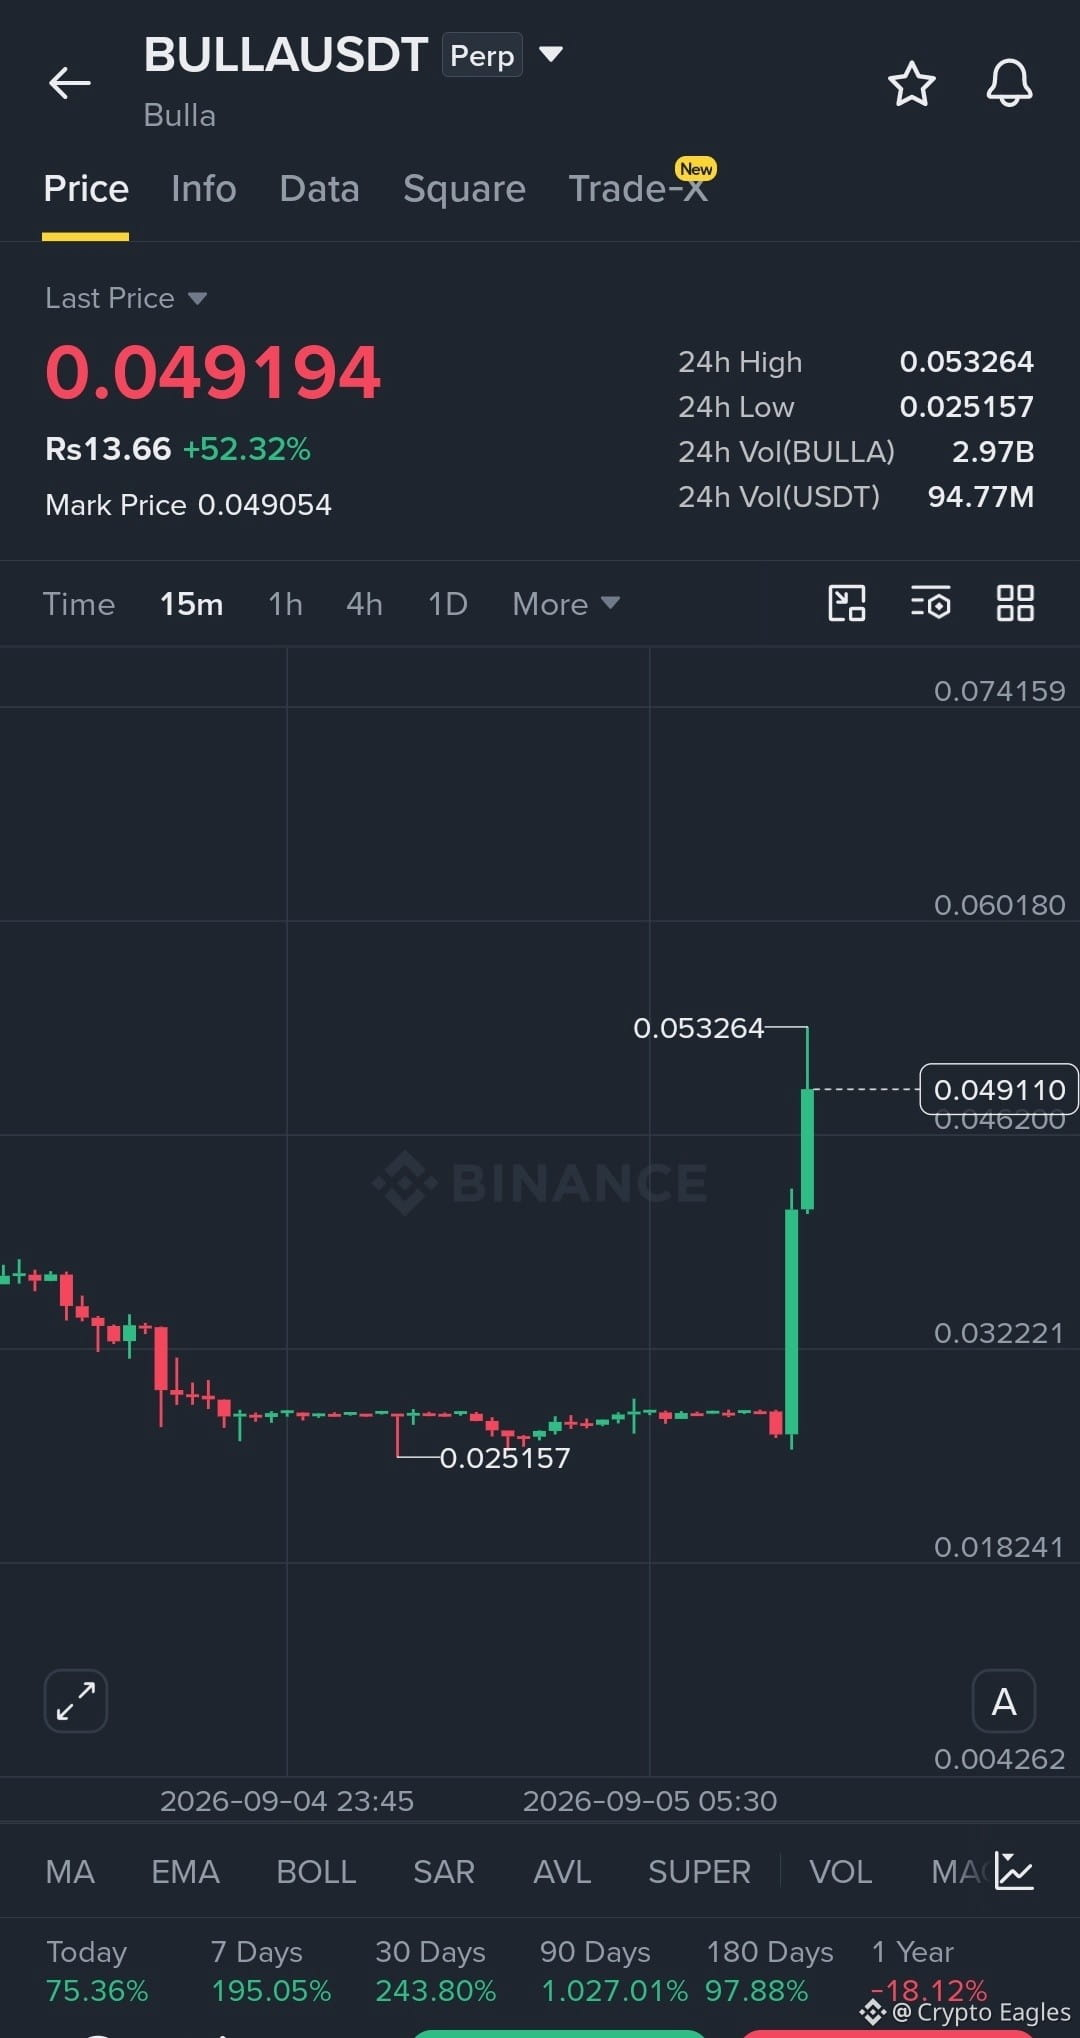
$BULLA Long Setup
Entry: 0.0465 – 0.0495
SL: 0.0435
TP1: 0.0533
TP2: 0.0602
TP3: 0.0741
Strong momentum is visible on the 15m chart. Prefer a hold/retest above 0.0462 rather than chasing the spike. A break above 0.0533 confirms further upside.
$MARSCOIN
$4
Entry: 0.0465 – 0.0495
SL: 0.0435
TP1: 0.0533
TP2: 0.0602
TP3: 0.0741
Strong momentum is visible on the 15m chart. Prefer a hold/retest above 0.0462 rather than chasing the spike. A break above 0.0533 confirms further upside.
$MARSCOIN
$4
Log in to explore more content