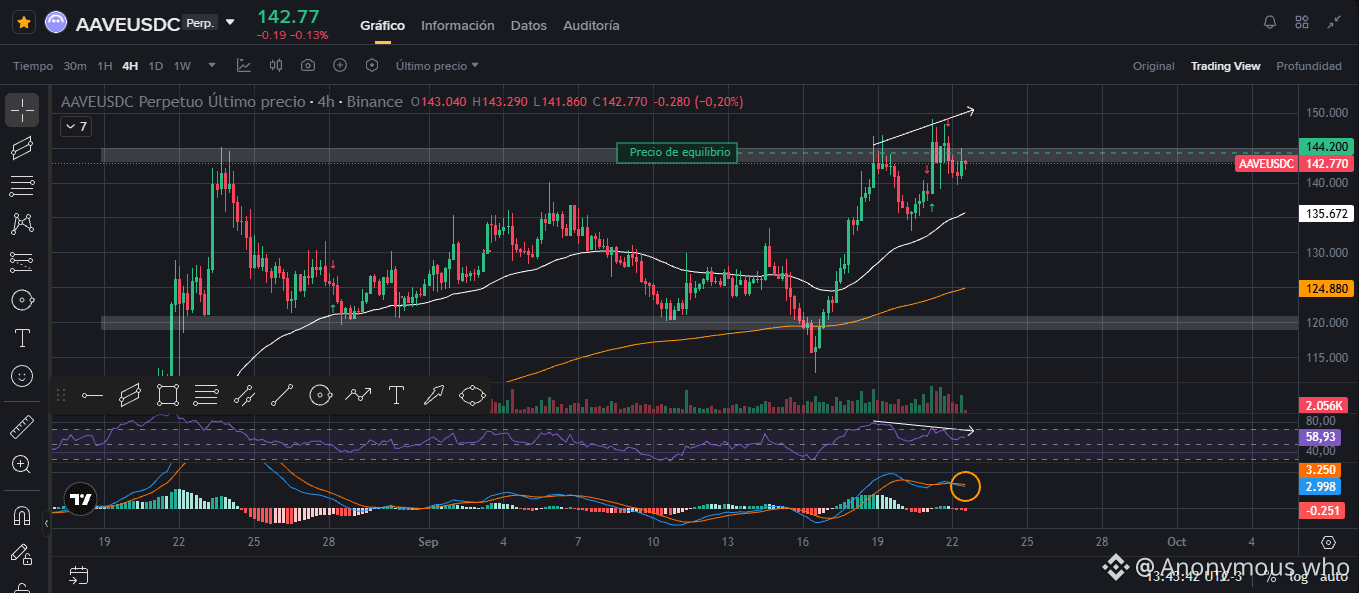
Align the range structure with the exhaustion of momentum on intermediate timeframes allows us to build setups with a clear statistical edge. Here’s the technical breakdown of my short position in $AAVE . 📊
🚨 Range Structure and Extremes (4H): AAVE price has reached the top (resistance) of a consolidated sideways channel, at 145 resistance. Arrival at this supply zone happens with the RSI in overbought territory, which prints a clear bearish divergence—signaling that the current bullish move is rising mostly on inertia and shows clear signs of exhaustion.
Momentum Confirmation: To the RSI divergence, we add a bearish MACD crossover, confirming the loss of buying strength and increasing the odds of a downward turn toward the middle or lower part of the range.
Efficient Execution (Maker vs. Taker): The entry was executed via a Sell Limit order at $144.2. Capturing the exact level with a limit order not only optimizes the Risk/Reward ratio (RR), but also reduces the impact of fees by acting as a Maker in the order book.
🎯 The Play / Execution Strategy: We’re looking for a corrective move toward the range’s internal support levels. We set Take Profit 1 (TP1) at $139, a key demand retest area, with a Stop Loss set at $148 above the range highs to invalidate the structure in case of a breakout. 🛡️
Do you see AAVE respecting the sideways resistance to target $139, or do you think buyers will force the breakout above $148? I’ll read your thoughts in the comments. 👇
#AAVE #Trading #TechnicalAnalysis #TradingSignals #DYOR
🚨 Range Structure and Extremes (4H): AAVE price has reached the top (resistance) of a consolidated sideways channel, at 145 resistance. Arrival at this supply zone happens with the RSI in overbought territory, which prints a clear bearish divergence—signaling that the current bullish move is rising mostly on inertia and shows clear signs of exhaustion.
Momentum Confirmation: To the RSI divergence, we add a bearish MACD crossover, confirming the loss of buying strength and increasing the odds of a downward turn toward the middle or lower part of the range.
Efficient Execution (Maker vs. Taker): The entry was executed via a Sell Limit order at $144.2. Capturing the exact level with a limit order not only optimizes the Risk/Reward ratio (RR), but also reduces the impact of fees by acting as a Maker in the order book.
🎯 The Play / Execution Strategy: We’re looking for a corrective move toward the range’s internal support levels. We set Take Profit 1 (TP1) at $139, a key demand retest area, with a Stop Loss set at $148 above the range highs to invalidate the structure in case of a breakout. 🛡️
Do you see AAVE respecting the sideways resistance to target $139, or do you think buyers will force the breakout above $148? I’ll read your thoughts in the comments. 👇
#AAVE #Trading #TechnicalAnalysis #TradingSignals #DYOR