

Binance account registration takes about ten minutes if you have an email inbox open, your ID card or passport on the desk and a phone for the face check. You enter an email or phone number, confirm a six-digit number, set a password, then pass identity verification before you can deposit or trade.
👉 Open your Binance account with a sign-up bonus
That link opens the sign-up form with the code GETREWARD already attached. The steps below follow the same order as the screens, with the spots where new users usually lose time.
What do you need before you start?
Most failed sign-ups stall on something the person did not have ready. Gather these first:
An email or phone you can open right now: The confirmation number arrives within a minute or two and expires after a short window.
A valid government ID: A passport, national ID card or driving licence, depending on your country. It must not be expired.
A phone or laptop with a working camera: Identity checks end with a live face scan, not an uploaded selfie.
Ten quiet minutes: Leaving the form half done is the main reason codes and settings get lost.
Your real details: Name and date of birth must match the ID exactly, so no nicknames or shortened names.
You need to be at least 18, and Binance only serves residents of countries where it operates. If your country is not supported, the form or the verification step will stop you. Using a VPN to get around that can get the account restricted later, often after you have already deposited.
Step 1: Pick email, phone, Google, Apple or the app
The first screen offers several ways in. They all lead to the same kind of account, but each has a trade-off:
Email: The most common path. Use an address you will keep for years, because security alerts and withdrawal confirmations go there.
Phone number: Enter it without the country prefix, as the field hint says, and pick the country from the list. Changing numbers later means a security review, so avoid a prepaid SIM you might drop.
Google or Apple: Faster, with no new password to invent at this stage. Your Binance login now depends on that Google or Apple account, so it needs its own 2FA. With Apple's "Hide My Email", Binance receives a relay address, and that is where its emails will land.
Telegram: Also offered on the web form. Same logic as Google or Apple: the safety of the Telegram account matters too.
The mobile app: Same fields as the website. The catch is the app store: if you install the app from a link, the pre-filled code can be dropped during the install.
If you are on a phone and want the code to stick, finish the sign-up in the mobile browser first, then install the app and log in. Nothing about the account changes when you switch devices afterwards.
Opening an account for a company is a different flow. The "Sign up as an entity" link at the bottom of the form leads to business verification, which asks for company documents instead of a personal ID.
Step 2: Fill in the form and check the code line
Type your email or phone into the first box, tick the box agreeing to the terms and privacy notice, and press Register. Before that last press, look for the optional code line on the form. Depending on your region and device it can sit below the email box, under a small expander, or on the next screen.
Why this matters: a sign-up code can only be attached while the account is being created. Support cannot add one later, and there is no setting for it. If you opened the form from the link above, the line should already show the code. If it is blank, type it in capitals with no spaces.
Three small things that cause trouble here:
Autofill: A password manager can paste an old email into the box. Read it once before you continue.
Typos in the address: A missing letter in gmail.com means the confirmation number never arrives and the address is locked to nothing.
Switching methods mid-form: Moving from email to phone can reset the code line. Check it again after you switch.
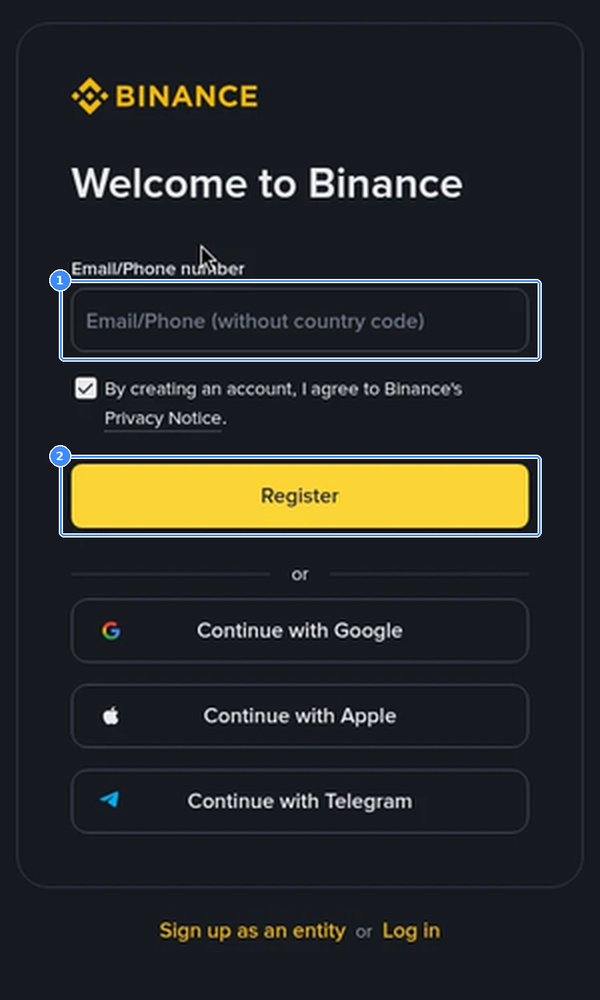
The first Binance sign-up screen: email or phone number at 1 and Register at 2, with Google, Apple and Telegram sign-up below.
Step 3: Confirm the six-digit number and set a password
Binance sends a six-digit verification number to the email or phone you entered. Type it in before it expires. If nothing shows up after two minutes, check spam and promotions folders, then use the resend option instead of starting over.
Next comes the password. Binance asks for at least 8 characters with at least one capital letter and one number. Treat that as the floor, not the goal:
Length beats tricks: A 16-character passphrase is harder to crack than an 8-character jumble with symbols.
Never reuse it: If the same password sits on a shopping site that gets breached, attackers try it on exchanges first.
Store it in a password manager: Not in a notes app, and not in a screenshot in your gallery.
At this point the account exists. You can log in and look around, but most features stay locked until identity verification is done.
Step 4: KYC basics and which documents you will be asked for
KYC stands for "know your customer". Regulated exchanges have to confirm who opens each account, which is why Binance asks for identity checks before deposits, trades and withdrawals. The process is the same core flow for most people:
Country of residence: Choose where you live now, not your nationality. This decides which documents and products you see.
Personal details: Full legal name, date of birth and address, exactly as they appear on your ID.
Document photos: Front and, for ID cards, back. All four corners visible, no glare, no fingers over the text.
Face check: A short live scan where you follow on-screen prompts, so the system can match you to the document photo.
Many reviews finish within minutes. Some take longer, especially at busy times or when a photo is blurry. Higher limits or certain products can need an extra step, usually proof of address, such as a recent bank statement or utility bill. What counts as recent varies, but three months is a common cut-off.
Why rejections happen, and the fix for each:
Name mismatch: You typed "Alex" and the passport says "Alexander". Re-enter the name letter for letter.
Blurry or cropped photo: Shoot in daylight on a dark, plain surface, with the whole card in frame.
Expired document: Use a different valid ID instead of waiting for the review.
Face scan failed: Remove glasses or a hat, face a window, and hold the phone at eye level.
Only upload documents inside the official Binance app or website. Nobody from Binance will ask you to send ID photos through chat, email or a form on another domain.
Step 5: Lock the account down before you fund it
An empty account is a poor target. A funded one with only a password is a good one. Spend five minutes in the Security section before the first deposit:
Two-factor authentication: Add an authenticator app, such as Binance Authenticator or Google Authenticator. It is safer than SMS, because a phone number can be moved to another SIM by a scammer.
Passkey: Binance supports passkeys, which let you log in with your phone's fingerprint or face recognition. A passkey is tied to your device and cannot be typed into a fake site.
Backup key: When you set up an authenticator, write the backup key on paper and store it offline. Losing the phone without it means a slow reset process.
Anti-phishing code: A word you choose that appears in every genuine Binance email. An email without it is not from Binance, however real it looks.
Our walkthrough of how to set up the Binance anti-phishing code covers where the setting sits and which emails show it.
Step 6: Choose how to make your first deposit
Once verification passes, the Deposit button opens up. There are three common routes, and the right one depends on where your money sits today:
Crypto from another wallet or exchange: Pick the coin, then the network. The network must match the one the sending side uses, or the funds can be lost.
Buy with a card or bank transfer: Available options and fees depend on your country and currency. Card buys are quick but usually cost more than a bank deposit.
P2P: You buy crypto from another user who receives your local currency. Only release or confirm after the money shows up, and use the in-app chat only.
For a first deposit, start small. Sending $20 of USDT first to confirm the address and network costs a little in network fees, but it is far cheaper than a mistake on $2,000.
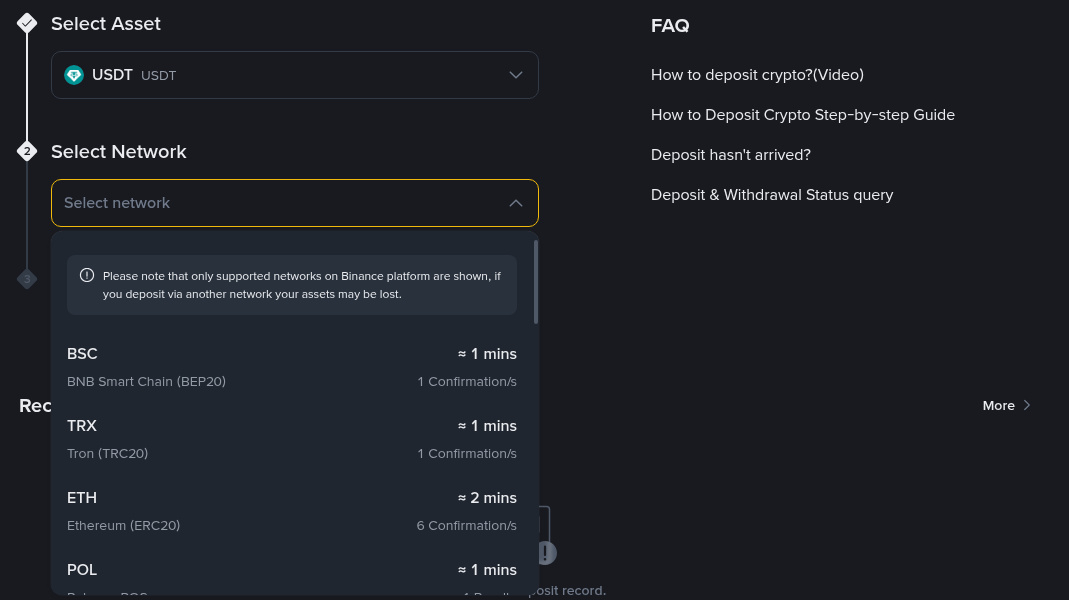
The crypto deposit screen. After choosing the coin, pick the network that matches the sending side; the list shows the typical arrival time and confirmations for each.
Step 7: Place a first trade and read the fee
Here is a worked first buy. You deposited 100 USDT and want Bitcoin on the BTC/USDT Spot pair:
Open Spot and search BTC/USDT: The order panel shows Limit, Market and Stop Limit tabs.
Pick Market for a first test: It fills at the current price. Limit lets you set your own price but may not fill straight away.
Enter 100 USDT in Total: The panel shows a minimum order of 5 USDT, so even a tiny test is possible.
Press Buy BTC: Then open Trade History and read the Fee column.
The regular Spot fee is 0.1% for both maker and taker orders. On a $100 buy that is $0.10. On a buy-then-sell round trip of $100 each way, expect about $0.20 in total.
When you buy BTC with USDT, the fee is normally taken from the coin you receive, so you end up with slightly less BTC than $100 worth. If you hold BNB and switch on "Use BNB to pay for fees", Binance takes the fee in BNB at a 25% discount, so that $0.10 becomes about $0.075.
A cent here or there does not matter on one trade. It adds up when you trade weekly for a year, which is why it pays to read that column once now.
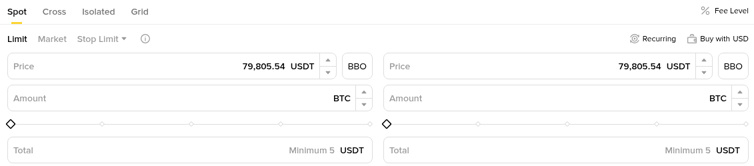
The Spot order panel on BTC/USDT. Choose Limit or Market, enter the amount or total, and note the 5 USDT minimum order.
Mistakes that cost new traders the most
These come up again and again in support forums. Each one is easy to avoid if you know it is coming:
Two accounts for one person: Binance's terms allow one personal account per person, and identity verification can only complete once. A second account to "start fresh" can get both restricted.
Registering without the code line checked: It cannot be added afterwards. The fix is to look before pressing Register, not after.
Funding before 2FA: The first day with money in the account is when phishing emails start to matter.
Wrong network on a deposit: Sending on a network the platform does not support for that coin can mean a long recovery or a total loss.
Clicking login links in emails or ads: Type binance.com yourself or use a bookmark. Fake login pages often copy the design pixel for pixel.
Trusting "support" in DMs: Binance staff do not ask for your password, 2FA codes or remote access to your screen.
Is the app or the website better for registration?
Both create the same account with the same rules. The website is easier for reading terms and checking the code line on a large screen. The app is easier for the face scan, because the phone camera is already in your hand.
A combination works well for many people: register on the website or mobile browser, then install the app and finish identity verification there. Your login, verification status and settings carry across instantly.
After the first week, add a withdrawal whitelist so funds can only go to addresses you saved yourself. The Binance withdrawal whitelist setup checklist walks through it step by step, including the waiting period for new addresses.
Where the welcome bonus fits
New users can see a task-based welcome program in the Rewards Hub, with up to $19,800 for eligible users. The program is the same whichever code you sign up with. The tasks usually involve verification, a deposit and some trading inside a time window, and each task has its own terms.
Read those terms before you deposit, so you know the deadlines. Do not trade more than you planned just to hit a task target.
FAQ
How long does Binance account registration take?
Creating the login takes a few minutes. Identity verification is often approved within minutes too, but it can take longer if the review queue is busy or a photo needs to be redone.
Can I use Binance without completing KYC?
You can log in and browse, but deposits, trading and withdrawals need verification for almost all users.
Can I change the email on my account later?
Yes, from the Security section. Expect a temporary hold on withdrawals after the change, which is a protection against account takeovers.
What happens if I signed up with Google and lose access to that Google account?
Recover the Google account first. If that fails, contact Binance support and be ready to pass identity checks again.
Do I need the code GETREWARD to get the welcome tasks?
No. Eligible new users see the same task-based program with any code or none.
Is a passport better than a national ID?
Either works where it is accepted. A passport has a single photo page, which some people find easier to shoot cleanly.
When your account is verified and protected, check the current Binance bonus event for the tasks and dates that apply to you before the first deposit.
Crypto prices are volatile and trading carries risk. This guide is general information, not financial advice.