

Key Takeaways
You can check that your balance is included in Binance's Proof of Reserves on the Wallet → Verification page, in about five minutes.
For a fully independent check, Binance's open-source verifier proves your record is inside the Merkle root covered by the zk-SNARK proof.
After the October 2026 security incident, Binance published extra snapshots on October 31 and November 4.
Proof of Reserves compares user assets with reserves at one moment. It is not a full financial audit.
To verify your account balance on Binance, log in on the Binance website and open
Profile → Wallet → Verification.
Choose the latest snapshot date and you'll see your Record ID, the assets covered and your balance at the moment of the snapshot. To go further, download your Merkle Tree file from the same page and run Binance's open-source verifier. It confirms, with math, that your account is part of the total Binance proved.
You don't have to take anyone's word for it. You can check for yourself in about five minutes, or in about twenty if you want the full cryptographic proof.
Why This Question Matters Right Now
On October 29, 2026, Binance reported unauthorized withdrawals from its hot wallets. By its own estimate they came to about $6.3 billion. The exchange paused withdrawals, said it would cover the losses with its own funds, and began restoring withdrawals in phases from November 1.
It then took an extra Proof of Reserves snapshot at 00:00 UTC on October 31. On November 2, Binance said the full zero-knowledge proof for that snapshot was complete for ten assets: BTC, ETH, USDT, BNB, SOL, USDC, XRP, USD1, RLUSD and ZEC. A second snapshot covering more tokens was planned for November 4, and Binance said its proof would take about 40 to 50 hours to generate.
So this is no longer a theoretical exercise. If you hold funds on Binance, this is the tool that lets you check for yourself that your balance was counted.
What Does Binance Proof of Reserves Actually Prove?
Proof of Reserves (PoR) shows that Binance holds at least 1:1 the assets it owes its users. It has two halves:
Reserves: the on-chain wallets Binance controls, both hot and cold.
Liabilities: the total of all user balances at a specific moment, called the snapshot.
Your own check is about the second half: was your balance included in the liabilities total?
A simple way to picture it: a tontine. Imagine a savings group with 500 members. The treasurer doesn't publish everyone's contributions. Instead, they publish one "fingerprint" of the complete register. Each member gets a personal receipt that proves their own line is inside that register, without revealing anyone else's line. If the treasurer secretly removed or changed a single line, the fingerprint would no longer match.
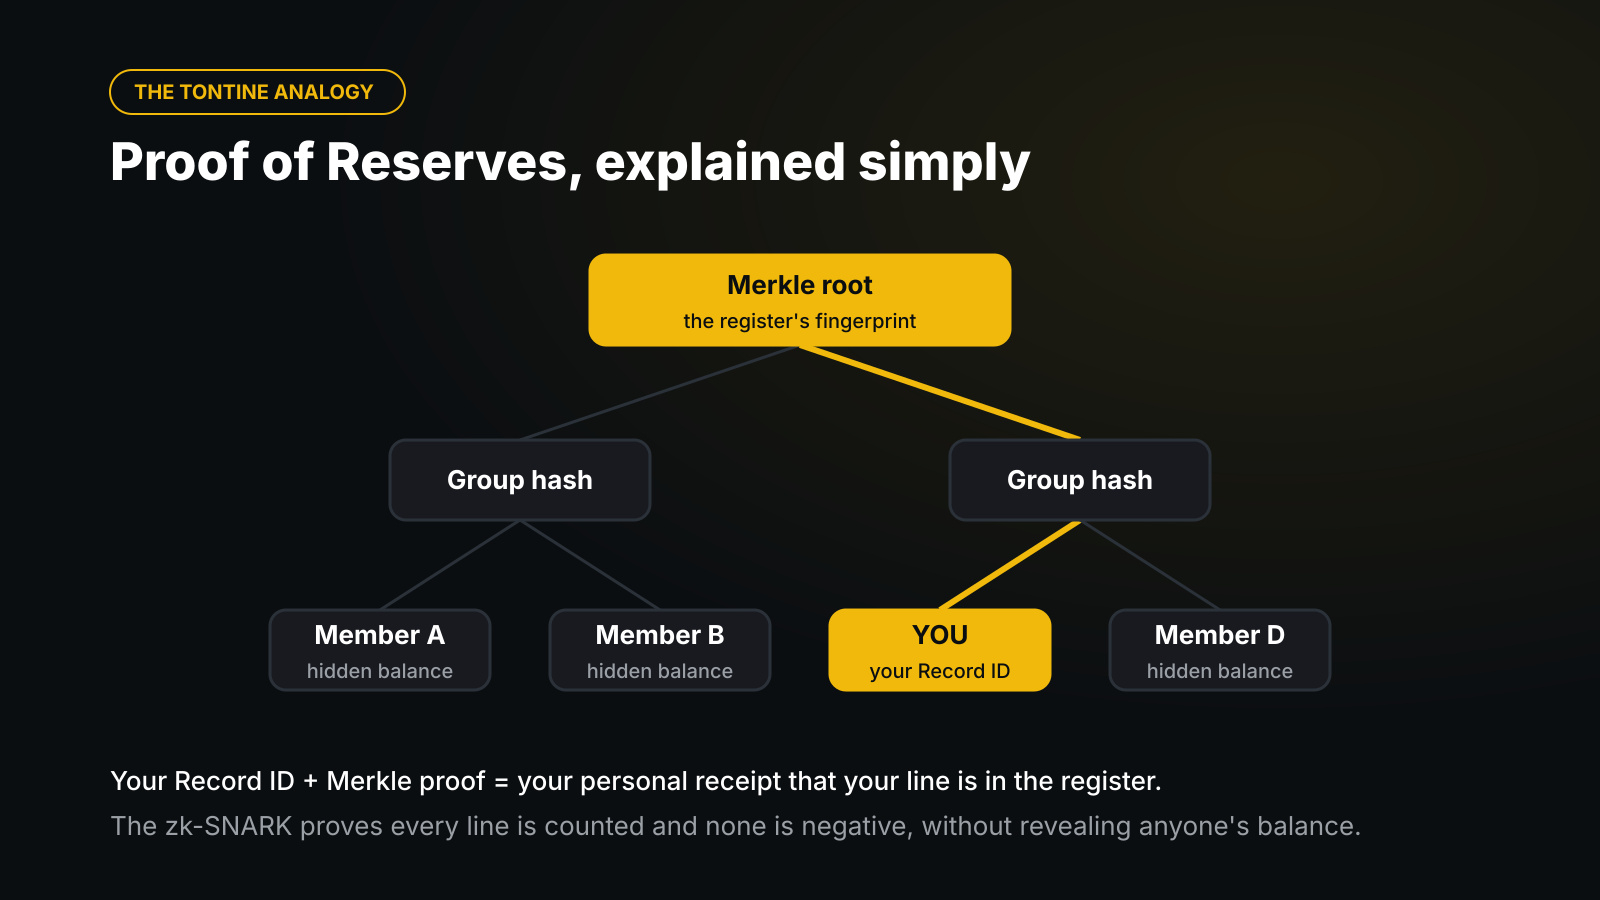
The register's fingerprint is the Merkle root.
Your personal receipt is your Record ID and Merkle proof.
The zk-SNARK is an extra mathematical guarantee that every line was added to the total and that no fake account with a negative balance was slipped in to shrink what Binance owes. It does this without showing anyone's balance.
Option 1: How to Do the Quick Check (About 5 Minutes)
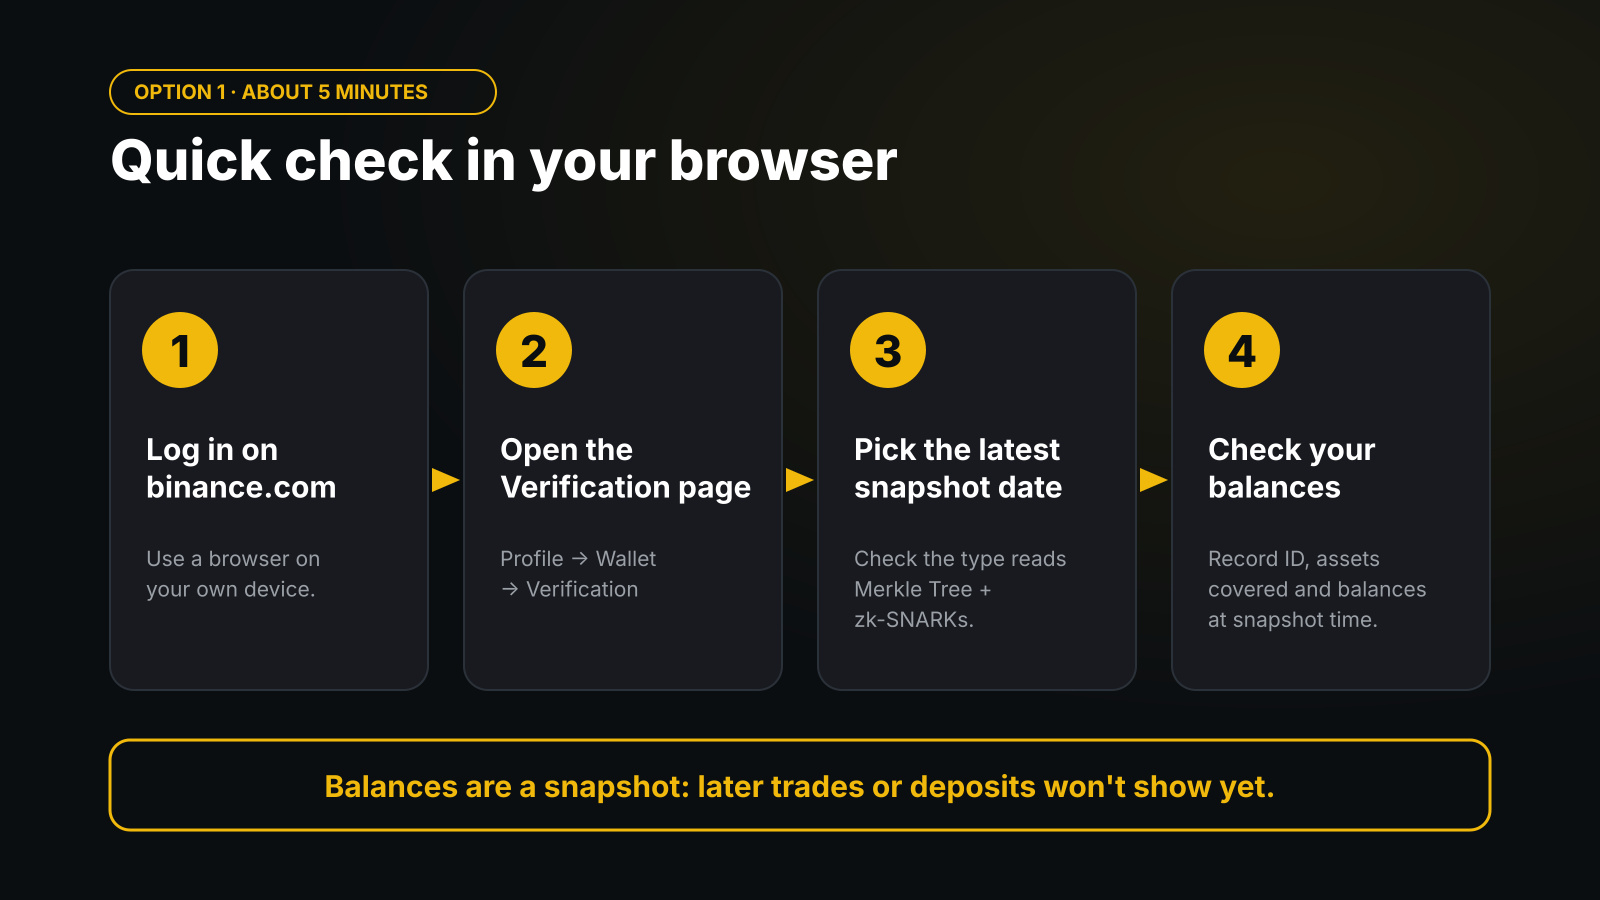
Step 1. Log in at binance.com from a browser.
Step 2. Go to Profile → Wallet → Verification.
Step 3. Select the snapshot date you want to check, usually the most recent one.
Step 4. Review what's shown: the verification type (it should read Merkle Tree + zk-SNARKs), your Record ID, the assets covered and your balances at the time of the snapshot.
Step 5. Compare those balances with what you held at that moment. A deposit or trade made after the snapshot will not appear, so small differences from today's balance are normal.
This tells you Binance's report lists your account with the right amounts. It does not yet prove the math independently. That's Option 2.
Option 2: How to Do the Full Independent Check (About 20 Minutes)
This is the "don't trust, verify" route. It uses Binance's open-source verifier, so the result doesn't depend on the Binance website telling you what you want to hear.
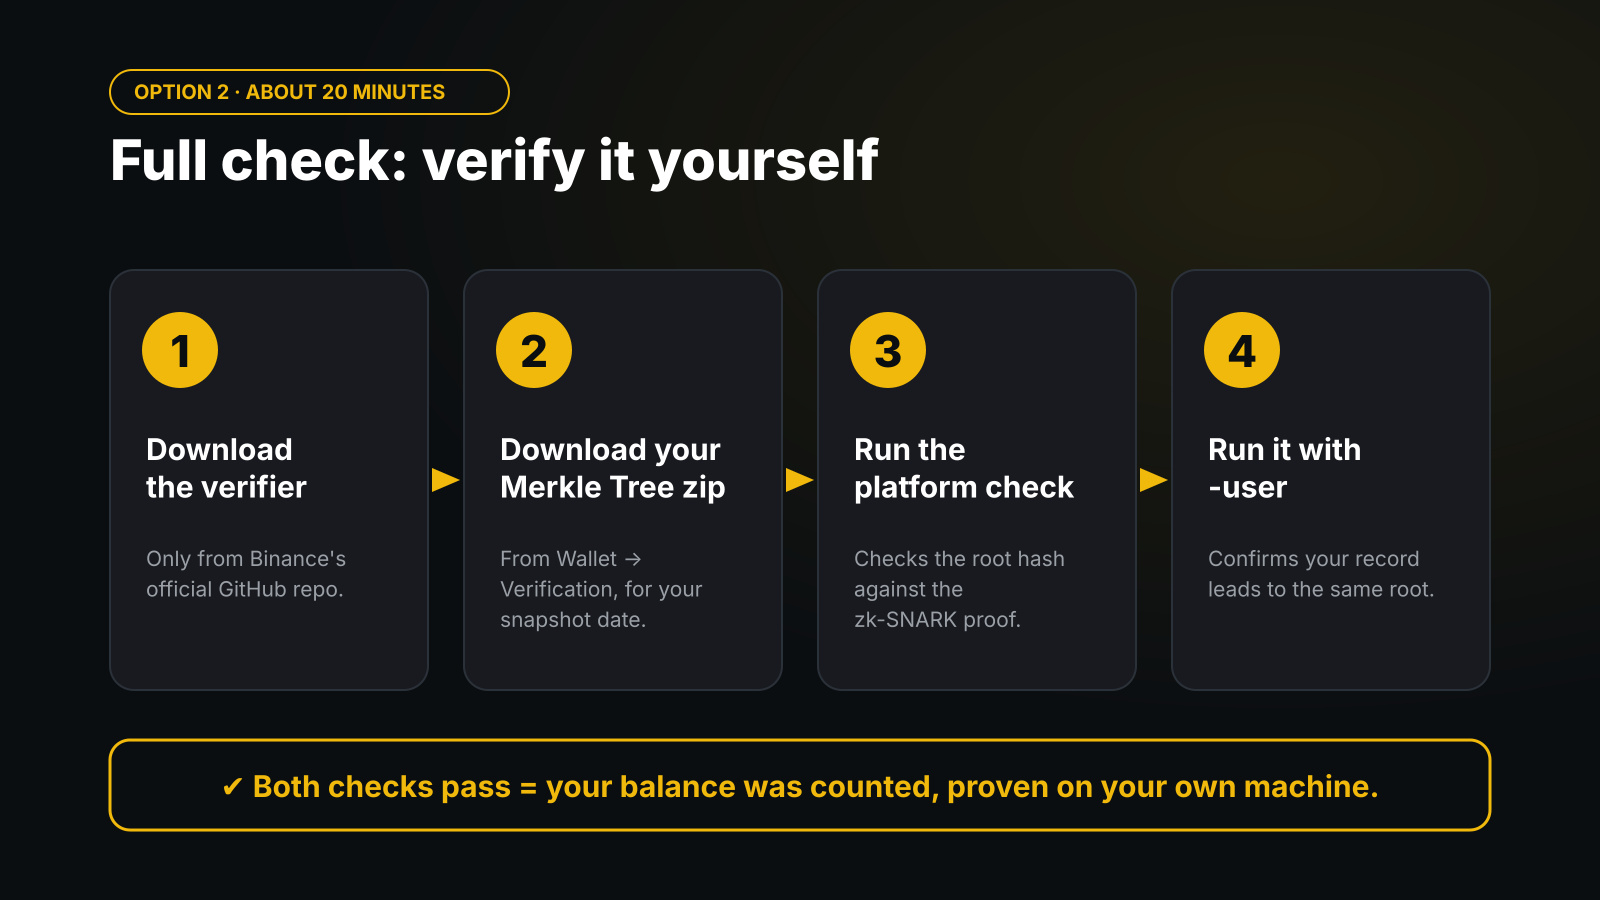
Step 1. Download the verifier from Binance's official GitHub repository (binance/zkmerkle-proof-of-solvency). Binance's guide lists which verifier version matches each snapshot period, so choose the one for your snapshot date.
Step 2. Download your data. On the Wallet → Verification page, expand the snapshot, confirm the type is Merkle Tree + Zksnarks, and click Download Merkle Tree. You get a zip file.
Step 3. Check the platform proof. Put config.json, proof.csv and the verifying key file from the zip into the verifier's config folder, then run the verifier for your system (macOS, Linux or Windows) from a terminal. This checks the published root hash against the zk-SNARK proof.
Step 4. Check your own account. Add user_config.json from the same zip to the config folder and run the verifier again with the -user option. It uses your Merkle path to confirm that your record leads to the same root.
If both checks pass, your balance was included in the total that Binance proved, mathematically and on your own machine. The exact file names and commands are in Binance's official guide, linked in the sources below.
Quick Check vs Full Check: Which One Should You Use?
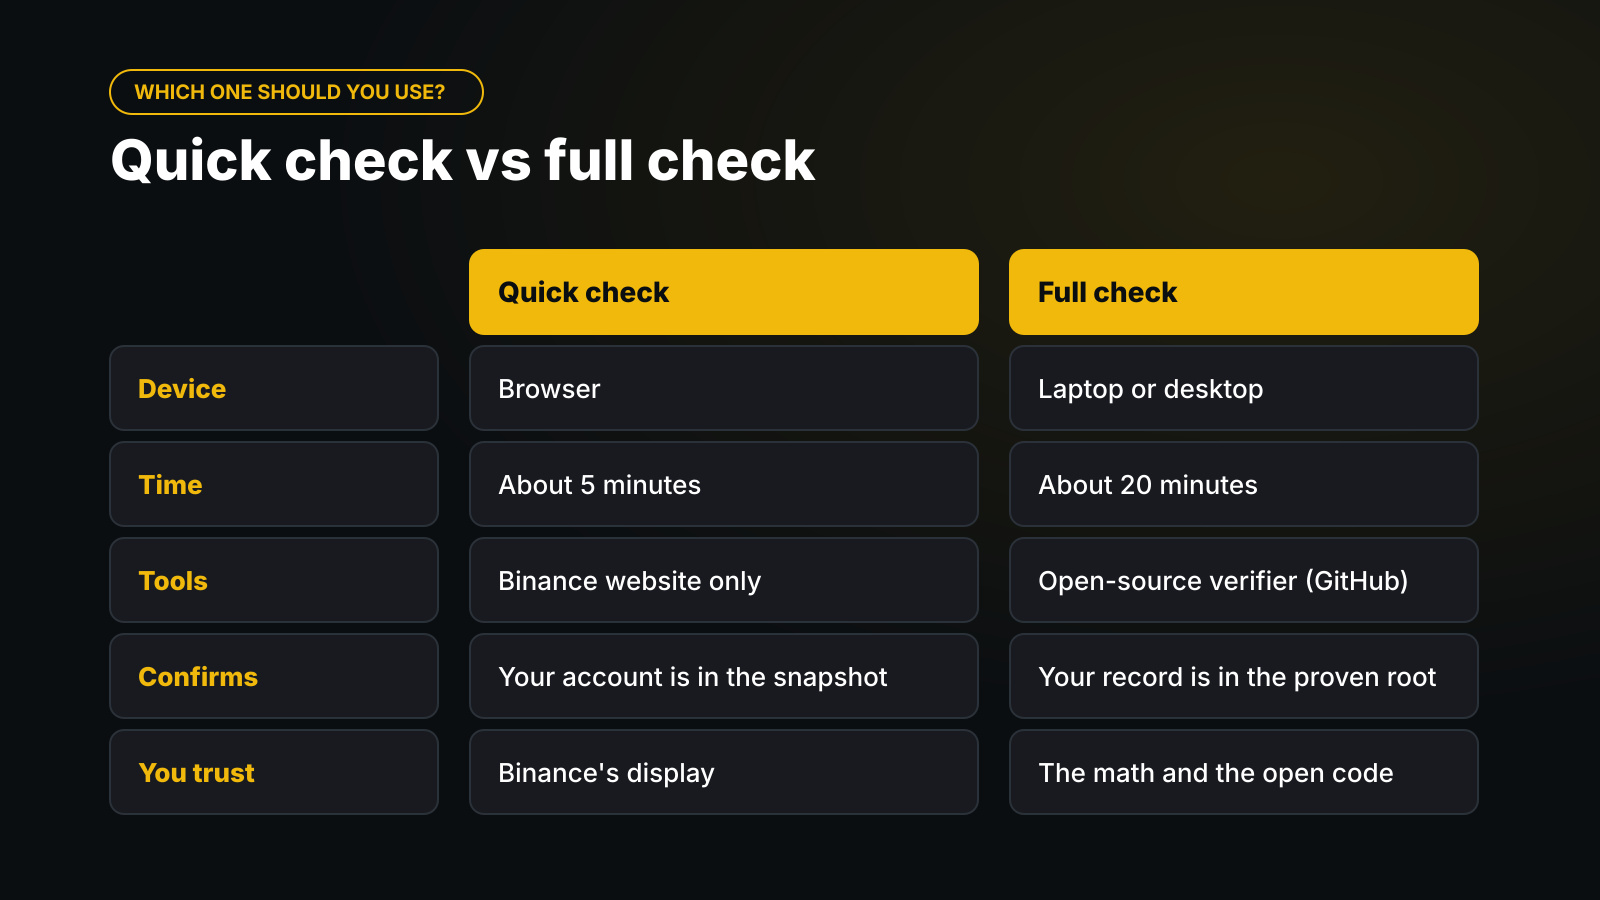
Use the quick check for peace of mind in a few minutes. Use the full check if you want proof that doesn't rely on anything Binance shows you.
What the Check Does Not Tell You
A balanced guide should say this clearly.
It's a snapshot. It shows coverage at one exact moment, not at every moment since.
It covers the assets listed. If a token isn't in the snapshot, your check doesn't cover it. That's why Binance planned a broader snapshot on November 4.
It's not a full financial audit. PoR compares user assets with reserves. It doesn't show every obligation a company has.
This isn't a weakness of the tool. It's what the tool is built to do. Used alongside your own security habits, it's one of the most concrete transparency checks a centralized exchange offers.
Verifying From Francophone Africa: Practical Tips
Many of us run our crypto entirely from a phone, often topped up through P2P with FCFA. Binance's official verification guide describes the steps on the website, and the full check needs a computer. A few practical tips:
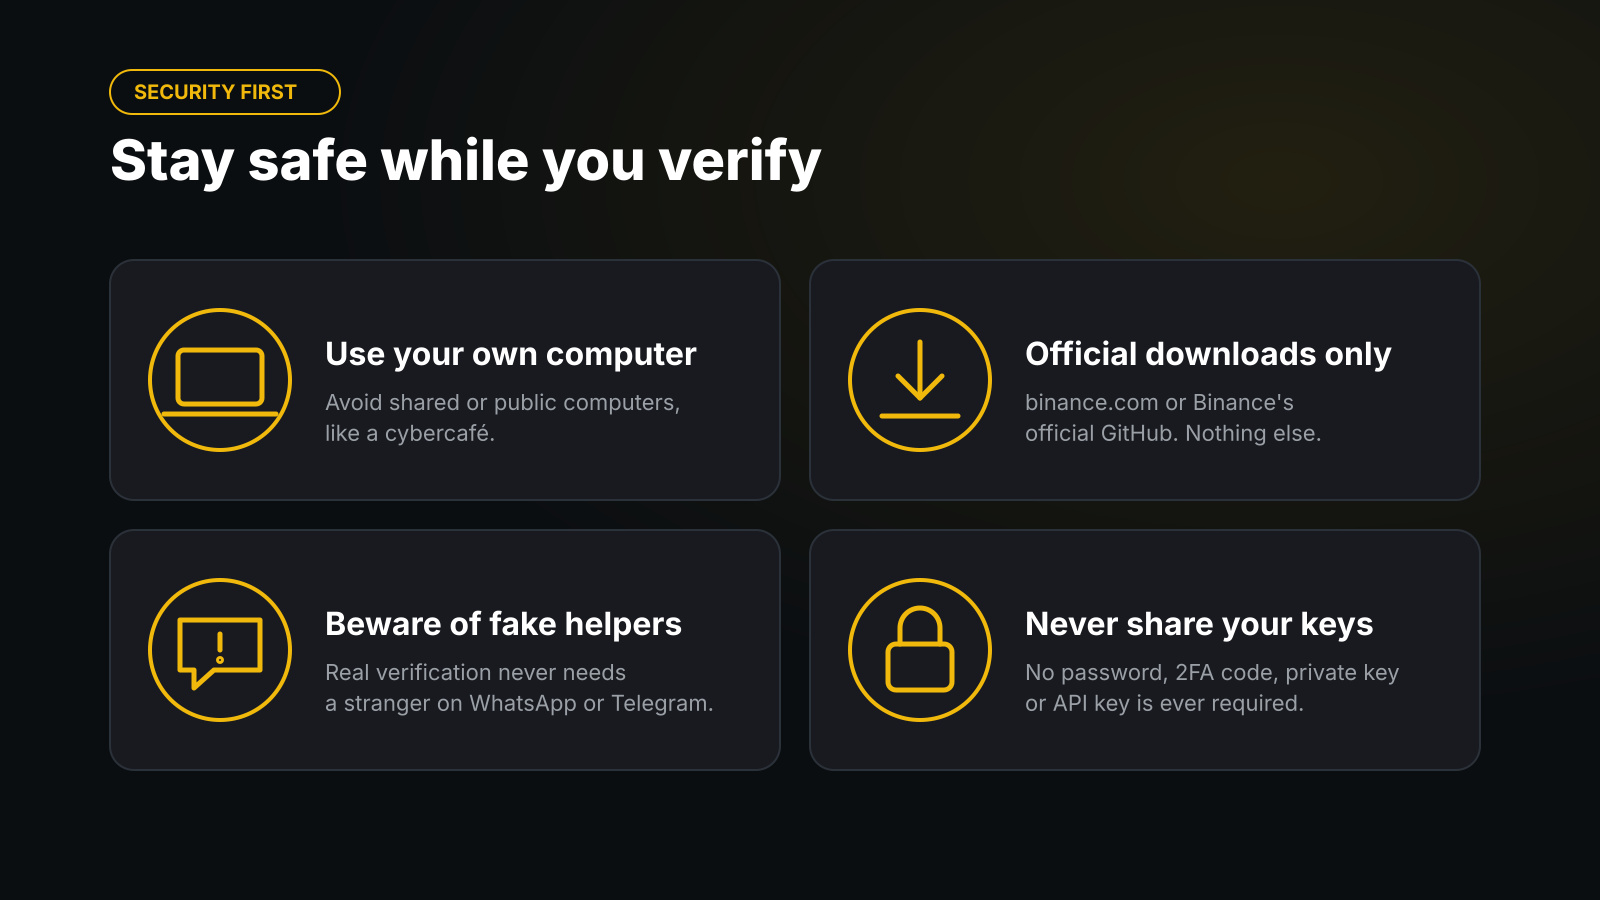
Use your own laptop or the computer of someone you trust. Avoid shared or public computers, like a cybercafé, for anything that involves logging in to your exchange account.
Download the verifier only from Binance's official GitHub or from links on binance.com. Never use a file someone sends you on WhatsApp or Telegram.
Be wary of messages offering to "verify your reserves" for you. No real verification ever needs your password, 2FA codes, private keys or API keys.
If you don't have a computer, the quick check in a browser is still worth doing. It takes a few minutes and you'll know your account appears in the snapshot.
Summary
You can confirm your own balance in Binance's Proof of Reserves in two ways. The quick check takes a few minutes on the Wallet → Verification page. The full check uses the open-source verifier to prove mathematically that your account is inside the published Merkle root. After the October 2026 incident, it's worth taking the few minutes to look.
FAQ
How often does Binance take a Proof of Reserves snapshot?
Normally once a month, at 00:00 UTC on the 1st, with results published by the 7th. Binance added extra snapshots on October 31 and November 4, 2026, after the security incident.
Can anyone else see my balance during verification?
No. Accounts are identified by a hashed ID, and the zk-SNARK proves the totals without revealing any individual balance. Only you see your own data when you're logged in.
Why doesn't my verified balance match my current balance?
Because the verification shows your holdings at the snapshot time. Anything you deposited, withdrew or traded afterwards won't appear until the next snapshot.
Sources
This article is for education only and isn't financial advice. Always DYOR.