
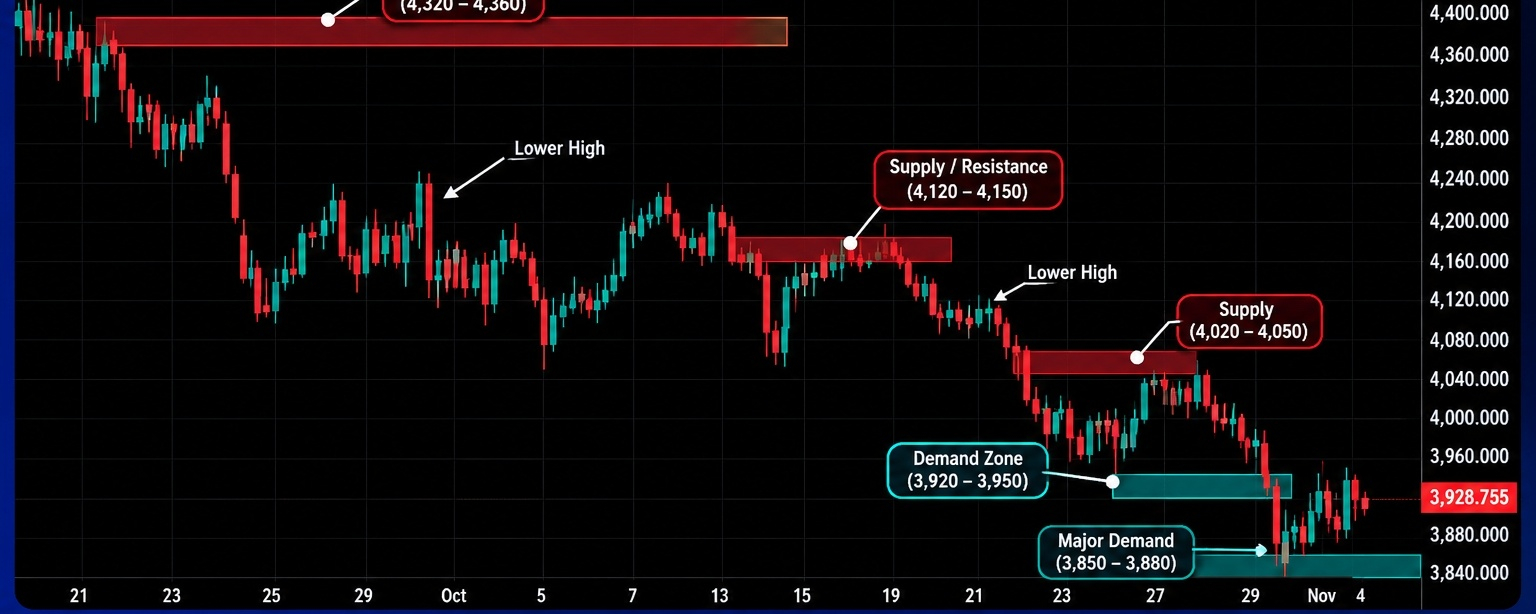

H4 Bias: Bearish
Structure State: Sustained bearish displacement from the 4,320–4,360 major supply region, followed by successive lower highs and lower lows. Price has declined through intermediate support and is consolidating around 3,880–3,950 demand.
Market Structure
$XAU maintains a clear bearish H4 structure following rejection from the major supply region at 4,320–4,360. The initial decline established successive lower highs and lower lows, with subsequent bearish displacement confirming the transition from the earlier consolidation into a sustained downward sequence.
The market encountered intermediate supply around 4,120–4,150, where another lower high developed before sellers extended the decline toward 4,020–4,050. This area subsequently acted as another supply region, reinforcing the bearish structure.
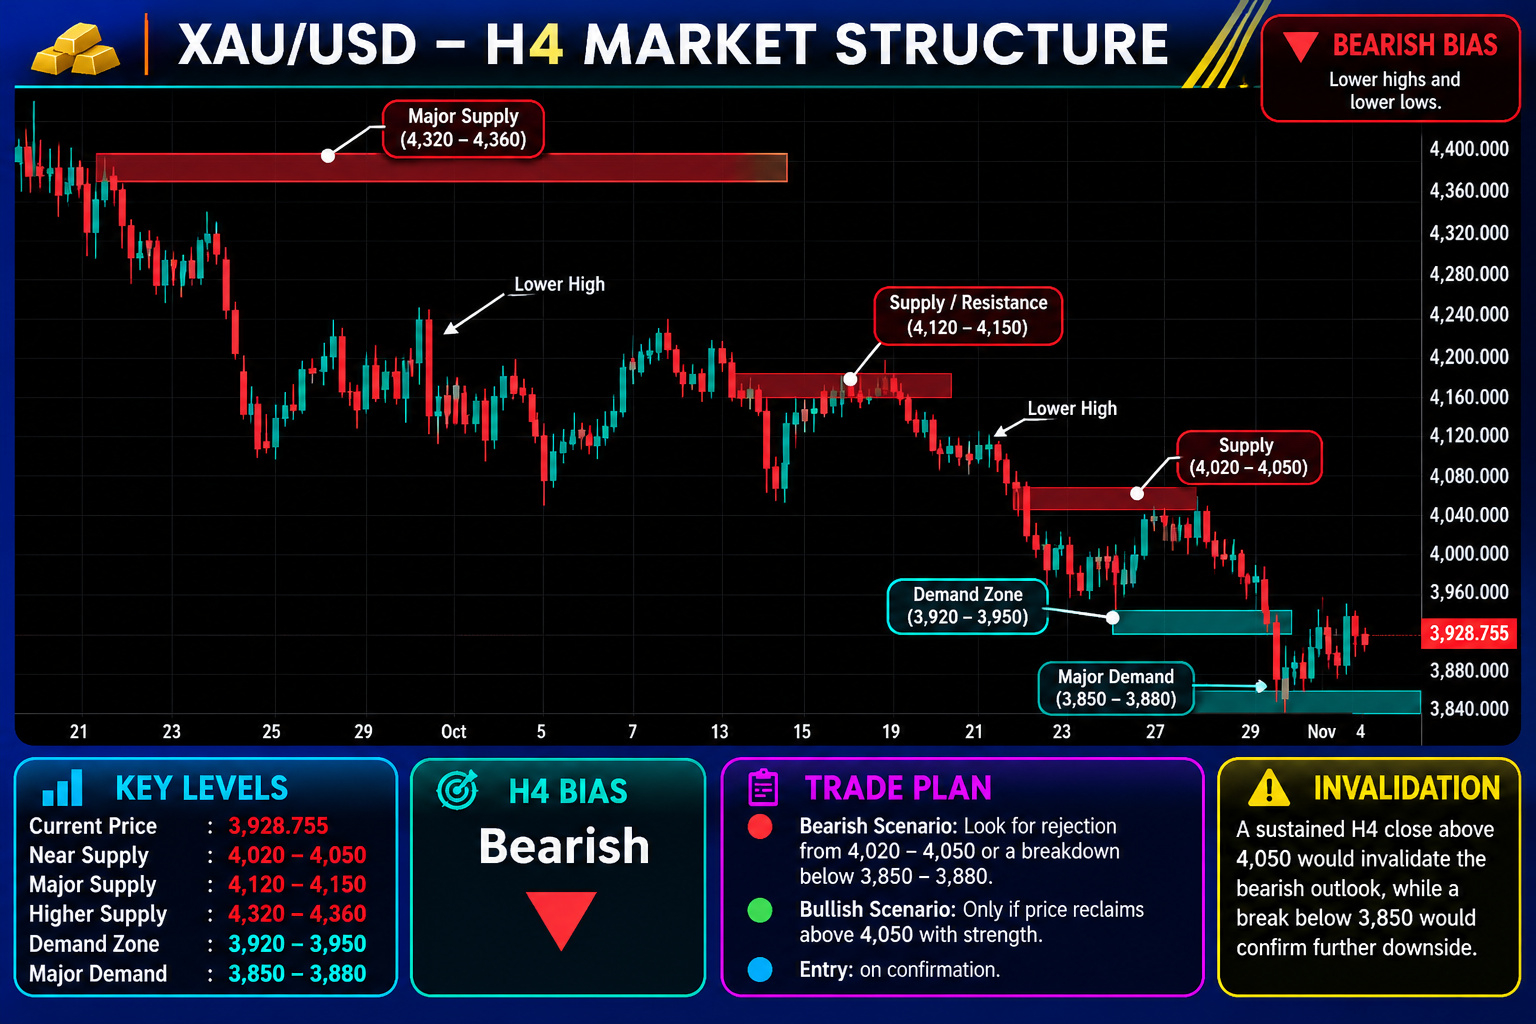
Price then moved lower toward the 3,920–3,950 demand zone, briefly approaching the major demand region at 3,850–3,880. The latest price action indicates a recovery from the lower demand area, but the broader sequence remains bearish. A sustained reclaim of nearby supply is necessary before considering a meaningful structural reversal.
Key Resistance
Resistance 1: 4,020–4,050 — immediate supply and potential bearish rejection region.
Resistance 2: 4,120–4,150 — intermediate supply and previous lower-high area.
Major Resistance: 4,320–4,360 — broader supply and origin of the significant bearish reversal.
Key Support
Support 1: 3,920–3,950 — immediate demand and current consolidation region.
Major Support: 3,850–3,880 — deeper demand zone and important downside liquidity area.
FVG — Fair Value Gap
The successive bearish displacement phases indicate potential bearish imbalances during the declines from 4,150 and 4,050. These areas should be assessed against the original three-candle formations before being treated as confirmed FVGs. The immediate focus remains on whether price can sustain its recovery from the 3,920–3,950 demand region.
Order Block (OB)
The 4,020–4,050 region represents the nearest supply and potential bearish order-block area. Above it, 4,120–4,150 provides another significant supply region. The 3,920–3,950 demand zone is the immediate area where bullish order-flow would need to develop to challenge the prevailing bearish structure.
Liquidity Map
Buy-side liquidity (BSL): Above the intermediate lower highs around 4,120–4,150 and the major supply region at 4,320–4,360.
Sell-side liquidity (SSL): Below the 3,920–3,950 demand area, with deeper liquidity around 3,850–3,880.
Liquidity consideration: A sustained break beneath major demand would expose further downside, while a recovery into supply could provide an opportunity for bearish continuation.
Trade Scenarios
Bearish continuation: Rejection from 4,020–4,050 would maintain the immediate bearish outlook. A decisive H4 breakdown below 3,920–3,950 would expose the 3,850–3,880 major demand region.
Bullish recovery: Sustained acceptance above 4,050 would improve the recovery structure and expose 4,120–4,150. A broader bullish reversal would require a meaningful reclaim of the major supply region rather than a temporary corrective rally.
Trendline
The broader sequence of lower highs confirms bearish directional pressure. The latest recovery from major demand represents a corrective move within the declining structure. The bearish trendline framework remains relevant until price establishes a confirmed higher high and reclaims significant resistance.
Invalidation
A sustained H4 close above 4,050 would weaken the immediate bearish-continuation scenario. A broader reclaim above 4,150 would further challenge the bearish structure, while sustained acceptance above 4,360 would invalidate the prevailing bearish thesis.
Professional Summary
Primary bias: Bearish.
Immediate supply: 4,020–4,050.
Major supply: 4,120–4,150.
Higher supply: 4,320–4,360.
Immediate demand: 3,920–3,950.
Major demand: 3,850–3,880.
Bearish trigger: Confirmed H4 breakdown below 3,920.
Recovery trigger: Sustained reclaim of 4,050, followed by 4,120–4,150.
Risk consideration: Gold is trading close to an important demand region. A temporary recovery should not be interpreted as a confirmed reversal without a corresponding change in H4 market structure.