



ONDO’s intraday chart shows a recovery after price fell toward $0.44, while reported 24-hour trading volume increased 145.3%.
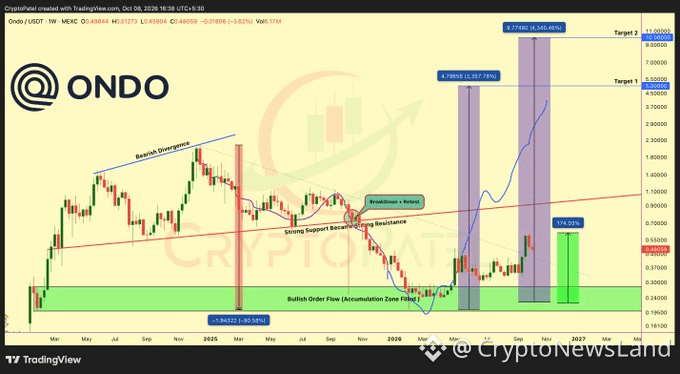
The weekly chart identifies 0.20–0.27 as an accumulation zone preceding the recovery and the proposed longer-term targets.
The $5 and $10 targets remain conditional projections, with no defined timeline or detailed valuation model provided in the chart.
ONDO’s weekly chart shows a recovery structure built around a marked accumulation zone, with higher price levels outlined in its long-term projection.
ONDO Rebounds Following Intraday Volatility
Crypto Patel reports that ONDO gained 174% from the 0.20–0.27 entry zone, recently reaching $0.60. The post retains $5 as the first target and $10 as the macro objective if the higher-timeframe accumulation structure develops. Separately, the intraday chart records ONDO at $0.4874, up 0.87% over 24 hours.
 Source: X
The price initially climbed toward $0.50 before falling sharply below $0.47. Selling continued toward $0.44, where the token fluctuated before recovering. ONDO then moved above $0.47 and returned toward the 0.48–0.49 range.
Another pullback briefly pushed the price below $0.47 during the evening. The token subsequently recovered, finishing near $0.487 on the displayed chart. This sequence shows a sharp decline followed by a substantial rebound within the session.
The volume of trading was around $503.1 million, up a reported 145.3%. The market cap was around $2.37 billion and the fully-diluted valuation was around $4.87 billion. These statistics are used to illustrate the activity that has been surrounding the price change.
Weekly Chart Marks the Accumulation Zone
The weekly ONDO/USDT chart identifies a green accumulation area around 0.20–0.27. This region follows an extended decline from earlier highs and a period of consolidation. The chart labels it “Bullish Order Flow (Accumulation Zone Filled).”
Earlier price action shows ONDO advancing through 2024 before weakening during 2025. A blue trendline marks a previous bearish divergence on the chart. Price later declined toward the accumulation region before beginning its recovery.
An ascending red trendline crosses several historical price levels. The chart labels this area “Strong Support Becoming Resistance” and marks a “BreakDown + Retest” region. These annotations describe the historical structure behind the chart’s bullish interpretation.
The supplied statistics list circulating supply at 4.86 billion ONDO. Maximum supply is 10 billion tokens, while total value locked stands near $965.79 million. The displayed holder count is approximately 215,310.
$5 and $10 Remain Conditional Targets
The weekly chart marks $5 as Target 1 and $10 as Target 2. Both levels sit substantially above the recent trading range. A projected blue path illustrates a possible upward trajectory with intervening fluctuations.
The graphic does not specify when either target might be reached. It also provides no detailed valuation model explaining the proposed levels. Therefore, both figures remain projections within the displayed technical scenario.
The longer-term outlook depends on the accumulation structure developing as anticipated. The chart connects that scenario with the marked support zone and subsequent recovery. However, the supplied information does not establish that either target will be achieved.
The intraday chart records a rebound after sharp selling pressure. Meanwhile, the weekly chart focuses on the accumulation area and higher projected levels. Subsequent price action will determine whether the broader structure continues to develop as illustrated.