⚡ XRP IS TESTING A MAJOR SUPPORT CLUSTER
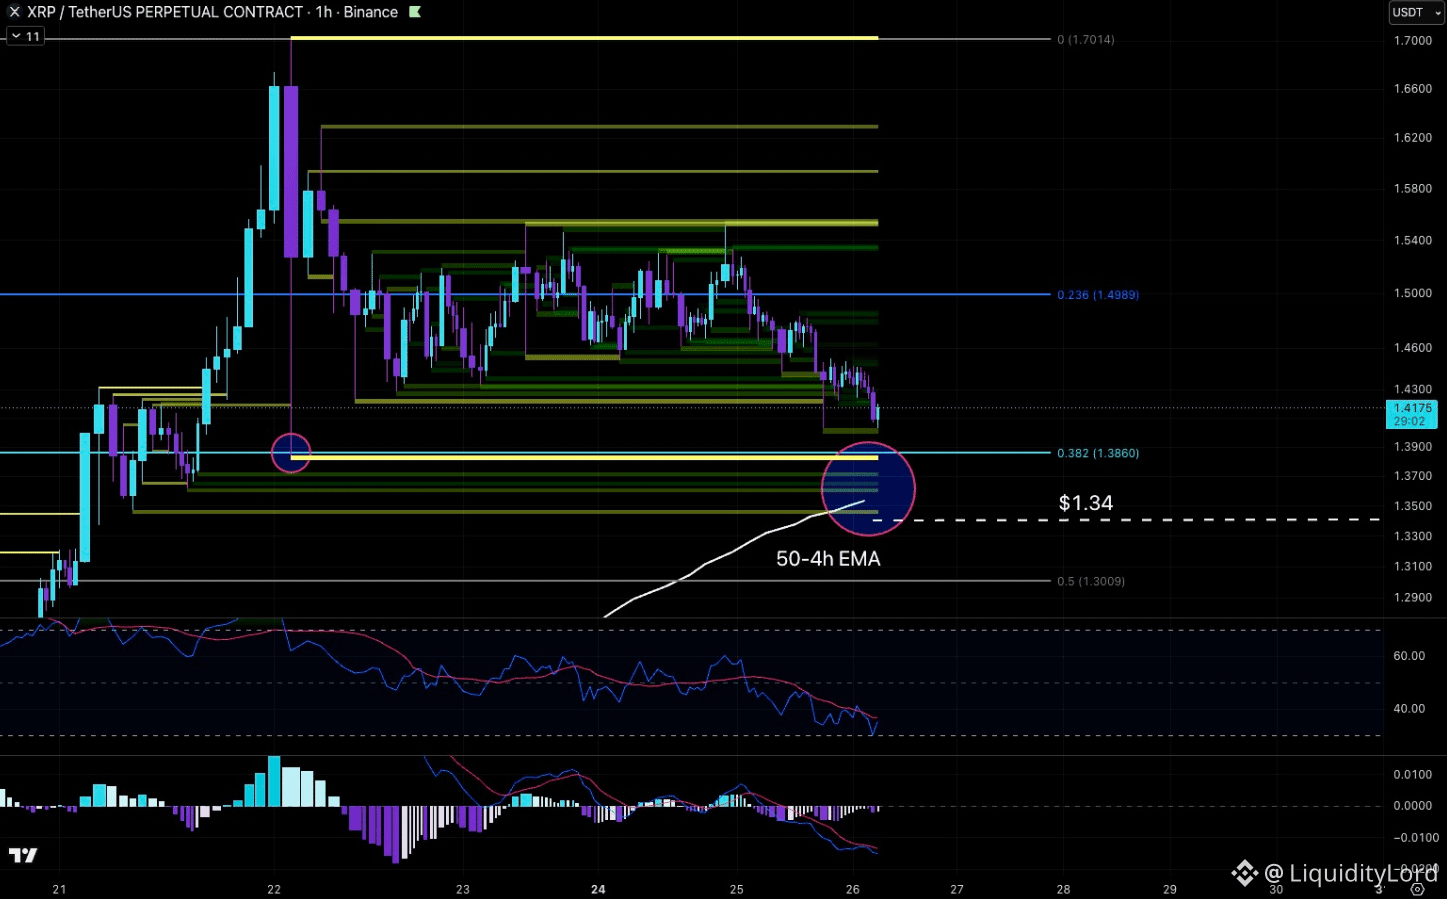
XRP trades around 1.4175 on the 1h chart after fading from the 1.54-1.56 resistance area. Price is now approaching the 1.386 Fibonacci level and the 50-4h EMA zone near 1.34-1.38.
📊 STRUCTURE CHECK
The key area is 1.386. The EMA cluster below adds another layer of support.
If buyers defend this zone, XRP can attempt a recovery toward 1.50. A clean reclaim of 1.4989 would improve the short-term structure and reopen higher resistance.
🎯 TARGET MAP
TP1: 1.5000
TP2: 1.5400
TP3: 1.5800
Stop Loss: 1.3400
TP1 is the first recovery checkpoint. TP2 is the main overhead resistance, while TP3 is the broader continuation target.
⚠ INVALIDATION
The bullish scenario weakens if XRP loses 1.386 and fails to reclaim it. A break below 1.34 would damage the support structure.
🧩 EXECUTION DYNAMICS
STONfi is relevant to execution, not the XRP thesis. Near key levels, liquidity can change quickly as traders adjust orders, spreads and depth. RFQ-based routing allows competing resolvers to search fragmented liquidity and compare quotes before execution.
This matters during volatility. XRP's chart determines whether 1.386 holds and whether recovery can develop, while STONfi operates at the execution layer. It does not create XRP's structure, but routing efficiency matters when liquidity shifts.
TON remains the broader ecosystem reference; XRP needs independent confirmation.
🔎 MY PLAN
I would avoid chasing weakness. My preferred scenario is a defense of 1.386-1.34 followed by a reclaim of 1.50.
If buyers recover 1.50, 1.54 becomes the next checkpoint and 1.58 the broader target. If XRP loses 1.34, I would step aside.
The move is not confirmed as a reversal yet. Buyers still need to show that support can hold and that the market can reclaim resistance without immediately losing the level again.
NFA - DYOR
$XRP
XRP trades around 1.4175 on the 1h chart after fading from the 1.54-1.56 resistance area. Price is now approaching the 1.386 Fibonacci level and the 50-4h EMA zone near 1.34-1.38.
📊 STRUCTURE CHECK
The key area is 1.386. The EMA cluster below adds another layer of support.
If buyers defend this zone, XRP can attempt a recovery toward 1.50. A clean reclaim of 1.4989 would improve the short-term structure and reopen higher resistance.
🎯 TARGET MAP
TP1: 1.5000
TP2: 1.5400
TP3: 1.5800
Stop Loss: 1.3400
TP1 is the first recovery checkpoint. TP2 is the main overhead resistance, while TP3 is the broader continuation target.
⚠ INVALIDATION
The bullish scenario weakens if XRP loses 1.386 and fails to reclaim it. A break below 1.34 would damage the support structure.
🧩 EXECUTION DYNAMICS
STONfi is relevant to execution, not the XRP thesis. Near key levels, liquidity can change quickly as traders adjust orders, spreads and depth. RFQ-based routing allows competing resolvers to search fragmented liquidity and compare quotes before execution.
This matters during volatility. XRP's chart determines whether 1.386 holds and whether recovery can develop, while STONfi operates at the execution layer. It does not create XRP's structure, but routing efficiency matters when liquidity shifts.
TON remains the broader ecosystem reference; XRP needs independent confirmation.
🔎 MY PLAN
I would avoid chasing weakness. My preferred scenario is a defense of 1.386-1.34 followed by a reclaim of 1.50.
If buyers recover 1.50, 1.54 becomes the next checkpoint and 1.58 the broader target. If XRP loses 1.34, I would step aside.
The move is not confirmed as a reversal yet. Buyers still need to show that support can hold and that the market can reclaim resistance without immediately losing the level again.
NFA - DYOR
$XRP