
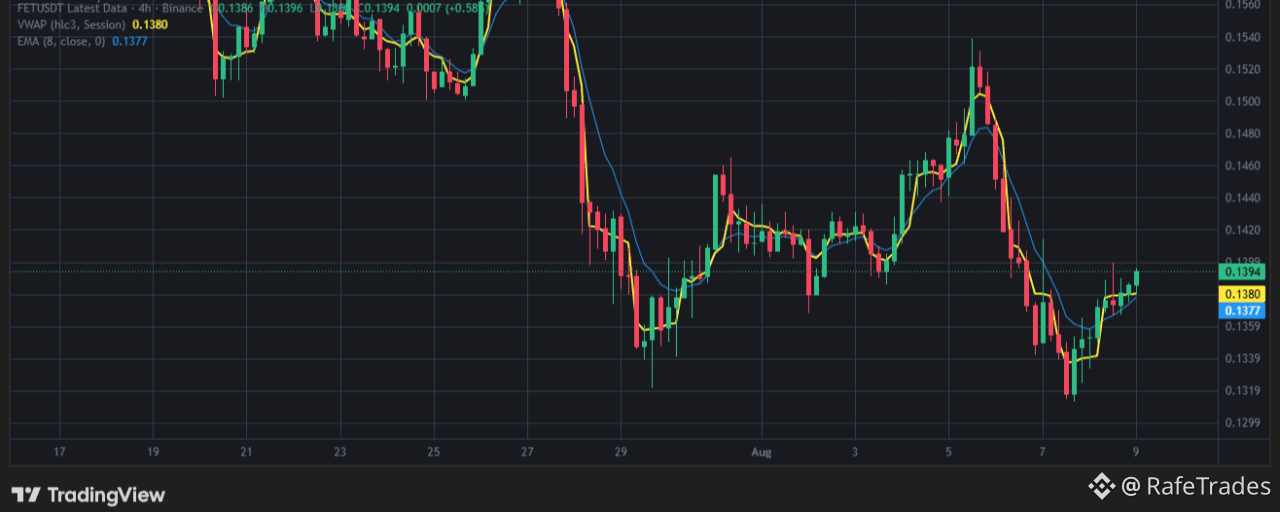
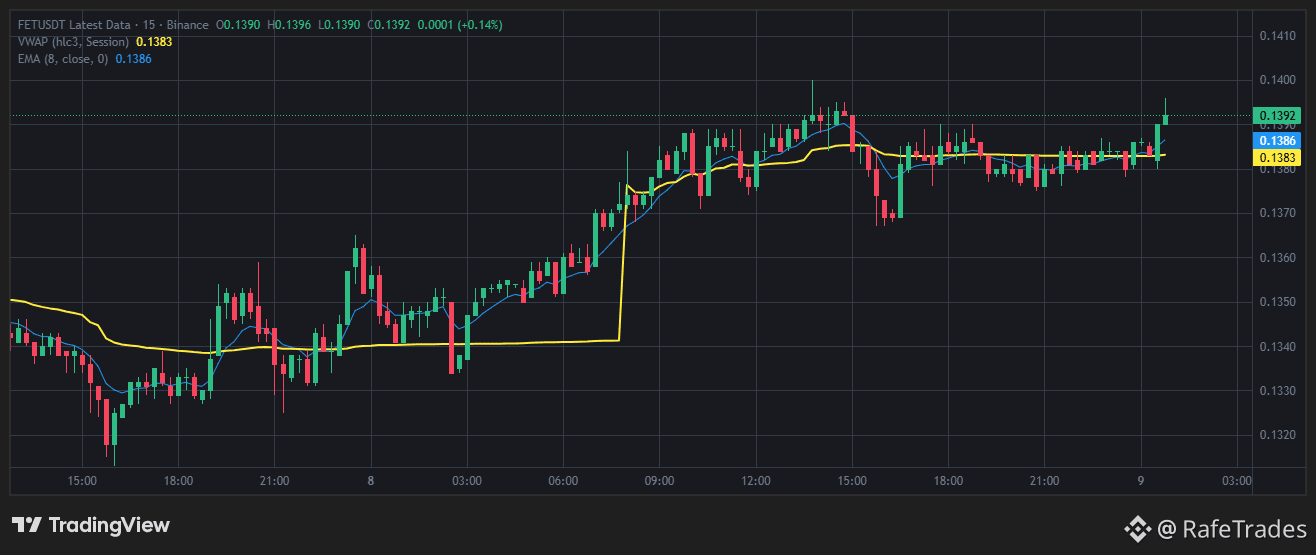
H4 holds the bid; M15 is coiling for the next impulse leg up.
The Macro Battlefield (H4)
$FET is trading above the H4 VWAP (0.1380) and the H4 EMA 8 (0.1377)—this is a bullish macro structure.
Price has been grinding higher since the August lows, forming a series of higher lows.
The 0.1386 swing low was aggressively defended. Smart money is accumulating.
Major liquidity sits overhead at 0.1399, 0.1420, and 0.1440.
The Micro Sniper Entry (M15)
$FET is hovering at 0.1392, sitting above the M15 VWAP (0.1383) and above the M15 EMA 8 (0.1386).
This is a tight compression coil—price is locked in a razor-thin range.
The M15 VWAP is acting as dynamic support—every dip is getting bought.
A micro BOS confirmed the macro trend shift. FET is primed for the breakout.
The Institutional Liquidation Map
Downside Trap (The Bids): 0.1383 (M15 VWAP) and 0.1377 (H4 EMA). Any flush here is a liquidity grab to fake out sellers.
Upside Magnets: Immediate target at 0.1396 (recent high), then 0.1399 and 0.1420 (major supply blocks).
Asymmetric Math: Risking ~0.0008 points to catch a ~0.0037 point rip to 0.1420. That is a 1:4.6 Risk-to-Reward setup.
Tactical Execution Plan (High-Win-Rate Lock)
Core Bias: BULLISH. BUY THE PULLBACK or BREAK THE RESISTANCE.
Trigger A (The Dip Snipe): Set limit bids at 0.1383 - 0.1386 (M15 VWAP/EMA retest zone). Wait for $FET to come to your bid.
Trigger B (The Aggressor): Enter on a 15-minute close above 0.1396 to catch the breakout momentum.
Ultra-Tight Stop-Loss: 0.1375 (below the H4 EMA safety net).
Take Profits:
1st Clip: 0.1399 (1:2 RR from the dip entry).
2nd Clip: 0.1420 (1:4.6 RR).
"No Man's Land" Kill Zone: Between 0.1390 and 0.1394—do NOT chase the mid-range. Let FET come to your discount zone or wait for the breakout confirmation.
Are you bidding the 0.1383 VWAP dip, or smashing the ask above 0.1396 for the breakout? Drop your exact entry level below. 👇