

Opening a Binance.com account from Egypt is mostly about three screens: the Register Welcome form (email or phone), attaching sign-up code GETREWARD on a new eligible account, and Identification with residence Egypt plus a clear Egyptian ID. Get those right and you avoid the usual reject loop — blurry National ID Card photos, name mismatches, and “wrong country” document types.
Educational only, not financial advice. Document menus, review times, and product availability change; confirm every step on your live Binance.com login. Identity data is sensitive — upload only on the official site or app, never through a chat link.
👉
Sign up on Binance with GETREWARD
Affiliation note: the sign-up link above uses my code GETREWARD.
Eligible new users can also work through the welcome bonus of up to 19,800 USDT on the same task list that ships with every sign-up code. Finish those tasks on your own schedule after the account is Verified. GETREWARD is a sign-up / welcome path only — it does not change Spot or Futures fee rates.
Quick facts for Egypt signup + KYC
Product: Binance.com global account (country selector Egypt) — not a separate local Egyptian brokerage
Age: 18+
Entry path: Register → confirm email/phone → Profile / Account → Identification → Get Verified
Docs (MENA FAQ tone): National ID Card (most recommended), Passport, or Driver's License — use what your live form lists
Extra step: Face / liveness scan; clear original ID both sides when the card path asks
Name rule: Account name must match the ID; you cannot freely edit after confirm
Typical review: Often within about 48 hours; some cases take longer
Those points follow Binance’s published personal-account identity guidance for MENA-facing flows. The exact Document Type list is built from the residence and issuing-country answers you pick — so open the form and read what Egypt returns for you.
Step 1 — Confirm you are on Binance.com (not a lookalike)
Type www.binance.com yourself (or open the official app tied to that same account). Skip chat DMs, “support” Telegram links, and hosts with extra words in the domain. The lock icon alone does not prove the host is real.
This guide stays on the global Binance.com product with country selector Egypt. Do not invent a parallel “Binance Egypt brokerage” licence story. Availability of P2P, fiat rails, and other features still depends on what your logged-in account shows after verification.
If you already finished a careful EGP buy checklist after Verified, keep this related guide handy:
Binance Egypt EGP P2P Buy USDT Checklist 2026
This article stops at account create + KYC.
Step 2 — Create the account and find the sign-up code field
Open Register on binance.com.
Choose email or phone as the form offers.
Set country / region of residence to Egypt when the selector appears. That answer shapes later document menus.
Look for the sign-up code field (sometimes under “Got a sign-up code?” or a similar expand control). Enter GETREWARD if you want the welcome task list attached from day one on an eligible new account.
Confirm the email or SMS code.
Finish password / passkey setup as prompted, then log in once.
Worked timing example (Cairo evening, first try):
T+0: Type binance.com → Register
T+1: Email + Egypt residence + expand sign-up code → paste the code from the intro
T+2: Confirm 6-digit email code
T+4: First login complete; open Identification
The join link in the intro only helps on a brand-new eligible account. It does not bypass KYC and it does not unlock products that your region still blocks.
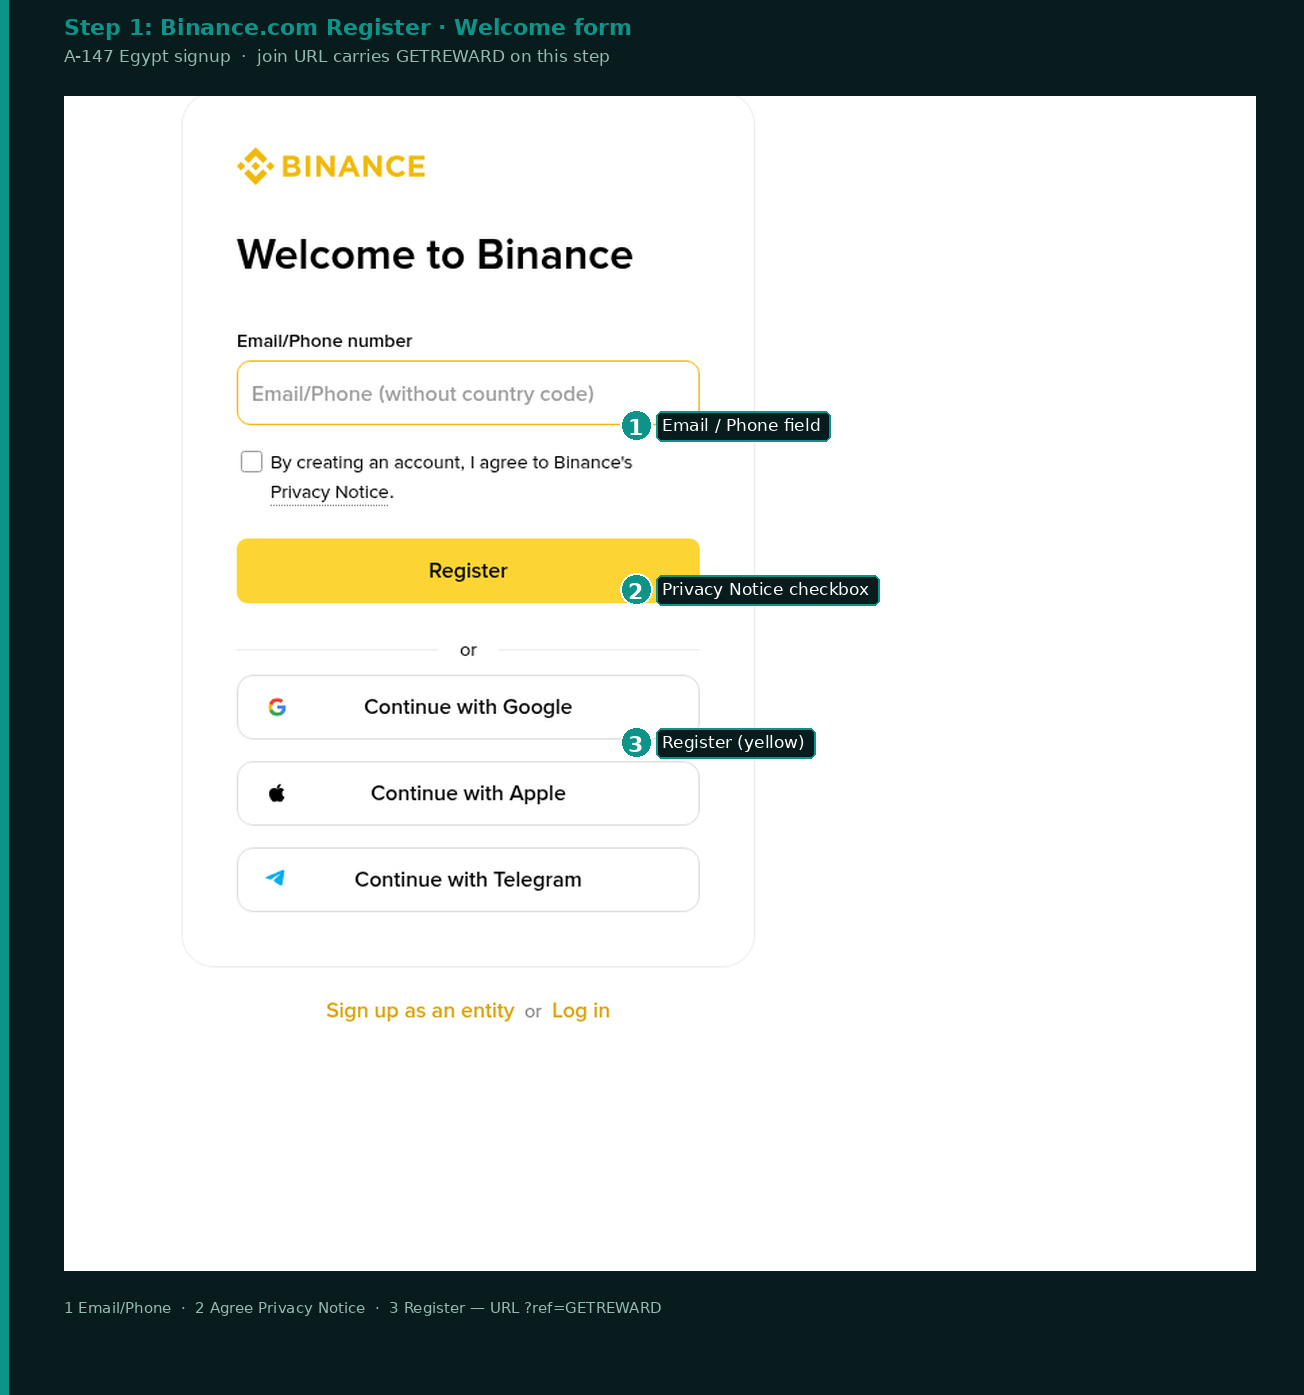
Binance.com Register Welcome — Email/Phone, Privacy Notice, Register; join URL carries GETREWARD.
Step 3 — Harden login basics before you upload ID
Before you photograph a National ID Card, spend two minutes on account hygiene the form already supports:
Turn on authenticator 2FA (app-based), not SMS-only if you have a choice.
Set an anti-phishing code so official Binance emails show a word you chose.
Use a password manager or a long unique password — do not reuse a bank password.
This guide does not walk through security-settings screenshots, withdrawal allowlists, or fund moves. Keep funds out of the story until Verified shows and you know the next product path (for many Egypt users that is EGP P2P after KYC).
Step 4 — Open Identification and set Egypt correctly
Path on the website: hover the profile icon → Account → Identification → Get Verified. Some home banners also show Verify after login.
Slow down on the country questions:
Residence — where you actually live (Egypt for this guide).
Document Issuing Country/Region — the country that issued the physical document in your hand.
Document Type — only the options the form lists for those answers.
For many Egypt-resident users holding an Egyptian National ID Card, that means residence Egypt, issuing country Egypt, then National ID Card (or the exact label the UI shows). Passport and Driver's License appear on MENA-facing FAQ lists as alternatives when the menu offers them — use only what your screen lists.
Mismatch that burns a review cycle: residence Egypt, but you upload a passport issued by another country while the form expected an Egypt-issued ID for that path. Fix: restart Verification, align residence + issuing country + document type with the plastic or passport you will photograph, then upload.
For a country-style lighting and reject checklist on the same Identification menu pattern, keep this process model nearby:
Binance Turkey KYC National ID Checklist 2026
Then swap in the Egyptian document types your own form lists.
Step 5 — Prepare Egyptian documents before the first photo
Binance’s MENA FAQ tone for personal verification commonly lists:
National ID Card — most recommended when you hold one; expect both front and back.
Passport — biodata page, all four corners in frame.
Driver's License — only if the live menu offers it for your answers; both sides if asked.
Pre-flight checklist for an Egyptian National ID Card:
You are 18+
Card is the physical original (not a photocopy, not a photo of a screen)
Not expired
Full name readable; no finger covering the photo or the ID number
Both sides ready in the same session
Account profile name will match the Latin / Arabic spelling the form asks you to type
Passport path: open the biodata page, avoid laminate glare, keep corners visible.
Do not upload a screenshot of a government portal image unless the live form explicitly offers that option for Egypt.
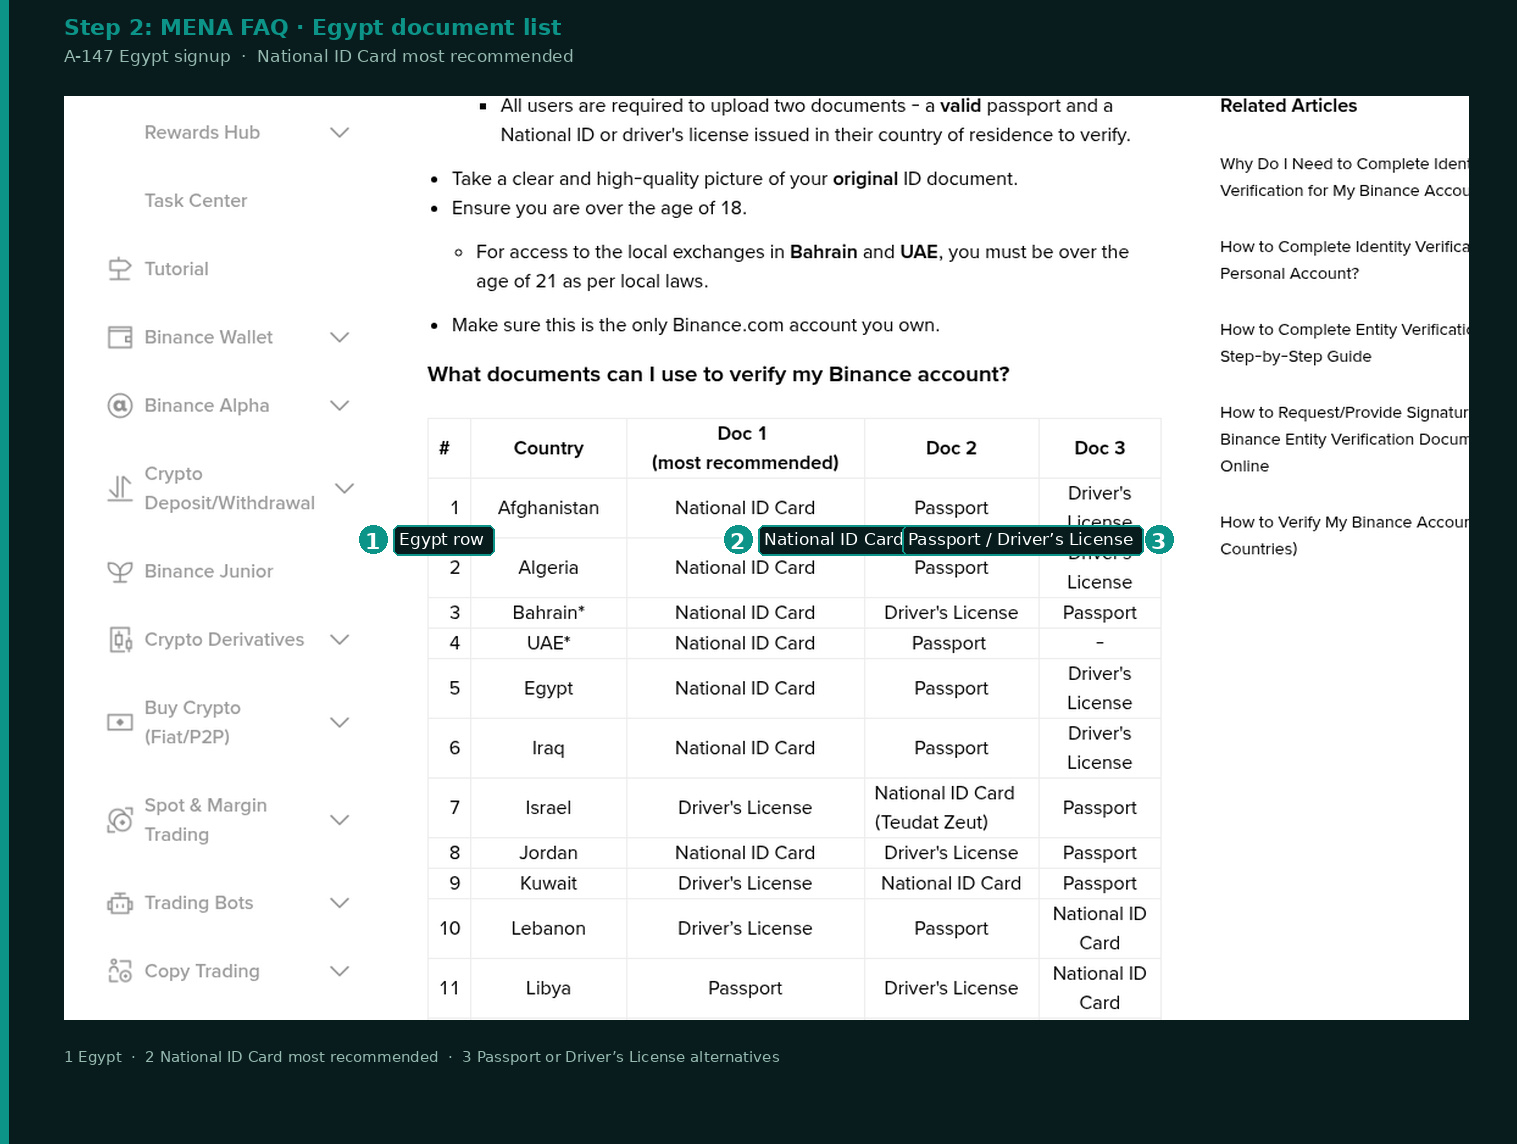
For Egypt, use the physical original card whenever the live form requires one.
MENA FAQ documents — Egypt row: National ID Card / Passport / Driver’s License.
Step 6 — Lighting and camera setup that passes first time
Liveness notes from Binance’s identity guidance are blunt: enable camera access, do not wear hats or heavy glasses, do not use filters, and make sure lighting is sufficient. The same habits apply to document shots.
Worked lighting setup (desk, evening, Cairo apartment example):
Sit facing a window or a lamp that lights your face from the front, not from behind.
Place the ID on a dark, non-reflective mat so edges stay visible.
Hold the phone parallel to the card; do not shoot at a steep angle that warps the rectangle.
Turn off beauty filters and portrait blur in the camera app.
Take one test photo of the front, zoom in on the name line and the ID number — if either is soft, move closer or add light, then reshoot.
Glare test: tilt the card a few degrees until chip or laminate shine moves off the photo and the text. Capture when the shine is gone.
Step 7 — Upload, liveness, then confirm personal details once
Follow the on-screen order:
Upload front (and back for ID cards).
Continue to the face / liveness check. Center your face, follow head-turn or expression prompts, keep eyes open, no hat or heavy glasses.
Confirm personal information. Spell the name exactly as on the ID, match date of birth, and double-check before Continue — Binance states you will not be able to change it freely once confirmed.
Submit and wait for the review notification. Do not spam resubmits every ten minutes; that usually creates duplicate tickets, not faster approval.
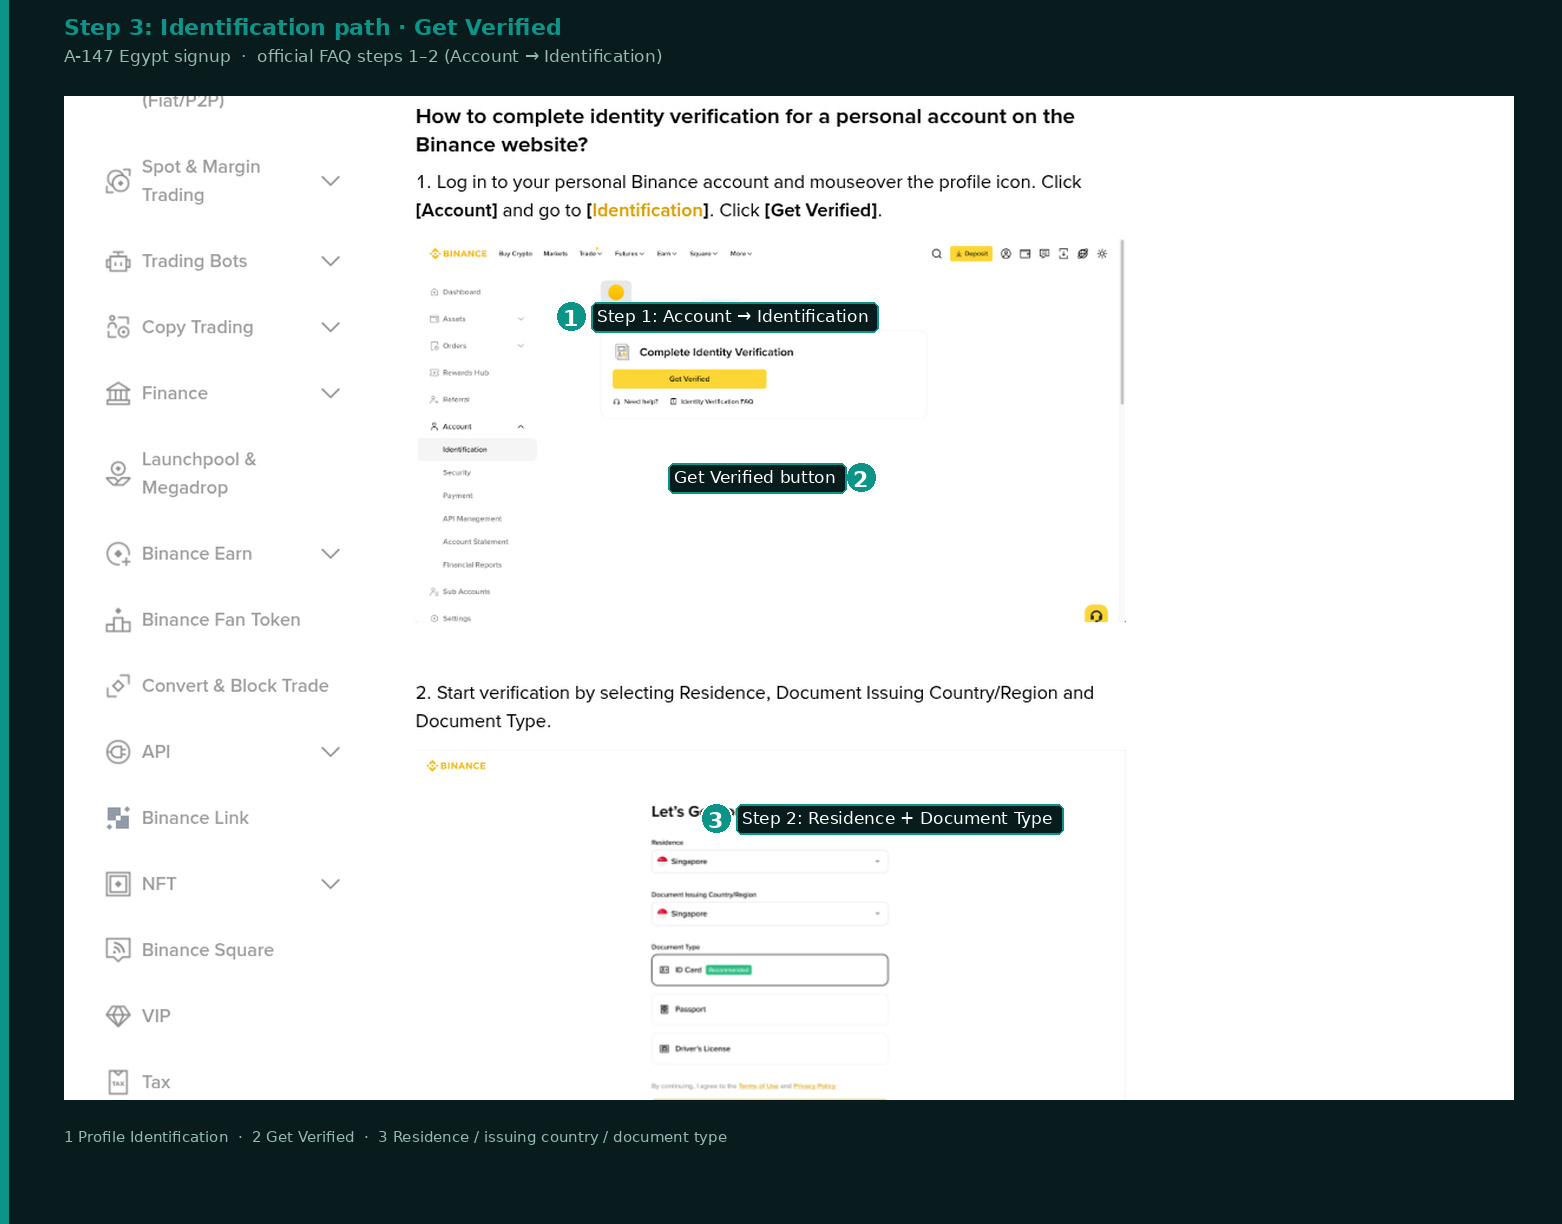
Identity verification path — Account → Identification → Get Verified; Residence + Document Type.
Worked reject → fix loop (teaching example)
Blurry / soft text: Phone too far or low light. Fix: Closer shot + front light; recheck name line
Glare on photo: Laminate shine over face. Fix: Tilt card until shine leaves the portrait
Cropped edges: Thumb or frame cut a corner. Fix: Retake with all four corners visible
Wrong document type: Passport uploaded on National ID path. Fix: Restart Verification; pick matching Document Type
Name mismatch: Typo vs ID spelling. Fix: Correct at confirm step before you lock the name
Liveness fail: Hat, filter, or dark room. Fix: Remove glasses/hat; face a lamp; retry once calmly
One clean resubmit beats five rushed ones.
Step 8 — Read Verified status before you chase products
After approval, Identification usually shows a Verified (or equivalent) state. Only then:
Open products your account actually lists (for many Egypt users the natural next lesson is EGP P2P buy habits — see the Egypt EGP checklist linked above).
Start welcome tasks on your own schedule if the account is eligible and the sign-up code was applied at register.
Keep 2FA and anti-phishing habits on; do not chase “support” DMs that ask for ID photos again.
If status stays Pending past the FAQ window, open the in-app / site support ticket from the same logged-in account with the verification reference — not from a third-party chat.
Full tick list beside the phone
Official binance.com session (typed yourself)
Residence set to Egypt on register / identity forms
Sign-up code GETREWARD entered only if this is a new eligible account you want welcome tasks on
Age 18+; authenticator 2FA on; anti-phishing word set
Identification → Get Verified opened
Document type matches the plastic or passport in hand (National ID Card most common)
Clear original photos both sides when asked; no photocopy / screen photo
Liveness passed without hat / filter / heavy glasses
Personal details confirmed once; name matches ID
Verified status visible before any large product step
Next step bookmarked: Egypt EGP P2P checklist after Verified (optional)
FAQ
Is Binance licensed as an Egyptian brokerage?
This guide does not claim that. It walks the Binance.com global product with country selector Egypt. Product availability is what your verified login shows.
Which ID should Egypt users upload first?
When you hold an Egyptian National ID Card, that is the most recommended path on MENA FAQ tone. Passport or Driver's License only if your live Document Type menu lists them for your residence and issuing-country answers.
Where is the sign-up code field?
On the Register form, expand the sign-up / “Got a code?” control and paste the same code from the intro before you submit. The join link can also attach it on a brand-new eligible account.
How long does KYC take?
Often within about 48 hours; some cases take longer. Lighting rejects and name mismatches add a full extra cycle.
Can I deposit or use P2P before Verified?
Limited accounts often cannot complete fiat P2P cleanly. Finish Identification first, then follow an EGP buy checklist if that is your next goal.
Does the sign-up code change Spot or Futures fees?
No. Sign-up code GETREWARD attaches welcome tasks for eligible new accounts. It does not cut Spot or Futures fee rates and it does not change P2P ad prices.
Ready to finish Egypt signup + KYC
Keep this setup guide beside your National ID Card for the first upload. Prefer one clear photo session over five blurry retries. After Verified shows, decide whether your next step is a careful EGP P2P buy, Spot practice size, or simply completing welcome tasks.
New accounts that still need the welcome task list can use sign-up code GETREWARD from the intro link above. See current tasks on:
after identity is on track.
Crypto involves risk of loss. Only use money you can afford to lose; this page is educational, not a recommendation to buy or sell any asset.