


$JASMY Spot Accumulation Strategy: Complete Institutional Execution Plan
Most retail traders lose capital not because their directional bias is wrong, but because they enter with poor risk management, chase market pumps out of FOMO, and get shaken out by routine wicks.
If you cannot sit in front of charts 24/7, market orders are your worst enemy. A systematic trader relies on pre-planned limit orders, multi-tiered Dollar-Cost Averaging (DCA), and strict position sizing. Below is a structured CEX Spot Accumulation Plan for $JASMY.
(Note: Figures are modeled on a standard $100 base allocation to make the risk math clear and scalable for any portfolio size.)
1. Market Structure & On-Chain Audit
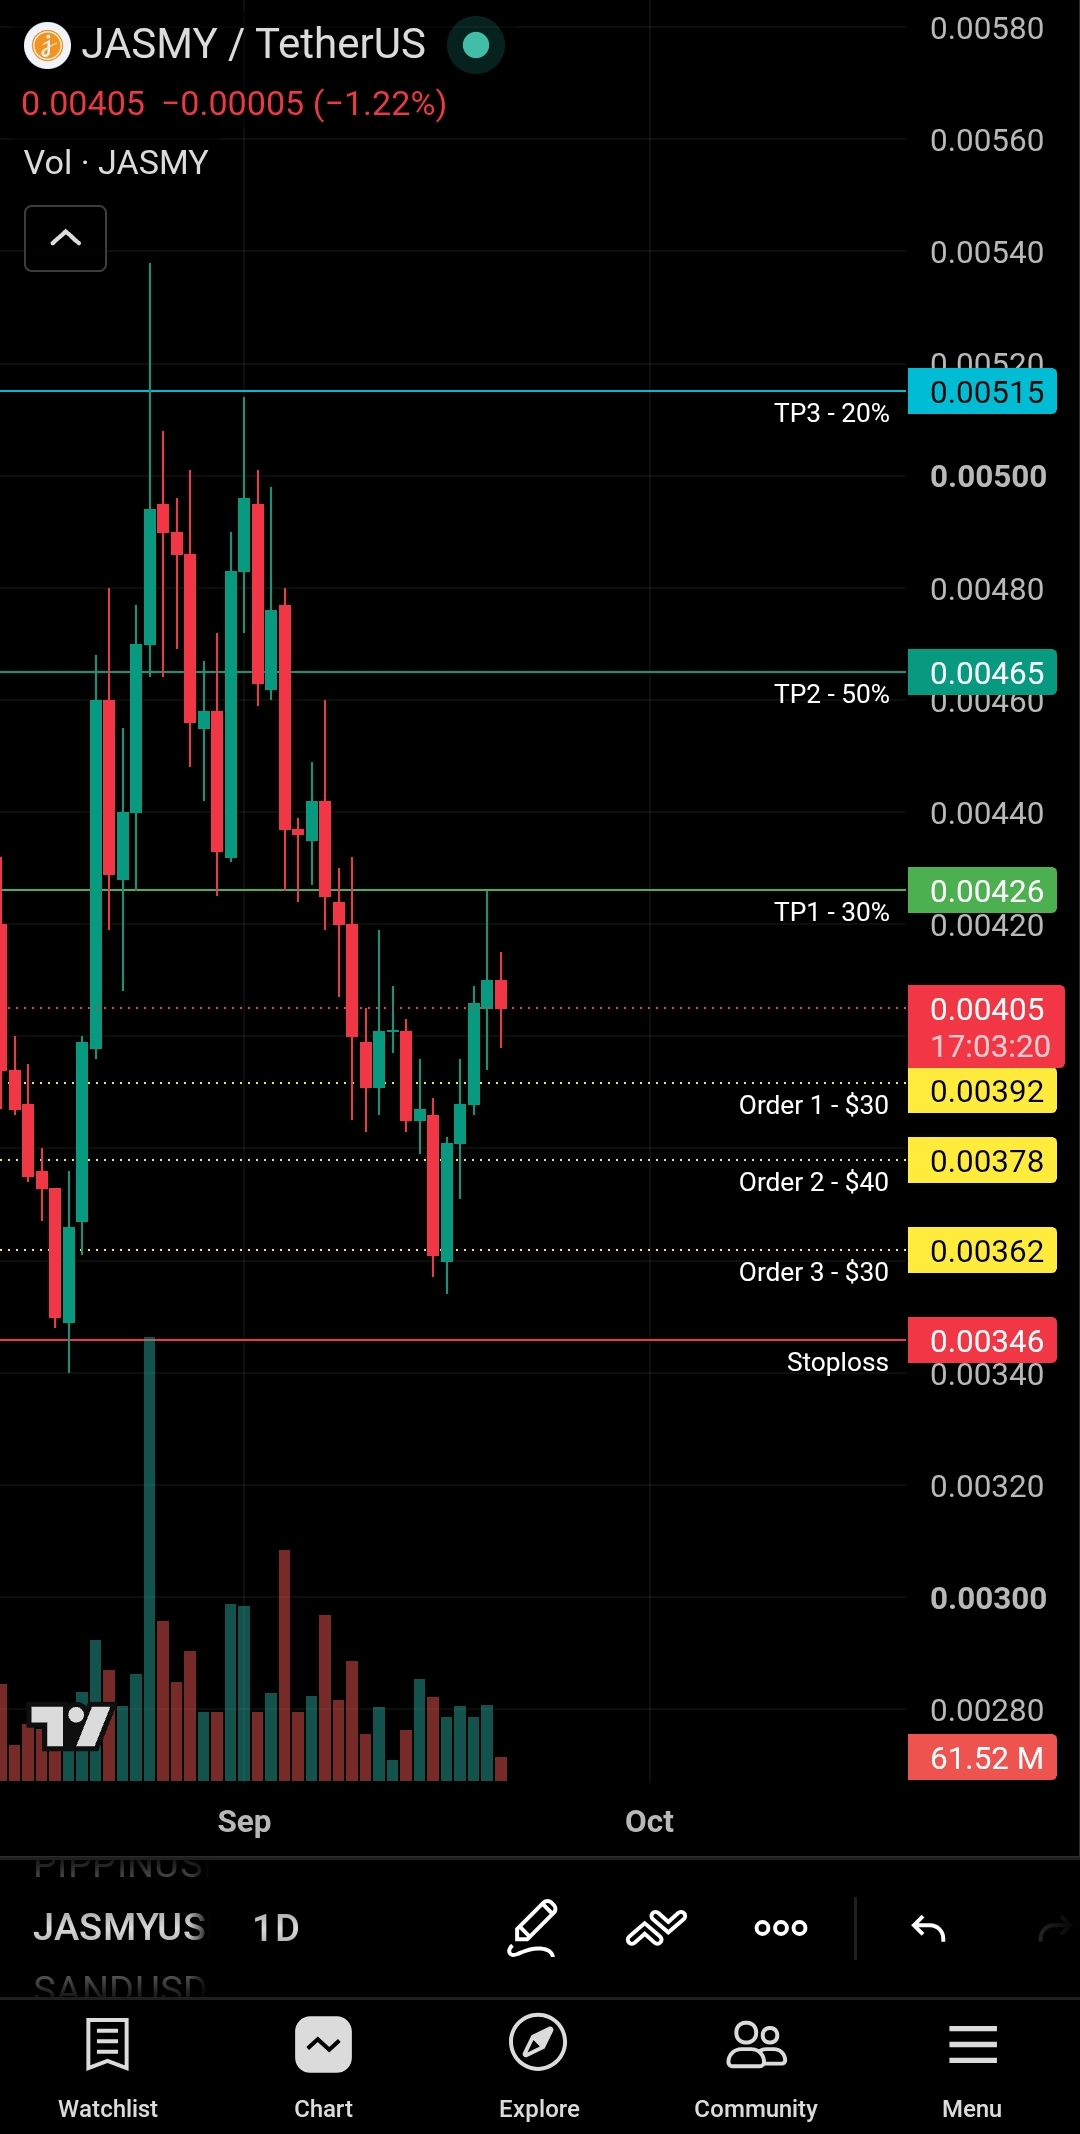
On the daily chart, $JASMY has formed a solid local double-bottom base around $0.0355 and is now consolidating. On-chain Net Money Flow analysis reveals an interesting divergence: while small/medium retail accounts have been selling into recent pullbacks, large institutional-sized inflow orders (+9.71M) have actively absorbed sell liquidity.
Rather than buying market tops, our strategy places limit orders across key structural demand zones and volume nodes to capture high-probability pullbacks.
2. Multi-Level Spot Limit Buy Plan ($100 Base Example)
Never deploy 100% of your capital at once. We split our allocation across three defined support levels:
Entry Order 1 (Aggressive / Momentum — $30 Allocation):
Limit Price: $0.00392
Rationale: First key local liquidity and retest zone.
Entry Order 2 (Conservative / Structure Retest — $40 Allocation):
Limit Price: $0.00378
Rationale: 4H Market Structure retest level.
Entry Order 3 (Deep Macro Support — $30 Allocation):
Limit Price: $0.00362
Rationale: Major Volume Profile Point of Control (POC).
Weighted Average Entry Price (If ALL Orders Fill): $0.003774
3. Profit Targets & Execution Strategy
Gains are locked in systematically as price reaches major supply zones:
Take-Profit 1 (TP1): $0.00426 (Sell 30% Position) — Retest of 1H local swing high.
Take-Profit 2 (TP2): $0.00465 (Sell 50% Position) — 4H/1D Volume Profile Resistance.
Take-Profit 3 (TP3): $0.00515 (Sell 20% Position) — Major Daily Macro Supply Zone.
4. Risk Management & Invalidation Rules
A trade plan without strict risk boundaries is just gambling.
Invalidation / Stop-Loss (SL): $0.00346 (Daily / 4H Close Below).
Rationale: Placed safely below the $0.00355 macro double-bottom low to prevent premature wick stop-hunts.
Maximum Risk Exposure: -$8.50 (Assumes full $100 position filled; capped at 8.50% max risk).
Overall Risk-to-Reward Ratio (R:R): 1 : 2.63
5. Active Trade Management
Break-Even Protocol: The moment price hits TP1 ($0.00426), move your Stop-Loss to your Average Entry Price ($0.003774). This guarantees the remaining trade is 100% risk-free.
Invalidation Protocol: If a 4H candle closes below $0.00346, cancel any unfilled limit orders below and exit the trade manually.
Final Discipline Note: Professional trading is about executing a plan with precision, not predicting every minor candle move. Set your spot limit orders, set your alerts, and let the market come to you.
Disclaimer: This analysis is for educational and informational purposes only. It demonstrates a quantitative technical and spot capital management model. Always conduct your own research (DYOR) and manage your risk according to your personal financial goals.
#jasmy #SpotTrading #TradingSignals #tradingStrategy #SpotAccumulation